:max_bytes(150000):strip_icc()/how-to-sync-contacts-from-iphone-to-mac-5714752-2c82289fe1f84868909ac8a60960d240.jpg)
"Elevate Your Channel Game - TubeBuddy Insights"
Elevate Your Channel Game - TubeBuddy Insights
The Benefits of TubeBuddy | Manage Your YouTube Channel More Easily

Richard Bennett
Nov 01, 2022• Proven solutions
TubeBuddy is a YouTube certified extension for your Google Chrome browser. When you visit YouTube after installing TubeBuddy a whole new set of useful tools becomes available.
TubeBuddy’s tools were designed to save you time and effort when performing some of the more mundane tasks involved in running a YouTube channel, like adding cards. Many of TubeBuddy’s tools are completely free to use, but others might require a paid license. There are three levels of licensing: $9, $19, or $39 per month.
The Benefits of Using TubeBuddy for YouTube
- Increased Productivity
- Bulk Tools for Annotations, Cards, Thumbnails and More
- Quick Optimization for Your Video’s Tags
- Useful Data
Benefits of TubeBuddy
YouTubers who use TubeBuddy are able to spend less time on busy-work and more time on coming up with creative video ideas. Here are some of the ways TubeBuddy can help you, especially if you have a large or mid-sized channel:
1. Increased Productivity
Most of TubeBuddy’s Productivity Tools are available for free, but some require a $9 per month Pro license.
You can use these tools to get your videos ready for posting faster, embed them off-YouTube more easily, and save time by creating canned responses or templates for cards and annotations.
For example, you might find yourself creating the same YouTube Card over and over again to include it in every video you make. Creating a template through TubeBuddy will save you this effort.
Another great productivity tool is the Video Topic Planner. You can save video ideas you come up with, or ideas viewers have suggested to you, and arrange them in a queue so you never forget what you are planning to make next.
2. Bulk Tools for Annotations, Cards, Thumbnails and More
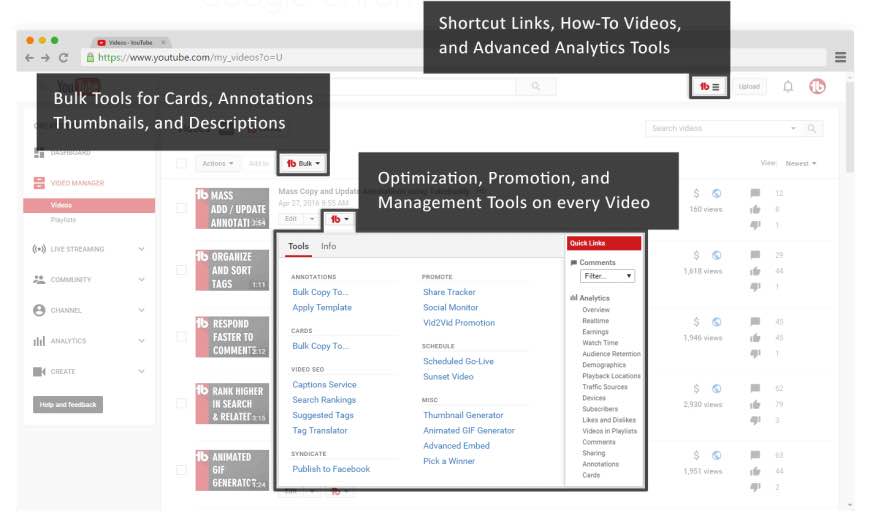
Most of TubeBuddy’s bulk processing tools require a $19 per month Star license.
Two of the most time-saving tools in this section are the Bulk Copy tools for cards and annotations. They will save you from having to recreate the same ones over and over. Then, using the Bulk Update tools, you will be able to make changes to all of your cards or annotations at once.
For example: if you use a YouTube Card to link to your personal website and include it in every video, and then you change your website, you change the link in all of your existing cards at once.
Another useful Bulk tool is Bulk Thumbnail Overlays, which will allow you to add a logo to all of your existing video thumbnails at once.
3. Quick Optimization for Your Video’s Tags
The SEO Tools in TubeBuddy will help you find the best tags for your videos and suggest tags you might want to target. Many of these tools are free, but others require a $19 Star license.
One of the best free tools in this category is View and Copy Video Tags. It allows you to see and copy the tags of other people’s videos. You will be able to see which keywords your competitors are targeting (and look for opportunities to target them more effectively). This can also save you a lot of time writing out tags that should really be the same as the ones on an existing video.
4. Useful Data
The most useful piece of data under Data and Research Tools is the Best Time to Publish. How many views you get on a video could vary greatly depending on when you post, and the best times to post vary depending on the demographics of your audience. This free tool from TubeBuddy will show you when you should be uploading.
Another interesting tool, which is unfortunately only available with $39 licenses, is the Competitor Scoreboard. It allows creators to compare their channels stats to those of their rival channels.
Have you ever tried TubeBuddy for YouTube?
Richard Bennett
Richard Bennett is a writer and a lover of all things video.
Follow @Richard Bennett
Richard Bennett
Nov 01, 2022• Proven solutions
TubeBuddy is a YouTube certified extension for your Google Chrome browser. When you visit YouTube after installing TubeBuddy a whole new set of useful tools becomes available.
TubeBuddy’s tools were designed to save you time and effort when performing some of the more mundane tasks involved in running a YouTube channel, like adding cards. Many of TubeBuddy’s tools are completely free to use, but others might require a paid license. There are three levels of licensing: $9, $19, or $39 per month.
The Benefits of Using TubeBuddy for YouTube
- Increased Productivity
- Bulk Tools for Annotations, Cards, Thumbnails and More
- Quick Optimization for Your Video’s Tags
- Useful Data
Benefits of TubeBuddy
YouTubers who use TubeBuddy are able to spend less time on busy-work and more time on coming up with creative video ideas. Here are some of the ways TubeBuddy can help you, especially if you have a large or mid-sized channel:
1. Increased Productivity
Most of TubeBuddy’s Productivity Tools are available for free, but some require a $9 per month Pro license.
You can use these tools to get your videos ready for posting faster, embed them off-YouTube more easily, and save time by creating canned responses or templates for cards and annotations.
For example, you might find yourself creating the same YouTube Card over and over again to include it in every video you make. Creating a template through TubeBuddy will save you this effort.
Another great productivity tool is the Video Topic Planner. You can save video ideas you come up with, or ideas viewers have suggested to you, and arrange them in a queue so you never forget what you are planning to make next.
2. Bulk Tools for Annotations, Cards, Thumbnails and More
Most of TubeBuddy’s bulk processing tools require a $19 per month Star license.
Two of the most time-saving tools in this section are the Bulk Copy tools for cards and annotations. They will save you from having to recreate the same ones over and over. Then, using the Bulk Update tools, you will be able to make changes to all of your cards or annotations at once.
For example: if you use a YouTube Card to link to your personal website and include it in every video, and then you change your website, you change the link in all of your existing cards at once.
Another useful Bulk tool is Bulk Thumbnail Overlays, which will allow you to add a logo to all of your existing video thumbnails at once.
3. Quick Optimization for Your Video’s Tags
The SEO Tools in TubeBuddy will help you find the best tags for your videos and suggest tags you might want to target. Many of these tools are free, but others require a $19 Star license.
One of the best free tools in this category is View and Copy Video Tags. It allows you to see and copy the tags of other people’s videos. You will be able to see which keywords your competitors are targeting (and look for opportunities to target them more effectively). This can also save you a lot of time writing out tags that should really be the same as the ones on an existing video.
4. Useful Data
The most useful piece of data under Data and Research Tools is the Best Time to Publish. How many views you get on a video could vary greatly depending on when you post, and the best times to post vary depending on the demographics of your audience. This free tool from TubeBuddy will show you when you should be uploading.
Another interesting tool, which is unfortunately only available with $39 licenses, is the Competitor Scoreboard. It allows creators to compare their channels stats to those of their rival channels.
Have you ever tried TubeBuddy for YouTube?
Richard Bennett
Richard Bennett is a writer and a lover of all things video.
Follow @Richard Bennett
One Youtube Showcase: Mastering Media Merging
How to Merge/Combine/Join YouTube (FLV) Videos
Richard Bennett
Mar 27, 2024• Proven solutions
YouTube is the most popular video sites in the world. You may have downloaded loads of videos from this website. But how to merge them together so that you can play all YouTube videos as one either on a PC, device, or TV? Here a professional YouTube merger is introduced in part 1 for you to easily complete the job. If you just want to merge the videos that have been already uploaded to YouTube, the YouTube Video Editor can help you with that.
Part 1: How to Merge Downloaded YouTube Videos
Part 2: How to Merge YouTube Videos Online
Part 1: How to Merge Downloaded YouTube Videos

Tool you need: Wondershare Filmora video editor
Wondershare Filmora is an easy-to-use video editing tool. With it, YouTube videos will be automatically merged orderly without interrupts. On top of that, you can add transitions between two YouTube videos to make your videos more harmonious. It also enables you to easily make a picture-in-picture (PIP) video , which is definitely another creative way to merge YouTube videos.
Sounds good? Download it now and use this YouTube merger to merge all your YouTube videos.


Below is the details about how to merge YouTube video in Filmora
Step 1.Import YouTube files to the program
Download and install Wondershare Filmora. It gives good support to the downloaded YouTube videos (usually in FLV or MP4 format). You can either click “Import” on the primary windows and select YouTube video files from your computer, or simply drag and drop YouTube video files from File Explorer to the User’s Album.

Step 2. Drag and drop YouTube videos to merge
To merge YouTube videos, select multiple YouTube videos in the User’s Album by holding down Ctrl or Shift key, and then drag and drop them to the video track on the Timeline. All YouTube files will join one after another without interrupts and there is none transition by default, but you can add transitions between video clips as you want. This will be introduced in Step 3.

Step 3. Merge YouTube videos with transition
By adding transitions, YouTube videos will flow nicely from one to the next. To do so, switch to Transition tab, and drag the desired transition to the Timeline. Alternatively, right click any transition and choose “Apply to All” and “Random to All” from the popup menu to add transitions between YouTube videos in seconds.

Step 4. Merge multiple YouTube files into one
Make sure you are satisfied with everything. You can click Play button to preview how YouTube videos will be merged. If the result is good, click “Export” button to save the YouTube video as one.

Therefore, go to the “Format” tab and select one desired format and click Create to start merging YouTube videos. By the way, if you want to play the merged YouTube files on iPod, iPhone, iPad, choose “Device” and select your device from the list. You can also directly upload back to YouTube for sharing or burn to DVD for playing on TV.
Part 2: How to Merge YouTube Videos Online

Tool you need: YouTube Video Editor
YouTube Video Editor is a browser-based video editor released by YouTube itself. It enables users to make minor edits to videos they’ve uploaded onto YouTube, as well as merge several clips together into one. It requires no additional software, or browser plug-ins (besides Adobe’s Flash), which makes it convenient to use. However, it lacks many basic features of modern day consumer video editing software and often crashes while dealing with large video files.

Get access to the editor
Sign in to your YouTube (or Google) account. Click “Upload”>> “Edit” to the Video Editor tab.

Place videos on the timeline
Simply drag the videos that need merge onto the timeline or hit the plus icon in the top right hand corner of each clip.

Save the settings
Review the result. If satisfied, hit the “Publish” button to save the settings.
Richard Bennett
Richard Bennett is a writer and a lover of all things video.
Follow @Richard Bennett
Richard Bennett
Mar 27, 2024• Proven solutions
YouTube is the most popular video sites in the world. You may have downloaded loads of videos from this website. But how to merge them together so that you can play all YouTube videos as one either on a PC, device, or TV? Here a professional YouTube merger is introduced in part 1 for you to easily complete the job. If you just want to merge the videos that have been already uploaded to YouTube, the YouTube Video Editor can help you with that.
Part 1: How to Merge Downloaded YouTube Videos
Part 2: How to Merge YouTube Videos Online
Part 1: How to Merge Downloaded YouTube Videos
Tool you need: Wondershare Filmora video editor
Wondershare Filmora is an easy-to-use video editing tool. With it, YouTube videos will be automatically merged orderly without interrupts. On top of that, you can add transitions between two YouTube videos to make your videos more harmonious. It also enables you to easily make a picture-in-picture (PIP) video , which is definitely another creative way to merge YouTube videos.
Sounds good? Download it now and use this YouTube merger to merge all your YouTube videos.
Below is the details about how to merge YouTube video in Filmora
Step 1.Import YouTube files to the program
Download and install Wondershare Filmora. It gives good support to the downloaded YouTube videos (usually in FLV or MP4 format). You can either click “Import” on the primary windows and select YouTube video files from your computer, or simply drag and drop YouTube video files from File Explorer to the User’s Album.
Step 2. Drag and drop YouTube videos to merge
To merge YouTube videos, select multiple YouTube videos in the User’s Album by holding down Ctrl or Shift key, and then drag and drop them to the video track on the Timeline. All YouTube files will join one after another without interrupts and there is none transition by default, but you can add transitions between video clips as you want. This will be introduced in Step 3.
Step 3. Merge YouTube videos with transition
By adding transitions, YouTube videos will flow nicely from one to the next. To do so, switch to Transition tab, and drag the desired transition to the Timeline. Alternatively, right click any transition and choose “Apply to All” and “Random to All” from the popup menu to add transitions between YouTube videos in seconds.
Step 4. Merge multiple YouTube files into one
Make sure you are satisfied with everything. You can click Play button to preview how YouTube videos will be merged. If the result is good, click “Export” button to save the YouTube video as one.
Therefore, go to the “Format” tab and select one desired format and click Create to start merging YouTube videos. By the way, if you want to play the merged YouTube files on iPod, iPhone, iPad, choose “Device” and select your device from the list. You can also directly upload back to YouTube for sharing or burn to DVD for playing on TV.
Part 2: How to Merge YouTube Videos Online
Tool you need: YouTube Video Editor
YouTube Video Editor is a browser-based video editor released by YouTube itself. It enables users to make minor edits to videos they’ve uploaded onto YouTube, as well as merge several clips together into one. It requires no additional software, or browser plug-ins (besides Adobe’s Flash), which makes it convenient to use. However, it lacks many basic features of modern day consumer video editing software and often crashes while dealing with large video files.
Get access to the editor
Sign in to your YouTube (or Google) account. Click “Upload”>> “Edit” to the Video Editor tab.
Place videos on the timeline
Simply drag the videos that need merge onto the timeline or hit the plus icon in the top right hand corner of each clip.
Save the settings
Review the result. If satisfied, hit the “Publish” button to save the settings.
Richard Bennett
Richard Bennett is a writer and a lover of all things video.
Follow @Richard Bennett
Also read:
- [Updated] 2024 Approved Transform Viewing Experience Adding Subtitles on Windows Media Player
- [Updated] Blurring Identity Erasing Faces From Video Content
- 10 Premier Travel Blogs to Watch Online for 2024
- 2024 Approved Earning Potential Unveiled YouTube AdSense Earning per Thousand Video Observations
- 2024 Approved Essential Collection Top 9 Premium Wedding Movies Online
- Adding a Cinematic Touch Ken Burns in Camtasa 9
- Bringing Google Chrome to Life with Windows 11
- Comprehensive Giroptic Camera Experience
- Essential Guide to Writing Click-Worthy Youtube Titles for 2024
- Exploring the Innovations of Tom's Tech Solutions
- From Clicks to Cash The Journey of YouTube's Ajay Nagar
- How To Transfer Data From Apple iPhone 12 To Other iPhone 15 Pro Max devices? | Dr.fone
- In 2024, Embrace the Season Ideal Winter Backgrounds for YT
- In 2024, Exploring New Horizons A Guide to Top 6 NFT Innovators
- OrbitRebuild Services
- Sudden Shadow Immediate Copyright Issue
- The Comprehensive Youtube Monetization Playbook - 2024 Edition
- Top 8 Must-Play Virtual Reality Titles for Now for 2024
- Uploading Made Simple The Essential Guide for iOS Devices and YouTube
- Title: Elevate Your Channel Game - TubeBuddy Insights
- Author: Steven
- Created at : 2025-01-28 00:11:06
- Updated at : 2025-01-30 01:33:29
- Link: https://youtube-clips.techidaily.com/elevate-your-channel-game-tubebuddy-insights/
- License: This work is licensed under CC BY-NC-SA 4.0.