
:max_bytes(150000):strip_icc()/YouTubeTVsigninbutton-29a18f0a1a5d429eb4dee97254cd5afd.jpg)
"Elevate Play Button Visuals Vivid Neon Lines Added for 2024"
Elevate Play Button Visuals: Vivid Neon Lines Added
Your YouTube video, or any other clip published on any forum, gets a larger number of hits if it has an attractive thumbnail. And, the fact is, a thumbnail becomes 10x more attractive when the main character that the image has have a neon border around it.
With that said, in the following sections, you will learn a couple of methods on how to add a YouTube thumbnail border around the main characters and/or objects that are significant to the clip.
In this article
01 Add Glowing Neon Border to YouTube Thumbnail with Filmora
02 Add a Glowing Neon Border in YouTube Thumbnail with Canva
03 Outline a Person in a YouTube Thumbnail with Photoshop
Part 1: How to Add Neon Border to YouTube Thumbnail for Free with Filmora
Being one of the most versatile and intuitive post-production tools available in the market today, Wondershare Filmora X allows you to add a neon border to a YouTube thumbnail quite conveniently. You can learn how to get this done on Windows or Mac by following the steps given below.
For Win 7 or later (64-bit)
For macOS 10.12 or later
Step 1: Define Project Settings and Add Image to the Timeline
Launch Wondershare Filmora X on your PC (a MacBook Pro M1 is used here), ensure that the project aspect ratio is set to 16:9 (Widescreen) on the splash screen, and click New Project. On the main interface, click the Preview quality and display settings icon from the upper-right area of the Timeline, click Change Project Aspect Ratio, click to select 1280 x 720 (HD) from the Resolution menu of the Project Settings box, and click OK to save the custom project settings.

Then select My Media from the menu bar if not already selected, click Project Media from the navigation pane, and click Import from the Media box to select and import the image of the main character or object that you want to use in the thumbnail.

Now, drag the image from the Media box to the Timeline at the bottom.

Step 2: Clear Image Background, Add Border, and Add Custom Background
Go to Effects from the menu bar, click to select the Default tab and then AI Portrait from the navigation pane, and click and drag the Human Segmentation preset from the right box, and place it over the image track in the Timeline.

Double-click the image layer, scroll down the upper-left box to the Video Effects section, and use the Edge Thickness and Edge Feather sliders to adjust the character’s edges to make them as realistic as possible. Click OK when done.

Next, click and drag the Human Border preset over the image track in the Timeline, and follow the same procedure to customize the border. This will give the character a neon border effect.

Now, use the method explained earlier to import a custom image for the background, and drag and place it under the previous track in the Timeline.

If you are running the latest version of Filmora, you will find there are some neon light effects available under AI Portrait as well.

Step 3: Add Titles to Thumbnail
Go to Titles from the menu bar, click to select the Default tab and then Lower 3rds from the navigation pane, and click and drag your preferred lower-third preset from the right window to a separate layer in the Timeline. Double-click the lower-third layer, and use the available options in the upper-left window to change the text, its color, etc., and drag the textbox to place it to your preferred position on the image as well. Click OK to save the changes.
Next, click to select Titles from the navigation pane, and drag your preferred title from the right window to the upper-most track in the Timeline. Now use the method explained earlier to edit the text, its color, position, etc. to make it look professional.

For more tips and tricks for creating YouTube thumbnail, you can check this You Tube thumbnail creating guide.
Step 4: Get the Neon Border Thumbnail
Click the Snapshot (Camera) icon from the upper-right area of the Timeline, go to My Media from the menu bar, right-click the thumbnail of the screenshot you captured, and click Reveal in Finder (on Mac) or Reveal in Explorer (on Windows) to get to the folder the YouTube thumbnail border is saved in.

Part 2: How to Add a Glowing Neon Border in Your YouTube Thumbnail with Canva
Canva is another intuitive editing program that works on the web interface rather than having you download and install an app on your PC. You can add a neon border for YouTube thumbnails using Canva by following the instructions given below:
Step 1: Define Project Settings and Add a Background
After signing in to your Canva account, click Create a design from the top-right corner of the page, click Custom size from the bottom, define 1280 and 720 in the Width and Height fields on the box that appears respectively, and click Create new design.

Now, click to select Background from the navigation bar on the left (if the Background tool is not visible, click More and then choose Background from the expanded list), and click to select a background from the images available in the center pane.

Step 2: Upload an Image and Add Effects
Click Uploads from the navigation bar, click the More icon from the right of the Upload media button present at the top of the center pane, choose your preferred method to upload the image (with the transparent background) that you want to use, upload the image, and drag it from the center pane to the Canvas.
Note: You can use any of the tools available online to remove the background from your image for free.

To add a YouTube thumbnail border, make sure that the image that you added to the Canvas is selected, click the Duplicate icon from the upper-right area, and use the scaling handles of the copy of the image to increase its size a bit. Reposition the image back to its original location as well.
Then, click Edit image from the upper-left corner of the Canvas, click Duotone from the Edit image pane at the center, if need be, click See all, choose your preferred duotone effect to apply on the image, choose your preferred highlight and shadow colors from the box that appears next, and click Back from the top of the pane.

Next, click See all next to the Adjust section from the center pane, and drag the Blur slider to the right to increase the blur effect on the image.

Step 3: Position the Layers
While keeping the duplicate image selected, click the Position button from the upper-right area of the Canvas, and click Background to send the second image behind the first one to get the neon border effect for the photo.

Part 3: How to Outline a Person in a YouTube Thumbnail with Photoshop
Because YouTube thumbnails are nothing but static images, creating YouTube thumbnail border with Adobe Photoshop is comparatively easier. The process of doing this is given below:
Step 1: Define Document Preferences and Import an Image
Launch Adobe Photoshop on your PC, click Create new, and on the New Document customization box, define the width and height values to 1280 and 720 pixels respectively. Select Transparent from the Background Contents menu as well if not already selected. Click Create from the bottom to create a new Photoshop document with the specified document settings. Next, open the folder that contains the source image, drag the photo to Photoshop, and press Enter to place the photo.

Step 2: Remove Background from the Image
Make sure that the image layer is selected in the Layers panel on the right, go to Select from the menu bar at the top, and click Subject. From the bottom of the Layers panel, click the Add a mask icon to get rid of the background, leaving only the human on the Canvas.

Step 3: Add a Custom Background and an Outline Around the Subject
Use the method explained earlier to import a background image of your choice to Photoshop. Drag the background image layer to the bottom in the Layers panel. Double-click the masked layer, click to select Stroke from the left pane of the Layer Style box, and use the options available on the right to manage the size, color, position, etc. of the stroke that has been added around the human subject. Click OK when done, and then export the image normally to use it as a YouTube thumbnail border.

Summary
It is important to know that the default resolution of a YouTube thumbnail is 1280 x 720 pixels that is usually written and referred to as 720p. While adding a YouTube thumbnail border, it is also imperative to have a good sense of color combination and fonts. Furthermore, a decent tool like Wondershare Filmora X must be used to add an appealing neon border around the main subject in the thumbnail image easily and quickly.
02 Add a Glowing Neon Border in YouTube Thumbnail with Canva
03 Outline a Person in a YouTube Thumbnail with Photoshop
Part 1: How to Add Neon Border to YouTube Thumbnail for Free with Filmora
Being one of the most versatile and intuitive post-production tools available in the market today, Wondershare Filmora X allows you to add a neon border to a YouTube thumbnail quite conveniently. You can learn how to get this done on Windows or Mac by following the steps given below.
For Win 7 or later (64-bit)
For macOS 10.12 or later
Step 1: Define Project Settings and Add Image to the Timeline
Launch Wondershare Filmora X on your PC (a MacBook Pro M1 is used here), ensure that the project aspect ratio is set to 16:9 (Widescreen) on the splash screen, and click New Project. On the main interface, click the Preview quality and display settings icon from the upper-right area of the Timeline, click Change Project Aspect Ratio, click to select 1280 x 720 (HD) from the Resolution menu of the Project Settings box, and click OK to save the custom project settings.
Then select My Media from the menu bar if not already selected, click Project Media from the navigation pane, and click Import from the Media box to select and import the image of the main character or object that you want to use in the thumbnail.
Now, drag the image from the Media box to the Timeline at the bottom.
Step 2: Clear Image Background, Add Border, and Add Custom Background
Go to Effects from the menu bar, click to select the Default tab and then AI Portrait from the navigation pane, and click and drag the Human Segmentation preset from the right box, and place it over the image track in the Timeline.
Double-click the image layer, scroll down the upper-left box to the Video Effects section, and use the Edge Thickness and Edge Feather sliders to adjust the character’s edges to make them as realistic as possible. Click OK when done.
Next, click and drag the Human Border preset over the image track in the Timeline, and follow the same procedure to customize the border. This will give the character a neon border effect.
Now, use the method explained earlier to import a custom image for the background, and drag and place it under the previous track in the Timeline.
If you are running the latest version of Filmora, you will find there are some neon light effects available under AI Portrait as well.
Step 3: Add Titles to Thumbnail
Go to Titles from the menu bar, click to select the Default tab and then Lower 3rds from the navigation pane, and click and drag your preferred lower-third preset from the right window to a separate layer in the Timeline. Double-click the lower-third layer, and use the available options in the upper-left window to change the text, its color, etc., and drag the textbox to place it to your preferred position on the image as well. Click OK to save the changes.
Next, click to select Titles from the navigation pane, and drag your preferred title from the right window to the upper-most track in the Timeline. Now use the method explained earlier to edit the text, its color, position, etc. to make it look professional.
For more tips and tricks for creating YouTube thumbnail, you can check this You Tube thumbnail creating guide.
Step 4: Get the Neon Border Thumbnail
Click the Snapshot (Camera) icon from the upper-right area of the Timeline, go to My Media from the menu bar, right-click the thumbnail of the screenshot you captured, and click Reveal in Finder (on Mac) or Reveal in Explorer (on Windows) to get to the folder the YouTube thumbnail border is saved in.
Part 2: How to Add a Glowing Neon Border in Your YouTube Thumbnail with Canva
Canva is another intuitive editing program that works on the web interface rather than having you download and install an app on your PC. You can add a neon border for YouTube thumbnails using Canva by following the instructions given below:
Step 1: Define Project Settings and Add a Background
After signing in to your Canva account, click Create a design from the top-right corner of the page, click Custom size from the bottom, define 1280 and 720 in the Width and Height fields on the box that appears respectively, and click Create new design.
Now, click to select Background from the navigation bar on the left (if the Background tool is not visible, click More and then choose Background from the expanded list), and click to select a background from the images available in the center pane.
Step 2: Upload an Image and Add Effects
Click Uploads from the navigation bar, click the More icon from the right of the Upload media button present at the top of the center pane, choose your preferred method to upload the image (with the transparent background) that you want to use, upload the image, and drag it from the center pane to the Canvas.
Note: You can use any of the tools available online to remove the background from your image for free.
To add a YouTube thumbnail border, make sure that the image that you added to the Canvas is selected, click the Duplicate icon from the upper-right area, and use the scaling handles of the copy of the image to increase its size a bit. Reposition the image back to its original location as well.
Then, click Edit image from the upper-left corner of the Canvas, click Duotone from the Edit image pane at the center, if need be, click See all, choose your preferred duotone effect to apply on the image, choose your preferred highlight and shadow colors from the box that appears next, and click Back from the top of the pane.
Next, click See all next to the Adjust section from the center pane, and drag the Blur slider to the right to increase the blur effect on the image.
Step 3: Position the Layers
While keeping the duplicate image selected, click the Position button from the upper-right area of the Canvas, and click Background to send the second image behind the first one to get the neon border effect for the photo.
Part 3: How to Outline a Person in a YouTube Thumbnail with Photoshop
Because YouTube thumbnails are nothing but static images, creating YouTube thumbnail border with Adobe Photoshop is comparatively easier. The process of doing this is given below:
Step 1: Define Document Preferences and Import an Image
Launch Adobe Photoshop on your PC, click Create new, and on the New Document customization box, define the width and height values to 1280 and 720 pixels respectively. Select Transparent from the Background Contents menu as well if not already selected. Click Create from the bottom to create a new Photoshop document with the specified document settings. Next, open the folder that contains the source image, drag the photo to Photoshop, and press Enter to place the photo.
Step 2: Remove Background from the Image
Make sure that the image layer is selected in the Layers panel on the right, go to Select from the menu bar at the top, and click Subject. From the bottom of the Layers panel, click the Add a mask icon to get rid of the background, leaving only the human on the Canvas.
Step 3: Add a Custom Background and an Outline Around the Subject
Use the method explained earlier to import a background image of your choice to Photoshop. Drag the background image layer to the bottom in the Layers panel. Double-click the masked layer, click to select Stroke from the left pane of the Layer Style box, and use the options available on the right to manage the size, color, position, etc. of the stroke that has been added around the human subject. Click OK when done, and then export the image normally to use it as a YouTube thumbnail border.
Summary
It is important to know that the default resolution of a YouTube thumbnail is 1280 x 720 pixels that is usually written and referred to as 720p. While adding a YouTube thumbnail border, it is also imperative to have a good sense of color combination and fonts. Furthermore, a decent tool like Wondershare Filmora X must be used to add an appealing neon border around the main subject in the thumbnail image easily and quickly.
Your YouTube Shorts Have Been Restored
How to Fix the YouTube Shorts Not Showing Up Issue?

Liza Brown
Oct 26, 2023• Proven solutions
Well, a YouTube Shorts is said to be YouTube’s short-form answer to TikTok. You can quickly scroll via algorithmically-driven feed, discover other similar short videos, and subscribe to your favorite creators.
Here, creators can record, share, and edit short-form video content that’s 60 seconds or less and vertically oriented. And, unlike Instagram stories, YouTube Shorts won’t disappear but will remain on your channel. So, that’s the brief intro of YouTube Shorts which we think everyone is aware of after YouTube has announced its YouTube Shorts availability globally.
However, certain factors are still there, raising the issue or concern of YouTube Shorts not showing. Thus, if you can’t find the YouTube Shorts option or videos, or YouTube Shorts disappeared, find a solution in this post.
Part 1: Why Do YouTube Shorts Not Showing Up?
There could be multiple reasons why YouTube Shorts not showing on your phone, the channel’s home page etc.
Besides, many scenarios arise with this issue, namely the YouTube Shorts option not showing up, the YouTube Shorts button missing, and YouTube Shorts videos not showing correctly.
And, there are valid reasons as well as to why these situations are happening to you. So, let’s discuss each of them separately in brief, along with the solutions in the next section.
- YouTube Shorts are not showing on the channel’s homepage
The standard and the most common reason why YouTube Shorts are not showing on the channel’s homepage is that you have not updated the YouTube app.
- YouTube Shorts option not showing up
This may be happening either because you’ve not updated the app or your internet connection is pretty slow to show you the option. There could be another reason as you may not have cleared the YouTube mobile app’s cache and data.
- YouTube Shorts button missing
Again, you may not have updated the YouTube app, or your internet connection is slow is the most common reason here. Moreover, the button of YouTube Shorts stays hidden behind the +icon.
- YouTube Shorts videos not showing correctly
The most valid reason for YouTube Shorts not showing correctly or YouTube Shorts disappearing is that you have a poor internet connection. Plus, we’ve discussed proper steps below if you’ve missed something while uploading the YouTube Shorts triggering this scenario.
Before we move on to fixing YouTube Shorts not showing the issue, here’s a quick note on which videos qualify as YouTube Shorts. Shorts are different from YouTube stories. Unlike YouTube stories, it gets displayed in your regular channel feed along with your other YouTube videos.
And, you must note that a YouTube Shorts video consists of two criteria as follows.
- The video has to be vertical (portrait-style)
- The video must be 60 seconds or less
Part 2: How to Fix YouTube Shorts Not Showing Up?
Here’s the section covering fixes on YouTube Shorts not showing. Please give it a read and resolve your issue happily!
Fix 1: Update the YouTube App
As we’ve already discussed above, check if your YouTube mobile app has the latest version. The newest version of the YouTube mobile app (Version: 16.17.36) has a dedicated Shorts button at the bottom. And, it replaces the Trending button from the YouTube app.
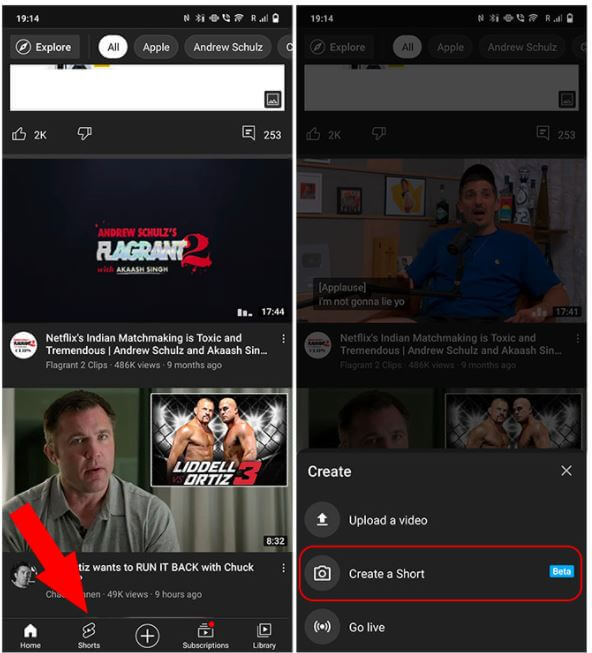
Moreover, the option to upload Shorts is now hidden behind the + icon. Tap on the + icon and hit the Create a Short option.
Fix 2: Check If Shorts Is Available in Your Country
Now, YouTube Shorts is available globally, but there was a phase when YouTube Shorts was a beta feature. It was only available in India and the US, which could be why you could not view Shorts in the YouTube app.
Fix 3: YouTube Shorts Is Mobile-only
As of now, YouTube Shorts is only available on a smartphone because it’s still in beta version. However, you can create Shorts via smartphone and the camera option in YouTube mobile app. Hence, there’s no point in searching for Shorts on your computer.
You can upload Shorts videos from your laptop. The entire process is similar to uploading a regular video. However, you have to mention #Shorts in the title and description to differentiate it as a Shorts video.
Common Fixes to YouTube Shorts Not Working
- Update the YouTube App to the latest version.
- Clear the YouTube mobile app’s data and cache.
- Check if your internet is connected or your internet connection is strong.
- Restart your smartphone and try again.
- The YouTube server can be down, busy, or under maintenance. Wait for a while and try again.
The fixes above are also applicable if the YouTube Shorts are not showing on iPhone as well.
Or, you can try the VPN solution before contacting the YouTube team.
If Videos Are Not Visible under YouTube Shorts
Solution 1: Ensure that you’ve added #shorts in the title and description. Those who have YouTube Shorts, they can make shorts videos via the Shorts camera. Those who can’t access this camera can also upload their current vertical videos that are less than 60 seconds after adding the hashtag #Shorts in the title or description.
All in all, you must include #shorts to let the YouTube algorithm figure out the video is created for Shorts, and the issue of YouTube Shorts not showing up will also be resolved.
Solution 2: Sometimes, you may not find YouTube Shorts videos if they’re precisely 60 seconds in duration because YouTube sometimes adds 1-2 seconds to a Shorts video for some reason. So, be alert here and ensure your Shorts video is around 58 seconds or less.
Solution 3: If your YouTube Shorts is not getting views, you need to wait more here because it takes a while for YouTube to index a Shorts video and suggest them to people. So, it’s the task of the algorithm that varies from person to person. Some Shorts videos take several days while others take weeks.
If YouTube Shorts Videos Are Not Showing up Correctly
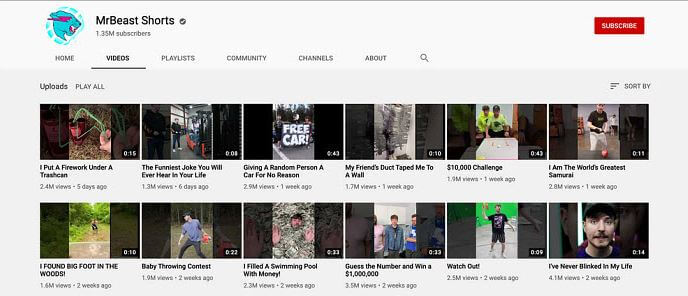
Once uploaded, the YouTube Shorts will be displayed in a vertical thumbnail on YouTube and other regular content already there in your account. Or, it’s your choice to create a new channel for the YouTube shorts videos. If the YouTube shorts not showing correctly, you can try as follows:
Step 1. Go to your channel and select the “customize channel” option.
Step 2. Hop on to the Featured section, and choose the add section.
Step 3. You’ll see shorts videos under the “videos” section. Click that, and the videos you have which are tagged in with #shorts in the title or description will automatically display here.
Bonus Tip: How to Easily Create Vertical Videos for YouTube Shorts on PC
The YouTube Shorts app is pretty convenient to use nowadays. However, it doesn’t allow you to fine-edit the videos if you’ve explored the app or specifically when you want your videos to look more professional. The app doesn’t even have many filtering options, such as Effects, Elements, etc., to make your videos more interactive.
With that said, you can always use an efficient third-party program like Wondershare Filmora to create professional-looking YouTube Shorts videos to engage your viewers highly. Even no famous YouTuber uploads their videos directly from the app without using any third-party tool.
We recommend Wondershare Filmora because it is a production and post-production app available for Windows and Mac computers. It gives tough competition to some globally renowned tools like Final Cut Pro X, Adobe Premiere Pro, etc., because of its simplicity. Furthermore, Filmora has its inbuilt screen, voice recording features, and webcam that can be useful to create game walkthroughs, interactive videos, and voiceovers as needed.


Moreover, a YouTube Shorts video can be made through Wondershare Filmora using the below-mentioned guide.
Note: We are assuming that you have already recorded a vertical video using your smartphone and that it has been transferred to your PC.
So, the signature feature to create YouTube Shorts videos on Wondershare Filmora is Auto Reframe.
Powered by AI technology, Auto Reframe automatically identifies the focal point of your video and crops it while always maintaining it within the frame. This way, the main object or action in your video never goes out of vision.
You can choose an aspect ratio that best fits YouTube Shorts which is 9:16.
How to Use Auto Reframe in Filmora?
Step 1. Open Filmora and Select Auto Reframe
You can choose among three ways to open the Auto Reframe feature in Filmora.
* **Way 1:** Once you open Filmora, the main interface will display the **Auto Reframe** tab on the right-hand panel. Click it to open directly
- Way 2: Import media as File > Import Media Files and select the file. After you import the media, right-click and choose the Auto Reframe.
- Way 3: Lastly, you can choose the Tools option on the top menu bar and hit the Auto Reframe.

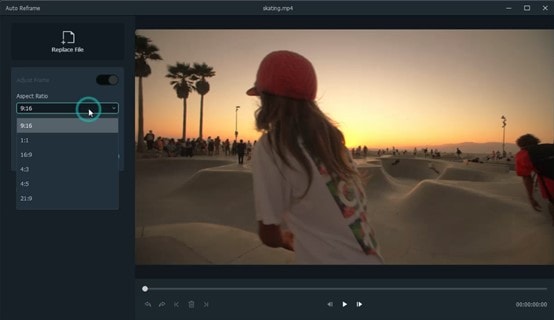
Step 2. Adjust the Aspect Ratio and Motion Speed
A separate dialog box will display once you have selected the Auto Reframe option. Now, click on Import Media and choose a single video to import. You can change the imported video by hitting the Replace File at the top menu.
There are multiple aspect ratio templates available such as square (1:1), vertical (9:16), standard (4:3), widescreen (16:9), and cinema (21:9). As you are making YouTube Shorts, so you need to select 9:16.
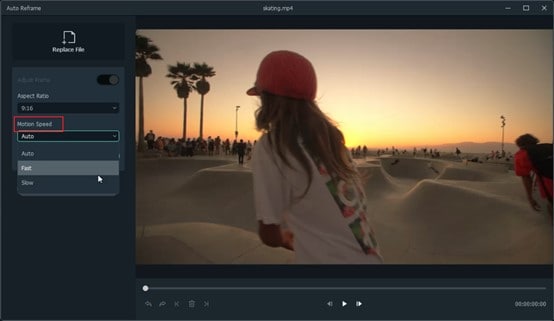
You can adjust the speed of your video in multiple options: keep it at Auto or make it Slow or Fast as per your requirements.
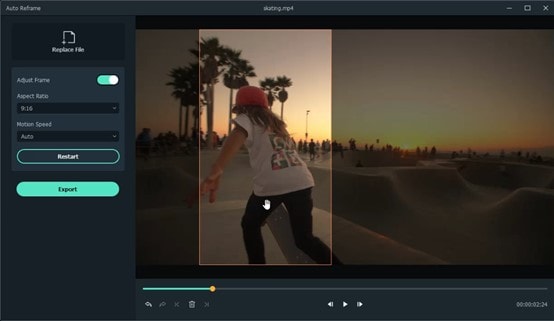
Step 3. Analyze, and Auto Reframe the Video
Once you finish the above adjustments, hit the Analysis tab. Filmora will take a few seconds to finish analyzing your video project.
Then the video will be automatically and quickly reframed to your specified speed and aspect ratio. You can modify these aspect ratios and speed options by hitting the Restart option as well.
Step 4. Preview the Reframed Video and Check
Lastly, you can preview your final video. If the video needs more work, you can also play and pause it at the point you want to adjust the frame. You can use Next Edit Point, Undo, Redo, and Previous Edit Point at the bottom panel.
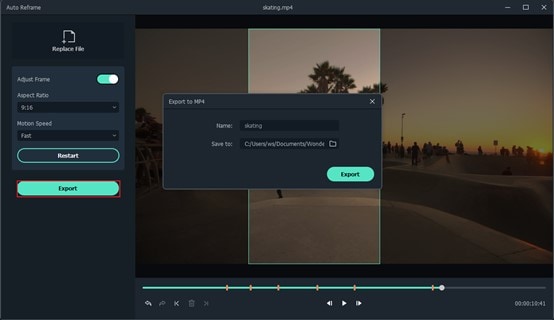
Step 5. Export the Reframed Video
Finally, after all the final adjustments, you can hit the Export tab, name your file and choose the destination folder.
Part 3: FAQs about YouTube Shorts
1. Where to download the YouTube Shorts app?
The YouTube Shorts app is currently available in the YouTube app that your iOS or Android smartphone has. To access it, sign in to your Google account, tap the + button at the bottom, and select the Create a Short option in the popup box that shows off.
2. What’s the YouTube Shorts video duration?
A YouTube Shorts video can be of only up to 60 seconds.
3. Can I Upload Shorts Video on Computer?
Yes. You can upload a Short video by following the traditional method.
- Click the Create camera icon on your PC.
- Click on Upload Videos.
- Locate the file on the PC you want to upload, and you are all done.
However, the option best works in smartphones, and still, if you are uploading through a laptop or PC, make sure to add #shorts in the title or description of the uploaded video.
4. What’s the YouTube Shorts size limitation?
YouTube hasn’t provided any information related to this as of now. However, you can rest assured that a 60 seconds long video file wouldn’t be too large for YouTube to handle.
5. How many subs do you need to access Shorts?
YouTube Shorts is available for everyone no matter how many subscribers the YouTube channel has.
6. Can you make money on Shorts?
Short-form video creators do not share revenue from advertisements played in the Shorts player right now. Instead, start the YouTube Shorts Fund, a $100M fund for creators that helps build the future of short-form video on YouTube.
Conclusion
Hopefully, you have resolved the concern of YouTube Shorts not showing. You can access your total dose of entertainment by getting the YouTube Shorts through our editing tips mentioned in the last section.
However, we’ve mainly defined the editing part of Wondershare Filmora except creating YouTube Shorts through its Auto Reframe feature. But, as you go through Filmora, you will find that editing is not a cumbersome task to follow over this platform. It’s the easiest!
Liza Brown
Liza Brown is a writer and a lover of all things video.
Follow @Liza Brown
Liza Brown
Oct 26, 2023• Proven solutions
Well, a YouTube Shorts is said to be YouTube’s short-form answer to TikTok. You can quickly scroll via algorithmically-driven feed, discover other similar short videos, and subscribe to your favorite creators.
Here, creators can record, share, and edit short-form video content that’s 60 seconds or less and vertically oriented. And, unlike Instagram stories, YouTube Shorts won’t disappear but will remain on your channel. So, that’s the brief intro of YouTube Shorts which we think everyone is aware of after YouTube has announced its YouTube Shorts availability globally.
However, certain factors are still there, raising the issue or concern of YouTube Shorts not showing. Thus, if you can’t find the YouTube Shorts option or videos, or YouTube Shorts disappeared, find a solution in this post.
Part 1: Why Do YouTube Shorts Not Showing Up?
There could be multiple reasons why YouTube Shorts not showing on your phone, the channel’s home page etc.
Besides, many scenarios arise with this issue, namely the YouTube Shorts option not showing up, the YouTube Shorts button missing, and YouTube Shorts videos not showing correctly.
And, there are valid reasons as well as to why these situations are happening to you. So, let’s discuss each of them separately in brief, along with the solutions in the next section.
- YouTube Shorts are not showing on the channel’s homepage
The standard and the most common reason why YouTube Shorts are not showing on the channel’s homepage is that you have not updated the YouTube app.
- YouTube Shorts option not showing up
This may be happening either because you’ve not updated the app or your internet connection is pretty slow to show you the option. There could be another reason as you may not have cleared the YouTube mobile app’s cache and data.
- YouTube Shorts button missing
Again, you may not have updated the YouTube app, or your internet connection is slow is the most common reason here. Moreover, the button of YouTube Shorts stays hidden behind the +icon.
- YouTube Shorts videos not showing correctly
The most valid reason for YouTube Shorts not showing correctly or YouTube Shorts disappearing is that you have a poor internet connection. Plus, we’ve discussed proper steps below if you’ve missed something while uploading the YouTube Shorts triggering this scenario.
Before we move on to fixing YouTube Shorts not showing the issue, here’s a quick note on which videos qualify as YouTube Shorts. Shorts are different from YouTube stories. Unlike YouTube stories, it gets displayed in your regular channel feed along with your other YouTube videos.
And, you must note that a YouTube Shorts video consists of two criteria as follows.
- The video has to be vertical (portrait-style)
- The video must be 60 seconds or less
Part 2: How to Fix YouTube Shorts Not Showing Up?
Here’s the section covering fixes on YouTube Shorts not showing. Please give it a read and resolve your issue happily!
Fix 1: Update the YouTube App
As we’ve already discussed above, check if your YouTube mobile app has the latest version. The newest version of the YouTube mobile app (Version: 16.17.36) has a dedicated Shorts button at the bottom. And, it replaces the Trending button from the YouTube app.
Moreover, the option to upload Shorts is now hidden behind the + icon. Tap on the + icon and hit the Create a Short option.
Fix 2: Check If Shorts Is Available in Your Country
Now, YouTube Shorts is available globally, but there was a phase when YouTube Shorts was a beta feature. It was only available in India and the US, which could be why you could not view Shorts in the YouTube app.
Fix 3: YouTube Shorts Is Mobile-only
As of now, YouTube Shorts is only available on a smartphone because it’s still in beta version. However, you can create Shorts via smartphone and the camera option in YouTube mobile app. Hence, there’s no point in searching for Shorts on your computer.
You can upload Shorts videos from your laptop. The entire process is similar to uploading a regular video. However, you have to mention #Shorts in the title and description to differentiate it as a Shorts video.
Common Fixes to YouTube Shorts Not Working
- Update the YouTube App to the latest version.
- Clear the YouTube mobile app’s data and cache.
- Check if your internet is connected or your internet connection is strong.
- Restart your smartphone and try again.
- The YouTube server can be down, busy, or under maintenance. Wait for a while and try again.
The fixes above are also applicable if the YouTube Shorts are not showing on iPhone as well.
Or, you can try the VPN solution before contacting the YouTube team.
If Videos Are Not Visible under YouTube Shorts
Solution 1: Ensure that you’ve added #shorts in the title and description. Those who have YouTube Shorts, they can make shorts videos via the Shorts camera. Those who can’t access this camera can also upload their current vertical videos that are less than 60 seconds after adding the hashtag #Shorts in the title or description.
All in all, you must include #shorts to let the YouTube algorithm figure out the video is created for Shorts, and the issue of YouTube Shorts not showing up will also be resolved.
Solution 2: Sometimes, you may not find YouTube Shorts videos if they’re precisely 60 seconds in duration because YouTube sometimes adds 1-2 seconds to a Shorts video for some reason. So, be alert here and ensure your Shorts video is around 58 seconds or less.
Solution 3: If your YouTube Shorts is not getting views, you need to wait more here because it takes a while for YouTube to index a Shorts video and suggest them to people. So, it’s the task of the algorithm that varies from person to person. Some Shorts videos take several days while others take weeks.
If YouTube Shorts Videos Are Not Showing up Correctly
Once uploaded, the YouTube Shorts will be displayed in a vertical thumbnail on YouTube and other regular content already there in your account. Or, it’s your choice to create a new channel for the YouTube shorts videos. If the YouTube shorts not showing correctly, you can try as follows:
Step 1. Go to your channel and select the “customize channel” option.
Step 2. Hop on to the Featured section, and choose the add section.
Step 3. You’ll see shorts videos under the “videos” section. Click that, and the videos you have which are tagged in with #shorts in the title or description will automatically display here.
Bonus Tip: How to Easily Create Vertical Videos for YouTube Shorts on PC
The YouTube Shorts app is pretty convenient to use nowadays. However, it doesn’t allow you to fine-edit the videos if you’ve explored the app or specifically when you want your videos to look more professional. The app doesn’t even have many filtering options, such as Effects, Elements, etc., to make your videos more interactive.
With that said, you can always use an efficient third-party program like Wondershare Filmora to create professional-looking YouTube Shorts videos to engage your viewers highly. Even no famous YouTuber uploads their videos directly from the app without using any third-party tool.
We recommend Wondershare Filmora because it is a production and post-production app available for Windows and Mac computers. It gives tough competition to some globally renowned tools like Final Cut Pro X, Adobe Premiere Pro, etc., because of its simplicity. Furthermore, Filmora has its inbuilt screen, voice recording features, and webcam that can be useful to create game walkthroughs, interactive videos, and voiceovers as needed.
Moreover, a YouTube Shorts video can be made through Wondershare Filmora using the below-mentioned guide.
Note: We are assuming that you have already recorded a vertical video using your smartphone and that it has been transferred to your PC.
So, the signature feature to create YouTube Shorts videos on Wondershare Filmora is Auto Reframe.
Powered by AI technology, Auto Reframe automatically identifies the focal point of your video and crops it while always maintaining it within the frame. This way, the main object or action in your video never goes out of vision.
You can choose an aspect ratio that best fits YouTube Shorts which is 9:16.
How to Use Auto Reframe in Filmora?
Step 1. Open Filmora and Select Auto Reframe
You can choose among three ways to open the Auto Reframe feature in Filmora.
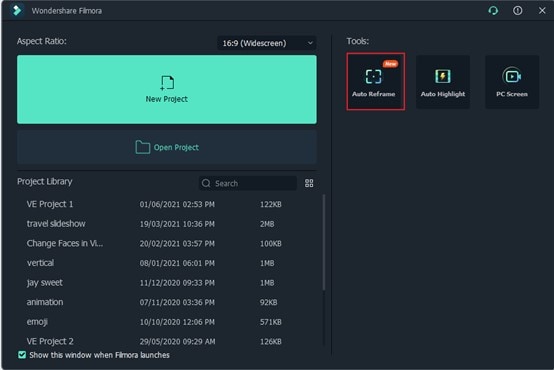
* **Way 1:** Once you open Filmora, the main interface will display the **Auto Reframe** tab on the right-hand panel. Click it to open directly
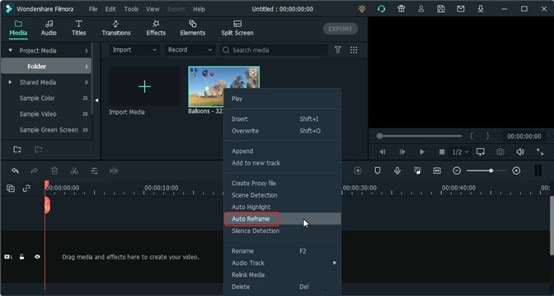
- Way 2: Import media as File > Import Media Files and select the file. After you import the media, right-click and choose the Auto Reframe.
- Way 3: Lastly, you can choose the Tools option on the top menu bar and hit the Auto Reframe.
Step 2. Adjust the Aspect Ratio and Motion Speed
A separate dialog box will display once you have selected the Auto Reframe option. Now, click on Import Media and choose a single video to import. You can change the imported video by hitting the Replace File at the top menu.
There are multiple aspect ratio templates available such as square (1:1), vertical (9:16), standard (4:3), widescreen (16:9), and cinema (21:9). As you are making YouTube Shorts, so you need to select 9:16.
You can adjust the speed of your video in multiple options: keep it at Auto or make it Slow or Fast as per your requirements.
Step 3. Analyze, and Auto Reframe the Video
Once you finish the above adjustments, hit the Analysis tab. Filmora will take a few seconds to finish analyzing your video project.
Then the video will be automatically and quickly reframed to your specified speed and aspect ratio. You can modify these aspect ratios and speed options by hitting the Restart option as well.
Step 4. Preview the Reframed Video and Check
Lastly, you can preview your final video. If the video needs more work, you can also play and pause it at the point you want to adjust the frame. You can use Next Edit Point, Undo, Redo, and Previous Edit Point at the bottom panel.
Step 5. Export the Reframed Video
Finally, after all the final adjustments, you can hit the Export tab, name your file and choose the destination folder.
Part 3: FAQs about YouTube Shorts
1. Where to download the YouTube Shorts app?
The YouTube Shorts app is currently available in the YouTube app that your iOS or Android smartphone has. To access it, sign in to your Google account, tap the + button at the bottom, and select the Create a Short option in the popup box that shows off.
2. What’s the YouTube Shorts video duration?
A YouTube Shorts video can be of only up to 60 seconds.
3. Can I Upload Shorts Video on Computer?
Yes. You can upload a Short video by following the traditional method.
- Click the Create camera icon on your PC.
- Click on Upload Videos.
- Locate the file on the PC you want to upload, and you are all done.
However, the option best works in smartphones, and still, if you are uploading through a laptop or PC, make sure to add #shorts in the title or description of the uploaded video.
4. What’s the YouTube Shorts size limitation?
YouTube hasn’t provided any information related to this as of now. However, you can rest assured that a 60 seconds long video file wouldn’t be too large for YouTube to handle.
5. How many subs do you need to access Shorts?
YouTube Shorts is available for everyone no matter how many subscribers the YouTube channel has.
6. Can you make money on Shorts?
Short-form video creators do not share revenue from advertisements played in the Shorts player right now. Instead, start the YouTube Shorts Fund, a $100M fund for creators that helps build the future of short-form video on YouTube.
Conclusion
Hopefully, you have resolved the concern of YouTube Shorts not showing. You can access your total dose of entertainment by getting the YouTube Shorts through our editing tips mentioned in the last section.
However, we’ve mainly defined the editing part of Wondershare Filmora except creating YouTube Shorts through its Auto Reframe feature. But, as you go through Filmora, you will find that editing is not a cumbersome task to follow over this platform. It’s the easiest!
Liza Brown
Liza Brown is a writer and a lover of all things video.
Follow @Liza Brown
Liza Brown
Oct 26, 2023• Proven solutions
Well, a YouTube Shorts is said to be YouTube’s short-form answer to TikTok. You can quickly scroll via algorithmically-driven feed, discover other similar short videos, and subscribe to your favorite creators.
Here, creators can record, share, and edit short-form video content that’s 60 seconds or less and vertically oriented. And, unlike Instagram stories, YouTube Shorts won’t disappear but will remain on your channel. So, that’s the brief intro of YouTube Shorts which we think everyone is aware of after YouTube has announced its YouTube Shorts availability globally.
However, certain factors are still there, raising the issue or concern of YouTube Shorts not showing. Thus, if you can’t find the YouTube Shorts option or videos, or YouTube Shorts disappeared, find a solution in this post.
Part 1: Why Do YouTube Shorts Not Showing Up?
There could be multiple reasons why YouTube Shorts not showing on your phone, the channel’s home page etc.
Besides, many scenarios arise with this issue, namely the YouTube Shorts option not showing up, the YouTube Shorts button missing, and YouTube Shorts videos not showing correctly.
And, there are valid reasons as well as to why these situations are happening to you. So, let’s discuss each of them separately in brief, along with the solutions in the next section.
- YouTube Shorts are not showing on the channel’s homepage
The standard and the most common reason why YouTube Shorts are not showing on the channel’s homepage is that you have not updated the YouTube app.
- YouTube Shorts option not showing up
This may be happening either because you’ve not updated the app or your internet connection is pretty slow to show you the option. There could be another reason as you may not have cleared the YouTube mobile app’s cache and data.
- YouTube Shorts button missing
Again, you may not have updated the YouTube app, or your internet connection is slow is the most common reason here. Moreover, the button of YouTube Shorts stays hidden behind the +icon.
- YouTube Shorts videos not showing correctly
The most valid reason for YouTube Shorts not showing correctly or YouTube Shorts disappearing is that you have a poor internet connection. Plus, we’ve discussed proper steps below if you’ve missed something while uploading the YouTube Shorts triggering this scenario.
Before we move on to fixing YouTube Shorts not showing the issue, here’s a quick note on which videos qualify as YouTube Shorts. Shorts are different from YouTube stories. Unlike YouTube stories, it gets displayed in your regular channel feed along with your other YouTube videos.
And, you must note that a YouTube Shorts video consists of two criteria as follows.
- The video has to be vertical (portrait-style)
- The video must be 60 seconds or less
Part 2: How to Fix YouTube Shorts Not Showing Up?
Here’s the section covering fixes on YouTube Shorts not showing. Please give it a read and resolve your issue happily!
Fix 1: Update the YouTube App
As we’ve already discussed above, check if your YouTube mobile app has the latest version. The newest version of the YouTube mobile app (Version: 16.17.36) has a dedicated Shorts button at the bottom. And, it replaces the Trending button from the YouTube app.
Moreover, the option to upload Shorts is now hidden behind the + icon. Tap on the + icon and hit the Create a Short option.
Fix 2: Check If Shorts Is Available in Your Country
Now, YouTube Shorts is available globally, but there was a phase when YouTube Shorts was a beta feature. It was only available in India and the US, which could be why you could not view Shorts in the YouTube app.
Fix 3: YouTube Shorts Is Mobile-only
As of now, YouTube Shorts is only available on a smartphone because it’s still in beta version. However, you can create Shorts via smartphone and the camera option in YouTube mobile app. Hence, there’s no point in searching for Shorts on your computer.
You can upload Shorts videos from your laptop. The entire process is similar to uploading a regular video. However, you have to mention #Shorts in the title and description to differentiate it as a Shorts video.
Common Fixes to YouTube Shorts Not Working
- Update the YouTube App to the latest version.
- Clear the YouTube mobile app’s data and cache.
- Check if your internet is connected or your internet connection is strong.
- Restart your smartphone and try again.
- The YouTube server can be down, busy, or under maintenance. Wait for a while and try again.
The fixes above are also applicable if the YouTube Shorts are not showing on iPhone as well.
Or, you can try the VPN solution before contacting the YouTube team.
If Videos Are Not Visible under YouTube Shorts
Solution 1: Ensure that you’ve added #shorts in the title and description. Those who have YouTube Shorts, they can make shorts videos via the Shorts camera. Those who can’t access this camera can also upload their current vertical videos that are less than 60 seconds after adding the hashtag #Shorts in the title or description.
All in all, you must include #shorts to let the YouTube algorithm figure out the video is created for Shorts, and the issue of YouTube Shorts not showing up will also be resolved.
Solution 2: Sometimes, you may not find YouTube Shorts videos if they’re precisely 60 seconds in duration because YouTube sometimes adds 1-2 seconds to a Shorts video for some reason. So, be alert here and ensure your Shorts video is around 58 seconds or less.
Solution 3: If your YouTube Shorts is not getting views, you need to wait more here because it takes a while for YouTube to index a Shorts video and suggest them to people. So, it’s the task of the algorithm that varies from person to person. Some Shorts videos take several days while others take weeks.
If YouTube Shorts Videos Are Not Showing up Correctly
Once uploaded, the YouTube Shorts will be displayed in a vertical thumbnail on YouTube and other regular content already there in your account. Or, it’s your choice to create a new channel for the YouTube shorts videos. If the YouTube shorts not showing correctly, you can try as follows:
Step 1. Go to your channel and select the “customize channel” option.
Step 2. Hop on to the Featured section, and choose the add section.
Step 3. You’ll see shorts videos under the “videos” section. Click that, and the videos you have which are tagged in with #shorts in the title or description will automatically display here.
Bonus Tip: How to Easily Create Vertical Videos for YouTube Shorts on PC
The YouTube Shorts app is pretty convenient to use nowadays. However, it doesn’t allow you to fine-edit the videos if you’ve explored the app or specifically when you want your videos to look more professional. The app doesn’t even have many filtering options, such as Effects, Elements, etc., to make your videos more interactive.
With that said, you can always use an efficient third-party program like Wondershare Filmora to create professional-looking YouTube Shorts videos to engage your viewers highly. Even no famous YouTuber uploads their videos directly from the app without using any third-party tool.
We recommend Wondershare Filmora because it is a production and post-production app available for Windows and Mac computers. It gives tough competition to some globally renowned tools like Final Cut Pro X, Adobe Premiere Pro, etc., because of its simplicity. Furthermore, Filmora has its inbuilt screen, voice recording features, and webcam that can be useful to create game walkthroughs, interactive videos, and voiceovers as needed.
Moreover, a YouTube Shorts video can be made through Wondershare Filmora using the below-mentioned guide.
Note: We are assuming that you have already recorded a vertical video using your smartphone and that it has been transferred to your PC.
So, the signature feature to create YouTube Shorts videos on Wondershare Filmora is Auto Reframe.
Powered by AI technology, Auto Reframe automatically identifies the focal point of your video and crops it while always maintaining it within the frame. This way, the main object or action in your video never goes out of vision.
You can choose an aspect ratio that best fits YouTube Shorts which is 9:16.
How to Use Auto Reframe in Filmora?
Step 1. Open Filmora and Select Auto Reframe
You can choose among three ways to open the Auto Reframe feature in Filmora.
* **Way 1:** Once you open Filmora, the main interface will display the **Auto Reframe** tab on the right-hand panel. Click it to open directly
- Way 2: Import media as File > Import Media Files and select the file. After you import the media, right-click and choose the Auto Reframe.
- Way 3: Lastly, you can choose the Tools option on the top menu bar and hit the Auto Reframe.
Step 2. Adjust the Aspect Ratio and Motion Speed
A separate dialog box will display once you have selected the Auto Reframe option. Now, click on Import Media and choose a single video to import. You can change the imported video by hitting the Replace File at the top menu.
There are multiple aspect ratio templates available such as square (1:1), vertical (9:16), standard (4:3), widescreen (16:9), and cinema (21:9). As you are making YouTube Shorts, so you need to select 9:16.
You can adjust the speed of your video in multiple options: keep it at Auto or make it Slow or Fast as per your requirements.
Step 3. Analyze, and Auto Reframe the Video
Once you finish the above adjustments, hit the Analysis tab. Filmora will take a few seconds to finish analyzing your video project.
Then the video will be automatically and quickly reframed to your specified speed and aspect ratio. You can modify these aspect ratios and speed options by hitting the Restart option as well.
Step 4. Preview the Reframed Video and Check
Lastly, you can preview your final video. If the video needs more work, you can also play and pause it at the point you want to adjust the frame. You can use Next Edit Point, Undo, Redo, and Previous Edit Point at the bottom panel.
Step 5. Export the Reframed Video
Finally, after all the final adjustments, you can hit the Export tab, name your file and choose the destination folder.
Part 3: FAQs about YouTube Shorts
1. Where to download the YouTube Shorts app?
The YouTube Shorts app is currently available in the YouTube app that your iOS or Android smartphone has. To access it, sign in to your Google account, tap the + button at the bottom, and select the Create a Short option in the popup box that shows off.
2. What’s the YouTube Shorts video duration?
A YouTube Shorts video can be of only up to 60 seconds.
3. Can I Upload Shorts Video on Computer?
Yes. You can upload a Short video by following the traditional method.
- Click the Create camera icon on your PC.
- Click on Upload Videos.
- Locate the file on the PC you want to upload, and you are all done.
However, the option best works in smartphones, and still, if you are uploading through a laptop or PC, make sure to add #shorts in the title or description of the uploaded video.
4. What’s the YouTube Shorts size limitation?
YouTube hasn’t provided any information related to this as of now. However, you can rest assured that a 60 seconds long video file wouldn’t be too large for YouTube to handle.
5. How many subs do you need to access Shorts?
YouTube Shorts is available for everyone no matter how many subscribers the YouTube channel has.
6. Can you make money on Shorts?
Short-form video creators do not share revenue from advertisements played in the Shorts player right now. Instead, start the YouTube Shorts Fund, a $100M fund for creators that helps build the future of short-form video on YouTube.
Conclusion
Hopefully, you have resolved the concern of YouTube Shorts not showing. You can access your total dose of entertainment by getting the YouTube Shorts through our editing tips mentioned in the last section.
However, we’ve mainly defined the editing part of Wondershare Filmora except creating YouTube Shorts through its Auto Reframe feature. But, as you go through Filmora, you will find that editing is not a cumbersome task to follow over this platform. It’s the easiest!
Liza Brown
Liza Brown is a writer and a lover of all things video.
Follow @Liza Brown
Also read:
- [New] Best Recording Equipment For Creating YouTube Masterpieces
- [New] Champion of Cinematography Audio-Visual Artistry
- Ultimate SEO Guide Elevating Your Video Rankings in a Digital Age
- The Beauty Bard In-Depth Gear & Tutorial Roundups
- Hone Your Livestream Skills on YouTube's Premier Platform
- 2024 Approved Best Practices for Secure YouTube MP4 Conversion
- [New] Discover YouTube's Free Text Translations & Downloads
- In 2024, Discover Ultimate ASMR Microphones for Clear Sounds
- In 2024, AJay The Creative Content Creator's Profitable Venture on YouTube
- [Updated] Breakneck Buzzers YouTube's Hottest Topics Amassing Views Overnight by '24
- 2024 Approved Decipher the Best Video Tracker Tools for High-Impact Results
- [New] Conquer the Blackened Canvas of YouTube
- Mastering YouTube Pace Control Top Tips for Slower Views (48 Chars)
- Elite Gamers' Showcase – Premium Setups Unveiled for 2024
- The Ultimate Selection for Captivating YouTube Content Starts
- Unlocking Income on YouTube Adopting Sourav Joshi’s Methods
- A Blur in the Timeline YouTube Videos Racing to 100 Million by Year's End for 2024
- Skyline Your Content's Search Trajectory Key YouTube SEO Tips (1-11)
- 2024 Approved Best Free Downloaders Download YouTube Thumbnail for Free
- YouTube Splits A Filmmaker’s Creative Playbook
- Conveniently Share Your Videos YouTube Shorts Mobile/Computer Tips
- In 2024, Artisans Shaping Virtual Marvel Universes
- Avoiding Common Pitfalls in Uploading HD Videos to YouTube
- [Updated] Elevate Your Content Strategy Prime Video Rank Monitors
- In 2024, Counterclockwise Content YouTube Replay Methods
- Unlocking Simplicity Your Guide to Direct Signup Buttons
- In 2024, Create Professional Movies on YouTube Quickly
- Top 10 Yoga YouTube Channel to Help You Stay Fit
- [New] Boost Your Blogging Bravery Following YouTuber Leaders
- Best ASMR YouTube Channels You Should Know for 2024
- [Updated] Enchanting Editing YouTube's Best Video Magic Hits
- In 2024, Bringing the Web to Reality Embedding YouTube Videos in Slides
- [New] Convert & Share with Ease Selecting the Top FLV-to-YouTube Applications
- In 2024, Blueprint for Broadcasting Breaks
- Propel Views Up Top Hashtag Combinations for YouTube Profit
- No-Cost YouTube Audio Tools for Seamless MP3 Downloads
- Comprehensive iTunes Update Upload YouTube Videos Guide for 2024
- [Updated] Beyond Youtube Our Choice of the Year's Top 27 Platforms
- In 2024, 4 Effective Methods for Slide Embedding From YouTube
- Identifying and Nurturing Your Brand's Character
- Seamless Sound Shift Best 10 YouTube Audio Converters
- Youtubers Unite with These 17 Top-Tier Lights
- Anime Gems on YouTube to Light Up Your Day [New List 2023]
- How To Embed A YouTube Playlist On a Website
- In 2024, Boost Your Meeting Impact with Efficient Screen Sharing
- In 2024, Conveniently Keep Your LinkedIn Videos with These 6 Apps
- [New] Unveiling the Finest DiscoVoice Tools A Review & Guide
- 2024 Approved Convert Text to Voice A Step-by-Step Guide to Creating MP3 Files
- Updated 10 Best Websites to Discover Free Premiere Pro Video Templates
- In 2024, Catch or Beat Sleeping Snorlax on Pokemon Go For Samsung Galaxy S23 | Dr.fone
- [New] Twitter Livestreaming A Comprehensive Guide
- In 2024, Top IMEI Unlokers for Your Vivo V29e Phone
- [Updated] Top 5 Game-Ready Keyboards Under $100 – A Comparison for 2024
- [Updated] In 2024, Designing an Eye-Catching TikTok Finale Scene
- Hassle-Free Ways to Remove FRP Lock on Oppo Reno 8T 5Gwith/without a PC
- New 2024 Approved Unlock the Full Potential of Online Gaming with Morphvox A Players Ultimate Manual to Mastering Changeable Voices
- [New] Efficient Subtitling Strategies for Facebook Media Posts
- [Updated] In 2024, Streamlining Your PowerPoint to Video Journey
- New Final Cut Pro X Not Responding? Heres the Fix for 2024
- Proven Ways in How To Hide Location on Life360 For Poco M6 5G | Dr.fone
- Ways to stop parent tracking your Nokia G310 | Dr.fone
- [New] In 2024, Audio Allies The New TikTok Trend
- 2024 Approved Rapid TikTok Video Loading A Guide
- 3 Easy Ways to Factory Reset a Locked iPhone 14 Pro Max Without iTunes | Dr.fone
- [New] Sharecast Mobile/PC Video Extractor for 2024
- [Updated] Leveraging Likes and Shares Top 30 Facebook Marketing Steps for 2024
- Title: "Elevate Play Button Visuals Vivid Neon Lines Added for 2024"
- Author: Steven
- Created at : 2024-05-25 19:12:25
- Updated at : 2024-05-26 19:12:25
- Link: https://youtube-clips.techidaily.com/elevate-play-button-visuals-vivid-neon-lines-added-for-2024/
- License: This work is licensed under CC BY-NC-SA 4.0.
