
"Elevate Content Discovery The TubeBuddy Way"
Elevate Content Discovery: The TubeBuddy Way
The Benefits of TubeBuddy | Manage Your YouTube Channel More Easily

Richard Bennett
Nov 01, 2022• Proven solutions
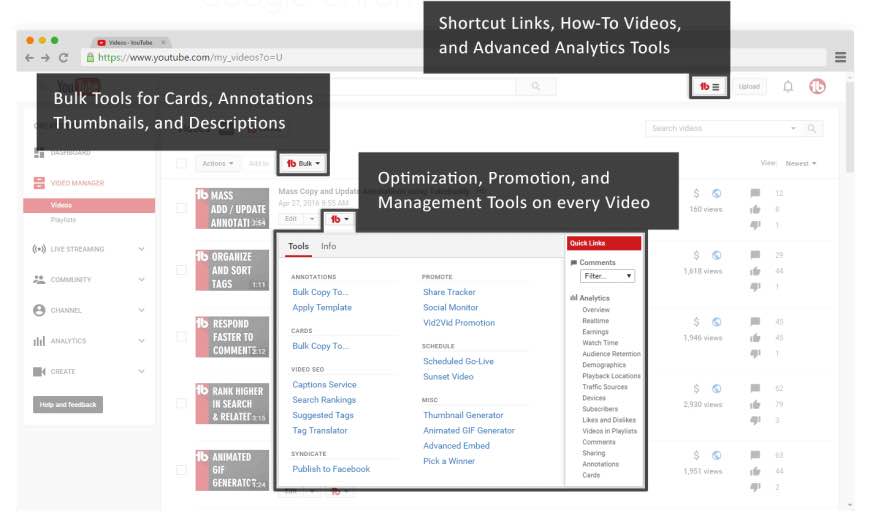
TubeBuddy is a YouTube certified extension for your Google Chrome browser. When you visit YouTube after installing TubeBuddy a whole new set of useful tools becomes available.
TubeBuddy’s tools were designed to save you time and effort when performing some of the more mundane tasks involved in running a YouTube channel, like adding cards. Many of TubeBuddy’s tools are completely free to use, but others might require a paid license. There are three levels of licensing: $9, $19, or $39 per month.
The Benefits of Using TubeBuddy for YouTube
- Increased Productivity
- Bulk Tools for Annotations, Cards, Thumbnails and More
- Quick Optimization for Your Video’s Tags
- Useful Data
Benefits of TubeBuddy
YouTubers who use TubeBuddy are able to spend less time on busy-work and more time on coming up with creative video ideas. Here are some of the ways TubeBuddy can help you, especially if you have a large or mid-sized channel:
1. Increased Productivity
Most of TubeBuddy’s Productivity Tools are available for free, but some require a $9 per month Pro license.
You can use these tools to get your videos ready for posting faster, embed them off-YouTube more easily, and save time by creating canned responses or templates for cards and annotations.
For example, you might find yourself creating the same YouTube Card over and over again to include it in every video you make. Creating a template through TubeBuddy will save you this effort.
Another great productivity tool is the Video Topic Planner. You can save video ideas you come up with, or ideas viewers have suggested to you, and arrange them in a queue so you never forget what you are planning to make next.
2. Bulk Tools for Annotations, Cards, Thumbnails and More
Most of TubeBuddy’s bulk processing tools require a $19 per month Star license.
Two of the most time-saving tools in this section are the Bulk Copy tools for cards and annotations. They will save you from having to recreate the same ones over and over. Then, using the Bulk Update tools, you will be able to make changes to all of your cards or annotations at once.
For example: if you use a YouTube Card to link to your personal website and include it in every video, and then you change your website, you change the link in all of your existing cards at once.
Another useful Bulk tool is Bulk Thumbnail Overlays, which will allow you to add a logo to all of your existing video thumbnails at once.
3. Quick Optimization for Your Video’s Tags
The SEO Tools in TubeBuddy will help you find the best tags for your videos and suggest tags you might want to target. Many of these tools are free, but others require a $19 Star license.
One of the best free tools in this category is View and Copy Video Tags. It allows you to see and copy the tags of other people’s videos. You will be able to see which keywords your competitors are targeting (and look for opportunities to target them more effectively). This can also save you a lot of time writing out tags that should really be the same as the ones on an existing video.
4. Useful Data
The most useful piece of data under Data and Research Tools is the Best Time to Publish. How many views you get on a video could vary greatly depending on when you post, and the best times to post vary depending on the demographics of your audience. This free tool from TubeBuddy will show you when you should be uploading.
Another interesting tool, which is unfortunately only available with $39 licenses, is the Competitor Scoreboard. It allows creators to compare their channels stats to those of their rival channels.
Have you ever tried TubeBuddy for YouTube?
Richard Bennett
Richard Bennett is a writer and a lover of all things video.
Follow @Richard Bennett
Richard Bennett
Nov 01, 2022• Proven solutions
TubeBuddy is a YouTube certified extension for your Google Chrome browser. When you visit YouTube after installing TubeBuddy a whole new set of useful tools becomes available.
TubeBuddy’s tools were designed to save you time and effort when performing some of the more mundane tasks involved in running a YouTube channel, like adding cards. Many of TubeBuddy’s tools are completely free to use, but others might require a paid license. There are three levels of licensing: $9, $19, or $39 per month.
The Benefits of Using TubeBuddy for YouTube
- Increased Productivity
- Bulk Tools for Annotations, Cards, Thumbnails and More
- Quick Optimization for Your Video’s Tags
- Useful Data
Benefits of TubeBuddy
YouTubers who use TubeBuddy are able to spend less time on busy-work and more time on coming up with creative video ideas. Here are some of the ways TubeBuddy can help you, especially if you have a large or mid-sized channel:
1. Increased Productivity
Most of TubeBuddy’s Productivity Tools are available for free, but some require a $9 per month Pro license.
You can use these tools to get your videos ready for posting faster, embed them off-YouTube more easily, and save time by creating canned responses or templates for cards and annotations.
For example, you might find yourself creating the same YouTube Card over and over again to include it in every video you make. Creating a template through TubeBuddy will save you this effort.
Another great productivity tool is the Video Topic Planner. You can save video ideas you come up with, or ideas viewers have suggested to you, and arrange them in a queue so you never forget what you are planning to make next.
2. Bulk Tools for Annotations, Cards, Thumbnails and More
Most of TubeBuddy’s bulk processing tools require a $19 per month Star license.
Two of the most time-saving tools in this section are the Bulk Copy tools for cards and annotations. They will save you from having to recreate the same ones over and over. Then, using the Bulk Update tools, you will be able to make changes to all of your cards or annotations at once.
For example: if you use a YouTube Card to link to your personal website and include it in every video, and then you change your website, you change the link in all of your existing cards at once.
Another useful Bulk tool is Bulk Thumbnail Overlays, which will allow you to add a logo to all of your existing video thumbnails at once.
3. Quick Optimization for Your Video’s Tags
The SEO Tools in TubeBuddy will help you find the best tags for your videos and suggest tags you might want to target. Many of these tools are free, but others require a $19 Star license.
One of the best free tools in this category is View and Copy Video Tags. It allows you to see and copy the tags of other people’s videos. You will be able to see which keywords your competitors are targeting (and look for opportunities to target them more effectively). This can also save you a lot of time writing out tags that should really be the same as the ones on an existing video.
4. Useful Data
The most useful piece of data under Data and Research Tools is the Best Time to Publish. How many views you get on a video could vary greatly depending on when you post, and the best times to post vary depending on the demographics of your audience. This free tool from TubeBuddy will show you when you should be uploading.
Another interesting tool, which is unfortunately only available with $39 licenses, is the Competitor Scoreboard. It allows creators to compare their channels stats to those of their rival channels.
Have you ever tried TubeBuddy for YouTube?
Richard Bennett
Richard Bennett is a writer and a lover of all things video.
Follow @Richard Bennett
Polishing Your YouTube Production Post-Publishment
How to Edit Uploaded/ Published YouTube Videos
Richard Bennett
Mar 27, 2024• Proven solutions
YouTube Video Editor gives you the capacity to edit your video straight from the YouTube platform; these include videos that has already been published or shared. In the first part, we’re going to teach you how to edit your published YouTube videos without losing video ID and URL, in the second part, we offer an advanced video editing tips for edit published videos.
Note: From 20th September 2017 users will no longer be able to use the complimentary editing suite. Check the best YouTube video editor alternatives from this complete guide.
If you want to hide or remove some videos of your or other people’s YouTube channel, you can check this article.
Simply want to do all the stuff on your phone? check this out.
Advanced Tips to Edit Uploaded/ Published YouTube Videos
It is true that YouTube Editor provides us a handy platform that allows us to edit existing YouTube videos in an efficient ways. However, the tools they provide are too basic. If you want to perform a more complex editing, you will need an offline editor such as Windows Movie Maker, iMovei or Adobe Premiere. But if you are looking for an simple while powerful tool, we highly recommend Wondershare Filmora . It is highly compatible with different image, audio, and video format. It is just as simple as importing the video and editing them.
The downside, however, is that you will lose the original ID of the video. This may serve as a problem if you have already shared the video before since the views may disappear. A good solution to this problem is to place an annotation to the old video telling your followers that you have created a better quality of the video then direct them to the link.
Check how to engage your audience to stay tuned from this video below:


Edit Existing YouTube Videos
Let me walk you through a familiar situation, you spend all night trying to make your video perfect, uploaded it on your YouTube channel and shred it to your social media accounts. Then you noticed that you need to repair something. The normal approach back then is to delete the video, re-edit using offline tools and then re-upload it again. Clearly, this process takes too much time. Furthermore, it changes the ID of your video which means that the previous embed will no longer work.
Note: Under this situation, you can’t add more footage or effects to the existing videos.
1. Sigin in
The first thing you need to do to edit uploaded/published YouTube videos is to sign-in with your Google account.

2. Locate the video you want to edit
After signing-in, you now have the option to view all your uploaded videos. Go My Channel > Choose YouTube Studio (it’s a beta version right now).

Click the “Videos” button, and you will see all your uploaded videos here. Choose the one you want to edit

3. Edit YouTube videos
Click on the video you want to edit, and you can see all the info about this video, including title, description, visibility, etc. Choose “Editor” at the left side of the interface, and you will be led to the YouTube video editor’s interface, You can now trim the existing YouTube video by dragging the sliders on the timeline.

4. Save
After you are happy with your edited video, you can now click save.
Note: In case you are not happy with the video that you edited, you can always revert back to your original video. Videos with more than 1,000 views will be saved as a new video after the editing. You may also add notes and annotation to your Videos. This annotation may appear alongside with the video depending on the time that you want it to appear.
Related article: How to add annotation to your YouTube video
Richard Bennett
Richard Bennett is a writer and a lover of all things video.
Follow @Richard Bennett
Richard Bennett
Mar 27, 2024• Proven solutions
YouTube Video Editor gives you the capacity to edit your video straight from the YouTube platform; these include videos that has already been published or shared. In the first part, we’re going to teach you how to edit your published YouTube videos without losing video ID and URL, in the second part, we offer an advanced video editing tips for edit published videos.
Note: From 20th September 2017 users will no longer be able to use the complimentary editing suite. Check the best YouTube video editor alternatives from this complete guide.
If you want to hide or remove some videos of your or other people’s YouTube channel, you can check this article.
Simply want to do all the stuff on your phone? check this out.
Advanced Tips to Edit Uploaded/ Published YouTube Videos
It is true that YouTube Editor provides us a handy platform that allows us to edit existing YouTube videos in an efficient ways. However, the tools they provide are too basic. If you want to perform a more complex editing, you will need an offline editor such as Windows Movie Maker, iMovei or Adobe Premiere. But if you are looking for an simple while powerful tool, we highly recommend Wondershare Filmora . It is highly compatible with different image, audio, and video format. It is just as simple as importing the video and editing them.
The downside, however, is that you will lose the original ID of the video. This may serve as a problem if you have already shared the video before since the views may disappear. A good solution to this problem is to place an annotation to the old video telling your followers that you have created a better quality of the video then direct them to the link.
Check how to engage your audience to stay tuned from this video below:
Edit Existing YouTube Videos
Let me walk you through a familiar situation, you spend all night trying to make your video perfect, uploaded it on your YouTube channel and shred it to your social media accounts. Then you noticed that you need to repair something. The normal approach back then is to delete the video, re-edit using offline tools and then re-upload it again. Clearly, this process takes too much time. Furthermore, it changes the ID of your video which means that the previous embed will no longer work.
Note: Under this situation, you can’t add more footage or effects to the existing videos.
1. Sigin in
The first thing you need to do to edit uploaded/published YouTube videos is to sign-in with your Google account.
2. Locate the video you want to edit
After signing-in, you now have the option to view all your uploaded videos. Go My Channel > Choose YouTube Studio (it’s a beta version right now).
Click the “Videos” button, and you will see all your uploaded videos here. Choose the one you want to edit
3. Edit YouTube videos
Click on the video you want to edit, and you can see all the info about this video, including title, description, visibility, etc. Choose “Editor” at the left side of the interface, and you will be led to the YouTube video editor’s interface, You can now trim the existing YouTube video by dragging the sliders on the timeline.
4. Save
After you are happy with your edited video, you can now click save.
Note: In case you are not happy with the video that you edited, you can always revert back to your original video. Videos with more than 1,000 views will be saved as a new video after the editing. You may also add notes and annotation to your Videos. This annotation may appear alongside with the video depending on the time that you want it to appear.
Related article: How to add annotation to your YouTube video
Richard Bennett
Richard Bennett is a writer and a lover of all things video.
Follow @Richard Bennett
Also read:
- [New] Best Practices for Boosting Views on FreeFire Gaming Channels
- [New] Step Up Your Game Expert Tips for TikTok Editing
- [Updated] In 2024, Dominate Discussion How to Trend on Social Media Platforms
- 2024 Approved Pro Video Cinematography Choosing the Right Lenses
- 2024 Approved The Best Sound Gear Matching Mics with 4K Cameras
- Engineering Video Excerpts for Online Platforms
- Global Earning Maestro of Video Content
- In 2024, BiteVideo Innovator
- In 2024, Entering the Virtual Realm Google Meet
- Maximize Apple Watch Longeaster: Discover These 8 Essential Configuration Adjustments for Better Power Efficiency
- Step-by-Step Guide on Downloading Snappea Software for Your Windows Computer
- Top YouTube Spotlight Key Influences on Your Viewership Position
- Unlocking Simplicity Your Guide to Direct Signup Buttons
- ウェブサイトでの404誤承解 : アクセスしようとするページを探しています
- Title: Elevate Content Discovery The TubeBuddy Way
- Author: Steven
- Created at : 2025-01-23 17:48:17
- Updated at : 2025-01-29 23:21:47
- Link: https://youtube-clips.techidaily.com/elevate-content-discovery-the-tubebuddy-way/
- License: This work is licensed under CC BY-NC-SA 4.0.