
:max_bytes(150000):strip_icc()/onur-binay-uk5FrhKtr7E-unsplash-61bd7ebecee043dbad9abd9677638b3f.jpg)
Effortless Sound Transformation From YouTube to WAV Format for 2024
Effortless Sound Transformation From YouTube to WAV Format
YouTube to WAV File: 4 Best Free Convert Solutions

Richard Bennett
Mar 27, 2024• Proven solutions
YouTube to WAV converter is a very common phenomenon. This is done by the users as they want to play the video on selected devices.
In this article, we will help you manage to convert YouTube to WAV file with ease.
You will Learn :
- What is WAV?
- How to Convert YouTube to WAV Format? (4 Options)
- Tips to Convert YouTube to WAV
- Beside WAV Other Popular Formats for YouTube Videos
What is WAV?
WAV, known as Wave Form Audio File Format and is fully supported by Windows, is a common format that was launched back in 1991, which supports most of the older devices as well.
For the users that want uncompressed and lossless quality prefer to use WAV format. It is extended from the RIFF format to the RF64 format.
How to Convert YouTube to WAV Format?
Some many ways and programs can be used as YouTube to WAV converter. All these programs are easy to use and definitive guides are also available online. Some of the best ways are mentioned below.
Option 1: Convert YouTube to WAV by Wondershare Filmora
Filmora is by far the best program that can be used to convert YouTube to WAV format. YouTube to WAV file conversion has never been as easy as it is with this program. The program is easy to use and allows the users to overcome the issues which other programs present.
Features of the Program
- It is one of the very few programs that come with split-screen functionality. It means that the video and audio can be played simultaneously on a single interface.
- The audio equalizer ensures that the tuning is done as per the requirements.
- There is an advanced functionality of text editing which allows the users to mention the text onto the converted video as well.
- The UI of the program is graphical and hence it is easy to use. The independent reviews have granted a score of 9.5 based on this functionality of the program.
- The part selection is available in the program. It means that multiple conversions can be done at the same time without losing quality.
How to Convert YouTube to WAV Using Filmora?
This YouTube WAV converter is easy to use. The best part is that it is compatible with major platforms i.e. Windows and Mac. The processes for both will be explained in detail so that you can understand the program better.
The Process to Convert YouTube to WAV:
Step 1: Download Filmora for Windows or Mac (depends on your operating system).
If you want to download the program for Windows then click below download icon:

For Mac version download click below icon:

Step 2: There are three ways to import media into the program.
Methond 1: Click File > Import Media. Choose the YouTube file that you want to convert to WAV format. If the file is on another device then you can get it from there as well.

Method 2: Click Import Media on the main interface and select the file from the window that pops up.
Method 3: You can also drag and drop the files onto the interface to make sure that they are imported.
Step 3: You now just need to export the video in the WAV format. Click the Export button and then go for the Local tab. The export formats that are currently supported by the program are WMV, MP4, AVI, MOV, F4V, MKV, TS, 3GP, MPEG-2, WEBM, GIF and MP3.

Step 4: You can then alter the settings within the settings tab. The bit rate is the main thing that defines the quality of the video. Once the settings are done press OK
Step 5: You can also export the video as per the device that you want to play it on.
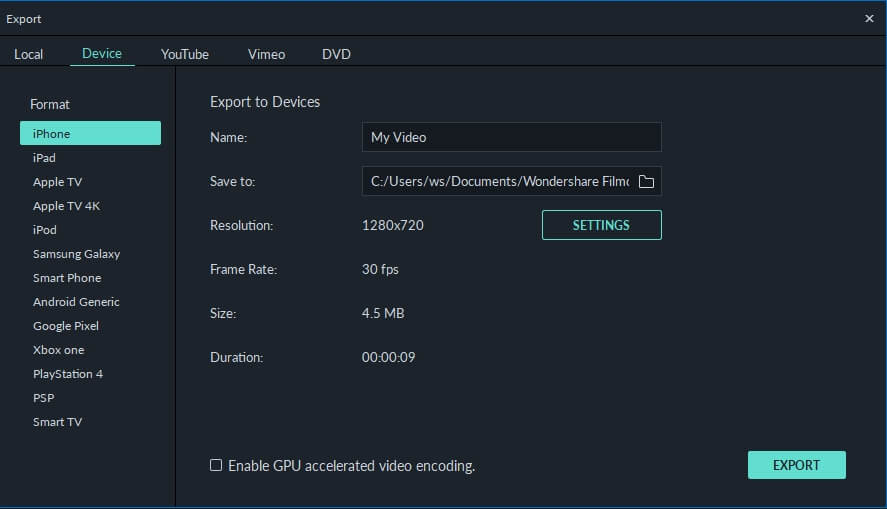
Step 6: You can also upload the video to social media platforms such as YouTube and Vimeo.
Step 7: You can also burn the converted format onto a DVD. Select the appropriate settings and press Export.
The process is explained as under. For video guides please visit Filmora 101 as it will get you the complete knowledge thoroughly.
You may also like: How to Convert YouTube to MP4 Safely? [Step by Step Guide] >>
Option 2: Other Way to Convert YouTube to WAV on Windows
5K Player is one of the best and the most used players that also work as YouTube to WAV conversion platform as well. The process is very easy to follow and is mentioned as under.
Step 1: Copy and paste the URL of the video on the desired location within the player. Click download and the process starts.

Step 2: Click “To Music” and select the WAV format from the drop-down that appears. You can also choose the bit rate, frame rate, and resolution. Once the conversion is completed you can save the file and the process ends here.
You may also like: >> How to to Convert WMV to MP4 Easily?
Option 3: Other Way to Convert YouTube to WAV on Mac
The Allavsoft is one of the best converters that can be used to convert YouTube to WAV on Mac. The process is simple and has been explained as under.
Step 1: Paste the URL of the YouTube video that you want to convert. You can also select the download quality and can access the file once the download has been completed.

Step 2: You can then select the format and once the conversion has been completed click the download button. The same has been depicted by numbers 2 and 3 in the picture below. WAV lossless quality should be selected from the dropdown to make sure that the work is done without any issue and problem.
Right format selection is important as the conversion is done instantly.
Option 4: YouTube to WAV Conversion Online
The process that you need to follow is explained as under.
Step 1: Visit https.//www.savethevideo.com/convert to access the converter.
Step 2: Paste the URL of the YouTube video that you want to convert and click the “Convert” button:

Step 3: Wait till the converter fetches the information.
Step 4: From the drop-down make sure that you select the WAV format.
Step 5: Click “Convert” once again and the process of conversion starts.
Step 6: The video then starts to download in the desired format.
Step 7: Click “Download” and save the file to the desired location. This concludes the process in full.
Tips to Convert YouTube to WAV
Below are some tips that would be useful for the users that want to convert YouTube to WAV format.
1. Always use the multipurpose software. It will allow you to download and convert the video at the same time-saving time.
2. Lossless quality is always to be selected while you are converting the format. It will make sure that the video is never compressed at all.
3. One of the best ways to convert the video is to disable the background noise. This will lead to awesome results.
4. Converting from YouTube to WAV also requires you to choose the software that is fast and reliable or else you will get the outcome which is not as per your requirements.
5. Free software programs can also get the malware to your system and therefore these are not recommended at all.
6. WAV is a format that is of high quality as the converters have loads of options so it is advised to use these carefully.
7. Make sure that the converters that are used are the ones that are highly rated and have a graphical user interface.
8. The YouTube to WAV downloader should be there on with the converter as it will make the process easy and you don’t need tons of software programs for a single purpose.
9. Always go for the program that supports the containers instead of just the format. If a program supports the containers then it is easy to convert a number of formats.
10. The conversion should be done with converters that do not cause any type of loss to enhance the quality as well.
Beside WAV Other Popular Formats for YouTube Videos
Many other video formats should be used to make sure that the best and the most advanced outcome is generated. Some of the most popular formats are as under.
- Audio Video Interleave Format, AVI
It is one of the oldest formats that are on the market. It was developed by Microsoft as a part of their video processing format for Windows. It was made publically available in 1992.
This one of the oldest formats is used universally. Many people consider it the standard to save videos. The AVI files are simple to use and are supported by almost every video player currently on the market.
It is easy to store as it takes less space than many other formats that are on the market. It will also let you transfer the files relatively faster due to the small size.
- Flash Video Format, FLV
The flash player by Adobe is one of the most common software programs on the system. This has made this video format one of the common ones on the market. The format can be played with ease as the supported plugins are there for other apps as well.
The flash content is supported by all browsers and therefore it is common to play these videos without any additional plugins. The best part of this format is the lossless quality that it provides to its users. Even if you compress these videos they remain HD as the quality remains the same.
- Apple QuickTime Movie, MOV
Among the Mac users, it is one of the most used formats. Developed by Apple it is a format that allows the users to overcome issues such as playback errors. The new version has also been launched which is known as QuickTime X.
The best part of this format is that it is available for Windows users as well. The files of the MOV format are usually of high quality. It is for the same that the size of such files is large as compared to other formats.
- Moving Pictures Expert Group 4, MP4
Introduced in 1998 it is a format that is used by the motion pictures association responsible for setting the standards. The format is widely used and is supported by various platforms as well as devices.
Even after the MP4 file is compressed it remains lossless and the quality remains the same. The HTML5 that has been launched currently also supports this format. It is compatible with almost all of the browsers that are on the market.
- 264
As the name suggests it is one of the best and the most used formats for HD videos. The compression remains lossless and even if the resolution is low the quality is maintained. The MP4 container is the one that is used to contain this format.
Most of the streaming devices, as well as the services, use this format while referring to HD video. The best part is that the format is widely accepted as industry standards for HD videos. Most of the users all over the world use this format to save their HD videos with ease.
- OGG
It is one of the most used video formats. It has been developed by the Xiph.org foundation to maintain the video as well as the audio quality on different platforms. The format is free and the documentation, as well as the configuration, can be downloaded by anyone.
- Advanced Systems Format, .ASF
If you want to stream videos then this is the format that is considered to be the best. It is still being used by the major popular streaming platforms of the world. The .ASF format is one of the best and it allows the users to overcome issues such as quality loss as well as streaming related issues.
You may also like: How to Post/Share a Video From YouTube on Instagram >>
Conclusion
If you require lossless compression then YouTube to WAV conversion is something that is required. Some many ways and means can be used to make sure that the idea is approached. The best way is to use Filmora as it is an easy and efficient operation.
The best way to get around the issue is to always use the service that is embedded with quality.
If you like this article then it is requested to comment and share it on social media. It will not only help others but will also let them have knowledgeable ideas.
Richard Bennett
Richard Bennett is a writer and a lover of all things video.
Follow @Richard Bennett
Richard Bennett
Mar 27, 2024• Proven solutions
YouTube to WAV converter is a very common phenomenon. This is done by the users as they want to play the video on selected devices.
In this article, we will help you manage to convert YouTube to WAV file with ease.
You will Learn :
- What is WAV?
- How to Convert YouTube to WAV Format? (4 Options)
- Tips to Convert YouTube to WAV
- Beside WAV Other Popular Formats for YouTube Videos
What is WAV?
WAV, known as Wave Form Audio File Format and is fully supported by Windows, is a common format that was launched back in 1991, which supports most of the older devices as well.
For the users that want uncompressed and lossless quality prefer to use WAV format. It is extended from the RIFF format to the RF64 format.
How to Convert YouTube to WAV Format?
Some many ways and programs can be used as YouTube to WAV converter. All these programs are easy to use and definitive guides are also available online. Some of the best ways are mentioned below.
Option 1: Convert YouTube to WAV by Wondershare Filmora
Filmora is by far the best program that can be used to convert YouTube to WAV format. YouTube to WAV file conversion has never been as easy as it is with this program. The program is easy to use and allows the users to overcome the issues which other programs present.
Features of the Program
- It is one of the very few programs that come with split-screen functionality. It means that the video and audio can be played simultaneously on a single interface.
- The audio equalizer ensures that the tuning is done as per the requirements.
- There is an advanced functionality of text editing which allows the users to mention the text onto the converted video as well.
- The UI of the program is graphical and hence it is easy to use. The independent reviews have granted a score of 9.5 based on this functionality of the program.
- The part selection is available in the program. It means that multiple conversions can be done at the same time without losing quality.
How to Convert YouTube to WAV Using Filmora?
This YouTube WAV converter is easy to use. The best part is that it is compatible with major platforms i.e. Windows and Mac. The processes for both will be explained in detail so that you can understand the program better.
The Process to Convert YouTube to WAV:
Step 1: Download Filmora for Windows or Mac (depends on your operating system).
If you want to download the program for Windows then click below download icon:
For Mac version download click below icon:
Step 2: There are three ways to import media into the program.
Methond 1: Click File > Import Media. Choose the YouTube file that you want to convert to WAV format. If the file is on another device then you can get it from there as well.
Method 2: Click Import Media on the main interface and select the file from the window that pops up.
Method 3: You can also drag and drop the files onto the interface to make sure that they are imported.
Step 3: You now just need to export the video in the WAV format. Click the Export button and then go for the Local tab. The export formats that are currently supported by the program are WMV, MP4, AVI, MOV, F4V, MKV, TS, 3GP, MPEG-2, WEBM, GIF and MP3.
Step 4: You can then alter the settings within the settings tab. The bit rate is the main thing that defines the quality of the video. Once the settings are done press OK
Step 5: You can also export the video as per the device that you want to play it on.
Step 6: You can also upload the video to social media platforms such as YouTube and Vimeo.
Step 7: You can also burn the converted format onto a DVD. Select the appropriate settings and press Export.
The process is explained as under. For video guides please visit Filmora 101 as it will get you the complete knowledge thoroughly.
You may also like: How to Convert YouTube to MP4 Safely? [Step by Step Guide] >>
Option 2: Other Way to Convert YouTube to WAV on Windows
5K Player is one of the best and the most used players that also work as YouTube to WAV conversion platform as well. The process is very easy to follow and is mentioned as under.
Step 1: Copy and paste the URL of the video on the desired location within the player. Click download and the process starts.
Step 2: Click “To Music” and select the WAV format from the drop-down that appears. You can also choose the bit rate, frame rate, and resolution. Once the conversion is completed you can save the file and the process ends here.
You may also like: >> How to to Convert WMV to MP4 Easily?
Option 3: Other Way to Convert YouTube to WAV on Mac
The Allavsoft is one of the best converters that can be used to convert YouTube to WAV on Mac. The process is simple and has been explained as under.
Step 1: Paste the URL of the YouTube video that you want to convert. You can also select the download quality and can access the file once the download has been completed.
Step 2: You can then select the format and once the conversion has been completed click the download button. The same has been depicted by numbers 2 and 3 in the picture below. WAV lossless quality should be selected from the dropdown to make sure that the work is done without any issue and problem.
Right format selection is important as the conversion is done instantly.
Option 4: YouTube to WAV Conversion Online
The process that you need to follow is explained as under.
Step 1: Visit https.//www.savethevideo.com/convert to access the converter.
Step 2: Paste the URL of the YouTube video that you want to convert and click the “Convert” button:
Step 3: Wait till the converter fetches the information.
Step 4: From the drop-down make sure that you select the WAV format.
Step 5: Click “Convert” once again and the process of conversion starts.
Step 6: The video then starts to download in the desired format.
Step 7: Click “Download” and save the file to the desired location. This concludes the process in full.
Tips to Convert YouTube to WAV
Below are some tips that would be useful for the users that want to convert YouTube to WAV format.
1. Always use the multipurpose software. It will allow you to download and convert the video at the same time-saving time.
2. Lossless quality is always to be selected while you are converting the format. It will make sure that the video is never compressed at all.
3. One of the best ways to convert the video is to disable the background noise. This will lead to awesome results.
4. Converting from YouTube to WAV also requires you to choose the software that is fast and reliable or else you will get the outcome which is not as per your requirements.
5. Free software programs can also get the malware to your system and therefore these are not recommended at all.
6. WAV is a format that is of high quality as the converters have loads of options so it is advised to use these carefully.
7. Make sure that the converters that are used are the ones that are highly rated and have a graphical user interface.
8. The YouTube to WAV downloader should be there on with the converter as it will make the process easy and you don’t need tons of software programs for a single purpose.
9. Always go for the program that supports the containers instead of just the format. If a program supports the containers then it is easy to convert a number of formats.
10. The conversion should be done with converters that do not cause any type of loss to enhance the quality as well.
Beside WAV Other Popular Formats for YouTube Videos
Many other video formats should be used to make sure that the best and the most advanced outcome is generated. Some of the most popular formats are as under.
- Audio Video Interleave Format, AVI
It is one of the oldest formats that are on the market. It was developed by Microsoft as a part of their video processing format for Windows. It was made publically available in 1992.
This one of the oldest formats is used universally. Many people consider it the standard to save videos. The AVI files are simple to use and are supported by almost every video player currently on the market.
It is easy to store as it takes less space than many other formats that are on the market. It will also let you transfer the files relatively faster due to the small size.
- Flash Video Format, FLV
The flash player by Adobe is one of the most common software programs on the system. This has made this video format one of the common ones on the market. The format can be played with ease as the supported plugins are there for other apps as well.
The flash content is supported by all browsers and therefore it is common to play these videos without any additional plugins. The best part of this format is the lossless quality that it provides to its users. Even if you compress these videos they remain HD as the quality remains the same.
- Apple QuickTime Movie, MOV
Among the Mac users, it is one of the most used formats. Developed by Apple it is a format that allows the users to overcome issues such as playback errors. The new version has also been launched which is known as QuickTime X.
The best part of this format is that it is available for Windows users as well. The files of the MOV format are usually of high quality. It is for the same that the size of such files is large as compared to other formats.
- Moving Pictures Expert Group 4, MP4
Introduced in 1998 it is a format that is used by the motion pictures association responsible for setting the standards. The format is widely used and is supported by various platforms as well as devices.
Even after the MP4 file is compressed it remains lossless and the quality remains the same. The HTML5 that has been launched currently also supports this format. It is compatible with almost all of the browsers that are on the market.
- 264
As the name suggests it is one of the best and the most used formats for HD videos. The compression remains lossless and even if the resolution is low the quality is maintained. The MP4 container is the one that is used to contain this format.
Most of the streaming devices, as well as the services, use this format while referring to HD video. The best part is that the format is widely accepted as industry standards for HD videos. Most of the users all over the world use this format to save their HD videos with ease.
- OGG
It is one of the most used video formats. It has been developed by the Xiph.org foundation to maintain the video as well as the audio quality on different platforms. The format is free and the documentation, as well as the configuration, can be downloaded by anyone.
- Advanced Systems Format, .ASF
If you want to stream videos then this is the format that is considered to be the best. It is still being used by the major popular streaming platforms of the world. The .ASF format is one of the best and it allows the users to overcome issues such as quality loss as well as streaming related issues.
You may also like: How to Post/Share a Video From YouTube on Instagram >>
Conclusion
If you require lossless compression then YouTube to WAV conversion is something that is required. Some many ways and means can be used to make sure that the idea is approached. The best way is to use Filmora as it is an easy and efficient operation.
The best way to get around the issue is to always use the service that is embedded with quality.
If you like this article then it is requested to comment and share it on social media. It will not only help others but will also let them have knowledgeable ideas.
Richard Bennett
Richard Bennett is a writer and a lover of all things video.
Follow @Richard Bennett
Building Custom Auto Subscribe Hyperlink for Channels
Create High-Quality Video - Wondershare Filmora
An easy and powerful YouTube video editor
Numerous video and audio effects to choose from
Detailed tutorials provided by the official channel
Building a YouTube channel isn’t a walk-in-the-park. As a content creator, you go toiling several processes to ensure its success. More so, you are probably building a brand and want people to know about your product or services. What about one easy way to remember the URL and share it with your potential subscribers? Besides sending such links to people, you’ll be reminding them to subscribe with just a click. And that’s YouTube auto-subscribe link. It is a more effective way than asking or directing to check your YouTube channel. They’ll probably not find it easy, maneuvering around numbers of other channels that bear names close to your channel. A visitor will quickly give up. You can save them the crap and engage more effectively.

In this article
01 How to subscribe to a YouTube channel?
02 How to create an auto-subscribe link for your YouTube channel?
03 Other tricks that work besides YouTube auto-subscribe.
How to subscribe to a YouTube channel?
A YouTube auto-subscribe link will be beneficial in many ways. Here are the steps to subscribe to a YouTube channel. You can subscribe from your phone or computer.
Using a phone
- First, open the YouTube app. Look for it on your phone’s home screen or search through apps.
- Then sign in to your “Google” account for you to be able to subscribe to YouTube channels.
- Next, locate the channel that you want to subscribe to. You can either subscribe from the channel home page or watch the channel video.
- Tap on the “Subscribe” button. The text on the “Subscribe” button will immediately change to “Subscribed” once you hit the subscribe tab.
- Finally, hit the “Subscriptions” tab to manage your channel subscriptions. You’ll also manage to see other latest updates from your subscription.
- You can now easily manage your notifications. You now start to receive notifications of other new channels by default. It is possible to modify this by choosing “All,” “None,” or “Personalized” to determine how to get notifications.

Using a computer
- First, visit the YouTube web page https://www.youtube.com in a web browser. The YouTube website will then be open.
- Then sign in to your YT account. Remember, you must also be signed in to a Google account to subscribe to YouTube channels.
- Browse for a channel and find what’s trending in the left-side panel of the screen.
- Hit the “Subscribe” button to subscribe to a channel. Once you are subscribed, the Subscribe text button will turn grey and change to “Subscribed.”
- View subscriptions by clicking the “three horizontal lines” found at the top-left corner of YouTube. You can also adjust your notification preferences to receive more or fewer updates from a channel.

How an auto-subscribe link will help boost your YouTube channel?
1. Links will auto-prompt visitors to subscribe to your YouTube channel.
2. You can use the link anywhere and reach very many visitors.
3. It works automatically to boost your subscriber count.
How to create an auto-subscribe link for your YouTube channel?
Here are the steps to create YouTube auto subscribers’ links on your computer and mobile device.

How to create a YouTube subscribe link on your computer
- Step 1. First, go to your YouTube Channel URL.
- Step 2. Press on your “Profile,” then click on the “Settings” option in the drop-down menu.
- Step 3. Next, click on the “Profile” picture and copy the URL link.
- Step 4. Add your “YouTube” channel URL with an “Auto Subscribe Tag.” “YouTube channel URL + ?sub_confirmation=1 Then remove the Plus Sign in between to get a YouTube subscribe link.
How to create a YouTube subscribe link on your mobile
- Step 1. Launch the YouTube app on your mobile phone, then click on the “Profile” icon.
- Step 2. Then go to the “Menu” tab and click on the “Your Channel” option.
- Step 3. Select the “Share” option from the drop-down menu.
- Step 4. Next, click on the “Copy link” of your YouTube Channel.
- Step 5. Finally, add your “YouTube” channel URL with the Auto Subscribe Tag.
How to locate your YouTube Channel URL
Unfortunately, many people don’t know their YouTube Channel URL. Check out how to locate your URL.
- Click on your “Profile” icon in the top-right corner of the YouTube page.
- Choose the “Settings” option from the drop-down menu.
- Next, hit the “Advanced” tab below your name.
- Boom! You get your link.
- Finally, combine your channel URL with the “Auto Subscribe” Tag.
● The formula: YouTube channel URL + “?sub_confirmation=1.” Remember to remove the parenthesis to get your auto-subscribe link.
Other tricks that work besides YouTube auto-subscribe
As a content creator, you need to do more to add YouTube auto subscribers to your channel.
Use closed captions to improve accessibility
Including subtitles or closed captions can drive a larger audience to access your content. Some YouTube users have challenges, for example, the deaf or those with hearing problems. Creating a video and not considering this may limit such users from getting to your channel as they may not get all the needed information. Follow these steps to create subtitles or closed captions.
- Sign in to YouTube Studio.
- Then select the “Subtitles” option from the left menu.
- Click on the video that you wish to edit.
- Next, click on the “Add Language” button and select your language.
- Go to the “Subtitles” section and select the “Add” button.
- Finally, enter your captions as the video plays. It will enable viewers who find it challenging to understand your video in detail and probably hit the subscribe button.

Translate your video descriptions
YouTube is accessed worldwide and not necessarily by those who speak your language. You can increase the chances of subscribers by translating your video titles and descriptions to make them understandable to people from across the world. It will make your videos more discoverable and show that you care about those from other regions. Check out how to add translations to YouTube videos.
- First, sign in to YouTube Studio.
- Then go to the left menu and select the “Subtitles” option.
- Choose the video in which you want to add the translations.
- It would be best if you choose a language for your video. Click the “Confirm” button.
- Then select the “Add language” option and choose the language you wish to translate your video into
- Go to “Titles & descriptions” and select the “Add” tab.
- Lastly, enter the translated description and hit the “Publish” button.
Use end screens for extra content promotion
An end screen call-to-action is essential in every video that you post on YouTube. They appear in the last 10 seconds and are useful in directing viewers to your chosen destination. Use them to direct a viewer to visit another channel, subscribe to your channel, or play another video. Here’s how to do it:
- Firstly, sign in to YouTube Studio.
- Then go to the “Videos” page and select a video to use.
- Select the “Editor” tab from the left menu.
- Next, choose the “Add an end screen” option to direct viewers appropriately.
Add a comment to your feed
This functionality is essential if many commenters repeatedly ask the same question. Besides, it will help you to boost engagement with a question.
Here are the simple steps on how to pin a comment to the top of your feed.
- Go to your “Community” tab.
- Then choose the comment that you wish to pin.
- Click on the “More” tab > “Pin” option.

Bonus: Will YouTube auto-subscribe me to a new channel?
It is not necessarily true that YouTube auto-subscribe will subscribe to a new channel. However, some reasons may contribute to that. You may have realized that YouTube just subscribed you to random channels without asking you. Here are the possible reasons for that.
• Spinoff Channel
A content creator may decide to come up with a Spinoff channel. In this case, they may automatically subscribe you to their new channel. In most cases, such content creators want to promote their new channel.
• Check your extensions
One of your browsers may be playing tricks on your YouTube account. Extensions may change your browser’s settings and make the “Unsubscribe” option unavailable. Try disabling all of your browser extensions, then check back if YouTube still subscribes you to channels unknown to you. If so, solve the issue by uninstalling the specific extensions. These could be ad blockers or free VPN extensions.
• Someone else can hit the button
Do you share your computer with other fellows? The chances are that someone hit the “Subscribe” button without your consent. Just unsubscribe and keep watching next time.
Conclusion
● The internet arena is very competitive. It would be best if you did everything right to drive as many YouTube auto-subscribers as possible to your channel. And creating a YouTube auto-subscribe link is the first step to making things easier for your potential subscribers. We have covered how to create a YouTube subscribe link and shown other tricks to help you keep your viewers locked.
Building a YouTube channel isn’t a walk-in-the-park. As a content creator, you go toiling several processes to ensure its success. More so, you are probably building a brand and want people to know about your product or services. What about one easy way to remember the URL and share it with your potential subscribers? Besides sending such links to people, you’ll be reminding them to subscribe with just a click. And that’s YouTube auto-subscribe link. It is a more effective way than asking or directing to check your YouTube channel. They’ll probably not find it easy, maneuvering around numbers of other channels that bear names close to your channel. A visitor will quickly give up. You can save them the crap and engage more effectively.
In this article
01 How to subscribe to a YouTube channel?
02 How to create an auto-subscribe link for your YouTube channel?
03 Other tricks that work besides YouTube auto-subscribe.
How to subscribe to a YouTube channel?
A YouTube auto-subscribe link will be beneficial in many ways. Here are the steps to subscribe to a YouTube channel. You can subscribe from your phone or computer.
Using a phone
- First, open the YouTube app. Look for it on your phone’s home screen or search through apps.
- Then sign in to your “Google” account for you to be able to subscribe to YouTube channels.
- Next, locate the channel that you want to subscribe to. You can either subscribe from the channel home page or watch the channel video.
- Tap on the “Subscribe” button. The text on the “Subscribe” button will immediately change to “Subscribed” once you hit the subscribe tab.
- Finally, hit the “Subscriptions” tab to manage your channel subscriptions. You’ll also manage to see other latest updates from your subscription.
- You can now easily manage your notifications. You now start to receive notifications of other new channels by default. It is possible to modify this by choosing “All,” “None,” or “Personalized” to determine how to get notifications.
Using a computer
- First, visit the YouTube web page https://www.youtube.com in a web browser. The YouTube website will then be open.
- Then sign in to your YT account. Remember, you must also be signed in to a Google account to subscribe to YouTube channels.
- Browse for a channel and find what’s trending in the left-side panel of the screen.
- Hit the “Subscribe” button to subscribe to a channel. Once you are subscribed, the Subscribe text button will turn grey and change to “Subscribed.”
- View subscriptions by clicking the “three horizontal lines” found at the top-left corner of YouTube. You can also adjust your notification preferences to receive more or fewer updates from a channel.
How an auto-subscribe link will help boost your YouTube channel?
1. Links will auto-prompt visitors to subscribe to your YouTube channel.
2. You can use the link anywhere and reach very many visitors.
3. It works automatically to boost your subscriber count.
How to create an auto-subscribe link for your YouTube channel?
Here are the steps to create YouTube auto subscribers’ links on your computer and mobile device.
How to create a YouTube subscribe link on your computer
- Step 1. First, go to your YouTube Channel URL.
- Step 2. Press on your “Profile,” then click on the “Settings” option in the drop-down menu.
- Step 3. Next, click on the “Profile” picture and copy the URL link.
- Step 4. Add your “YouTube” channel URL with an “Auto Subscribe Tag.” “YouTube channel URL + ?sub_confirmation=1 Then remove the Plus Sign in between to get a YouTube subscribe link.
How to create a YouTube subscribe link on your mobile
- Step 1. Launch the YouTube app on your mobile phone, then click on the “Profile” icon.
- Step 2. Then go to the “Menu” tab and click on the “Your Channel” option.
- Step 3. Select the “Share” option from the drop-down menu.
- Step 4. Next, click on the “Copy link” of your YouTube Channel.
- Step 5. Finally, add your “YouTube” channel URL with the Auto Subscribe Tag.
How to locate your YouTube Channel URL
Unfortunately, many people don’t know their YouTube Channel URL. Check out how to locate your URL.
- Click on your “Profile” icon in the top-right corner of the YouTube page.
- Choose the “Settings” option from the drop-down menu.
- Next, hit the “Advanced” tab below your name.
- Boom! You get your link.
- Finally, combine your channel URL with the “Auto Subscribe” Tag.
● The formula: YouTube channel URL + “?sub_confirmation=1.” Remember to remove the parenthesis to get your auto-subscribe link.
Other tricks that work besides YouTube auto-subscribe
As a content creator, you need to do more to add YouTube auto subscribers to your channel.
Use closed captions to improve accessibility
Including subtitles or closed captions can drive a larger audience to access your content. Some YouTube users have challenges, for example, the deaf or those with hearing problems. Creating a video and not considering this may limit such users from getting to your channel as they may not get all the needed information. Follow these steps to create subtitles or closed captions.
- Sign in to YouTube Studio.
- Then select the “Subtitles” option from the left menu.
- Click on the video that you wish to edit.
- Next, click on the “Add Language” button and select your language.
- Go to the “Subtitles” section and select the “Add” button.
- Finally, enter your captions as the video plays. It will enable viewers who find it challenging to understand your video in detail and probably hit the subscribe button.
Translate your video descriptions
YouTube is accessed worldwide and not necessarily by those who speak your language. You can increase the chances of subscribers by translating your video titles and descriptions to make them understandable to people from across the world. It will make your videos more discoverable and show that you care about those from other regions. Check out how to add translations to YouTube videos.
- First, sign in to YouTube Studio.
- Then go to the left menu and select the “Subtitles” option.
- Choose the video in which you want to add the translations.
- It would be best if you choose a language for your video. Click the “Confirm” button.
- Then select the “Add language” option and choose the language you wish to translate your video into
- Go to “Titles & descriptions” and select the “Add” tab.
- Lastly, enter the translated description and hit the “Publish” button.
Use end screens for extra content promotion
An end screen call-to-action is essential in every video that you post on YouTube. They appear in the last 10 seconds and are useful in directing viewers to your chosen destination. Use them to direct a viewer to visit another channel, subscribe to your channel, or play another video. Here’s how to do it:
- Firstly, sign in to YouTube Studio.
- Then go to the “Videos” page and select a video to use.
- Select the “Editor” tab from the left menu.
- Next, choose the “Add an end screen” option to direct viewers appropriately.
Add a comment to your feed
This functionality is essential if many commenters repeatedly ask the same question. Besides, it will help you to boost engagement with a question.
Here are the simple steps on how to pin a comment to the top of your feed.
- Go to your “Community” tab.
- Then choose the comment that you wish to pin.
- Click on the “More” tab > “Pin” option.
Bonus: Will YouTube auto-subscribe me to a new channel?
It is not necessarily true that YouTube auto-subscribe will subscribe to a new channel. However, some reasons may contribute to that. You may have realized that YouTube just subscribed you to random channels without asking you. Here are the possible reasons for that.
• Spinoff Channel
A content creator may decide to come up with a Spinoff channel. In this case, they may automatically subscribe you to their new channel. In most cases, such content creators want to promote their new channel.
• Check your extensions
One of your browsers may be playing tricks on your YouTube account. Extensions may change your browser’s settings and make the “Unsubscribe” option unavailable. Try disabling all of your browser extensions, then check back if YouTube still subscribes you to channels unknown to you. If so, solve the issue by uninstalling the specific extensions. These could be ad blockers or free VPN extensions.
• Someone else can hit the button
Do you share your computer with other fellows? The chances are that someone hit the “Subscribe” button without your consent. Just unsubscribe and keep watching next time.
Conclusion
● The internet arena is very competitive. It would be best if you did everything right to drive as many YouTube auto-subscribers as possible to your channel. And creating a YouTube auto-subscribe link is the first step to making things easier for your potential subscribers. We have covered how to create a YouTube subscribe link and shown other tricks to help you keep your viewers locked.
Also read:
- Best Channel Discoveries in ASMR
- Turning YouTube Music Into MP3 Files with MacOS
- [New] Biggest FIFA Visuals YouTube Insights Graphed
- [Updated] Craft Clearer, Crisper YouTube Videos with Quality Tools
- [New] A Comprehensive Guide to Making GIFs From YouTube Tracks
- The Ultimate Guide to Multi-Video Watching on YouTube
- Mini Stories Decoded What's Inside?
- [Updated] Download Premium-Quality Designs at No Cost – For YouTube Creators
- Unlock the Secrets Capturing Apple Devices for Engaging Videos
- Innovative Tactics Starting Your YouTube Enterprise From Mobile
- In 2024, A Guide to Finding Hidden YouTube Treasures
- [Updated] Cutting-Edge Techniques for YouTube Video Edits via WM Maker
- In 2024, Boosting Revenue with YouTube Short Videos – A Complete Plan
- Unlock the Power of Sony Vegas to Enhance Your YouTube Channel
- Youtube Foundations Building a Brand & Generating Income for Novices
- Streamlining Content Across Platforms YouTube & IGTV
- [Updated] Engaging Viewers Best Practices & Pitfalls in Dayly Blogging
- [Updated] Building a Million Views Empire Safe and Secure Methods
- Unveiling CarryMinati's Channel Economics (Ajey)
- Don't Overlook Tags in Video Description
- [Updated] Dissecting YouTube's Selection of Trending Video Responses
- Step-by-Step Guide Creating Engaging Tech Product Videos
- Ultimate List 10 Costless Video Caption Extractors
- Elevate Everyday - YouTube's Finest Yoga Influencers
- Elevate Your Brand - Discover the Riches in Our Gallery of 50 Free YouTube Banners for 2024
- [Updated] Discover the Top 30 Free Intro Creators on YouTube
- Elevate Your YouTube Presence Filmmaking with Filmora for 2024
- 2024 Approved Discover 12 Cutting-Edge Flip-Screen Cams for Video Content
- Top 10 Historical YouTube Hubs Essential Viewing For Students & Enthusiasts
- The Ultimate Guide to Picking Powerful YT Thumbnails
- YouTube to WebM The 10 Best YouTube to WebM Converters
- [Updated] Essential Knowledge The Do's and Don'ts on YouTube
- Three Safe Methods for Directly Downloading YouTube's Audios as MP3
- Innovative Education Prime 15 YouTube Science Outlets
- Mouthwatering Movies A Cook's Guide
- 2024 Approved How to Edit YouTube Videos in Sony Vegas
- Personalizing Public vs Private Settings on YouTube
- 2024 Approved Arena of Games 100+ Channel Spectrums Galore
- Streaming to Profit YouTube Policy Changes
- [New] Elevating Your YouTube Presence Through FameBit-Inspired Sponsorships
- 2024 Approved Capitalizing on Hairstyle Demonstrations
- [New] Adding Videos to Written Work A Budget-Friendly Way
- [Updated] Essential Tips for Producing Engaging Educational Content for YouTube
- Narrating Your Journey Channeling Authenticity Online
- How to Share/Fake Location on WhatsApp for Google Pixel Fold | Dr.fone
- [New] 2024 Approved Steps to Become a Live Spectator on TikTok
- 2024 Approved The Elite List of Win11's Screen Recording Apps
- Optimal Budget-Free FB Video/Picture Engineer for 2024
- How to Track a Lost Honor 100 for Free? | Dr.fone
- Slick Shots From Yesteryear Mastering VHS Hacks in Modern Edits
- Updated In 2024, Transcribing Speech to MP3 Audio Format for Diverse Platforms
- [New] Effortless Facebook Live Four Strategies to Record Successfully
- 2024 Approved Mastering Sound on Mac Navigating Through The Top 5 Audio Mixer Choices
- How can I get more stardust in pokemon go On Motorola G24 Power? | Dr.fone
- In 2024, Quick Tips Initiating Discord Video Conversations Anywhere
- Make a Splash 10 Leading Music Video Makers Of for 2024
- [Updated] 2024 Approved Android Sound Logging - Without Rooting Need
- Title: Effortless Sound Transformation From YouTube to WAV Format for 2024
- Author: Steven
- Created at : 2024-05-25 19:12:07
- Updated at : 2024-05-26 19:12:07
- Link: https://youtube-clips.techidaily.com/effortless-sound-transformation-from-youtube-to-wav-format-for-2024/
- License: This work is licensed under CC BY-NC-SA 4.0.
