
:max_bytes(150000):strip_icc()/ipad_productivity_apps-5a4ba7a022fa3a0036d15522.jpg)
"Effortless Music Extraction Choose the Right Apps for YouTube & MP3"
Effortless Music Extraction: Choose the Right Apps for YouTube & MP3
6 Free Software to Convert YouTube to MP3 for iPhone

Ollie Mattison
Mar 27, 2024• Proven solutions
Loved a video on YouTube, but was unable to find the MP3 version? Worry not! Now, with a YouTube music converter, you can easily convert YouTube videos into MP3 files for your iPhone and enjoy them to your heart’s content. A trusted brand can offer you the best MP3 audio files out of your favorite YouTube videos within no time. Here we bring free apps to convert music for your iPhone.
- Part 1: YouTube to MP3 Converter on iPhone
- Part 2: YouTube to MP3 Converter for iPhone (on Desktop)
- Part 3: FAQs About YouTube to MP3 Converter
You may also like:
How to convert Youtube to mp3 [three ways] >>
How to video chat call on Snapchat with 3 steps >>
Best 10 Flvto Alternatives to Convert YouTube Videos >>
Best Video Resolution Converter >>
Part 1: YouTube to MP3 Converter on iPhone
1. Video to MP3 Converter
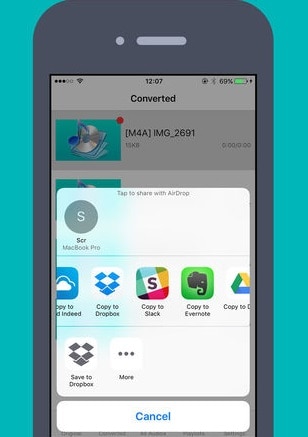
Video to MP3 Converter is an App that allows you to convert videos into different formats of audio such as MP3, M4A, OPUS, WAV, and a lot more, and save it on your iPhone.
The features of this App are –
- You can select audio tracks and customize sample rate, volume, and bitrate.
- You can decide the starting and ending point of the audio to be converted.
- You can import audio or video from Album, camera roll, One Drive, Google Drive, Dropbox, or iCloud.
- You can open audio files with this App and share them with other Apps as well.
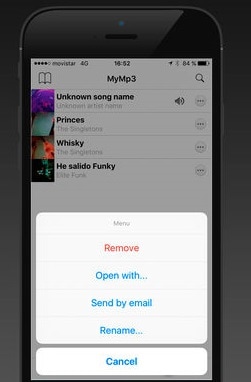
2. MyMP3
MyMP3 can convert videos available on your device into MP3 quickly. You can save recorded audio into MP3 and WAV format.
The main features of MyMP3 are –
- You can convert local videos into MP3 and share them on any social media, email, or instant messaging App.
- It allows you to edit the metadata.
- You can record from a microphone, CD, turntable, audio streamed from the internet, Skype call or phone calls, and the likes.
- It allows ripping CDs, renaming batch files, scheduling recordings, silence detection, and playlist management while recording vinyl albums.
Part 2: YouTube to MP3 converter for iPhone (on Desktop)
1. Filmora Editor
You can use Filmora as a YouTube music converter which will help in converting without much effort. Filmora is basically a video editing software that can help you edit videos in various ways. You can edit any of your video projects with ease when using Filmora. In order to convert Youtube to MP3 in iPhone, you can choose iPhone as the target device while exporting. Let’s check out some amazing features of this software. Or you can learn more from Wondershare Video Community .
Key Features:
- Anyone can easily use it for its extremely easy interface and design.
- People can have the delight in various graphical features with this tool such as filters and overlays.
- With this software, one can seamlessly merge multiple videos without compromising quality.
- There are lots of advanced tools associated with Filmora including background blur option, audio mixer, screen splitting, text editing, green screen, speed ramping, and more.
- If you are looking for stunning effects, Filmstocks, NewBlue FX and BorisFX can definitely meet any of your needs.
- 4k videos are also supported via Filmora easily.


2. Freemake Video Downloader
Freemake Video Downloader is a YouTube music converter that allows you to save YouTube videos and MP3s on your iPhone. While converting the videos into MP3s you need to specify the destination device (Export to iPod/iPhone), so that the right format can be set for the same.
Features of this application are –
- You can have the audios exported to iTunes automatically.
- Simple 3 step process to download and save YouTube videos into your iPhone.

3. Any Audio Converter
Any Audio Converter is an online converter and downloader that allows you to convert YouTube videos to MP3 for iPhone to your desired quality, and size of audio files. This YouTube music converter can convert downloaded videos and music to MP3, WAV, and WMA faster with better quality.
Major features of this audio converter are –
- You can download online videos and music from more than 100 sites.
- It helps you to rip and extract audio from CDs and videos.
- It supports audio conversion in multiple formats without compromising the quality.
- You can burn videos to AVCHD DVD or DVD.
- You can edit videos with special effects, clips, or crop effects.

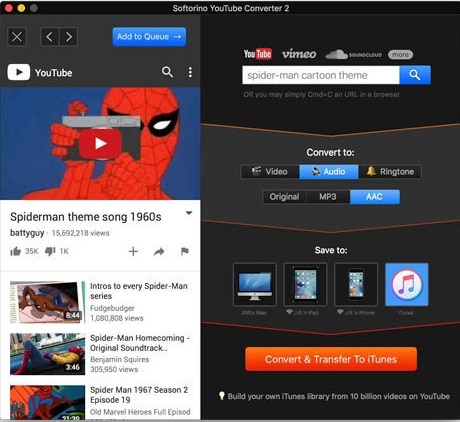
4. Softorino YouTube Converter 2
Softorino YouTube Converter 2 can not only convert YouTube to MP3 for iPhone, but also to MP4 for all iOS devices as well. It is compatible with over 60 top sources.
- With this App, you can access videos, music, and ringtones as well.
- It supports all iOS devices and delivers 4K ultra HD, with subtitles.
- Automatically connects your device to Wi-Fi, and recognizes content automatically for the album
Part 3: FAQs About YouTube to MP3 Converter
1. Can You Convert YouTube Videos to mp3 on iPhone?
Yes, you can. There are numerous YouTube to mp3 convert websites and YouTube audio downloader apps that let you convert YouTube videos to mp3 on your iPhone.
But there are legal issues you need to consider before joining the conversion trend. Technically, it is not illegal to convert a YouTube video to MP3 - but it is illegal to download a copyrighted music video. Moreover, YouTube has stated that stream-ripping violates their Terms of Service, and both YouTube & Google have tried to shut down numerous websites that provide video conversion services.
2. How Can I Save a Song From YouTube to My iPhone?
There are several ways to do that. The legal and recommended method is to get a YouTube Music Premium subscription. This will enable you to download songs from YouTube and save them on your iPhone for offline consumption. The alternative way involves numerous websites and apps that enable you to convert YouTube videos to mp3 and download them on your iPhone. This approach, however, is illegal and should be avoided.
Final Verdict
After going through the list of YouTube music converters in this article, we have found that Filmora is the ultimate solution for all your video download and audio conversion needs. With its matchless features, this App makes your life simple and melodious. However, it is our suggestion, the final call will be yours. We would like to know which was your choice and how was the experience using it. Thanks, readers for having a glance at this post. We hope you are delighted after reading it and finding what you needed.
Ollie Mattison
Ollie Mattison is a writer and a lover of all things video.
Follow @Ollie Mattison
Ollie Mattison
Mar 27, 2024• Proven solutions
Loved a video on YouTube, but was unable to find the MP3 version? Worry not! Now, with a YouTube music converter, you can easily convert YouTube videos into MP3 files for your iPhone and enjoy them to your heart’s content. A trusted brand can offer you the best MP3 audio files out of your favorite YouTube videos within no time. Here we bring free apps to convert music for your iPhone.
- Part 1: YouTube to MP3 Converter on iPhone
- Part 2: YouTube to MP3 Converter for iPhone (on Desktop)
- Part 3: FAQs About YouTube to MP3 Converter
You may also like:
How to convert Youtube to mp3 [three ways] >>
How to video chat call on Snapchat with 3 steps >>
Best 10 Flvto Alternatives to Convert YouTube Videos >>
Best Video Resolution Converter >>
Part 1: YouTube to MP3 Converter on iPhone
1. Video to MP3 Converter
Video to MP3 Converter is an App that allows you to convert videos into different formats of audio such as MP3, M4A, OPUS, WAV, and a lot more, and save it on your iPhone.
The features of this App are –
- You can select audio tracks and customize sample rate, volume, and bitrate.
- You can decide the starting and ending point of the audio to be converted.
- You can import audio or video from Album, camera roll, One Drive, Google Drive, Dropbox, or iCloud.
- You can open audio files with this App and share them with other Apps as well.
2. MyMP3
MyMP3 can convert videos available on your device into MP3 quickly. You can save recorded audio into MP3 and WAV format.
The main features of MyMP3 are –
- You can convert local videos into MP3 and share them on any social media, email, or instant messaging App.
- It allows you to edit the metadata.
- You can record from a microphone, CD, turntable, audio streamed from the internet, Skype call or phone calls, and the likes.
- It allows ripping CDs, renaming batch files, scheduling recordings, silence detection, and playlist management while recording vinyl albums.
Part 2: YouTube to MP3 converter for iPhone (on Desktop)
1. Filmora Editor
You can use Filmora as a YouTube music converter which will help in converting without much effort. Filmora is basically a video editing software that can help you edit videos in various ways. You can edit any of your video projects with ease when using Filmora. In order to convert Youtube to MP3 in iPhone, you can choose iPhone as the target device while exporting. Let’s check out some amazing features of this software. Or you can learn more from Wondershare Video Community .
Key Features:
- Anyone can easily use it for its extremely easy interface and design.
- People can have the delight in various graphical features with this tool such as filters and overlays.
- With this software, one can seamlessly merge multiple videos without compromising quality.
- There are lots of advanced tools associated with Filmora including background blur option, audio mixer, screen splitting, text editing, green screen, speed ramping, and more.
- If you are looking for stunning effects, Filmstocks, NewBlue FX and BorisFX can definitely meet any of your needs.
- 4k videos are also supported via Filmora easily.
2. Freemake Video Downloader
Freemake Video Downloader is a YouTube music converter that allows you to save YouTube videos and MP3s on your iPhone. While converting the videos into MP3s you need to specify the destination device (Export to iPod/iPhone), so that the right format can be set for the same.
Features of this application are –
- You can have the audios exported to iTunes automatically.
- Simple 3 step process to download and save YouTube videos into your iPhone.
3. Any Audio Converter
Any Audio Converter is an online converter and downloader that allows you to convert YouTube videos to MP3 for iPhone to your desired quality, and size of audio files. This YouTube music converter can convert downloaded videos and music to MP3, WAV, and WMA faster with better quality.
Major features of this audio converter are –
- You can download online videos and music from more than 100 sites.
- It helps you to rip and extract audio from CDs and videos.
- It supports audio conversion in multiple formats without compromising the quality.
- You can burn videos to AVCHD DVD or DVD.
- You can edit videos with special effects, clips, or crop effects.
4. Softorino YouTube Converter 2
Softorino YouTube Converter 2 can not only convert YouTube to MP3 for iPhone, but also to MP4 for all iOS devices as well. It is compatible with over 60 top sources.
- With this App, you can access videos, music, and ringtones as well.
- It supports all iOS devices and delivers 4K ultra HD, with subtitles.
- Automatically connects your device to Wi-Fi, and recognizes content automatically for the album
Part 3: FAQs About YouTube to MP3 Converter
1. Can You Convert YouTube Videos to mp3 on iPhone?
Yes, you can. There are numerous YouTube to mp3 convert websites and YouTube audio downloader apps that let you convert YouTube videos to mp3 on your iPhone.
But there are legal issues you need to consider before joining the conversion trend. Technically, it is not illegal to convert a YouTube video to MP3 - but it is illegal to download a copyrighted music video. Moreover, YouTube has stated that stream-ripping violates their Terms of Service, and both YouTube & Google have tried to shut down numerous websites that provide video conversion services.
2. How Can I Save a Song From YouTube to My iPhone?
There are several ways to do that. The legal and recommended method is to get a YouTube Music Premium subscription. This will enable you to download songs from YouTube and save them on your iPhone for offline consumption. The alternative way involves numerous websites and apps that enable you to convert YouTube videos to mp3 and download them on your iPhone. This approach, however, is illegal and should be avoided.
Final Verdict
After going through the list of YouTube music converters in this article, we have found that Filmora is the ultimate solution for all your video download and audio conversion needs. With its matchless features, this App makes your life simple and melodious. However, it is our suggestion, the final call will be yours. We would like to know which was your choice and how was the experience using it. Thanks, readers for having a glance at this post. We hope you are delighted after reading it and finding what you needed.
Ollie Mattison
Ollie Mattison is a writer and a lover of all things video.
Follow @Ollie Mattison
The Ultimate Guide to Free, Accurate YouTube Transcript Creation
How to Transcribe a YouTube Video for FREE

Richard Bennett
Mar 27, 2024• Proven solutions
If you want to transcribe your videos to make the dialogs and speeches available in text format, you can use YouTube Transcribe feature that the streaming site offers for free. In this article, I’ll share with you a couple of methods to transcribe a YouTube video for free.
- Part 1: Transcribe YouTube Video Automatically for Free [2 Ways]
- Part 2: Transcribe YouTube Video to Text Online with Third-Party Service
- Part 3: Benefits of Transcribing YouTube Videos
- Part 4: YouTube Video Transcription FAQs
Part 1: How to Transcribe YouTube Video Automatically for Free [2 Ways]
Besides the basic video editing features on the YouTube platform, you can now quickly transcribe YouTube videos to the text as well. The good thing is, you can either use the automatic transcription feature that YouTube offers, or upload it manually while adjusting the timing as you go further.
Below are the two methods to transcribe your YouTube videos for free:
Method 1: Use the Automated Transcription Service on YouTube
As the name suggests, YouTube automatic transcription service works automatically. This means you don’t even have to click the ‘Transcribe’ button anymore to transcribe a YouTube video, and the website takes care of it on its own. All you need to do is, choose English as the language of the video when setting up subtitles. You can follow the instructions given below to do so:
Step 1 Upload a Video
Sign in to your YouTube account, click your profile picture from the top-right corner, and click YouTube Studio from the menu. Next, click CREATE from the upper-right corner, click Upload videos from the menu, and drag and drop a video from your computer to the Upload videos box that appears next.

Step 2 Select Transcription Language
On the Details page of the next box that appears, scroll down and click MORE OPTIONS, and select English in the Video language drop-down list under the Language, subtitles, and closed captions (CC) section.

Step 3 Publish the Video
Follow the on-screen instructions from this point to publish the video, and wait while YouTube automatically transcribes and adds the close captions to it.
Note: Depending on the duration of the clip, the time YouTube would take to transcribe may vary.
After YouTube has transcribed the video, you can download the transcription file in your preferred format. The instructions are given below explain how you can do so:
- Get to the Subtitles Window
While on the YouTube Studio page, click Subtitles from the left pane to go to the Channel subtitles page. And then click the video you want to modify.
- Get to Classic Studio
In the video subtitle page of the target video, hover mouse on the Published Automatic status under the Subtitles column, click the Options icon (with three vertical dots) that appears, and click Edit on Classic Studio.

- Download Transcription File
Click and open the Actions drop-down list from the top-left corner of the left pane, click your preferred transcription format including .vtt, .srt and .sbv from the list, and save the file on your local hard disk.

Method 2: Get YouTube Transcription when Watching
In addition, if you are watching any other video, you can make YouTube transcribe that for you as well. You can follow the instructions given below to get the YouTube video to text transcription:
Step 1: Play the Video
Go to the video on YouTube and start playing it. Make sure NOT to get to full-screen mode as doing so would hide the option to transcribe the clip.
Step 2: Enable Transcription
Click the More icon (with three horizontal dots) from under the bottom-right corner of the video player, and click Open transcript to see the video transcription in the Transcript pane that appears in the right.
Step 3: Manage Timestamps
Click the Options icon (with three vertical dots) from the top-right corner of the Transcript pane, and click Toggle timestamp to enable or disable the timestamps in the video transcription.
Limitations of Using YouTube Transcribe
Although YouTube’s automatic transcription is a decent feature that saves you a lot of time, since Google uses machine learning algorithms to convert the speech to text, the level of accuracy may vary depending on the accent of the speaker, and the clarity of the audio the video has. Also, even sometime you may not be satisfied with the end-results.
Alternatively, you can use Kapwing to transcribe a YouTube video and download the transcription file with the below step-by-step instructions:
Step 1: Add YouTube Video
Copy the URL of YouTube video you want to transcribe, go to https://www.kapwing.com/subtitles , paste the URL in the Paste a URL field, wait while Kapwing fetches the content of the video, and opens the Add subtitles to Video page.
Step 2: Transcribe the Video
Click Auto-generate from the right window, and follow the on-screen instructions to transcribe YouTube video to text.

Step 3: Download the Transcription File
Click Download SRT from the left pane, and follow the instructions from there to download the transcription file in *.srt format.

Pros
- Kapwing is free to use
- The auto-transcription process is quick and less tedious
- Kapwing also allows manual transcription and uploading of an existing *.srt file
Cons
- The auto-transcribed text might lack accuracy as the task is done by the speech-to-text tools that work in the background
You can follow the step-by-step instructions to transcribe a YouTube video and download the transcription file using Kapwing:
Step 1: Add YouTube Video
Copy the URL of YouTube video you want to transcribe, go to https://www.kapwing.com/subtitles , paste the URL in the Paste a URL field, wait while Kapwing fetches the content of the video, and opens the Add subtitles to Video page.
Step 2: Transcribe the Video
Click Auto-generate from the right window, and follow the on-screen instructions to transcribe YouTube video to text.
Step 3: Download the Transcription File
Click Download SRT from the left pane, and follow the instructions from there to download the transcription file in *.srt format.
Pros
- Kapwing is free to use
- The auto-transcription process is quick and less tedious
- Kapwing also allows manual transcription and uploading of an existing *.srt file
Cons
- The auto-transcribed text might lack accuracy as the task is done by the speech-to-text tools that work in the background
Part 3: Benefits of Transcribing YouTube Videos
You may need video transcriptions for several reasons, such as analyzing the summary of the entire speech in the video, extracting a single phrase or quote that was spoken in the clip, or making the video helpful even for those suffering from hearing impairment. When you transcribe a YouTube video, the transcript can be useful in many ways. Some of the most common benefits of transcribing a video include:
- Search Engine Optimization
When you add subtitles, the text can appear in Google search results when someone types a similar phrase in the search box. This helps get more views to your videos, thus giving your channel popularity, and you, monetary gains in the long run.
- Accent
If the speaker in the video is from a different region and is using an accent that you are not much comfortable with, you can turn on the subtitles and read the dialogs along with the video.
- Repurposing on Blogs
If you own a blog that you have embedded your video to, the transcription could be used to add text to it so the target audience can get a fair idea of what the video is all about. This is useful because many people prefer reading over watching.
YouTube Video Transcription FAQs
1. How to Transcribe YouTube Video to Text
Usually the transcription files have *.srt extension that are globally accepted and supported by almost all media players. However, there might be instances when you want to have the subtitles in plain text.
That said, to convert an SRT file to TXT, you can:
- Right-click the SRT file
- Go to Rename
- Replace srt with txt and press Enter
- Click OK on the confirmation box that appears next to convert SRT to TXT
After this, you can simply double-click the file, and read and modify the transcribed content as needed.
2. How to Edit and Upload Edited Transcript to YouTube
If you made any modifications to the transcript that was automatically generated by YouTube or any other third-party transcription tool, you can follow the steps given below to upload the new file to the YouTube video:
- Go to YouTube Studio and then to the Channel subtitles page as explained earlier
- Expand the Languages column of the target video
- Click the Options icon that appears under the Subtitles column when you hover mouse on to it
- Click Edit on Classic Studio
- On the next page, click Edit from the top-right corner

- Click to open the Actions drop-down list from the upper-left corner
- Click Upload a file
- Follow the on-screen instructions from there to upload the modified transcription file
- Click Save Changes from the top-right corner of the page when done
Conclusion
If you are looking for a quick and easy way of adding subtitles to your videos, letting YouTube transcribe for you could be a good approach. However, because these auto-generated transcriptions are created by machine learning algorithms, their accuracy cannot be counted on. Therefore, the best way to get the job done accurately is, let YouTube auto-transcribe your video, download the transcription file, make the necessary changes to it, and then upload the file back to the video.
Richard Bennett
Richard Bennett is a writer and a lover of all things video.
Follow @Richard Bennett
Richard Bennett
Mar 27, 2024• Proven solutions
If you want to transcribe your videos to make the dialogs and speeches available in text format, you can use YouTube Transcribe feature that the streaming site offers for free. In this article, I’ll share with you a couple of methods to transcribe a YouTube video for free.
- Part 1: Transcribe YouTube Video Automatically for Free [2 Ways]
- Part 2: Transcribe YouTube Video to Text Online with Third-Party Service
- Part 3: Benefits of Transcribing YouTube Videos
- Part 4: YouTube Video Transcription FAQs
Part 1: How to Transcribe YouTube Video Automatically for Free [2 Ways]
Besides the basic video editing features on the YouTube platform, you can now quickly transcribe YouTube videos to the text as well. The good thing is, you can either use the automatic transcription feature that YouTube offers, or upload it manually while adjusting the timing as you go further.
Below are the two methods to transcribe your YouTube videos for free:
Method 1: Use the Automated Transcription Service on YouTube
As the name suggests, YouTube automatic transcription service works automatically. This means you don’t even have to click the ‘Transcribe’ button anymore to transcribe a YouTube video, and the website takes care of it on its own. All you need to do is, choose English as the language of the video when setting up subtitles. You can follow the instructions given below to do so:
Step 1 Upload a Video
Sign in to your YouTube account, click your profile picture from the top-right corner, and click YouTube Studio from the menu. Next, click CREATE from the upper-right corner, click Upload videos from the menu, and drag and drop a video from your computer to the Upload videos box that appears next.
Step 2 Select Transcription Language
On the Details page of the next box that appears, scroll down and click MORE OPTIONS, and select English in the Video language drop-down list under the Language, subtitles, and closed captions (CC) section.
Step 3 Publish the Video
Follow the on-screen instructions from this point to publish the video, and wait while YouTube automatically transcribes and adds the close captions to it.
Note: Depending on the duration of the clip, the time YouTube would take to transcribe may vary.
After YouTube has transcribed the video, you can download the transcription file in your preferred format. The instructions are given below explain how you can do so:
- Get to the Subtitles Window
While on the YouTube Studio page, click Subtitles from the left pane to go to the Channel subtitles page. And then click the video you want to modify.
- Get to Classic Studio
In the video subtitle page of the target video, hover mouse on the Published Automatic status under the Subtitles column, click the Options icon (with three vertical dots) that appears, and click Edit on Classic Studio.
- Download Transcription File
Click and open the Actions drop-down list from the top-left corner of the left pane, click your preferred transcription format including .vtt, .srt and .sbv from the list, and save the file on your local hard disk.
Method 2: Get YouTube Transcription when Watching
In addition, if you are watching any other video, you can make YouTube transcribe that for you as well. You can follow the instructions given below to get the YouTube video to text transcription:
Step 1: Play the Video
Go to the video on YouTube and start playing it. Make sure NOT to get to full-screen mode as doing so would hide the option to transcribe the clip.
Step 2: Enable Transcription
Click the More icon (with three horizontal dots) from under the bottom-right corner of the video player, and click Open transcript to see the video transcription in the Transcript pane that appears in the right.
Step 3: Manage Timestamps
Click the Options icon (with three vertical dots) from the top-right corner of the Transcript pane, and click Toggle timestamp to enable or disable the timestamps in the video transcription.
Limitations of Using YouTube Transcribe
Although YouTube’s automatic transcription is a decent feature that saves you a lot of time, since Google uses machine learning algorithms to convert the speech to text, the level of accuracy may vary depending on the accent of the speaker, and the clarity of the audio the video has. Also, even sometime you may not be satisfied with the end-results.
Alternatively, you can use Kapwing to transcribe a YouTube video and download the transcription file with the below step-by-step instructions:
Step 1: Add YouTube Video
Copy the URL of YouTube video you want to transcribe, go to https://www.kapwing.com/subtitles , paste the URL in the Paste a URL field, wait while Kapwing fetches the content of the video, and opens the Add subtitles to Video page.
Step 2: Transcribe the Video
Click Auto-generate from the right window, and follow the on-screen instructions to transcribe YouTube video to text.
Step 3: Download the Transcription File
Click Download SRT from the left pane, and follow the instructions from there to download the transcription file in *.srt format.
Pros
- Kapwing is free to use
- The auto-transcription process is quick and less tedious
- Kapwing also allows manual transcription and uploading of an existing *.srt file
Cons
- The auto-transcribed text might lack accuracy as the task is done by the speech-to-text tools that work in the background
You can follow the step-by-step instructions to transcribe a YouTube video and download the transcription file using Kapwing:
Step 1: Add YouTube Video
Copy the URL of YouTube video you want to transcribe, go to https://www.kapwing.com/subtitles , paste the URL in the Paste a URL field, wait while Kapwing fetches the content of the video, and opens the Add subtitles to Video page.
Step 2: Transcribe the Video
Click Auto-generate from the right window, and follow the on-screen instructions to transcribe YouTube video to text.
Step 3: Download the Transcription File
Click Download SRT from the left pane, and follow the instructions from there to download the transcription file in *.srt format.
Pros
- Kapwing is free to use
- The auto-transcription process is quick and less tedious
- Kapwing also allows manual transcription and uploading of an existing *.srt file
Cons
- The auto-transcribed text might lack accuracy as the task is done by the speech-to-text tools that work in the background
Part 3: Benefits of Transcribing YouTube Videos
You may need video transcriptions for several reasons, such as analyzing the summary of the entire speech in the video, extracting a single phrase or quote that was spoken in the clip, or making the video helpful even for those suffering from hearing impairment. When you transcribe a YouTube video, the transcript can be useful in many ways. Some of the most common benefits of transcribing a video include:
- Search Engine Optimization
When you add subtitles, the text can appear in Google search results when someone types a similar phrase in the search box. This helps get more views to your videos, thus giving your channel popularity, and you, monetary gains in the long run.
- Accent
If the speaker in the video is from a different region and is using an accent that you are not much comfortable with, you can turn on the subtitles and read the dialogs along with the video.
- Repurposing on Blogs
If you own a blog that you have embedded your video to, the transcription could be used to add text to it so the target audience can get a fair idea of what the video is all about. This is useful because many people prefer reading over watching.
YouTube Video Transcription FAQs
1. How to Transcribe YouTube Video to Text
Usually the transcription files have *.srt extension that are globally accepted and supported by almost all media players. However, there might be instances when you want to have the subtitles in plain text.
That said, to convert an SRT file to TXT, you can:
- Right-click the SRT file
- Go to Rename
- Replace srt with txt and press Enter
- Click OK on the confirmation box that appears next to convert SRT to TXT
After this, you can simply double-click the file, and read and modify the transcribed content as needed.
2. How to Edit and Upload Edited Transcript to YouTube
If you made any modifications to the transcript that was automatically generated by YouTube or any other third-party transcription tool, you can follow the steps given below to upload the new file to the YouTube video:
- Go to YouTube Studio and then to the Channel subtitles page as explained earlier
- Expand the Languages column of the target video
- Click the Options icon that appears under the Subtitles column when you hover mouse on to it
- Click Edit on Classic Studio
- On the next page, click Edit from the top-right corner
- Click to open the Actions drop-down list from the upper-left corner
- Click Upload a file
- Follow the on-screen instructions from there to upload the modified transcription file
- Click Save Changes from the top-right corner of the page when done
Conclusion
If you are looking for a quick and easy way of adding subtitles to your videos, letting YouTube transcribe for you could be a good approach. However, because these auto-generated transcriptions are created by machine learning algorithms, their accuracy cannot be counted on. Therefore, the best way to get the job done accurately is, let YouTube auto-transcribe your video, download the transcription file, make the necessary changes to it, and then upload the file back to the video.
Richard Bennett
Richard Bennett is a writer and a lover of all things video.
Follow @Richard Bennett
Also read:
- In 2024, Annual Roundup Top No-Money Video Editing Software Reviewed
- Collaboration Techniques in Video Making, Viewership Up
- Mastering Personalized YouTube Channel URLs Simple Steps Guide
- Football Inscriptions Premier FIFA YouTube Insights
- Directing Fundamentals A Comprehensive Online Course by YouTube Experts for 2024
- Premium Picks 10 Must-Subscribe News Channels
- In 2024, Achieve Unprecedented Image Quality via AV1 on YouTube
- [New] Dominating Viewers' Spaces Channel Empire Rules
- 2024 Approved Discovering 2023'S Cinematic Hidden Gems
- [New] Becoming a Bull or Bear Best Stock Vids on YouTube
- [New] Angles of Perspective YouTube's Path to Dynamic Video Editing
- Video-Enhanced Slideshow Mastery with YouTube
- In 2024, A Comprehensive List of Top Video-Making Software (iPhone, Android)
- Uncovering Basics of ASMR Audio Experiences
- Download Free YouTube Pics & Templates for 2024
- Your Comprehensible Guide to Economical Webinars on YouTube
- Dance Dictates Selecting Perfect Audio-Visuals
- Breaking the Mold How to Create a Standout YouTube Channel Name for 2024
- Customizing YouTube Viewing Policies for Your Content
- 7 Star-Rated Apps for Effortless YouTube LIVE Broadcast From iPhone and Android for 2024
- All About YouTube TV Your Comprehensive Resource for 2024
- Top 10 YouTube Cameras, From Novices to Experts
- [Updated] Broadcasting Strategies for YouTube, Facebook, Twitch, and Others
- No Money, No Problem! Your Guide to Free YouTube Ads
- Double Your Watch Time on YouTube with These Tips
- The Key to Online Success Mastering Backlink Construction
- The Small Screen, Big Impact Effortless Business/Personal YouTube Channel Setup
- Is Purchasing YouTube Views Worth It for Channel Growth?
- Easily Unlock Your Oppo Reno 10 Pro+ 5G Device SIM
- How to Sign .uot file document with Electronic Digital Signature - (Tutorial)
- [Updated] The Seamless Guide to Saving GIFs on iPhones/Androids
- [Updated] Elevate Instagram's Visual Feast Integrating Audio Effects for 2024
- [Updated] The Ultimate Guide to Capturing Professional Quality in Zoom Podcasts for 2024
- How to retrieve erased videos from Tecno Pova 5 Pro
- Translate Videos and Subtitles with Veed.io
- [Updated] How To View Facebook Content On Your Home Theater, In 2024
- How to Use Pokémon Emerald Master Ball Cheat On Vivo S18 | Dr.fone
- In 2024, Unlocking Apple iPhone SE (2020) Lock Screen 3 Foolproof Methods that Actually Work | Dr.fone
- How to Share Location in Messenger On Google Pixel 8? | Dr.fone
- [New] In 2024, Unlocking Snapchat's Video Potential Mobile Tips
- Top 10 Fingerprint Lock Apps to Lock Your Realme 12 5G Phone
- 2024 Approved Navigating Influencer Growth on Instagram Top 5 Steps with Real Success
- 2024 Approved Bridging Chrome, Android & iPhone with TikTok Uploads
- New The Ultimate Guide to Burning Videos to DVDs on Windows and Mac OS
- 2024 Approved Sonic Storytelling Showcasing Sound Waves & Engaging Animated Sequences with Sony Vegas Pro
- 3 Methods to Mirror Vivo Y36 to Roku | Dr.fone
- [Updated] In 2024, Scrutinizing Instagram's Video Post Limit
- Updated 2024 Approved Best 5 AI Voice Generators Online (Supports All Browsers)
- What Does Jailbreaking iPhone X i Do? Get Answers here | Dr.fone
- New Windows Movie Maker Is Out, These Alternatives Are In for 2024
- [Updated] Unlocking Creative Expression Tips for Sharing GIFs on Snapchat for 2024
- How To Update or Downgrade iPhone 6s Without Losing Data? | Dr.fone
- Title: "Effortless Music Extraction Choose the Right Apps for YouTube & MP3"
- Author: Steven
- Created at : 2024-05-25 19:12:01
- Updated at : 2024-05-26 19:12:01
- Link: https://youtube-clips.techidaily.com/effortless-music-extraction-choose-the-right-apps-for-youtube-and-mp3/
- License: This work is licensed under CC BY-NC-SA 4.0.
