
:max_bytes(150000):strip_icc()/Roblox_MeepCity-5978fbc0054ad90010302587.jpg)
Effortless Guide to Share Your Videos as Shorts on Computers & Phones
Effortless Guide to Share Your Videos as Shorts on Computers & Phones
How to Upload Shorts Video on YouTube? [2024]

Richard Bennett
Mar 27, 2024• Proven solutions


Quite recently, YouTube launched Shorts to compete with Tik Tok. At the time of this writing, the users in India have access to the fully functional version of the app. Although YouTube Shorts is available for both Android and iOS platforms, its functions are limited as the application is still in its Beta phase for the remaining part of the globe.
With that said, the following sections explain the step-by-step process on how to upload a short video on YouTube Shorts both from your smartphone and a PC.
Part 1: How to Upload Short Video on YouTube from PC?
The fact is, if you are using a computer to upload short videos to YouTube, the process is identical to publishing your other, regular footage. However, there are a few guidelines that your clips must comply with so that the streaming platform could specifically identify them as YouTube Shorts. These norms include:
- Your videos must not be more than 60 seconds long in duration
- They must be shot in portrait orientation, ideally in the 9:16 aspect ratio
- The title or the description must contain ‘#Shorts’ (without quotes) in it
Once you have a video recorded using the first two guidelines from the above list, you can use the instructions given below to upload the media on YouTube:
Step 1: Select a Short Video to Upload
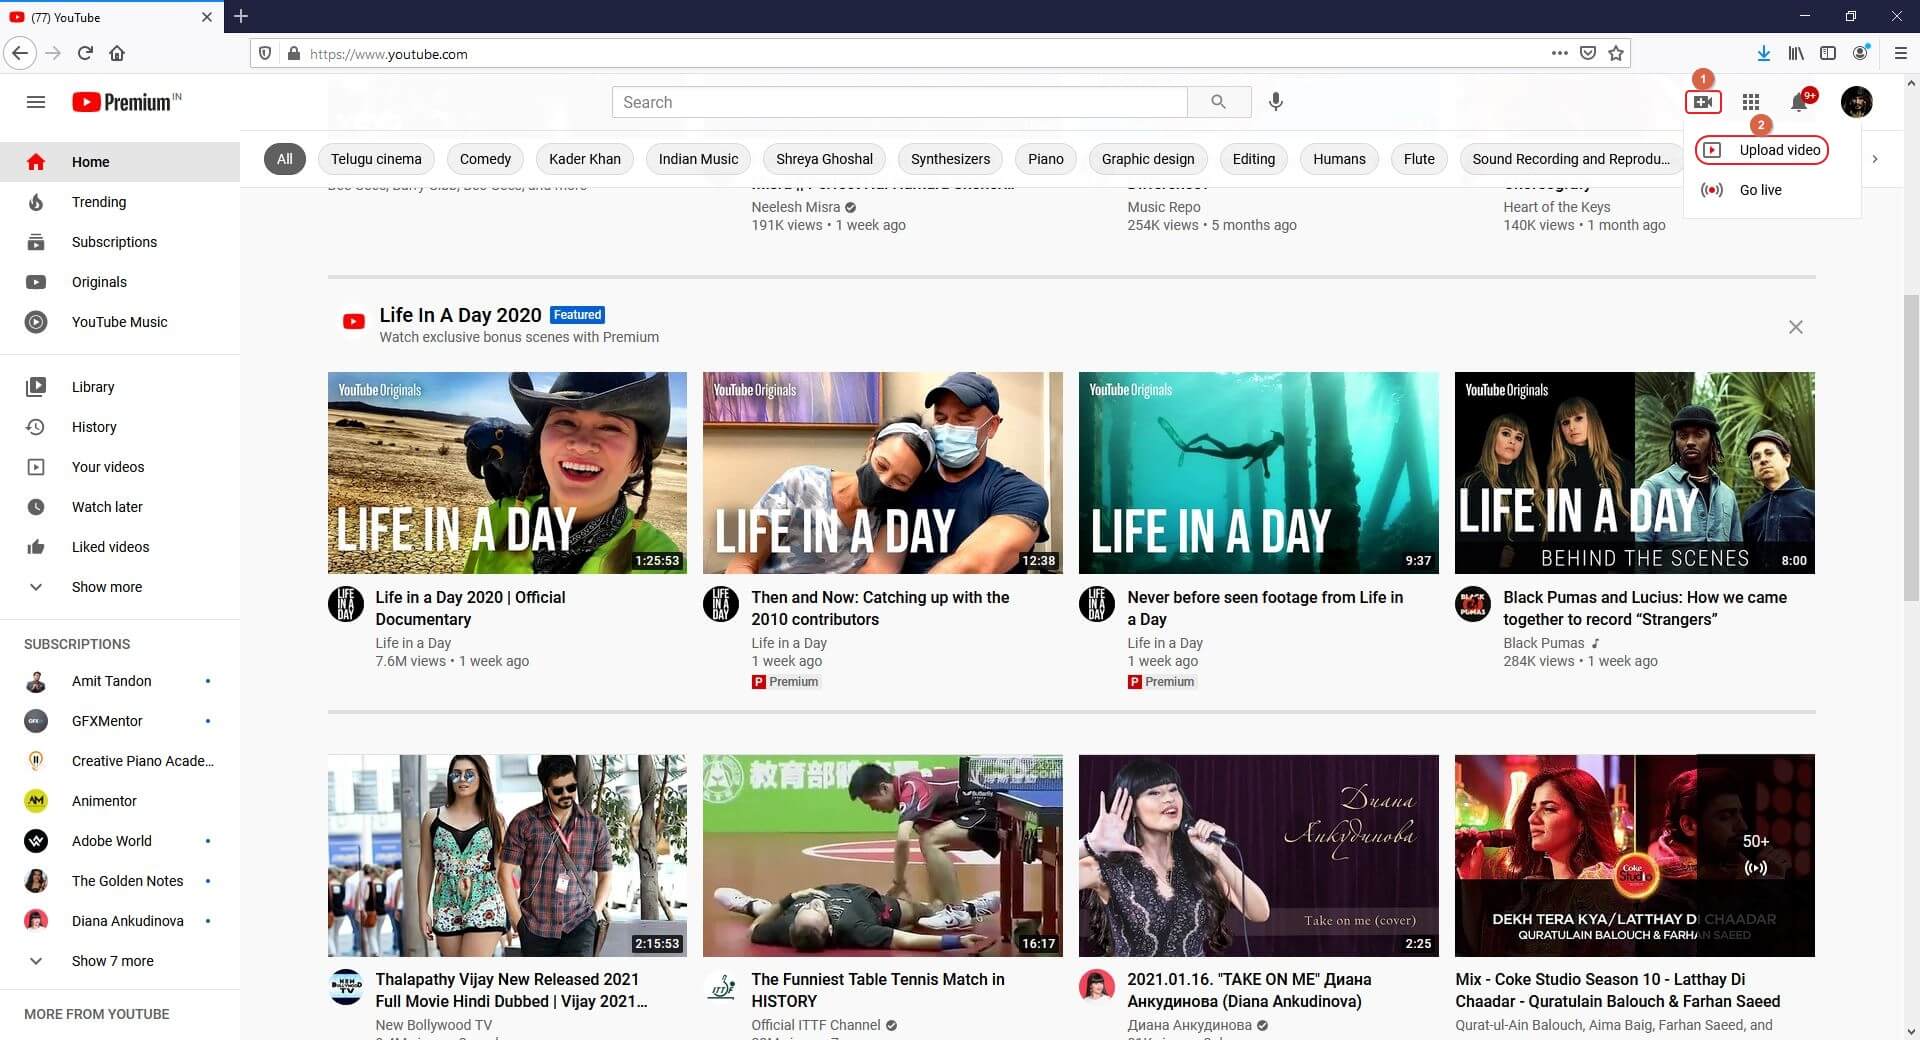
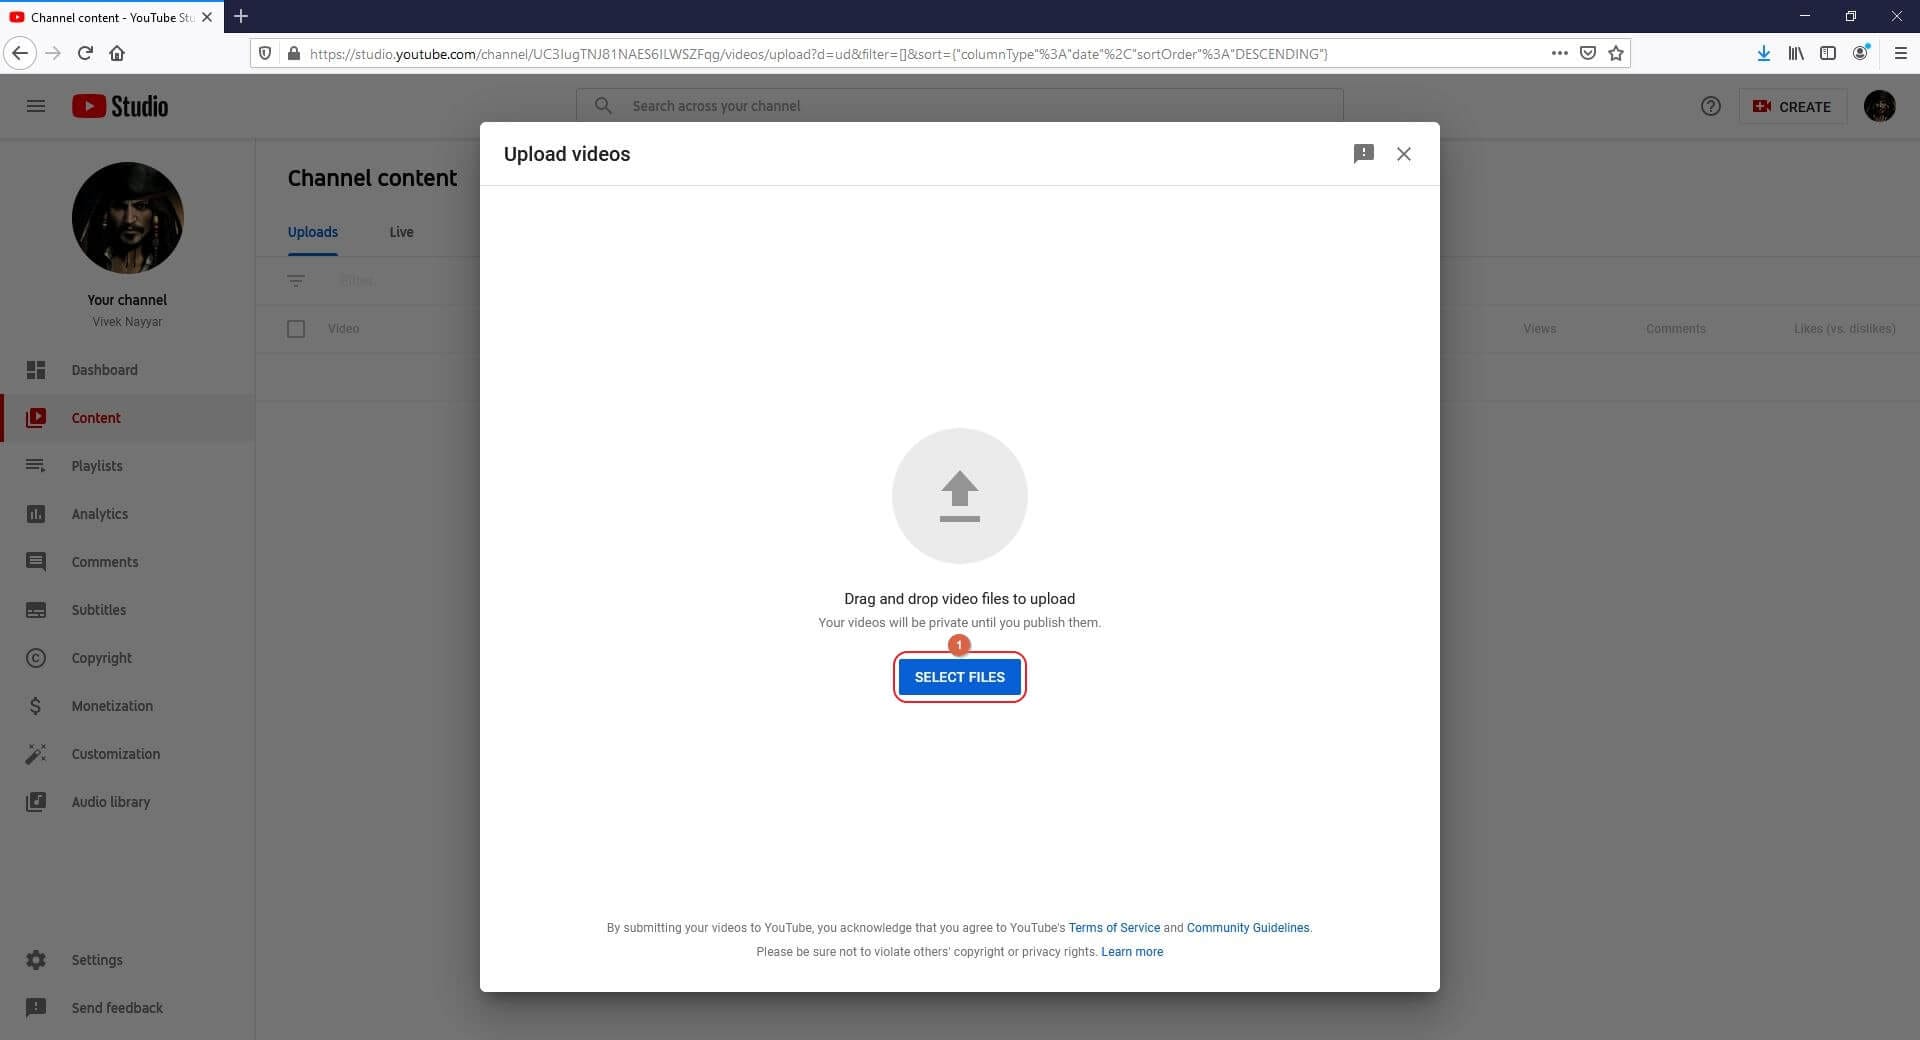
Launch your favorite web browser on your PC, go to YouTube, make sure to sign in to your YouTube account, click the Create (Camera) icon from the top-right corner of the web page, click SELECT FILES on the Upload videos window, and locate, select, and upload a short video from your PC to the portal.
Step 2: Mark the Video as Short
On the Details window that appears, add #Shorts in the Title or Description field, optionally pick a thumbnail from the suggested images present under the Thumbnail section (or upload a custom picture from your PC), select your preferred radio button from under the Audience section, make the other necessary changes if need be, and click NEXT. When the Video elements window comes up, choose your preferred options and elements, click NEXT.

Step 3: Publish the Short Video
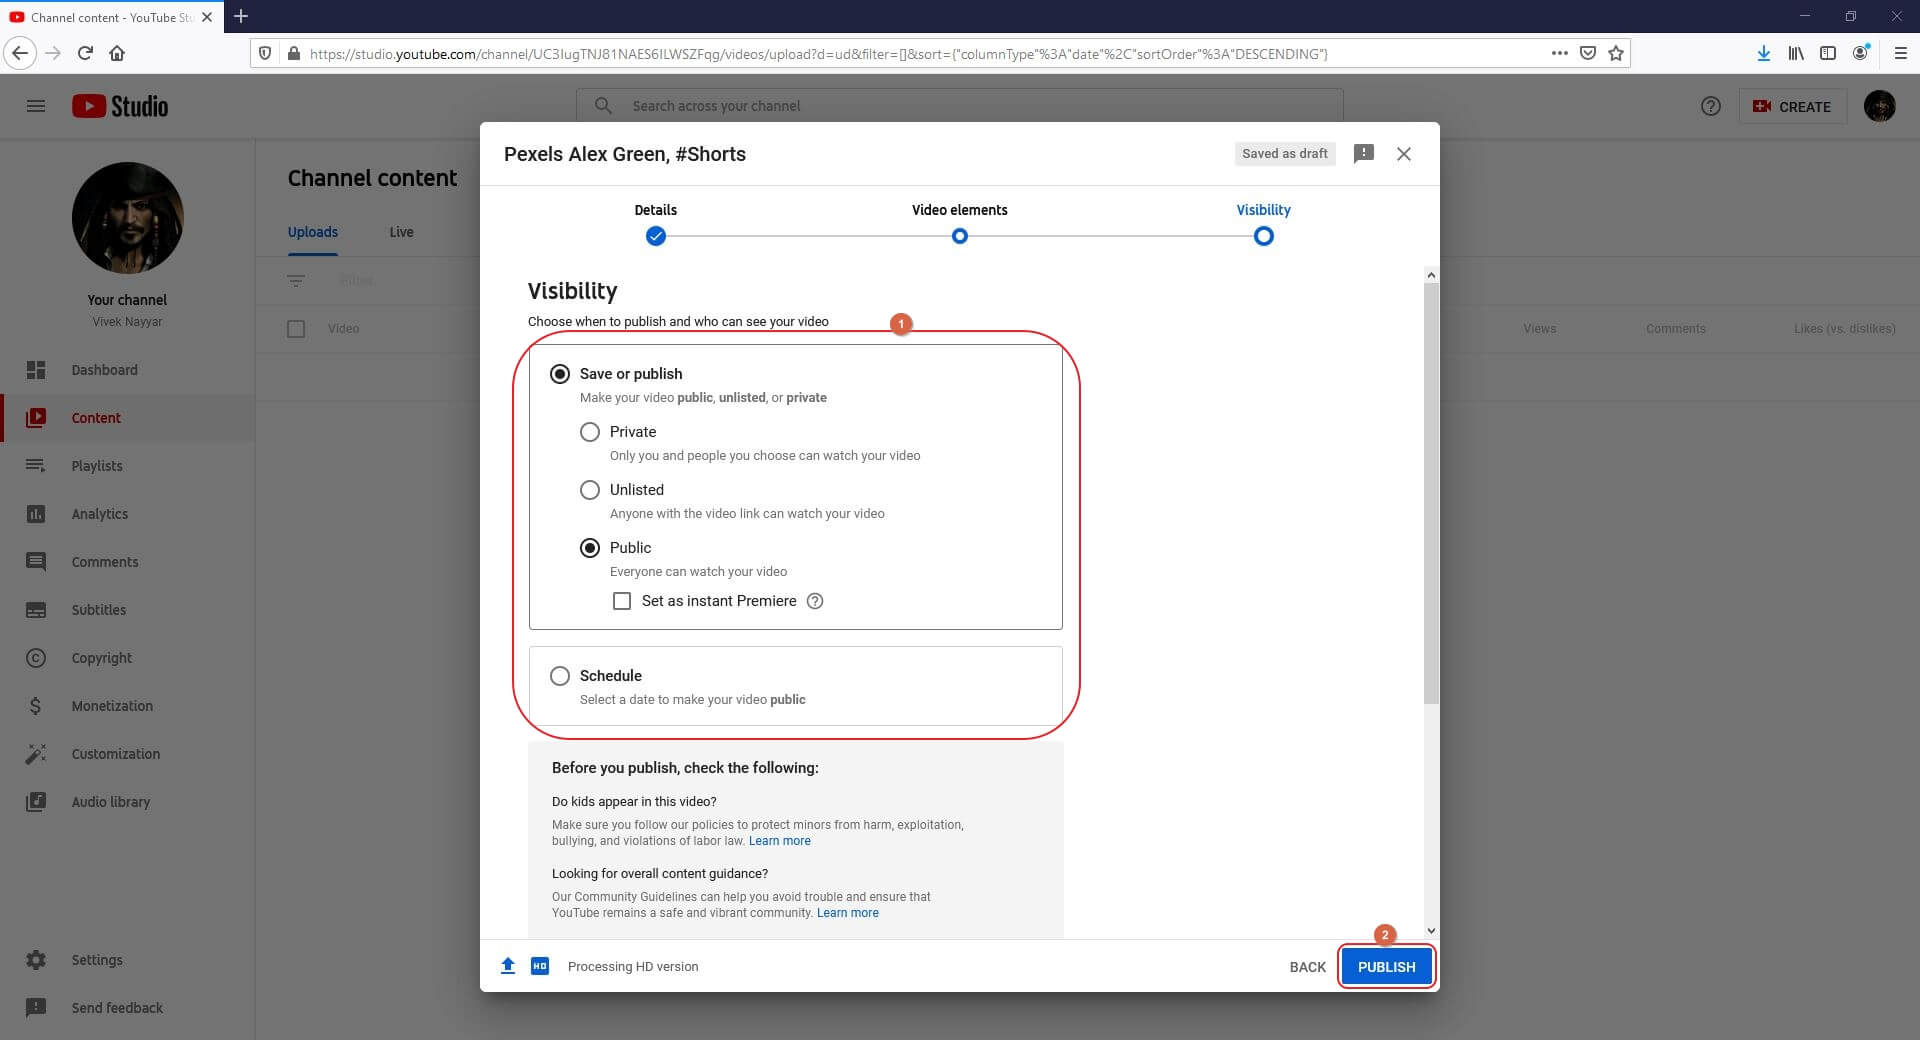
On the Visibility window, choose your preferred radio button from under the Save or publish section or select Schedule to set a different time when the short video should be published automatically. Finally, click SAVE to publish the clip as a short video on YouTube from your computer.
To sum up, uploading YouTube Shorts video from desktop has nothing different from uploading regular YouTube video besides the requirements listed at the beginning of this article. If you prefer to edit videos for YouTube Shortson a computer, I recommend you to try our video editor Filmora , which is an ideal solution for YouTubers. Download the free trial version below and get started.
For Win 7 or later (64-bit)
 Secure Download
For macOS 10.12 or later
Secure Download
Part 2: How to Upload Short Video on YouTube Mobile App?
The process of uploading YouTube Shorts from the mobile app is fairly simple compared to the method used on a computer. While using the app, you can either upload an existing video or shoot a new one from within the program itself then and there, add music and text, and upload it right away. Both these methods are explained below in detail:
Note: The guidelines for creating and uploading short videos to YouTube remain the same, regardless of the platform or device you use.
Method 1: Upload an Existing Short Video
Note: Make sure to have the target video on the smartphone and that you have downloaded, installed, and signed in to the YouTube app before proceeding.
Step 1: Select a Video to Upload

On your Android or iOS smartphone, launch the YouTube app, tap the + (Create) icon from the bottom, tap Create a Short from the Create box that pops up from the bottom, tap Upload from the bottom-right corner of the next screen, and select and upload a short, 60 seconds video recorded in portrait orientation from your device’s storage to the app.
Step 2: Add Details
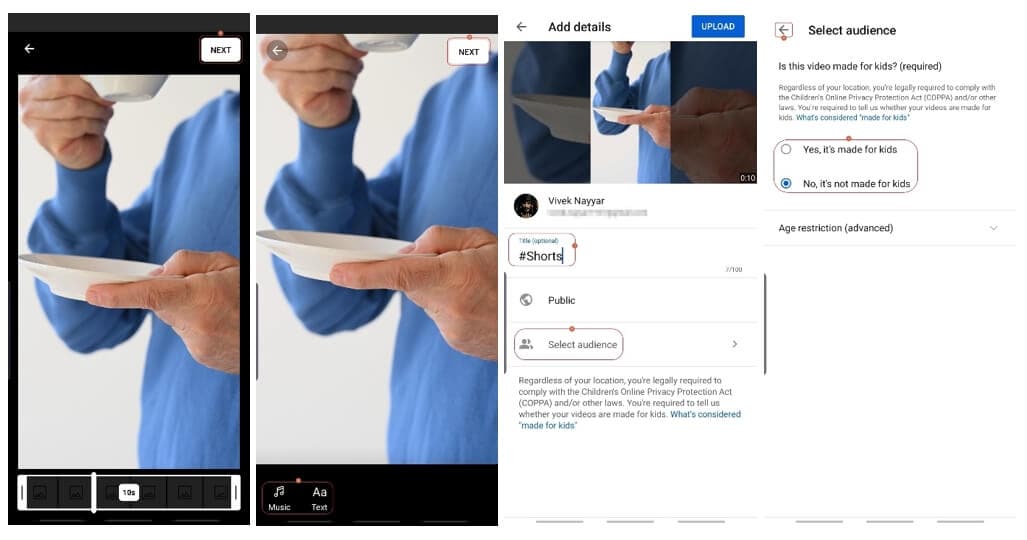
On the next screen, tap NEXT, user the Music and Text icons at the bottom-left corner to add a background music and caption to the video respectively, and tap NEXT from the top-right corner. On the next screen, enter a name for the video in the Title field along with the #Shorts tag, and tap Select audience to choose your preferred audience.
Step 3: Upload the Video
Finally tap UPLOAD from the top-right corner to upload the short video on YouTube.
Method 2: Record a Short Video and Upload
Step 1: Record Shorts Video
Previously, I have introduced how to record and upload YouTube Shorts videos , so I will keep the content concise here.
Please note you will not see the Create a Short option if you are outsides of India.

In the YouTube app, tap the + (Add) button and select Create a Short. Please note you will not see the Create a Short option if you are outsides of India.
Next, use the Speed and Timer icons to set the speed of the video and the countdown timer duration before the app starts recording the video when you press the Record button respectively.
Now tap the Record button from the bottom to start recording a video and stop to stop the recording. Make sure to shoot the footage in the portrait mode (ideally in the 9:16 aspect ratio). Tap NEXT from the bottom-right corner to proceed to the next step.
Step 2: Add Text and Music to the Short Video
On the next window, use the Music and Text buttons from the bottom-left corner to add a background music and caption to the video, and tap NEXT from the top-right corner.
Step 3: Upload and Post the Short Video
On the Add details window, enter a name for the video along with the #Shorts tag in the Create a title field, tap Select audience to select the target audience, and tap UPLOAD from the top-right corner to upload the short video on YouTube.
Conclusion
Learning the process of how to post short videos on YouTube is fairly simple as long as you have the video recorded in the portrait orientation, it is up to 60 seconds long, and contains the ‘#Shorts’ tag (without quotes) in the title or description. The good thing is, if you don’t have access to the YouTube app on your smartphone, the method for how to upload short video on YouTube explained in the first section can be followed while using your desktop computer.
Richard Bennett
Richard Bennett is a writer and a lover of all things video.
Follow @Richard Bennett
Richard Bennett
Mar 27, 2024• Proven solutions
Quite recently, YouTube launched Shorts to compete with Tik Tok. At the time of this writing, the users in India have access to the fully functional version of the app. Although YouTube Shorts is available for both Android and iOS platforms, its functions are limited as the application is still in its Beta phase for the remaining part of the globe.
With that said, the following sections explain the step-by-step process on how to upload a short video on YouTube Shorts both from your smartphone and a PC.
Part 1: How to Upload Short Video on YouTube from PC?
The fact is, if you are using a computer to upload short videos to YouTube, the process is identical to publishing your other, regular footage. However, there are a few guidelines that your clips must comply with so that the streaming platform could specifically identify them as YouTube Shorts. These norms include:
- Your videos must not be more than 60 seconds long in duration
- They must be shot in portrait orientation, ideally in the 9:16 aspect ratio
- The title or the description must contain ‘#Shorts’ (without quotes) in it
Once you have a video recorded using the first two guidelines from the above list, you can use the instructions given below to upload the media on YouTube:
Step 1: Select a Short Video to Upload
Launch your favorite web browser on your PC, go to YouTube, make sure to sign in to your YouTube account, click the Create (Camera) icon from the top-right corner of the web page, click SELECT FILES on the Upload videos window, and locate, select, and upload a short video from your PC to the portal.
Step 2: Mark the Video as Short
On the Details window that appears, add #Shorts in the Title or Description field, optionally pick a thumbnail from the suggested images present under the Thumbnail section (or upload a custom picture from your PC), select your preferred radio button from under the Audience section, make the other necessary changes if need be, and click NEXT. When the Video elements window comes up, choose your preferred options and elements, click NEXT.
Step 3: Publish the Short Video
On the Visibility window, choose your preferred radio button from under the Save or publish section or select Schedule to set a different time when the short video should be published automatically. Finally, click SAVE to publish the clip as a short video on YouTube from your computer.
To sum up, uploading YouTube Shorts video from desktop has nothing different from uploading regular YouTube video besides the requirements listed at the beginning of this article. If you prefer to edit videos for YouTube Shortson a computer, I recommend you to try our video editor Filmora , which is an ideal solution for YouTubers. Download the free trial version below and get started.
For Win 7 or later (64-bit)
Secure Download
For macOS 10.12 or later
Secure Download
Part 2: How to Upload Short Video on YouTube Mobile App?
The process of uploading YouTube Shorts from the mobile app is fairly simple compared to the method used on a computer. While using the app, you can either upload an existing video or shoot a new one from within the program itself then and there, add music and text, and upload it right away. Both these methods are explained below in detail:
Note: The guidelines for creating and uploading short videos to YouTube remain the same, regardless of the platform or device you use.
Method 1: Upload an Existing Short Video
Note: Make sure to have the target video on the smartphone and that you have downloaded, installed, and signed in to the YouTube app before proceeding.
Step 1: Select a Video to Upload
On your Android or iOS smartphone, launch the YouTube app, tap the + (Create) icon from the bottom, tap Create a Short from the Create box that pops up from the bottom, tap Upload from the bottom-right corner of the next screen, and select and upload a short, 60 seconds video recorded in portrait orientation from your device’s storage to the app.
Step 2: Add Details
On the next screen, tap NEXT, user the Music and Text icons at the bottom-left corner to add a background music and caption to the video respectively, and tap NEXT from the top-right corner. On the next screen, enter a name for the video in the Title field along with the #Shorts tag, and tap Select audience to choose your preferred audience.
Step 3: Upload the Video
Finally tap UPLOAD from the top-right corner to upload the short video on YouTube.
Method 2: Record a Short Video and Upload
Step 1: Record Shorts Video
Previously, I have introduced how to record and upload YouTube Shorts videos , so I will keep the content concise here.
Please note you will not see the Create a Short option if you are outsides of India.
In the YouTube app, tap the + (Add) button and select Create a Short. Please note you will not see the Create a Short option if you are outsides of India.
Next, use the Speed and Timer icons to set the speed of the video and the countdown timer duration before the app starts recording the video when you press the Record button respectively.
Now tap the Record button from the bottom to start recording a video and stop to stop the recording. Make sure to shoot the footage in the portrait mode (ideally in the 9:16 aspect ratio). Tap NEXT from the bottom-right corner to proceed to the next step.
Step 2: Add Text and Music to the Short Video
On the next window, use the Music and Text buttons from the bottom-left corner to add a background music and caption to the video, and tap NEXT from the top-right corner.
Step 3: Upload and Post the Short Video
On the Add details window, enter a name for the video along with the #Shorts tag in the Create a title field, tap Select audience to select the target audience, and tap UPLOAD from the top-right corner to upload the short video on YouTube.
Conclusion
Learning the process of how to post short videos on YouTube is fairly simple as long as you have the video recorded in the portrait orientation, it is up to 60 seconds long, and contains the ‘#Shorts’ tag (without quotes) in the title or description. The good thing is, if you don’t have access to the YouTube app on your smartphone, the method for how to upload short video on YouTube explained in the first section can be followed while using your desktop computer.
Richard Bennett
Richard Bennett is a writer and a lover of all things video.
Follow @Richard Bennett
Advanced Google Slides Techniques: Adding YouTube Media
Create High-Quality Video - Wondershare Filmora
An easy and powerful YouTube video editor
Numerous video and audio effects to choose from
Detailed tutorials provided by the official channel
Google Slide presentation is a powerful tool for creators to keep their audience engaged. This online platform lets you create and demonstrate your ideas. It will capture your viewers’ attention from the very beginning. It also doesn’t matter whatever learning style you engage. Adding YouTube videos to Google Slide will appeal to all levels of individuals.
More so, it is the best way to provide a break for both the audience and the creator. You can break Google Slide presentations with videos to offer some break. Viewers and the presenter get a breather in the process. The presenter can take a short break from speaking while the video plays. Let’s now dive into how to embed a YouTube video in Google Slides.

In this article
01 Why should we add a video to Google Slides?
02 How to add a YouTube video to Google Slide
03 How to choose the right video for your Slides?
Why should we add a video to Google Slides?
There is a great impact of adding video to Google Slides.
For attention
Videos will automatically awaken you, especially if your thoughts have started to sway during a presentation. A video has a direct way of showing creativity. The audience automatically connects the dots between the video and the presentation lines alike.
To stimulate discussion
A picture is worth a thousand words. There is a way that an added video will help the audience connect to the day’s topic. It will bring up several ideas and stir up discussion with the presenter.
Easy following
With videos embedded in Google Slide, viewers will find it easy to understand and digest. Videos automatically eliminate boredom and make any topic interesting.
How to add a YouTube video to Google Slide
Use these two methods to add a YouTube video to Google Slides. Via the Search and Direct link.
Method 1. Embed YouTube video to Google Slide by search and selection
Google has owned YouTube since the year 2006. You can, therefore, integrate Google’s products with YouTube easily.
Step 1. First, go to the slide where you want to embed your video.
Step 2. Then choose the “Insert” option from the menu bar and hit the “Video” option.

Step 3. It would be best if you now viewed the “YouTube” search bar to type in the video you want to embed. You can use keywords to search for the video in question and view instant search results.
Step 4. Then select the video you want to embed, and you’ll see it appear on the “Slide.”

Step 5. Format your video. Remember that the entire video will be embedded. You don’t necessarily need the whole video. It is time to select just a brief but relevant clip from the video to use. Then position your video to the right point using the axes from the exact starting point to the finished part you want the video to appear in.
Method 2. Embed YouTube video to Google Slide by direct link
You can engage this method if you want to include the entire video.
Step 1. Get the URL of the specific YouTube video that you want to use.

Step 2. Then go to your browser’s “Address bar” to copy the YouTube link.
Step 3. Next, open the “Presentation” slide to put your video to.
Step 4. Choose the “Insert” tab from the menu bar.
Step 5. Then hit on the “Video” option from the drop-down menu that appears.
Step 6. A new window will open automatically. Choose the “By URL” tab.
Step 7. Then paste the YouTube video URL in the “Paste YouTube URL Here” bar section.

Step 8. Wait for the video file to load and press the “Select” option. The video will immediately appear in the presentation slide. Just drag and drop the video in your preferred position.
Note: You can do a few edits inside the application. Set the timer when your video should start and when to stop. You can also adjust the video player size.
How to choose the right video for your Slides?
Not all videos will make an impact on your Google Slide. You need to use the best shot that adds value to your presentation. These guidelines will help you to settle on the best video.
Be Professional – choose the best video for your presentation. Remember that the video is part of the presentation and carries more weight. Settling for quality video will bring out the professionalism in you.
Relevant – how do you know that what you are showing your audience corresponds to the presentation piece? Ensure that the video you add has something to do with the Google Slide presentation topic. The two should naturally flow to make it easy to understand the whole concept.
Precise – your presentation is not about the video. The ideal length should not exceed 60 seconds. The longer the video, the greater the chance for your audience to lose track along the way.
Know every footage you are working with – this will help you pick the best shots for your presentation. So, learn every aspect of the video before settling down to use it.
Add new content – even though one content may suit several presentations, don’t rely on the same piece each time. Your audience will want to feel something fresh each time you are presenting. So, compose different videos for different scenarios to make that big impact.
Create an eye-catching video for your Slides with Filmora
The video quality matters when it comes to creating your Slides. The best video creator – Filmora – works in simple steps to give you an eye-catching video. It will create videos for all scenarios like marketing, tutorial, gaming, etc.
Key features of Filmora
- It offers you advanced video effects like filters, motion elements, etc
- You can multiply your fun with multiple screens with the Split Screen feature
- Easily change backgrounds using the Green Screen feature
- The speed control lets you fast forward or slow down a special moment
- Import your video clips to social media platforms
- You can also adjust the audio of your tracks using the Audio Mixer feature
Follow this guide to create a video for your slide with Filmora
Step 1. Launch Filmora
First, begin by downloading and installing Filmora on your computer device. Once installed, launch it and allow it to run. You can either create a new project or open an existing project to work on.
Step 2. Create a new project
Here, click on the “New Project” tab on the app’s welcome screen. The editor should load immediately. Then proceed to register the product. Just hit on the “Register” tab.
Step 3. Import video
Check the upper left corner of your screen to see the “Import” tab. Click on it and choose the “Import Media Files” option. Next, navigate to the location of your computer’s local list to select the clip or video you want to edit. Then, hit the “Import” button to add the video to the timeline for editing.
Step 4. Edit video
Drag and drop the raw footage to Filmora’s timeline to begin editing. Here, you can trim, add other video clips, merge, and add effects as you wish. Likewise, you can add opening titles, subtitles, and end credits to your video. More so, this tool offers different templates to use. Just drag and drop the templates you wish to use to a specific location on the timeline.
Step 5. Preview your file
Last but not least, you can preview your files. Click on the “Play” tab to start previewing your video clips. The main essence of this part is to allow you to make the necessary changes to your clips if there is a need.
Step 6. Export and Share
With Filmora, you can export your file to various social media platforms. But first, go to the “Output window” and select the video file format to use. This software supports several output formats to apply to any platform and device. Just click on the “Format” tab and choose the file format to use. Then also change the resolution and other parameters like frame rate and channel of your video in the “Settings” section. Finally, share your video to your YouTube channel and get ready to add the video to the Google Slide presentation.
For Win 7 or later (64-bit)
For macOS 10.12 or later
Conclusion
● You now know how to put a YouTube video in Google Slides the simple way. You can search for your YouTube videos or directly use the URL link. Whatever the case, remember that it’s the quality of your video that carries more weight. Thanks to the availability of third-party apps that you can use to create and improve the quality of your videos.
● Filmora is at your service to create high-resolution videos that you can export in any format to your YouTube channel. The tool is intuitive, and it won’t matter whether you haven’t tried it before. It is a perfect choice for both professionals and first-time users.
Google Slide presentation is a powerful tool for creators to keep their audience engaged. This online platform lets you create and demonstrate your ideas. It will capture your viewers’ attention from the very beginning. It also doesn’t matter whatever learning style you engage. Adding YouTube videos to Google Slide will appeal to all levels of individuals.
More so, it is the best way to provide a break for both the audience and the creator. You can break Google Slide presentations with videos to offer some break. Viewers and the presenter get a breather in the process. The presenter can take a short break from speaking while the video plays. Let’s now dive into how to embed a YouTube video in Google Slides.
In this article
01 Why should we add a video to Google Slides?
02 How to add a YouTube video to Google Slide
03 How to choose the right video for your Slides?
Why should we add a video to Google Slides?
There is a great impact of adding video to Google Slides.
For attention
Videos will automatically awaken you, especially if your thoughts have started to sway during a presentation. A video has a direct way of showing creativity. The audience automatically connects the dots between the video and the presentation lines alike.
To stimulate discussion
A picture is worth a thousand words. There is a way that an added video will help the audience connect to the day’s topic. It will bring up several ideas and stir up discussion with the presenter.
Easy following
With videos embedded in Google Slide, viewers will find it easy to understand and digest. Videos automatically eliminate boredom and make any topic interesting.
How to add a YouTube video to Google Slide
Use these two methods to add a YouTube video to Google Slides. Via the Search and Direct link.
Method 1. Embed YouTube video to Google Slide by search and selection
Google has owned YouTube since the year 2006. You can, therefore, integrate Google’s products with YouTube easily.
Step 1. First, go to the slide where you want to embed your video.
Step 2. Then choose the “Insert” option from the menu bar and hit the “Video” option.
Step 3. It would be best if you now viewed the “YouTube” search bar to type in the video you want to embed. You can use keywords to search for the video in question and view instant search results.
Step 4. Then select the video you want to embed, and you’ll see it appear on the “Slide.”
Step 5. Format your video. Remember that the entire video will be embedded. You don’t necessarily need the whole video. It is time to select just a brief but relevant clip from the video to use. Then position your video to the right point using the axes from the exact starting point to the finished part you want the video to appear in.
Method 2. Embed YouTube video to Google Slide by direct link
You can engage this method if you want to include the entire video.
Step 1. Get the URL of the specific YouTube video that you want to use.
Step 2. Then go to your browser’s “Address bar” to copy the YouTube link.
Step 3. Next, open the “Presentation” slide to put your video to.
Step 4. Choose the “Insert” tab from the menu bar.
Step 5. Then hit on the “Video” option from the drop-down menu that appears.
Step 6. A new window will open automatically. Choose the “By URL” tab.
Step 7. Then paste the YouTube video URL in the “Paste YouTube URL Here” bar section.
Step 8. Wait for the video file to load and press the “Select” option. The video will immediately appear in the presentation slide. Just drag and drop the video in your preferred position.
Note: You can do a few edits inside the application. Set the timer when your video should start and when to stop. You can also adjust the video player size.
How to choose the right video for your Slides?
Not all videos will make an impact on your Google Slide. You need to use the best shot that adds value to your presentation. These guidelines will help you to settle on the best video.
Be Professional – choose the best video for your presentation. Remember that the video is part of the presentation and carries more weight. Settling for quality video will bring out the professionalism in you.
Relevant – how do you know that what you are showing your audience corresponds to the presentation piece? Ensure that the video you add has something to do with the Google Slide presentation topic. The two should naturally flow to make it easy to understand the whole concept.
Precise – your presentation is not about the video. The ideal length should not exceed 60 seconds. The longer the video, the greater the chance for your audience to lose track along the way.
Know every footage you are working with – this will help you pick the best shots for your presentation. So, learn every aspect of the video before settling down to use it.
Add new content – even though one content may suit several presentations, don’t rely on the same piece each time. Your audience will want to feel something fresh each time you are presenting. So, compose different videos for different scenarios to make that big impact.
Create an eye-catching video for your Slides with Filmora
The video quality matters when it comes to creating your Slides. The best video creator – Filmora – works in simple steps to give you an eye-catching video. It will create videos for all scenarios like marketing, tutorial, gaming, etc.
Key features of Filmora
- It offers you advanced video effects like filters, motion elements, etc
- You can multiply your fun with multiple screens with the Split Screen feature
- Easily change backgrounds using the Green Screen feature
- The speed control lets you fast forward or slow down a special moment
- Import your video clips to social media platforms
- You can also adjust the audio of your tracks using the Audio Mixer feature
Follow this guide to create a video for your slide with Filmora
Step 1. Launch Filmora
First, begin by downloading and installing Filmora on your computer device. Once installed, launch it and allow it to run. You can either create a new project or open an existing project to work on.
Step 2. Create a new project
Here, click on the “New Project” tab on the app’s welcome screen. The editor should load immediately. Then proceed to register the product. Just hit on the “Register” tab.
Step 3. Import video
Check the upper left corner of your screen to see the “Import” tab. Click on it and choose the “Import Media Files” option. Next, navigate to the location of your computer’s local list to select the clip or video you want to edit. Then, hit the “Import” button to add the video to the timeline for editing.
Step 4. Edit video
Drag and drop the raw footage to Filmora’s timeline to begin editing. Here, you can trim, add other video clips, merge, and add effects as you wish. Likewise, you can add opening titles, subtitles, and end credits to your video. More so, this tool offers different templates to use. Just drag and drop the templates you wish to use to a specific location on the timeline.
Step 5. Preview your file
Last but not least, you can preview your files. Click on the “Play” tab to start previewing your video clips. The main essence of this part is to allow you to make the necessary changes to your clips if there is a need.
Step 6. Export and Share
With Filmora, you can export your file to various social media platforms. But first, go to the “Output window” and select the video file format to use. This software supports several output formats to apply to any platform and device. Just click on the “Format” tab and choose the file format to use. Then also change the resolution and other parameters like frame rate and channel of your video in the “Settings” section. Finally, share your video to your YouTube channel and get ready to add the video to the Google Slide presentation.
For Win 7 or later (64-bit)
For macOS 10.12 or later
Conclusion
● You now know how to put a YouTube video in Google Slides the simple way. You can search for your YouTube videos or directly use the URL link. Whatever the case, remember that it’s the quality of your video that carries more weight. Thanks to the availability of third-party apps that you can use to create and improve the quality of your videos.
● Filmora is at your service to create high-resolution videos that you can export in any format to your YouTube channel. The tool is intuitive, and it won’t matter whether you haven’t tried it before. It is a perfect choice for both professionals and first-time users.
Also read:
- 2024 Approved Discover 7 Premium Android AdBlocking Tools
- In 2024, Disseminating Data-Driven Insights You Vs. Others on Video Markets
- Triple Tactic Tracker How to Scrutinize Your Subscriber Earnings on Google's Platform, YouTube
- 2024 Approved Best Practices for Secure YouTube MP4 Conversion
- Best Free Subtitles & Downloader Guide for 2024
- 2024 Approved Elevating Online Presence How to Flawlessly Transmit Upside-Down Videos on Youtube
- [Updated] Crafting Team Videos to Foster Viewership and Following
- Navigating Revenue Sharing on YouTube's Trending Content
- [Updated] Elevate Your Video Impact 20 Essential Thumbnail Fonts
- [New] Discover the Best 11 No-Fee Name Crafting for Channels
- [Updated] 9 Powerful YouTube Video Downloader for Android
- Detailed Guide to Dollar Counts A Stepwise Strategy to Track YouTube Earnings
- [Updated] Beauty Brilliance Masterclasses and Product Explorations
- In 2024, A Symphony of Streams Harmonizing Your Multiple YouTube Views
- Best Webcams for YouTube Livestreaming for 2024
- Comparing Profits From High-Ranking YouTube Videos
- 2024 Approved DailyMovement vs Youtube Income Comparison
- In 2024, Enhancing Video Quality with Right Lighting
- In 2024, Effortlessly Post Videos on YouTube with Our Expert Guide
- Unleash Creativity - Expertly Reviewed Top 10 YouTube Trimmers
- 2024 Approved Craft Your Narrative Best Free Mobile Editors, Android Focus
- In 2024, Deletion Methods for YouTube's Backlogged Video Collection
- [New] Diving Into Viral Video Dialogues
- The Essential Tips for Discarding Unwanted YouTube Files
- Making the Leap Set Up a Sports Vlog on macOS
- Culinary Champions Must-Subscribe Food Bloggers for 2024
- [New] Choosing Prime Audio Editors for YouTube Creators
- Elevate Your Skill Discovering the Top 10 Budget-Friendly Video Artists on YouTube for 2024
- Dynamic Duo Display YouTube’s Way of Creative Splitting for 2024
- Stream Masters List Elite Software & Devices for Youtubers
- [New] A Tale of Two Approaches Polite vs Aggressive Asking
- Perfecting Your Playlists Adapting Spotify to the YouTube Music Ecosystem
- 2024 Approved Building a Strong Network How to Form Effective YouTube Partner Relationships
- [Updated] Cutting to a Consensus in News Endings
- 2024 Approved Buy YouTube Subscribers - Hundreds of Subscribers for $5?
- 2024 Approved Earnings Exploration How YouTube Turns Viewers Into Cash
- In 2024, Detailed Methods for Seamless WireCast Livestreams on YouTube
- Advanced Techniques Using Jump Cuts Effectively
- 2024 Approved Amp Up Your Audio Game with Top 4 Budget Convert Apps
- Unlocking YouTube's Central Hub for Video Crafting
- In 2024, Discovering YouTube's Elite 10 News Channel Leaders
- Embedding YouTube Playlists with Minimal Complexity and Maximum Impact for 2024
- [New] Earning Potential for Creators in YouTube Ads?
- 10 Best Free YouTube Channel Art Makers
- A Deep Dive Into the Top 9 YouTube Downloader Apps for Android for 2024
- Stand Out with a Unique Streamer Identity A Filmora Approach
- [Updated] 7 Uncomplicated Steps for Skyrocketing Subscribers
- Transform Your Twitch Broadcasts for YouTube Viewers
- [Updated] Decoding Hashtags' Role in Elevating Your YouTube Gaming Experience
- Capture Attention YT Imagery and Its Dimension Magic for 2024
- In 2024, Premier Alternatives Exceeding the Limits of Twitter
- New Boost Your LinkedIn Video Performance with These Proven Aspect Ratios
- Updated The Top Gaming Intro Maker Tools and Services
- In 2024, Does Life360 Notify When You Log Out On Nokia 130 Music? | Dr.fone
- In 2024, S Best Green Screen Video Editing Apps for Android and iOS Users
- 2024 Approved Discover the Top 10 Video Trimmers for Your PC and Browser
- [Updated] Streamlining Media Transfer Twitter Content on Snapchat
- [Updated] 2024 Approved Precision in Practice Tailoring PS4 Recordings to Suit Your Style
- [Updated] Elevate Your Farming Game to Immortal Status with These #7-14 Mods
- [Updated] Top 5 PS1 Games Emulators - Resurrecting Console Legends on PC
- Navigating Screen Customization A Google Meet Essentials Guide
- Building Brand Persona Writing Killer Bios for Facebook Profiles
- In 2024, Demystifying IGTV For a Comprehensive Social Media Experience
- [Updated] First Step Into Furnishings Simplest MC Houses Unveiled for 2024
- 2024 Approved Pinnacle 10 Royale Clashes
- Tips for Restarting Disrupted FB Live Videos for 2024
- [New] In 2024, How To Dive Into a Friend's Life Without Fuss on TikTok
- In 2024, iSpoofer is not working On Poco F5 Pro 5G? Fixed | Dr.fone
- [New] Acoustic Indexing Sound and Vocal Files
- [Updated] 2024 Approved Leading Screenshot & Record Tools for Firefox
- New Pioneering Audio Creation with LexisEdit A Beginners Blueprint
- 2024 Approved Universal Video Editing Solutions 35 Options for Every Device and OS
- From Script to Screen 10 Essential Android Movie Making Tools for 2024
- In 2024, How to Create a Special Animated Transition in Filmora in Just 2 Minutes. This Simple Step-by-Step Guide Will Show You the Easy Way
- Essential Strategies Preserving WhatsApp Call Recordings
- Title: Effortless Guide to Share Your Videos as Shorts on Computers & Phones
- Author: Steven
- Created at : 2024-05-25 19:11:55
- Updated at : 2024-05-26 19:11:55
- Link: https://youtube-clips.techidaily.com/effortless-guide-to-share-your-videos-as-shorts-on-computers-and-phones/
- License: This work is licensed under CC BY-NC-SA 4.0.
