
:max_bytes(150000):strip_icc()/computer-promo-image-3a7546bffced49e0addc218f4ef51aed.jpg)
Efficient Time Markers in YouTube Videos (Desktop/Mobile Edition) for 2024
Efficient Time Markers in YouTube Videos (Desktop/Mobile Edition)
How to Add Timestamps on YouTube Video Link?

Richard Bennett
Mar 27, 2024• Proven solutions
It is a well-known fact that internet users have a short interest span, about just eight seconds. This attention span applies to all internet platforms including YouTube. YouTube is the second largest and most visited search engine after Google. It provides users with information through engaging and eye-catchy videos. However, certain videos are longer where only a particular section of the video holds the important information. Viewers tend to skip the long videos and if you do not want this to happen to you, you can link to that specific part on your video adding value for your channel viewers with a link known as the YouTube Timestamp link.
When you have a Timestamp link on your video, you can help your viewers directly reach the specific time in the video. This helps avoid the viewers from losing interest or to search for the key part in your video themselves.
Here in this article, we will explain Timestamp links, how to add Timestamp to YouTube video links, and what are the benefits of Timestamp.
- Part 1: YouTube Timestamp Links Introduction
- Part 2: Adding a Timestamp to YouTube Video Link on Desktop
- Part 3: How to Share Specific Parts of YouTube Video
- part 4: Getting YouTube Timestamp Link on Mobile
- Part 5: FAQ About YouTube Timestamps
Part 1: What is YouTube Timestamp Links
In this fast-paced world where viewers have limited time at hand, YouTube Timestamp links are extremely helpful. These links are anchor text or video hyperlinks found either in the description beneath the video or at the video link end.

The Timestamps links allow you to put a link to a key moment in your YouTube video allowing the viewers and subscribers to view the video at the precise time specified. Your YouTube video maybe half an hour long or maybe your users do not have the time now or forget to later watch your video, but when you add Timestamp to the YouTube link, you provide them ways to get to the content quickly enhancing the user experience.
In addition to this, you can even provide a reference in minutes and hours where necessary. The YouTube Timestamp link acts as a guide that directs viewers to the part of the video, which is most relevant to them without having to watch the entire video.
Part 2: How to Add a Timestamp to YouTube Video Link on Desktop?
In the following section, I will show you how to add timestamp to YouTube video link in several ways.
Use YouTube’s Share Feature
Using YouTube’s share feature is the simplest way to add Timestamp to YouTube videos. Here are easy steps to follow to do this.
- Open the YouTube video on your desktop that you want to share.
- Play the video or navigate the timeline and stop at the key moment you wish to apply the timestamp to.
- Now click on the Share button, a pop-up will appear. Under the URL, you will see a small box indicating Start at. The Timestamp is generated automatically, but you can adjust it.

- Copy the updated URL with Timestamp to share the video or click on the social sharing icons to do so.
- When your viewers click on this URL, the video will begin at the specified Timestamp.
Use the Browser URL to add Timestamp manually
You can add Timestamp manually as well. Follow the step-by-step guide below to add a Timestamp manually.
- Open your YouTube video in a browser on your desktop and then find the URL in the browser’s address bar.
- Enter the specific time you want the viewers to watch the video from at the end of the video URL.
You can add time manually in two ways depending on the URL.
?t=As or
&t=As
“youtu.be/” Format
If your YouTube video link is a youtu.be format, then just add ?t=As at the end of the video link. The A denotes the seconds at which you want the viewer to watch your video. The time can also be specified in minutes and seconds and when you want to do that just add ?t=AmBs. For instance, ?t=2m40s.
“youtube.com/” Format
When your YouTube video link has a youtube.com format, the adjustment starts with an ampersand. &t=As or &t=AmBs is what you can use. If you are looking to add the Timestamp at 2m40s, just add “&t=2m40s at the end of the video URL.
Whenever anybody uses the URL with Timestamp, the video will start from the specified time.
However, when adding a Timestamp manually, always leave include whole numbers. For example, if the time starts at 4m, use 4 and not 04.
Copy video URL at current time
You can use YouTube’s built-in feature to share the key parts of your YouTube video. Follow the steps here.
- Visit YouTube and open the video you want to add Timestamp link to.
- Play the video or navigate the timeline to reach the specific part you like to use in Timestamp.
- Now either press Ctrl + click or right-click anywhere on the video. A pop-up opens where you can see various texts, click on the Copy video URL at current time and share the link.

- Anyone who clicks on this link will be instantly transported to the exact segment of your YouTube video.
Part 3: How to Share Specific Parts of Videos with Vibby and Get YouTube Link with Timestamp
The above-mentioned methods to add and send YouTube link with timestamp are quick and easy, but they have a few limitations. If you need more control and share highlighted parts of YouTube video without cutting the video, you need to use a third-party tool known as Vibby.
Vibby allows you to not only share specific parts of videos from YouTube but other platforms as well like Vimeo and Twitch. With the tool, you can clip multiple sections of the video and share them with others.
- To get started, signup either with mail, Google, Twitter, Facebook, or Twitch account.
- Once signed in, go to Create vib at the top left corner and then paste the URL of the YouTube video you would like to share and then click on the Start button.

- Your video will load in the Vibby editor, now click on Highlight the parts to share.
- Here you will see the Start highlight button, jump 5-sec option, option to switch between HD and SD video quality, and volume control button. Navigate to the part you want to share and click on Start highlight.

- When you reach the end of the part, click on Finish highlight. Repeat the process to highlight multiple parts of the video. All the highlighted parts will appear in a list on the right side of the screen.
- Add a description to each part and format it, you have the option to preview before hitting the Save vib button.
- Name the vib and assign a category and then publish it to Vibby or make it a private vib.
- You get a dedicated link to your vib with the ability to embed it on your website or blog.
In this way, you can share the highlights of the YouTube video or Vimeo video easily.
Part 4: How to Get YouTube Timestamp Link on iPhone and Android?
Linking to specific YouTube Timestamp Link is straightforward on both iPhone and Android.
- Go to YouTube and select the video you want to share.
- Move through the progress bar of the video to reach the key part and click on the Share button.
- A pop-up menu appears, highlight the URL and click on the Copy button.
- Paste the URL and manually add the Timestamp using the steps mentioned in add a Timestamp manually.
Part 5: Is Timestamp Beneficial for your Video?
Timestamping your YouTube videos may decrease the watch time, but it enhances the user experience, and they want to see more of your videos. Apart from this, adding Timestamps to your videos make your videos discoverable through Google search. YouTube and Google will reward you for the videos in form of a high search engine ranking.
Bonus: How to Add YouTube Timestamp Link in YouTube Video Description
Adding a YouTube Timestamp link in your video description is easy. Here are the steps to do so.
- Go to your YouTube channel and select the video you want to add Timestamp to and then navigate to the description below it.
- Edit the description by clicking on the Edit Video button.
- You are redirected to the Video Details page. Here write 0:00 at the first part of the timecode, and then continue with the time of the key part of the video you want to add the Timestamp to in 2:40 format. You can add more Timestamp as well and then click on the Save button.

- Reload the video page and you will see auto-generated Timestamp Links at the specific time you provided in the description.
Note: You need to add at least three timestamps which are 10 seconds or longer in order to add timestamps successfully.
Conclusion
As much as possible YouTubers want to make videos short and to the point. However, if a video needs to be longer, you can still help users navigate through to find what is important to them by adding Timestamp to YouTube link or Timestamp the YouTube descriptions. This can help your viewers jump straight to the interesting part in the video, rather than viewing the entire video saving their time and boost user experience.
Richard Bennett
Richard Bennett is a writer and a lover of all things video.
Follow @Richard Bennett
Richard Bennett
Mar 27, 2024• Proven solutions
It is a well-known fact that internet users have a short interest span, about just eight seconds. This attention span applies to all internet platforms including YouTube. YouTube is the second largest and most visited search engine after Google. It provides users with information through engaging and eye-catchy videos. However, certain videos are longer where only a particular section of the video holds the important information. Viewers tend to skip the long videos and if you do not want this to happen to you, you can link to that specific part on your video adding value for your channel viewers with a link known as the YouTube Timestamp link.
When you have a Timestamp link on your video, you can help your viewers directly reach the specific time in the video. This helps avoid the viewers from losing interest or to search for the key part in your video themselves.
Here in this article, we will explain Timestamp links, how to add Timestamp to YouTube video links, and what are the benefits of Timestamp.
- Part 1: YouTube Timestamp Links Introduction
- Part 2: Adding a Timestamp to YouTube Video Link on Desktop
- Part 3: How to Share Specific Parts of YouTube Video
- part 4: Getting YouTube Timestamp Link on Mobile
- Part 5: FAQ About YouTube Timestamps
Part 1: What is YouTube Timestamp Links
In this fast-paced world where viewers have limited time at hand, YouTube Timestamp links are extremely helpful. These links are anchor text or video hyperlinks found either in the description beneath the video or at the video link end.
The Timestamps links allow you to put a link to a key moment in your YouTube video allowing the viewers and subscribers to view the video at the precise time specified. Your YouTube video maybe half an hour long or maybe your users do not have the time now or forget to later watch your video, but when you add Timestamp to the YouTube link, you provide them ways to get to the content quickly enhancing the user experience.
In addition to this, you can even provide a reference in minutes and hours where necessary. The YouTube Timestamp link acts as a guide that directs viewers to the part of the video, which is most relevant to them without having to watch the entire video.
Part 2: How to Add a Timestamp to YouTube Video Link on Desktop?
In the following section, I will show you how to add timestamp to YouTube video link in several ways.
Use YouTube’s Share Feature
Using YouTube’s share feature is the simplest way to add Timestamp to YouTube videos. Here are easy steps to follow to do this.
- Open the YouTube video on your desktop that you want to share.
- Play the video or navigate the timeline and stop at the key moment you wish to apply the timestamp to.
- Now click on the Share button, a pop-up will appear. Under the URL, you will see a small box indicating Start at. The Timestamp is generated automatically, but you can adjust it.
- Copy the updated URL with Timestamp to share the video or click on the social sharing icons to do so.
- When your viewers click on this URL, the video will begin at the specified Timestamp.
Use the Browser URL to add Timestamp manually
You can add Timestamp manually as well. Follow the step-by-step guide below to add a Timestamp manually.
- Open your YouTube video in a browser on your desktop and then find the URL in the browser’s address bar.
- Enter the specific time you want the viewers to watch the video from at the end of the video URL.
You can add time manually in two ways depending on the URL.
?t=As or
&t=As
“youtu.be/” Format
If your YouTube video link is a youtu.be format, then just add ?t=As at the end of the video link. The A denotes the seconds at which you want the viewer to watch your video. The time can also be specified in minutes and seconds and when you want to do that just add ?t=AmBs. For instance, ?t=2m40s.
“youtube.com/” Format
When your YouTube video link has a youtube.com format, the adjustment starts with an ampersand. &t=As or &t=AmBs is what you can use. If you are looking to add the Timestamp at 2m40s, just add “&t=2m40s at the end of the video URL.
Whenever anybody uses the URL with Timestamp, the video will start from the specified time.
However, when adding a Timestamp manually, always leave include whole numbers. For example, if the time starts at 4m, use 4 and not 04.
Copy video URL at current time
You can use YouTube’s built-in feature to share the key parts of your YouTube video. Follow the steps here.
- Visit YouTube and open the video you want to add Timestamp link to.
- Play the video or navigate the timeline to reach the specific part you like to use in Timestamp.
- Now either press Ctrl + click or right-click anywhere on the video. A pop-up opens where you can see various texts, click on the Copy video URL at current time and share the link.
- Anyone who clicks on this link will be instantly transported to the exact segment of your YouTube video.
Part 3: How to Share Specific Parts of Videos with Vibby and Get YouTube Link with Timestamp
The above-mentioned methods to add and send YouTube link with timestamp are quick and easy, but they have a few limitations. If you need more control and share highlighted parts of YouTube video without cutting the video, you need to use a third-party tool known as Vibby.
Vibby allows you to not only share specific parts of videos from YouTube but other platforms as well like Vimeo and Twitch. With the tool, you can clip multiple sections of the video and share them with others.
- To get started, signup either with mail, Google, Twitter, Facebook, or Twitch account.
- Once signed in, go to Create vib at the top left corner and then paste the URL of the YouTube video you would like to share and then click on the Start button.
- Your video will load in the Vibby editor, now click on Highlight the parts to share.
- Here you will see the Start highlight button, jump 5-sec option, option to switch between HD and SD video quality, and volume control button. Navigate to the part you want to share and click on Start highlight.
- When you reach the end of the part, click on Finish highlight. Repeat the process to highlight multiple parts of the video. All the highlighted parts will appear in a list on the right side of the screen.
- Add a description to each part and format it, you have the option to preview before hitting the Save vib button.
- Name the vib and assign a category and then publish it to Vibby or make it a private vib.
- You get a dedicated link to your vib with the ability to embed it on your website or blog.
In this way, you can share the highlights of the YouTube video or Vimeo video easily.
Part 4: How to Get YouTube Timestamp Link on iPhone and Android?
Linking to specific YouTube Timestamp Link is straightforward on both iPhone and Android.
- Go to YouTube and select the video you want to share.
- Move through the progress bar of the video to reach the key part and click on the Share button.
- A pop-up menu appears, highlight the URL and click on the Copy button.
- Paste the URL and manually add the Timestamp using the steps mentioned in add a Timestamp manually.
Part 5: Is Timestamp Beneficial for your Video?
Timestamping your YouTube videos may decrease the watch time, but it enhances the user experience, and they want to see more of your videos. Apart from this, adding Timestamps to your videos make your videos discoverable through Google search. YouTube and Google will reward you for the videos in form of a high search engine ranking.
Bonus: How to Add YouTube Timestamp Link in YouTube Video Description
Adding a YouTube Timestamp link in your video description is easy. Here are the steps to do so.
- Go to your YouTube channel and select the video you want to add Timestamp to and then navigate to the description below it.
- Edit the description by clicking on the Edit Video button.
- You are redirected to the Video Details page. Here write 0:00 at the first part of the timecode, and then continue with the time of the key part of the video you want to add the Timestamp to in 2:40 format. You can add more Timestamp as well and then click on the Save button.
- Reload the video page and you will see auto-generated Timestamp Links at the specific time you provided in the description.
Note: You need to add at least three timestamps which are 10 seconds or longer in order to add timestamps successfully.
Conclusion
As much as possible YouTubers want to make videos short and to the point. However, if a video needs to be longer, you can still help users navigate through to find what is important to them by adding Timestamp to YouTube link or Timestamp the YouTube descriptions. This can help your viewers jump straight to the interesting part in the video, rather than viewing the entire video saving their time and boost user experience.
Richard Bennett
Richard Bennett is a writer and a lover of all things video.
Follow @Richard Bennett
Streamline Your Browsing: Eliminate YouTube Ads in Chrome, Firefox, iOS
How to Block YouTube Ads on Chrome/Firefox/Android/iPhone
Richard Bennett
Mar 27, 2024• Proven solutions
YouTube is unquestionably the world’s most popular video-sharing platform with a massive 2 billion active monthly users. With such a large audience, advertisers are pouring a lot of funds into Google’s video platform that makes up a big portion of the company’s advertising revenue. Unfortunately, according to the BI Intelligence Digital Trust Survey , YouTube serves up the most annoying ads with 43 percent of the respondents considering YouTube ads most irksome.
Every now and then you’ll get annoyed with the obtrusive ads and ask how to block YouTube ads. Getting away with the un-skippable and plagued 30-second ads during the playback or the onscreen pop-up ads that come suddenly on the playing screen will make your life miserable when watching a show or practicing a dance move. To help you escape the forced ads on YouTube we’ll go through the YouTube ad blocking techniques available. You will learn:
- Part 1: How to block YouTube ads on the computer (Chrome & Firefox)
- Part 2: How to block YouTube ads on the mobile phone (Android & iPhone)
Here is the video guide to help you block Youtube ads on the computer and mobile phone


Part 1: How to block YouTube ads on the computer (Chrome & Firefox)
In case you care about and want to support content creators on YouTube, you can buy the YouTube Premium which will also give you access to exclusive shows and will eliminate ads from your YouTube life.
However, as most of us won’t like the idea of paying for a free service, there are possible solutions of how to block YouTube ads in Chrome or Firefox. You will need to install a third-party browser extension proficient in blocking the annoying YouTube ads in Google Chrome or Mozilla Firefox.
1.Google Chrome
Chrome allows you to have extensions to enhance the browser features and interact more with the content presented to you. These third-party extensions or sometimes called Add-ons can help prevent the irritating YouTube ads to show up on the site. To install them, follow the steps.
- 1. Open Google Chrome browser and go to Menu.
- 2. In the Menu look for “More Tools” and in there tap the “Extensions”.
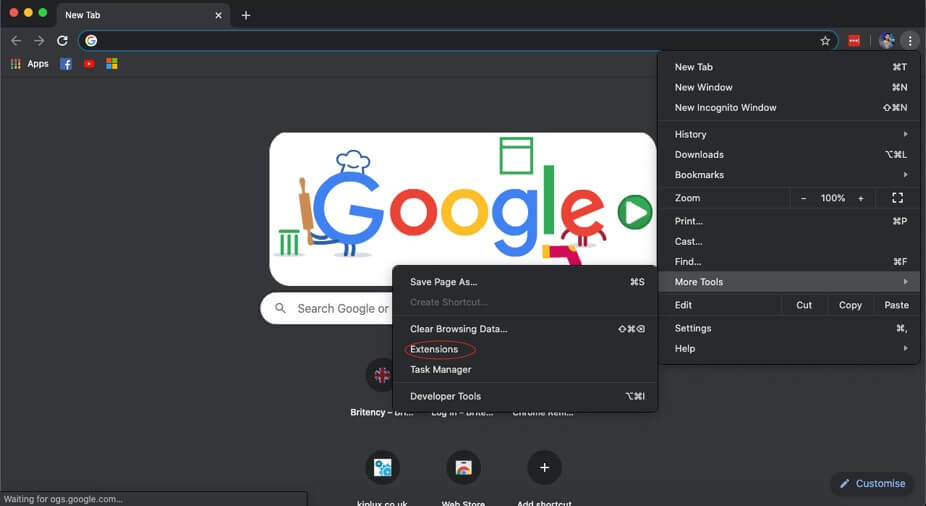
- 3. In the Extensions tap the “Main menu” at the left-hand side. It will show the menu here open the Chrome Web Store. Or you can simply open Chrome Web Store
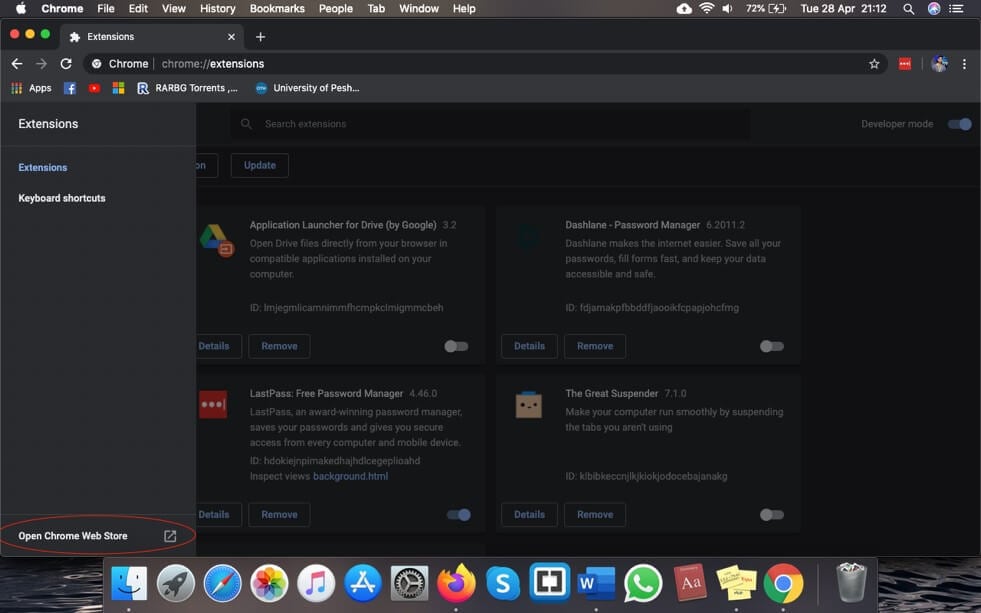
- 4. You will need to sign in with your Google account if you’re not already signed in.
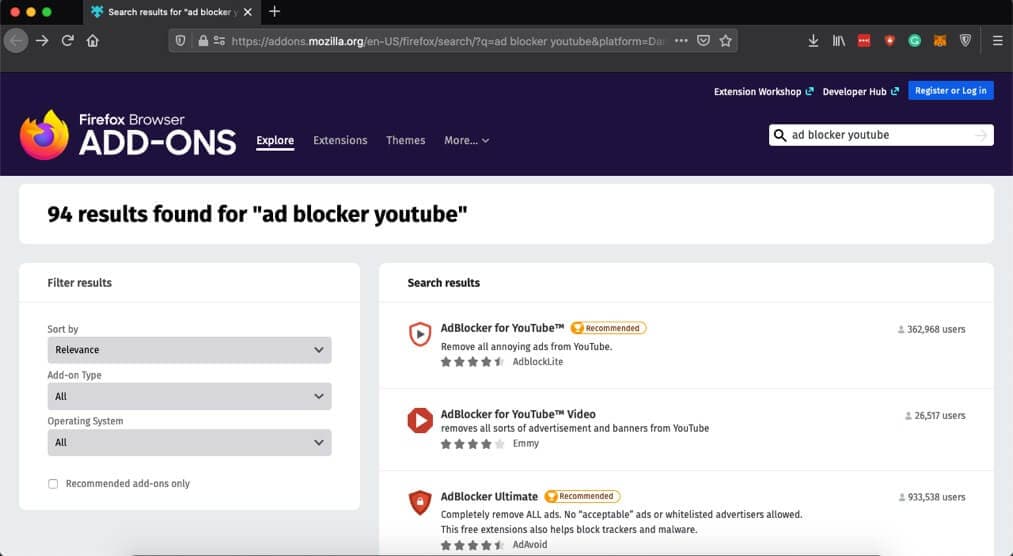
- 5. In the search box type “ad blocker YouTube” and tap enter. You’ll see a list of ad blockers available for chrome.
- 6. You will adblocker’s specifically for YouTube ads. Select whichever you like and it will block the YouTube ads on Chrome.

2.Mozilla Firefox
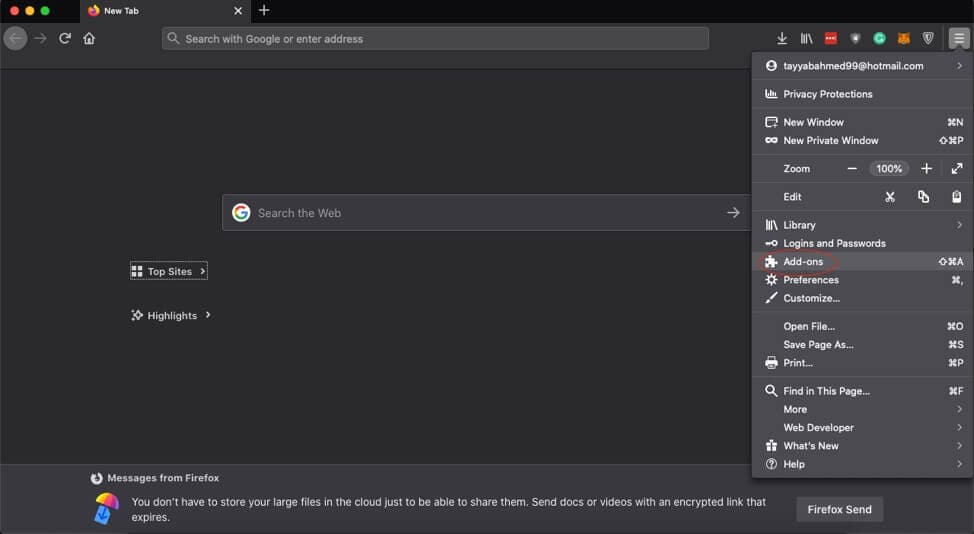
You can also install third-party extensions to block YouTube ads from popping up in the middle of the playback. To install the extensions, follow the steps.
- 1. Tap the Hamburger Menu on Firefox at the top-right corner and select Add-ons.
- 2. In the search bar “Find more extensions” type “ad blocker YouTube” and press enter.
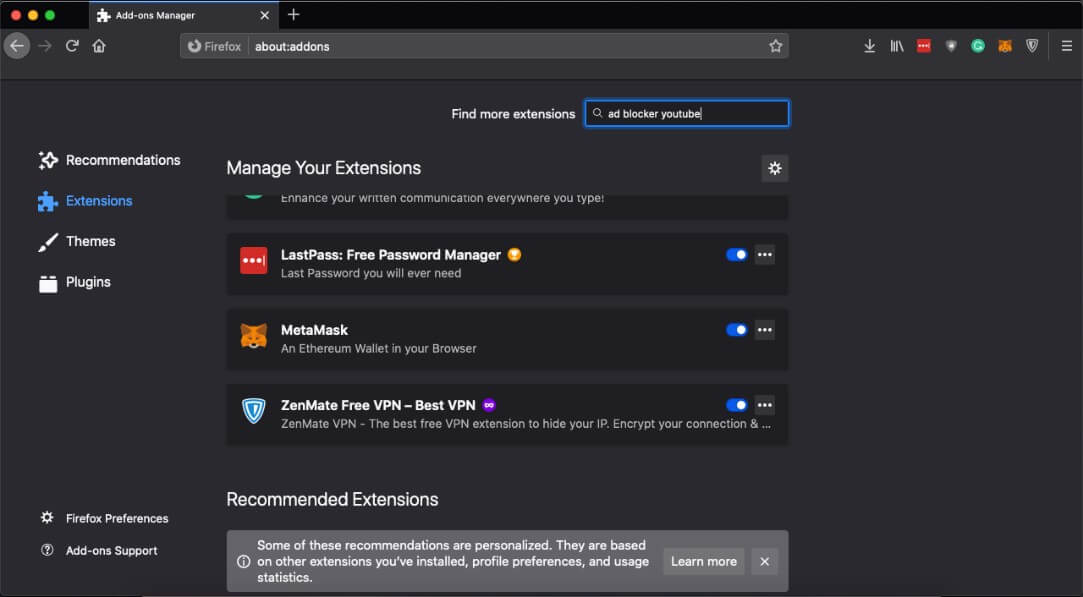
- 3. Select an appropriate ad blocker and it will protect you from the irritating ads.
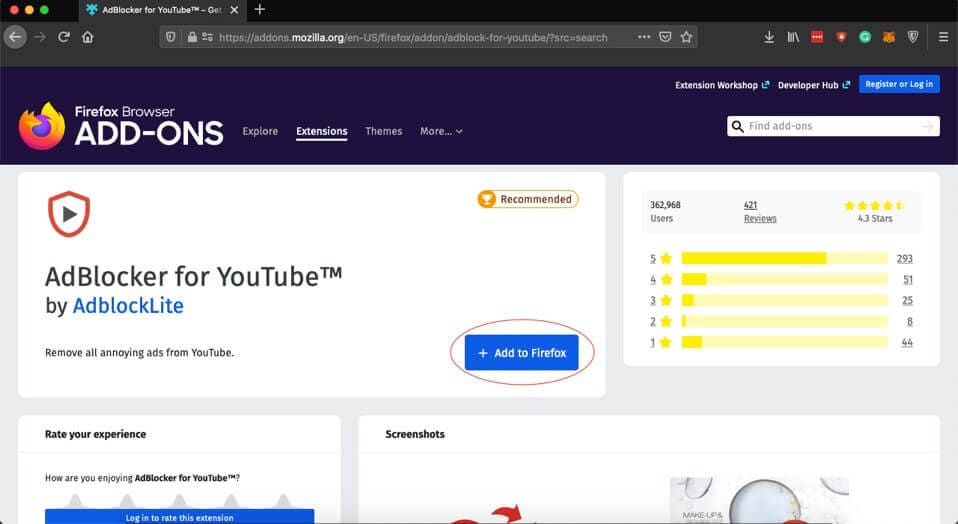
- 4. Tap the “Add to Firefox” to download the extension.
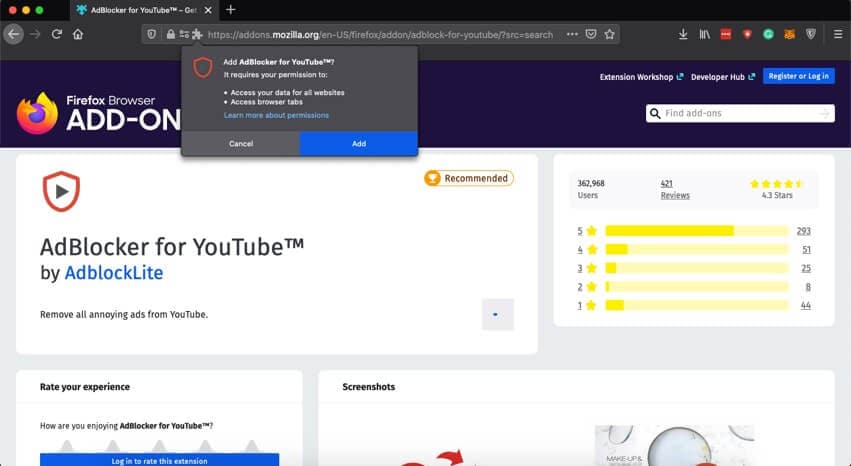
- 5. It will ask for permission, press “Add” again to grant the permissions.
Part 2: How to block YouTube ads on the mobile phone (Android & iPhone)
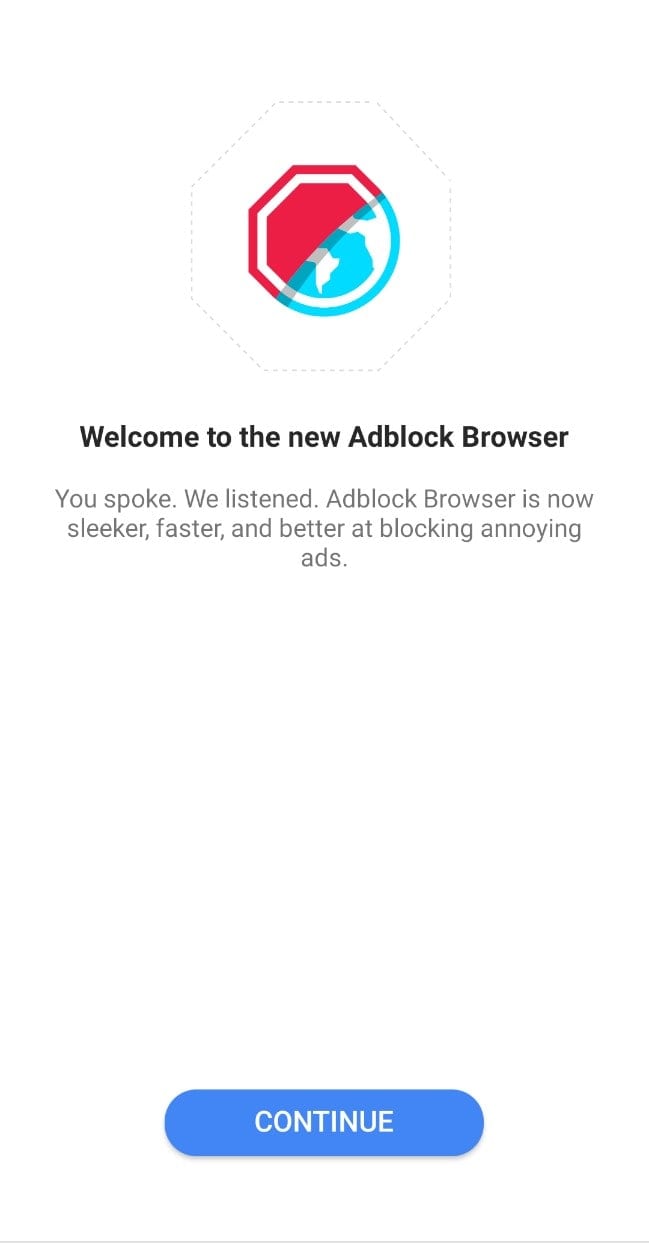
Ads can cause inconvenience and make YouTube watching a sour experience. To protect yourself from the constant nagging ads on mobile platforms both Android and iPhone you can utilize the numerous ad-blocking apps for Android and iOS. Though the simplest method of blocking the ads and watch YouTube content without ads is to use the Adblock Browser available both for both devices at Google Play Store and Apple Store. This technique won’t require you to root your Android phone or jailbreak the iPhone for watching ad-free YouTube videos.
1.Android
Android is pretty flexible and allows you to add many feature-rich third-party apps. Though there might be other options available to get rid of the irksome YouTube ads, the easiest and single app solution to remove ads is downloading an Adblock browser app that will act as your default browser when you try to want to watch YouTube videos. The steps to set up your Android to block YouTube ads are down here.
- 1. Click Here to install Adblock Browser on your Android device.
- 2. It is a full-fledged browser and can act as your primary browser for YouTube playback.

- 3. After installing the Adblock Browser your Android device may still try to play videos in the YouTube app.
- 4. To current that, open the “Settings” on your Android and go to “Apps & notifications” and press See all. In the apps find YouTube, tap in to see app info.
- 5. In the App info screen click “Storage & cache”.
- 6. Tap on “Clear storage”. This will clear all the cache and data of the app from the operating system.
- 7. Now your YouTube videos will be played in the Adblock Browser.
2.iPhone
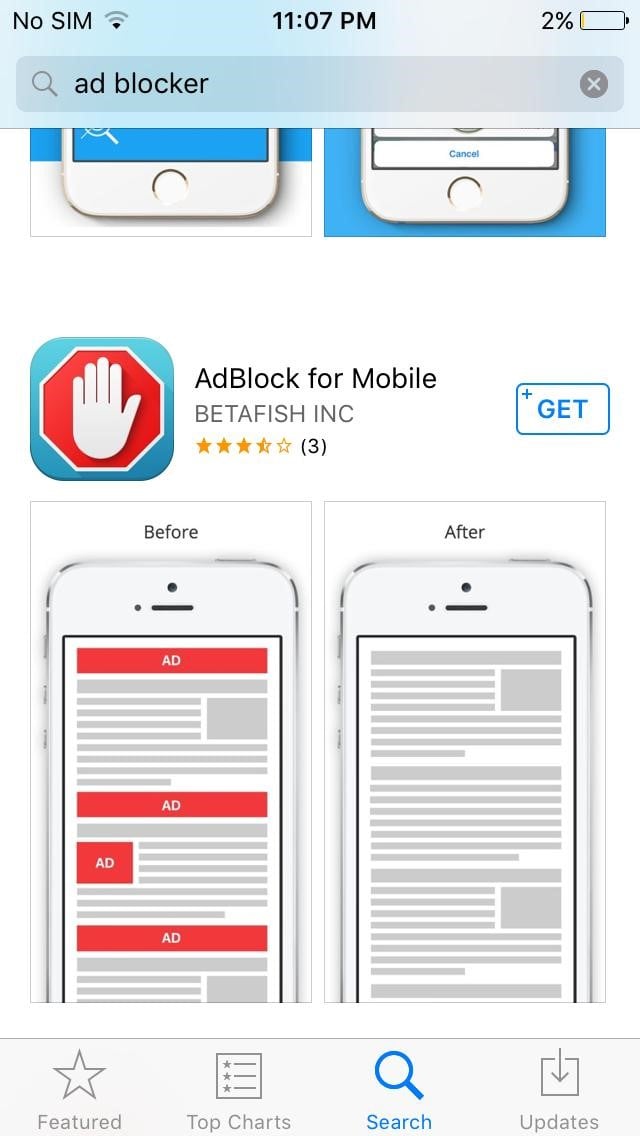
On iOS, you can keep using the default iOS browser and still be able to block YouTube ads in the Safari browser app. You can add third-party ad blocker apps to disable YouTube ads on your iPhone and link it as the Content Blocker in the Safari settings. To activate the ad blocking feature, follow the steps.
- 1. Open Apple Store and download any ad blocker app you like.
- 2. Now come to the iPhone device Settings and go to Safari.
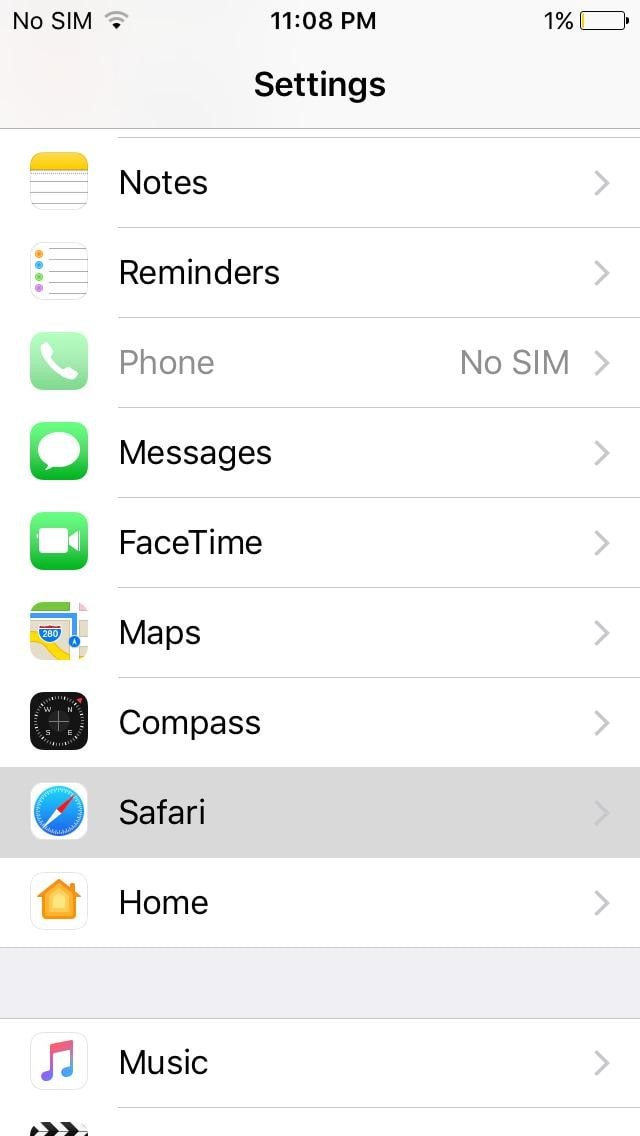
- 3. In the Safari settings, you will find a “Block Pop-ups” toggle button, activate it.
- 4. Right below the toggle button, you’ll see the “Content Blockers” tap to configure it.
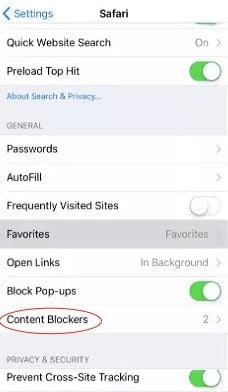
- 5. The ad blocker app you just downloaded will be displaying under Allow these content blockers, enable it with the toggle button.
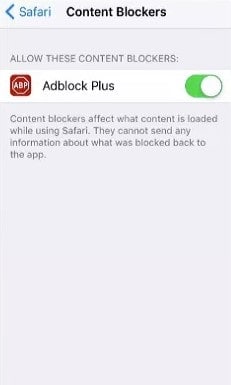
- 6. Now your Safari browser will block all YouTube ads during playback.
Conclusion
Ads can be annoying and time-wasting if you are being forced to watch them every other minute. YouTube is as addictive as its active userbase depict and during that addiction, anyone will not accept an interruption. To do away with the disruptive adds and block YouTube ads on any of your devices from PC to Mac, or mobile devices you need to have an adblocker application that will disable YouTube ads and make your video viewing experience smooth and relishing.
Richard Bennett
Richard Bennett is a writer and a lover of all things video.
Follow @Richard Bennett
Richard Bennett
Mar 27, 2024• Proven solutions
YouTube is unquestionably the world’s most popular video-sharing platform with a massive 2 billion active monthly users. With such a large audience, advertisers are pouring a lot of funds into Google’s video platform that makes up a big portion of the company’s advertising revenue. Unfortunately, according to the BI Intelligence Digital Trust Survey , YouTube serves up the most annoying ads with 43 percent of the respondents considering YouTube ads most irksome.
Every now and then you’ll get annoyed with the obtrusive ads and ask how to block YouTube ads. Getting away with the un-skippable and plagued 30-second ads during the playback or the onscreen pop-up ads that come suddenly on the playing screen will make your life miserable when watching a show or practicing a dance move. To help you escape the forced ads on YouTube we’ll go through the YouTube ad blocking techniques available. You will learn:
- Part 1: How to block YouTube ads on the computer (Chrome & Firefox)
- Part 2: How to block YouTube ads on the mobile phone (Android & iPhone)
Here is the video guide to help you block Youtube ads on the computer and mobile phone
Part 1: How to block YouTube ads on the computer (Chrome & Firefox)
In case you care about and want to support content creators on YouTube, you can buy the YouTube Premium which will also give you access to exclusive shows and will eliminate ads from your YouTube life.
However, as most of us won’t like the idea of paying for a free service, there are possible solutions of how to block YouTube ads in Chrome or Firefox. You will need to install a third-party browser extension proficient in blocking the annoying YouTube ads in Google Chrome or Mozilla Firefox.
1.Google Chrome
Chrome allows you to have extensions to enhance the browser features and interact more with the content presented to you. These third-party extensions or sometimes called Add-ons can help prevent the irritating YouTube ads to show up on the site. To install them, follow the steps.
- 1. Open Google Chrome browser and go to Menu.
- 2. In the Menu look for “More Tools” and in there tap the “Extensions”.
- 3. In the Extensions tap the “Main menu” at the left-hand side. It will show the menu here open the Chrome Web Store. Or you can simply open Chrome Web Store
- 4. You will need to sign in with your Google account if you’re not already signed in.
- 5. In the search box type “ad blocker YouTube” and tap enter. You’ll see a list of ad blockers available for chrome.
- 6. You will adblocker’s specifically for YouTube ads. Select whichever you like and it will block the YouTube ads on Chrome.
2.Mozilla Firefox
You can also install third-party extensions to block YouTube ads from popping up in the middle of the playback. To install the extensions, follow the steps.
- 1. Tap the Hamburger Menu on Firefox at the top-right corner and select Add-ons.
- 2. In the search bar “Find more extensions” type “ad blocker YouTube” and press enter.
- 3. Select an appropriate ad blocker and it will protect you from the irritating ads.
- 4. Tap the “Add to Firefox” to download the extension.
- 5. It will ask for permission, press “Add” again to grant the permissions.
Part 2: How to block YouTube ads on the mobile phone (Android & iPhone)
Ads can cause inconvenience and make YouTube watching a sour experience. To protect yourself from the constant nagging ads on mobile platforms both Android and iPhone you can utilize the numerous ad-blocking apps for Android and iOS. Though the simplest method of blocking the ads and watch YouTube content without ads is to use the Adblock Browser available both for both devices at Google Play Store and Apple Store. This technique won’t require you to root your Android phone or jailbreak the iPhone for watching ad-free YouTube videos.
1.Android
Android is pretty flexible and allows you to add many feature-rich third-party apps. Though there might be other options available to get rid of the irksome YouTube ads, the easiest and single app solution to remove ads is downloading an Adblock browser app that will act as your default browser when you try to want to watch YouTube videos. The steps to set up your Android to block YouTube ads are down here.
- 1. Click Here to install Adblock Browser on your Android device.
- 2. It is a full-fledged browser and can act as your primary browser for YouTube playback.
- 3. After installing the Adblock Browser your Android device may still try to play videos in the YouTube app.
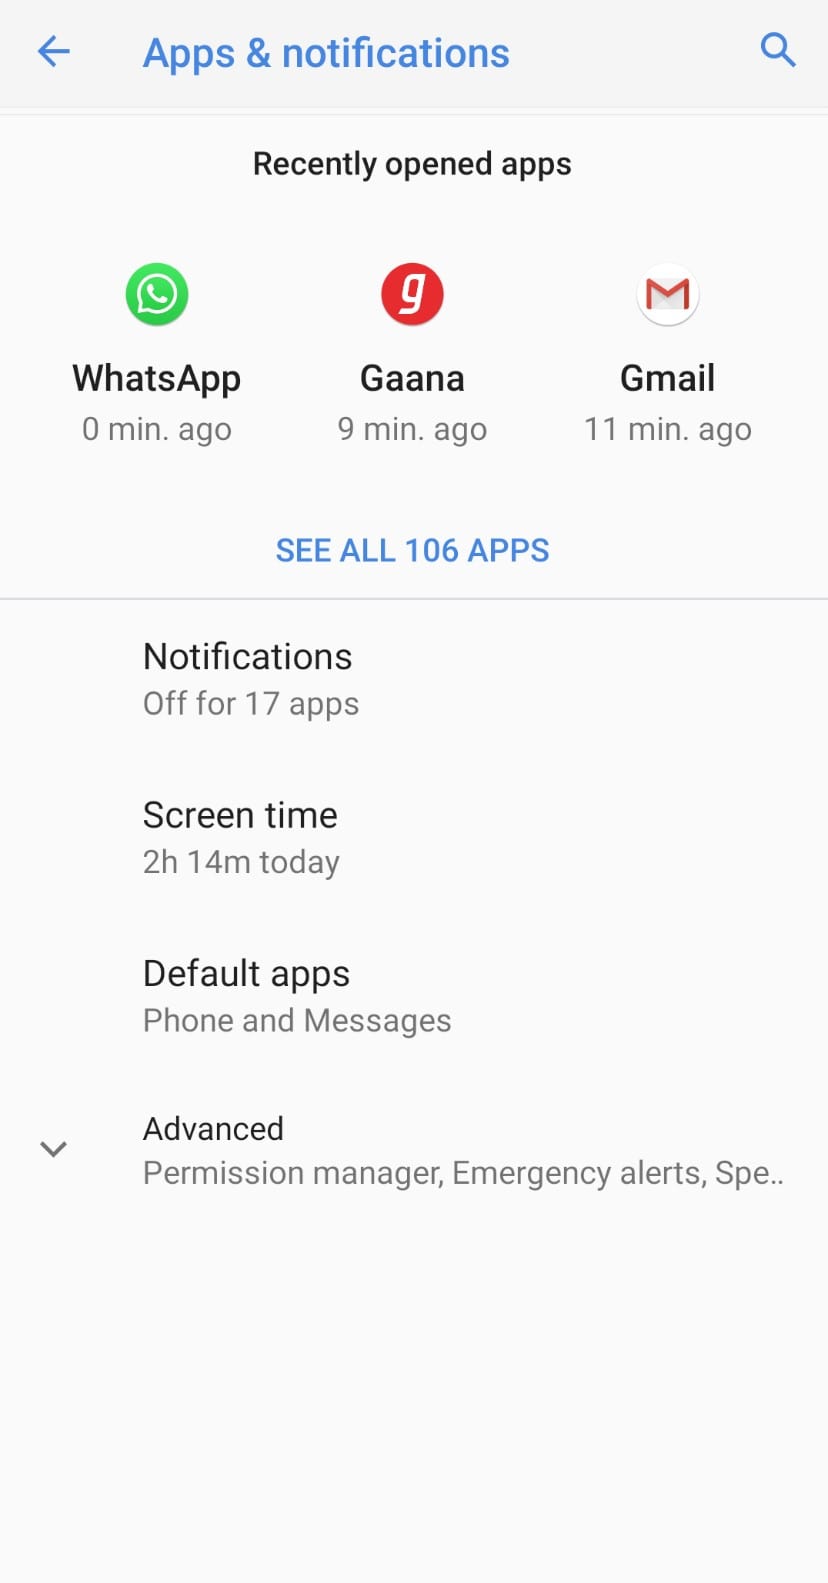
- 4. To current that, open the “Settings” on your Android and go to “Apps & notifications” and press See all. In the apps find YouTube, tap in to see app info.
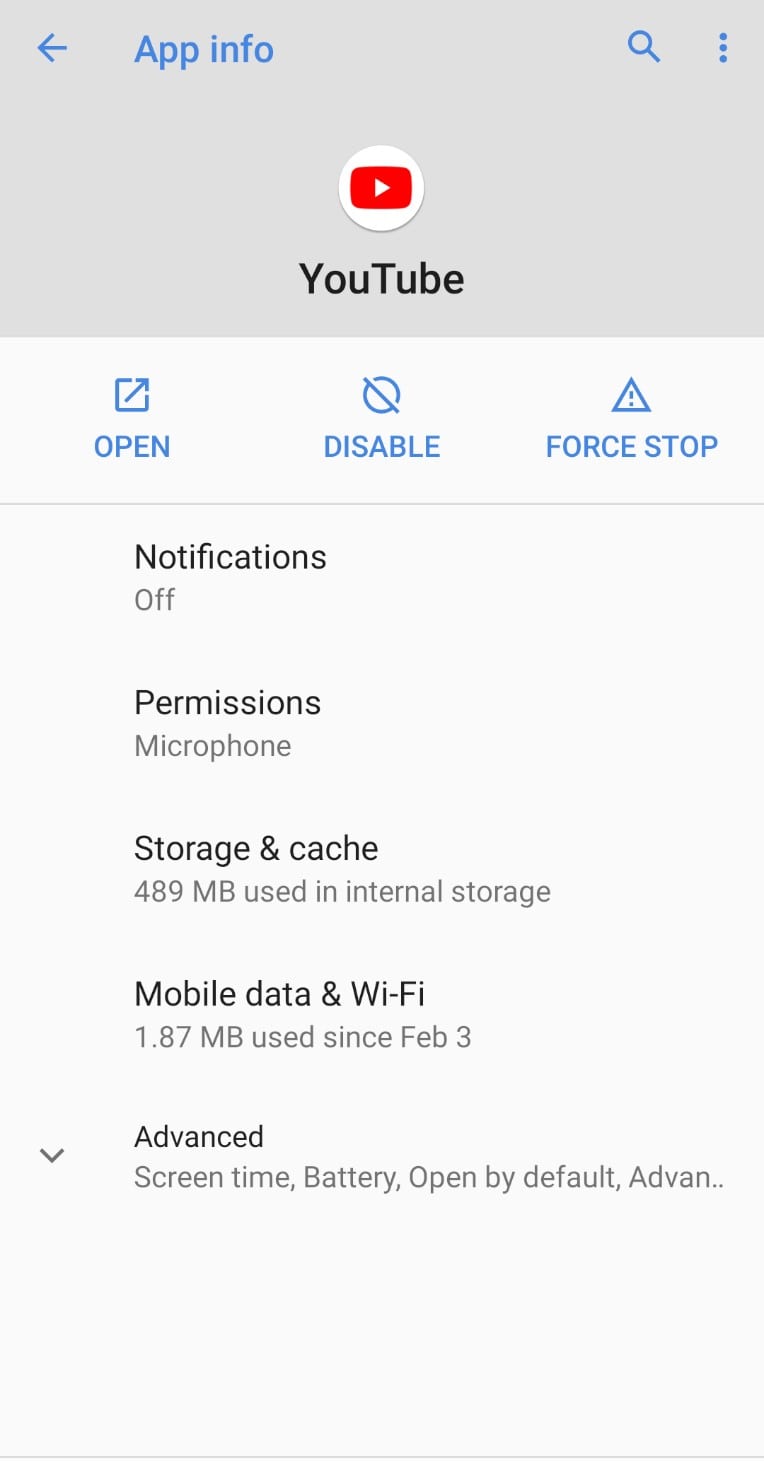
- 5. In the App info screen click “Storage & cache”.
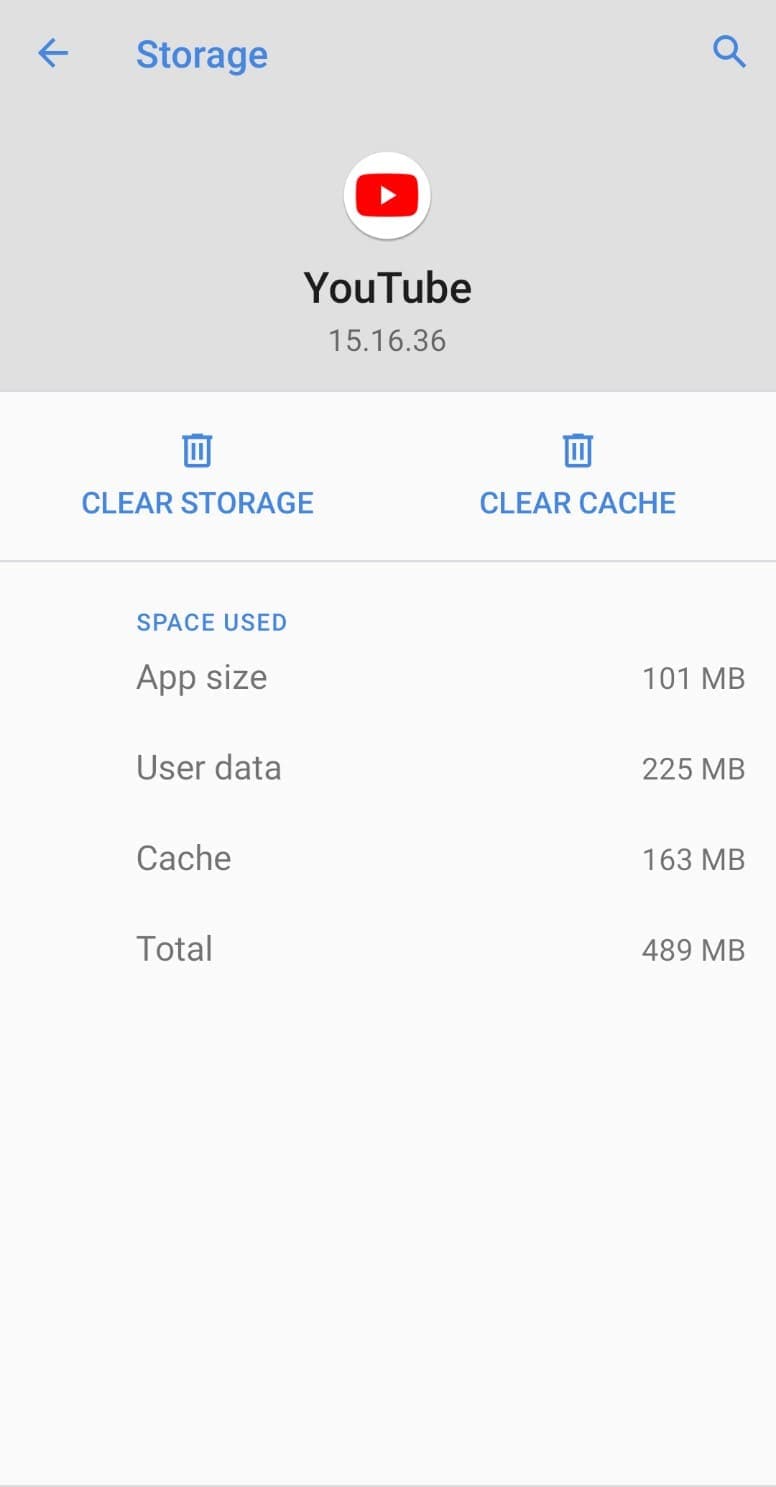
- 6. Tap on “Clear storage”. This will clear all the cache and data of the app from the operating system.
- 7. Now your YouTube videos will be played in the Adblock Browser.
2.iPhone
On iOS, you can keep using the default iOS browser and still be able to block YouTube ads in the Safari browser app. You can add third-party ad blocker apps to disable YouTube ads on your iPhone and link it as the Content Blocker in the Safari settings. To activate the ad blocking feature, follow the steps.
- 1. Open Apple Store and download any ad blocker app you like.
- 2. Now come to the iPhone device Settings and go to Safari.
- 3. In the Safari settings, you will find a “Block Pop-ups” toggle button, activate it.
- 4. Right below the toggle button, you’ll see the “Content Blockers” tap to configure it.
- 5. The ad blocker app you just downloaded will be displaying under Allow these content blockers, enable it with the toggle button.
- 6. Now your Safari browser will block all YouTube ads during playback.
Conclusion
Ads can be annoying and time-wasting if you are being forced to watch them every other minute. YouTube is as addictive as its active userbase depict and during that addiction, anyone will not accept an interruption. To do away with the disruptive adds and block YouTube ads on any of your devices from PC to Mac, or mobile devices you need to have an adblocker application that will disable YouTube ads and make your video viewing experience smooth and relishing.
Richard Bennett
Richard Bennett is a writer and a lover of all things video.
Follow @Richard Bennett
Richard Bennett
Mar 27, 2024• Proven solutions
YouTube is unquestionably the world’s most popular video-sharing platform with a massive 2 billion active monthly users. With such a large audience, advertisers are pouring a lot of funds into Google’s video platform that makes up a big portion of the company’s advertising revenue. Unfortunately, according to the BI Intelligence Digital Trust Survey , YouTube serves up the most annoying ads with 43 percent of the respondents considering YouTube ads most irksome.
Every now and then you’ll get annoyed with the obtrusive ads and ask how to block YouTube ads. Getting away with the un-skippable and plagued 30-second ads during the playback or the onscreen pop-up ads that come suddenly on the playing screen will make your life miserable when watching a show or practicing a dance move. To help you escape the forced ads on YouTube we’ll go through the YouTube ad blocking techniques available. You will learn:
- Part 1: How to block YouTube ads on the computer (Chrome & Firefox)
- Part 2: How to block YouTube ads on the mobile phone (Android & iPhone)
Here is the video guide to help you block Youtube ads on the computer and mobile phone
Part 1: How to block YouTube ads on the computer (Chrome & Firefox)
In case you care about and want to support content creators on YouTube, you can buy the YouTube Premium which will also give you access to exclusive shows and will eliminate ads from your YouTube life.
However, as most of us won’t like the idea of paying for a free service, there are possible solutions of how to block YouTube ads in Chrome or Firefox. You will need to install a third-party browser extension proficient in blocking the annoying YouTube ads in Google Chrome or Mozilla Firefox.
1.Google Chrome
Chrome allows you to have extensions to enhance the browser features and interact more with the content presented to you. These third-party extensions or sometimes called Add-ons can help prevent the irritating YouTube ads to show up on the site. To install them, follow the steps.
- 1. Open Google Chrome browser and go to Menu.
- 2. In the Menu look for “More Tools” and in there tap the “Extensions”.
- 3. In the Extensions tap the “Main menu” at the left-hand side. It will show the menu here open the Chrome Web Store. Or you can simply open Chrome Web Store
- 4. You will need to sign in with your Google account if you’re not already signed in.
- 5. In the search box type “ad blocker YouTube” and tap enter. You’ll see a list of ad blockers available for chrome.
- 6. You will adblocker’s specifically for YouTube ads. Select whichever you like and it will block the YouTube ads on Chrome.
2.Mozilla Firefox
You can also install third-party extensions to block YouTube ads from popping up in the middle of the playback. To install the extensions, follow the steps.
- 1. Tap the Hamburger Menu on Firefox at the top-right corner and select Add-ons.
- 2. In the search bar “Find more extensions” type “ad blocker YouTube” and press enter.
- 3. Select an appropriate ad blocker and it will protect you from the irritating ads.
- 4. Tap the “Add to Firefox” to download the extension.
- 5. It will ask for permission, press “Add” again to grant the permissions.
Part 2: How to block YouTube ads on the mobile phone (Android & iPhone)
Ads can cause inconvenience and make YouTube watching a sour experience. To protect yourself from the constant nagging ads on mobile platforms both Android and iPhone you can utilize the numerous ad-blocking apps for Android and iOS. Though the simplest method of blocking the ads and watch YouTube content without ads is to use the Adblock Browser available both for both devices at Google Play Store and Apple Store. This technique won’t require you to root your Android phone or jailbreak the iPhone for watching ad-free YouTube videos.
1.Android
Android is pretty flexible and allows you to add many feature-rich third-party apps. Though there might be other options available to get rid of the irksome YouTube ads, the easiest and single app solution to remove ads is downloading an Adblock browser app that will act as your default browser when you try to want to watch YouTube videos. The steps to set up your Android to block YouTube ads are down here.
- 1. Click Here to install Adblock Browser on your Android device.
- 2. It is a full-fledged browser and can act as your primary browser for YouTube playback.
- 3. After installing the Adblock Browser your Android device may still try to play videos in the YouTube app.
- 4. To current that, open the “Settings” on your Android and go to “Apps & notifications” and press See all. In the apps find YouTube, tap in to see app info.
- 5. In the App info screen click “Storage & cache”.
- 6. Tap on “Clear storage”. This will clear all the cache and data of the app from the operating system.
- 7. Now your YouTube videos will be played in the Adblock Browser.
2.iPhone
On iOS, you can keep using the default iOS browser and still be able to block YouTube ads in the Safari browser app. You can add third-party ad blocker apps to disable YouTube ads on your iPhone and link it as the Content Blocker in the Safari settings. To activate the ad blocking feature, follow the steps.
- 1. Open Apple Store and download any ad blocker app you like.
- 2. Now come to the iPhone device Settings and go to Safari.
- 3. In the Safari settings, you will find a “Block Pop-ups” toggle button, activate it.
- 4. Right below the toggle button, you’ll see the “Content Blockers” tap to configure it.
- 5. The ad blocker app you just downloaded will be displaying under Allow these content blockers, enable it with the toggle button.
- 6. Now your Safari browser will block all YouTube ads during playback.
Conclusion
Ads can be annoying and time-wasting if you are being forced to watch them every other minute. YouTube is as addictive as its active userbase depict and during that addiction, anyone will not accept an interruption. To do away with the disruptive adds and block YouTube ads on any of your devices from PC to Mac, or mobile devices you need to have an adblocker application that will disable YouTube ads and make your video viewing experience smooth and relishing.
Richard Bennett
Richard Bennett is a writer and a lover of all things video.
Follow @Richard Bennett
Also read:
- Elevating Video Quality Sharing iMovie Work via YouTube
- The YouTuber's Guide to Picking Perfect Recording Tools
- Discovering All in YouTube Shorts Guide
- Top Editors for YouTube' Writers and Creators - All Free!
- Instant Video Hoarder's Guide to Easy Acquisition
- Reclaiming Credibility From a YouTube Ban
- Elite Filmmakers Merging Sounds, Images for 2024
- [New] Essential Illumination Strategies for Filming
- [Updated] A Guide to the 8 Truly Effective Youtube Marketing Methods
- Banner Bliss Get a Peek at Our Library of 50 Free YouTube Banners
- In 2024, Crafting Impactful YouTube Channel Logo Tips
- Transform Your Viewing Experience Activating AV1 on YouTube
- 2024 Approved Constructive Approaches to Defeating Digital Trolls
- [New] A Guide to Crafting Effective YouTube Backlinks
- [New] Earning Through YouTube An Overview
- Virtual Studio Compiling the Best DJ Visuals for Download
- Are There Legal Constraints in Capturing Online Video Screenshots?
- Mastering YouTube Screens' Final Touches
- [Updated] Customize and Upload Longer YouTube Content
- [Updated] Enhancing Video Reach Convert YT to IGTV
- 2024 Approved Economical Growth Methodology - Subscribe Now
- [Updated] Essential Steps for Seamless YouTube Video Loops
- Content Integration Cross-Platform Short Forms for 2024
- Countering Harshness Maintaining Poise Online
- 2024 Approved Dominate the Digital Arena Audience Expansion on Youtube
- 2024 Approved Dominating Viewers' Spaces Channel Empire Rules
- In 2024, Dissecting Video Platform Features YouTube Vs. DailyMention
- Three Ways to Convert YouTube Music Tracks Safely to MP3 Format
- Creating Compelling Valorant Thumbnails for Digital Viewers
- In 2024, Cutting Edge Editors Scouting the Ultimate Tools for YouTube Shorts
- [New] Defeat Bot Intruders, Elevate Video Engagement
- In 2024, Effortless iDevice Integration for Video Sharing Platforms
- [Updated] Direct Hit The Techno-Friendly Way to Upload Your Short Clips
- Quick Captioning Method for Enhanced YouTube Video Quality
- Access Tons of Free Vocal Textures
- 2024 Approved Boost Engagement - Top 8 YouTube Video Trackers Unveiled
- [Updated] Evolving Channels 8 Fastest Video Climbers
- [Updated] Beyond the Box 27 Premium Videostreaming Alternatives
- [Updated] Achieve Professional Quality on YT with Simple Blurring
- 2024 Approved Capture Stillness on the Go without Tripods
- YouTube Mastery Essential Tech to Enhance Your Streams
- 2024 Approved Easy-to-Follow Guide to Using YouTube TV Effectively
- How to Download Part of YouTube Video?
- Professional Insights Top 10 Capture Cards for YouTube Enthusiasts
- In 2024, Crafting a Non-Ad Revenue Stream on YouTube The Self-Sustaining Creator’s Tale
- YouTube Studio's Pathway to High-Quality Videography
- [Updated] Effortless Guide to Adding Banners on Gaming Channels
- Digital Domain Decisions Short-Form Content
- 2024 Approved Boost Engagement with Tailored Templates for Video Info
- [Updated] Best Practices in Adobe Captivate for Videos
- Updated Movie Magic Made Simple A Step-by-Step Guide
- Pixel Perfect A Beginners Guide to HD Video Resolution for 2024
- [Updated] 2024 Approved A Step-by-Step Path to Authentic Selfie Verification on IG
- Updated 2024 Approved Top Web-Based Audio Visualization Tools
- Three Ways to Sim Unlock Vivo X Flip
- In 2024, OBS Not Recording Audio [Solved]
- Spoofing Life360 How to Do it on OnePlus Ace 3? | Dr.fone
- [New] 2024 Approved The Invisible Force Behind Non-Existent FB Videos
- In 2024, How to Mirror Nokia 105 Classic to Mac? | Dr.fone
- [Updated] Navigating OBS Livestream Integration for Maximum Facebook Reach for 2024
- In 2024, Legal Considerations When Uploading Videos to Social Network Sites
- Wondering the Best Alternative to Hola On Motorola G24 Power? Here Is the Answer | Dr.fone
- In 2024, How To Change Your Apple ID on Apple iPhone 15 Plus With or Without Password | Dr.fone
- Updated Mastering Your PCs Sounds A Look at the Leading Recorders for 2024
- In 2024, Here are Some Pro Tips for Pokemon Go PvP Battles On Vivo S18 | Dr.fone
- In 2024, 10 Free Location Spoofers to Fake GPS Location on your Oppo A38 | Dr.fone
- 2024 Approved From Concept to Completion A Stories Polling Handbook
- [Updated] 2024 Approved Twitter's Reactive Content Unveiled
- Updated Best Tricks for Learning Photo Slideshow for 2024
- [New] 2024 Approved Unintended TikTok Reset – How to Get Back Old Videos?
- How to Create a Whiteboard Video Step by Step for 2024
- [New] Navigating Instagram's Self-Verification Maze
- In 2024, The Educator's Resourceful Recorder Companion
- [Updated] Facebook Live in Action 2023 Edition
- [New] In 2024, Express Yourself Authentically on Instagram with These Captions
- What Legendaries Are In Pokemon Platinum On Vivo Y02T? | Dr.fone
- In 2024, Reasons why Pokémon GPS does not Work On Apple iPhone 14 Pro? | Dr.fone
- In 2024, How to Bypass FRP from Vivo Y36i?
- In 2024, Top 9 Oppo A18 Monitoring Apps for Parental Controls | Dr.fone
- In 2024, How Can You Transfer Files From Honor X50 GT To iPhone 15/14/13? | Dr.fone
- iSpoofer is not working On Oppo Find X7? Fixed | Dr.fone
- New Free to Edit 10 Android Video Apps with No Watermark Restrictions
- In 2024, A Detailed and Trustworthy Review of Murf.ai AI Text-to-Speech Tool
- In 2024, The Easy Way to Remove an Apple ID from Your MacBook For your Apple iPhone 11 Pro
- 2024 Approved Revolutionize Your Content Harnessing the Power of FB Lives
- Updated 2024 Approved How to Make a Wonderful Video Slideshow with Your Travel Photos
- Title: Efficient Time Markers in YouTube Videos (Desktop/Mobile Edition) for 2024
- Author: Steven
- Created at : 2024-05-25 19:11:34
- Updated at : 2024-05-26 19:11:34
- Link: https://youtube-clips.techidaily.com/efficient-time-markers-in-youtube-videos-desktopmobile-edition-for-2024/
- License: This work is licensed under CC BY-NC-SA 4.0.
