
:max_bytes(150000):strip_icc()/GettyImages-973902638-5c055ec346e0fb0001dfd9f1.jpg)
"Easier Than Ever Top 9 Uncomplicated, No-Cost Video Tools for You"
Easier Than Ever: Top 9 Uncomplicated, No-Cost Video Tools for You
9 Best Free and Easy Editing Apps You Should Know

Richard Bennett
Dec 14, 2023• Proven solutions
Have you ever made a video 100% on your phone using a mobile video editing app?
If you’ve just started off on YouTube, there’s a good chance your main camera is the one in your phone. Actually, there’s a good chance of that even if you’ve been making YouTube videos for a while now.
Since you’re shooting videos on your phone, why shouldn’t you edit them there too? Here are 9 free video editing apps you can use for YouTube.
Note: This is not a ranked list. The apps will appear in alphabetical order.
- Adobe Premiere Clip (Android or iOS)
- Cameo (iOS)
- Clips (iOS)
- Filmora (Android or iOS)
- Funimate (Android or iOS)
- iMovie (iOS)
- Movie Maker Filmmaker by Alive (Android or iOS)
- PowerDirector (Android)
- Vlogit (Android or iOS)
Adobe Premiere Clip (Android or iOS )

Key Points:
- Automatic using clips. Times them to music
- Guides you with pop-up tips
- No text/title overlays
- Exports directly to YouTube
Adobe Premiere Pro is a professional-grade desktop editor, and Adobe Premiere Clip lives up to the quality standards set by its big-brother software. It is missing some features you might want for YouTube videos, like title effects, but it does have some bells and whistles. There’s a good selection of filters.

Making changes to your picture, like adjusting the exposure or the prevalence of highlights or shadows, is just a matter of sliding bars. The tools for splitting and duplicating clips are easy to find too. You just toggle between the two icons right above your video – the one that looks like a shutter and the one that looks like adjustment bars – to switch between the picture tools and the other tools.

You cannot add what you might normally think of as a title effect in Adobe Premiere Clip, so it’ll be hard to fully complete your video. You can add text cards to put in-between your video clips, but you can’t overlay the title on top of a clip.
You can share your video directly to YouTube when you export.
Cameo (iOS)

Key Points:
- Easy-to-apply themes
- Customizable titles
- Limited features
- Exports to 4K (if your clips are 4K)
Vimeo is a video sharing site with more of a ‘filmmaker’ focus than YouTube, so it isn’t a surprise that their mobile editing app Cameo can export high-quality 4K videos.
Like some of the other apps on this list, Cameo does not have a huge variety of functions. You can reorder your clips, trim them, add titles, and apply themes (essentially filter and title combos).
There are three icons on the main interface: Scissors, a Music Note, and Filters.
The Scissors will take you to the trimming screen, where you can make your clip shorter or longer.

You can also add a title in the trimming screen, but you will not be able to change the font style or color until you are in the Filter screen.
In the Filter screen (tap the overlapping filters icon on the main interface) you will be able to adjust the color of your text by tapping on the circle with the A in it. Tapping where it says ‘Font’ will change your font style.

You can also tap on Themes and choose a premade style.

Here’s what ‘Crush’ looks like applied:

My font was changed, and there’s also a filter now. In order to apply a filter, you must start with a theme.
Clips (iOS)

Key Points:
- Great selection of stickers
- Lacks some basic tools
- Simple interface
Clips is an intuitive app with a lot of options for decorating your videos. It is lacking in some of the more basic editings features you might expect (i.e. you cannot split clips or do any color correction), but it has a lot of fun features like stickers and emojis that could make up for that depending on your needs.

There are also more traditional effects, like filters and titles. There are a wide range of title options in styles that are popular on YouTube, and a fairly standard filter selection.

While you cannot split clips in this app, but trimming and reordering them is easy. For trimming, you just select the clip and then Trim to open a screen where you can drag the start and end points of the clip.
To rearrange your clips, just tap the clip you want to move and hold down. You’ll be able to drag it to a new location.
It’d be hard to rely on Clips exclusively as your YouTube video editor, but it’s well suited for Instagram or for making quick ‘on-the-go’ videos.
Filmora (Android or iOS)

Key Points:
- Export directly to YouTube
- 16:9 or 1:1 for Instagram
- Includes effects like transitions, filters, and overlays
- End-roll logo
You can make a complete video easily just by tapping and dragging in Filmora, and there are even effects like filters, transitions, and overlays you can add to make your video more polished.
After importing your media into Filmora (you can import videos and photos saved on your phone, or media which has been uploaded to a social media account like Facebook or Instagram) you can change the order of your clips by tapping one, pressing down for a moment, and then dragging your clips where you want them.
Trimming a clip is as simple as tapping on it and then Duration. You’ll get this screen where you can adjust the length easily by dragging the markers to beginning or endpoints.

Cropping and zooming are simple too.

Filmora comes with pre-made themes you can apply which include titles, filters, and other effects. These might not be ideal if you already have branding you like to use for YouTube, but in some situations, they can make video creation a lot faster.

Filmora comes loaded with music, or you can even import your own music from your phone.
Once you’re done, tap ‘save’ in the top right corner of your screen to export your video. From the save screen, you’ll be able to export your video directly to YouTube.

One potential drawback is that Filmora will add its own logo to the end of your exported video. This logo will not distract from your video content since it is added at the end and never overlaps any of your clips, but it still might not be ideal for all creators.
Funimate (Android or iOS )

Key Points:
- Easily add text and shapes
- Rainbow doodling
- Shake effects
- Small ‘Funimate’ watermark in videos from the free version
Funimate is lives up to the ‘fun’ promise in its name. It’s designed mostly for music videos/Musical.ly and while it is missing a lot of more typical editing options, there are a few free tools in Funimate that other apps just don’t have.
For example, there are shake and distortion effects available through Funimate that you usually only find in desktop software.
You can also draw rainbow designs on your video with your finger – no other app on this list can do that.
The text tool in Funimate is easy to use, and there are cool looking glow effects you can apply in the color selection screen. Those options are also available when you’re adding shapes, likes stars and sparkles.
Funimate is not built for typical editing, which is both its strength and its weakness. Trimming your clips is its own stage which you must complete before you start adding effects, and you cannot split clips or add multiple clips.
The free version of Funimate does add a small watermark to your videos in the bottom-right corner, but it is subtle enough that I almost missed it completely while reviewing the app.
iMovie (iOS)

Key Points:
- Trailer templates
- Themes
- Limited tools and resources
iMovie’s mobile app is designed for ease and includes things like ‘trailer templates’ and themes that allow you to make a video quickly and with minimal effort.
This streamlined app is limited in its features. Other apps on this list have left out color correction tools or clip splitting tools and instead loaded up on decorative features like stickers, emojis, and overlays. iMovie has left out these tools and does not have an abundance of decorative features either.
There are filters, themes, and titles, however.
The titles are simple but polished, and you’ll find all the standard types of filters.
The themes include a variety of graphics and are applied to your entire video, not individual clips. You can also apply one filter to your entire video.
iMovie also includes a decent selection of transitions, which you can apply easily by tapping the area between two clips.
Movie Maker Filmmaker by Alive (Android or iOS )

Key Points:
- Good title tool
- Stickers
- Change clip duration
- 16:9 or 1:1
Movie Maker Filmmaker (the app will be labeled ‘Alive’ in on your phone) has a lot of features that will help you put together a fun YouTube video. There’s a great selection of stickers, filters, and overlays and they’re all easy to apply. You just click on what you want and resize/reposition it in the player.

This app is missing a lot of basic editing features, however. You cannot adjust things like brightness or saturation. This won’t be a problem if you’re happy with your clips as-is, but it’s a bit odd to not have those options.
There is a text tool and while it is fairly basic, it is also flexible. There is a good selection of fonts to choose from, and you can also choose whether or not you want a colored background, and if your text should have a shadow.
Once you’ve decided on the look of your text you can drag it, resize it, and tilt it however you want in the preview screen.
A slightly odd feature of this app is that it doesn’t save your video to your phone or export it directly to YouTube. Instead, it saves it – and shares it – within the app and gives you the option of sharing it with YouTube after.
Power Director (Android)

Key Points:
- A timeline like desktop software
- All the basic editing features
- Lots of transitions
- Videos from the free version will be watermarked
The first thing you’ll notice when you open up Power Director is that the interface looks a lot like the interface of a lot of desktop editors with a very classic timeline. This familiarity could make it easy to jump into if you’re used to editing on your laptop.
However, Power Director is a bit less intuitive than most of the other apps on this list. I wouldn’t go so far as to say it’s difficult to use – it isn’t, it’s much easier than a lot of desktop software – but among mobile apps designed for streamlined efficiency it does stand out as being a bit harder to dive into.
That is partly because there’s a lot you can do with it. It has the tools you would expect in an editor. You can split and trim clips, and you have all the standard color tools including some that most mobile apps leave out.
A lot of apps have Brightness, Contrast, and Saturation, but PowerDirector also has Color Temperature and Tint.
In addition to editing tools, PowerDirector has bells and whistles like filters –
- and a ton of great transitions.
One drawback of PowerDirector is that the free version will watermark your videos. This watermark is not intrusive, but it isn’t as subtle as the Funimate one either.
You can export videos from PowerDirector directly to YouTube.
Vlogit (Android or iOS )

Key Points:
- Easy thumbnail maker
- Export directly to YouTube
- Animated stickers
Vlogit is also an app from the creators of the Filmora Video Editor. It isn’t quite as intuitive as Filmora, but the major benefit of Vlogit for YouTube creators is that it was designed with you in mind. It has features like animated stickers, emojis, and a thumbnail maker which were included specifically because YouTubers and vloggers need them.
All the usual adjustments you might want to make, like saturation or sharpness, are easy in Vlogit. So are adjustments to the length or crop of clips.
After you save your video you’ll have the option of creating a thumbnail using a screenshot from your video. You can add a colored border, text, emojis, and more!
Once you’re done, you can export directly to YouTube. Like Filmora, Vlogit does have a post-video logo roll.
Have you ever used a free mobile app to edit one of your YouTube videos? What did you use, and were you happy with the results?
Richard Bennett
Richard Bennett is a writer and a lover of all things video.
Follow @Richard Bennett
Richard Bennett
Dec 14, 2023• Proven solutions
Have you ever made a video 100% on your phone using a mobile video editing app?
If you’ve just started off on YouTube, there’s a good chance your main camera is the one in your phone. Actually, there’s a good chance of that even if you’ve been making YouTube videos for a while now.
Since you’re shooting videos on your phone, why shouldn’t you edit them there too? Here are 9 free video editing apps you can use for YouTube.
Note: This is not a ranked list. The apps will appear in alphabetical order.
- Adobe Premiere Clip (Android or iOS)
- Cameo (iOS)
- Clips (iOS)
- Filmora (Android or iOS)
- Funimate (Android or iOS)
- iMovie (iOS)
- Movie Maker Filmmaker by Alive (Android or iOS)
- PowerDirector (Android)
- Vlogit (Android or iOS)
Adobe Premiere Clip (Android or iOS )
Key Points:
- Automatic using clips. Times them to music
- Guides you with pop-up tips
- No text/title overlays
- Exports directly to YouTube
Adobe Premiere Pro is a professional-grade desktop editor, and Adobe Premiere Clip lives up to the quality standards set by its big-brother software. It is missing some features you might want for YouTube videos, like title effects, but it does have some bells and whistles. There’s a good selection of filters.
Making changes to your picture, like adjusting the exposure or the prevalence of highlights or shadows, is just a matter of sliding bars. The tools for splitting and duplicating clips are easy to find too. You just toggle between the two icons right above your video – the one that looks like a shutter and the one that looks like adjustment bars – to switch between the picture tools and the other tools.
You cannot add what you might normally think of as a title effect in Adobe Premiere Clip, so it’ll be hard to fully complete your video. You can add text cards to put in-between your video clips, but you can’t overlay the title on top of a clip.
You can share your video directly to YouTube when you export.
Cameo (iOS)
Key Points:
- Easy-to-apply themes
- Customizable titles
- Limited features
- Exports to 4K (if your clips are 4K)
Vimeo is a video sharing site with more of a ‘filmmaker’ focus than YouTube, so it isn’t a surprise that their mobile editing app Cameo can export high-quality 4K videos.
Like some of the other apps on this list, Cameo does not have a huge variety of functions. You can reorder your clips, trim them, add titles, and apply themes (essentially filter and title combos).
There are three icons on the main interface: Scissors, a Music Note, and Filters.
The Scissors will take you to the trimming screen, where you can make your clip shorter or longer.
You can also add a title in the trimming screen, but you will not be able to change the font style or color until you are in the Filter screen.
In the Filter screen (tap the overlapping filters icon on the main interface) you will be able to adjust the color of your text by tapping on the circle with the A in it. Tapping where it says ‘Font’ will change your font style.
You can also tap on Themes and choose a premade style.
Here’s what ‘Crush’ looks like applied:
My font was changed, and there’s also a filter now. In order to apply a filter, you must start with a theme.
Clips (iOS)
Key Points:
- Great selection of stickers
- Lacks some basic tools
- Simple interface
Clips is an intuitive app with a lot of options for decorating your videos. It is lacking in some of the more basic editings features you might expect (i.e. you cannot split clips or do any color correction), but it has a lot of fun features like stickers and emojis that could make up for that depending on your needs.
There are also more traditional effects, like filters and titles. There are a wide range of title options in styles that are popular on YouTube, and a fairly standard filter selection.
While you cannot split clips in this app, but trimming and reordering them is easy. For trimming, you just select the clip and then Trim to open a screen where you can drag the start and end points of the clip.
To rearrange your clips, just tap the clip you want to move and hold down. You’ll be able to drag it to a new location.
It’d be hard to rely on Clips exclusively as your YouTube video editor, but it’s well suited for Instagram or for making quick ‘on-the-go’ videos.
Filmora (Android or iOS)
Key Points:
- Export directly to YouTube
- 16:9 or 1:1 for Instagram
- Includes effects like transitions, filters, and overlays
- End-roll logo
You can make a complete video easily just by tapping and dragging in Filmora, and there are even effects like filters, transitions, and overlays you can add to make your video more polished.
After importing your media into Filmora (you can import videos and photos saved on your phone, or media which has been uploaded to a social media account like Facebook or Instagram) you can change the order of your clips by tapping one, pressing down for a moment, and then dragging your clips where you want them.
Trimming a clip is as simple as tapping on it and then Duration. You’ll get this screen where you can adjust the length easily by dragging the markers to beginning or endpoints.
Cropping and zooming are simple too.
Filmora comes with pre-made themes you can apply which include titles, filters, and other effects. These might not be ideal if you already have branding you like to use for YouTube, but in some situations, they can make video creation a lot faster.
Filmora comes loaded with music, or you can even import your own music from your phone.
Once you’re done, tap ‘save’ in the top right corner of your screen to export your video. From the save screen, you’ll be able to export your video directly to YouTube.
One potential drawback is that Filmora will add its own logo to the end of your exported video. This logo will not distract from your video content since it is added at the end and never overlaps any of your clips, but it still might not be ideal for all creators.
Funimate (Android or iOS )
Key Points:
- Easily add text and shapes
- Rainbow doodling
- Shake effects
- Small ‘Funimate’ watermark in videos from the free version
Funimate is lives up to the ‘fun’ promise in its name. It’s designed mostly for music videos/Musical.ly and while it is missing a lot of more typical editing options, there are a few free tools in Funimate that other apps just don’t have.
For example, there are shake and distortion effects available through Funimate that you usually only find in desktop software.
You can also draw rainbow designs on your video with your finger – no other app on this list can do that.
The text tool in Funimate is easy to use, and there are cool looking glow effects you can apply in the color selection screen. Those options are also available when you’re adding shapes, likes stars and sparkles.
Funimate is not built for typical editing, which is both its strength and its weakness. Trimming your clips is its own stage which you must complete before you start adding effects, and you cannot split clips or add multiple clips.
The free version of Funimate does add a small watermark to your videos in the bottom-right corner, but it is subtle enough that I almost missed it completely while reviewing the app.
iMovie (iOS)
Key Points:
- Trailer templates
- Themes
- Limited tools and resources
iMovie’s mobile app is designed for ease and includes things like ‘trailer templates’ and themes that allow you to make a video quickly and with minimal effort.
This streamlined app is limited in its features. Other apps on this list have left out color correction tools or clip splitting tools and instead loaded up on decorative features like stickers, emojis, and overlays. iMovie has left out these tools and does not have an abundance of decorative features either.
There are filters, themes, and titles, however.
The titles are simple but polished, and you’ll find all the standard types of filters.
The themes include a variety of graphics and are applied to your entire video, not individual clips. You can also apply one filter to your entire video.
iMovie also includes a decent selection of transitions, which you can apply easily by tapping the area between two clips.
Movie Maker Filmmaker by Alive (Android or iOS )
Key Points:
- Good title tool
- Stickers
- Change clip duration
- 16:9 or 1:1
Movie Maker Filmmaker (the app will be labeled ‘Alive’ in on your phone) has a lot of features that will help you put together a fun YouTube video. There’s a great selection of stickers, filters, and overlays and they’re all easy to apply. You just click on what you want and resize/reposition it in the player.
This app is missing a lot of basic editing features, however. You cannot adjust things like brightness or saturation. This won’t be a problem if you’re happy with your clips as-is, but it’s a bit odd to not have those options.
There is a text tool and while it is fairly basic, it is also flexible. There is a good selection of fonts to choose from, and you can also choose whether or not you want a colored background, and if your text should have a shadow.
Once you’ve decided on the look of your text you can drag it, resize it, and tilt it however you want in the preview screen.
A slightly odd feature of this app is that it doesn’t save your video to your phone or export it directly to YouTube. Instead, it saves it – and shares it – within the app and gives you the option of sharing it with YouTube after.
Power Director (Android)
Key Points:
- A timeline like desktop software
- All the basic editing features
- Lots of transitions
- Videos from the free version will be watermarked
The first thing you’ll notice when you open up Power Director is that the interface looks a lot like the interface of a lot of desktop editors with a very classic timeline. This familiarity could make it easy to jump into if you’re used to editing on your laptop.
However, Power Director is a bit less intuitive than most of the other apps on this list. I wouldn’t go so far as to say it’s difficult to use – it isn’t, it’s much easier than a lot of desktop software – but among mobile apps designed for streamlined efficiency it does stand out as being a bit harder to dive into.
That is partly because there’s a lot you can do with it. It has the tools you would expect in an editor. You can split and trim clips, and you have all the standard color tools including some that most mobile apps leave out.
A lot of apps have Brightness, Contrast, and Saturation, but PowerDirector also has Color Temperature and Tint.
In addition to editing tools, PowerDirector has bells and whistles like filters –
- and a ton of great transitions.
One drawback of PowerDirector is that the free version will watermark your videos. This watermark is not intrusive, but it isn’t as subtle as the Funimate one either.
You can export videos from PowerDirector directly to YouTube.
Vlogit (Android or iOS )
Key Points:
- Easy thumbnail maker
- Export directly to YouTube
- Animated stickers
Vlogit is also an app from the creators of the Filmora Video Editor. It isn’t quite as intuitive as Filmora, but the major benefit of Vlogit for YouTube creators is that it was designed with you in mind. It has features like animated stickers, emojis, and a thumbnail maker which were included specifically because YouTubers and vloggers need them.
All the usual adjustments you might want to make, like saturation or sharpness, are easy in Vlogit. So are adjustments to the length or crop of clips.
After you save your video you’ll have the option of creating a thumbnail using a screenshot from your video. You can add a colored border, text, emojis, and more!
Once you’re done, you can export directly to YouTube. Like Filmora, Vlogit does have a post-video logo roll.
Have you ever used a free mobile app to edit one of your YouTube videos? What did you use, and were you happy with the results?
Richard Bennett
Richard Bennett is a writer and a lover of all things video.
Follow @Richard Bennett
Charting a Course to Riches: YouTube’s Monetary Milestones
YouTube is a widely beloved platform that appeals to individuals of all age groups. If you understand how to harness its potential, YouTube can become a source of income. Generating income from YouTube videos becomes simple through YouTube video monetization. If you’re keen on monetizing your YouTube account, this article is your guide. You can turn it into a part-time gig or a full-time profession, potentially earning a solid income.
To earn well, your content must align with what viewers truly desire. Read this article to learn about how you can monetize YouTube videos, its rules, and requirements.
YouTube Monetization Helper Create the conditions for effective YouTube monetization with Wondershare Filmora!
Free Download Free Download Learn More

Part 1. How to Get Monetized on YouTube: Rules and Requirements
How to Monetize YouTube Channel
Begin making money from your YouTube videos through the YouTube Partner Program. You can create earnings from your YouTube channel by connecting it to your Google account. Monetize your website using Google AdSense.
Google AdSense generates substantial website revenue. If viewers interact with the ads in your videos, you earn money. Adding AdSense to your YouTube channel makes your videos monetizable.
Some videos cannot be monetized, however. Content must meet specific requirements to qualify for YouTube’s program. Criteria include content quality, community guidelines, and copyright compliance. Your YouTube channel can generate income once your videos meet these standards.
Monetizing YouTube Videos: What Are The Requirements?
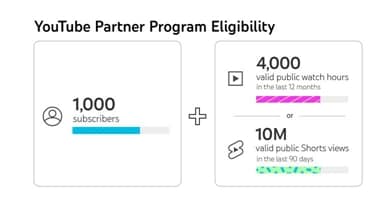
You can monetize your YouTube videos by joining the YouTube Partner Program. Everyone can create a YouTube account, but YPP requires certain requirements. Every time you create content, you must consider these requirements.
Prior to applying for the program, your channel must first accomplish the following:
- One thousand subscribers
- A total of 4,000 watch hours in the past year
Building your audience and creating great content will help you meet these requirements. Joining the YPP, and making sure your YouTube channel complies with YouTube’s rules and policies, is the more complicated aspect.
Those advertising on YouTube want to avoid being linked to low-quality content. Therefore, YouTube Partner Program members are encouraged to create unique, valuable videos.
When you upload content to YouTube, you’ll need to keep these things in mind. Those who plan on monetizing their videos should thoroughly read these documents. You also need to set up a Google AdSense account, which tracks and pays for your YouTube ads.

Part 2. 10 Proven Ways to Monetize Your YouTube Channel
10 Methods to Monetize YouTube Videos
You can monetize your YouTube videos in 10 different ways, including:
- Google Adsense
- Paid Sponsorship
- YouTube Premium
- Memberships
- Merchandise
- Invest in crowd-funding
- Stickers, chats, and thanks
- YouTube Shorts
- YouTube Brandconnect
- YouTube Shopping
1. Google AdSense
YouTube channel monetization is the most popular method. By adding AdSense to your videos, you can generate revenue from the ads displayed. You must adhere to our advertiser-friendly guidelines when creating your videos. The monetization of all videos may not be possible, therefore. YouTube and AdSense work seamlessly together. With no technical knowledge required, your monetization strategy can be set up and managed easily.

2. Paid Sponsorships
Sponsorship involves paying a content creator to use, demonstrate, or test a brand’s product in a video. Both the creator and the brand benefit from sponsorships provided by brands.
The rewards of sponsorship can be immense, but sponsorships are hard to come by. You can pitch relevant brands to partner with your influential channel if your channel has a large following.

3. YouTube Premium
Joining the YouTube Partner Program qualifies you for YouTube Premium. In addition, it can increase your earnings. YouTube Premium members get paid when they watch your content as a creator. The number of Premium members has now surpassed 20 million. It is possible that this may occur quite frequently. YouTube Premium will automatically pay you if someone watches your content.

4. Memberships
Creating membership tiers on your channel allows you to offer different perks to different levels of subscription. Using memberships has the main benefit of providing a more steady income stream. Ad revenue is a more traditional method of monetization. This feature is enabled by channels with at least 1,000 subscribers, and the creator sets fees.

5. Merchandise
You can sell merchandise on YouTube videos with over 10,000 subscribers using a merch shelf. By selling branded merchandise to your YouTube fans, you can generate additional revenue.
It’s especially useful for YouTube creators without their own website who want to sell merchandise. Currently, there are over 45 platforms or retailers worldwide that support merch, so growing your brand is easy.
6. Invest in crowd-funding
It’s not just for startups anymore; you can use crowdfunding to fund content creation on YouTube as well. You can find people to support your work through third-party applications like Patreon in exchange for perks. You can now place sponsor buttons on your YouTube videos, which allows you to crowdfund. With this, you can offer rewards in exchange for monthly funding like with Patreon.
7. Stickers, chats, and thanks
During live streams and premieres, creators can engage their fans with Super Chat and Super Stickers. In the live chat, fans can purchase Super Chats to display their message prominently. A Super Sticker is an animated image displayed during a live chat session. The Super Thanks feature enables creators to earn income from their videos. Additional appreciation may be expressed by those who wish to do so
8. YouTube Shorts
Using the YouTube app, short, vertical videos can be uploaded straight to YouTube using a smartphone. In the same way as Instagram Stories are uploaded to the social media site. The length of YouTube shorts is limited to 60 seconds. In 2021 and 2022, a $100 million fund will be distributed for YouTube Shorts. With this initial stage, YouTube Shorts began to monetize in May 2021. A YouTube Short will only be compensated if it meets the fund’s criteria.

9. YouTube BrandConnect
Brands and YouTube creators can work together on content campaigns through YouTube BrandConnect. In terms of product recommendations, audiences trust creators. It is also possible to partner with YouTube channels through BrandConnect
10. YouTube Shopping
YouTube shopping gives you the chance to promote your own products or those of other brands. It is possible to connect your store (such as Shopify) to YouTube. Add your products to videos, shorts, live streams, etc., as well as tag other brands’ products.
Part 3. Wondershare Filmora: A Video Editing Software to Help Edit YouTube Videos
Wondershare Filmora is your creative ally when it comes to enhancing and editing YouTube videos. Video editing software like Filmora allows you to produce visually engaging and captivating content. Creating the conditions for effective YouTube monetization.
Filmora is cross-platform compatible. Making it accessible for all creators, so you can work on your videos wherever you are. With Filmora, you can enhance your video content no matter what platform you’re using.
Edit YouTube videos with Filmora’s features
Using Filmora’s features, you can give your videos a professional edge.
Free Download For Win 7 or later(64-bit)
Free Download For macOS 10.14 or later
Adjustment Layer
Take the Adjustment Layer feature, for instance, which allows you to add general effects to multiple video clips simultaneously, saving you time and effort. This feature can make your video content more engaging, ultimately attracting a larger audience.
Split Screen
You can create eye-catching split-screen videos with Filmora’s Split Screen Video Editor. Simply click a button to create split-screen videos using premade templates. Enhancing the visual appeal and dynamic of your videos for easy monetization on YouTube.
Motion Tracking
Motion Tracking is another exciting feature that Filmora brings to the table. It enables you to track the movement of objects within your videos and pin graphics and media files to follow the motion magically. This not only adds a touch of professionalism to your videos but also keeps your audience engaged.
Video Effects
Filmora offers a treasure trove of creative possibilities with its Video Effects, including transitions, filters, titles, and motion elements that you won’t find elsewhere. These exclusive features will help you infuse your videos with creativity and style.
Mask and Blend
And let’s not forget the Mask and Blend feature, which allows you to create unique video effects by masking and blending video clips. With only a few clicks, you can create distinct video effects that will set your content apart.
Wondershare Filmora empowers you to take your YouTube videos to the next level. making them more visually appealing, engaging, and ultimately better suited for monetization.
Try Filmora out Free! Click here!
Free Download For Win 7 or later(64-bit)
Free Download For macOS 10.14 or later
Conclusion
For those aspiring to turn their passion into a source of income, YouTube is a treasure trove of opportunities. This comprehensive 2024 guide has shed light on the path to monetizing your YouTube channel. With Google AdSense, paid sponsorships, and YouTube Premium, you’ve learned the ropes of the YouTube Partner Program.
With Wondershare Filmora‘s user-friendly tools, your videos will stand out on a professional level. As a result, your YouTube dreams will become a reality in 2024 with dedication and these insights.
Free Download Free Download Learn More
Part 1. How to Get Monetized on YouTube: Rules and Requirements
How to Monetize YouTube Channel
Begin making money from your YouTube videos through the YouTube Partner Program. You can create earnings from your YouTube channel by connecting it to your Google account. Monetize your website using Google AdSense.
Google AdSense generates substantial website revenue. If viewers interact with the ads in your videos, you earn money. Adding AdSense to your YouTube channel makes your videos monetizable.
Some videos cannot be monetized, however. Content must meet specific requirements to qualify for YouTube’s program. Criteria include content quality, community guidelines, and copyright compliance. Your YouTube channel can generate income once your videos meet these standards.
Monetizing YouTube Videos: What Are The Requirements?
You can monetize your YouTube videos by joining the YouTube Partner Program. Everyone can create a YouTube account, but YPP requires certain requirements. Every time you create content, you must consider these requirements.
Prior to applying for the program, your channel must first accomplish the following:
- One thousand subscribers
- A total of 4,000 watch hours in the past year
Building your audience and creating great content will help you meet these requirements. Joining the YPP, and making sure your YouTube channel complies with YouTube’s rules and policies, is the more complicated aspect.
Those advertising on YouTube want to avoid being linked to low-quality content. Therefore, YouTube Partner Program members are encouraged to create unique, valuable videos.
When you upload content to YouTube, you’ll need to keep these things in mind. Those who plan on monetizing their videos should thoroughly read these documents. You also need to set up a Google AdSense account, which tracks and pays for your YouTube ads.
Part 2. 10 Proven Ways to Monetize Your YouTube Channel
10 Methods to Monetize YouTube Videos
You can monetize your YouTube videos in 10 different ways, including:
- Google Adsense
- Paid Sponsorship
- YouTube Premium
- Memberships
- Merchandise
- Invest in crowd-funding
- Stickers, chats, and thanks
- YouTube Shorts
- YouTube Brandconnect
- YouTube Shopping
1. Google AdSense
YouTube channel monetization is the most popular method. By adding AdSense to your videos, you can generate revenue from the ads displayed. You must adhere to our advertiser-friendly guidelines when creating your videos. The monetization of all videos may not be possible, therefore. YouTube and AdSense work seamlessly together. With no technical knowledge required, your monetization strategy can be set up and managed easily.
2. Paid Sponsorships
Sponsorship involves paying a content creator to use, demonstrate, or test a brand’s product in a video. Both the creator and the brand benefit from sponsorships provided by brands.
The rewards of sponsorship can be immense, but sponsorships are hard to come by. You can pitch relevant brands to partner with your influential channel if your channel has a large following.
3. YouTube Premium
Joining the YouTube Partner Program qualifies you for YouTube Premium. In addition, it can increase your earnings. YouTube Premium members get paid when they watch your content as a creator. The number of Premium members has now surpassed 20 million. It is possible that this may occur quite frequently. YouTube Premium will automatically pay you if someone watches your content.
4. Memberships
Creating membership tiers on your channel allows you to offer different perks to different levels of subscription. Using memberships has the main benefit of providing a more steady income stream. Ad revenue is a more traditional method of monetization. This feature is enabled by channels with at least 1,000 subscribers, and the creator sets fees.
5. Merchandise
You can sell merchandise on YouTube videos with over 10,000 subscribers using a merch shelf. By selling branded merchandise to your YouTube fans, you can generate additional revenue.
It’s especially useful for YouTube creators without their own website who want to sell merchandise. Currently, there are over 45 platforms or retailers worldwide that support merch, so growing your brand is easy.
6. Invest in crowd-funding
It’s not just for startups anymore; you can use crowdfunding to fund content creation on YouTube as well. You can find people to support your work through third-party applications like Patreon in exchange for perks. You can now place sponsor buttons on your YouTube videos, which allows you to crowdfund. With this, you can offer rewards in exchange for monthly funding like with Patreon.
7. Stickers, chats, and thanks
During live streams and premieres, creators can engage their fans with Super Chat and Super Stickers. In the live chat, fans can purchase Super Chats to display their message prominently. A Super Sticker is an animated image displayed during a live chat session. The Super Thanks feature enables creators to earn income from their videos. Additional appreciation may be expressed by those who wish to do so
8. YouTube Shorts
Using the YouTube app, short, vertical videos can be uploaded straight to YouTube using a smartphone. In the same way as Instagram Stories are uploaded to the social media site. The length of YouTube shorts is limited to 60 seconds. In 2021 and 2022, a $100 million fund will be distributed for YouTube Shorts. With this initial stage, YouTube Shorts began to monetize in May 2021. A YouTube Short will only be compensated if it meets the fund’s criteria.
9. YouTube BrandConnect
Brands and YouTube creators can work together on content campaigns through YouTube BrandConnect. In terms of product recommendations, audiences trust creators. It is also possible to partner with YouTube channels through BrandConnect
10. YouTube Shopping
YouTube shopping gives you the chance to promote your own products or those of other brands. It is possible to connect your store (such as Shopify) to YouTube. Add your products to videos, shorts, live streams, etc., as well as tag other brands’ products.
Part 3. Wondershare Filmora: A Video Editing Software to Help Edit YouTube Videos
Wondershare Filmora is your creative ally when it comes to enhancing and editing YouTube videos. Video editing software like Filmora allows you to produce visually engaging and captivating content. Creating the conditions for effective YouTube monetization.
Filmora is cross-platform compatible. Making it accessible for all creators, so you can work on your videos wherever you are. With Filmora, you can enhance your video content no matter what platform you’re using.
Edit YouTube videos with Filmora’s features
Using Filmora’s features, you can give your videos a professional edge.
Free Download For Win 7 or later(64-bit)
Free Download For macOS 10.14 or later
Adjustment Layer
Take the Adjustment Layer feature, for instance, which allows you to add general effects to multiple video clips simultaneously, saving you time and effort. This feature can make your video content more engaging, ultimately attracting a larger audience.
Split Screen
You can create eye-catching split-screen videos with Filmora’s Split Screen Video Editor. Simply click a button to create split-screen videos using premade templates. Enhancing the visual appeal and dynamic of your videos for easy monetization on YouTube.
Motion Tracking
Motion Tracking is another exciting feature that Filmora brings to the table. It enables you to track the movement of objects within your videos and pin graphics and media files to follow the motion magically. This not only adds a touch of professionalism to your videos but also keeps your audience engaged.
Video Effects
Filmora offers a treasure trove of creative possibilities with its Video Effects, including transitions, filters, titles, and motion elements that you won’t find elsewhere. These exclusive features will help you infuse your videos with creativity and style.
Mask and Blend
And let’s not forget the Mask and Blend feature, which allows you to create unique video effects by masking and blending video clips. With only a few clicks, you can create distinct video effects that will set your content apart.
Wondershare Filmora empowers you to take your YouTube videos to the next level. making them more visually appealing, engaging, and ultimately better suited for monetization.
Try Filmora out Free! Click here!
Free Download For Win 7 or later(64-bit)
Free Download For macOS 10.14 or later
Conclusion
For those aspiring to turn their passion into a source of income, YouTube is a treasure trove of opportunities. This comprehensive 2024 guide has shed light on the path to monetizing your YouTube channel. With Google AdSense, paid sponsorships, and YouTube Premium, you’ve learned the ropes of the YouTube Partner Program.
With Wondershare Filmora‘s user-friendly tools, your videos will stand out on a professional level. As a result, your YouTube dreams will become a reality in 2024 with dedication and these insights.
Also read:
- [Updated] Decoding YouTube's Strategic Approach to Short-Form Video Promotion
- Bridging Mac & Monetization IMovie Editing to YouTube Success for 2024
- Discovering the Potential Apple Devices on Your YouTube Channel for 2024
- 2024 Approved Crafting the Perfect Panel of Playback with YouTube
- YouTube Mysteries Solved Decoding 'Unlisted' Content Explained
- In 2024, Best Practices in Selecting YouTube Video Extractor Apps for Android
- [New] Alternative Video Editor Tips Beyond YouTube
- [Updated] Audio Artisans Crafting a Personal Library with 6 Best Free YouTube Apps
- Capturing Life on Camera Mastering the Art of Vlogging
- [Updated] Elevate Your Content SEO Mastery Starts Here
- In 2024, 3 Creative Ways to Enhance YouTube Videos with Neon Edges
- Chart a Course to Popularity The Fundamentals of Channel Featuring on Youtube for 2024
- [Updated] Elevate Your YT Presence and Skyrocket To 1000+ Fans
- In 2024, Digital Dollars Kings & Queens YouTube Edition
- Direct the Degrees Cutting-Edge YouTube Video Manipulation
- Essential Tags to Amplify Your YouTube Gaming Channel
- EpicEditor Hub Innovative PC Cutting with Tunes
- In 2024, Brighter Days with Five Winter-Themed Backgrounds
- [Updated] Easy Access Best Free YouTube Subtitle Extractors
- How to Add Custom YouTube Shorts Thumbnails Effortlessly
- [New] Best Recording Equipment For Creating YouTube Masterpieces
- Scale Up Influence Crafting Content That Resonates
- [New] Conquering the Labyrinth of Lesser-Known YouTube Content
- Prime Cinematic Creator A Symphony of Sights & Sounds
- 2024 Approved Dissecting the Safety of Using Subforsup For YouTube Growth
- Initiate Your Journey Into ASMR Filming – Essential Insights Revealed
- Adjust Your Video Feedback Control in YouTube
- [New] Chuckles Galore Navigate the Best 15 Comedic YouTube Crews
- Effective Team Videos Boosting Channelnode Growth Rate for 2024
- [New] Essential Resources for Crafting Eye-Catching YouTube Ends
- Enhance Your Online Presence with These 50 Complimentary Banners
- [New] Bewitching Blend YouTube Edition of Top Magic Tricks
- Step-by-Step Guide to Adding Your Own Video Images
- Endless Entertainment Loop YouTube Content on TV
- Exclusive YouTube Snippet Access - High Quality, Free Download
- 2024 Approved Budget-Conscious Filmmaker's Essential Video Gear List
- Discover the Power of 10-Second Beats in YouTube Music
- Completely Erase Your Connection with YouTube Shorts for 2024
- In 2024, Download YouTube Images with Ease Online
- Skyrocket Views on YouTube in Minutes (2 Strategies)
- Crafting Captivating YouTube Thumbnails A Sizing Guide
- 3-Part Blueprint to Monitor and Maximize Your YouTube Profits
- Best Practices for YouTube Video Marketing for 2024
- Elevate Your Content Mastering the Art of Selected YouTube Channels for 2024
- [New] Attract More Viewers Crafting Impressive Youtube Description with Custom Templates
- 2024 Approved Avoiding Common Pitfalls in YouTube Sponsorships, According to FameBit
- The Sound of Success Audio Tips to Elevate Your YouTube Experience
- Tailoring Tags A Guide for Enhanced Online Visibility
- [New] 2024 Approved Skyrocketing Popularity on IGTV with Powerful, Targeted Hash Tags
- Updated In 2024, Utilizing Mystery and Intrigue Through Suspense Music for Film Scoring Excellence
- Retro Reviver Software
- [New] 2024 Approved Scrutinizing the Importance of Honesty in Online Self-Portraits
- In 2024, 7 Ways to Unlock a Locked Samsung Galaxy A54 5G Phone
- [Updated] Capture the Essence of Movement in iPhone Photography
- [Updated] How to Create Time Travel Teleportation Effects
- 2024 Approved Are You Looking for the Best Way to Add Subtitles to Your Video? The Top SRT File Creators Can Help You Do That
- 2024 Approved Get to Know How Excellent Sparkle Video Effects Can Significantly Impact Different Projects. Its Miraculous. Read Below to Learn More and Add Sparkle Effect to Your Videos
- In 2024, The Ultimate Guide to Removing Background Noise in Audio Editing
- New 2024 Approved The 9 Premier Artificial Intelligence Vocal Tools Reimagining Tomorrows Daily Routine
- Best Android Data Recovery - undelete lost call logs from Tecno Camon 20 Premier 5G
- How to play MP4 files on Samsung Galaxy A05s?
- 2024 Approved Essential Mac Screen Recorders – Top 10 FREE List
- 2024 Approved The Ultimate Guide to Fast Video Trimming on Mac Tips and Tricks
- Vision & Motion Fusion Leading Phones Combining Power, Speed, and Smooth Shots
- Best Practices in Unbounded Online Space Use
- In 2024, Effective Guide to Cast Apple iPhone 14 Pro to MacBook without Hindrance | Dr.fone
- Different Methods for Resetting Motorola Moto G23 Phones with Screen Locked and Not | Dr.fone
- Innovative Interface Intensity
- Top 6 Free Talking Stock Photo Sites for 2024
- Unlock the Secrets Maximizing Your Video Content on Zoom & YouTube Live
- Crafting Memorable Tweets Video Integration
- 7 Best MP4 Video Editors on Mac Edit MP4 Videos Easily for 2024
- [Updated] In 2024, Eliminate Your Discord Servers Desktop & Android Tips
- In 2024, A Working Guide For Pachirisu Pokemon Go Map On Vivo S17t | Dr.fone
- Updated Identifying Core Functionalities in Digital Sound Editors for Mac
- 2024 Approved How To Leverage Different Gadgets Recording and Saving YouTube Livestayere
- [New] Cutting-Edge Approaches to Crafting Top FB Cover Videos for 2024
- [Updated] Cut-to-the-Chase Newest Method for iDevice Screen Recordings, 2023 for 2024
- Bypassing Identification to Explore Instagram Stories [Desktop, Android, iOS]
- Vivo V27 Bootloop Problem, How to Fix it Without Data Loss | Dr.fone
- Title: "Easier Than Ever Top 9 Uncomplicated, No-Cost Video Tools for You"
- Author: Steven
- Created at : 2024-05-25 19:10:16
- Updated at : 2024-05-26 19:10:16
- Link: https://youtube-clips.techidaily.com/easier-than-ever-top-9-uncomplicated-no-cost-video-tools-for-you/
- License: This work is licensed under CC BY-NC-SA 4.0.
