
:max_bytes(150000):strip_icc()/GettyImages-1079012838-18c9de31049847f5bb71da74611f8c94.jpg)
"Dive Into the Depth of 4K Content Your Ultimate Guide for YouTube Submission for 2024"
Dive Into the Depth of 4K Content: Your Ultimate Guide for YouTube Submission
Create High-Quality Video - Wondershare Filmora
An easy and powerful YouTube video editor
Numerous video and audio effects to choose from
Detailed tutorials provided by the official channel
Many people have a strong desire to make videos. Whether you make videos for a living or as a pastime, it doesn’t matter. When you make a fantastic film that you’re pleased with, you want to show it off to your friends and family. YouTube, the most popular site for sharing videos on various themes, is one of the most incredible places to start.
YouTube is fantastic for sharing videos, but it can be harsh on artists due to the high bar for content and video quality. If you want to succeed as a YouTuber, you must create videos that are informative and high-resolution. This is critical since your viewers may wish to watch your movies on a computer screen or a 4K smart TV.
If you’ve decided to make videos in 4K resolution, you’ll find information on recommended encoding settings, how to upload a video to YouTube, potential problems, and more below.
In this article
01 What Is The Distinction Between Various Resolutions?
02 Why Would You Want To Upload A 4k Video?
03 What Is The Best Way To Upload A 4k Video To Youtube?
04 Tips On How To Make Sure The Video You’re Uploading Is Of High Quality
What Is The Distinction Between Various Resolutions?
The number of pixels on a screen is referred to as resolution. Low resolution indicates fewer pixels and typically less space, whereas high resolution means more pixels and generally greater space and detail. You probably have a poor resolution if you’re using a standard laptop or an old screen.
When watching a video on a larger screen, the resolution significantly impacts your viewing experience. Whether it’s a live stream or an on-demand movie, the correct resolution is crucial to reaching a wider audience, and this is where iPhones and iPads appear to have an advantage. Let’s take a closer look at each of these resolution types and their associated pixel sizes.
1. SD RESOLUTION (STANDARD DEFINITION)
Previously, resolutions were separated into SD (Standard Definition) and HD (High Definition) categories. SD was defined as a video with a resolution of less than 720p. However, as television and computer monitor display resolutions improved over time, a video was less likely to be shot in Standard Definition.
The following are the most common standard video resolutions:
- 640 × 360 pixels (or 360p)
- 640 × 480 pixels (or 480p)
2. RESOLUTION: 720P HD (HIGH DEFINITION)
The lowest video resolution is 720p, which is commonly referred to as ‘HD.’ 720p (1280 x 720 pixels) is a resolution recognized for modest web content, even though most videos require at least 1080p. Because most computer monitors are now in HD, the recommended practice for web and streaming is to choose a resolution higher than 720p.
The resolution of HD videos is usually: 1280 x 720 pixels (or 720p)
3. 1080P FULL HD RESOLUTION
1080p resolutions, also known as ‘Full HD,’ have become the industry standard for a clear HD video that doesn’t take up a lot of storage space. It’s also worth noting that this is the standard screen resolution for all smartphones.
The resolution of full HD videos is usually: 1920 x 1080 pixels (or 1080p)
4. 2K RESOLUTION WITH QHD (QUAD HIGH DEFINITION)
Quad HD resolution, or QHD for short, is widely found on high-end smartphones and gaming monitors. The resolution of 1440p is four times that of HD Ready (or 720p HD). Many high-end smartphones have a Quad HD+ resolution (296 x 1440 pixels), which is ideal for 1440p. Another common screen resolution is 2K, which allows for larger displays and reframing without sacrificing quality or image editing.
The resolution of QHD and 2K videos is:
- 2560 x 1440 pixels in QHD (or 1440p)
- 2048 x 1080 pixels in 2K (or 1080p)
5. 4K (OR UHD/ULTRA-HIGH-DEFINITION) RESOLUTION
This sort of resolution, often known as 4Kor UHD (Ultra High Definition), has a pixel size of 3840 x 2160 pixels. It has a similar appearance to 2K, but it provides video artists more room to edit and zoom in. For vivid color, graphics, or dramatic viewing, both 2K and 4K resolutions are available. Unless you wish to tweak colors or trim in closer, there aren’t enough visible distinctions between 2K and 4K. So, it matters when you want to change a certain detail, but it doesn’t matter when someone else is looking at it.
The resolution of 4K videos is: 3840 x 2160 (or 2160p / simply 4K) is a resolution of 3840 x 2160 pixels.
Why Would You Want To Upload A 4k Video?
YouTube is the second-largest social media site, with approximately 1.9 billion monthly active users. YouTube is where you want to be to access this large audience and promote your brand, with one billion hours of video watched every day on the platform.
However, for your target audience to watch your videos, you must ensure excellent video quality. Poorly shot or edited films may alienate your viewers, especially when there are billions of other videos to choose from on the site.
- 4k is the most satisfactory resolution for uploading to YouTube. Although not every viewer can watch videos in 4k, it ensures that your visitors get the best possible experience.
- Traditional Full HD (1920 x 1080) TVs feature four times as many pixels as 4K TVs. Because of the higher pixel density, the picture quality of 4K TVs is more colorful and detailed, even on TV displays of the same size. This distinction is most noticeable on large-screen televisions.
- Even if you recorded in 1080p and upscaled to 4K, you should post in 4K to YouTube for the finest image quality. Recording in 1080p, editing in 1080p, exporting in 4k, and YouTube viewing is sharper in 1080p.
- With 4K, you get stunning visuals with a resolution of 38402160, which is four times that of Full-HD. That’s why visuals appear crisp and lifelike, even on large-screen TVs rather than pixelated. Down-converted 4K to Full-HD photographs have superior quality and resolution than images shot in Full-HD from the start.
What Is The Best Way To Upload A 4k Video To Youtube?
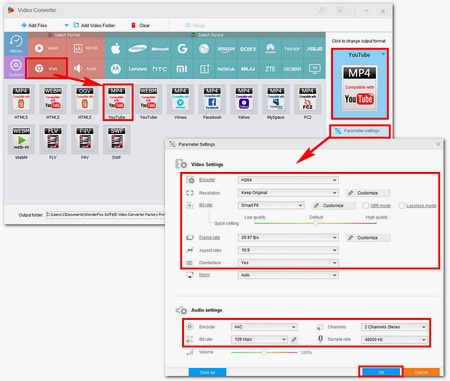
The YouTube upload process is not complicated, but it does need several steps. You can finally post your video once it has been prepared and converted to MP4 format.
Follow the steps below to post your video to YouTube:
1. Go to YouTube.com in your browser.
2. Log in to your account and click the “Create” symbol, which looks like a camera with a plus sign, in the right corner of the menu bar.
3. Select “Upload video” from the drop-down menu.
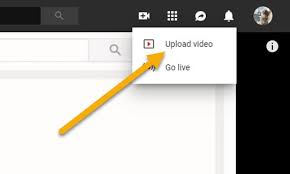
4. Drag and drop your video file into the upload box, or select your file from the “Select File” menu and click “Open.”
5. Make a note of the title and description while YouTube is processing your video.

6. Select a video thumbnail from the options or upload your own and select your “Audience” from the drop-down menu. To manage age restriction settings.
7. Select “More Options” to add searchable keywords to your video, manage subtitles and comments, and more.
8. Select if you want to add promotions to your video by clicking “Next.”
9. Finally, click “Next” and wait for the video to be processed entirely before publishing it.
10. You can also automatically set it to publish at a later date.
Tips On How To Make Sure The Video You’re Uploading Is Of High Quality
The following are five tips for amateur and top newbie YouTubers who want to improve their videos.
1. Cut Your Video Into Clips And Organize It
While it may appear to be the simplest solution to perform an entire video at once, this might make the process tedious or even damage your video if you are interrupted or make a speech error. Smaller video segments are easier to edit and blend into a single, well-formatted video.
2. Youtube Video Export
You can also modify your videos in various formats to your heart’s content before exporting them to YouTube and publishing them. Although uploading and exporting may take some time, the quality of your video will significantly increase, and the time and work you put in will be evident.
3. Change Up Your Shots
Rather than keeping your camera fixed, try varied angles while shooting. This may not work for all of your videos, but it is critical to keep your viewers engaged while they watch them, especially if you want them to stay until the finish and come back for more. Unless you’re talking about anything incredibly essential, sitting and listening to someone talk for more than 10 minutes without the camera moving will quickly become dull or old.
4. Transitions And Effects
When editing a video with numerous parts, the use of effects and transitions can considerably impact the overall quality of the video. Filmora is far more sophisticated than Windows Movie Maker and iMovie on Mac. It also allows you to create a professional-looking YouTube video with hundreds of presets such as filters, overlays, components, transitions, and blending several layers of effects and audio to enhance your YouTube tale.
Wondershare Filmii is one of the greatest choices for Windows for beginners who wish to create video footage with templates automatically. Smart video templates, trendy filters and overlays, fun stickers and motion components, and, most importantly, advanced editing capabilities are all available.
For Win 7 or later (64-bit)
For macOS 10.12 or later
Conclusion
● This is pretty much everything we’ve gathered to assist you in uploading 4K videos to YouTube. Do not become worried. Your 4K video will be in low resolution when you first publish it. This is due to YouTube’s high-resolution processing requiring time. It could take a few hours for your video to be available in 4K mode.
● The duration, format, frame rate, and resolution of your video all affect the processing time for high-definition videos. If you don’t want your video to be seen unless it has a high-quality option, upload it as unlisted and then publish it once 4K resolution is available.
Many people have a strong desire to make videos. Whether you make videos for a living or as a pastime, it doesn’t matter. When you make a fantastic film that you’re pleased with, you want to show it off to your friends and family. YouTube, the most popular site for sharing videos on various themes, is one of the most incredible places to start.
YouTube is fantastic for sharing videos, but it can be harsh on artists due to the high bar for content and video quality. If you want to succeed as a YouTuber, you must create videos that are informative and high-resolution. This is critical since your viewers may wish to watch your movies on a computer screen or a 4K smart TV.
If you’ve decided to make videos in 4K resolution, you’ll find information on recommended encoding settings, how to upload a video to YouTube, potential problems, and more below.
In this article
01 What Is The Distinction Between Various Resolutions?
02 Why Would You Want To Upload A 4k Video?
03 What Is The Best Way To Upload A 4k Video To Youtube?
04 Tips On How To Make Sure The Video You’re Uploading Is Of High Quality
What Is The Distinction Between Various Resolutions?
The number of pixels on a screen is referred to as resolution. Low resolution indicates fewer pixels and typically less space, whereas high resolution means more pixels and generally greater space and detail. You probably have a poor resolution if you’re using a standard laptop or an old screen.
When watching a video on a larger screen, the resolution significantly impacts your viewing experience. Whether it’s a live stream or an on-demand movie, the correct resolution is crucial to reaching a wider audience, and this is where iPhones and iPads appear to have an advantage. Let’s take a closer look at each of these resolution types and their associated pixel sizes.
1. SD RESOLUTION (STANDARD DEFINITION)
Previously, resolutions were separated into SD (Standard Definition) and HD (High Definition) categories. SD was defined as a video with a resolution of less than 720p. However, as television and computer monitor display resolutions improved over time, a video was less likely to be shot in Standard Definition.
The following are the most common standard video resolutions:
- 640 × 360 pixels (or 360p)
- 640 × 480 pixels (or 480p)
2. RESOLUTION: 720P HD (HIGH DEFINITION)
The lowest video resolution is 720p, which is commonly referred to as ‘HD.’ 720p (1280 x 720 pixels) is a resolution recognized for modest web content, even though most videos require at least 1080p. Because most computer monitors are now in HD, the recommended practice for web and streaming is to choose a resolution higher than 720p.
The resolution of HD videos is usually: 1280 x 720 pixels (or 720p)
3. 1080P FULL HD RESOLUTION
1080p resolutions, also known as ‘Full HD,’ have become the industry standard for a clear HD video that doesn’t take up a lot of storage space. It’s also worth noting that this is the standard screen resolution for all smartphones.
The resolution of full HD videos is usually: 1920 x 1080 pixels (or 1080p)
4. 2K RESOLUTION WITH QHD (QUAD HIGH DEFINITION)
Quad HD resolution, or QHD for short, is widely found on high-end smartphones and gaming monitors. The resolution of 1440p is four times that of HD Ready (or 720p HD). Many high-end smartphones have a Quad HD+ resolution (296 x 1440 pixels), which is ideal for 1440p. Another common screen resolution is 2K, which allows for larger displays and reframing without sacrificing quality or image editing.
The resolution of QHD and 2K videos is:
- 2560 x 1440 pixels in QHD (or 1440p)
- 2048 x 1080 pixels in 2K (or 1080p)
5. 4K (OR UHD/ULTRA-HIGH-DEFINITION) RESOLUTION
This sort of resolution, often known as 4Kor UHD (Ultra High Definition), has a pixel size of 3840 x 2160 pixels. It has a similar appearance to 2K, but it provides video artists more room to edit and zoom in. For vivid color, graphics, or dramatic viewing, both 2K and 4K resolutions are available. Unless you wish to tweak colors or trim in closer, there aren’t enough visible distinctions between 2K and 4K. So, it matters when you want to change a certain detail, but it doesn’t matter when someone else is looking at it.
The resolution of 4K videos is: 3840 x 2160 (or 2160p / simply 4K) is a resolution of 3840 x 2160 pixels.
Why Would You Want To Upload A 4k Video?
YouTube is the second-largest social media site, with approximately 1.9 billion monthly active users. YouTube is where you want to be to access this large audience and promote your brand, with one billion hours of video watched every day on the platform.
However, for your target audience to watch your videos, you must ensure excellent video quality. Poorly shot or edited films may alienate your viewers, especially when there are billions of other videos to choose from on the site.
- 4k is the most satisfactory resolution for uploading to YouTube. Although not every viewer can watch videos in 4k, it ensures that your visitors get the best possible experience.
- Traditional Full HD (1920 x 1080) TVs feature four times as many pixels as 4K TVs. Because of the higher pixel density, the picture quality of 4K TVs is more colorful and detailed, even on TV displays of the same size. This distinction is most noticeable on large-screen televisions.
- Even if you recorded in 1080p and upscaled to 4K, you should post in 4K to YouTube for the finest image quality. Recording in 1080p, editing in 1080p, exporting in 4k, and YouTube viewing is sharper in 1080p.
- With 4K, you get stunning visuals with a resolution of 38402160, which is four times that of Full-HD. That’s why visuals appear crisp and lifelike, even on large-screen TVs rather than pixelated. Down-converted 4K to Full-HD photographs have superior quality and resolution than images shot in Full-HD from the start.
What Is The Best Way To Upload A 4k Video To Youtube?
The YouTube upload process is not complicated, but it does need several steps. You can finally post your video once it has been prepared and converted to MP4 format.
Follow the steps below to post your video to YouTube:
1. Go to YouTube.com in your browser.
2. Log in to your account and click the “Create” symbol, which looks like a camera with a plus sign, in the right corner of the menu bar.
3. Select “Upload video” from the drop-down menu.
4. Drag and drop your video file into the upload box, or select your file from the “Select File” menu and click “Open.”
5. Make a note of the title and description while YouTube is processing your video.
6. Select a video thumbnail from the options or upload your own and select your “Audience” from the drop-down menu. To manage age restriction settings.
7. Select “More Options” to add searchable keywords to your video, manage subtitles and comments, and more.
8. Select if you want to add promotions to your video by clicking “Next.”
9. Finally, click “Next” and wait for the video to be processed entirely before publishing it.
10. You can also automatically set it to publish at a later date.
Tips On How To Make Sure The Video You’re Uploading Is Of High Quality
The following are five tips for amateur and top newbie YouTubers who want to improve their videos.
1. Cut Your Video Into Clips And Organize It
While it may appear to be the simplest solution to perform an entire video at once, this might make the process tedious or even damage your video if you are interrupted or make a speech error. Smaller video segments are easier to edit and blend into a single, well-formatted video.
2. Youtube Video Export
You can also modify your videos in various formats to your heart’s content before exporting them to YouTube and publishing them. Although uploading and exporting may take some time, the quality of your video will significantly increase, and the time and work you put in will be evident.
3. Change Up Your Shots
Rather than keeping your camera fixed, try varied angles while shooting. This may not work for all of your videos, but it is critical to keep your viewers engaged while they watch them, especially if you want them to stay until the finish and come back for more. Unless you’re talking about anything incredibly essential, sitting and listening to someone talk for more than 10 minutes without the camera moving will quickly become dull or old.
4. Transitions And Effects
When editing a video with numerous parts, the use of effects and transitions can considerably impact the overall quality of the video. Filmora is far more sophisticated than Windows Movie Maker and iMovie on Mac. It also allows you to create a professional-looking YouTube video with hundreds of presets such as filters, overlays, components, transitions, and blending several layers of effects and audio to enhance your YouTube tale.
Wondershare Filmii is one of the greatest choices for Windows for beginners who wish to create video footage with templates automatically. Smart video templates, trendy filters and overlays, fun stickers and motion components, and, most importantly, advanced editing capabilities are all available.
For Win 7 or later (64-bit)
For macOS 10.12 or later
Conclusion
● This is pretty much everything we’ve gathered to assist you in uploading 4K videos to YouTube. Do not become worried. Your 4K video will be in low resolution when you first publish it. This is due to YouTube’s high-resolution processing requiring time. It could take a few hours for your video to be available in 4K mode.
● The duration, format, frame rate, and resolution of your video all affect the processing time for high-definition videos. If you don’t want your video to be seen unless it has a high-quality option, upload it as unlisted and then publish it once 4K resolution is available.
Joshi’s Success: YouTube Earnings Strategy
YouTubers don’t only create fun vlogs, but they generate serious income from it, too. One such YouTuber is Sourav Joshi - quite popular in his niche.
If you’re curious about Sourav Joshi vlog income, this blog is the right place to get this secret information. From biography to monthly income to popular videos, you’re going to learn almost everything about Sourav and his YouTube channel.
And if you’re into producing content for YouTube, read on to find bonus tips.
Part 1: Who is Sourav Joshi?

An Indian YouTuber, Sourav started his first channel “Sourav Joshi Arts” on the Platform in September, 2015. You can find drawings of famous people, including Abraham Lincoln on his arts channel.
Later in February, 2019, Sourav started his vlogging channel “Sourav Joshi Vlogs.” And no doubt, he has been successful in his journey and has established himself as a popular YouTuber.
Sourav Joshi Biography
| Name | Sourav Joshi |
|---|---|
| Real Name | Sourav Joshi |
| Net Worth (2022) | $1 Million |
| Monthly Income & Salary | $30,000 - 45,000 |
| Yearly Income | Rs. 2.5 - 3 Crore |
| Age | 22 years |
| Gender | Male |
| Nationality | Indian |
| Height | 5 feet 7 inche |
| Profession | YouTuber, Content Creator |
| YouTube Channel | Sourav Joshi ArtsSourav Joshi Vlogs |
| Awards & Recognition | Silver & Gold Play Button |
Being creative and unique can help you go big on YouTube. With his art videos and fun vlogs, Saurav has proved it, too. Let’s explore how much Saurav Joshi earn from YouTube.
Part 2: Sourav Joshi YouTube Earnings and Stats
Now that you know who Sourav Joshi is and what he does to earn dollars from YouTube, see how YouTube calculates income.
Sourav Joshi YouTube Income
As an established YouTuber, Sourav makes money from affiliate marketing, sponsorships, paid partnerships, and Google AdSense.
Want to know Sourav Joshi’s income from YouTube? He’s known to earn $30,000 to $45,000 monthly, and has a current net worth, $1 million.
Sourav receives 320-350 million views monthly on his two YouTube videos that helped him elevate his net worth.
Sourav Joshi YouTube Stats
| Monthly Earnings | Rs. 35-50 lakh, $30,000 to $45,000 |
|---|---|
| Yearly Earnings | Rs. 2.5 - 3 Crore |
| Total Video Uploads | Sourav Joshi Vlogs - 1K VideosSourav Joshi Arts - 676 Videos |
| Subscribers | Sourav Joshi Vlogs - 17.2MSourav Joshi Arts - 3.75M |
| Video Views | Sourav Joshi Vlogs - 6,378,282,781Sourav Joshi Arts - 177,342,864 |
| Last 30-Day Views | Sourav Joshi Vlogs - 316.365M |
How Famous Sourav Joshi is?
The views on his videos show him as a popular Indian YouTuber. Not only this, he has made a record of 100 days 100 trending videos on the platform.
Sourav’s channel was the fastest growing one during the Covid-19 lockdown. Even his Instagram bio says “Most subscribed vlogger of India.”
The vlogger enjoys 3.7M followers on Instagram.
Part 3: Why is Sourav Joshi Trending on YouTube?
With two successful channels, net worth in million, luxury cars, and collaboration with music albums, Sourav is a well-known YouTuber among kids and adults.
The reasons for his success and popularity are:
Exclusive Personality

It’s no secret that with dedication and hard work Sourav has managed to create himself a successful YouTuber.
He also gives off humble vibes. Looking at his content, you’ll see and feel adoration he has for his brother and cousin brother. He seems like a genuine and fun guy, too.
Engaging and Interactive Content

Since he’s got two channels, both are great in terms of content. On his art channel, he’s drawn images of known people, such as Bollywood actor Tiger Shroff, Indian Cricketer MS Dhoni, and many more.
More so, on his vlog channel, he created daily-life vlogs which most people can relate to. From travel videos to surprises for family, you can see enjoyable content on Sourav’s vlog channel.
Most Viewed Vlogs/Videos
As an artist, Sourav has created some stunning portraits of popular people. But one video where he drew hair got the most views.

His “How I Draw Hairs | Step by Step” got around 13,353, 361 views.
How I Draw Hairs | Step by step
In this 8-minute video clip, you can see him draw hair with absolute perfection, making the final product look 100% realistic.

During the lockdown, Sourav vlogs got massive popularity. One such vlog was “Golgappa CHALLENGE WITH PIYUSH.”
Golgappa CHALLENGE WITH PIYUSH 馃槏馃構
This 13-minute vlog was fun, and viewers can see Sourav enjoying with his younger brother, too.

People love watching vlogs, especially when they’re relatable to their personal lives. Many viewers can relate to “Highway Pe Faas Gye” vlog while enjoying it.
Highway Pe Faas Gye 馃槄 Popat Hi Popat
This is one of the most-viewed vlogs by Sourav with 23,431,594 views.
Pro Tips: How to be a YouTuber and Make Videos Like Sourav Joshi
A fun 11-minute video requires a lot of efforts, including top-tier video editing. If you’re impressed with the work of Sourav, try Filmora to edit your next video.
Wondershare Filmora is an intuitive software that offers a series of features and templates, so you can edit and make your videos impressive, following only a few simple steps which can help you do the right job.
Step1 Import your Footage

The first step is to click on “import” to access the folder where you can browse the video clips you need to edit.
Step2 Drag your Footage to Timeline

Drag and drop your files from the media library to be used as the background in the first round. Then, drag and drop another video to be used on the top of that background in the second round.
Step3 Work on Speed and Duration Settings

In the duration settings, you can adjust the video duration. If there’s need for adding more video clips together, repeat the same process on several tracks, sharing the same frame.
Step4 Fix Size and Positioning of your Video

For this step, you can use editing interface, so you can work on your video’s position. Drag the sliders to the interface and change the size, position, and direction of your footage.
Step5 See Advance Editing Option
When it comes to making a video 10x impressive, use Filmora’s advance editing sounds like a great move.
Simply access the editing panel by double-clicking the video. After this, you can perform the following:
Motion effects

Adjustment of video tone

Color correction of the video

Options for audio

Apply masks to your video, they feature different shape and positions, so adjust them accordingly.

Step6 Use More Features from Library
The software comes with a vast library packed with stunning effects, elements, transitions, and stock video. Don’t hesitate to use them and make your video more visually interesting.
Effects

Find “effects” on the top menu, click, and choose from the list.
Stock Video

“Stock video” button is also located on the top menu. Click on it to find more eye-pleasing content for your footage.
Elements

Go to the top menu and find “elements.” You can add these elements to ensure your video appear interesting and engaging.
Transitions

Using various video clips in a single video? Use transitions, located on the top menu, to smooth out everything.
Step7 Save and Export your Footage

Once you’re satisfied with the end result, it’s time to save and export the video for actual usage.
Wrap Up
Becoming a content creator and earning in dollars seems like a dream job. But not everyone understands that it needs a lot of effort and patience to reach this level of success on YouTube.
Although the journey is unpredictable, it doesn’t hurt to try. See Sourav Joshi for an example. His art or creativity paved a way for him and made him a successful YouTuber in such a young age.
You can try creating a video for YouTube. And use Filmora to make your videos impressive and aesthetically pleasing.
Free Download For Win 7 or later(64-bit)
Free Download For macOS 10.14 or later
Part 1: Who is Sourav Joshi?
An Indian YouTuber, Sourav started his first channel “Sourav Joshi Arts” on the Platform in September, 2015. You can find drawings of famous people, including Abraham Lincoln on his arts channel.
Later in February, 2019, Sourav started his vlogging channel “Sourav Joshi Vlogs.” And no doubt, he has been successful in his journey and has established himself as a popular YouTuber.
Sourav Joshi Biography
| Name | Sourav Joshi |
|---|---|
| Real Name | Sourav Joshi |
| Net Worth (2022) | $1 Million |
| Monthly Income & Salary | $30,000 - 45,000 |
| Yearly Income | Rs. 2.5 - 3 Crore |
| Age | 22 years |
| Gender | Male |
| Nationality | Indian |
| Height | 5 feet 7 inche |
| Profession | YouTuber, Content Creator |
| YouTube Channel | Sourav Joshi ArtsSourav Joshi Vlogs |
| Awards & Recognition | Silver & Gold Play Button |
Being creative and unique can help you go big on YouTube. With his art videos and fun vlogs, Saurav has proved it, too. Let’s explore how much Saurav Joshi earn from YouTube.
Part 2: Sourav Joshi YouTube Earnings and Stats
Now that you know who Sourav Joshi is and what he does to earn dollars from YouTube, see how YouTube calculates income.
Sourav Joshi YouTube Income
As an established YouTuber, Sourav makes money from affiliate marketing, sponsorships, paid partnerships, and Google AdSense.
Want to know Sourav Joshi’s income from YouTube? He’s known to earn $30,000 to $45,000 monthly, and has a current net worth, $1 million.
Sourav receives 320-350 million views monthly on his two YouTube videos that helped him elevate his net worth.
Sourav Joshi YouTube Stats
| Monthly Earnings | Rs. 35-50 lakh, $30,000 to $45,000 |
|---|---|
| Yearly Earnings | Rs. 2.5 - 3 Crore |
| Total Video Uploads | Sourav Joshi Vlogs - 1K VideosSourav Joshi Arts - 676 Videos |
| Subscribers | Sourav Joshi Vlogs - 17.2MSourav Joshi Arts - 3.75M |
| Video Views | Sourav Joshi Vlogs - 6,378,282,781Sourav Joshi Arts - 177,342,864 |
| Last 30-Day Views | Sourav Joshi Vlogs - 316.365M |
How Famous Sourav Joshi is?
The views on his videos show him as a popular Indian YouTuber. Not only this, he has made a record of 100 days 100 trending videos on the platform.
Sourav’s channel was the fastest growing one during the Covid-19 lockdown. Even his Instagram bio says “Most subscribed vlogger of India.”
The vlogger enjoys 3.7M followers on Instagram.
Part 3: Why is Sourav Joshi Trending on YouTube?
With two successful channels, net worth in million, luxury cars, and collaboration with music albums, Sourav is a well-known YouTuber among kids and adults.
The reasons for his success and popularity are:
Exclusive Personality
It’s no secret that with dedication and hard work Sourav has managed to create himself a successful YouTuber.
He also gives off humble vibes. Looking at his content, you’ll see and feel adoration he has for his brother and cousin brother. He seems like a genuine and fun guy, too.
Engaging and Interactive Content
Since he’s got two channels, both are great in terms of content. On his art channel, he’s drawn images of known people, such as Bollywood actor Tiger Shroff, Indian Cricketer MS Dhoni, and many more.
More so, on his vlog channel, he created daily-life vlogs which most people can relate to. From travel videos to surprises for family, you can see enjoyable content on Sourav’s vlog channel.
Most Viewed Vlogs/Videos
As an artist, Sourav has created some stunning portraits of popular people. But one video where he drew hair got the most views.
His “How I Draw Hairs | Step by Step” got around 13,353, 361 views.
How I Draw Hairs | Step by step
In this 8-minute video clip, you can see him draw hair with absolute perfection, making the final product look 100% realistic.
During the lockdown, Sourav vlogs got massive popularity. One such vlog was “Golgappa CHALLENGE WITH PIYUSH.”
Golgappa CHALLENGE WITH PIYUSH 馃槏馃構
This 13-minute vlog was fun, and viewers can see Sourav enjoying with his younger brother, too.
People love watching vlogs, especially when they’re relatable to their personal lives. Many viewers can relate to “Highway Pe Faas Gye” vlog while enjoying it.
Highway Pe Faas Gye 馃槄 Popat Hi Popat
This is one of the most-viewed vlogs by Sourav with 23,431,594 views.
Pro Tips: How to be a YouTuber and Make Videos Like Sourav Joshi
A fun 11-minute video requires a lot of efforts, including top-tier video editing. If you’re impressed with the work of Sourav, try Filmora to edit your next video.
Wondershare Filmora is an intuitive software that offers a series of features and templates, so you can edit and make your videos impressive, following only a few simple steps which can help you do the right job.
Step1 Import your Footage
The first step is to click on “import” to access the folder where you can browse the video clips you need to edit.
Step2 Drag your Footage to Timeline
Drag and drop your files from the media library to be used as the background in the first round. Then, drag and drop another video to be used on the top of that background in the second round.
Step3 Work on Speed and Duration Settings
In the duration settings, you can adjust the video duration. If there’s need for adding more video clips together, repeat the same process on several tracks, sharing the same frame.
Step4 Fix Size and Positioning of your Video
For this step, you can use editing interface, so you can work on your video’s position. Drag the sliders to the interface and change the size, position, and direction of your footage.
Step5 See Advance Editing Option
When it comes to making a video 10x impressive, use Filmora’s advance editing sounds like a great move.
Simply access the editing panel by double-clicking the video. After this, you can perform the following:
Motion effects
Adjustment of video tone
Color correction of the video
Options for audio
Apply masks to your video, they feature different shape and positions, so adjust them accordingly.
Step6 Use More Features from Library
The software comes with a vast library packed with stunning effects, elements, transitions, and stock video. Don’t hesitate to use them and make your video more visually interesting.
Effects
Find “effects” on the top menu, click, and choose from the list.
Stock Video
“Stock video” button is also located on the top menu. Click on it to find more eye-pleasing content for your footage.
Elements
Go to the top menu and find “elements.” You can add these elements to ensure your video appear interesting and engaging.
Transitions
Using various video clips in a single video? Use transitions, located on the top menu, to smooth out everything.
Step7 Save and Export your Footage
Once you’re satisfied with the end result, it’s time to save and export the video for actual usage.
Wrap Up
Becoming a content creator and earning in dollars seems like a dream job. But not everyone understands that it needs a lot of effort and patience to reach this level of success on YouTube.
Although the journey is unpredictable, it doesn’t hurt to try. See Sourav Joshi for an example. His art or creativity paved a way for him and made him a successful YouTuber in such a young age.
You can try creating a video for YouTube. And use Filmora to make your videos impressive and aesthetically pleasing.
Free Download For Win 7 or later(64-bit)
Free Download For macOS 10.14 or later
Also read:
- In 2024, 8 Fastest Growing YouTube Channel
- Overcoming YouTube Disqualification
- [New] Efficient Thumbnail Generation with Your Phone for Video Content
- 2024 Approved Elevating YouTube Productions with Effective Video Lighting
- In 2024, Binge-Watch With Ease Best Playlist Extractors Reviewed & Rated
- In 2024, Best YouTube To GIF Makers You Should Use (Online & Desktop)
- [Updated] Become a Visionary Creator Optimal Camera Lens Selection
- Unified Media Playback on YouTube FLV Files Tutorial
- Mastering YouTube Google Meet Live Broadcast Steps
- Peering at Starred Online Chatter
- [New] Epic YouTube Playback Stories
- Building a Cross-Platform Social Media Presence for 2024
- 2024 Approved Deciphering Digital Domination A Deep Dive Into Directors' Videos
- [New] Diverse Vlogging Content Suggestions
- How to Turn on AV1 Settings on YouTube and Why You Should Do It for 2024
- [Updated] Discover Websites Your Gateway to YouTube Branded Content
- Smooth Loop Setup Tailoring YouTube Content for Television
- 2024 Approved Dazzling Deception YouTube's Editors Magic Showcase
- Choosing Streaming Giants Vimeo, YouTube, or DailyMotion?
- 2024 Approved Discover These 10 Non-YouTube Video Sites for iPhone & Android Users
- Superior Sound Modification Equipment for Video Artists
- The Audio Advantage Elevating Sound Quality in YouTube Productions
- In 2024, Decoding Dimensions The Key to Perfect Aspect Ratios in Video
- Enrich YouTube Images With Radiant Neon Effects for 2024
- Your Key to Creative Advertising Access All 50 FREE YouTube Banner Designs
- In 2024, Channel Cash Flow Harnessing YouTube Ad Revenue Anywhere
- Navigating Netflix & YouTubers How Jake Paul Succeeded
- Digital Recorder Snap Your Screen, Upload to YouTube Online/PC/Mac
- [Updated] Dynamic, Animated, and Personalized Filmora Subscribe Button for YouTube
- Startups' Guide to Earnings on YouTube Platform
- Maximizing Your Monetary Gains From Mobile YouTube Channels - 2024 Guide
- [New] Engaging Students The Power of YouTube in Education
- In 2024, Blitzing Sharing Easy YouTube Playlist Methods
- ASMR Sound Mastery Selecting the Ideal Microphone
- In 2024, Breaking Even on YouTube Key View Figures Explored
- In 2024, Best Free Downloaders Download YouTube Thumbnail for Free[Online/Win/Mac]
- 2024 Approved Elite Yoga Routines YouTube's Leading Fitness Sites
- Essential Vids Summary Uncovered for 2024
- New In 2024, Create Cartoons Like a Pro Top 10 Software for Beginners
- Updated Crafting Immersive Experiences Vertical Aspect Ratio Design Principles for 2024
- In 2024, Apex Window-Based Podcast Enhancements Top 8 Selections
- FRP Hijacker by Hagard Download and Bypass your Samsung Galaxy F14 5G FRP Locks
- [Updated] Selecting the Ideal Team Communication Tool A Slack Vs. Discord Evaluation
- Updated In 2024, YouTube Video Aspect Ratios The Pros and Cons of Each Option
- In 2024, Pro MPEG Blender - Craft the Finest Mac MP3 Fusion
- [Updated] 2024 Approved Top 10 Firefox Video & Image Export Add-Ons
- In 2024, How to Change your Samsung Galaxy S24+ Location on Twitter | Dr.fone
- In 2024, How to Remove Find My iPhone without Apple ID On your iPhone 6?
- [Updated] 2024 Approved The Essential Tips for Subtitling Stories on Instagram
- [New] 2024 Approved Evaluating Screencast Software The Bandicam/Camtasia Comparison
- New In 2024, The Art of Color Correction in Final Cut Pro 2023
- Spearheading Immersive Worlds Top VR Minds
- [Updated] Android's Low-Cost Video Communication Guide
- Top 5 AI Music Video Examples and Makers to Make Them
- [New] Troubleshooting Your Facebook Stories Won't Load Properly
- In 2024, Does Life360 Notify When You Log Out On Honor X50? | Dr.fone
- Updated The Ultimate Process Rewiring Audio in Film Projects for 2024
- How to Update Apple iPhone 6s without Losing Data? | Dr.fone
- Updated How To Get More NFL Viewers For Your Sports Live Streaming Channel
- How To Transfer WhatsApp From Apple iPhone 12 Pro Max to other iPhone 12 devices? | Dr.fone
- Best-Worth Steadicams for High-End Aerial Film Production for 2024
- Time Lapse Video Is Very Interesting and Creative, Which Usually Attracts More Attention. This Article Will Show You How to Make a Time Lapse Video with Adobe After Effects for 2024
- 2024 Approved Audio Division Made Simple Techniques for Cutting Sound Files
- [Updated] Covert Measures for Efficient Home-Based Learning
- [New] Activating Grid View in Google Meet Webinars A Step-by-Step Guide
- How to Repair corrupt MP4 and AVI files of Realme 11 Pro+ with Video Repair Utility on Windows?
- How to Find iSpoofer Pro Activation Key On OnePlus 11 5G? | Dr.fone
- Undelete lost data from Infinix GT 10 Pro
- Title: "Dive Into the Depth of 4K Content Your Ultimate Guide for YouTube Submission for 2024"
- Author: Steven
- Created at : 2024-05-25 19:08:08
- Updated at : 2024-05-26 19:08:08
- Link: https://youtube-clips.techidaily.com/dive-into-the-depth-of-4k-content-your-ultimate-guide-for-youtube-submission-for-2024/
- License: This work is licensed under CC BY-NC-SA 4.0.
