
:max_bytes(150000):strip_icc()/how-to-connect-chromecast-to-a-mobile-hotspot-2107d18431604b07aa857499aafb1a60.jpg)
Dismantling the Economics of YouTube's Ambitious Shorts Fund for 2024
Dismantling the Economics of YouTube’s Ambitious Shorts Fund
YouTube offers content creators a platform for creating a lucrative career. Of the major developments made in the recent past is the introduction of Shorts. These short vertical videos have grown in popularity as more people view videos on their phones. With this development, the YouTube Shorts fund was launched to reward creators for their efforts. The fund allows creators to monetize their Shorts quickly, supporting and incentivizing them to create high-quality Shorts content. In this article, we will explore the YouTube Shorts Fund 2023, including YouTube shorts fund eligibility.
YouTube Shorts Monetization A cross-platform for taking your overexposed footage to cinema-quality Shorts video!
Free Download Free Download Learn More

Part 1. YouTube Shorts Fund: Introduction and Benefits
YouTube launched YouTube Shorts Funds in 2021 to financially support creators who produce engaging and popular Shorts content. The monetization scheme would distribute $100 million to high-performing creators on the platform. The creators would receive high engagement and views from their Shorts for funding.
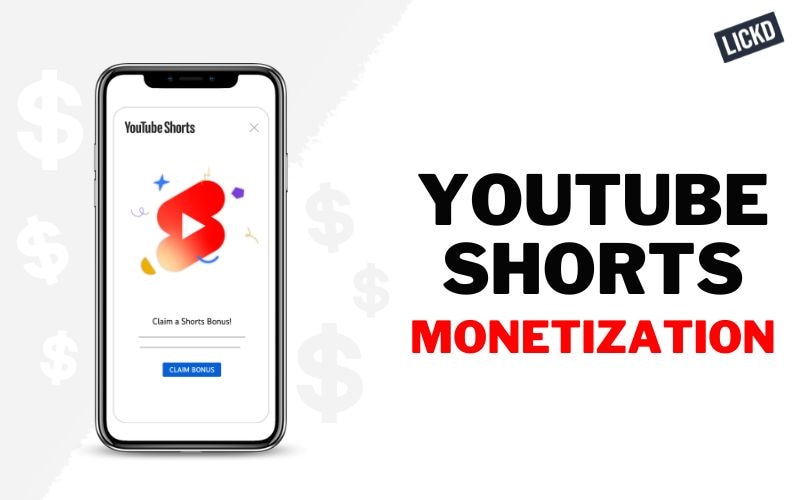
The main objective of the YouTube Shorts fund is to encourage creativity, diversity, and innovation in Shorts content creation. The fund operated between 2021 and 2022. It lets creators earn $100 - $10,000 a month for their content.
Participating in YouTube Shorts Funds offer several benefits to the creators:
- Additional Exposure: YouTube Shorts are predominately featured on the homepage, allowing creators to reach more people.
- Recognition: YouTube recognizes top Shorts creators through the Shorts Funding program, encouraging them to create more quality content.
- Potential Earnings: Creators can monetize their Shorts content in several ways including adding and other unique features.
YouTube incorporated monetization of Shorts in its YouTube Partner Program (YPP). Therefore, YouTube merged the Shorts Fund with the YPP in February 2023. This led to YouTube Shorts Fund 2023 which now offers creators more opportunities to make money quickly on YouTube.
Part 2. Making Money with YouTube Shorts: Eligibility and Earnings
The new YouTube Shorts monetization policy means that content creators on YouTube with access to the YPP can also earn from Shorts. The revenue-sharing model has now taken the place of the YouTube Shorts Fund, which only rewarded creators using YouTube’s money. However, creators don’t have to be members of the YPP to start receiving YouTube Shorts funding. They only need to meet certain requirements, make unique content, and adhere to Community Guidelines.
- YouTube Shorts Fund Eligibility
- Additional Steps of Actions to Activate YouTube Shorts Funding
- What the YPP Shorts Fund Entails
- How Much Can You Make with Short
YouTube Shorts Fund Eligibility
As of 2023, YouTube offers Shorts Funding as a monetization option. Creators can also choose to monetize with YPP combined with Shorts Fundings.
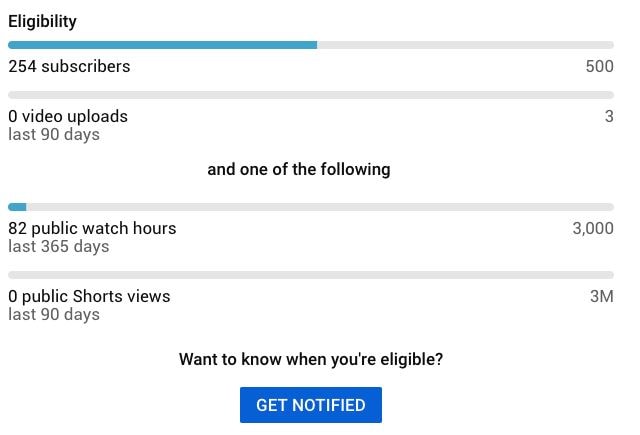
The eligibility requirements for Shorts funding include:
- At least 1,000 subscribers
- At least 10 million public Shorts views in the last 90 days
To become a member of the YPP and start accessing Shorts funding this way, the minimum requirements are as follows:
- At least 500 subscribers (You previously needed 1,000)
- At least 3,000 public watch hours over the last 13 months (You previously needed 4,000)
Additional Steps of Actions to Activate YouTube Shorts Funding
In addition to the basic eligibility requirements, creators are also required to take additional measures to comply with YouTube’s requirements. Additional steps include:
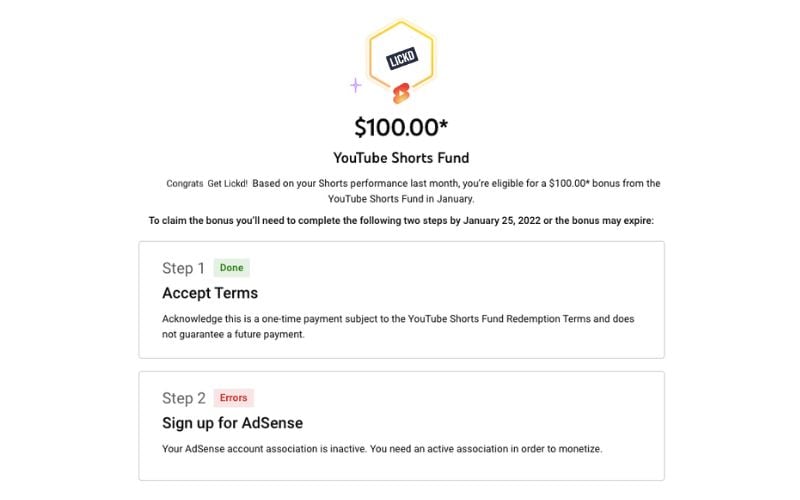
- Ensuring AdSense Account is active and in good standing: Since ad revenue will be paid through AdSense, you need to make sure your account is in good standing.
- Review and Accept the Terms of Shorts Monetization Module: In the YouTube Studio, head over to the Shorts Fund section and click on the Terms and Conditions link.
- Enable Monetization for Individual Shorts: Edit the monetization settings for each Short to start generating ad revenue.
- Comply with YouTube Policies and Guidelines: Visit the YouTube Creator Academy to learn more about the platform’s policies and guidelines.
What the YPP Shorts Fund Entails
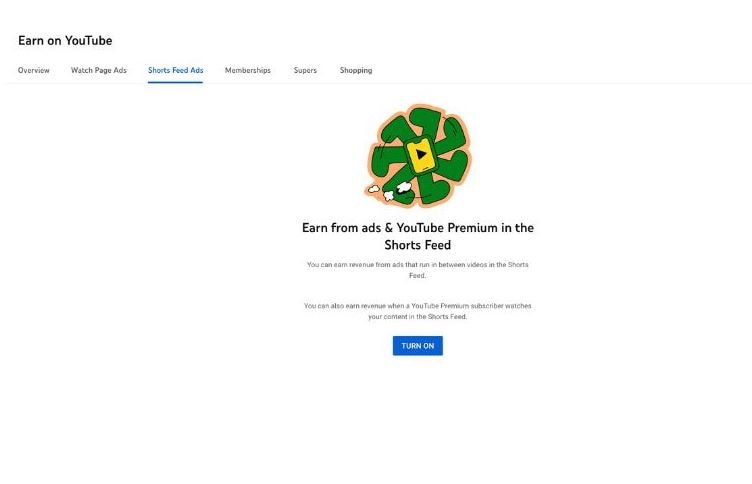
The YPP Shorts Fund program includes the following features:
- Watch Page Monetization – Creators earn ad revenue from long-form content, YouTube Premium content, and live streams
- Shorts Monetization Module – Creators earn money from ads that play between YouTube Shorts.
- Commerce Product Addendum – Additional monetization features, including Super Chats. Channel Memberships, Super Thanks, and Super Stickers.
How Much Can You Make with Short s
The amount of money you can make on Shorts often varies. It can be hard to make decent money on Shorts sometimes, and other times it brings in a nice chunk of revenue. Unfortunately, the earnings are not as spectacular as the long YouTube videos. Most creators agree that the revenue per thousand views (RPM) for shorts is around $0.05 - $0.07. This would translate to about $50 - $70 for a million Shorts views. Although the ad revenue is relatively lower, you can generate more revenue with the shopping features. This will depend on how wee you keep your audience active and engaged.
Part 3. How to Use YouTube Shorts Funding: Application and Activation
The process of applying for and activating YouTube Short Funding is simple. You need to accept the Shorts Monetization Module in your terms and conditions. After activating, monetization starts immediately.
Head over to the YouTube Studio. Sign in to your account to accept the terms. Be sure to use a web browser because the YouTube app will not allow you to make these changes. Accept the terms and follow these steps to turn on the ads:
- Setp 1: Click the Content button at the bottom of the menu in the YouTube Studio
- Setp 2: Pick the video you want to monetize, and click Edit
- Setp 3: Select the Earn tab pick on, and choose the ads you want to turn on.
- Setp 4: Save your settings and the ads will be active.
Part 4. Editing YouTube Shorts for More Revenue with Wondershare Filmora
The best way to earn from the YouTube Shorts Fund is to create quality content. With good video editing software, you can achieve this and build a community of subscribers. Wondershare Filmora is a video editing software that is effective in creating quality Shorts videos. It supports various video resolutions, including vertical videos. It also has some fascinating features that make every creation unique and exciting. Take your overexposed footage to cinema-quality Shorts video that will keep your audience engaged.
Free Download For Win 7 or later(64-bit)
Free Download For macOS 10.14 or later
Filmora can help create visually appealing and engaging videos, ultimately increasing the chances of monetization on YouTube. The following features make editing videos on Filmora quick and easy.
1. Auto Reframe
You may have recorded horizontal videos and want to upload them as Shorts. The Auto Reframe feature allows you to automatically resize the video in seconds. You only need to choose the clip you want to resize and reframe it. No editing skills are required to do this.
2. Add Text to Video
Texts tell the audience what is happening in the video. It is also a great way to highlight major events in YouTube Shorts. The Add Text to Video feature on Filmora makes it easy to add text or captions to your videos.
3. Auto Synchronization
When editing Shorts, you will likely add many footage in a short video. It is common for the audio to end up being where it is not supposed to. The Auto Synchronization feature is the ultimate audio sync. It effortlessly matches your audio with the video, making sure viewers see what they hear
4. Mask & Blend
Creativity is a major component of YouTube Shorts content. The Filmora Masking and Blending mode helps you make creative video clips. It comes with a pen tool for creating free-form shapes on the go. Make your videos more impressive to your audience.
5. Auto Beat Sync
With YouTube Shorts, you need to entertain your audience in under a minute. A combination of visual and audio elements makes the video more entertaining. The Auto Beat Sync feature matches the footage with the music automatically. Be sure every beat corresponds to the scene.
Conclusion
The YouTube Shorts Fund offers an exceptional for creators to make additional income on the platform. Although the original Funds program has been updated with the latest monetization policy, creators can still generate nice revenue amount. As a creator, you need to publish quality and highly engaging content. With Wondershare Filmora, you can create content that will generate more revenue on the Shorts platform. The video editing software offers fantastic features that make video editing quick and fun.
Free Download Free Download Learn More
Part 1. YouTube Shorts Fund: Introduction and Benefits
YouTube launched YouTube Shorts Funds in 2021 to financially support creators who produce engaging and popular Shorts content. The monetization scheme would distribute $100 million to high-performing creators on the platform. The creators would receive high engagement and views from their Shorts for funding.
The main objective of the YouTube Shorts fund is to encourage creativity, diversity, and innovation in Shorts content creation. The fund operated between 2021 and 2022. It lets creators earn $100 - $10,000 a month for their content.
Participating in YouTube Shorts Funds offer several benefits to the creators:
- Additional Exposure: YouTube Shorts are predominately featured on the homepage, allowing creators to reach more people.
- Recognition: YouTube recognizes top Shorts creators through the Shorts Funding program, encouraging them to create more quality content.
- Potential Earnings: Creators can monetize their Shorts content in several ways including adding and other unique features.
YouTube incorporated monetization of Shorts in its YouTube Partner Program (YPP). Therefore, YouTube merged the Shorts Fund with the YPP in February 2023. This led to YouTube Shorts Fund 2023 which now offers creators more opportunities to make money quickly on YouTube.
Part 2. Making Money with YouTube Shorts: Eligibility and Earnings
The new YouTube Shorts monetization policy means that content creators on YouTube with access to the YPP can also earn from Shorts. The revenue-sharing model has now taken the place of the YouTube Shorts Fund, which only rewarded creators using YouTube’s money. However, creators don’t have to be members of the YPP to start receiving YouTube Shorts funding. They only need to meet certain requirements, make unique content, and adhere to Community Guidelines.
- YouTube Shorts Fund Eligibility
- Additional Steps of Actions to Activate YouTube Shorts Funding
- What the YPP Shorts Fund Entails
- How Much Can You Make with Short
YouTube Shorts Fund Eligibility
As of 2023, YouTube offers Shorts Funding as a monetization option. Creators can also choose to monetize with YPP combined with Shorts Fundings.
The eligibility requirements for Shorts funding include:
- At least 1,000 subscribers
- At least 10 million public Shorts views in the last 90 days
To become a member of the YPP and start accessing Shorts funding this way, the minimum requirements are as follows:
- At least 500 subscribers (You previously needed 1,000)
- At least 3,000 public watch hours over the last 13 months (You previously needed 4,000)
Additional Steps of Actions to Activate YouTube Shorts Funding
In addition to the basic eligibility requirements, creators are also required to take additional measures to comply with YouTube’s requirements. Additional steps include:
- Ensuring AdSense Account is active and in good standing: Since ad revenue will be paid through AdSense, you need to make sure your account is in good standing.
- Review and Accept the Terms of Shorts Monetization Module: In the YouTube Studio, head over to the Shorts Fund section and click on the Terms and Conditions link.
- Enable Monetization for Individual Shorts: Edit the monetization settings for each Short to start generating ad revenue.
- Comply with YouTube Policies and Guidelines: Visit the YouTube Creator Academy to learn more about the platform’s policies and guidelines.
What the YPP Shorts Fund Entails
The YPP Shorts Fund program includes the following features:
- Watch Page Monetization – Creators earn ad revenue from long-form content, YouTube Premium content, and live streams
- Shorts Monetization Module – Creators earn money from ads that play between YouTube Shorts.
- Commerce Product Addendum – Additional monetization features, including Super Chats. Channel Memberships, Super Thanks, and Super Stickers.
How Much Can You Make with Short s
The amount of money you can make on Shorts often varies. It can be hard to make decent money on Shorts sometimes, and other times it brings in a nice chunk of revenue. Unfortunately, the earnings are not as spectacular as the long YouTube videos. Most creators agree that the revenue per thousand views (RPM) for shorts is around $0.05 - $0.07. This would translate to about $50 - $70 for a million Shorts views. Although the ad revenue is relatively lower, you can generate more revenue with the shopping features. This will depend on how wee you keep your audience active and engaged.
Part 3. How to Use YouTube Shorts Funding: Application and Activation
The process of applying for and activating YouTube Short Funding is simple. You need to accept the Shorts Monetization Module in your terms and conditions. After activating, monetization starts immediately.
Head over to the YouTube Studio. Sign in to your account to accept the terms. Be sure to use a web browser because the YouTube app will not allow you to make these changes. Accept the terms and follow these steps to turn on the ads:
- Setp 1: Click the Content button at the bottom of the menu in the YouTube Studio
- Setp 2: Pick the video you want to monetize, and click Edit
- Setp 3: Select the Earn tab pick on, and choose the ads you want to turn on.
- Setp 4: Save your settings and the ads will be active.
Part 4. Editing YouTube Shorts for More Revenue with Wondershare Filmora
The best way to earn from the YouTube Shorts Fund is to create quality content. With good video editing software, you can achieve this and build a community of subscribers. Wondershare Filmora is a video editing software that is effective in creating quality Shorts videos. It supports various video resolutions, including vertical videos. It also has some fascinating features that make every creation unique and exciting. Take your overexposed footage to cinema-quality Shorts video that will keep your audience engaged.
Free Download For Win 7 or later(64-bit)
Free Download For macOS 10.14 or later
Filmora can help create visually appealing and engaging videos, ultimately increasing the chances of monetization on YouTube. The following features make editing videos on Filmora quick and easy.
1. Auto Reframe
You may have recorded horizontal videos and want to upload them as Shorts. The Auto Reframe feature allows you to automatically resize the video in seconds. You only need to choose the clip you want to resize and reframe it. No editing skills are required to do this.
2. Add Text to Video
Texts tell the audience what is happening in the video. It is also a great way to highlight major events in YouTube Shorts. The Add Text to Video feature on Filmora makes it easy to add text or captions to your videos.
3. Auto Synchronization
When editing Shorts, you will likely add many footage in a short video. It is common for the audio to end up being where it is not supposed to. The Auto Synchronization feature is the ultimate audio sync. It effortlessly matches your audio with the video, making sure viewers see what they hear
4. Mask & Blend
Creativity is a major component of YouTube Shorts content. The Filmora Masking and Blending mode helps you make creative video clips. It comes with a pen tool for creating free-form shapes on the go. Make your videos more impressive to your audience.
5. Auto Beat Sync
With YouTube Shorts, you need to entertain your audience in under a minute. A combination of visual and audio elements makes the video more entertaining. The Auto Beat Sync feature matches the footage with the music automatically. Be sure every beat corresponds to the scene.
Conclusion
The YouTube Shorts Fund offers an exceptional for creators to make additional income on the platform. Although the original Funds program has been updated with the latest monetization policy, creators can still generate nice revenue amount. As a creator, you need to publish quality and highly engaging content. With Wondershare Filmora, you can create content that will generate more revenue on the Shorts platform. The video editing software offers fantastic features that make video editing quick and fun.
The Beginner’s Blueprint to Free YouTube Audio to Text
How to Transcribe a YouTube Video for FREE

Richard Bennett
Mar 27, 2024• Proven solutions
If you want to transcribe your videos to make the dialogs and speeches available in text format, you can use YouTube Transcribe feature that the streaming site offers for free. In this article, I’ll share with you a couple of methods to transcribe a YouTube video for free.
- Part 1: Transcribe YouTube Video Automatically for Free [2 Ways]
- Part 2: Transcribe YouTube Video to Text Online with Third-Party Service
- Part 3: Benefits of Transcribing YouTube Videos
- Part 4: YouTube Video Transcription FAQs
Part 1: How to Transcribe YouTube Video Automatically for Free [2 Ways]
Besides the basic video editing features on the YouTube platform, you can now quickly transcribe YouTube videos to the text as well. The good thing is, you can either use the automatic transcription feature that YouTube offers, or upload it manually while adjusting the timing as you go further.
Below are the two methods to transcribe your YouTube videos for free:
Method 1: Use the Automated Transcription Service on YouTube
As the name suggests, YouTube automatic transcription service works automatically. This means you don’t even have to click the ‘Transcribe’ button anymore to transcribe a YouTube video, and the website takes care of it on its own. All you need to do is, choose English as the language of the video when setting up subtitles. You can follow the instructions given below to do so:
Step 1 Upload a Video
Sign in to your YouTube account, click your profile picture from the top-right corner, and click YouTube Studio from the menu. Next, click CREATE from the upper-right corner, click Upload videos from the menu, and drag and drop a video from your computer to the Upload videos box that appears next.

Step 2 Select Transcription Language
On the Details page of the next box that appears, scroll down and click MORE OPTIONS, and select English in the Video language drop-down list under the Language, subtitles, and closed captions (CC) section.

Step 3 Publish the Video
Follow the on-screen instructions from this point to publish the video, and wait while YouTube automatically transcribes and adds the close captions to it.
Note: Depending on the duration of the clip, the time YouTube would take to transcribe may vary.
After YouTube has transcribed the video, you can download the transcription file in your preferred format. The instructions are given below explain how you can do so:
- Get to the Subtitles Window
While on the YouTube Studio page, click Subtitles from the left pane to go to the Channel subtitles page. And then click the video you want to modify.
- Get to Classic Studio
In the video subtitle page of the target video, hover mouse on the Published Automatic status under the Subtitles column, click the Options icon (with three vertical dots) that appears, and click Edit on Classic Studio.

- Download Transcription File
Click and open the Actions drop-down list from the top-left corner of the left pane, click your preferred transcription format including .vtt, .srt and .sbv from the list, and save the file on your local hard disk.

Method 2: Get YouTube Transcription when Watching
In addition, if you are watching any other video, you can make YouTube transcribe that for you as well. You can follow the instructions given below to get the YouTube video to text transcription:
Step 1: Play the Video
Go to the video on YouTube and start playing it. Make sure NOT to get to full-screen mode as doing so would hide the option to transcribe the clip.
Step 2: Enable Transcription
Click the More icon (with three horizontal dots) from under the bottom-right corner of the video player, and click Open transcript to see the video transcription in the Transcript pane that appears in the right.
Step 3: Manage Timestamps
Click the Options icon (with three vertical dots) from the top-right corner of the Transcript pane, and click Toggle timestamp to enable or disable the timestamps in the video transcription.
Limitations of Using YouTube Transcribe
Although YouTube’s automatic transcription is a decent feature that saves you a lot of time, since Google uses machine learning algorithms to convert the speech to text, the level of accuracy may vary depending on the accent of the speaker, and the clarity of the audio the video has. Also, even sometime you may not be satisfied with the end-results.
Alternatively, you can use Kapwing to transcribe a YouTube video and download the transcription file with the below step-by-step instructions:
Step 1: Add YouTube Video
Copy the URL of YouTube video you want to transcribe, go to https://www.kapwing.com/subtitles , paste the URL in the Paste a URL field, wait while Kapwing fetches the content of the video, and opens the Add subtitles to Video page.
Step 2: Transcribe the Video
Click Auto-generate from the right window, and follow the on-screen instructions to transcribe YouTube video to text.

Step 3: Download the Transcription File
Click Download SRT from the left pane, and follow the instructions from there to download the transcription file in *.srt format.

Pros
- Kapwing is free to use
- The auto-transcription process is quick and less tedious
- Kapwing also allows manual transcription and uploading of an existing *.srt file
Cons
- The auto-transcribed text might lack accuracy as the task is done by the speech-to-text tools that work in the background
You can follow the step-by-step instructions to transcribe a YouTube video and download the transcription file using Kapwing:
Step 1: Add YouTube Video
Copy the URL of YouTube video you want to transcribe, go to https://www.kapwing.com/subtitles , paste the URL in the Paste a URL field, wait while Kapwing fetches the content of the video, and opens the Add subtitles to Video page.
Step 2: Transcribe the Video
Click Auto-generate from the right window, and follow the on-screen instructions to transcribe YouTube video to text.
Step 3: Download the Transcription File
Click Download SRT from the left pane, and follow the instructions from there to download the transcription file in *.srt format.
Pros
- Kapwing is free to use
- The auto-transcription process is quick and less tedious
- Kapwing also allows manual transcription and uploading of an existing *.srt file
Cons
- The auto-transcribed text might lack accuracy as the task is done by the speech-to-text tools that work in the background
Part 3: Benefits of Transcribing YouTube Videos
You may need video transcriptions for several reasons, such as analyzing the summary of the entire speech in the video, extracting a single phrase or quote that was spoken in the clip, or making the video helpful even for those suffering from hearing impairment. When you transcribe a YouTube video, the transcript can be useful in many ways. Some of the most common benefits of transcribing a video include:
- Search Engine Optimization
When you add subtitles, the text can appear in Google search results when someone types a similar phrase in the search box. This helps get more views to your videos, thus giving your channel popularity, and you, monetary gains in the long run.
- Accent
If the speaker in the video is from a different region and is using an accent that you are not much comfortable with, you can turn on the subtitles and read the dialogs along with the video.
- Repurposing on Blogs
If you own a blog that you have embedded your video to, the transcription could be used to add text to it so the target audience can get a fair idea of what the video is all about. This is useful because many people prefer reading over watching.
YouTube Video Transcription FAQs
1. How to Transcribe YouTube Video to Text
Usually the transcription files have *.srt extension that are globally accepted and supported by almost all media players. However, there might be instances when you want to have the subtitles in plain text.
That said, to convert an SRT file to TXT, you can:
- Right-click the SRT file
- Go to Rename
- Replace srt with txt and press Enter
- Click OK on the confirmation box that appears next to convert SRT to TXT
After this, you can simply double-click the file, and read and modify the transcribed content as needed.
2. How to Edit and Upload Edited Transcript to YouTube
If you made any modifications to the transcript that was automatically generated by YouTube or any other third-party transcription tool, you can follow the steps given below to upload the new file to the YouTube video:
- Go to YouTube Studio and then to the Channel subtitles page as explained earlier
- Expand the Languages column of the target video
- Click the Options icon that appears under the Subtitles column when you hover mouse on to it
- Click Edit on Classic Studio
- On the next page, click Edit from the top-right corner

- Click to open the Actions drop-down list from the upper-left corner
- Click Upload a file
- Follow the on-screen instructions from there to upload the modified transcription file
- Click Save Changes from the top-right corner of the page when done
Conclusion
If you are looking for a quick and easy way of adding subtitles to your videos, letting YouTube transcribe for you could be a good approach. However, because these auto-generated transcriptions are created by machine learning algorithms, their accuracy cannot be counted on. Therefore, the best way to get the job done accurately is, let YouTube auto-transcribe your video, download the transcription file, make the necessary changes to it, and then upload the file back to the video.
Richard Bennett
Richard Bennett is a writer and a lover of all things video.
Follow @Richard Bennett
Richard Bennett
Mar 27, 2024• Proven solutions
If you want to transcribe your videos to make the dialogs and speeches available in text format, you can use YouTube Transcribe feature that the streaming site offers for free. In this article, I’ll share with you a couple of methods to transcribe a YouTube video for free.
- Part 1: Transcribe YouTube Video Automatically for Free [2 Ways]
- Part 2: Transcribe YouTube Video to Text Online with Third-Party Service
- Part 3: Benefits of Transcribing YouTube Videos
- Part 4: YouTube Video Transcription FAQs
Part 1: How to Transcribe YouTube Video Automatically for Free [2 Ways]
Besides the basic video editing features on the YouTube platform, you can now quickly transcribe YouTube videos to the text as well. The good thing is, you can either use the automatic transcription feature that YouTube offers, or upload it manually while adjusting the timing as you go further.
Below are the two methods to transcribe your YouTube videos for free:
Method 1: Use the Automated Transcription Service on YouTube
As the name suggests, YouTube automatic transcription service works automatically. This means you don’t even have to click the ‘Transcribe’ button anymore to transcribe a YouTube video, and the website takes care of it on its own. All you need to do is, choose English as the language of the video when setting up subtitles. You can follow the instructions given below to do so:
Step 1 Upload a Video
Sign in to your YouTube account, click your profile picture from the top-right corner, and click YouTube Studio from the menu. Next, click CREATE from the upper-right corner, click Upload videos from the menu, and drag and drop a video from your computer to the Upload videos box that appears next.
Step 2 Select Transcription Language
On the Details page of the next box that appears, scroll down and click MORE OPTIONS, and select English in the Video language drop-down list under the Language, subtitles, and closed captions (CC) section.
Step 3 Publish the Video
Follow the on-screen instructions from this point to publish the video, and wait while YouTube automatically transcribes and adds the close captions to it.
Note: Depending on the duration of the clip, the time YouTube would take to transcribe may vary.
After YouTube has transcribed the video, you can download the transcription file in your preferred format. The instructions are given below explain how you can do so:
- Get to the Subtitles Window
While on the YouTube Studio page, click Subtitles from the left pane to go to the Channel subtitles page. And then click the video you want to modify.
- Get to Classic Studio
In the video subtitle page of the target video, hover mouse on the Published Automatic status under the Subtitles column, click the Options icon (with three vertical dots) that appears, and click Edit on Classic Studio.
- Download Transcription File
Click and open the Actions drop-down list from the top-left corner of the left pane, click your preferred transcription format including .vtt, .srt and .sbv from the list, and save the file on your local hard disk.
Method 2: Get YouTube Transcription when Watching
In addition, if you are watching any other video, you can make YouTube transcribe that for you as well. You can follow the instructions given below to get the YouTube video to text transcription:
Step 1: Play the Video
Go to the video on YouTube and start playing it. Make sure NOT to get to full-screen mode as doing so would hide the option to transcribe the clip.
Step 2: Enable Transcription
Click the More icon (with three horizontal dots) from under the bottom-right corner of the video player, and click Open transcript to see the video transcription in the Transcript pane that appears in the right.
Step 3: Manage Timestamps
Click the Options icon (with three vertical dots) from the top-right corner of the Transcript pane, and click Toggle timestamp to enable or disable the timestamps in the video transcription.
Limitations of Using YouTube Transcribe
Although YouTube’s automatic transcription is a decent feature that saves you a lot of time, since Google uses machine learning algorithms to convert the speech to text, the level of accuracy may vary depending on the accent of the speaker, and the clarity of the audio the video has. Also, even sometime you may not be satisfied with the end-results.
Alternatively, you can use Kapwing to transcribe a YouTube video and download the transcription file with the below step-by-step instructions:
Step 1: Add YouTube Video
Copy the URL of YouTube video you want to transcribe, go to https://www.kapwing.com/subtitles , paste the URL in the Paste a URL field, wait while Kapwing fetches the content of the video, and opens the Add subtitles to Video page.
Step 2: Transcribe the Video
Click Auto-generate from the right window, and follow the on-screen instructions to transcribe YouTube video to text.
Step 3: Download the Transcription File
Click Download SRT from the left pane, and follow the instructions from there to download the transcription file in *.srt format.
Pros
- Kapwing is free to use
- The auto-transcription process is quick and less tedious
- Kapwing also allows manual transcription and uploading of an existing *.srt file
Cons
- The auto-transcribed text might lack accuracy as the task is done by the speech-to-text tools that work in the background
You can follow the step-by-step instructions to transcribe a YouTube video and download the transcription file using Kapwing:
Step 1: Add YouTube Video
Copy the URL of YouTube video you want to transcribe, go to https://www.kapwing.com/subtitles , paste the URL in the Paste a URL field, wait while Kapwing fetches the content of the video, and opens the Add subtitles to Video page.
Step 2: Transcribe the Video
Click Auto-generate from the right window, and follow the on-screen instructions to transcribe YouTube video to text.
Step 3: Download the Transcription File
Click Download SRT from the left pane, and follow the instructions from there to download the transcription file in *.srt format.
Pros
- Kapwing is free to use
- The auto-transcription process is quick and less tedious
- Kapwing also allows manual transcription and uploading of an existing *.srt file
Cons
- The auto-transcribed text might lack accuracy as the task is done by the speech-to-text tools that work in the background
Part 3: Benefits of Transcribing YouTube Videos
You may need video transcriptions for several reasons, such as analyzing the summary of the entire speech in the video, extracting a single phrase or quote that was spoken in the clip, or making the video helpful even for those suffering from hearing impairment. When you transcribe a YouTube video, the transcript can be useful in many ways. Some of the most common benefits of transcribing a video include:
- Search Engine Optimization
When you add subtitles, the text can appear in Google search results when someone types a similar phrase in the search box. This helps get more views to your videos, thus giving your channel popularity, and you, monetary gains in the long run.
- Accent
If the speaker in the video is from a different region and is using an accent that you are not much comfortable with, you can turn on the subtitles and read the dialogs along with the video.
- Repurposing on Blogs
If you own a blog that you have embedded your video to, the transcription could be used to add text to it so the target audience can get a fair idea of what the video is all about. This is useful because many people prefer reading over watching.
YouTube Video Transcription FAQs
1. How to Transcribe YouTube Video to Text
Usually the transcription files have *.srt extension that are globally accepted and supported by almost all media players. However, there might be instances when you want to have the subtitles in plain text.
That said, to convert an SRT file to TXT, you can:
- Right-click the SRT file
- Go to Rename
- Replace srt with txt and press Enter
- Click OK on the confirmation box that appears next to convert SRT to TXT
After this, you can simply double-click the file, and read and modify the transcribed content as needed.
2. How to Edit and Upload Edited Transcript to YouTube
If you made any modifications to the transcript that was automatically generated by YouTube or any other third-party transcription tool, you can follow the steps given below to upload the new file to the YouTube video:
- Go to YouTube Studio and then to the Channel subtitles page as explained earlier
- Expand the Languages column of the target video
- Click the Options icon that appears under the Subtitles column when you hover mouse on to it
- Click Edit on Classic Studio
- On the next page, click Edit from the top-right corner
- Click to open the Actions drop-down list from the upper-left corner
- Click Upload a file
- Follow the on-screen instructions from there to upload the modified transcription file
- Click Save Changes from the top-right corner of the page when done
Conclusion
If you are looking for a quick and easy way of adding subtitles to your videos, letting YouTube transcribe for you could be a good approach. However, because these auto-generated transcriptions are created by machine learning algorithms, their accuracy cannot be counted on. Therefore, the best way to get the job done accurately is, let YouTube auto-transcribe your video, download the transcription file, make the necessary changes to it, and then upload the file back to the video.
Richard Bennett
Richard Bennett is a writer and a lover of all things video.
Follow @Richard Bennett
Also read:
- Boost Engagement and Growth - Unlocking YouTube Analytics via Social Blade for 2024
- 2024 Approved Elevate Video Rankings Proven YouTube SEO Solutions
- [New] Advanced Array Manipulations and Sorting Algorithms
- Elevating Your Content with Engaging Haul Creation
- 2024 Approved A Vlogger's Guide To Camera Lenses
- In 2024, Earnings Enlightenment Joshi and YouTube Success Stories
- Explore These 10 Best Free Non-YouTube Video Sites on Phones
- [Updated] Decoding the Mystery of YouTube Shorts
- Advanced Presentation Techniques YouTube in Slides
- Building a Bountiful Beauty Channel Fortune
- [Updated] YouTube Monetization Does YouTube Pay Monthly?
- [New] Erase Unwanted Boards From Old YouTube Videos for Clearer Viewing
- The Ultimate List of 12 Superior Flipscreen Vlog Cameras
- In 2024, Elevate Your YT Marketing Essential Tips for Higher Rankings
- 2024 Approved Best YouTube Video Reaction Ideas
- 2024 Approved Deciphering YouTube Shorts A Comprehensive Overview
- 2024 Approved Effortless YouTube Income Computations
- Video-Enhanced Slideshow Mastery with YouTube
- Market Masters Essential Stock YouTube Series
- [New] Discover Your Favorite 6 Premier YouTube Short Downloaders
- [Updated] Earnings Exploration How YouTube Turns Viewers Into Cash
- 2024 Approved Amplify Your Content Best Practices in Collaborative YouTube Outros
- 9 Premier Apps for Extracting and Saving YouTube Videos on Android for 2024
- In 2024, Beginning the Video Odyssey How to Create an Engaging YouTube Channel
- Fierce Femininity Top 10 Ladies Who've Captured YouTube Audiences
- 2024 Approved Building Direct Subscribe URLs for Your Channel' Market
- The Ultimate YouTube SEO Compendium for Enhanced Visibility
- In 2024, Engaging Tactics for Increased Subscriber Count
- In 2024, Discover Top ASMR for iOS/Android Devices
- Updated A Symphony of Screens Crafting Audio-Visual Masterpieces with Filmora
- How to Show Wi-Fi Password on Oppo Reno 11F 5G
- [New] 2024 Approved Behind the Photo Instagram Selfie Credibility Explored
- In 2024, Step-by-Step Tutorial How To Bypass Lava FRP
- Chuckles in a Minute How to Whip Up Memes for 2024
- Refining Zoom Image Precision Proactive Measures
- [Updated] Top 6 Minecraft Survival House Ideas for 2024
- New 2024 Approved Edit Like a Pro GoPro Video Editing for Mac Users (2023 Update)
- [Updated] Achieving Accuracy and Artistry in Altered Image Tones
- In 2024, How to Share/Fake Location on WhatsApp for OnePlus Nord CE 3 Lite 5G | Dr.fone
- How to Unlock SIM Card on Xiaomi Civi 3 Disney 100th Anniversary Edition online without jailbreak
- Breaking Barriers Download & Store Your FMB Conversations for 2024
- How to Change/Fake Your Vivo Y27 5G Location on Viber | Dr.fone
- [Updated] In 2024, Top 9 Rapid Techniques for Skyrocketing Your TikTok Audience
- [New] In 2024, Enhancing Cross-Platform Engagement Sharing TikTok on Facebook
- 2024 Approved Zoom Ease Preparing Effective Video Conferences
- What to Do if Google Play Services Keeps Stopping on Lava Yuva 2 Pro | Dr.fone
- [Updated] In 2024, Enhance Creativity and Quality in Live Video Recording Using Logitech Cam
- In 2024, How to Change GPS Location on Realme C67 4G Easily & Safely | Dr.fone
- Thrifty Cloud Haven Budget Storage, Bulk Files Handling
- Which Pokémon can Evolve with a Moon Stone For Oppo Find N3? | Dr.fone
- [Updated] 2024 Approved Unlock Content Potential with the Right Vimeo Membership Choice
- iPogo will be the new iSpoofer On Honor 90 Lite? | Dr.fone
- Blending Melodies Into Motion Pictures
- Fixes for Apps Keep Crashing on Oppo A1 5G | Dr.fone
- [New] 2024 Approved 4 Proven Strategies to Add Big Heads in Your TikTok VFX (3 Ways)
- In 2024, 3 Things You Must Know about Fake Snapchat Location On Realme Narzo 60 5G | Dr.fone
- In 2024, Snap It All Complimentary Android Recordings
- Title: Dismantling the Economics of YouTube's Ambitious Shorts Fund for 2024
- Author: Steven
- Created at : 2024-05-25 19:07:46
- Updated at : 2024-05-26 19:07:46
- Link: https://youtube-clips.techidaily.com/dismantling-the-economics-of-youtubes-ambitious-shorts-fund-for-2024/
- License: This work is licensed under CC BY-NC-SA 4.0.
