
:max_bytes(150000):strip_icc()/how-to-connect-multiple-bluetooth-speakers-4173788-311e11fa61fd439f9528c27402f47cb9.png)
"Digital Recorder Snap Your Screen, Upload to YouTube Online/PC/Mac"
Digital Recorder: Snap Your Screen, Upload to YouTube Online/PC/Mac
10 Record Screen and Upload to YouTube Tools [PC, Mac, Online]

Richard Bennett
Mar 27, 2024• Proven solutions
Recording the screen, including the audio, can help you introduce your gaming flow, show how to perform a task on the computer, or create a presentation. You can also upload the screen record to YouTube for free. There are several solutions if you want to record your screen and upload it to YouTube. You can record the screen with some screen recording software on your Mac or your Windows PC or with some online screen recording software or the screen recording feature built-in YouTube itself. In this article, we will show you how to to record screens and upload to YouTube on Windows and Mac with some screen recorders , some of which are free to use, or freemium, which are built in your computer. Check it out now.
- Part 1: Record Screen and Upload to YouTube Directly on PC
- Part 2: Record Screen and Upload to YouTube Online
- Part 3: Record Screen and Upload it to YouTube on Mac
Recommended YouTube Screen Recorders to Record Screen and Upload to YouTube Directly [Windows & Mac]
The following YouTube screen recording software can be used on both Windows and Mac computers. You can record the entire screen or a particular portion of the screen, record your own voiceover or add music to the recorded video and then upload it to YouTube directly.
Using Wondershare Filmora
Filmora is an easy-to-use yet powerful enough video editing software which features the Recording tools. Using Filmora, you can record the desktop screen , audio and webcam simultaneously. But compared with Filmora, the highest frame rates that Filmora can capture at 1 second is 60FPS.

Launch Wondershare Filmora and choose Full Feature mode to begin a project. Go to the Record tab and choose Record PC Screen. There are three types of screen recording to choose from – Target Window, Full Screen and Custom. You can also choose to record computer system audio or record from microphone. Click the icons to turn them off or on accordingly. Click Settings to see if there’s anything you need to adjust before recording.
 Download Mac Version ](https://tools.techidaily.com/wondershare/filmora/download/ )
The recorded footage will be loaded to the Media panel directly, you can then cut out imperfect frames, add some texts and titles, or apply transitions and filters to it. To upload the recorded screen video, click the Export in the main interface, and then switch to YouTube tab in the Export window.

Sign in your YouTube account and complete the video info accordingly and then click the Export button to upload the recorded video to YouTube directly.
If you are looking for more screen recorders which can run on Windows, Mac, Linux, Android, iOS or online for different purposes, you can check our picks of the best screen recorders for all platforms based on different purposes.
Part 1: How to Record Screen on Windows PC and Upload to YouTube Directly
1. Bandicam
To record screen using Bandicam, select “Screen Recording” and a green-edged rectangle window will appear. Adjust the rectangle window on the video then play the video.
Clicking the REC button will change the green-edged line of the rectangle window to red. Click the stop button to stop recording. To watch the recorded video, go to the “General” tab and click “Open.”
You can also upload your desired videos to YouTube from Bandicam by clicking the “Upload” button found under Bandicam’s “Output” tab.

2. Using Microsoft Expression Encoder 4
You can download Microsoft Expression Encoder 4 to record the screen of your device and upload it to YouTube. The software has a screen capture tool and encoder. Install the software as you would usually do. There’ll be 2 shortcuts in the start menu – Microsoft Expression Encoder 4 Screen Capture (used to capture the screen) and Microsoft Expression Encoder 4 (converts the screen into a video that can be uploaded to YouTube).
3. Using Ezvid
Ezvid can record screen and audio simultaneously. It can also capture the whole area of the screen, making it perfect for tutorial videos. Ezvid also has speech synthesis that translates text captions into artificial human language, so it can easily produce human sound with only a click of a button.
4. Using Smartpixel
Smartpixel is a screen recorder for Android and Windows. It has a user-friendly interface and different editing as well as recording functions. Smartpixel can export various video formats such as 3gp, MP4, wmv, avi and flv. It also allows you to upload videos to different online platforms like GoPlay and YouTube.
Part 2: How to Record Screen Online
1. Using YouTube
You can now also record desktop screen with the features in YouTube. To start recording the screen using YouTube, you just need to sign-in to the website using your Google Account. Click “Creator Studio”. Go to Live Streaming and choose “Events”. You’ll be directed to the “Create Event” page. Provide the title for your screencast video, set the video’s privacy to either Private or Unlisted.
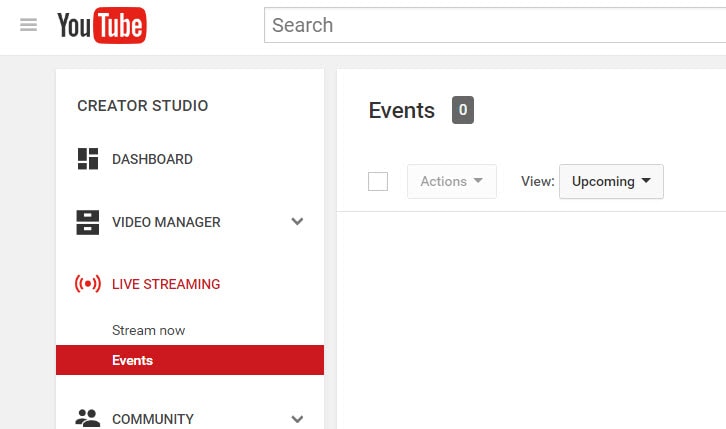
Click “Go Live Now” The Hangouts on Air page will open. Start the webcam from recording by clicking the camera icon. If you don’t want to record audio, you can just click the microphone icon.
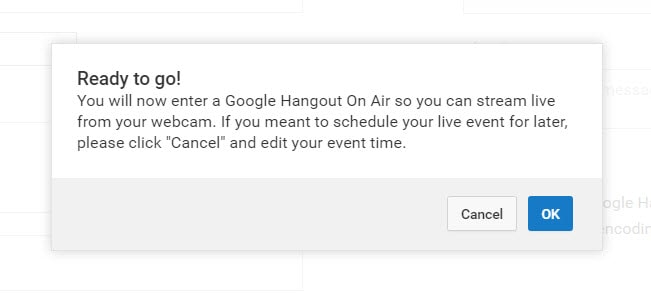
Click “Screenshare” and choose a desktop window that you want to record for the screencast. Click “Start Screenshare” to share the screen then click the “Start Broadcast” button to begin recording the screen. When you’re done recording, just “Stop Broadcast” and go to the YouTube website. The new screencast video is stored in your YouTube video dashboard. You can share the video or download it to your Google Drive.
For more details, you can check How to record YouTube videos . If you’re looking for more online screen recorders for YouTube, you can check our picks of the 10 Best Free Online Screen Recorders .
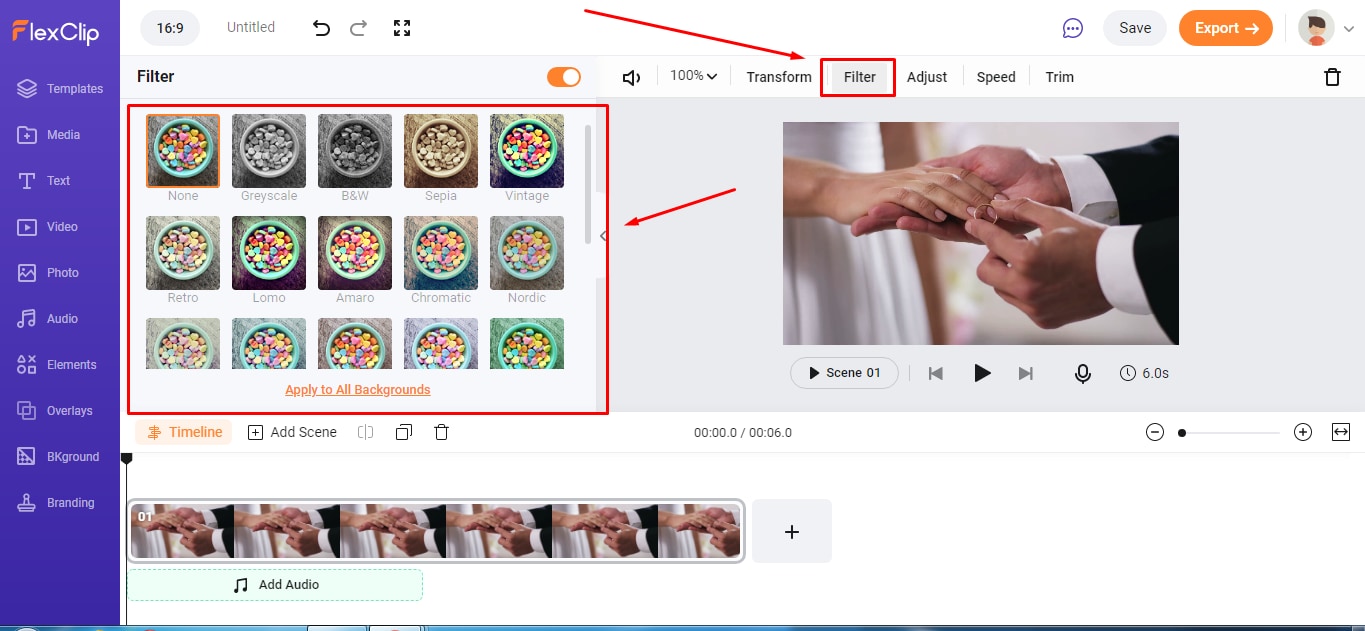
2. Using FlexClip - Free Online Screen Recorder
FlexClip is a complete bundle of creativity. Why so? It is because it’s a web-based tool that helps you with image and video editing and post-production. It also offers a free online screen recording option.
FlexClip lets you record your webcam, screen, and audio with a simple click. Contrarily, you can also record simultaneous screens without a hitch! It can record almost anything that is being displayed on your computer screen. So be it gameplays, seminars, courses, presentations, or anything, you can always use this program to save your recording.
And once you’re done capturing the screen, FlexClip also allows you to edit your recording. You can add subtitles, highlights, overlays, and annotations to increase your video’s worth. So no wonder why FlexClip is one of the leading web-based software for free online screen capturing, especially if you want to make great YouTube videos.
The recording process is easy. All you need to do is visit the website and click the “Start Recording” button.
Then, choose your layout to start recording the screen and audio. When you’re finished, just hit the “Stop” button to end recording to edit the video in FlexClip’s built-in video editor. Lastly, download the screencast to upload it to your YouTube channel.
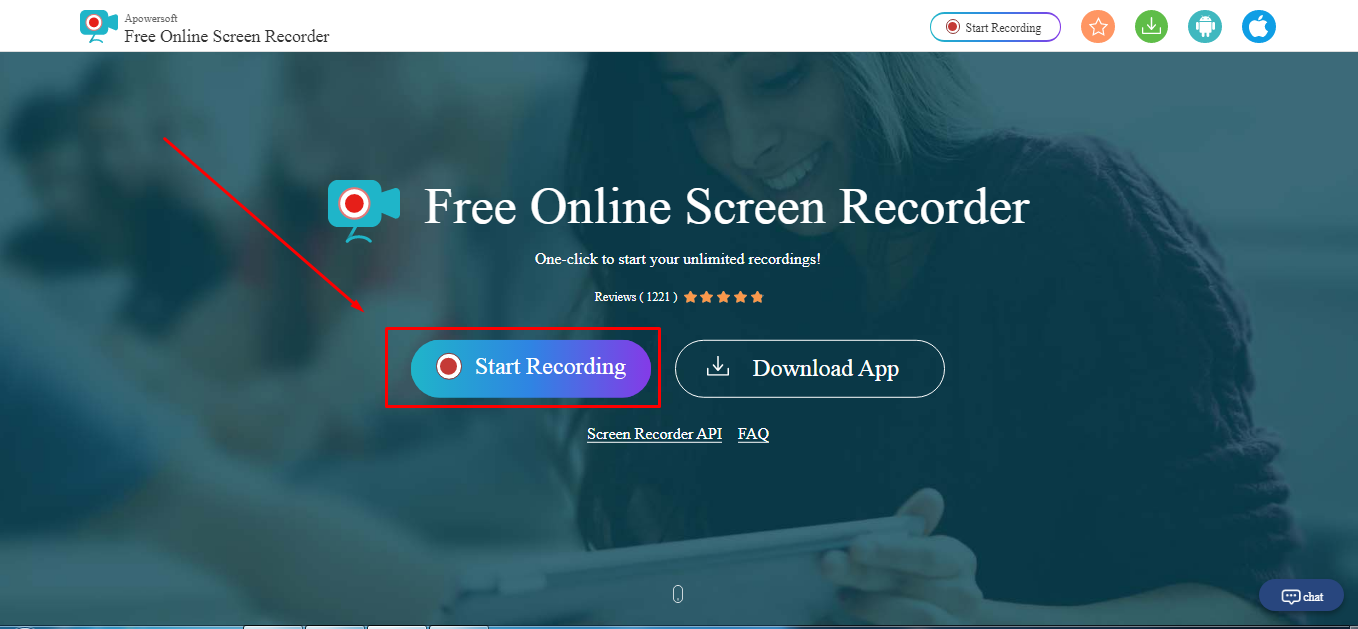
3. Using Apowersoft - Online Screen Recorder (Free)
Apowersoft is a renowned company that creates digital products, including file compressors, watermark removers, and more. Since there’s a growing demand for screen recorders for YouTube, the Apowersoft creators have also launched a “Free Online Screen Recorder.” Yup! You’re reading the right name.
Apowersoft – Free Online Screen Recorder eases the screen recording process. While it’s an online tool, you can also download the app on your Mac or Windows OS.
It’s a free program with simple features, such as a screen and webcam recording with audio. So if your YouTube content doesn’t require overlays, subtitles, or other editing stuff, this software is ideal due to its simplicity.
You can click the “Start Recording” button to get started.
.
Then, select the screen you wish to record, and save the captured screen to your local disk or cloud so you can upload the videos later to your YouTube channel.
Part 3: How to Record Screen for YouTube with Free Screen Recorder on Mac
1. Using QuickTime Player
QuickTime Player can be used to record movies from your camera or the screen of your iPad, iPod touch or iPhone. It can also record your Mac’s screen or record audio from your microphone. To record the screen of your Pad, iPod touch or iPhone, you should use the movie-recording function. You can use it to record the screen for YouTube video, or you can also record the YouTube video and empower it with your creativity.
For more details of using QuickTime Player to record YouTube videos, check our guide: How to record videos with Quicktime.
2. Using Screen Flow
Screen Flow is our second pick for Mac. Although it’s paid software, you can still enjoy the blessings of this screen recorder through the trial version. It’s a very handy tool that allows Mac screen recording and all iOS devices, such as iPhones and iPad.
Okay! So what’s good about screen flow? Let’s uncover. Firstly, it’s an editor + screen recorder specifically made for YouTube. You can capture the screen and edit the footage before uploading it to your channel.
Secondly, this software allows you to record simultaneous screens and your webcam. Plus, you can also record your voice through its mic recording option.
Another great thing about Screen Flow is that it has numerous video filters and a customizable title library. It also permits you to save screen recordings on your Mac or directly share them to your YouTube channel, other social media accounts, websites, or cloud storage in a few clicks.
Here’s a video to help you get started with screen recording on your Mac using Screen Flow:
3. Using Vmaker
Vmaker is another authentic software to record screens for your YouTube videos. It’s a free program, but you can buy premium versions to unlock more features.
The tool is trusted by many software review websites, such as “crozdesk.” It is available on both Mac and Windows OS. However, it seems like this software performs well on Mac operating systems.
Vmaker allows you to record your screen, your favorite YouTube videos, and the audio – all together! You can record the entire Mac screen or a specific portion in HD quality. Moreover, the software allows you to pick resolutions up to 4K to record the media.
This program also offers editing features like adding subtitles, music, flip, blur, trim, and more to create an awesome video. All videos are saved to your cloud workspace once you finish recording. Then, you can share the recorded video screens on your YouTube.
The tool is ideal for making tutorials, courses, demos, and product review videos. All you need to do is download Vmaker on your Mac. Choose a webcam, screen, or both with audio for recording. Start recording in the highest quality. Edit your video and share it on your YouTube channel.
Conclusion
Above are some screen recorders that you can use to record YouTube videos or record the screen and webcam simultaneously to make a video and upload it it to YouTube. If you want to record a screen video and edit it further, you should try Wondershare Filmora video editor.
Download Mac Version ](https://tools.techidaily.com/wondershare/filmora/download/ )
FAQs
Q1. How do you record your screen on a Mac for YouTube?
There are some great tools for screen recording on Mac for YouTube. The most loved and enjoyed program is Filmora by Wondershare. It’s a professional tool for screen recording and video editing. Most importantly, it has a user-friendly interface and records your screen in high quality.
Another option is the Quick Time Player. This program also allows screen recording. Likewise, Screen Flow is also a great program for screen capturing for YouTube on Mac.
Q2. Can I screen-record and upload it to YouTube?
There are two ways to do it. First, you can download the free or paid screen recording software on your Windows or macOS. Second, you can look for online screen recorders like FlexClip or the built-in YouTube recorder and directly share the recorded video to your channel.
Some tools, like Apowersoft and Vmaker, save screen recordings to the cloud or local disk. And there’s no direct sharing of the recorded screens to your YouTube channel. So if you’re using such programs, you will need to sign in to your YouTube channel and upload the file from your computer hard drive.
Q3. How do I record my computer screen for 2022?
Some of the greatest video editing and screen recording tools like Filmora, Bandicam, and FlexClip allow you to record your computer screen. Depending on the software, you can directly share the video to your YouTube channel. Or, save the video on your computer and then upload it on your channel.
Richard Bennett
Richard Bennett is a writer and a lover of all things video.
Follow @Richard Bennett
Richard Bennett
Mar 27, 2024• Proven solutions
Recording the screen, including the audio, can help you introduce your gaming flow, show how to perform a task on the computer, or create a presentation. You can also upload the screen record to YouTube for free. There are several solutions if you want to record your screen and upload it to YouTube. You can record the screen with some screen recording software on your Mac or your Windows PC or with some online screen recording software or the screen recording feature built-in YouTube itself. In this article, we will show you how to to record screens and upload to YouTube on Windows and Mac with some screen recorders , some of which are free to use, or freemium, which are built in your computer. Check it out now.
- Part 1: Record Screen and Upload to YouTube Directly on PC
- Part 2: Record Screen and Upload to YouTube Online
- Part 3: Record Screen and Upload it to YouTube on Mac
Recommended YouTube Screen Recorders to Record Screen and Upload to YouTube Directly [Windows & Mac]
The following YouTube screen recording software can be used on both Windows and Mac computers. You can record the entire screen or a particular portion of the screen, record your own voiceover or add music to the recorded video and then upload it to YouTube directly.
Using Wondershare Filmora
Filmora is an easy-to-use yet powerful enough video editing software which features the Recording tools. Using Filmora, you can record the desktop screen , audio and webcam simultaneously. But compared with Filmora, the highest frame rates that Filmora can capture at 1 second is 60FPS.
Launch Wondershare Filmora and choose Full Feature mode to begin a project. Go to the Record tab and choose Record PC Screen. There are three types of screen recording to choose from – Target Window, Full Screen and Custom. You can also choose to record computer system audio or record from microphone. Click the icons to turn them off or on accordingly. Click Settings to see if there’s anything you need to adjust before recording.
Download Mac Version ](https://tools.techidaily.com/wondershare/filmora/download/ )
The recorded footage will be loaded to the Media panel directly, you can then cut out imperfect frames, add some texts and titles, or apply transitions and filters to it. To upload the recorded screen video, click the Export in the main interface, and then switch to YouTube tab in the Export window.
Sign in your YouTube account and complete the video info accordingly and then click the Export button to upload the recorded video to YouTube directly.
If you are looking for more screen recorders which can run on Windows, Mac, Linux, Android, iOS or online for different purposes, you can check our picks of the best screen recorders for all platforms based on different purposes.
Part 1: How to Record Screen on Windows PC and Upload to YouTube Directly
1. Bandicam
To record screen using Bandicam, select “Screen Recording” and a green-edged rectangle window will appear. Adjust the rectangle window on the video then play the video.
Clicking the REC button will change the green-edged line of the rectangle window to red. Click the stop button to stop recording. To watch the recorded video, go to the “General” tab and click “Open.”
You can also upload your desired videos to YouTube from Bandicam by clicking the “Upload” button found under Bandicam’s “Output” tab.
2. Using Microsoft Expression Encoder 4
You can download Microsoft Expression Encoder 4 to record the screen of your device and upload it to YouTube. The software has a screen capture tool and encoder. Install the software as you would usually do. There’ll be 2 shortcuts in the start menu – Microsoft Expression Encoder 4 Screen Capture (used to capture the screen) and Microsoft Expression Encoder 4 (converts the screen into a video that can be uploaded to YouTube).
3. Using Ezvid
Ezvid can record screen and audio simultaneously. It can also capture the whole area of the screen, making it perfect for tutorial videos. Ezvid also has speech synthesis that translates text captions into artificial human language, so it can easily produce human sound with only a click of a button.
4. Using Smartpixel
Smartpixel is a screen recorder for Android and Windows. It has a user-friendly interface and different editing as well as recording functions. Smartpixel can export various video formats such as 3gp, MP4, wmv, avi and flv. It also allows you to upload videos to different online platforms like GoPlay and YouTube.
Part 2: How to Record Screen Online
1. Using YouTube
You can now also record desktop screen with the features in YouTube. To start recording the screen using YouTube, you just need to sign-in to the website using your Google Account. Click “Creator Studio”. Go to Live Streaming and choose “Events”. You’ll be directed to the “Create Event” page. Provide the title for your screencast video, set the video’s privacy to either Private or Unlisted.
Click “Go Live Now” The Hangouts on Air page will open. Start the webcam from recording by clicking the camera icon. If you don’t want to record audio, you can just click the microphone icon.
Click “Screenshare” and choose a desktop window that you want to record for the screencast. Click “Start Screenshare” to share the screen then click the “Start Broadcast” button to begin recording the screen. When you’re done recording, just “Stop Broadcast” and go to the YouTube website. The new screencast video is stored in your YouTube video dashboard. You can share the video or download it to your Google Drive.
For more details, you can check How to record YouTube videos . If you’re looking for more online screen recorders for YouTube, you can check our picks of the 10 Best Free Online Screen Recorders .
2. Using FlexClip - Free Online Screen Recorder
FlexClip is a complete bundle of creativity. Why so? It is because it’s a web-based tool that helps you with image and video editing and post-production. It also offers a free online screen recording option.
FlexClip lets you record your webcam, screen, and audio with a simple click. Contrarily, you can also record simultaneous screens without a hitch! It can record almost anything that is being displayed on your computer screen. So be it gameplays, seminars, courses, presentations, or anything, you can always use this program to save your recording.
And once you’re done capturing the screen, FlexClip also allows you to edit your recording. You can add subtitles, highlights, overlays, and annotations to increase your video’s worth. So no wonder why FlexClip is one of the leading web-based software for free online screen capturing, especially if you want to make great YouTube videos.
The recording process is easy. All you need to do is visit the website and click the “Start Recording” button.
Then, choose your layout to start recording the screen and audio. When you’re finished, just hit the “Stop” button to end recording to edit the video in FlexClip’s built-in video editor. Lastly, download the screencast to upload it to your YouTube channel.
3. Using Apowersoft - Online Screen Recorder (Free)
Apowersoft is a renowned company that creates digital products, including file compressors, watermark removers, and more. Since there’s a growing demand for screen recorders for YouTube, the Apowersoft creators have also launched a “Free Online Screen Recorder.” Yup! You’re reading the right name.
Apowersoft – Free Online Screen Recorder eases the screen recording process. While it’s an online tool, you can also download the app on your Mac or Windows OS.
It’s a free program with simple features, such as a screen and webcam recording with audio. So if your YouTube content doesn’t require overlays, subtitles, or other editing stuff, this software is ideal due to its simplicity.
You can click the “Start Recording” button to get started.
.
Then, select the screen you wish to record, and save the captured screen to your local disk or cloud so you can upload the videos later to your YouTube channel.
Part 3: How to Record Screen for YouTube with Free Screen Recorder on Mac
1. Using QuickTime Player
QuickTime Player can be used to record movies from your camera or the screen of your iPad, iPod touch or iPhone. It can also record your Mac’s screen or record audio from your microphone. To record the screen of your Pad, iPod touch or iPhone, you should use the movie-recording function. You can use it to record the screen for YouTube video, or you can also record the YouTube video and empower it with your creativity.
For more details of using QuickTime Player to record YouTube videos, check our guide: How to record videos with Quicktime.
2. Using Screen Flow
Screen Flow is our second pick for Mac. Although it’s paid software, you can still enjoy the blessings of this screen recorder through the trial version. It’s a very handy tool that allows Mac screen recording and all iOS devices, such as iPhones and iPad.
Okay! So what’s good about screen flow? Let’s uncover. Firstly, it’s an editor + screen recorder specifically made for YouTube. You can capture the screen and edit the footage before uploading it to your channel.
Secondly, this software allows you to record simultaneous screens and your webcam. Plus, you can also record your voice through its mic recording option.
Another great thing about Screen Flow is that it has numerous video filters and a customizable title library. It also permits you to save screen recordings on your Mac or directly share them to your YouTube channel, other social media accounts, websites, or cloud storage in a few clicks.
Here’s a video to help you get started with screen recording on your Mac using Screen Flow:
3. Using Vmaker
Vmaker is another authentic software to record screens for your YouTube videos. It’s a free program, but you can buy premium versions to unlock more features.
The tool is trusted by many software review websites, such as “crozdesk.” It is available on both Mac and Windows OS. However, it seems like this software performs well on Mac operating systems.
Vmaker allows you to record your screen, your favorite YouTube videos, and the audio – all together! You can record the entire Mac screen or a specific portion in HD quality. Moreover, the software allows you to pick resolutions up to 4K to record the media.
This program also offers editing features like adding subtitles, music, flip, blur, trim, and more to create an awesome video. All videos are saved to your cloud workspace once you finish recording. Then, you can share the recorded video screens on your YouTube.
The tool is ideal for making tutorials, courses, demos, and product review videos. All you need to do is download Vmaker on your Mac. Choose a webcam, screen, or both with audio for recording. Start recording in the highest quality. Edit your video and share it on your YouTube channel.
Conclusion
Above are some screen recorders that you can use to record YouTube videos or record the screen and webcam simultaneously to make a video and upload it it to YouTube. If you want to record a screen video and edit it further, you should try Wondershare Filmora video editor.
Download Mac Version ](https://tools.techidaily.com/wondershare/filmora/download/ )
FAQs
Q1. How do you record your screen on a Mac for YouTube?
There are some great tools for screen recording on Mac for YouTube. The most loved and enjoyed program is Filmora by Wondershare. It’s a professional tool for screen recording and video editing. Most importantly, it has a user-friendly interface and records your screen in high quality.
Another option is the Quick Time Player. This program also allows screen recording. Likewise, Screen Flow is also a great program for screen capturing for YouTube on Mac.
Q2. Can I screen-record and upload it to YouTube?
There are two ways to do it. First, you can download the free or paid screen recording software on your Windows or macOS. Second, you can look for online screen recorders like FlexClip or the built-in YouTube recorder and directly share the recorded video to your channel.
Some tools, like Apowersoft and Vmaker, save screen recordings to the cloud or local disk. And there’s no direct sharing of the recorded screens to your YouTube channel. So if you’re using such programs, you will need to sign in to your YouTube channel and upload the file from your computer hard drive.
Q3. How do I record my computer screen for 2022?
Some of the greatest video editing and screen recording tools like Filmora, Bandicam, and FlexClip allow you to record your computer screen. Depending on the software, you can directly share the video to your YouTube channel. Or, save the video on your computer and then upload it on your channel.
Richard Bennett
Richard Bennett is a writer and a lover of all things video.
Follow @Richard Bennett
Video Marketing Strategies: Integrating Logo/Watermark for Brand Identity
How to Add Logo or Watermark to YouTube Video
Richard Bennett
Mar 27, 2024• Proven solutions
A watermark is a still image that is usually plugged in the videos, for the purpose of claiming copyrights or publicity purpose. YouTube generally carries a “branding” option where you can brand your video with your channel. This doesn’t provide a stable watermark. Therefore, when someone downloads that video using a second party (YouTube downloader) it gets removed. For this purpose the legal author will have to put a Channel watemark on their YouTube videos. In this guide, we will show you how to add watermark to your YouTube videos, existing or new.
You May Also Like:
Best Watermark Apps for iPhone - How to Watermark Photos on iPhone >>
Wondershare AniEraser Seamless, Effortless, Intuitive.
AniEraser makes it easy to perfect any photo or video; no matter the device or platform - experience a smooth, effortless transformation of your image and maximize its potential with just one click.
Make your moment perfect.
Free Download Free Download Edit online

![]()
How to Add a Watermark to Your YouTube Videos
- Part 1: How to add logo or watermark to in existing YouTube videos
- Part 2: Add logos or watermarks to your videos before uploading
Part 1: How to add logo or watermark to in existing YouTube videos
To add a watermark to your previously uploaded videos you will need to have created and saved your watermark outside of your video editing program.
- Sign in to your YouTube account. Click on the thumbnail image of your account at the top right corner. This will give you a drop down menu. Then Click on the small gear (indicating settings)

- This will lead you to setting center. Click on “view additional features”

- To the left of the window, Click the third option of “branding”
- Click on “add watermark”. Then you can choose an image from your computer. After your image is uploaded, click save.

Notes
YouTube watermark size: Your watermark should be transparent, square, and larger than 50x50 pixels, which is the size it will be shrunk down to when it appears in the corner of your videos.
YouTube watermark starting time: you will have the option of choosing a start time for your watermark, making it appear only at the end of your video, or having it there for the entire length of your video. Once that is done click ‘Update’ and your watermark will be applied to your videos.
YouTube watermark color: Youtube suggests that your watermark have only one color. The point is that you should not use anything flashy that will take attention away from your video, so having two or three colors is not necessarily wrong if your design is subtle.
Here is a tutorial video for how to add watermark to Your YouTube videos:
Part 2: Add logos or watermarks to your videos before uploading
1. Wondershare Filmora
Wondershare Filmora which is one of the ideal video editing tools especially when it comes to watermarking your videos . It helps you in adding static and video watermarks over the video. The basic theme of the video watermarking is the concept of picture-in-picture .
![]()
The following steps have to be taken to add a watermark:
- Add the video and watermarking data by drag dropping it into the workspace
- Drag the required video on the timeline and the watermark on it as well
- Adjust the watermark and add pre-made special effects to it
- Mask the watermark in the shape you like
- Save the video
Download Mac Version ](https://tools.techidaily.com/wondershare/filmora/download/ )
2. Windows movie maker
Windows movie maker is free default windows software that can easily add watermark to your videos to secure your copyrights. It can cater two types of watermarks; images and text. For images, it just supports PNG and GIF format files and generally doesn’t support transparency. Moreover, an external file, Windows Logo Locator is needed for placing the logo at different positions.
How to add watermark to video with Windows Movie Maker
Adding Text watermark:
- Open windows movie maker
- Click on ‘videos’ under the title of import.
- Import your video to the timeline.
- Right beneath imports under the category of edit you will find ‘titles and credits’. Click.
- Enter the text for watermark.
- Choose the title positioning, font and transparency.
- Add title. You will find it along the length of timeline. You may drag to expand it, for viewing it during the entire videos length. Select file and click publish video.
Adding image watermark:
The image should be in .PNG or .GIF format.
- Save the image in >C:\Program Files\Movie Maker\Shared\AddOnTFX\.
- Download a logo Locator as per your installed windows from FX archives.
- Select the location of the logo in your video where you want it to appear.
- Choose the screen size and the logo size
- Type the name of the file of the logo you had already saved with the extension. For e.g. logo.png
- Copy the text that appears underneath and paste it on the notepad and save the typed file in >C:\Program Files\Movie Maker\Shared\AddOnTFX\.
- Open windows movie maker again.
- Choose title and credits underneath the edit category.
- Press space bar once and then click ‘change the title animation’.
- You will see your image there. Click on ad title and press Ctrl+p to publish.

Part 3: How to Create a Transparent logo for Youtube Channel
Do you want to make a transparent image as logo for your YouTube? If you want to brand your YouTube channel, we believe it is a must to add transparent logo for YouTube branding. Actually, you can do this in Filmora just with a green screen image. Check the steps below to know the secret.
Step 1: Import video and image to Filmora
Open Filmora. Choose Create New Project. Click import media files here in Media library. Select your video and a green screen image. In fact, a green screen video is also accessable, but usually brand logo is image. Now drag them onto timeline.

Step 2: Import video and image to Filmora
Right click on the image clip in the timeline. Choose Green Screen. You will see the image is transparent in the preview window. Now, you need to adjust some details. You can adjust edge thickness and edge feather to better edge. If the green screen background is not totally removed, drag tolerance to adjust it.

Step 3: Scale the logo
You can clip the image clip first and go to preview window to scale it down or up by dragging the green dot. You can put the YouTube logo at corner.
![]()
Richard Bennett
Richard Bennett is a writer and a lover of all things video.
Follow @Richard Bennett
Richard Bennett
Mar 27, 2024• Proven solutions
A watermark is a still image that is usually plugged in the videos, for the purpose of claiming copyrights or publicity purpose. YouTube generally carries a “branding” option where you can brand your video with your channel. This doesn’t provide a stable watermark. Therefore, when someone downloads that video using a second party (YouTube downloader) it gets removed. For this purpose the legal author will have to put a Channel watemark on their YouTube videos. In this guide, we will show you how to add watermark to your YouTube videos, existing or new.
You May Also Like:
Best Watermark Apps for iPhone - How to Watermark Photos on iPhone >>
Wondershare AniEraser Seamless, Effortless, Intuitive.
AniEraser makes it easy to perfect any photo or video; no matter the device or platform - experience a smooth, effortless transformation of your image and maximize its potential with just one click.
Make your moment perfect.
Free Download Free Download Edit online
![]()
How to Add a Watermark to Your YouTube Videos
- Part 1: How to add logo or watermark to in existing YouTube videos
- Part 2: Add logos or watermarks to your videos before uploading
Part 1: How to add logo or watermark to in existing YouTube videos
To add a watermark to your previously uploaded videos you will need to have created and saved your watermark outside of your video editing program.
- Sign in to your YouTube account. Click on the thumbnail image of your account at the top right corner. This will give you a drop down menu. Then Click on the small gear (indicating settings)
- This will lead you to setting center. Click on “view additional features”
- To the left of the window, Click the third option of “branding”
- Click on “add watermark”. Then you can choose an image from your computer. After your image is uploaded, click save.
Notes
YouTube watermark size: Your watermark should be transparent, square, and larger than 50x50 pixels, which is the size it will be shrunk down to when it appears in the corner of your videos.
YouTube watermark starting time: you will have the option of choosing a start time for your watermark, making it appear only at the end of your video, or having it there for the entire length of your video. Once that is done click ‘Update’ and your watermark will be applied to your videos.
YouTube watermark color: Youtube suggests that your watermark have only one color. The point is that you should not use anything flashy that will take attention away from your video, so having two or three colors is not necessarily wrong if your design is subtle.
Here is a tutorial video for how to add watermark to Your YouTube videos:
Part 2: Add logos or watermarks to your videos before uploading
1. Wondershare Filmora
Wondershare Filmora which is one of the ideal video editing tools especially when it comes to watermarking your videos . It helps you in adding static and video watermarks over the video. The basic theme of the video watermarking is the concept of picture-in-picture .
![]()
The following steps have to be taken to add a watermark:
- Add the video and watermarking data by drag dropping it into the workspace
- Drag the required video on the timeline and the watermark on it as well
- Adjust the watermark and add pre-made special effects to it
- Mask the watermark in the shape you like
- Save the video
Download Mac Version ](https://tools.techidaily.com/wondershare/filmora/download/ )
2. Windows movie maker
Windows movie maker is free default windows software that can easily add watermark to your videos to secure your copyrights. It can cater two types of watermarks; images and text. For images, it just supports PNG and GIF format files and generally doesn’t support transparency. Moreover, an external file, Windows Logo Locator is needed for placing the logo at different positions.
How to add watermark to video with Windows Movie Maker
Adding Text watermark:
- Open windows movie maker
- Click on ‘videos’ under the title of import.
- Import your video to the timeline.
- Right beneath imports under the category of edit you will find ‘titles and credits’. Click.
- Enter the text for watermark.
- Choose the title positioning, font and transparency.
- Add title. You will find it along the length of timeline. You may drag to expand it, for viewing it during the entire videos length. Select file and click publish video.
Adding image watermark:
The image should be in .PNG or .GIF format.
- Save the image in >C:\Program Files\Movie Maker\Shared\AddOnTFX\.
- Download a logo Locator as per your installed windows from FX archives.
- Select the location of the logo in your video where you want it to appear.
- Choose the screen size and the logo size
- Type the name of the file of the logo you had already saved with the extension. For e.g. logo.png
- Copy the text that appears underneath and paste it on the notepad and save the typed file in >C:\Program Files\Movie Maker\Shared\AddOnTFX\.
- Open windows movie maker again.
- Choose title and credits underneath the edit category.
- Press space bar once and then click ‘change the title animation’.
- You will see your image there. Click on ad title and press Ctrl+p to publish.
Part 3: How to Create a Transparent logo for Youtube Channel
Do you want to make a transparent image as logo for your YouTube? If you want to brand your YouTube channel, we believe it is a must to add transparent logo for YouTube branding. Actually, you can do this in Filmora just with a green screen image. Check the steps below to know the secret.
Step 1: Import video and image to Filmora
Open Filmora. Choose Create New Project. Click import media files here in Media library. Select your video and a green screen image. In fact, a green screen video is also accessable, but usually brand logo is image. Now drag them onto timeline.
Step 2: Import video and image to Filmora
Right click on the image clip in the timeline. Choose Green Screen. You will see the image is transparent in the preview window. Now, you need to adjust some details. You can adjust edge thickness and edge feather to better edge. If the green screen background is not totally removed, drag tolerance to adjust it.
Step 3: Scale the logo
You can clip the image clip first and go to preview window to scale it down or up by dragging the green dot. You can put the YouTube logo at corner.
![]()
Richard Bennett
Richard Bennett is a writer and a lover of all things video.
Follow @Richard Bennett
Also read:
- Streamlining Long Videos on YouTube Through Effective Chapter Management
- 2024 Approved Architects Crafting Fantasy Realms for Marvel
- The Best Laptops For Video Editing You Should Know for 2024
- Channel Conclusion Mastery Customized Screens in Focus for 2024
- Money Multiplier How to Maximize YouTube Profits with Mobile Viewers
- Pioneering Vlogging Tech Our Ranking of Top 12 Video Cameras
- 10 Expert Suggestions to Make Your YT Shorts Stand Out
- Comparing Profit Potential DailyMovement and Youtube's Earnings for 2024
- In-Video Earnings Techno Gamers' Guide
- Efficient Strategies for Saving Youtube Thumbnails on Any OS for 2024
- [Updated] Enhance Visibility Must-Have YouTube SEO Tactics Explained
- Premium YouTube Insights Everything You Must Know
- Elevating Ad Effectiveness for YouTube for 2024
- Perfecting Video Segmentation for Enhanced Viewing Experience on YouTube
- Elevating Your Unboxing Channel A Complete How-To
- [Updated] Bridging Platform Gaps YouTube Shorts to MP4 Transformation
- [Updated] Top 10 YouTube Video Trimmers Online
- 2024 Approved 2023'S Favorite Animated Channels on YouTube (Daytime Vibes)
- [Updated] Daily Digital Dynasty Ranking the Top 10 YouTube Videos
- 2024 Approved Dive Into iOS Screenshots A Comprehensive YouTube Guide
- Playlist Perfection Weaving YouTube Videos Into Webpages
- 2024 Approved Dancefloor Dynamics Top-Rated DJ Video Selections
- [Updated] 15 Premium, Free Music Websites Every Videographer Needs
- Edit Like a Champion—Top Strategies for Beginner YouTubers
- Navigating the World of Hashtags YouTube's Best Practices
- [Updated] Boost Engagement Adding Dynamic Backgrounds to Your Thumbnails
- Everything Uncovered About the World of YT Shorts for 2024
- [Updated] 10 Prime Yoga Videos to Transform Your Body & Mind
- Chuckle Chronicles Top YouTube Humorists' Masterpieces for 2024
- YouTube Studio for Beginners Basic to Pro Editing Guide
- [Filmora] Best Magic Tricks of YouTube Video Editors EVER for 2024
- Which Micro-Video Service Meets Your Individual Needs Better?
- The Complete Playbook to Propel Your YouTube Gaming Vids with Hashes
- [Updated] Crown Jewels of Online Watching YouTube's Treasures
- [Updated] Breaking Through Boundaries Optimizing Videos for Maximum Traction
- Get Back to Pure Content How to Block YouTube Ads on All Devices
- 2024 Approved Building a YouTubing Brand From Scratch with These 8 Courses
- [Updated] Elevate Your Content with These Top 5 YouTube Marketing Methods
- Exclusive Access to 6 Premium Thumbnail Generators for YouTube
- Seamless Sound Shift Best 10 YouTube Audio Converters
- Professional & Amateur Cameras A YouTube Journey
- Breaking the Mold High-Fidelity Sound without a Microphone for 2024
- Ultimate Sound Editing Solutions for Online Bloggers
- [Updated] Elite Recommendations Top 10 High-End Video Card Models
- In 2024, Constructing Captivating Conclusions
- 2024 Approved Earnings on YouTube The Crucial Number of Video Views for Money
- Seamless Share YouTube Videos Set Up Autoplay on FB for 2024
- New Critically Acclaimed Audio Repository Top 10 Music Capture Apps
- Behind the Scenes Professional Steam Capture Methods for 2024
- New Wondershare Filmora Tutorial | Using The AI Auto Reframe Feature
- Updated 2024 Approved Best 10 Tools To Make Quiz Videos
- In 2024, Unlock Your Samsung Galaxy M34s Potential The Top 20 Lock Screen Apps You Need to Try
- Easy-to-Follow OBS Setup on Thriftier Tech
- [Updated] Flip Photo Trail on FB - 3 Techniques Explored
- 2024 Approved Android & iOS Best PS2 Emulator Comparisons
- In 2024, 5 Quick Methods to Bypass Vivo S17 FRP
- [New] In 2024, Effective Methods to Document FaceTime Calls
- Updated S Most Popular Video Editing Software for Mac Computers for 2024
- New In 2024, Maximize Productivity Best Free Mac Apps for Converting Speech to Text (No Downloads or Costs)
- [Updated] In 2024, Real-Time Video Sharing and Organizing
- Mastering Lock Screen Settings How to Enable and Disable on Samsung Galaxy S23 Tactical Edition
- Vimeo Profits Unleashed Strategies for Creative Entrepreneurs
- Title: "Digital Recorder Snap Your Screen, Upload to YouTube Online/PC/Mac"
- Author: Steven
- Created at : 2024-05-25 19:06:03
- Updated at : 2024-05-26 19:06:03
- Link: https://youtube-clips.techidaily.com/digital-recorder-snap-your-screen-upload-to-youtube-onlinepcmac/
- License: This work is licensed under CC BY-NC-SA 4.0.
