
:max_bytes(150000):strip_icc()/Holding-iPhone-Emergency-SOS-Power-Off-Screen-8630001-1896d5a5d1e84350b096a0098f4e45c4.jpg)
Detailed Steps to Supercharge Your YouTube Audio Content
Detailed Steps to Supercharge Your YouTube Audio Content
How to Edit Audio on YouTube

Richard Bennett
Mar 27, 2024• Proven solutions
In this article, we are going to show you how to edit audio with YouTube Video Editor, and the tips on adding your own audio file to YouTube.
- Part 1: Add your Own Audio File to YouTube Video
- Part 2: How to Edit Audio with YouTube Video Editor
Part 1: Add your Own Audio File to YouTube Video
Tools You Are Going to Need
YouTube video editor is far from meeting the needs of people who want to have more control on their audio. On the bright side, if you are interested in learning how to edit audio on YouTube, there is a solution. There are many video editors in the market that allow you to add your own music or audio files to a video. Windows Movie Maker, iMovie, Adobe Premiere, and Magisto are some of the video editors available for you to choose from. In this guide, we recommend the Wondershare Filmora video editor. Below is a quick tutorial about how to edit audio in Filmora.
 Download Mac Version ](https://tools.techidaily.com/wondershare/filmora/download/ )
Why Should You Choose Wondershare Filmora?
There are many advantages associated with the use of Wondershare Filmora. You will see that it allows you to fully edit any audio file and gain 100% control over your files. It is an integrated solution that lacks nothing in terms of efficiency and quality standards. To be more specific, Filmora offers the following unique features:
- Built-in audio editing tools that allow you to gain full control of your audio in an easy way
- Exclusive audio track that enables you to mute, detach or even de-noise the audio from video
- All audio effects can easily be adjusted with one click only
- The built-in Equalizer is capable enough to create amazing audio effects
- Directly upload your video to YouTube, Facebook or Vimeo from Wondershare Filmora
How to add audio files to YouTube video with Wondershare Filmora
Do you want to know more about audio editing? Please read this article: How to add audio to video.
Step 1 Import Video Clips into Filmora
Filmora supports a wide range of video formats, such as MKV, MOV, AVI, WebM and MP4, you can import the video clip shot with Camera, smartphone or camcorder easily to it.
Step 2 Detach Audio
If you want to edit the original audio of the video, you can choose to split the audio file from the video by using the Audio Detach option on Wondershare Filmora. Then, the audio file will be shown in the audio track, and you can cut or trim it.

Note: If you do not want to keep the original audio file in the video, you can delete it from the audio track directly.
Step 3Add Audio Files
Wondershare Filmora offers you multiple royalty free audio effects and music in its rich audio library. What is more, you can also import your own music or audio file from your computer or iTunes. Of course, you should know that the audio should be royalty free for you to make use of. In a different situation, you cannot upload it and benefit from its quality and nature.
Step 4Edit Audio
In this step, you can adjust the audio volume and pitch, etc. There are multiple options for you to benefit from, including the Audio Equalizer, Music, Mix Audio. In this way, you can make sure that the audio is exactly like you have wanted it to be. For further information as to how you can improve the sound quality of your recorded videos, you can check out: How to improve sound quality of recorded videos.
Step 5Save Your Work and Upload on YouTube
If you are satisfied with your work on the audio file and you wish to publish it, the process is quite simple. You just hit Export and select to upload the video to YouTube. After signing in to your YouTube account, you will be ready to start uploading the audio file.

In case you wish to edit the audio from an already published video, you have to download the video first. Then, you can follow the steps above to edit the audio file in Filmora. As one of the widely used video editing software for YouTubers, Filmora is here to empower your imagination. Just download the free trial version and try it now.

Part 2: How to Edit Audio with YouTube Video Editor
Unfortunately, YouTube does not allow users to upload audio files such as MP3, WAV, etc. Instead, you can only upload audio files which are offered by YouTube in the first place. Since YouTube has got a plentiful audio library, you can find a lot of audio there. In this part, we will show you how to add and edit audio with YouTube Video Editor.
You may also like: How to Add Music to YouTube Videos >>
Note: From 20th September 2017 users will no longer be able to use the complimentary editing suite. Check the best YouTube video editor alternatives from this complete guide. In the following part, I will show you how to add audio track , replace the original audio and adjust the audio position and length as well.
- Step 1: Sign in to your YouTube account
- **Step 2:**Click your profile avatar and select Creator Studio option.
- Step 3: In the left pane, go to Video Manager and then click Videos. In the Videos list, choose the video that you want to add new audio track, and then select Audio from the Edit button.

- Step 4: Now you can add or replace the audio in your video. Here you will find that there are various songs and audio files you can choose from. Click ADD TO VIDEO and the audio track will be added to the video directly.

- Step 5: Now you will see the audio track appears at the bottom of the player. Here you can trim and drag the audio bar to adjust the audio positon and length. To Trim the audio, click the beginning or the end of the audio bar and then drag it to the left or right. After trimming, drag it to meet the target position.

Conclusion
Normally, it would be better to add and edit audio to video before updating to YouTube. In this case, Filmora is highly recommended as one of the best video editor for YouTubers , which provides some royalty free music sound in the Music Library to choose from and also the audio editing tools like remove background noise from the video, add fade in and fade out effects with ease or play the video backward or fast forward.
Richard Bennett
Richard Bennett is a writer and a lover of all things video.
Follow @Richard Bennett
Richard Bennett
Mar 27, 2024• Proven solutions
In this article, we are going to show you how to edit audio with YouTube Video Editor, and the tips on adding your own audio file to YouTube.
- Part 1: Add your Own Audio File to YouTube Video
- Part 2: How to Edit Audio with YouTube Video Editor
Part 1: Add your Own Audio File to YouTube Video
Tools You Are Going to Need
YouTube video editor is far from meeting the needs of people who want to have more control on their audio. On the bright side, if you are interested in learning how to edit audio on YouTube, there is a solution. There are many video editors in the market that allow you to add your own music or audio files to a video. Windows Movie Maker, iMovie, Adobe Premiere, and Magisto are some of the video editors available for you to choose from. In this guide, we recommend the Wondershare Filmora video editor. Below is a quick tutorial about how to edit audio in Filmora.
Download Mac Version ](https://tools.techidaily.com/wondershare/filmora/download/ )
Why Should You Choose Wondershare Filmora?
There are many advantages associated with the use of Wondershare Filmora. You will see that it allows you to fully edit any audio file and gain 100% control over your files. It is an integrated solution that lacks nothing in terms of efficiency and quality standards. To be more specific, Filmora offers the following unique features:
- Built-in audio editing tools that allow you to gain full control of your audio in an easy way
- Exclusive audio track that enables you to mute, detach or even de-noise the audio from video
- All audio effects can easily be adjusted with one click only
- The built-in Equalizer is capable enough to create amazing audio effects
- Directly upload your video to YouTube, Facebook or Vimeo from Wondershare Filmora
How to add audio files to YouTube video with Wondershare Filmora
Do you want to know more about audio editing? Please read this article: How to add audio to video.
Step 1 Import Video Clips into Filmora
Filmora supports a wide range of video formats, such as MKV, MOV, AVI, WebM and MP4, you can import the video clip shot with Camera, smartphone or camcorder easily to it.
Step 2 Detach Audio
If you want to edit the original audio of the video, you can choose to split the audio file from the video by using the Audio Detach option on Wondershare Filmora. Then, the audio file will be shown in the audio track, and you can cut or trim it.
Note: If you do not want to keep the original audio file in the video, you can delete it from the audio track directly.
Step 3Add Audio Files
Wondershare Filmora offers you multiple royalty free audio effects and music in its rich audio library. What is more, you can also import your own music or audio file from your computer or iTunes. Of course, you should know that the audio should be royalty free for you to make use of. In a different situation, you cannot upload it and benefit from its quality and nature.
Step 4Edit Audio
In this step, you can adjust the audio volume and pitch, etc. There are multiple options for you to benefit from, including the Audio Equalizer, Music, Mix Audio. In this way, you can make sure that the audio is exactly like you have wanted it to be. For further information as to how you can improve the sound quality of your recorded videos, you can check out: How to improve sound quality of recorded videos.
Step 5Save Your Work and Upload on YouTube
If you are satisfied with your work on the audio file and you wish to publish it, the process is quite simple. You just hit Export and select to upload the video to YouTube. After signing in to your YouTube account, you will be ready to start uploading the audio file.
In case you wish to edit the audio from an already published video, you have to download the video first. Then, you can follow the steps above to edit the audio file in Filmora. As one of the widely used video editing software for YouTubers, Filmora is here to empower your imagination. Just download the free trial version and try it now.
Part 2: How to Edit Audio with YouTube Video Editor
Unfortunately, YouTube does not allow users to upload audio files such as MP3, WAV, etc. Instead, you can only upload audio files which are offered by YouTube in the first place. Since YouTube has got a plentiful audio library, you can find a lot of audio there. In this part, we will show you how to add and edit audio with YouTube Video Editor.
You may also like: How to Add Music to YouTube Videos >>
Note: From 20th September 2017 users will no longer be able to use the complimentary editing suite. Check the best YouTube video editor alternatives from this complete guide. In the following part, I will show you how to add audio track , replace the original audio and adjust the audio position and length as well.
- Step 1: Sign in to your YouTube account
- **Step 2:**Click your profile avatar and select Creator Studio option.
- Step 3: In the left pane, go to Video Manager and then click Videos. In the Videos list, choose the video that you want to add new audio track, and then select Audio from the Edit button.
- Step 4: Now you can add or replace the audio in your video. Here you will find that there are various songs and audio files you can choose from. Click ADD TO VIDEO and the audio track will be added to the video directly.
- Step 5: Now you will see the audio track appears at the bottom of the player. Here you can trim and drag the audio bar to adjust the audio positon and length. To Trim the audio, click the beginning or the end of the audio bar and then drag it to the left or right. After trimming, drag it to meet the target position.
Conclusion
Normally, it would be better to add and edit audio to video before updating to YouTube. In this case, Filmora is highly recommended as one of the best video editor for YouTubers , which provides some royalty free music sound in the Music Library to choose from and also the audio editing tools like remove background noise from the video, add fade in and fade out effects with ease or play the video backward or fast forward.
Richard Bennett
Richard Bennett is a writer and a lover of all things video.
Follow @Richard Bennett
Capturing Quality: Lens Recommendations for Content Makers
Best Camera Lenses for YouTube
Richard Bennett
Mar 27, 2024• Proven solutions
A DSLR is the ideal camera for some vlogs, and using a DSLR means you get to customize the look of your vlog by choosing the perfect lens. Choosing the best camera lens for your YouTube channel can be tricky because there are so many options. This article will walk you through some of them, and make two recommendations of great vlogging lenses. If you already have a good understanding of how camera lenses work then feel free to scroll down to the lens recs.
Part 1. Understanding Lenses: Zoom lens, Fixed lens, aperture, f-stop
There are two main categories of camera lenses: ‘zoom’ – lenses that allow you to zoom in and out – and ‘fixed’. If your lenses are tools then zoom lenses are Swiss army knives; they are very versatile. Fixed lenses, also called prime lenses, have more specific purposes. Do you need a tool that can do a lot of things, or a tool that is perfect for one specific job? Sometimes it is useful to have access to both.
We have explained the differences between Fixed lens and Zoom lens and advantages of using each lens, check this article: Zoom Lens vs. Fixed Lenses: Which one is best for YouTuber? for the detailed information.
Before we get into the recommendations here is a little background information on lenses in general:
Beginner’s Guide to Aperture and F-Stops
In order to be able to select the lens you’ll be using to record your YouTube videos, you first need to understand a few very basic concepts, such as aperture or f-stops.
1.What is a lens’s aperture?
The aperture of your lens is the hole through which light reaches your camera’s sensor, or the film if you are using a film camera. The wider your aperture is the more light you are letting into your camera. In low light it is better to have a wide aperture, and when you are working with a lot of light it is better to have a narrow aperture so your footage is not overexposed.
Aperture is simply an opening in the lens that lets the light through. If you want to increase the amount of the light that is reaching the camera’s sensor you need to open up the aperture blades that are located in the lens. The f-values like f/1.2 or f/1.8 indicate that the aperture is wide open and that the camera is receiving the maximum amount of light a lens you’re using can provide.
2.What is an ‘f-stop’?
Light passes through your lens’s aperture on its way to your camera’s sensor, and the f-stop of your lens relates to the amount of light it lets in. The lower your f-stop, the wider your aperture, and the more light you are letting into your camera. The more light you let into your camera the easier it is to achieve a blurred background. A lot of vloggers love blurring their backgrounds because it is a quick way to disguising the rooms they are shooting in.
F-stops are written like ‘f/1.8’ or ‘f/4’ on your lens. For more information on f-stops and blurring your background read “The Best Bokeh Lens - How to Get the Blurred Background for YouTube Videos” and watch Tasha’s video.
F-stops or f-numbers indicate how open the aperture is, so for example if your camera is displaying f/32 value it means that your camera is letting very little light to get through to the camera’s sensor. The f-number depends on a few other parameters such as shutter speed, exposure or ISO values. Large apertures provide a shallow depth of field which creates a smooth and artistic background blur, while a small aperture enables you to keep both the background and the foreground of your shot in focus.
Part 2: Types of Camera Lenses
The visual aspect of a video may not be the only thing you’ll have to dedicate special attention to while recording your YouTube video, but it is surely one of the most important factors of the video production process. A lens you are using will largely contribute to the aesthetics of the video. That’s why you need to know which type of lens will deliver the best results when shooting different types of scenes. Here are some of the most common types of lenses you’ll encounter.
Standard lenses
These lenses are featured in almost all camera kits, so the chances are that if you have a DSLR camera you already have a standard, mid-range lens. These lenses commonly have a fixed 50mm focal length, although zoom lenses with focal lengths in the range between 35mm and 75mm are also considered standard. You can use them to capture medium shots, single or multiple figure shots, and in some cases establishing shots, because they offer enough versatility to cover a multitude of different scenes. Standard lenses often have large apertures, which makes them quite useful if you often shoot videos under light conditions you can’t control.
Macro lenses
Details, product shots or any other subject that can be filmed from close proximity looks better if they are recorded with macro lenses. The high contrast and sharpness these lenses provide allow you to create stunning close-ups of all hosts, guests or actors in your YouTube videos. What’s more, if you are presenting a new product to your audience you can use the macro lens to make some captivating shots that will attract more audience. Zoom lenses can also be used for macro photography and video, although prime macro lenses produce better results.
Telephoto lenses
The subjects of your videos don’t always have to be in your immediate surroundings, because telephoto lenses let you capture scenes that are several miles away from you. Wildlife or sports videographers frequently use telephoto lenses because they don’t have another way of getting close to their subjects. However, telephoto lenses with 70-300mm focal length can also be used to take stunning portraits or close up shots. The biggest downside of telephoto lenses is their weight because the lenses with higher focal lengths can weigh up to 10lbs, which makes them a bit inconvenient to always carry with you.
Wide-angle lenses
Recording videos of vast open spaces, breathtaking vistas or beautiful city views is much easier if you have a wide-angle lens. The short focal length allows the lens to have a wider field of view which covers more space than standard or telephoto lenses. Wide-angle lenses also have lower apertures than lenses with longer focal lengths which results in images that have a shallow depth of field. Ultra-wide lenses like fisheye distort the view so the videos recorded with these lenses often suffer from the lack of realism.
Specialist lenses
YouTubers who are working on demanding projects can try to solve their troubles by using a specialist lens. Soft-focus lenses can help you take better portraits while tilt-shift lenses allow you to control the perspective. However, it is hard to imagine a scenario in which you’ll need a specialist lense if you are just starting out since even experienced videographers only use special lenses when they have absolutely no better way to record a scene.
Part 3: Recommended Best Camera Lenses for Shooting YouTube Videos
Here are a couple great lenses that might be good fits for you and your YouTube channel. The thing that makes them both ideal for vlogging is that they have low enough f-stops to blur out your background.
| Camera Lens | Type | Price | Aperture | Focal Length |
|---|---|---|---|---|
| Canon EF-S 10-18mm f/4.5-5.6 IS STM Lens | Wide angle | $279 | f/4.5-5.6 | 10 -18mm |
| Rokinon 8mm f/3.5 | Fisheye | $249 | f/3.5 | 8mm |
| Canon 50mm f/1.8 STM Lens | Prime | $125 | f/1.8 | 50mm |
| Canon EF 135mm f/2L USM Lens | Telephoto | $999 | f/2 | 135mm |
| Tamron SP AF 17-50mm f/2.8 | Standard Zoom | $299 | f/2.8 | 17 -50mm |
| Sony 30mm f/3.5 Macro | Macro | $278 | f/3.5 | 30mm |
1.Canon EF-S 10-18mm f/4.5-5.6 IS STM Lens
Canon released this lens in 2014 and shortly after it has gained the reputation of one of the most reliable wide to ultra-wide lenses for Canon cameras. Like most STM lenses, it offers incredibly fast autofocus technology that makes it a great choice for fast-paced action videos. The lens is equipped with an image stabilization system which guarantees that your videos are going to remain sharp even if the camera wasn’t perfectly still while you were recording. Somewhat smaller aperture range makes this lens poor choice for low light scenes, although you can get decent results if you manage to keep the camera still.
2. Rokinon 8mm Ultra Wide f/3.5 Fisheye Lens
Outdoor videos look much cooler when they are recorded with a wide-angle lens because the wider field of view enables you to capture more space in a shot. Fisheye lenses were made popular by GoPro cameras because they make the videos look more fun while producing high image quality. Rokinon 8mm lens allows you to adjust focus and aperture manually so you can fine-tune your shot before hitting the record button. To make things even better this model is compatible with a wide range of cameras including Pentax, Canon or Nikon DSLRs. It has a relatively fast aperture that enables it to deliver solid performances under low light conditions.
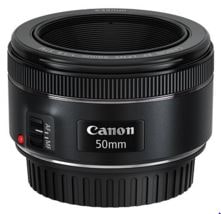
3.Canon EF 50mm f/1.8 STM Lens
The EF 50mm is a fixed lens with an f-stop of 1.8, which means it is great for blurring your background and performs well even in poorer lighting conditions. This is a really great lens for an opinion or beauty vlog, where you do not need to move around. You can stay put right where the focus is sharpest and stand out by blurring everything behind you. If you tend to reuse the same sets then you do not really need a zoom feature. If your shooting conditions rarely change then it is just as easy to use a reliable fixed lens like the EF 50mm since you will not need to be rethinking your set up and adjusting.
If you are looking for an inexpensive prime lens that lets you create sharp videos with shallow depth of field, you should look no further. This model is one of three Canon’s 50mm prime lenses, although the 50mm f/1.4 USM and 50mm f/1.2 ‘L’ USM models are much more expensive. You can use it to record a lot of different types of YouTube videos, like product reviews or makeup tutorials. The 50 mm f/1.8 STM lens doesn’t have image stabilization technology so you should try to be as still as you can possibly be when shooting handheld videos in order to avoid recording footage that has a lot of camera shakes.
4.Canon EF 135mm f/2L USM Lens
Recording moving objects from a distance requires you to have a lens that allows you to smoothly track their movements while keeping the subject in focus. The Canon EF 135mm f2/L USM lens is perhaps one of the best telephoto lenses on the market because it uses L glass that is widely accepted as the best in the industry. The Canon’s telephoto lens is compatible with ASP-C and Full Frame EF mount cameras. Keep in mind that this is also a prime lens and you can’t increase or decrease its focal length, but even so, it is a perfect choice for documentary-style videos.
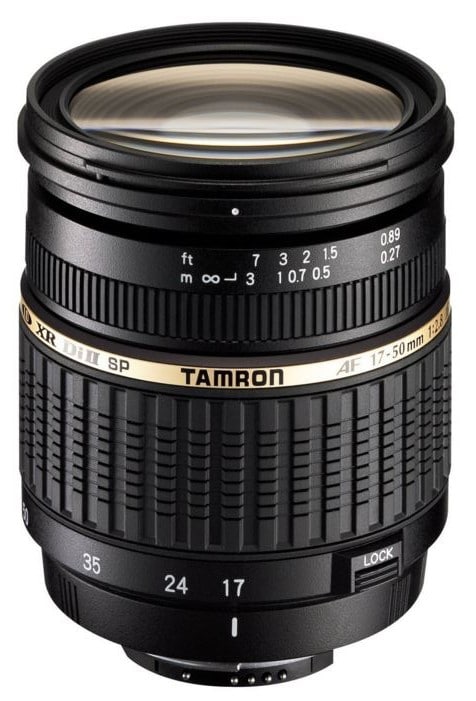
5.Tamron SP AF 17-50mm f/2.8 XR Di II LD Aspherical (IF) Lens
The Tamron’s standard zoom lens offers good value at a very reasonable price. The maximum aperture is f/2.8, while the minimum aperture value this lens supports is f/32, which means that its users can easily experiment with different depths of field. The lens is compatible with most Canon cameras so if you have a camera from another manufacturer you may have to use the lens adapter in order to mount it onto your camera. Like most standard zoom lenses, Tamron SP AF model is highly versatile and you can use it to record a wide range of different scenes.
A lot of zoom lenses do not have wide enough apertures to create blurred backgrounds, but this Tamron lens is an exception at f/2.8. This low f-stop also means that it performs better in poor lighting conditions than a lot of other zoom lenses. If your shooting conditions change a lot – if you often change locations, for example – then it will be good to have a sturdy, well-built, zoom lens like the AF 17-mm that can be quickly adapted to new angles and distances.
6.Sony 30mm f/3.5 Macro
All Sony’s APS-C format E mount cameras are compatible with this multi-purpose lens. When mounted the 30mm lens provides a 45mm focal length equivalent, which means that you can use it to take macro shots of products or to record medium or close-up shots. This is a prime lens, so changing the focal length isn’t really an option, but the 1:1 life-size magnification, as well as the 0.9-inch working distance, allow you to get close to the subjects in the video. The aperture range is between f/3.5 and f/22 which means that you can choose how shallow the depth of field in your shot should be.
If you are using a 4k camera to shoot your YouTube video, check out best camera lens for 4k professional production.
Richard Bennett
Richard Bennett is a writer and a lover of all things video.
Follow @Richard Bennett
Richard Bennett
Mar 27, 2024• Proven solutions
A DSLR is the ideal camera for some vlogs, and using a DSLR means you get to customize the look of your vlog by choosing the perfect lens. Choosing the best camera lens for your YouTube channel can be tricky because there are so many options. This article will walk you through some of them, and make two recommendations of great vlogging lenses. If you already have a good understanding of how camera lenses work then feel free to scroll down to the lens recs.
Part 1. Understanding Lenses: Zoom lens, Fixed lens, aperture, f-stop
There are two main categories of camera lenses: ‘zoom’ – lenses that allow you to zoom in and out – and ‘fixed’. If your lenses are tools then zoom lenses are Swiss army knives; they are very versatile. Fixed lenses, also called prime lenses, have more specific purposes. Do you need a tool that can do a lot of things, or a tool that is perfect for one specific job? Sometimes it is useful to have access to both.
We have explained the differences between Fixed lens and Zoom lens and advantages of using each lens, check this article: Zoom Lens vs. Fixed Lenses: Which one is best for YouTuber? for the detailed information.
Before we get into the recommendations here is a little background information on lenses in general:
Beginner’s Guide to Aperture and F-Stops
In order to be able to select the lens you’ll be using to record your YouTube videos, you first need to understand a few very basic concepts, such as aperture or f-stops.
1.What is a lens’s aperture?
The aperture of your lens is the hole through which light reaches your camera’s sensor, or the film if you are using a film camera. The wider your aperture is the more light you are letting into your camera. In low light it is better to have a wide aperture, and when you are working with a lot of light it is better to have a narrow aperture so your footage is not overexposed.
Aperture is simply an opening in the lens that lets the light through. If you want to increase the amount of the light that is reaching the camera’s sensor you need to open up the aperture blades that are located in the lens. The f-values like f/1.2 or f/1.8 indicate that the aperture is wide open and that the camera is receiving the maximum amount of light a lens you’re using can provide.
2.What is an ‘f-stop’?
Light passes through your lens’s aperture on its way to your camera’s sensor, and the f-stop of your lens relates to the amount of light it lets in. The lower your f-stop, the wider your aperture, and the more light you are letting into your camera. The more light you let into your camera the easier it is to achieve a blurred background. A lot of vloggers love blurring their backgrounds because it is a quick way to disguising the rooms they are shooting in.
F-stops are written like ‘f/1.8’ or ‘f/4’ on your lens. For more information on f-stops and blurring your background read “The Best Bokeh Lens - How to Get the Blurred Background for YouTube Videos” and watch Tasha’s video.
F-stops or f-numbers indicate how open the aperture is, so for example if your camera is displaying f/32 value it means that your camera is letting very little light to get through to the camera’s sensor. The f-number depends on a few other parameters such as shutter speed, exposure or ISO values. Large apertures provide a shallow depth of field which creates a smooth and artistic background blur, while a small aperture enables you to keep both the background and the foreground of your shot in focus.
Part 2: Types of Camera Lenses
The visual aspect of a video may not be the only thing you’ll have to dedicate special attention to while recording your YouTube video, but it is surely one of the most important factors of the video production process. A lens you are using will largely contribute to the aesthetics of the video. That’s why you need to know which type of lens will deliver the best results when shooting different types of scenes. Here are some of the most common types of lenses you’ll encounter.
Standard lenses
These lenses are featured in almost all camera kits, so the chances are that if you have a DSLR camera you already have a standard, mid-range lens. These lenses commonly have a fixed 50mm focal length, although zoom lenses with focal lengths in the range between 35mm and 75mm are also considered standard. You can use them to capture medium shots, single or multiple figure shots, and in some cases establishing shots, because they offer enough versatility to cover a multitude of different scenes. Standard lenses often have large apertures, which makes them quite useful if you often shoot videos under light conditions you can’t control.
Macro lenses
Details, product shots or any other subject that can be filmed from close proximity looks better if they are recorded with macro lenses. The high contrast and sharpness these lenses provide allow you to create stunning close-ups of all hosts, guests or actors in your YouTube videos. What’s more, if you are presenting a new product to your audience you can use the macro lens to make some captivating shots that will attract more audience. Zoom lenses can also be used for macro photography and video, although prime macro lenses produce better results.
Telephoto lenses
The subjects of your videos don’t always have to be in your immediate surroundings, because telephoto lenses let you capture scenes that are several miles away from you. Wildlife or sports videographers frequently use telephoto lenses because they don’t have another way of getting close to their subjects. However, telephoto lenses with 70-300mm focal length can also be used to take stunning portraits or close up shots. The biggest downside of telephoto lenses is their weight because the lenses with higher focal lengths can weigh up to 10lbs, which makes them a bit inconvenient to always carry with you.
Wide-angle lenses
Recording videos of vast open spaces, breathtaking vistas or beautiful city views is much easier if you have a wide-angle lens. The short focal length allows the lens to have a wider field of view which covers more space than standard or telephoto lenses. Wide-angle lenses also have lower apertures than lenses with longer focal lengths which results in images that have a shallow depth of field. Ultra-wide lenses like fisheye distort the view so the videos recorded with these lenses often suffer from the lack of realism.
Specialist lenses
YouTubers who are working on demanding projects can try to solve their troubles by using a specialist lens. Soft-focus lenses can help you take better portraits while tilt-shift lenses allow you to control the perspective. However, it is hard to imagine a scenario in which you’ll need a specialist lense if you are just starting out since even experienced videographers only use special lenses when they have absolutely no better way to record a scene.
Part 3: Recommended Best Camera Lenses for Shooting YouTube Videos
Here are a couple great lenses that might be good fits for you and your YouTube channel. The thing that makes them both ideal for vlogging is that they have low enough f-stops to blur out your background.
| Camera Lens | Type | Price | Aperture | Focal Length |
|---|---|---|---|---|
| Canon EF-S 10-18mm f/4.5-5.6 IS STM Lens | Wide angle | $279 | f/4.5-5.6 | 10 -18mm |
| Rokinon 8mm f/3.5 | Fisheye | $249 | f/3.5 | 8mm |
| Canon 50mm f/1.8 STM Lens | Prime | $125 | f/1.8 | 50mm |
| Canon EF 135mm f/2L USM Lens | Telephoto | $999 | f/2 | 135mm |
| Tamron SP AF 17-50mm f/2.8 | Standard Zoom | $299 | f/2.8 | 17 -50mm |
| Sony 30mm f/3.5 Macro | Macro | $278 | f/3.5 | 30mm |
1.Canon EF-S 10-18mm f/4.5-5.6 IS STM Lens
Canon released this lens in 2014 and shortly after it has gained the reputation of one of the most reliable wide to ultra-wide lenses for Canon cameras. Like most STM lenses, it offers incredibly fast autofocus technology that makes it a great choice for fast-paced action videos. The lens is equipped with an image stabilization system which guarantees that your videos are going to remain sharp even if the camera wasn’t perfectly still while you were recording. Somewhat smaller aperture range makes this lens poor choice for low light scenes, although you can get decent results if you manage to keep the camera still.
2. Rokinon 8mm Ultra Wide f/3.5 Fisheye Lens
Outdoor videos look much cooler when they are recorded with a wide-angle lens because the wider field of view enables you to capture more space in a shot. Fisheye lenses were made popular by GoPro cameras because they make the videos look more fun while producing high image quality. Rokinon 8mm lens allows you to adjust focus and aperture manually so you can fine-tune your shot before hitting the record button. To make things even better this model is compatible with a wide range of cameras including Pentax, Canon or Nikon DSLRs. It has a relatively fast aperture that enables it to deliver solid performances under low light conditions.
3.Canon EF 50mm f/1.8 STM Lens
The EF 50mm is a fixed lens with an f-stop of 1.8, which means it is great for blurring your background and performs well even in poorer lighting conditions. This is a really great lens for an opinion or beauty vlog, where you do not need to move around. You can stay put right where the focus is sharpest and stand out by blurring everything behind you. If you tend to reuse the same sets then you do not really need a zoom feature. If your shooting conditions rarely change then it is just as easy to use a reliable fixed lens like the EF 50mm since you will not need to be rethinking your set up and adjusting.
If you are looking for an inexpensive prime lens that lets you create sharp videos with shallow depth of field, you should look no further. This model is one of three Canon’s 50mm prime lenses, although the 50mm f/1.4 USM and 50mm f/1.2 ‘L’ USM models are much more expensive. You can use it to record a lot of different types of YouTube videos, like product reviews or makeup tutorials. The 50 mm f/1.8 STM lens doesn’t have image stabilization technology so you should try to be as still as you can possibly be when shooting handheld videos in order to avoid recording footage that has a lot of camera shakes.
4.Canon EF 135mm f/2L USM Lens
Recording moving objects from a distance requires you to have a lens that allows you to smoothly track their movements while keeping the subject in focus. The Canon EF 135mm f2/L USM lens is perhaps one of the best telephoto lenses on the market because it uses L glass that is widely accepted as the best in the industry. The Canon’s telephoto lens is compatible with ASP-C and Full Frame EF mount cameras. Keep in mind that this is also a prime lens and you can’t increase or decrease its focal length, but even so, it is a perfect choice for documentary-style videos.
5.Tamron SP AF 17-50mm f/2.8 XR Di II LD Aspherical (IF) Lens
The Tamron’s standard zoom lens offers good value at a very reasonable price. The maximum aperture is f/2.8, while the minimum aperture value this lens supports is f/32, which means that its users can easily experiment with different depths of field. The lens is compatible with most Canon cameras so if you have a camera from another manufacturer you may have to use the lens adapter in order to mount it onto your camera. Like most standard zoom lenses, Tamron SP AF model is highly versatile and you can use it to record a wide range of different scenes.
A lot of zoom lenses do not have wide enough apertures to create blurred backgrounds, but this Tamron lens is an exception at f/2.8. This low f-stop also means that it performs better in poor lighting conditions than a lot of other zoom lenses. If your shooting conditions change a lot – if you often change locations, for example – then it will be good to have a sturdy, well-built, zoom lens like the AF 17-mm that can be quickly adapted to new angles and distances.
6.Sony 30mm f/3.5 Macro
All Sony’s APS-C format E mount cameras are compatible with this multi-purpose lens. When mounted the 30mm lens provides a 45mm focal length equivalent, which means that you can use it to take macro shots of products or to record medium or close-up shots. This is a prime lens, so changing the focal length isn’t really an option, but the 1:1 life-size magnification, as well as the 0.9-inch working distance, allow you to get close to the subjects in the video. The aperture range is between f/3.5 and f/22 which means that you can choose how shallow the depth of field in your shot should be.
If you are using a 4k camera to shoot your YouTube video, check out best camera lens for 4k professional production.
Richard Bennett
Richard Bennett is a writer and a lover of all things video.
Follow @Richard Bennett
Also read:
- [New] Comprehensive List of High-Quality Game Entrance Makers Online
- Aspect Ratios Unveiled Your Guide to Stellar YT Images for 2024
- [New] Bring Your YouTube Vision to Life with FREE Banner Resources
- [Updated] Becoming an Economic Force A Guide to Earning on YouTube
- [New] Champion's Tech The Ultimate Gaming Toolkit
- In 2024, Bend Reality with Your Own Animated Craftsmanship
- Fast Techniques for Reordering YouTube Video Queues
- In 2024, Essential Techniques for Splendid Lyric Videos, Lyric Video Maker Edition
- [Updated] Ecological Architecture Merging Nature and City Planning
- The Ultimate Smartphone Filmmaker's Handbook for YouTube Thumbnails
- [Updated] Common YouTube Shorts When Thumbnails Disappear Without Notice
- [Updated] A Step-by-Step Guide to Elevate Your Stream on YouTube
- [New] Essential Insights Mastering YouTube Keyword Strategies
- [Updated] Convenient Techniques for Customizing Your Own Short Videos
- [Updated] Can You Receive a Monthly Check From YouTube?
- Diving Into VTUBERdom Career Beginnings Explained
- Engage Viewers with Powerful Channel-Building Stories for 2024
- [Updated] Achieving Success in Your YouTube Endeavours A Step-by-Step Blueprint
- Securely Transforming YouTube Videos Top 3 Reliable Methods
- 2024 Approved Dynamic Videos Made Easy with Best Stabilizers
- [New] Easy-to-Use Platforms for Free YouTube Thumbnail Extracting
- Unleashing Potential The Best SEO Practices for Your YouTube Videos
- 2024 Approved Content Creator Acclaim Through Subscriber Recognition
- In 2024, Elevating Video Sharing From YouTube to Insta
- In 2024, Cutting-Edge Tools Free YouTube Intro Creators
- [Updated] EditMelodiesPC Top Video & Music Pairing Software
- [Updated] Effortless Estimation of Digital Gains
- [New] Building Mental Armor Against Online Critics
- Best ASMR YouTube Channels You Should Know for 2024
- The Pathway to Recognition YouTubers' Guide to Personal Brands
- Top Voice Modification Tools for YouTube Creators
- Quick Share Your YouTube Playlist Journey
- Audio Overhaul Methods for Content Creators Online for 2024
- Transforming Channels via Youtube Music Upload
- 2024 Approved Digital Arena 100+ Titles for the True Gamer
- New Essential Tips for Converting Audio to Video Files for 2024
- Android Device Capture - FREE! Simplify Your Tech Life
- Elevate Your Presence Setting Up an Instagram Company for 2024
- 2024 Approved Direct Playback Connecting FB Vids to TVs
- Innovative Approaches to Customizing Your TikTok Videos
- In 2024, Closing Chapter on Instagram How to Discard Account Permanently
- In 2024, Why is iPogo not working On Oppo Reno 8T 5G? Fixed | Dr.fone
- Updated 2024 Approved Sizing Up Success A Beginners Guide to Image Ratio Calculation
- [New] Tailored to Your Taste The BestDiscord's Hot 10 Themes for 2024
- In 2024, Fixing Foneazy MockGo Not Working On Nokia G310 | Dr.fone
- [Updated] 2024 Approved Rising Stars Guide Essential Hashtags to Increase Your Insta Presence
- [Updated] Elite Gamers Top 10 on TikTok Unleashed
- Updated In 2024, Surveillance on a Budget 10 Free Security Camera Tools
- [Updated] 2023'S Leading YouTube Engagement Tools
- 5 Streamlined Methods for Mac Cam Recording for 2024
- Here Are some of the Best Face Swap Apps for Your iPhone or Android Device that Allows You to Swap Face Easily
- Updated The Ultimate Guide to Blurring Faces in Photos and Videos (Free Resources)
- In 2024, VLLO on Mac Your Ultimate Guide to Downloads and Alternatives
- [Updated] 2024 Approved Perfecting the Art of Twitch Live Streams Recording
- Updated In 2024, 10 Premier Volume Maximizers for Windows PCs - Elevate Your Audio Experience Now!
- Elevate Your Photos Top-Rated Vignette Apps for iPhone and Android
- Title: Detailed Steps to Supercharge Your YouTube Audio Content
- Author: Steven
- Created at : 2024-05-25 19:05:28
- Updated at : 2024-05-26 19:05:28
- Link: https://youtube-clips.techidaily.com/detailed-steps-to-supercharge-your-youtube-audio-content/
- License: This work is licensed under CC BY-NC-SA 4.0.
