
:max_bytes(150000):strip_icc():format(webp)/best-time-of-day-to-instagram-3485858-1-5bb3cc9046e0fb002612537d.jpg)
"Decoding YouTube Analytics Insights for Every Content Creator for 2024"
Decoding YouTube Analytics: Insights for Every Content Creator
It’s not the easiest way to earn money online, but YouTube is one of the best ways. YouTube is a powerful channel to promote your video and get more traffic.
The most common question is how much YouTubers earn on 100, 1000, or 10,000 views. We’re going to answer that question in this article and explain how to calculate YouTube views to money.
First off, we’re going to talk about how YouTube works.
Next, we’ll examine the importance of YouTube views, plus how to calculate them.
- Estimated your YouTube earning by YouTube revenue reports
- How much money can you make on YouTube?
- Bonus tip: Increase YouTube earnings with a powerful video editing software
Part 1: The rules to know for each means earning money from YouTube
As a YouTube creator, finding ways to earn money from your content cannot be easy. Some creators make a living solely off their channels. Others supplement their income with affiliate marketing, sponsorships, and ad revenue. But if you want to earn money from YouTube truly, you need to understand which monetization methods work best for you and your content.
Here’s what you should know when using each method and why you should consider doing so:
| Methods | Viewers/Clicks/Impressions | Earnings/Commission |
|---|---|---|
| YouTube Ads $1 CPM | 1 million Ad views | Average rate per ad=0.18Total ~ $5000 |
| Brand Sponsorships | 5K Sub 5K-30K Sub 30K-500K Sub 500K-1M+ Sub | $300 $700 $950 $3500 |
| Affiliate Marketing 30%-35% commission | If 100 people buys $20 product through affiliate link. Total $2000 | $2000*35%= $700 |
| Crowdfunding (Patreon, Indiegogo, GoFundMe) $5 | 100 subscribers funds the channel | 100*5=$500 |
| Merchandise Shelf $5 Shirt | 100 subscribers purchases your merch | 100*5=$500 |
| Channel Memberships $5/month | 100 loyal subscribers join membership | 100*5=$500 |
YouTube Ads
The video ads on the platform aren’t lucrative and can be used to supplement your income in the form of AdSense earnings. An actual advertiser pays 0.18 per ad view on average (as shown above). That means 1000 ad views equals $18 and $3-$5 per 1000 views.
Brand Sponsorships
Brands can sponsor your videos to reach their target audience. YouTube videos are a big part of our lives, and brands are becoming increasingly aware of how useful these videos can be. To be eligible for sponsorship, your channel must be of 5000 subscribers.
Affiliate Marketing
YouTubers help brands increase sales by encouraging their viewers to shop at the company’s store or visit its specific product pages. They then earn a commission (30%-35%) on products that people buy after clicking an affiliate link.
Crowdfunding
Today many people use crowdfunding websites to raise money for personal, channel-related projects. Most YouTubers are doing it to generate steady cash flow. Some of them use this source to fund their YouTube videos so that it increases quality and engagement.
Merchandise Shelf
Your merchandise represents and feeds your audience’s connection with you. Your product is your business, so you’re first and foremost an entrepreneur. Then design your YouTube marketing strategy to sell your merchandise and generate income.
Channel Membership
YouTube has a plan that allows you to charge your subscribers for membership on your YouTube channel. Members get access to exclusive live chats, badges, emojis, etc. Subscribers must give a set amount every month to a channel that makes a steady monthly income for YouTubers.
Part 2: Calculate YouTube income by YouTube Money Calculator
How much money do you earn on YouTube? There is no simple way to answer this question, but a YouTube income calculator can give you a rough estimate. It shows you whether you’re getting enough money to keep producing videos or if you need to look for additional ways of making money from your channel.
The tools below provide a detailed breakdown of the earnings from a specific YouTube video or channel based on audience engagement, views, and other factors.
YouTube Money Calculator

Pros
- Does not ask for much information, just a URL
- It has flexibility to check earnings by channel and video separately
Cons
- Calculate earnings based on views only
How-to-steps
Step1 To check earnings by channel, import the channel URL and click the search icon.

Step2 You’ll see the result showing, ‘Number of total Subscribers’, ‘Number of Total Video Views’, ‘Total estimated earnings’, and ‘Average Earnings per Video’.

Step3 If you want to check earnings by video, below you’ll see another search bar where you can paste the specific video URL.

Step4 The result will show you the ‘Number of Total Video Views’, and ‘Estimated Video earnings’.

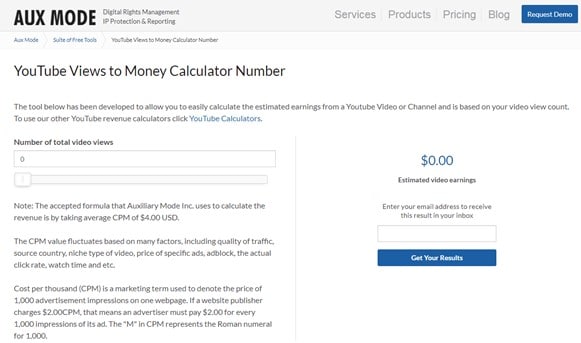
Aux mode
Pros
- Easy interface, with a view slider
- Does Not require any information
Cons
- Based on your video view count only
How-to-steps
Go to AUX MODE
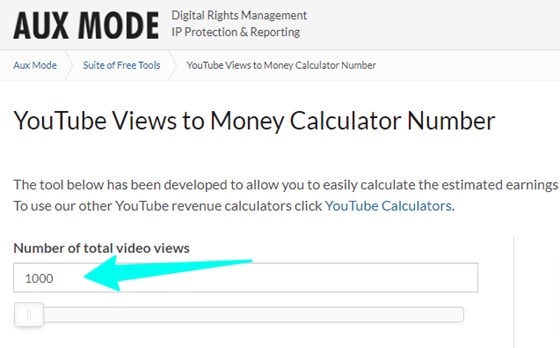
Step1 You can type total video views or, increase or decrease total views with the arrows.
Step2 Below you’ll find a slider, you can slide forward to increase views and vice versa.

Step3 On your right, you’ll find estimated results in real time. You can also enter your email address to recieve the result in you inbox.

Tunepocket

Pros
- Slider interface shows real time result
- It shows all results based on views, existing video, and revenue of whole channel
Cons
- None
How-to-steps
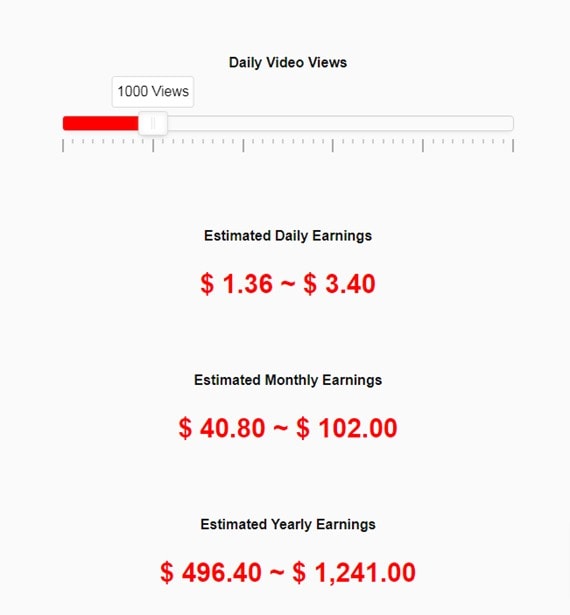
Step1 The first calculator on the page is based on daily views. Drag the slider according to your video views and below you’ll find estimated earnings including daily, monthly, and annually.
Step2 Scroll down and you’ll find another calculator that requires specific video URL. Copy and paste the URL of YouTube video and get results based on views.

Step3 The last calculator is about the estimated revenue for a channel. You need to paste the channel URL to find the results. It includes, Number of Total Subscribers, Number of Total Videos, Number of Total Video Views, Channel Title, and Estimated Total Earnings

Part 3: Estimated your YouTube earning by YouTube revenue reports
To better understand the best strategies and tactics to optimize your video content, use YouTube analytic reports to help you get a clearer understanding of how your YouTube channel performs. To check your revenue report:
Step1 Login to your YouTube Studio

Step2 In the left menu, select Analytics.

Step3 From the top menu, select Revenue.

RPM
The RPM is calculated based on how much traffic you’re getting from YouTube compared to all your other sources combined. RPM is calculated as total revenue divided by total views times 1000.
Playback-based CPM
Your CPM (Cost Per Thousand) report tells you how much each ad was worth in terms of the percentage of each play a video was spent. The playback-based CPM report shows your estimated average gross revenue per 1000 playbacks where one or more ads are shown.
Monthly estimated revenue
This is a simple report showing the statistics of your video earnings over the last 6 months. It can fluctuate by invalid traffic, content disputes and ad campaign types.
Revenue sources
You must use this report to see your estimated revenue from each revenue source if you have different revenue sources.
Transaction revenue
The transactions reports show you how much your members and fans have spent in transactions. It shows estimated earnings from channel memberships and merch.
Top-earning videos
This top-earning videos report will show you the most profitable videos and their estimated revenue.
Ad type
If you use different types of Ads for your videos, this report will help you find the percentage of your Ads revenue from each ad type.
Part 4: How much money can you make on YouTube?
The answer to that question can vary widely depending on the type of content you produce and the demographics of your target market. However, we’ve found that a single video ad can be worth anywhere from around $100 to $5,000.
It’s safe to say that most YouTubers earn between $1,000 and $10,000 per month from their ads alone. But there are many other factors to take into consideration when calculating the money, you can make on YouTube:
The number of views your videos get
The key to making money from videos on YouTube is views. The more views you have, the more chance of getting paid will increase. So you need to create videos that will get viewers to click.
According to Forbes’s estimation, you can make $3-$5 per 1000 views. e.g., a video with 1,000,000 views can make around $5,000 on views only.
The engagement level of your audience
When building a YouTube channel, the key to success lies in engaging with your audience. After all, if they don’t like what you’re offering, they will not watch your videos. So you’ve got to have a message that resonates and is useful.
Your channel type
The YouTube algorithm is set up to favor channels with a high volume of views per video and high-quality content rather than low-quality channels that generate a lot of traffic but don’t produce quality videos. So, if you want to increase your revenue from your YouTube videos, try to focus on high-quality content.
Your monetization method
Several monetization methods exist, including Subscription, advertising, affiliate marketing, paid search, and sponsorships. Each monetization method requires a slightly different setup and management, resulting in different revenue.
The country you are in
It is important to know that in some countries, making money off YouTube is extremely difficult. For example, in certain countries, monetizing your videos is impossible without using illegal methods, which will get you into legal trouble.
Some other factors, e.g., it’s worth comparing the RPM of your country and other countries, different rules and prices of YouTube Ads depending on your country.
Bonus tip: Increase YouTube earnings with a powerful video editing software
Are you tired of your boring, run-of-the-mill videos? Are you looking for ways to improve your YouTube earnings? Then let’s look at some of the best editing software to help create your next great content.
Wondershare Filmora is a powerful yet easy-to-use video editing software that makes it easier than ever to make awesome videos. Filmora offers more than 50 cutting-edge tools and effects that make it easier to edit any media source, including videos, photos, and music and share the result in just minutes. Use Filmora’s powerful features like keyframing, motion tracking, split screen, instant mode, VFX, templates etc., to make your video stand out.
Here’s a demo of the software, editing YouTube Shorts:
Free Download For Win 7 or later(64-bit)
Free Download For macOS 10.14 or later
Step1 Open Filmora 11 application.

Step2 Open Project Settings

Step3 Change Aspect Ratio, Resolution, and Frame rate

Step4 Drag video to the timeline

Step5 Right-click and select Crop to Fit

Step6 Right-Click again and select Crop and Zoom

Step7 Adjust the frame

Step8 Lastly Export you file

Bottom line
People want to watch a video when searching for the answers to a question. The best videos are designed to help users accomplish their specific goals while providing them with something they can take away and use for themselves. You need to put up good videos to keep viewers coming back.
To do that, use the game-changing Filmora 11 (mentioned in the article) to create engaging YouTube videos and amaze your audience. Slowly but surely, your audience will increase and then all the guidance in this article will help you easily analyze, calculate and increase your YouTube revenue.
Free Download For Win 7 or later(64-bit)
Free Download For macOS 10.14 or later
Part 1: The rules to know for each means earning money from YouTube
As a YouTube creator, finding ways to earn money from your content cannot be easy. Some creators make a living solely off their channels. Others supplement their income with affiliate marketing, sponsorships, and ad revenue. But if you want to earn money from YouTube truly, you need to understand which monetization methods work best for you and your content.
Here’s what you should know when using each method and why you should consider doing so:
| Methods | Viewers/Clicks/Impressions | Earnings/Commission |
|---|---|---|
| YouTube Ads $1 CPM | 1 million Ad views | Average rate per ad=0.18Total ~ $5000 |
| Brand Sponsorships | 5K Sub 5K-30K Sub 30K-500K Sub 500K-1M+ Sub | $300 $700 $950 $3500 |
| Affiliate Marketing 30%-35% commission | If 100 people buys $20 product through affiliate link. Total $2000 | $2000*35%= $700 |
| Crowdfunding (Patreon, Indiegogo, GoFundMe) $5 | 100 subscribers funds the channel | 100*5=$500 |
| Merchandise Shelf $5 Shirt | 100 subscribers purchases your merch | 100*5=$500 |
| Channel Memberships $5/month | 100 loyal subscribers join membership | 100*5=$500 |
YouTube Ads
The video ads on the platform aren’t lucrative and can be used to supplement your income in the form of AdSense earnings. An actual advertiser pays 0.18 per ad view on average (as shown above). That means 1000 ad views equals $18 and $3-$5 per 1000 views.
Brand Sponsorships
Brands can sponsor your videos to reach their target audience. YouTube videos are a big part of our lives, and brands are becoming increasingly aware of how useful these videos can be. To be eligible for sponsorship, your channel must be of 5000 subscribers.
Affiliate Marketing
YouTubers help brands increase sales by encouraging their viewers to shop at the company’s store or visit its specific product pages. They then earn a commission (30%-35%) on products that people buy after clicking an affiliate link.
Crowdfunding
Today many people use crowdfunding websites to raise money for personal, channel-related projects. Most YouTubers are doing it to generate steady cash flow. Some of them use this source to fund their YouTube videos so that it increases quality and engagement.
Merchandise Shelf
Your merchandise represents and feeds your audience’s connection with you. Your product is your business, so you’re first and foremost an entrepreneur. Then design your YouTube marketing strategy to sell your merchandise and generate income.
Channel Membership
YouTube has a plan that allows you to charge your subscribers for membership on your YouTube channel. Members get access to exclusive live chats, badges, emojis, etc. Subscribers must give a set amount every month to a channel that makes a steady monthly income for YouTubers.
Part 2: Calculate YouTube income by YouTube Money Calculator
How much money do you earn on YouTube? There is no simple way to answer this question, but a YouTube income calculator can give you a rough estimate. It shows you whether you’re getting enough money to keep producing videos or if you need to look for additional ways of making money from your channel.
The tools below provide a detailed breakdown of the earnings from a specific YouTube video or channel based on audience engagement, views, and other factors.
YouTube Money Calculator
Pros
- Does not ask for much information, just a URL
- It has flexibility to check earnings by channel and video separately
Cons
- Calculate earnings based on views only
How-to-steps
Step1 To check earnings by channel, import the channel URL and click the search icon.
Step2 You’ll see the result showing, ‘Number of total Subscribers’, ‘Number of Total Video Views’, ‘Total estimated earnings’, and ‘Average Earnings per Video’.
Step3 If you want to check earnings by video, below you’ll see another search bar where you can paste the specific video URL.
Step4 The result will show you the ‘Number of Total Video Views’, and ‘Estimated Video earnings’.
Aux mode
Pros
- Easy interface, with a view slider
- Does Not require any information
Cons
- Based on your video view count only
How-to-steps
Go to AUX MODE
Step1 You can type total video views or, increase or decrease total views with the arrows.
Step2 Below you’ll find a slider, you can slide forward to increase views and vice versa.
Step3 On your right, you’ll find estimated results in real time. You can also enter your email address to recieve the result in you inbox.
Tunepocket
Pros
- Slider interface shows real time result
- It shows all results based on views, existing video, and revenue of whole channel
Cons
- None
How-to-steps
Step1 The first calculator on the page is based on daily views. Drag the slider according to your video views and below you’ll find estimated earnings including daily, monthly, and annually.
Step2 Scroll down and you’ll find another calculator that requires specific video URL. Copy and paste the URL of YouTube video and get results based on views.
Step3 The last calculator is about the estimated revenue for a channel. You need to paste the channel URL to find the results. It includes, Number of Total Subscribers, Number of Total Videos, Number of Total Video Views, Channel Title, and Estimated Total Earnings
Part 3: Estimated your YouTube earning by YouTube revenue reports
To better understand the best strategies and tactics to optimize your video content, use YouTube analytic reports to help you get a clearer understanding of how your YouTube channel performs. To check your revenue report:
Step1 Login to your YouTube Studio
Step2 In the left menu, select Analytics.
Step3 From the top menu, select Revenue.
RPM
The RPM is calculated based on how much traffic you’re getting from YouTube compared to all your other sources combined. RPM is calculated as total revenue divided by total views times 1000.
Playback-based CPM
Your CPM (Cost Per Thousand) report tells you how much each ad was worth in terms of the percentage of each play a video was spent. The playback-based CPM report shows your estimated average gross revenue per 1000 playbacks where one or more ads are shown.
Monthly estimated revenue
This is a simple report showing the statistics of your video earnings over the last 6 months. It can fluctuate by invalid traffic, content disputes and ad campaign types.
Revenue sources
You must use this report to see your estimated revenue from each revenue source if you have different revenue sources.
Transaction revenue
The transactions reports show you how much your members and fans have spent in transactions. It shows estimated earnings from channel memberships and merch.
Top-earning videos
This top-earning videos report will show you the most profitable videos and their estimated revenue.
Ad type
If you use different types of Ads for your videos, this report will help you find the percentage of your Ads revenue from each ad type.
Part 4: How much money can you make on YouTube?
The answer to that question can vary widely depending on the type of content you produce and the demographics of your target market. However, we’ve found that a single video ad can be worth anywhere from around $100 to $5,000.
It’s safe to say that most YouTubers earn between $1,000 and $10,000 per month from their ads alone. But there are many other factors to take into consideration when calculating the money, you can make on YouTube:
The number of views your videos get
The key to making money from videos on YouTube is views. The more views you have, the more chance of getting paid will increase. So you need to create videos that will get viewers to click.
According to Forbes’s estimation, you can make $3-$5 per 1000 views. e.g., a video with 1,000,000 views can make around $5,000 on views only.
The engagement level of your audience
When building a YouTube channel, the key to success lies in engaging with your audience. After all, if they don’t like what you’re offering, they will not watch your videos. So you’ve got to have a message that resonates and is useful.
Your channel type
The YouTube algorithm is set up to favor channels with a high volume of views per video and high-quality content rather than low-quality channels that generate a lot of traffic but don’t produce quality videos. So, if you want to increase your revenue from your YouTube videos, try to focus on high-quality content.
Your monetization method
Several monetization methods exist, including Subscription, advertising, affiliate marketing, paid search, and sponsorships. Each monetization method requires a slightly different setup and management, resulting in different revenue.
The country you are in
It is important to know that in some countries, making money off YouTube is extremely difficult. For example, in certain countries, monetizing your videos is impossible without using illegal methods, which will get you into legal trouble.
Some other factors, e.g., it’s worth comparing the RPM of your country and other countries, different rules and prices of YouTube Ads depending on your country.
Bonus tip: Increase YouTube earnings with a powerful video editing software
Are you tired of your boring, run-of-the-mill videos? Are you looking for ways to improve your YouTube earnings? Then let’s look at some of the best editing software to help create your next great content.
Wondershare Filmora is a powerful yet easy-to-use video editing software that makes it easier than ever to make awesome videos. Filmora offers more than 50 cutting-edge tools and effects that make it easier to edit any media source, including videos, photos, and music and share the result in just minutes. Use Filmora’s powerful features like keyframing, motion tracking, split screen, instant mode, VFX, templates etc., to make your video stand out.
Here’s a demo of the software, editing YouTube Shorts:
Free Download For Win 7 or later(64-bit)
Free Download For macOS 10.14 or later
Step1 Open Filmora 11 application.
Step2 Open Project Settings
Step3 Change Aspect Ratio, Resolution, and Frame rate
Step4 Drag video to the timeline
Step5 Right-click and select Crop to Fit
Step6 Right-Click again and select Crop and Zoom
Step7 Adjust the frame
Step8 Lastly Export you file
Bottom line
People want to watch a video when searching for the answers to a question. The best videos are designed to help users accomplish their specific goals while providing them with something they can take away and use for themselves. You need to put up good videos to keep viewers coming back.
To do that, use the game-changing Filmora 11 (mentioned in the article) to create engaging YouTube videos and amaze your audience. Slowly but surely, your audience will increase and then all the guidance in this article will help you easily analyze, calculate and increase your YouTube revenue.
Free Download For Win 7 or later(64-bit)
Free Download For macOS 10.14 or later
Stepwise Strategies to Make a Stellar YouTube Opening Sequence
2024 | How to Make a YouTube Intro Video?

Richard Bennett
Mar 27, 2024• Proven solutions
Be it YouTube or any other streaming channel, or even for selling your videos on any e-commerce website, intros play a vital role in your brand promotion, and creating them is not as complicated as it sounds either.
The following sections describe in detail how to make a YouTube intro with Wondershare Filmora video editor, and keep it safe so it can be re-used easily in all your creations to maintain consistency and to give your brand a unique identity.
Part 1: How to Make a YouTube Intro Video with Filmora
With Wondershare Filmora, you can create your custom intros from scratch, i.e., even if you don’t have an existing image or footage to start with. You can follow the method given below to learn how to make YouTube intro with Filmora:
Step 1: Add Intro Background to Filmora
Launch Wondershare Filmora, go to Media tab at the top, select the Sample Colors category from the left pane.
Notice all the existing solid and gradient colors in the Media library in the right, hover the mouse over the tile of the color you want to use as a background, and click the + icon that appears in the center to add it to the timeline.

Note: The default duration of such solids is 5 seconds. You can increase or decrease this time by dragging the right handle of track in the timeline.
Alternatively, you can also use your own background image or video clip by selecting the Project Media category from the left pane, clicking anywhere inside the Media window, and then importing your favorite media file to Filmora. After importing, you can follow the procedure given above to add it to the timeline.
Step 2: Select and Add Audio/Sound Effect to YouTube Intro
With audio in the YouTube intro, your video will be more recognizable. If you have watched PewDiePie ‘s video, you’ll find that even though he changed the images on the intro often, he keeps the music and sound the same in the intro.

In Filmora, you can use the music and sound effect in the inbuilt audio library, double click the audio thumbnail from the library to listen to the soundtrack.
Repeat the process until you find the background music or sound effect that you can use in the intro. Once found, drag and drop it to the audio track below the video.

Note: You should keep the background and the audio at the same duration. For more details about audio editing in Filmora, please check this guide about how to edit audio .
Step 3: Add Text/Logo to Intro Video
In the intro video, you can add your channel name, company name, or other branding elements for brand awareness consideration.
Click Titles tab, hover the mouse over the tile with the text you want to use, and then drag and drop it to the track above the video.


To customize, double-click the title track in the timeline, use the new window that appears in the upper-left area of the interface to change, format, and animate the text as needed, and click OK from the bottom-right corner of the library.
Also, you need to adjust the position and duration of the title to get a better view.
In the intro video, it is recommended to add your logo or slogan as well. To add your logo, drag and drop it to the track above the video, and adjust its position and size. For more details, you can check the guide about How to Add Photo or Video to Watermark .
Step 4: Add Effects to YouTube Intro
Go to Effects tab, choose a category from the top-left pane, and click and drag your preferred effect from the Effects library to the timeline.
Adjust the playback duration by dragging the right handle of the track in the timeline as explained above. Optionally, double-click the Effects track to customize the appearance as needed.
Step 5: Export the Intro and Add to Shared Media
Once you are done creating your YouTube intro with all the required ingredients, click EXPORT from the top-center area of the interface, go to the Local tab on the Export box, choose your preferred output format from the left pane (the most common and widely used is MP4), adjust other preferences like destination location, resolution, framerate, etc. from the right pane of the box, and click EXPORT to export the YouTube intro.
Once exported, back on the main interface, select Media again from the standard toolbar, select the Shared Media container from the left pane, click anywhere inside the Media library, and import the YouTube intro video you just created to Shared Media so it can be reused every time you create a new video for the series.

Also, you can save the project, and then revise the element, effects or text to make a YouTube intro vibration.
You can find there are many video tutorials about how to use Filmora to make a YouTube intro, and below is one for you to have a quick glance.
Part 2: How to Make YouTube Intros with Templates
If the turnaround time of your project is about to end, and you need to hustle up, you can always use pre-built templates that not only expedite your creation process, they also look more professional because they are designed by the experts who already have decades of experience in the industry.
Besides the pre-programmed templates and effects in Filmora, you can find more visual effect packs in the effect store Filmstock .
You can learn how to make YouTube intro video in Filmora with a template downloaded from Filmstock.
Step 1: Visit Filmora Effects Page on Filmstock
Visit https://filmstock.wondershare.com/ and log in with the same WSID that you used on Filmora, and then click EFFECTS from the top of the webpage. Since Filmstock also provides templates for After Effects, you should select Filmora Effects to access the entire Filmora Effects library.

You can search the effects that you want in the Search bar, here, since I’m looking for effects for YouTube intro, I just enter “intro”. The effects related to intro will be displayed like below.
Step 2: Download Video Effect Packs for Filmora
Click your preferred intro effect template, click Download Now and follow the on-screen instructions to obtain and download the template.
After downloading, you will see these them in red circles under titles, transitions, or filters, based on the elements included in this effect pack. You can then add this downloaded titles or transitions to the intro video.

Looking for an online solution? Check the list of Top 10 Free Online YouTube Intro Makers .
Part 3: Creative Intro Makers Made with Filmora (Video Tutorial Included)
Both the above processes on how to make YouTube intro video are helpful as long as you use effective titles, decent effects, and extremely appealing color combinations. While the first method gives you full control over the creation as you can use all your imaginations to prepare one, the second method saves your time and yet lets you come up with a professionally-looking intro clip.
Below is a video tutorial from YouTuber Nash. He demonstrated how to create a YouTube Intro with the Sample Colors, Titles, filters and sound effects.
FAQs About YouTube Intro Video Making
- 1. What is a YouTube Intro Video?
A YouTube intro video is 5 seconds to 7 seconds short motion clip that comprises your company name and logo. Such intros help in your brand promotion and give any film or episode that follows them a unique identity. This allows audiences to recognize your organization, and with regular appearances, you can establish strong goodwill among your customers.
- 2. What Should I Put in a YouTube Intro Video?
A YouTube intro video should have your YouTube channel name, an effective and well-formatted text, brand logo, background music, effects, and a slight and simple animation.
Conclusion
To learn how to make a YouTube intro is easy, and things can get even simpler if you are using an efficient and robust post-production software like Wondershare Filmora, which not only allows you to create such clips from the scratch, it also enables you to access Filmstock’ online library to download more fantastic templates in order to expedite your workflow.
Richard Bennett
Richard Bennett is a writer and a lover of all things video.
Follow @Richard Bennett
Richard Bennett
Mar 27, 2024• Proven solutions
Be it YouTube or any other streaming channel, or even for selling your videos on any e-commerce website, intros play a vital role in your brand promotion, and creating them is not as complicated as it sounds either.
The following sections describe in detail how to make a YouTube intro with Wondershare Filmora video editor, and keep it safe so it can be re-used easily in all your creations to maintain consistency and to give your brand a unique identity.
Part 1: How to Make a YouTube Intro Video with Filmora
With Wondershare Filmora, you can create your custom intros from scratch, i.e., even if you don’t have an existing image or footage to start with. You can follow the method given below to learn how to make YouTube intro with Filmora:
Step 1: Add Intro Background to Filmora
Launch Wondershare Filmora, go to Media tab at the top, select the Sample Colors category from the left pane.
Notice all the existing solid and gradient colors in the Media library in the right, hover the mouse over the tile of the color you want to use as a background, and click the + icon that appears in the center to add it to the timeline.
Note: The default duration of such solids is 5 seconds. You can increase or decrease this time by dragging the right handle of track in the timeline.
Alternatively, you can also use your own background image or video clip by selecting the Project Media category from the left pane, clicking anywhere inside the Media window, and then importing your favorite media file to Filmora. After importing, you can follow the procedure given above to add it to the timeline.
Step 2: Select and Add Audio/Sound Effect to YouTube Intro
With audio in the YouTube intro, your video will be more recognizable. If you have watched PewDiePie ‘s video, you’ll find that even though he changed the images on the intro often, he keeps the music and sound the same in the intro.
In Filmora, you can use the music and sound effect in the inbuilt audio library, double click the audio thumbnail from the library to listen to the soundtrack.
Repeat the process until you find the background music or sound effect that you can use in the intro. Once found, drag and drop it to the audio track below the video.
Note: You should keep the background and the audio at the same duration. For more details about audio editing in Filmora, please check this guide about how to edit audio .
Step 3: Add Text/Logo to Intro Video
In the intro video, you can add your channel name, company name, or other branding elements for brand awareness consideration.
Click Titles tab, hover the mouse over the tile with the text you want to use, and then drag and drop it to the track above the video.
To customize, double-click the title track in the timeline, use the new window that appears in the upper-left area of the interface to change, format, and animate the text as needed, and click OK from the bottom-right corner of the library.
Also, you need to adjust the position and duration of the title to get a better view.
In the intro video, it is recommended to add your logo or slogan as well. To add your logo, drag and drop it to the track above the video, and adjust its position and size. For more details, you can check the guide about How to Add Photo or Video to Watermark .
Step 4: Add Effects to YouTube Intro
Go to Effects tab, choose a category from the top-left pane, and click and drag your preferred effect from the Effects library to the timeline.
Adjust the playback duration by dragging the right handle of the track in the timeline as explained above. Optionally, double-click the Effects track to customize the appearance as needed.
Step 5: Export the Intro and Add to Shared Media
Once you are done creating your YouTube intro with all the required ingredients, click EXPORT from the top-center area of the interface, go to the Local tab on the Export box, choose your preferred output format from the left pane (the most common and widely used is MP4), adjust other preferences like destination location, resolution, framerate, etc. from the right pane of the box, and click EXPORT to export the YouTube intro.
Once exported, back on the main interface, select Media again from the standard toolbar, select the Shared Media container from the left pane, click anywhere inside the Media library, and import the YouTube intro video you just created to Shared Media so it can be reused every time you create a new video for the series.
Also, you can save the project, and then revise the element, effects or text to make a YouTube intro vibration.
You can find there are many video tutorials about how to use Filmora to make a YouTube intro, and below is one for you to have a quick glance.
Part 2: How to Make YouTube Intros with Templates
If the turnaround time of your project is about to end, and you need to hustle up, you can always use pre-built templates that not only expedite your creation process, they also look more professional because they are designed by the experts who already have decades of experience in the industry.
Besides the pre-programmed templates and effects in Filmora, you can find more visual effect packs in the effect store Filmstock .
You can learn how to make YouTube intro video in Filmora with a template downloaded from Filmstock.
Step 1: Visit Filmora Effects Page on Filmstock
Visit https://filmstock.wondershare.com/ and log in with the same WSID that you used on Filmora, and then click EFFECTS from the top of the webpage. Since Filmstock also provides templates for After Effects, you should select Filmora Effects to access the entire Filmora Effects library.
You can search the effects that you want in the Search bar, here, since I’m looking for effects for YouTube intro, I just enter “intro”. The effects related to intro will be displayed like below.
Step 2: Download Video Effect Packs for Filmora
Click your preferred intro effect template, click Download Now and follow the on-screen instructions to obtain and download the template.
After downloading, you will see these them in red circles under titles, transitions, or filters, based on the elements included in this effect pack. You can then add this downloaded titles or transitions to the intro video.
Looking for an online solution? Check the list of Top 10 Free Online YouTube Intro Makers .
Part 3: Creative Intro Makers Made with Filmora (Video Tutorial Included)
Both the above processes on how to make YouTube intro video are helpful as long as you use effective titles, decent effects, and extremely appealing color combinations. While the first method gives you full control over the creation as you can use all your imaginations to prepare one, the second method saves your time and yet lets you come up with a professionally-looking intro clip.
Below is a video tutorial from YouTuber Nash. He demonstrated how to create a YouTube Intro with the Sample Colors, Titles, filters and sound effects.
FAQs About YouTube Intro Video Making
- 1. What is a YouTube Intro Video?
A YouTube intro video is 5 seconds to 7 seconds short motion clip that comprises your company name and logo. Such intros help in your brand promotion and give any film or episode that follows them a unique identity. This allows audiences to recognize your organization, and with regular appearances, you can establish strong goodwill among your customers.
- 2. What Should I Put in a YouTube Intro Video?
A YouTube intro video should have your YouTube channel name, an effective and well-formatted text, brand logo, background music, effects, and a slight and simple animation.
Conclusion
To learn how to make a YouTube intro is easy, and things can get even simpler if you are using an efficient and robust post-production software like Wondershare Filmora, which not only allows you to create such clips from the scratch, it also enables you to access Filmstock’ online library to download more fantastic templates in order to expedite your workflow.
Richard Bennett
Richard Bennett is a writer and a lover of all things video.
Follow @Richard Bennett
Also read:
- Elevate Your Vlogs Optimizing Title, Description & Tags
- Best Hashtags for YouTube To Get Your Views to 6 Figures for 2024
- In 2024, Culinary Comrades YouTube's Best Food Blogs
- Unveiling the Secrets to Supervised Simultaneous Streams
- [Updated] 10 Best YouTube Stations for Market Reports
- Efficiently Managing YouTube Videos with the Watch Later Feature for 2024
- [Updated] Boosting Revenue with the Perfect YouTube Trailer Strategy
- Overcoming the Zero View Challenge 10 Actionable Tips
- Discover the Power of 10-Second Beats in YouTube Music
- 2024 Approved Essential Tips for Editing Your Videos in YouTube Studio
- 2024 Approved Elevate Your Online Presence Audios for Your Channel
- 2024 Approved Content Kings & Queens 8 YT's Booming Stars
- 2024 Approved Elevate Your Content Incorporating Exact Timestamps in Videos
- Animator’s Playground Building Your Own Visual Treats
- Identifying and Nurturing Your Brand's Character
- [Updated] Effortless Keyword Harvesting Explore the Best 7 No-Fee Tag Extractors
- [New] 2 Ways to Increase Your YouTube Audience Fast
- Effortless WebM Creation 10 Best YouTube Video Transformers for 2024
- Excellence Guild Crafting Photos + Sounds, Visuals
- Overcoming Obscured Visual Space on YouTube
- Channel Growth Essential Steps for YouTube Backlink Creation
- How To Share A YouTube Playlist
- Customizing YouTube Viewing Policies for Your Content
- [Updated] Best 5 Non-YouTube Editing Tools for Vids
- Expert Speaker Change Devices for YouTube Gurus
- Build Stellar YouTube Beginnings on a Shoestring Budget
- Conceptualists Engineering Marvel Online Worlds for 2024
- [New] Enhance Engagement Select Best Fonts for Your Thumbnails
- [Updated] Cultivating Growth Selecting the Right Co-Stars for YouTube
- Streamline Your Slides with These 4 YouTube Video Inclusion Methods
- [Updated] Elevating Your Valorant Videos with Impressive Thumbnails
- Video Voyages Venturing Into the Vlog Profit World
- [New] Effortless Media Incorporation YouTube to Slides
- [New] Best YouTube Shorts Video Editor Tools for iOS & Android Devices
- 2024 Approved Boosted Audio-Visual Experience Choose AV1 on YouTube
- 2024 Approved Accelerated Fame – The Speed of YouTube’s Most-Watched Video Milestones
- In 2024, Craft the Perfect Thumbnail Top 9 Budget-Friendly Tools
- The Fiscal Footprint of a Gigantism Icon
- [New] Delving Into Past Our Top 10 Picks of History Channels Online
- Transform Viewing Experience with These Leading Top-Ranked, Cost-Free & On-Demand Video Downloaders
- [Updated] Direct Route Uploading From YouTube to Dailymotion
- Up-to-Date Strategies for YouTube Earnings
- [Updated] Enchanting Editing YouTube's Best Video Magic Hits
- Videography 101 Crafting Attractive Haul & Try-On Vids
- Dissecting Digital Dynamics Comparative Channel Analysis
- From Camera to Chrome YouTube Shorts Video Upload Guide
- Increase Your TikTok Presence Using Hashtags Effectively
- 4 Solutions to Fix Unfortunately Your App Has Stopped Error on Infinix Smart 7 | Dr.fone
- In 2024, What Legendaries Are In Pokemon Platinum On OnePlus 12R? | Dr.fone
- [New] Optimal Budget-Friendly Digital Video Reader
- [New] Step Into Reflection Editing Your Facebook Past Videos
- Fix Unfortunately Settings Has Stopped on Realme 11 5G Quickly | Dr.fone
- In 2024, How to use Snapchat Location Spoofer to Protect Your Privacy On OnePlus Nord CE 3 Lite 5G? | Dr.fone
- How to use iSpoofer on Vivo S18 Pro? | Dr.fone
- [New] Master TikTok Snap Enhancers Quickly & Virally
- [Updated] Ultimate Non-Timebound Screen Recording Selection for 2024
- Unlocking Your Most-Watched Fb Movies
- Best Methods for Vivo Y100t Wont Turn On | Dr.fone
- FCP Essentials Creating Engaging Picture-in-Picture Effects for Your Videos
- [Updated] 2024 Approved The Essential Blueprint Setting Up Your First Xbox Recorder
- 2024 Approved Elevate Your Video Conferencing Mastering Zoom Filters
- [New] Echoes Unleashed Mac Studio Techniques
- In 2024, How to Change Pitch in Audacity? Without Losing Quality
- This Guide Will Help You to Understand Everything About the Zoho Show. Also, Know What the Zoho Show Slide Is, Why It Is Used and All Related Information
- [New] In 2024, Choosing Between Bandicam and Camtasia for Video Capture
- How to Stop Life360 from Tracking You On Vivo S17e? | Dr.fone
- New 2024 Approved 7 Best Transition Sound Effects (Free Download) That You Dont Know
- New 2024 Approved Top Hand-Drawn Whiteboard Animation Tools to Try This Year
- How To Unbrick a Dead Xiaomi 13 Ultra | Dr.fone
- 8 Solutions to Fix Find My Friends Location Not Available On Apple iPhone SE (2020) | Dr.fone
- In 2024, Things You Should Know When Unlocking Total Wireless Of Apple iPhone 15
- Becoming an Expert in Video Capturing Streamlabs OBS Guide for 2024
- [Updated] Unlock Earnings The Guide to Successful Vimeo Monetization for 2024
- In 2024, Unlock Your Device iCloud DNS Bypass Explained and Tested, Plus Easy Alternatives From Apple iPhone XS
- How to Resolve Honor X50i Screen Not Working | Dr.fone
- How to Unlock Apple iPhone 15 with a Mask On | Dr.fone
- [Updated] 2024 Approved Speaking with Impact in Google Meet The Guidebook
- New Edit Like a Pro GoPro Quik Review & Best PC Alternatives for Video Editing for 2024
- In 2024, How to Migrate Android Data From Oppo A1x 5G to New Android Phone? | Dr.fone
- Updated 2024 Approved The 5 Best Free M4A Audio Editors You Need to Try
- 2024 Approved Collecting Serene Melodies A Comprehensive Approach
- Updated In 2024, Remove Filmora Logo A Step-by-Step Guide for Free and Paid Users
- How to Resolve OnePlus 11R Screen Not Working | Dr.fone
- In 2024, All You Need To Know About Mega Greninja For Oppo Find X7 Ultra | Dr.fone
- Title: "Decoding YouTube Analytics Insights for Every Content Creator for 2024"
- Author: Steven
- Created at : 2024-05-25 19:04:30
- Updated at : 2024-05-26 19:04:30
- Link: https://youtube-clips.techidaily.com/decoding-youtube-analytics-insights-for-every-content-creator-for-2024/
- License: This work is licensed under CC BY-NC-SA 4.0.
