
:max_bytes(150000):strip_icc()/camera_smartphone_167455841-56a9fe0b3df78cf772abf2f3.jpg)
"Decoding Vtubers The Path From Concept to Career for 2024"
Decoding Vtubers: The Path From Concept to Career?
Create High-Quality Video - Wondershare Filmora
An easy and powerful YouTube video editor
Numerous video and audio effects to choose from
Detailed tutorials provided by the official channel
Faceless creators, or people who do not show their faces in their films, have become more prevalent on YouTube. Although being a faceless artist allows you to have a little more privacy on the internet, some viewers like to see a person on-screen.
So, what’s the best way to win over both sides? However, becoming a virtual YouTuber allows you to have your cake and eat it, as well. Vtubing is similar to live streaming, only that instead of showing your face, your facial emotions and movements are recorded by a digital avatar. Vtubing has grown considerably more accessible, with a large number of people watching Vtubing videos on YouTube.
Moreover, Every VTuber is essentially a character. Whether they’re just being themselves on camera or acting out a backstory they made up, watching a VTuber is like watching an anime in and of itself. The avatars or characters provide VTubers with a lot of creative freedom, allowing them to create unique material.
Being a VTuber isn’t all that different from being a regular one in terms of technicalities. However, it would be beneficial if you still had a good notion of what you want to do with your channel. Even though the two activities are conceptually equivalent, VTubing has a little greater entry barrier due to equipment needs.
In this article
01 What is a virtual YouTuber?
02 What Does It Take to Become a Virtual YouTuber?
03 How to become a virtual youtuber?
What is a virtual YouTuber?
A virtual YouTuber, or VTuber for short, is an online video maker or entertainment who represents themselves through a virtual avatar. This avatar is created using computer graphics (CG), and it frequently has an anime-inspired look. Most VTubers, as the name implies, utilize YouTube as their primary platform, while others do upload videos or host streams on other platforms (e.g., Twitch, Facebook Gaming, and so on) and are still referred to as such.
Vtuber’s Brief History
Kizuna AI, a Japanese VTuber, created and popularized the phrase “virtual YouTuber” in 2016. While she wasn’t the first to employ a CG avatar for video blogging, she is almost entirely to blame for the VTubers craze exploding in Japan and then the rest of the world in late 2016. Because Kizuna AI grew in popularity so quickly, new VTubers began to appear regularly. Some creators, who had already established their platform and/or displayed their faces on camera, created VTuber versions of themselves simply to jump on the bandwagon.
According to User Local, a Japanese data technology firm, over 10,000 active VTubers will exist on YouTube alone by 2020. Kizuna AI, who has the highest following of all VTubers on the internet at the time of writing, has over 10 million subscribers across all of her social media sites (YouTube, Twitter, TikTok, and Bilibili).
Is VTubers the Next Big Thing in Video Content?
If you follow video marketing trends, you may have seen an uptick in animated videos featuring anime-style avatars. VTubers are the creators of this content, and it’s taking the world by storm. Top VTubers earn hundreds of thousands of dollars every month and have millions of followers. The industry, according to analysts, is on the increase.
In 2019, the overall number of VTuber subscribers climbed by 28%, while total views of Vtuber content increased by 99 percent, according to HyperSense. This may not appear to be a severe trend at first sight. Virtual YouTubers, on the other hand, are being used by marketers and corporations like Mattel and KFC to promote genuine engagement.
Top 5 Virtual YouTubers
The following are the top 5 virtual YouTubers. Each of their videos can be watched for a few minutes with English subtitles.
1. Kizuna AI
Kizuna AI is one of Japan’s most well-known and popular female vloggers, with over two million subscribers to her channel. She appears to be a pop star, but she is artificial intelligence, as she boasts. Since she began posting videos on her main channel, A.I.Channel, in 2016, she has gained a considerable following. On the channel, she discusses various topics and plays popular games. A.I.Games, a Kizuna AI YouTube channel dedicated to games, A.I.Games is also available. She is enthusiastic and honest in both good and bad ways, which is one of her best qualities.
Link: https://www.youtube.com/channel/UC4YaOt1yT-ZeyB0OmxHgolA
2. Kaguya Luna
Kaguya Luna is a popular Japanese vlogger who launched her Kaguya Luna Official channel in 2017. She is one of the Big Four VTubers, with over a million subscribers. Kaguya Luna is adored because she presents herself in such a way. Her videos are mostly made up of her free-wheeling speaking without any acting scripts. Her high-pitched voice is striking, and she is always active and talkative. She also performs as a pop vocalist in a live presentation.v
Link: https://www.youtube.com/channel/UCQYADFw7xEJ9oZSM5ZbqyBw
3. Hoshimachi Suisei
Suisei is an idol singer who debuted independently in 2018 before joining the Hololive group. She aims to perform onstage at the Tokyo Budokan. Her deep alto voice is ideal for covers such as Zombieland Saga’s “Saga Jihen,” as well as her original compositions such as “Next Color Planet” and “Ghost.” She also has a reputation as a sociopath, which was established after she violently backstabbed her fellow Hololive stars in a Project Winter playthrough.
Link: https://www.youtube.com/channel/UC5CwaMl1eIgY8h02uZw7u8A
4. Usada Pekora
This adorable little kitten is the most popular VTuber from VShojo’s English-language agency, and it’s easy to understand why her “Nyanderthals” like her. Nyatasha is best known for covering rap songs and going off on obscene tangents with lines like “It’s not about wiping my ass, it’s about sending a message,” despite how innocent she appears and sounds.
Link: https://www.youtube.com/channel/UC1DCedRgGHBdm81E1llLhOQ
5. Sakura Miko
Nyahello! Sakura, a shrine maiden with a theatrical demeanour and a dubious aptitude for video games, began her career as a freelance VTuber before joining Hololive. Her bombastic attitude is part of her appeal: she gets overly passionate about unimportant games, uses any excuse to stare up a female character’s skirt, and swears profusely in Japanese and English whenever she is frustrated. It’s never boring to see her shenanigans.
Link: https://www.youtube.com/channel/UC-hM6YJuNYVAmUWxeIr9FeA
What Does It Take to Become a Virtual YouTuber?
If you’ve been watching YouTube for a while, you’ve most likely noticed the VTuber trend, which began in 2017. Instead of displaying their faces, VTubers, or Virtual YouTubers, communicate with their viewers using an avatar. As this trend grows in popularity (and VTubers gain more subscribers), a lot of people are curious about how they do it. Here are answers to all of your questions on how to become a VTuber on YouTube so you may live out your virtual fantasies.
A high-end PC with enough storage space and a powerful graphics card is required for VTubers. A webcam that tracks motion and connects to your computer is required. The most prominent VTubers employ a blue screen and green room arrangement, which simply consists of walls with one color painted on them in the background of their vlogs so that everything looks to be happening inside an empty virtual area while they walk around.
Investing a lot of money in supplies or equipment for your virtual YouTuber setup isn’t essential, just like it isn’t required for any other creative endeavor. Buying such items may yield greater results if you know how to utilize them effectively but becoming a VTuber may be done for very little money, if at all.
How to become a virtual youtuber?
1. Selecting a Model
To become a virtual YouTuber, you’ll need a model to play the role of your online persona. There are several other ways to do this, but Live2D is the most popular among elite VTubers.
2. Make your model move
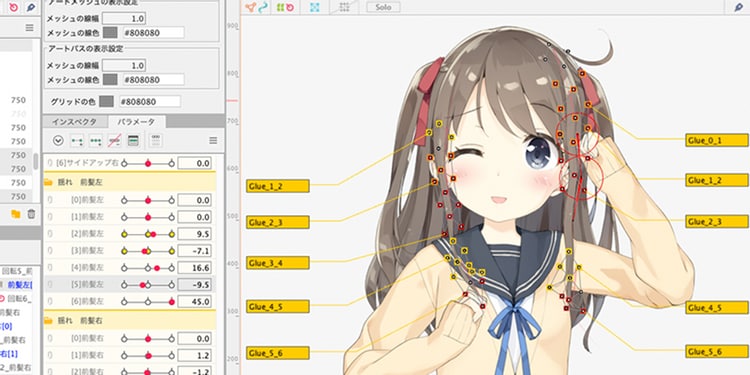
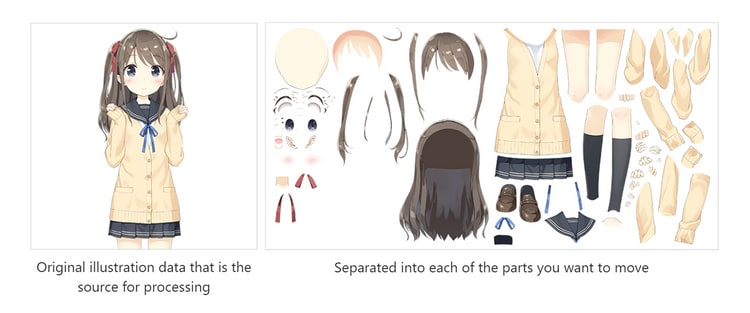
A model must be set up before it can move. In computer graphics, rigging is the process of generating and connecting a rig or bone structure to a model, which can subsequently be animated. When working in two dimensions, this usually entails dividing an image into the pieces you want to move.
You’ll want to set up a webcam to track your movements once you’ve created a rigged model. As a result, your model will adjust to fit you every time you move. Most VTubers only track their faces, but hand movements are becoming increasingly popular.
3. Streaming and/or Recording
This portion of VTubing isn’t all that dissimilar from creating regular video material. You’ll need something to record footage of your model as it moves in lockstep with you. VirtualCast, a free VR communication tool that allows you to be “anyone you choose to be” in a virtual world, may be used for pre-recorded videos. It does, however, necessitate the usage of a virtual reality headset.
Conclusion
● In 2020, the popularity of VTuber content surged. There’s no better time than now to become a virtual YouTuber if you’ve been thinking about it for a long. After all, the nicest part about VTubing is that it’s available to everyone with a smart device and a camera.
● As VTubers are always looking for authenticity, you can become a successful VTuber by sharing the things that matter. Keep an eye on VTubers with a large following and observe what they do. Seek feedback to help you improve your skills or ask for assistance if you require it. Create stuff that will pique the interest of others while also maintaining your own.
Faceless creators, or people who do not show their faces in their films, have become more prevalent on YouTube. Although being a faceless artist allows you to have a little more privacy on the internet, some viewers like to see a person on-screen.
So, what’s the best way to win over both sides? However, becoming a virtual YouTuber allows you to have your cake and eat it, as well. Vtubing is similar to live streaming, only that instead of showing your face, your facial emotions and movements are recorded by a digital avatar. Vtubing has grown considerably more accessible, with a large number of people watching Vtubing videos on YouTube.
Moreover, Every VTuber is essentially a character. Whether they’re just being themselves on camera or acting out a backstory they made up, watching a VTuber is like watching an anime in and of itself. The avatars or characters provide VTubers with a lot of creative freedom, allowing them to create unique material.
Being a VTuber isn’t all that different from being a regular one in terms of technicalities. However, it would be beneficial if you still had a good notion of what you want to do with your channel. Even though the two activities are conceptually equivalent, VTubing has a little greater entry barrier due to equipment needs.
In this article
01 What is a virtual YouTuber?
02 What Does It Take to Become a Virtual YouTuber?
03 How to become a virtual youtuber?
What is a virtual YouTuber?
A virtual YouTuber, or VTuber for short, is an online video maker or entertainment who represents themselves through a virtual avatar. This avatar is created using computer graphics (CG), and it frequently has an anime-inspired look. Most VTubers, as the name implies, utilize YouTube as their primary platform, while others do upload videos or host streams on other platforms (e.g., Twitch, Facebook Gaming, and so on) and are still referred to as such.
Vtuber’s Brief History
Kizuna AI, a Japanese VTuber, created and popularized the phrase “virtual YouTuber” in 2016. While she wasn’t the first to employ a CG avatar for video blogging, she is almost entirely to blame for the VTubers craze exploding in Japan and then the rest of the world in late 2016. Because Kizuna AI grew in popularity so quickly, new VTubers began to appear regularly. Some creators, who had already established their platform and/or displayed their faces on camera, created VTuber versions of themselves simply to jump on the bandwagon.
According to User Local, a Japanese data technology firm, over 10,000 active VTubers will exist on YouTube alone by 2020. Kizuna AI, who has the highest following of all VTubers on the internet at the time of writing, has over 10 million subscribers across all of her social media sites (YouTube, Twitter, TikTok, and Bilibili).
Is VTubers the Next Big Thing in Video Content?
If you follow video marketing trends, you may have seen an uptick in animated videos featuring anime-style avatars. VTubers are the creators of this content, and it’s taking the world by storm. Top VTubers earn hundreds of thousands of dollars every month and have millions of followers. The industry, according to analysts, is on the increase.
In 2019, the overall number of VTuber subscribers climbed by 28%, while total views of Vtuber content increased by 99 percent, according to HyperSense. This may not appear to be a severe trend at first sight. Virtual YouTubers, on the other hand, are being used by marketers and corporations like Mattel and KFC to promote genuine engagement.
Top 5 Virtual YouTubers
The following are the top 5 virtual YouTubers. Each of their videos can be watched for a few minutes with English subtitles.
1. Kizuna AI
Kizuna AI is one of Japan’s most well-known and popular female vloggers, with over two million subscribers to her channel. She appears to be a pop star, but she is artificial intelligence, as she boasts. Since she began posting videos on her main channel, A.I.Channel, in 2016, she has gained a considerable following. On the channel, she discusses various topics and plays popular games. A.I.Games, a Kizuna AI YouTube channel dedicated to games, A.I.Games is also available. She is enthusiastic and honest in both good and bad ways, which is one of her best qualities.
Link: https://www.youtube.com/channel/UC4YaOt1yT-ZeyB0OmxHgolA
2. Kaguya Luna
Kaguya Luna is a popular Japanese vlogger who launched her Kaguya Luna Official channel in 2017. She is one of the Big Four VTubers, with over a million subscribers. Kaguya Luna is adored because she presents herself in such a way. Her videos are mostly made up of her free-wheeling speaking without any acting scripts. Her high-pitched voice is striking, and she is always active and talkative. She also performs as a pop vocalist in a live presentation.v
Link: https://www.youtube.com/channel/UCQYADFw7xEJ9oZSM5ZbqyBw
3. Hoshimachi Suisei
Suisei is an idol singer who debuted independently in 2018 before joining the Hololive group. She aims to perform onstage at the Tokyo Budokan. Her deep alto voice is ideal for covers such as Zombieland Saga’s “Saga Jihen,” as well as her original compositions such as “Next Color Planet” and “Ghost.” She also has a reputation as a sociopath, which was established after she violently backstabbed her fellow Hololive stars in a Project Winter playthrough.
Link: https://www.youtube.com/channel/UC5CwaMl1eIgY8h02uZw7u8A
4. Usada Pekora
This adorable little kitten is the most popular VTuber from VShojo’s English-language agency, and it’s easy to understand why her “Nyanderthals” like her. Nyatasha is best known for covering rap songs and going off on obscene tangents with lines like “It’s not about wiping my ass, it’s about sending a message,” despite how innocent she appears and sounds.
Link: https://www.youtube.com/channel/UC1DCedRgGHBdm81E1llLhOQ
5. Sakura Miko
Nyahello! Sakura, a shrine maiden with a theatrical demeanour and a dubious aptitude for video games, began her career as a freelance VTuber before joining Hololive. Her bombastic attitude is part of her appeal: she gets overly passionate about unimportant games, uses any excuse to stare up a female character’s skirt, and swears profusely in Japanese and English whenever she is frustrated. It’s never boring to see her shenanigans.
Link: https://www.youtube.com/channel/UC-hM6YJuNYVAmUWxeIr9FeA
What Does It Take to Become a Virtual YouTuber?
If you’ve been watching YouTube for a while, you’ve most likely noticed the VTuber trend, which began in 2017. Instead of displaying their faces, VTubers, or Virtual YouTubers, communicate with their viewers using an avatar. As this trend grows in popularity (and VTubers gain more subscribers), a lot of people are curious about how they do it. Here are answers to all of your questions on how to become a VTuber on YouTube so you may live out your virtual fantasies.
A high-end PC with enough storage space and a powerful graphics card is required for VTubers. A webcam that tracks motion and connects to your computer is required. The most prominent VTubers employ a blue screen and green room arrangement, which simply consists of walls with one color painted on them in the background of their vlogs so that everything looks to be happening inside an empty virtual area while they walk around.
Investing a lot of money in supplies or equipment for your virtual YouTuber setup isn’t essential, just like it isn’t required for any other creative endeavor. Buying such items may yield greater results if you know how to utilize them effectively but becoming a VTuber may be done for very little money, if at all.
How to become a virtual youtuber?
1. Selecting a Model
To become a virtual YouTuber, you’ll need a model to play the role of your online persona. There are several other ways to do this, but Live2D is the most popular among elite VTubers.
2. Make your model move
A model must be set up before it can move. In computer graphics, rigging is the process of generating and connecting a rig or bone structure to a model, which can subsequently be animated. When working in two dimensions, this usually entails dividing an image into the pieces you want to move.
You’ll want to set up a webcam to track your movements once you’ve created a rigged model. As a result, your model will adjust to fit you every time you move. Most VTubers only track their faces, but hand movements are becoming increasingly popular.
3. Streaming and/or Recording
This portion of VTubing isn’t all that dissimilar from creating regular video material. You’ll need something to record footage of your model as it moves in lockstep with you. VirtualCast, a free VR communication tool that allows you to be “anyone you choose to be” in a virtual world, may be used for pre-recorded videos. It does, however, necessitate the usage of a virtual reality headset.
Conclusion
● In 2020, the popularity of VTuber content surged. There’s no better time than now to become a virtual YouTuber if you’ve been thinking about it for a long. After all, the nicest part about VTubing is that it’s available to everyone with a smart device and a camera.
● As VTubers are always looking for authenticity, you can become a successful VTuber by sharing the things that matter. Keep an eye on VTubers with a large following and observe what they do. Seek feedback to help you improve your skills or ask for assistance if you require it. Create stuff that will pique the interest of others while also maintaining your own.
The Ultimate List of Free, User-Friendly Editing Apps
9 Best Free and Easy Editing Apps You Should Know

Richard Bennett
Dec 14, 2023• Proven solutions
Have you ever made a video 100% on your phone using a mobile video editing app?
If you’ve just started off on YouTube, there’s a good chance your main camera is the one in your phone. Actually, there’s a good chance of that even if you’ve been making YouTube videos for a while now.
Since you’re shooting videos on your phone, why shouldn’t you edit them there too? Here are 9 free video editing apps you can use for YouTube.
Note: This is not a ranked list. The apps will appear in alphabetical order.
- Adobe Premiere Clip (Android or iOS)
- Cameo (iOS)
- Clips (iOS)
- Filmora (Android or iOS)
- Funimate (Android or iOS)
- iMovie (iOS)
- Movie Maker Filmmaker by Alive (Android or iOS)
- PowerDirector (Android)
- Vlogit (Android or iOS)
Adobe Premiere Clip (Android or iOS )

Key Points:
- Automatic using clips. Times them to music
- Guides you with pop-up tips
- No text/title overlays
- Exports directly to YouTube
Adobe Premiere Pro is a professional-grade desktop editor, and Adobe Premiere Clip lives up to the quality standards set by its big-brother software. It is missing some features you might want for YouTube videos, like title effects, but it does have some bells and whistles. There’s a good selection of filters.

Making changes to your picture, like adjusting the exposure or the prevalence of highlights or shadows, is just a matter of sliding bars. The tools for splitting and duplicating clips are easy to find too. You just toggle between the two icons right above your video – the one that looks like a shutter and the one that looks like adjustment bars – to switch between the picture tools and the other tools.

You cannot add what you might normally think of as a title effect in Adobe Premiere Clip, so it’ll be hard to fully complete your video. You can add text cards to put in-between your video clips, but you can’t overlay the title on top of a clip.
You can share your video directly to YouTube when you export.
Cameo (iOS)

Key Points:
- Easy-to-apply themes
- Customizable titles
- Limited features
- Exports to 4K (if your clips are 4K)
Vimeo is a video sharing site with more of a ‘filmmaker’ focus than YouTube, so it isn’t a surprise that their mobile editing app Cameo can export high-quality 4K videos.
Like some of the other apps on this list, Cameo does not have a huge variety of functions. You can reorder your clips, trim them, add titles, and apply themes (essentially filter and title combos).
There are three icons on the main interface: Scissors, a Music Note, and Filters.
The Scissors will take you to the trimming screen, where you can make your clip shorter or longer.

You can also add a title in the trimming screen, but you will not be able to change the font style or color until you are in the Filter screen.
In the Filter screen (tap the overlapping filters icon on the main interface) you will be able to adjust the color of your text by tapping on the circle with the A in it. Tapping where it says ‘Font’ will change your font style.

You can also tap on Themes and choose a premade style.

Here’s what ‘Crush’ looks like applied:

My font was changed, and there’s also a filter now. In order to apply a filter, you must start with a theme.
Clips (iOS)

Key Points:
- Great selection of stickers
- Lacks some basic tools
- Simple interface
Clips is an intuitive app with a lot of options for decorating your videos. It is lacking in some of the more basic editings features you might expect (i.e. you cannot split clips or do any color correction), but it has a lot of fun features like stickers and emojis that could make up for that depending on your needs.

There are also more traditional effects, like filters and titles. There are a wide range of title options in styles that are popular on YouTube, and a fairly standard filter selection.

While you cannot split clips in this app, but trimming and reordering them is easy. For trimming, you just select the clip and then Trim to open a screen where you can drag the start and end points of the clip.
To rearrange your clips, just tap the clip you want to move and hold down. You’ll be able to drag it to a new location.
It’d be hard to rely on Clips exclusively as your YouTube video editor, but it’s well suited for Instagram or for making quick ‘on-the-go’ videos.
Filmora (Android or iOS)

Key Points:
- Export directly to YouTube
- 16:9 or 1:1 for Instagram
- Includes effects like transitions, filters, and overlays
- End-roll logo
You can make a complete video easily just by tapping and dragging in Filmora, and there are even effects like filters, transitions, and overlays you can add to make your video more polished.
After importing your media into Filmora (you can import videos and photos saved on your phone, or media which has been uploaded to a social media account like Facebook or Instagram) you can change the order of your clips by tapping one, pressing down for a moment, and then dragging your clips where you want them.
Trimming a clip is as simple as tapping on it and then Duration. You’ll get this screen where you can adjust the length easily by dragging the markers to beginning or endpoints.

Cropping and zooming are simple too.

Filmora comes with pre-made themes you can apply which include titles, filters, and other effects. These might not be ideal if you already have branding you like to use for YouTube, but in some situations, they can make video creation a lot faster.

Filmora comes loaded with music, or you can even import your own music from your phone.
Once you’re done, tap ‘save’ in the top right corner of your screen to export your video. From the save screen, you’ll be able to export your video directly to YouTube.

One potential drawback is that Filmora will add its own logo to the end of your exported video. This logo will not distract from your video content since it is added at the end and never overlaps any of your clips, but it still might not be ideal for all creators.
Funimate (Android or iOS )

Key Points:
- Easily add text and shapes
- Rainbow doodling
- Shake effects
- Small ‘Funimate’ watermark in videos from the free version
Funimate is lives up to the ‘fun’ promise in its name. It’s designed mostly for music videos/Musical.ly and while it is missing a lot of more typical editing options, there are a few free tools in Funimate that other apps just don’t have.
For example, there are shake and distortion effects available through Funimate that you usually only find in desktop software.
You can also draw rainbow designs on your video with your finger – no other app on this list can do that.
The text tool in Funimate is easy to use, and there are cool looking glow effects you can apply in the color selection screen. Those options are also available when you’re adding shapes, likes stars and sparkles.
Funimate is not built for typical editing, which is both its strength and its weakness. Trimming your clips is its own stage which you must complete before you start adding effects, and you cannot split clips or add multiple clips.
The free version of Funimate does add a small watermark to your videos in the bottom-right corner, but it is subtle enough that I almost missed it completely while reviewing the app.
iMovie (iOS)

Key Points:
- Trailer templates
- Themes
- Limited tools and resources
iMovie’s mobile app is designed for ease and includes things like ‘trailer templates’ and themes that allow you to make a video quickly and with minimal effort.
This streamlined app is limited in its features. Other apps on this list have left out color correction tools or clip splitting tools and instead loaded up on decorative features like stickers, emojis, and overlays. iMovie has left out these tools and does not have an abundance of decorative features either.
There are filters, themes, and titles, however.
The titles are simple but polished, and you’ll find all the standard types of filters.
The themes include a variety of graphics and are applied to your entire video, not individual clips. You can also apply one filter to your entire video.
iMovie also includes a decent selection of transitions, which you can apply easily by tapping the area between two clips.
Movie Maker Filmmaker by Alive (Android or iOS )

Key Points:
- Good title tool
- Stickers
- Change clip duration
- 16:9 or 1:1
Movie Maker Filmmaker (the app will be labeled ‘Alive’ in on your phone) has a lot of features that will help you put together a fun YouTube video. There’s a great selection of stickers, filters, and overlays and they’re all easy to apply. You just click on what you want and resize/reposition it in the player.

This app is missing a lot of basic editing features, however. You cannot adjust things like brightness or saturation. This won’t be a problem if you’re happy with your clips as-is, but it’s a bit odd to not have those options.
There is a text tool and while it is fairly basic, it is also flexible. There is a good selection of fonts to choose from, and you can also choose whether or not you want a colored background, and if your text should have a shadow.
Once you’ve decided on the look of your text you can drag it, resize it, and tilt it however you want in the preview screen.
A slightly odd feature of this app is that it doesn’t save your video to your phone or export it directly to YouTube. Instead, it saves it – and shares it – within the app and gives you the option of sharing it with YouTube after.
Power Director (Android)

Key Points:
- A timeline like desktop software
- All the basic editing features
- Lots of transitions
- Videos from the free version will be watermarked
The first thing you’ll notice when you open up Power Director is that the interface looks a lot like the interface of a lot of desktop editors with a very classic timeline. This familiarity could make it easy to jump into if you’re used to editing on your laptop.
However, Power Director is a bit less intuitive than most of the other apps on this list. I wouldn’t go so far as to say it’s difficult to use – it isn’t, it’s much easier than a lot of desktop software – but among mobile apps designed for streamlined efficiency it does stand out as being a bit harder to dive into.
That is partly because there’s a lot you can do with it. It has the tools you would expect in an editor. You can split and trim clips, and you have all the standard color tools including some that most mobile apps leave out.
A lot of apps have Brightness, Contrast, and Saturation, but PowerDirector also has Color Temperature and Tint.
In addition to editing tools, PowerDirector has bells and whistles like filters –
- and a ton of great transitions.
One drawback of PowerDirector is that the free version will watermark your videos. This watermark is not intrusive, but it isn’t as subtle as the Funimate one either.
You can export videos from PowerDirector directly to YouTube.
Vlogit (Android or iOS )

Key Points:
- Easy thumbnail maker
- Export directly to YouTube
- Animated stickers
Vlogit is also an app from the creators of the Filmora Video Editor. It isn’t quite as intuitive as Filmora, but the major benefit of Vlogit for YouTube creators is that it was designed with you in mind. It has features like animated stickers, emojis, and a thumbnail maker which were included specifically because YouTubers and vloggers need them.
All the usual adjustments you might want to make, like saturation or sharpness, are easy in Vlogit. So are adjustments to the length or crop of clips.
After you save your video you’ll have the option of creating a thumbnail using a screenshot from your video. You can add a colored border, text, emojis, and more!
Once you’re done, you can export directly to YouTube. Like Filmora, Vlogit does have a post-video logo roll.
Have you ever used a free mobile app to edit one of your YouTube videos? What did you use, and were you happy with the results?
Richard Bennett
Richard Bennett is a writer and a lover of all things video.
Follow @Richard Bennett
Richard Bennett
Dec 14, 2023• Proven solutions
Have you ever made a video 100% on your phone using a mobile video editing app?
If you’ve just started off on YouTube, there’s a good chance your main camera is the one in your phone. Actually, there’s a good chance of that even if you’ve been making YouTube videos for a while now.
Since you’re shooting videos on your phone, why shouldn’t you edit them there too? Here are 9 free video editing apps you can use for YouTube.
Note: This is not a ranked list. The apps will appear in alphabetical order.
- Adobe Premiere Clip (Android or iOS)
- Cameo (iOS)
- Clips (iOS)
- Filmora (Android or iOS)
- Funimate (Android or iOS)
- iMovie (iOS)
- Movie Maker Filmmaker by Alive (Android or iOS)
- PowerDirector (Android)
- Vlogit (Android or iOS)
Adobe Premiere Clip (Android or iOS )
Key Points:
- Automatic using clips. Times them to music
- Guides you with pop-up tips
- No text/title overlays
- Exports directly to YouTube
Adobe Premiere Pro is a professional-grade desktop editor, and Adobe Premiere Clip lives up to the quality standards set by its big-brother software. It is missing some features you might want for YouTube videos, like title effects, but it does have some bells and whistles. There’s a good selection of filters.
Making changes to your picture, like adjusting the exposure or the prevalence of highlights or shadows, is just a matter of sliding bars. The tools for splitting and duplicating clips are easy to find too. You just toggle between the two icons right above your video – the one that looks like a shutter and the one that looks like adjustment bars – to switch between the picture tools and the other tools.
You cannot add what you might normally think of as a title effect in Adobe Premiere Clip, so it’ll be hard to fully complete your video. You can add text cards to put in-between your video clips, but you can’t overlay the title on top of a clip.
You can share your video directly to YouTube when you export.
Cameo (iOS)
Key Points:
- Easy-to-apply themes
- Customizable titles
- Limited features
- Exports to 4K (if your clips are 4K)
Vimeo is a video sharing site with more of a ‘filmmaker’ focus than YouTube, so it isn’t a surprise that their mobile editing app Cameo can export high-quality 4K videos.
Like some of the other apps on this list, Cameo does not have a huge variety of functions. You can reorder your clips, trim them, add titles, and apply themes (essentially filter and title combos).
There are three icons on the main interface: Scissors, a Music Note, and Filters.
The Scissors will take you to the trimming screen, where you can make your clip shorter or longer.
You can also add a title in the trimming screen, but you will not be able to change the font style or color until you are in the Filter screen.
In the Filter screen (tap the overlapping filters icon on the main interface) you will be able to adjust the color of your text by tapping on the circle with the A in it. Tapping where it says ‘Font’ will change your font style.
You can also tap on Themes and choose a premade style.
Here’s what ‘Crush’ looks like applied:
My font was changed, and there’s also a filter now. In order to apply a filter, you must start with a theme.
Clips (iOS)
Key Points:
- Great selection of stickers
- Lacks some basic tools
- Simple interface
Clips is an intuitive app with a lot of options for decorating your videos. It is lacking in some of the more basic editings features you might expect (i.e. you cannot split clips or do any color correction), but it has a lot of fun features like stickers and emojis that could make up for that depending on your needs.
There are also more traditional effects, like filters and titles. There are a wide range of title options in styles that are popular on YouTube, and a fairly standard filter selection.
While you cannot split clips in this app, but trimming and reordering them is easy. For trimming, you just select the clip and then Trim to open a screen where you can drag the start and end points of the clip.
To rearrange your clips, just tap the clip you want to move and hold down. You’ll be able to drag it to a new location.
It’d be hard to rely on Clips exclusively as your YouTube video editor, but it’s well suited for Instagram or for making quick ‘on-the-go’ videos.
Filmora (Android or iOS)
Key Points:
- Export directly to YouTube
- 16:9 or 1:1 for Instagram
- Includes effects like transitions, filters, and overlays
- End-roll logo
You can make a complete video easily just by tapping and dragging in Filmora, and there are even effects like filters, transitions, and overlays you can add to make your video more polished.
After importing your media into Filmora (you can import videos and photos saved on your phone, or media which has been uploaded to a social media account like Facebook or Instagram) you can change the order of your clips by tapping one, pressing down for a moment, and then dragging your clips where you want them.
Trimming a clip is as simple as tapping on it and then Duration. You’ll get this screen where you can adjust the length easily by dragging the markers to beginning or endpoints.
Cropping and zooming are simple too.
Filmora comes with pre-made themes you can apply which include titles, filters, and other effects. These might not be ideal if you already have branding you like to use for YouTube, but in some situations, they can make video creation a lot faster.
Filmora comes loaded with music, or you can even import your own music from your phone.
Once you’re done, tap ‘save’ in the top right corner of your screen to export your video. From the save screen, you’ll be able to export your video directly to YouTube.
One potential drawback is that Filmora will add its own logo to the end of your exported video. This logo will not distract from your video content since it is added at the end and never overlaps any of your clips, but it still might not be ideal for all creators.
Funimate (Android or iOS )
Key Points:
- Easily add text and shapes
- Rainbow doodling
- Shake effects
- Small ‘Funimate’ watermark in videos from the free version
Funimate is lives up to the ‘fun’ promise in its name. It’s designed mostly for music videos/Musical.ly and while it is missing a lot of more typical editing options, there are a few free tools in Funimate that other apps just don’t have.
For example, there are shake and distortion effects available through Funimate that you usually only find in desktop software.
You can also draw rainbow designs on your video with your finger – no other app on this list can do that.
The text tool in Funimate is easy to use, and there are cool looking glow effects you can apply in the color selection screen. Those options are also available when you’re adding shapes, likes stars and sparkles.
Funimate is not built for typical editing, which is both its strength and its weakness. Trimming your clips is its own stage which you must complete before you start adding effects, and you cannot split clips or add multiple clips.
The free version of Funimate does add a small watermark to your videos in the bottom-right corner, but it is subtle enough that I almost missed it completely while reviewing the app.
iMovie (iOS)
Key Points:
- Trailer templates
- Themes
- Limited tools and resources
iMovie’s mobile app is designed for ease and includes things like ‘trailer templates’ and themes that allow you to make a video quickly and with minimal effort.
This streamlined app is limited in its features. Other apps on this list have left out color correction tools or clip splitting tools and instead loaded up on decorative features like stickers, emojis, and overlays. iMovie has left out these tools and does not have an abundance of decorative features either.
There are filters, themes, and titles, however.
The titles are simple but polished, and you’ll find all the standard types of filters.
The themes include a variety of graphics and are applied to your entire video, not individual clips. You can also apply one filter to your entire video.
iMovie also includes a decent selection of transitions, which you can apply easily by tapping the area between two clips.
Movie Maker Filmmaker by Alive (Android or iOS )
Key Points:
- Good title tool
- Stickers
- Change clip duration
- 16:9 or 1:1
Movie Maker Filmmaker (the app will be labeled ‘Alive’ in on your phone) has a lot of features that will help you put together a fun YouTube video. There’s a great selection of stickers, filters, and overlays and they’re all easy to apply. You just click on what you want and resize/reposition it in the player.
This app is missing a lot of basic editing features, however. You cannot adjust things like brightness or saturation. This won’t be a problem if you’re happy with your clips as-is, but it’s a bit odd to not have those options.
There is a text tool and while it is fairly basic, it is also flexible. There is a good selection of fonts to choose from, and you can also choose whether or not you want a colored background, and if your text should have a shadow.
Once you’ve decided on the look of your text you can drag it, resize it, and tilt it however you want in the preview screen.
A slightly odd feature of this app is that it doesn’t save your video to your phone or export it directly to YouTube. Instead, it saves it – and shares it – within the app and gives you the option of sharing it with YouTube after.
Power Director (Android)
Key Points:
- A timeline like desktop software
- All the basic editing features
- Lots of transitions
- Videos from the free version will be watermarked
The first thing you’ll notice when you open up Power Director is that the interface looks a lot like the interface of a lot of desktop editors with a very classic timeline. This familiarity could make it easy to jump into if you’re used to editing on your laptop.
However, Power Director is a bit less intuitive than most of the other apps on this list. I wouldn’t go so far as to say it’s difficult to use – it isn’t, it’s much easier than a lot of desktop software – but among mobile apps designed for streamlined efficiency it does stand out as being a bit harder to dive into.
That is partly because there’s a lot you can do with it. It has the tools you would expect in an editor. You can split and trim clips, and you have all the standard color tools including some that most mobile apps leave out.
A lot of apps have Brightness, Contrast, and Saturation, but PowerDirector also has Color Temperature and Tint.
In addition to editing tools, PowerDirector has bells and whistles like filters –
- and a ton of great transitions.
One drawback of PowerDirector is that the free version will watermark your videos. This watermark is not intrusive, but it isn’t as subtle as the Funimate one either.
You can export videos from PowerDirector directly to YouTube.
Vlogit (Android or iOS )
Key Points:
- Easy thumbnail maker
- Export directly to YouTube
- Animated stickers
Vlogit is also an app from the creators of the Filmora Video Editor. It isn’t quite as intuitive as Filmora, but the major benefit of Vlogit for YouTube creators is that it was designed with you in mind. It has features like animated stickers, emojis, and a thumbnail maker which were included specifically because YouTubers and vloggers need them.
All the usual adjustments you might want to make, like saturation or sharpness, are easy in Vlogit. So are adjustments to the length or crop of clips.
After you save your video you’ll have the option of creating a thumbnail using a screenshot from your video. You can add a colored border, text, emojis, and more!
Once you’re done, you can export directly to YouTube. Like Filmora, Vlogit does have a post-video logo roll.
Have you ever used a free mobile app to edit one of your YouTube videos? What did you use, and were you happy with the results?
Richard Bennett
Richard Bennett is a writer and a lover of all things video.
Follow @Richard Bennett
Also read:
- [New] Collaborative Video Workflows for Content Growth
- Crafting Compelling End Screens in YouTube Videos for 2024
- [Updated] Enlightening Editing Paths to Audience-Appealing Descriptors
- From Shorts to MP4 A Step-by-Step Tutorial
- [New] Enhance Engagement with Effective YT Summary Writing
- No-Cost Yield Assessment Apps for Videos
- Best Free Downloader Turn YouTube Audio Into Premium MP3s for 2024
- Cultivating a Sustainable Advertising Ecosystem FameBit’s Strategies for 2024
- Edit Like a Pro 10 Must-Know Tips for Newbies
- Building Your Brand with a Sports YouTube Chain on macOS
- [New] Creating Seamless Connections Spotify to YouTube Music Conversion
- 2024 Approved A Step-by-Step Approach for Adding Soundtracks to YouTube Clips
- [New] Essential Strategies for Successful Mukbang Production
- Navigating to Your Digital Editing Oasis on YouTube
- [Updated] Captivating Channels Spotlight on the Most Popular Female Creators
- A Journey Beyond Top 10 Global Explorer Channels for 2024
- [Updated] Cutting Edge MP4 Utilities Choosing the Right One for Mac
- In 2024, Engaging Viewers at the End of a YT Video
- Unlocking the Potential of Edu-Vids Strategies for Captivating Your Viewers on YouTube
- A Perfect Guide To Remove or Disable Google Smart Lock On Sony Xperia 1 V
- In 2024, How to Reset a ZTE Blade A73 5G Phone that is Locked?
- 2024 Approved Cutting Confinement with Comedy Best Facebook Incarceration Laughs of Today
- In 2024, Best ZTE Nubia Flip 5G Pattern Lock Removal Tools Remove Android Pattern Lock Without Losing Data
- [Updated] Elevate Your TikTok Experience Instant Download Savvy for 2024
- 2024 Approved Gaming Revolution Top 5 Android Solutions for PlayStation 2 Titles
- Fix Apple iPhone 6s Stuck on Data Transfer Verified Solution! | Dr.fone
- How to Change Location on TikTok to See More Content On your Realme C51 | Dr.fone
- Top-Notch Removers for Clearing Brand Identities on Phones
- [Updated] 2024 Approved Complete Guide to Using ZD Soft's Recording Tools
- [New] 2024 Approved Showcase Splendor Best Cover Apps for iPhones & Android
- Updated In 2024, What to Look for in a Video to Audio Converter A Beginners Guide
- Title: "Decoding Vtubers The Path From Concept to Career for 2024"
- Author: Steven
- Created at : 2024-05-25 19:04:29
- Updated at : 2024-05-26 19:04:29
- Link: https://youtube-clips.techidaily.com/decoding-vtubers-the-path-from-concept-to-career-for-2024/
- License: This work is licensed under CC BY-NC-SA 4.0.
