
"Crafting Eye-Catching Video Summaries 3 Neon Border Methods"
Crafting Eye-Catching Video Summaries: 3 Neon Border Methods
Your YouTube video, or any other clip published on any forum, gets a larger number of hits if it has an attractive thumbnail. And, the fact is, a thumbnail becomes 10x more attractive when the main character that the image has have a neon border around it.
With that said, in the following sections, you will learn a couple of methods on how to add a YouTube thumbnail border around the main characters and/or objects that are significant to the clip.
In this article
01 Add Glowing Neon Border to YouTube Thumbnail with Filmora
02 Add a Glowing Neon Border in YouTube Thumbnail with Canva
03 Outline a Person in a YouTube Thumbnail with Photoshop
Part 1: How to Add Neon Border to YouTube Thumbnail for Free with Filmora
Being one of the most versatile and intuitive post-production tools available in the market today, Wondershare Filmora X allows you to add a neon border to a YouTube thumbnail quite conveniently. You can learn how to get this done on Windows or Mac by following the steps given below.
For Win 7 or later (64-bit)
For macOS 10.12 or later
Step 1: Define Project Settings and Add Image to the Timeline
Launch Wondershare Filmora X on your PC (a MacBook Pro M1 is used here), ensure that the project aspect ratio is set to 16:9 (Widescreen) on the splash screen, and click New Project. On the main interface, click the Preview quality and display settings icon from the upper-right area of the Timeline, click Change Project Aspect Ratio, click to select 1280 x 720 (HD) from the Resolution menu of the Project Settings box, and click OK to save the custom project settings.

Then select My Media from the menu bar if not already selected, click Project Media from the navigation pane, and click Import from the Media box to select and import the image of the main character or object that you want to use in the thumbnail.

Now, drag the image from the Media box to the Timeline at the bottom.

Step 2: Clear Image Background, Add Border, and Add Custom Background
Go to Effects from the menu bar, click to select the Default tab and then AI Portrait from the navigation pane, and click and drag the Human Segmentation preset from the right box, and place it over the image track in the Timeline.

Double-click the image layer, scroll down the upper-left box to the Video Effects section, and use the Edge Thickness and Edge Feather sliders to adjust the character’s edges to make them as realistic as possible. Click OK when done.

Next, click and drag the Human Border preset over the image track in the Timeline, and follow the same procedure to customize the border. This will give the character a neon border effect.

Now, use the method explained earlier to import a custom image for the background, and drag and place it under the previous track in the Timeline.

If you are running the latest version of Filmora, you will find there are some neon light effects available under AI Portrait as well.

Step 3: Add Titles to Thumbnail
Go to Titles from the menu bar, click to select the Default tab and then Lower 3rds from the navigation pane, and click and drag your preferred lower-third preset from the right window to a separate layer in the Timeline. Double-click the lower-third layer, and use the available options in the upper-left window to change the text, its color, etc., and drag the textbox to place it to your preferred position on the image as well. Click OK to save the changes.
Next, click to select Titles from the navigation pane, and drag your preferred title from the right window to the upper-most track in the Timeline. Now use the method explained earlier to edit the text, its color, position, etc. to make it look professional.

For more tips and tricks for creating YouTube thumbnail, you can check this You Tube thumbnail creating guide .
Step 4: Get the Neon Border Thumbnail
Click the Snapshot (Camera) icon from the upper-right area of the Timeline, go to My Media from the menu bar, right-click the thumbnail of the screenshot you captured, and click Reveal in Finder (on Mac) or Reveal in Explorer (on Windows) to get to the folder the YouTube thumbnail border is saved in.

Part 2: How to Add a Glowing Neon Border in Your YouTube Thumbnail with Canva
Canva is another intuitive editing program that works on the web interface rather than having you download and install an app on your PC. You can add a neon border for YouTube thumbnails using Canva by following the instructions given below:
Step 1: Define Project Settings and Add a Background
After signing in to your Canva account, click Create a design from the top-right corner of the page, click Custom size from the bottom, define 1280 and 720 in the Width and Height fields on the box that appears respectively, and click Create new design.

Now, click to select Background from the navigation bar on the left (if the Background tool is not visible, click More and then choose Background from the expanded list), and click to select a background from the images available in the center pane.

Step 2: Upload an Image and Add Effects
Click Uploads from the navigation bar, click the More icon from the right of the Upload media button present at the top of the center pane, choose your preferred method to upload the image (with the transparent background) that you want to use, upload the image, and drag it from the center pane to the Canvas.
Note: You can use any of the tools available online to remove the background from your image for free.

To add a YouTube thumbnail border, make sure that the image that you added to the Canvas is selected, click the Duplicate icon from the upper-right area, and use the scaling handles of the copy of the image to increase its size a bit. Reposition the image back to its original location as well.
Then, click Edit image from the upper-left corner of the Canvas, click Duotone from the Edit image pane at the center, if need be, click See all, choose your preferred duotone effect to apply on the image, choose your preferred highlight and shadow colors from the box that appears next, and click Back from the top of the pane.

Next, click See all next to the Adjust section from the center pane, and drag the Blur slider to the right to increase the blur effect on the image.

Step 3: Position the Layers
While keeping the duplicate image selected, click the Position button from the upper-right area of the Canvas, and click Background to send the second image behind the first one to get the neon border effect for the photo.

Part 3: How to Outline a Person in a YouTube Thumbnail with Photoshop
Because YouTube thumbnails are nothing but static images, creating YouTube thumbnail border with Adobe Photoshop is comparatively easier. The process of doing this is given below:
Step 1: Define Document Preferences and Import an Image
Launch Adobe Photoshop on your PC, click Create new, and on the New Document customization box, define the width and height values to 1280 and 720 pixels respectively. Select Transparent from the Background Contents menu as well if not already selected. Click Create from the bottom to create a new Photoshop document with the specified document settings. Next, open the folder that contains the source image, drag the photo to Photoshop, and press Enter to place the photo.

Step 2: Remove Background from the Image
Make sure that the image layer is selected in the Layers panel on the right, go to Select from the menu bar at the top, and click Subject. From the bottom of the Layers panel, click the Add a mask icon to get rid of the background, leaving only the human on the Canvas.

Step 3: Add a Custom Background and an Outline Around the Subject
Use the method explained earlier to import a background image of your choice to Photoshop. Drag the background image layer to the bottom in the Layers panel. Double-click the masked layer, click to select Stroke from the left pane of the Layer Style box, and use the options available on the right to manage the size, color, position, etc. of the stroke that has been added around the human subject. Click OK when done, and then export the image normally to use it as a YouTube thumbnail border.

Summary
It is important to know that the default resolution of a YouTube thumbnail is 1280 x 720 pixels that is usually written and referred to as 720p. While adding a YouTube thumbnail border, it is also imperative to have a good sense of color combination and fonts. Furthermore, a decent tool like Wondershare Filmora X must be used to add an appealing neon border around the main subject in the thumbnail image easily and quickly.
02 Add a Glowing Neon Border in YouTube Thumbnail with Canva
03 Outline a Person in a YouTube Thumbnail with Photoshop
Part 1: How to Add Neon Border to YouTube Thumbnail for Free with Filmora
Being one of the most versatile and intuitive post-production tools available in the market today, Wondershare Filmora X allows you to add a neon border to a YouTube thumbnail quite conveniently. You can learn how to get this done on Windows or Mac by following the steps given below.
For Win 7 or later (64-bit)
For macOS 10.12 or later
Step 1: Define Project Settings and Add Image to the Timeline
Launch Wondershare Filmora X on your PC (a MacBook Pro M1 is used here), ensure that the project aspect ratio is set to 16:9 (Widescreen) on the splash screen, and click New Project. On the main interface, click the Preview quality and display settings icon from the upper-right area of the Timeline, click Change Project Aspect Ratio, click to select 1280 x 720 (HD) from the Resolution menu of the Project Settings box, and click OK to save the custom project settings.
Then select My Media from the menu bar if not already selected, click Project Media from the navigation pane, and click Import from the Media box to select and import the image of the main character or object that you want to use in the thumbnail.
Now, drag the image from the Media box to the Timeline at the bottom.
Step 2: Clear Image Background, Add Border, and Add Custom Background
Go to Effects from the menu bar, click to select the Default tab and then AI Portrait from the navigation pane, and click and drag the Human Segmentation preset from the right box, and place it over the image track in the Timeline.
Double-click the image layer, scroll down the upper-left box to the Video Effects section, and use the Edge Thickness and Edge Feather sliders to adjust the character’s edges to make them as realistic as possible. Click OK when done.
Next, click and drag the Human Border preset over the image track in the Timeline, and follow the same procedure to customize the border. This will give the character a neon border effect.
Now, use the method explained earlier to import a custom image for the background, and drag and place it under the previous track in the Timeline.
If you are running the latest version of Filmora, you will find there are some neon light effects available under AI Portrait as well.
Step 3: Add Titles to Thumbnail
Go to Titles from the menu bar, click to select the Default tab and then Lower 3rds from the navigation pane, and click and drag your preferred lower-third preset from the right window to a separate layer in the Timeline. Double-click the lower-third layer, and use the available options in the upper-left window to change the text, its color, etc., and drag the textbox to place it to your preferred position on the image as well. Click OK to save the changes.
Next, click to select Titles from the navigation pane, and drag your preferred title from the right window to the upper-most track in the Timeline. Now use the method explained earlier to edit the text, its color, position, etc. to make it look professional.
For more tips and tricks for creating YouTube thumbnail, you can check this You Tube thumbnail creating guide .
Step 4: Get the Neon Border Thumbnail
Click the Snapshot (Camera) icon from the upper-right area of the Timeline, go to My Media from the menu bar, right-click the thumbnail of the screenshot you captured, and click Reveal in Finder (on Mac) or Reveal in Explorer (on Windows) to get to the folder the YouTube thumbnail border is saved in.
Part 2: How to Add a Glowing Neon Border in Your YouTube Thumbnail with Canva
Canva is another intuitive editing program that works on the web interface rather than having you download and install an app on your PC. You can add a neon border for YouTube thumbnails using Canva by following the instructions given below:
Step 1: Define Project Settings and Add a Background
After signing in to your Canva account, click Create a design from the top-right corner of the page, click Custom size from the bottom, define 1280 and 720 in the Width and Height fields on the box that appears respectively, and click Create new design.
Now, click to select Background from the navigation bar on the left (if the Background tool is not visible, click More and then choose Background from the expanded list), and click to select a background from the images available in the center pane.
Step 2: Upload an Image and Add Effects
Click Uploads from the navigation bar, click the More icon from the right of the Upload media button present at the top of the center pane, choose your preferred method to upload the image (with the transparent background) that you want to use, upload the image, and drag it from the center pane to the Canvas.
Note: You can use any of the tools available online to remove the background from your image for free.
To add a YouTube thumbnail border, make sure that the image that you added to the Canvas is selected, click the Duplicate icon from the upper-right area, and use the scaling handles of the copy of the image to increase its size a bit. Reposition the image back to its original location as well.
Then, click Edit image from the upper-left corner of the Canvas, click Duotone from the Edit image pane at the center, if need be, click See all, choose your preferred duotone effect to apply on the image, choose your preferred highlight and shadow colors from the box that appears next, and click Back from the top of the pane.
Next, click See all next to the Adjust section from the center pane, and drag the Blur slider to the right to increase the blur effect on the image.
Step 3: Position the Layers
While keeping the duplicate image selected, click the Position button from the upper-right area of the Canvas, and click Background to send the second image behind the first one to get the neon border effect for the photo.
Part 3: How to Outline a Person in a YouTube Thumbnail with Photoshop
Because YouTube thumbnails are nothing but static images, creating YouTube thumbnail border with Adobe Photoshop is comparatively easier. The process of doing this is given below:
Step 1: Define Document Preferences and Import an Image
Launch Adobe Photoshop on your PC, click Create new, and on the New Document customization box, define the width and height values to 1280 and 720 pixels respectively. Select Transparent from the Background Contents menu as well if not already selected. Click Create from the bottom to create a new Photoshop document with the specified document settings. Next, open the folder that contains the source image, drag the photo to Photoshop, and press Enter to place the photo.
Step 2: Remove Background from the Image
Make sure that the image layer is selected in the Layers panel on the right, go to Select from the menu bar at the top, and click Subject. From the bottom of the Layers panel, click the Add a mask icon to get rid of the background, leaving only the human on the Canvas.
Step 3: Add a Custom Background and an Outline Around the Subject
Use the method explained earlier to import a background image of your choice to Photoshop. Drag the background image layer to the bottom in the Layers panel. Double-click the masked layer, click to select Stroke from the left pane of the Layer Style box, and use the options available on the right to manage the size, color, position, etc. of the stroke that has been added around the human subject. Click OK when done, and then export the image normally to use it as a YouTube thumbnail border.
Summary
It is important to know that the default resolution of a YouTube thumbnail is 1280 x 720 pixels that is usually written and referred to as 720p. While adding a YouTube thumbnail border, it is also imperative to have a good sense of color combination and fonts. Furthermore, a decent tool like Wondershare Filmora X must be used to add an appealing neon border around the main subject in the thumbnail image easily and quickly.
Revolutionize Earning with Youtube Short Tactics
YouTube offers content creators a platform for creating a lucrative career. Of the major developments made in the recent past is the introduction of Shorts. These short vertical videos have grown in popularity as more people view videos on their phones. With this development, the YouTube Shorts fund was launched to reward creators for their efforts. The fund allows creators to monetize their Shorts quickly, supporting and incentivizing them to create high-quality Shorts content. In this article, we will explore the YouTube Shorts Fund 2023, including YouTube shorts fund eligibility.
YouTube Shorts Monetization A cross-platform for taking your overexposed footage to cinema-quality Shorts video  Free Download Learn More

Part 1. YouTube Shorts Fund: Introduction and Benefits
YouTube launched YouTube Shorts Funds in 2021 to financially support creators who produce engaging and popular Shorts content. The monetization scheme would distribute $100 million to high-performing creators on the platform. The creators would receive high engagement and views from their Shorts for funding.

The main objective of the YouTube Shorts fund is to encourage creativity, diversity, and innovation in Shorts content creation. The fund operated between 2021 and 2022. It lets creators earn $100 - $10,000 a month for their content.
Participating in YouTube Shorts Funds offer several benefits to the creators:
- Additional Exposure: YouTube Shorts are predominately featured on the homepage, allowing creators to reach more people.
- Recognition: YouTube recognizes top Shorts creators through the Shorts Funding program, encouraging them to create more quality content.
- Potential Earnings: Creators can monetize their Shorts content in several ways including adding and other unique features.
YouTube incorporated monetization of Shorts in its YouTube Partner Program (YPP). Therefore, YouTube merged the Shorts Fund with the YPP in February 2023. This led to YouTube Shorts Fund 2023 which now offers creators more opportunities to make money quickly on YouTube.
Part 2. Making Money with YouTube Shorts: Eligibility and Earnings
The new YouTube Shorts monetization policy means that content creators on YouTube with access to the YPP can also earn from Shorts. The revenue-sharing model has now taken the place of the YouTube Shorts Fund, which only rewarded creators using YouTube’s money. However, creators don’t have to be members of the YPP to start receiving YouTube Shorts funding. They only need to meet certain requirements, make unique content, and adhere to Community Guidelines.
- YouTube Shorts Fund Eligibility
- Additional Steps of Actions to Activate YouTube Shorts Funding
- What the YPP Shorts Fund Entails
- How Much Can You Make with Short
YouTube Shorts Fund Eligibility
As of 2023, YouTube offers Shorts Funding as a monetization option. Creators can also choose to monetize with YPP combined with Shorts Fundings.
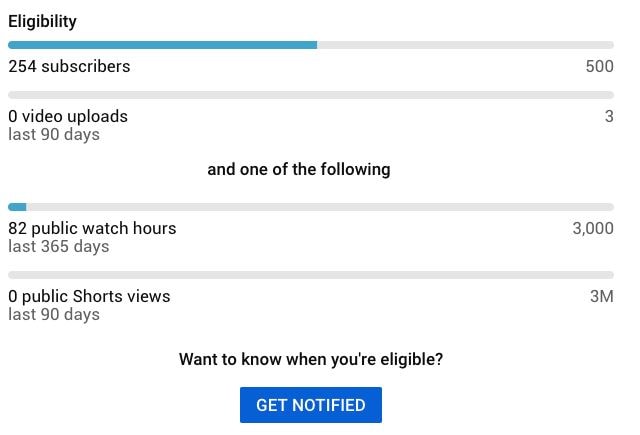
The eligibility requirements for Shorts funding include:
- At least 1,000 subscribers
- At least 10 million public Shorts views in the last 90 days
To become a member of the YPP and start accessing Shorts funding this way, the minimum requirements are as follows:
- At least 500 subscribers (You previously needed 1,000)
- At least 3,000 public watch hours over the last 13 months (You previously needed 4,000)
Additional Steps of Actions to Activate YouTube Shorts Funding
In addition to the basic eligibility requirements, creators are also required to take additional measures to comply with YouTube’s requirements. Additional steps include:
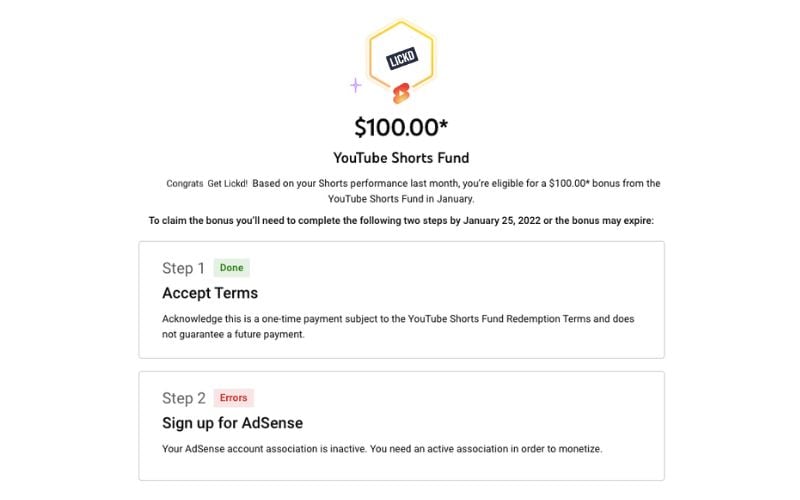
- Ensuring AdSense Account is active and in good standing: Since ad revenue will be paid through AdSense, you need to make sure your account is in good standing.
- Review and Accept the Terms of Shorts Monetization Module: In the YouTube Studio, head over to the Shorts Fund section and click on the Terms and Conditions link.
- Enable Monetization for Individual Shorts: Edit the monetization settings for each Short to start generating ad revenue.
- Comply with YouTube Policies and Guidelines: Visit the YouTube Creator Academy to learn more about the platform’s policies and guidelines.
What the YPP Shorts Fund Entails
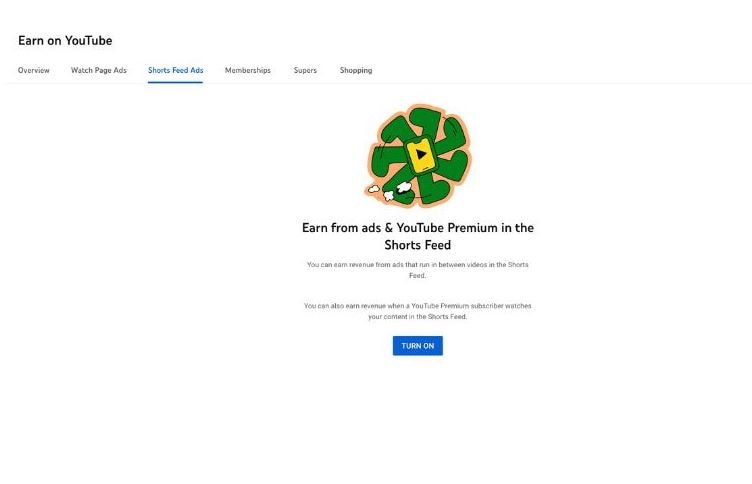
The YPP Shorts Fund program includes the following features:
- Watch Page Monetization – Creators earn ad revenue from long-form content, YouTube Premium content, and live streams
- Shorts Monetization Module – Creators earn money from ads that play between YouTube Shorts.
- Commerce Product Addendum – Additional monetization features, including Super Chats. Channel Memberships, Super Thanks, and Super Stickers.
How Much Can You Make with Short s
The amount of money you can make on Shorts often varies. It can be hard to make decent money on Shorts sometimes, and other times it brings in a nice chunk of revenue. Unfortunately, the earnings are not as spectacular as the long YouTube videos. Most creators agree that the revenue per thousand views (RPM) for shorts is around $0.05 - $0.07. This would translate to about $50 - $70 for a million Shorts views. Although the ad revenue is relatively lower, you can generate more revenue with the shopping features. This will depend on how wee you keep your audience active and engaged.
Part 3. How to Use YouTube Shorts Funding: Application and Activation
The process of applying for and activating YouTube Short Funding is simple. You need to accept the Shorts Monetization Module in your terms and conditions. After activating, monetization starts immediately.
Head over to the YouTube Studio. Sign in to your account to accept the terms. Be sure to use a web browser because the YouTube app will not allow you to make these changes. Accept the terms and follow these steps to turn on the ads:
- Setp 1: Click the Content button at the bottom of the menu in the YouTube Studio
- Setp 2: Pick the video you want to monetize, and click Edit
- Setp 3: Select the Earn tab pick on, and choose the ads you want to turn on.
- Setp 4: Save your settings and the ads will be active.
Part 4. Editing YouTube Shorts for More Revenue with Wondershare Filmora
The best way to earn from the YouTube Shorts Fund is to create quality content. With good video editing software, you can achieve this and build a community of subscribers. Wondershare Filmora is a video editing software that is effective in creating quality Shorts videos. It supports various video resolutions, including vertical videos. It also has some fascinating features that make every creation unique and exciting. Take your overexposed footage to cinema-quality Shorts video that will keep your audience engaged.
Free Download For Win 7 or later(64-bit)
Free Download For macOS 10.14 or later
Filmora can help create visually appealing and engaging videos, ultimately increasing the chances of monetization on YouTube. The following features make editing videos on Filmora quick and easy.
1. Auto Reframe
You may have recorded horizontal videos and want to upload them as Shorts. The Auto Reframe feature allows you to automatically resize the video in seconds. You only need to choose the clip you want to resize and reframe it. No editing skills are required to do this.
2. Add Text to Video
Texts tell the audience what is happening in the video. It is also a great way to highlight major events in YouTube Shorts. The Add Text to Video feature on Filmora makes it easy to add text or captions to your videos.
3. Auto Synchronization
When editing Shorts, you will likely add many footage in a short video. It is common for the audio to end up being where it is not supposed to. The Auto Synchronization feature is the ultimate audio sync. It effortlessly matches your audio with the video, making sure viewers see what they hear
4. Mask & Blend
Creativity is a major component of YouTube Shorts content. The Filmora Masking and Blending mode helps you make creative video clips. It comes with a pen tool for creating free-form shapes on the go. Make your videos more impressive to your audience.
5. Auto Beat Sync
With YouTube Shorts, you need to entertain your audience in under a minute. A combination of visual and audio elements makes the video more entertaining. The Auto Beat Sync feature matches the footage with the music automatically. Be sure every beat corresponds to the scene.
Conclusion
The YouTube Shorts Fund offers an exceptional for creators to make additional income on the platform. Although the original Funds program has been updated with the latest monetization policy, creators can still generate nice revenue amount. As a creator, you need to publish quality and highly engaging content. With Wondershare Filmora, you can create content that will generate more revenue on the Shorts platform. The video editing software offers fantastic features that make video editing quick and fun.
Free Download Free Download Learn More
Part 1. YouTube Shorts Fund: Introduction and Benefits
YouTube launched YouTube Shorts Funds in 2021 to financially support creators who produce engaging and popular Shorts content. The monetization scheme would distribute $100 million to high-performing creators on the platform. The creators would receive high engagement and views from their Shorts for funding.
The main objective of the YouTube Shorts fund is to encourage creativity, diversity, and innovation in Shorts content creation. The fund operated between 2021 and 2022. It lets creators earn $100 - $10,000 a month for their content.
Participating in YouTube Shorts Funds offer several benefits to the creators:
- Additional Exposure: YouTube Shorts are predominately featured on the homepage, allowing creators to reach more people.
- Recognition: YouTube recognizes top Shorts creators through the Shorts Funding program, encouraging them to create more quality content.
- Potential Earnings: Creators can monetize their Shorts content in several ways including adding and other unique features.
YouTube incorporated monetization of Shorts in its YouTube Partner Program (YPP). Therefore, YouTube merged the Shorts Fund with the YPP in February 2023. This led to YouTube Shorts Fund 2023 which now offers creators more opportunities to make money quickly on YouTube.
Part 2. Making Money with YouTube Shorts: Eligibility and Earnings
The new YouTube Shorts monetization policy means that content creators on YouTube with access to the YPP can also earn from Shorts. The revenue-sharing model has now taken the place of the YouTube Shorts Fund, which only rewarded creators using YouTube’s money. However, creators don’t have to be members of the YPP to start receiving YouTube Shorts funding. They only need to meet certain requirements, make unique content, and adhere to Community Guidelines.
- YouTube Shorts Fund Eligibility
- Additional Steps of Actions to Activate YouTube Shorts Funding
- What the YPP Shorts Fund Entails
- How Much Can You Make with Short
YouTube Shorts Fund Eligibility
As of 2023, YouTube offers Shorts Funding as a monetization option. Creators can also choose to monetize with YPP combined with Shorts Fundings.
The eligibility requirements for Shorts funding include:
- At least 1,000 subscribers
- At least 10 million public Shorts views in the last 90 days
To become a member of the YPP and start accessing Shorts funding this way, the minimum requirements are as follows:
- At least 500 subscribers (You previously needed 1,000)
- At least 3,000 public watch hours over the last 13 months (You previously needed 4,000)
Additional Steps of Actions to Activate YouTube Shorts Funding
In addition to the basic eligibility requirements, creators are also required to take additional measures to comply with YouTube’s requirements. Additional steps include:
- Ensuring AdSense Account is active and in good standing: Since ad revenue will be paid through AdSense, you need to make sure your account is in good standing.
- Review and Accept the Terms of Shorts Monetization Module: In the YouTube Studio, head over to the Shorts Fund section and click on the Terms and Conditions link.
- Enable Monetization for Individual Shorts: Edit the monetization settings for each Short to start generating ad revenue.
- Comply with YouTube Policies and Guidelines: Visit the YouTube Creator Academy to learn more about the platform’s policies and guidelines.
What the YPP Shorts Fund Entails
The YPP Shorts Fund program includes the following features:
- Watch Page Monetization – Creators earn ad revenue from long-form content, YouTube Premium content, and live streams
- Shorts Monetization Module – Creators earn money from ads that play between YouTube Shorts.
- Commerce Product Addendum – Additional monetization features, including Super Chats. Channel Memberships, Super Thanks, and Super Stickers.
How Much Can You Make with Short s
The amount of money you can make on Shorts often varies. It can be hard to make decent money on Shorts sometimes, and other times it brings in a nice chunk of revenue. Unfortunately, the earnings are not as spectacular as the long YouTube videos. Most creators agree that the revenue per thousand views (RPM) for shorts is around $0.05 - $0.07. This would translate to about $50 - $70 for a million Shorts views. Although the ad revenue is relatively lower, you can generate more revenue with the shopping features. This will depend on how wee you keep your audience active and engaged.
Part 3. How to Use YouTube Shorts Funding: Application and Activation
The process of applying for and activating YouTube Short Funding is simple. You need to accept the Shorts Monetization Module in your terms and conditions. After activating, monetization starts immediately.
Head over to the YouTube Studio. Sign in to your account to accept the terms. Be sure to use a web browser because the YouTube app will not allow you to make these changes. Accept the terms and follow these steps to turn on the ads:
- Setp 1: Click the Content button at the bottom of the menu in the YouTube Studio
- Setp 2: Pick the video you want to monetize, and click Edit
- Setp 3: Select the Earn tab pick on, and choose the ads you want to turn on.
- Setp 4: Save your settings and the ads will be active.
Part 4. Editing YouTube Shorts for More Revenue with Wondershare Filmora
The best way to earn from the YouTube Shorts Fund is to create quality content. With good video editing software, you can achieve this and build a community of subscribers. Wondershare Filmora is a video editing software that is effective in creating quality Shorts videos. It supports various video resolutions, including vertical videos. It also has some fascinating features that make every creation unique and exciting. Take your overexposed footage to cinema-quality Shorts video that will keep your audience engaged.
Free Download For Win 7 or later(64-bit)
Free Download For macOS 10.14 or later
Filmora can help create visually appealing and engaging videos, ultimately increasing the chances of monetization on YouTube. The following features make editing videos on Filmora quick and easy.
1. Auto Reframe
You may have recorded horizontal videos and want to upload them as Shorts. The Auto Reframe feature allows you to automatically resize the video in seconds. You only need to choose the clip you want to resize and reframe it. No editing skills are required to do this.
2. Add Text to Video
Texts tell the audience what is happening in the video. It is also a great way to highlight major events in YouTube Shorts. The Add Text to Video feature on Filmora makes it easy to add text or captions to your videos.
3. Auto Synchronization
When editing Shorts, you will likely add many footage in a short video. It is common for the audio to end up being where it is not supposed to. The Auto Synchronization feature is the ultimate audio sync. It effortlessly matches your audio with the video, making sure viewers see what they hear
4. Mask & Blend
Creativity is a major component of YouTube Shorts content. The Filmora Masking and Blending mode helps you make creative video clips. It comes with a pen tool for creating free-form shapes on the go. Make your videos more impressive to your audience.
5. Auto Beat Sync
With YouTube Shorts, you need to entertain your audience in under a minute. A combination of visual and audio elements makes the video more entertaining. The Auto Beat Sync feature matches the footage with the music automatically. Be sure every beat corresponds to the scene.
Conclusion
The YouTube Shorts Fund offers an exceptional for creators to make additional income on the platform. Although the original Funds program has been updated with the latest monetization policy, creators can still generate nice revenue amount. As a creator, you need to publish quality and highly engaging content. With Wondershare Filmora, you can create content that will generate more revenue on the Shorts platform. The video editing software offers fantastic features that make video editing quick and fun.
Also read:
- [New] 10 Best Yoga YouTube Channels to Follow - Keep Fit
- [New] Captivating Clicks The Top 8 YT Thumbnails to Use
- Easy Path to Popularity Two Tactics for YouTube Fame
- Pinpointing Your Individual Playlist Hub on YouTube
- [Updated] A Compreayer's Primer to Navigating the Online Copyright Labyrinth
- Enhancing Video Visibility with Strategic YouTube Links for 2024
- In 2024, Deep Dive Evolution of Virtual Performance Artists
- Elevate Your Digital Presence Mastering the Art of Video Reacts
- Navigating the Complexities of YouTube Copyright Claims
- Creating Costless Webinars on YouTube A Handbook for 2024
- [Updated] Elevate Presentations - Add YouTube in Google Slides
- Transform Viewing Experience with These Leading Top-Ranked, Cost-Free & On-Demand Video Downloaders
- In 2024, 15 YouTube Starter Templates A Guide to Popularity
- Crafting the Perfect Schedule for Jobs & YouTube for 2024
- Best ASMR Apps for Android and iOS
- Fresh Vlog Discussion Ideas Each Day
- Best 3D Entrance Makers for YouTube Creators
- [New] Digital Elites 8 The Speedy Video Channels
- 2024 Approved Discover the Top Free Platforms for YouTube Ops
- [New] Earning Power Through Engagement Ajay’s Success on YouTube Monetization
- Perfect Lighting Setup for Engaging YouTube Videos
- [New] Direct Download Destiny #10 Online Tool Reviewers' Choice
- 2024 Approved Acoustic Mastery Secrets for Exceptional Audio Capture
- Best in Class Textify Your Vlogs
- Unleash Video Power on YouTube Without Spending a Dime (Frame by Frame)
- Daytime Delights The Most Inspiring Anime Streaming Channels for 2024
- Transform Your YT Prompts with Green Savvy
- In 2024, Coherent and Curated YouTube Playlists Online & Mobile Assembly Guide
- How to Integrate Siri on TikTok - A Comprehensive Guidebook for 2024
- In 2024, Best 3 Realme 11 Pro+ Emulator for Mac to Run Your Wanted Android Apps | Dr.fone
- In 2024, Create Epic Trailers Top Movie Maker Software for Mac and PC
- New 2024 Approved 6 Best Voice Changers
- Engage and Captivate with These Top-Tier Unpacked Vids
- [New] 2024 Approved Direct Capture Tool for Chrome Systems
- If You Are Experiencing a Color Distortion in Your Video, You Are in the Right Place. We Have Provided a Detailed Guide with Three Methods that Will Help You Correct This Issue for 2024
- [New] In 2024, Fixing Absence of Color on Game Feedback
- 2024 Approved Masterclass in Screenshotting Professional-Level Techniques Using Mobizen
- Why Is My Honor 100 Pro Offline? Troubleshooting Guide | Dr.fone
- [New] 2024 Approved 10 Best Hash Monitoring Apps for Major Social Platforms (FB/Twitter/Insta)
- Title: "Crafting Eye-Catching Video Summaries 3 Neon Border Methods"
- Author: Steven
- Created at : 2024-06-26 15:42:25
- Updated at : 2024-06-27 15:42:25
- Link: https://youtube-clips.techidaily.com/crafting-eye-catching-video-summaries-3-neon-border-methods/
- License: This work is licensed under CC BY-NC-SA 4.0.
