
"Crafting Captivating Thumbnails A Comprehensive Guide for YouTube Creators"
Crafting Captivating Thumbnails: A Comprehensive Guide for YouTube Creators
There is a saying that first impressions last, and this is proven true, especially when it comes to YouTube video viewership. For sure, you have experienced watching a video out of curiosity because of its thumbnail. That is why content creators take time to resize YouTube thumbnails or use a YouTube thumbnail size converter to customize the preview images that represent their videos.
This technique not only attract viewers to watch your video, but it also gives a glimpse of your content. In this article, we will provide you with a quick tutorial on how to resize a YouTube thumbnail and suggest handy tools you can use to create the perfect YouTube video thumbnail!

Best YouTube Thumbnail Size
According to YouTube’s help center, there are some things to remember when creating a thumbnail for your YouTube videos.
- First, make sure that the thumbnail size is 1280 pixels by 720 pixels and 640 pixels wide. It is the best YouTube thumbnail size.
- When it comes to the thumbnail dimension, make sure to use an aspect ratio of 16:9.
- Also, your YouTube thumbnail image should not exceed 2MB and is in either JPG, GIF or PNG format.
How To Resize Your YouTube Thumbnail
The primary reason for changing the YouTube thumbnail size is to gain more audience. If you are a content creator, your main goal is to introduce your content to a wider range of viewers, right? So you have to pay attention to even the smallest detail, such as YouTube thumbnails to increase viewership and top YouTube SEO.
In fact, YouTube recommends this technique to get more viewers. Also, resizing your YouTube thumbnail will prevent you from getting the “file larger than 2MB error” which can cause your thumbnail to be discarded.
So, how can you use this technique? Check our tutorial below as we walk you through various recommended methods for resizing a YouTube thumbnail:
Method 1: Resize YouTube Thumbnail With Windows Default App
The easiest way to resize YouTube thumbnails is through the Windows default app. Within just a few modifications, you can resize your thumbnail to fit as a preview image for your YouTube video.
Please take note that your image should be at least 2 megabytes or less to achieve the perfect YouTube thumbnail fit. If your image exceeds the limit, your thumbnail will either be rejected, or your image will have a black screen around it-which is not ideal at all.
Now, let us start the tutorial.
Step1 Open an image you want to set as a thumbnail. Then, Right-click> Resize.

Step2 Select “Define custom dimensions.”

Step3 Set the width to 1280 and the height to 720. Then tick the box for “Maintain Aspect Ratio “and click “Save Resized Copy.”

Step4 Click the upload thumbnail button on YouTube and import your resized image.

Method 2. Online YouTube Thumbnail Size Converter
The second method you can use is the online YouTube thumbnail size converter. As it completely works in browsers, you do not need to worry about any app installation to access the feature. Furthermore, using online YouTube thumbnail size converters ensures you maintain your image resolution and prevents it from getting blurry or pixelated.
There are various YouTube thumbnail resizers available online. Some of the most popular are Fotor, Super Image Converter, Pixelied, Super Image Converter , Adobe Express , Newisty, and Promo . Let us focus on the last online tool and the steps on how to use it.
Promo is a free online software you can use to convert an image to a YouTube thumbnail. It is one of the best YouTube Thumbnail tools as it uses simple operation steps and automatically resizes your image without losing its quality.

Here are the steps on how to use the Promo YouTube thumbnail size converter:
Step1 Go to Promo’s official website and import your image

Step2 Scroll down and find the YouTube thumbnail size where your resized image is displayed. Then, click “Download.”

Method 3: Convert the Image to YouTube Thumbnail Using Wondershare Filmora
It is without a doubt that online YouTube thumbnail resizers are great tools for converting your image to an ideal YouTube thumbnail. But it would be much better if you resize your video using the same app you use for editing. That way, you will save time using two separate apps, and your task will be much more efficient using an all-in-one video editing tool.
Wondershare Filmora , one of the most well-known software for creating high-quality and compelling videos, combines these functions in one app. Filmora is not just an excellent software for crafting YouTube videos but also a reliable tool you can use in creating and resizing YouTube thumbnails.
Free Download For Win 7 or later(64-bit)
Free Download For macOS 10.14 or later
Here is the step-by-step tutorial on how to use Filmora in resizing your YouTube thumbnail. It is divided into two parts:
1. Take a Snapshot as the Thumbnail with Filmora
Step1 Open the video in the timeline, click the play icon in the player window, and pause when you reach the desired frame for the YouTube thumbnail. Click the camera icon to take a snapshot.

Step2 In the snapshot window, choose to save the snapshot as a PNG or JPG file.
Step3 Select the output storage location and click OK.

2. Resize the YouTube Thumbnail
Step1 Import the image into the app timeline.

Step2 Drag and drop the image into the timeline and click the green “Export“ button. In the popup Export window, select GIF. Next, click “Settings“ to adjust the resolution.

Step3 As the recommended size of a YouTube Thumbnail is 1280 * 720 pixels, you can set the resolution to 1280 * 720. Then click Apply and Export the GIF. You can now upload the GIF thumbnail to your YouTube account.

Method 4. Convert Images to YouTube Thumbnail Using Third-Party Software
In addition to using dedicated video editing software, several third-party image editing programs can be used to resize images for use as YouTube thumbnails. Programs like GIMP are popular for this purpose, as it offers a wide range of tools and features for editing and resizing images.
This program allows you to import an image, resize it to the dimensions required for a YouTube thumbnail (typically 1280 x 720 pixels), and save the edited version to your desired location. Using an image editing program can be a good option if you need more control over the appearance of your thumbnail or if you want to make more extensive edits beyond simply resizing the image.
To resize an image using an image editing program like GIMP, follow these steps:
Step1 Install and launch GIMP on your computer.

Step2 Click on “File“ > “Open,” then search for the file you want to resize.

Step3 Click on “Image“ > “Scale Image“ and make sure that the resolution is 1920 by 1080.

Step4 Click on “File“ > “Export As“ and toggle the “Select File Type (By Extension)“ option. Choose JPG/JPEG format because it can compress the thumbnail enough to stay within the limit of 2 megabytes.

Step5 You can change the quality of the image and click the “Export“ button to save the thumbnail.

Comparison of These 4 YouTube Thumbnail Resizing Methods
Now that we’ve explored the four methods for resizing YouTube thumbnails, it’s time to compare the pros and cons of each method. In this section, we’ll consider factors such as ease of use, speed, quality, cost, and compatibility to help you determine the best option for your needs.
Take a look at the table below for a more detailed comparison.
| | Windows Default App | Online YouTube Thumbnail Size Converter | Wondershare Filmora | Third-Party Software | |
| ————————————————– | ——————————————- | ———————– | ———————— | ——– |
| Other Software Required or Not | No | Yes (Internet Browser) | Yes | Yes |
| Internet Connection Required | No | Yes | No | No |
| Complexity of Operations | Easy | Easy | Easy | Moderate |
| Support Other Editing of the YouTube Thumbnail | No | No | Yes | Yes |
| File Size Limit | None | 25MB | None | None |
Resizing YouTube thumbnails using the Windows default app is a quick and easy method that requires no additional software or tools. However, the quality of the resized thumbnail may improve if the original image is low resolution, and this method is only suitable for users on Windows operating systems.
Online YouTube thumbnail size converters are convenient and easy to use, and they can be accessed from any device with an internet connection. They also typically preserve the quality of the original image. However, some online converters may have size limits or require a subscription to unlock all features, and using an online converter can be slower than using a dedicated software tool.
Using Wondershare Filmora allows you to create and edit YouTube thumbnails within a single application, which can be a time-saving advantage if you’re already using Filmora for other video editing tasks. However, Filmora is a paid software, so there is a cost associated with using it, and it may have a steeper learning curve for users new to video editing.
Image editing programs like GIMP offer many features and tools for customizing your thumbnail, including adding text, applying filters, and making more extensive edits beyond simply resizing the image. They also typically offer more control over the quality and appearance of the resized thumbnail.
However, using a third-party image editing program may require a learning curve and maybe more time-consuming than other methods, and there may be a cost associated with purchasing the software.
Each of the four methods for resizing YouTube thumbnails has its pros and cons, and the best method will depend on the user’s specific needs and preferences.
Conclusion
This article explored four methods for resizing YouTube thumbnails: using the Windows default app, online converters, Wondershare Filmora, and image editing programs like GIMP. Each method has advantages and disadvantages; the best one depends on your specific needs and preferences. No matter your chosen method, you can resize YouTube thumbnails confidently with these tools and techniques.
Free Download For macOS 10.14 or later
Here is the step-by-step tutorial on how to use Filmora in resizing your YouTube thumbnail. It is divided into two parts:
1. Take a Snapshot as the Thumbnail with Filmora
Step1 Open the video in the timeline, click the play icon in the player window, and pause when you reach the desired frame for the YouTube thumbnail. Click the camera icon to take a snapshot.
Step2 In the snapshot window, choose to save the snapshot as a PNG or JPG file.
Step3 Select the output storage location and click OK.
2. Resize the YouTube Thumbnail
Step1 Import the image into the app timeline.
Step2 Drag and drop the image into the timeline and click the green “Export“ button. In the popup Export window, select GIF. Next, click “Settings“ to adjust the resolution.
Step3 As the recommended size of a YouTube Thumbnail is 1280 * 720 pixels, you can set the resolution to 1280 * 720. Then click Apply and Export the GIF. You can now upload the GIF thumbnail to your YouTube account.
Method 4. Convert Images to YouTube Thumbnail Using Third-Party Software
In addition to using dedicated video editing software, several third-party image editing programs can be used to resize images for use as YouTube thumbnails. Programs like GIMP are popular for this purpose, as it offers a wide range of tools and features for editing and resizing images.
This program allows you to import an image, resize it to the dimensions required for a YouTube thumbnail (typically 1280 x 720 pixels), and save the edited version to your desired location. Using an image editing program can be a good option if you need more control over the appearance of your thumbnail or if you want to make more extensive edits beyond simply resizing the image.
To resize an image using an image editing program like GIMP, follow these steps:
Step1 Install and launch GIMP on your computer.
Step2 Click on “File“ > “Open,” then search for the file you want to resize.
Step3 Click on “Image“ > “Scale Image“ and make sure that the resolution is 1920 by 1080.
Step4 Click on “File“ > “Export As“ and toggle the “Select File Type (By Extension)“ option. Choose JPG/JPEG format because it can compress the thumbnail enough to stay within the limit of 2 megabytes.
Step5 You can change the quality of the image and click the “Export“ button to save the thumbnail.
Comparison of These 4 YouTube Thumbnail Resizing Methods
Now that we’ve explored the four methods for resizing YouTube thumbnails, it’s time to compare the pros and cons of each method. In this section, we’ll consider factors such as ease of use, speed, quality, cost, and compatibility to help you determine the best option for your needs.
Take a look at the table below for a more detailed comparison.
| | Windows Default App | Online YouTube Thumbnail Size Converter | Wondershare Filmora | Third-Party Software | |
| ————————————————– | ——————————————- | ———————– | ———————— | ——– |
| Other Software Required or Not | No | Yes (Internet Browser) | Yes | Yes |
| Internet Connection Required | No | Yes | No | No |
| Complexity of Operations | Easy | Easy | Easy | Moderate |
| Support Other Editing of the YouTube Thumbnail | No | No | Yes | Yes |
| File Size Limit | None | 25MB | None | None |
Resizing YouTube thumbnails using the Windows default app is a quick and easy method that requires no additional software or tools. However, the quality of the resized thumbnail may improve if the original image is low resolution, and this method is only suitable for users on Windows operating systems.
Online YouTube thumbnail size converters are convenient and easy to use, and they can be accessed from any device with an internet connection. They also typically preserve the quality of the original image. However, some online converters may have size limits or require a subscription to unlock all features, and using an online converter can be slower than using a dedicated software tool.
Using Wondershare Filmora allows you to create and edit YouTube thumbnails within a single application, which can be a time-saving advantage if you’re already using Filmora for other video editing tasks. However, Filmora is a paid software, so there is a cost associated with using it, and it may have a steeper learning curve for users new to video editing.
Image editing programs like GIMP offer many features and tools for customizing your thumbnail, including adding text, applying filters, and making more extensive edits beyond simply resizing the image. They also typically offer more control over the quality and appearance of the resized thumbnail.
However, using a third-party image editing program may require a learning curve and maybe more time-consuming than other methods, and there may be a cost associated with purchasing the software.
Each of the four methods for resizing YouTube thumbnails has its pros and cons, and the best method will depend on the user’s specific needs and preferences.
Conclusion
This article explored four methods for resizing YouTube thumbnails: using the Windows default app, online converters, Wondershare Filmora, and image editing programs like GIMP. Each method has advantages and disadvantages; the best one depends on your specific needs and preferences. No matter your chosen method, you can resize YouTube thumbnails confidently with these tools and techniques.
Skyrocket Your YouTube Dollars with Short Video Monetization
YouTube Shorts have grown in popularity since the launch of the platform in 2021. At first, they offered a way for creators to share their content in a vertical format. However, YouTube Shorts monetization is also a great way for creators to earn money. When you monetize YouTube shorts, you increase the potential of earning more income on the platform. In this article, we explore what entails monetized YouTube shorts and how to increase your YT shorts earnings.
YouTube Shorts Monetization A cross-platform offers useful features for making your YouTube videos stand out to earn more revenue!
Free Download Free Download Learn More

Part 1. YouTube Shorts Monetization: Eligibility Criteria
With short monetization options, you can monetize your short-firm content by joining the YouTube Partner Program (YPP). Being a member of this program gives you access to all tools for making money on YouTube. This includes the ability to place ads on your videos or make money directly from your audience through fan funding.
Eligibility Requirements for Monetizing Shorts
The easiest way to monetize Shorts on YouTube is to access the fan-funding program. This program gives you access to special tools that you can use to generate revenue by interacting with views. This is a great option for creators who primarily make short-form videos. The requirements for this option are as follows:
- At least 500 subscribers to your channels
- At least 3 public video uploads in the last 90 days
- At least 3,000 public watch hours in the last 365 days, or
- At least 3 million public Shorts views in the last 90 days

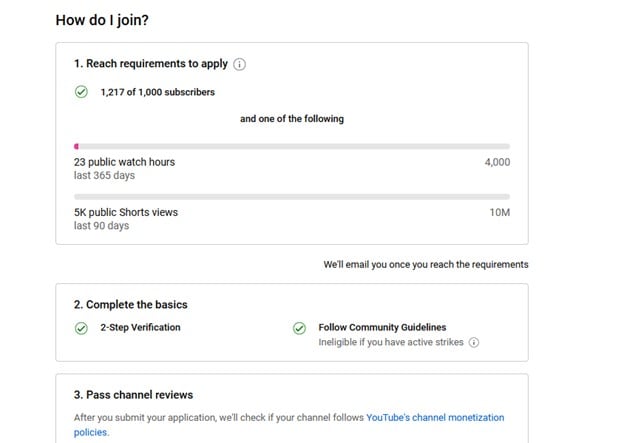
Eligibility for Monetizing Shorts and Videos
The other way you can monetize shorts is by accessing ad revenue and fan-funding. With this option, you will generate income from ads that appear between Shorts in addition to interacting with viewers. This is a great option for creators who make long and short videos. The requirements for this include:
- At least 1,000 subscribers to your channels
- At least 4,000 public watch hours in the last 365 days, or
- At least 10 million valid public Shorts views in the last 90 days
Additional Guidelines for Creators
Once you meet the eligibility criteria, you will be required to follow certain guidelines or policies to continue earning. The additional guidelines include:
- Follow YouTube’s Advertiser-Friendly Content Guidelines
- Make sure your channel does not have active Community Guidelines Strikes
- Live in a region where the program is available
- Avoid uploading another creator’s content by transforming the content or adding a new perspective to it
- Avoid using unedited clips from TV shows or movies that you don’t have rights to
- Don’t pay for fake or automated views
- Turn on 2-Step verification for your Google Account
- Have an active AdSense account
- Have access to advanced YouTube features by verifying your identity
Part 2. Monetizing YouTube Shorts: Step-by-Step Guide
Can you monetize YouTube shorts? Yes, in more than one way. The easiest is through the ad-revenue sharing model. Follow these steps to become part of the YPP and start monetizing your Shorts on YouTube:
Step 1Sign in to YouTube

Step 2Select YouTube Studio
In the top right of the YouTube page, click on your profile picture. From the pop-up menu that appears, select YouTube Studio.

Step 3In the left menu, Click on Earn

Step 4
If you are eligible for the YPP, you will see an Apply Click on it to go to the next step. If you are not yet eligible, click the Get Notified button to be notified once your channel becomes eligible. That’s when you will have the opportunity to finish the application process.
Step 5
Click Start to review and accept YouTube’s Base terms.

Step 6
Link your existing AdSense account if you have one. If not. Click Start to set up a new one.

Step 7
Wait for YouTube to review and approve your application. The process will normally take a month. Once you are approved for the YPP, go to the Earn section in YouTube Studio. Then accept the Shorts Monetization Module. This will allow you to access ads and other money-making tools on YouTube.

The instructions shared above are for applying for the YPP using a computer or desktop. You will still follow the same steps when using a mobile device, but you will do so using the YouTube Studio app.
The money-making feature monetizes Shorts in exciting ways. To start monetizing with Super Thanks fan funding, click Supers on the Earn tab in YouTube Studio. Then click Get Started, and follow the presented prompts. The same process is applicable for Channel Memberships, and other fan-funding options.
Part 3. YouTube Shorts Monetization: A Realistic Look at Earnings Potential
Monetizing YouTube Shorts has the potential to make decent earnings. Although the amount is not as much as a long-form videos, it is a great way of making money on YouTube quickly. Most YouTube Shorts creators agree that the revenue per thousand views (RPM) for short-form content is currently around $0.05 - $0.07. This means that for a million Shorts views, you will make $50 - $70.
Factors That Influence Earnings
The amount of money you make on YouTube Shorts is not fixed. It will depend on several factors, including the revenue channel and your interactions with viewers
- Ad revenue: A higher view count on Shorts increases ad revenue from the ads that are between Shorts on the platform.
- Viewer engagement: Viewer engagement brings in additional revenue through features like Super Thanks.
- Number of monetized Shorts: Monetizing most of your short-form videos will increase the revenue generated.
- Shopping Revenue: How well you promote your products and the set price point of the products will determine the shopping revenue generated.
Examples of Creators Who Have Earned from Shorts
The revenue-sharing program is the easiest way for creators to earn money on YouTube. Since monetizing their Shorts, these creators earned some decent bonus amounts:
- Hassan Khadair (2.1 million subscribers) - Earned $872.14 in ads from 22 million Shorts views
- Riley Lemon (84,000 subscribers) - Earned $76.23 in ads from 1.9 million Shorts views
- James Seo (573,000 subscribers) - Earned $445.09 in ads from 10.3 million Shorts views
- Matthew King (212,000 subscribers) - Earned $163.73 in ads from 4.2 million Shorts views
Part 4. Editing YouTube Shorts with WonderShare to Boost Revenue Potential
The best way to reap big from Shorts YouTube monetization is to make quality videos that will go viral easily. Videos that generate more views will earn you more revenue and increase the number of subscribers within a short time. With Wondershare Filmora, making such videos is easy. The video editing software offers useful features for making your videos stand out. From jaw-dropping sports videos to cinema-like production, the choice of options is endless.
Free Download For Win 7 or later(64-bit)
Free Download For macOS 10.14 or later
The choice of Filmora features you use on your editing projects will depend on your goals. Here are a few favorites to get you started:
1. Auto Reframe
Before uploading a short-form video on YouTube, you want to make sure it is of the right resolution. The Auto Reframe feature on Filmora allows you to instantly resize your videos while keeping all the important details. You only need to record one video for all platforms, and edit to fit with auto reframe.
2. Text to Speech
Narration is an important aspect of YouTube Shorts. You can tell what is happening in the clip in the simplest way for your audience to understand. The Text to Speech (TTS) feature on Filmora allows you to convert your text files to voice-over. This makes your Shorts video more entertaining and enriched with more elements.
3. AI Portrait
Just like other vertical social media videos, Shorts require some bit of personalization. You may want to add a bit of elements or filters. The AI Portrait feature automatically removes background with high accuracy to further enhance your videos. It also comes with over 70 portrait and sticker effects to bring out the mood you are going after. Automatically recognize the faces of your subjects and add AR stickers on the go.
Conclusion
YouTube Shorts have become immensely popular. They tend to have a higher ROI and receive more engagement compared to long-form video content. This makes vertical short-form videos more important and lucrative for content creators. When it comes to YouTube short video monetization, posting quality videos is the key ingredient. We recommend using Wondershare FIlmora to edit your videos. This will make sure they are more entertaining and keep more people engaged.
Free Download Free Download Learn More
Part 1. YouTube Shorts Monetization: Eligibility Criteria
With short monetization options, you can monetize your short-firm content by joining the YouTube Partner Program (YPP). Being a member of this program gives you access to all tools for making money on YouTube. This includes the ability to place ads on your videos or make money directly from your audience through fan funding.
Eligibility Requirements for Monetizing Shorts
The easiest way to monetize Shorts on YouTube is to access the fan-funding program. This program gives you access to special tools that you can use to generate revenue by interacting with views. This is a great option for creators who primarily make short-form videos. The requirements for this option are as follows:
- At least 500 subscribers to your channels
- At least 3 public video uploads in the last 90 days
- At least 3,000 public watch hours in the last 365 days, or
- At least 3 million public Shorts views in the last 90 days
Eligibility for Monetizing Shorts and Videos
The other way you can monetize shorts is by accessing ad revenue and fan-funding. With this option, you will generate income from ads that appear between Shorts in addition to interacting with viewers. This is a great option for creators who make long and short videos. The requirements for this include:
- At least 1,000 subscribers to your channels
- At least 4,000 public watch hours in the last 365 days, or
- At least 10 million valid public Shorts views in the last 90 days
Additional Guidelines for Creators
Once you meet the eligibility criteria, you will be required to follow certain guidelines or policies to continue earning. The additional guidelines include:
- Follow YouTube’s Advertiser-Friendly Content Guidelines
- Make sure your channel does not have active Community Guidelines Strikes
- Live in a region where the program is available
- Avoid uploading another creator’s content by transforming the content or adding a new perspective to it
- Avoid using unedited clips from TV shows or movies that you don’t have rights to
- Don’t pay for fake or automated views
- Turn on 2-Step verification for your Google Account
- Have an active AdSense account
- Have access to advanced YouTube features by verifying your identity
Part 2. Monetizing YouTube Shorts: Step-by-Step Guide
Can you monetize YouTube shorts? Yes, in more than one way. The easiest is through the ad-revenue sharing model. Follow these steps to become part of the YPP and start monetizing your Shorts on YouTube:
Step 1Sign in to YouTube
Step 2Select YouTube Studio
In the top right of the YouTube page, click on your profile picture. From the pop-up menu that appears, select YouTube Studio.
Step 3In the left menu, Click on Earn
Step 4
If you are eligible for the YPP, you will see an Apply Click on it to go to the next step. If you are not yet eligible, click the Get Notified button to be notified once your channel becomes eligible. That’s when you will have the opportunity to finish the application process.
Step 5
Click Start to review and accept YouTube’s Base terms.
Step 6
Link your existing AdSense account if you have one. If not. Click Start to set up a new one.
Step 7
Wait for YouTube to review and approve your application. The process will normally take a month. Once you are approved for the YPP, go to the Earn section in YouTube Studio. Then accept the Shorts Monetization Module. This will allow you to access ads and other money-making tools on YouTube.
The instructions shared above are for applying for the YPP using a computer or desktop. You will still follow the same steps when using a mobile device, but you will do so using the YouTube Studio app.
The money-making feature monetizes Shorts in exciting ways. To start monetizing with Super Thanks fan funding, click Supers on the Earn tab in YouTube Studio. Then click Get Started, and follow the presented prompts. The same process is applicable for Channel Memberships, and other fan-funding options.
Part 3. YouTube Shorts Monetization: A Realistic Look at Earnings Potential
Monetizing YouTube Shorts has the potential to make decent earnings. Although the amount is not as much as a long-form videos, it is a great way of making money on YouTube quickly. Most YouTube Shorts creators agree that the revenue per thousand views (RPM) for short-form content is currently around $0.05 - $0.07. This means that for a million Shorts views, you will make $50 - $70.
Factors That Influence Earnings
The amount of money you make on YouTube Shorts is not fixed. It will depend on several factors, including the revenue channel and your interactions with viewers
- Ad revenue: A higher view count on Shorts increases ad revenue from the ads that are between Shorts on the platform.
- Viewer engagement: Viewer engagement brings in additional revenue through features like Super Thanks.
- Number of monetized Shorts: Monetizing most of your short-form videos will increase the revenue generated.
- Shopping Revenue: How well you promote your products and the set price point of the products will determine the shopping revenue generated.
Examples of Creators Who Have Earned from Shorts
The revenue-sharing program is the easiest way for creators to earn money on YouTube. Since monetizing their Shorts, these creators earned some decent bonus amounts:
- Hassan Khadair (2.1 million subscribers) - Earned $872.14 in ads from 22 million Shorts views
- Riley Lemon (84,000 subscribers) - Earned $76.23 in ads from 1.9 million Shorts views
- James Seo (573,000 subscribers) - Earned $445.09 in ads from 10.3 million Shorts views
- Matthew King (212,000 subscribers) - Earned $163.73 in ads from 4.2 million Shorts views
Part 4. Editing YouTube Shorts with WonderShare to Boost Revenue Potential
The best way to reap big from Shorts YouTube monetization is to make quality videos that will go viral easily. Videos that generate more views will earn you more revenue and increase the number of subscribers within a short time. With Wondershare Filmora, making such videos is easy. The video editing software offers useful features for making your videos stand out. From jaw-dropping sports videos to cinema-like production, the choice of options is endless.
Free Download For Win 7 or later(64-bit)
Free Download For macOS 10.14 or later
The choice of Filmora features you use on your editing projects will depend on your goals. Here are a few favorites to get you started:
1. Auto Reframe
Before uploading a short-form video on YouTube, you want to make sure it is of the right resolution. The Auto Reframe feature on Filmora allows you to instantly resize your videos while keeping all the important details. You only need to record one video for all platforms, and edit to fit with auto reframe.
2. Text to Speech
Narration is an important aspect of YouTube Shorts. You can tell what is happening in the clip in the simplest way for your audience to understand. The Text to Speech (TTS) feature on Filmora allows you to convert your text files to voice-over. This makes your Shorts video more entertaining and enriched with more elements.
3. AI Portrait
Just like other vertical social media videos, Shorts require some bit of personalization. You may want to add a bit of elements or filters. The AI Portrait feature automatically removes background with high accuracy to further enhance your videos. It also comes with over 70 portrait and sticker effects to bring out the mood you are going after. Automatically recognize the faces of your subjects and add AR stickers on the go.
Conclusion
YouTube Shorts have become immensely popular. They tend to have a higher ROI and receive more engagement compared to long-form video content. This makes vertical short-form videos more important and lucrative for content creators. When it comes to YouTube short video monetization, posting quality videos is the key ingredient. We recommend using Wondershare FIlmora to edit your videos. This will make sure they are more entertaining and keep more people engaged.
Also read:
- [New] 2024 Approved Flawless Frameworks Premium Webcams for Your Podcasts
- [New] Craft Compelling Videos Utilize No-Cost Templates & Samples
- [New] Crafting an Impactful Online Presence with Perfect YT Dimensions
- [New] Discover 7 Unforgettable Marriage Videos on Vimeo
- [New] In 2024, Conquer & Cease The Unremovable Guide to Youtube Shorts
- [Updated] A Beginner's Blueprint for Bolstering YouTube Believers for 2024
- [Updated] Dive Deep Into the World of Facebook Story Creation Expert Advice Inside for 2024
- 1. Optimize Your Site: Advanced Configuration Techniques
- 4 Ways to Transfer Music from OnePlus 12R to iPhone | Dr.fone
- Effective Solutions for Non-Working Logitech G230 Mic – A Comprehensive Guide
- Evolution of Innovation: Identifying a Revolutionary 5G Application Surpassing Traditional Connectivity Boundaries | ZDNet
- In 2024, 4 Ways to Transfer Music from Oppo K11x to iPhone | Dr.fone
- In 2024, Cut, Trim & Enhance YouTube Editing Tips for the Rookie
- In 2024, Deciphering YouTube's Subscriber Code
- In 2024, Digital Detox Ignoring Negativity on YouTube
- In 2024, How To Do Vivo T2 5G Screen Sharing | Dr.fone
- Round Table of Angles Samsung vs LG Camera Debate for 2024
- Strategizing for Successful YouTube Ad Sponsorships with FameBit
- YouTube Channels for Filmmakers to Learn Filmmaking Tips
- Title: Crafting Captivating Thumbnails A Comprehensive Guide for YouTube Creators
- Author: Steven
- Created at : 2025-02-09 18:14:37
- Updated at : 2025-02-11 00:46:55
- Link: https://youtube-clips.techidaily.com/crafting-captivating-thumbnails-a-comprehensive-guide-for-youtube-creators/
- License: This work is licensed under CC BY-NC-SA 4.0.