:max_bytes(150000):strip_icc()/GettyImages-1182646353-592e5ea20e2846d7b84b9d60e2b5a92c.jpg)
Crafting an Impactful Online Presence with Perfect YT Dimensions for 2024
Crafting an Impactful Online Presence with Perfect YT Dimensions
Best YouTube Banner Size and Channel Art Dimension (The Ultimate Guide)

Richard Bennett
Oct 26, 2023• Proven solutions
YouTube is a social platform that relies on visually exciting material to attract the audience. Just like a book with an appealing cover compels a person to pick it up and read, it is significant to display and advertise your YouTube channel in a way that makes viewers click and browse through the channel.
Despite creating a beautiful banner on your desktop screen, it might end up distorted on a mobile screen if the recommended sizes for all kinds of gadgets are not followed. Hence, choosing your YouTube channel art dimension is essential since it is the viewer’s first impression. To commence with, you must be careful about your YouTube banner size and channel art dimensions. Are you wondering how to create the perfect banner or cover photo as we know it? Worry not as we are going to tell you the exact details to achieve an ideal YouTube banner size that fits all devices from computers to phones.
- Part 1: The Recommended YouTube Banner Size
- Part 2: The Best YouTube Banner Size on Different Devices
- Part 3: The Best YouTube Video Maker–Wondershare Filmora
Part 1: The Recommended YouTube Banner Size
According to YouTube’s official standards, the recommended banner size is 2560×1440 pixels. However, the minimum image dimensions are 2048×1152 pixels. To ensure that your text is visible regardless of the screen size, sticking to the “safe area” of 2560×423 pixels is the best option. Why are these sizes significant? Well, it’s essential to keep in mind the fact that people worldwide will be using different kinds of gadgets to access YouTube, and it is crucial to optimize your YouTube banner size for it to be ideal.
Part 2: The Best YouTube Banner Size on Different Devices
For the best results on all devices, your YouTube banner size should be:
YouTube Channel Art/Banner Dimensions Displayed on TVs
2560 x 1440 px
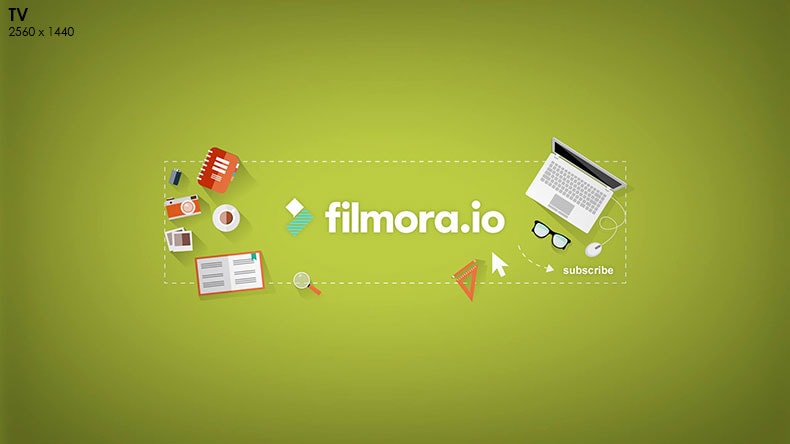
YouTube will display your entire channel art on TVs
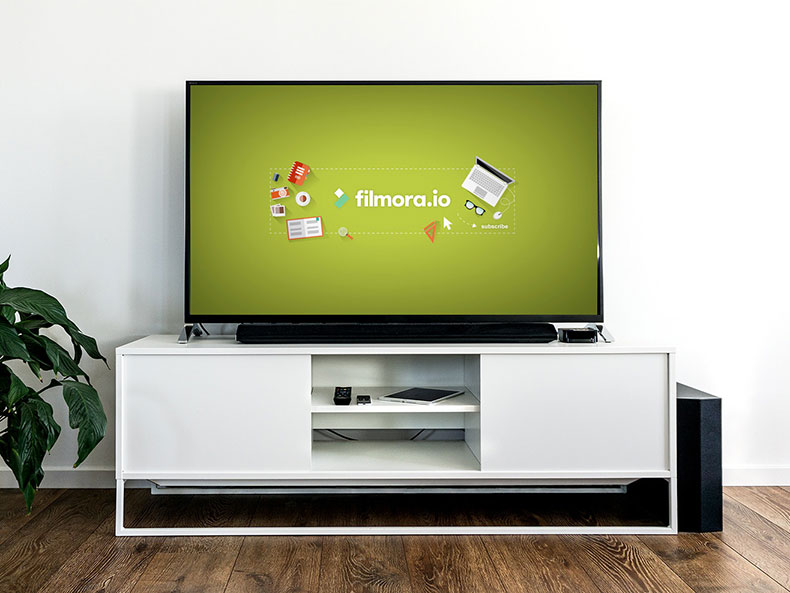
Here’s what our YouTube channel art example would look like on a TV.
YouTube Channel Art/Banner Dimensions Displayed on Smaller Desktop Monitors and Mobile Phones
1546 x 423 px
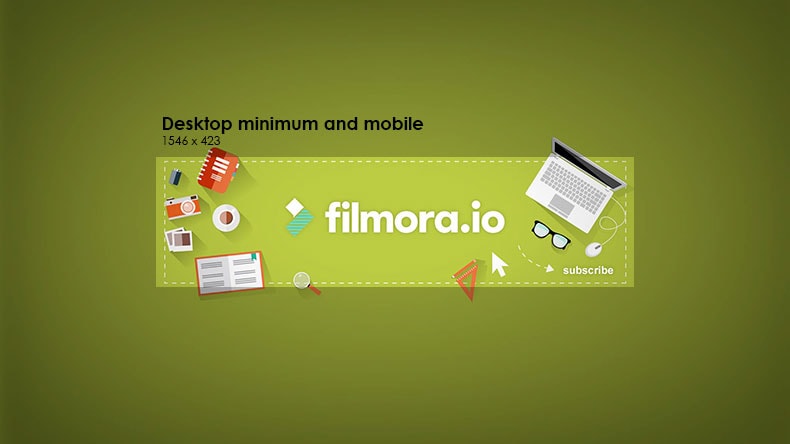
On small desktop monitors and mobile devices, YouTube will display less than 20% of your entire channel art, the center area measuring a width of 1546 pixels and a height of 423 pixels. You want to make sure that your text and logo make it into this part.

Here’s what our YouTube channel art example would look like on a mobile phone.
YouTube Channel Art/Banner Dimensions Displayed on Tablets
1855 x 423 px
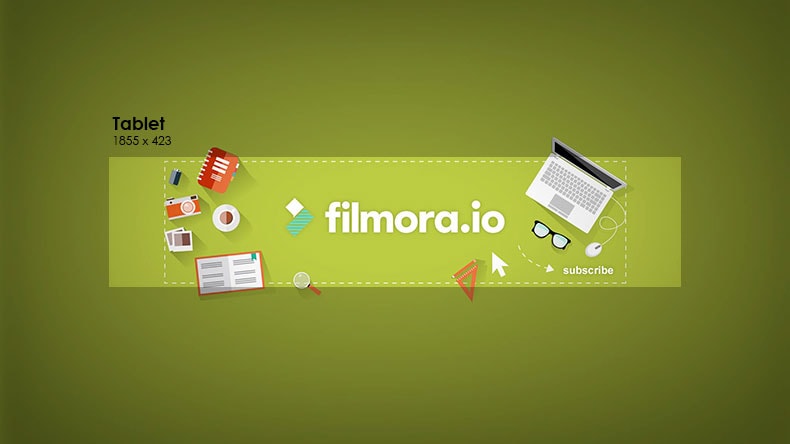
On tablet devices, YouTube will display around 20% more of your channel art, just to the sides of your smaller desktop monitor and mobile device area.

Here’s what our YouTube channel art example would look like on a tablet device.
YouTube Channel Art/Banner Dimensions Displayed on Larger Desktop Monitors
2560 x 423 px
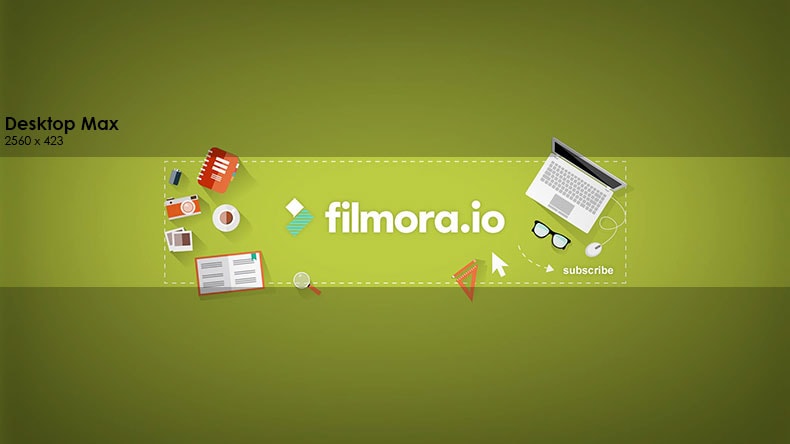
On larger desktop monitors, YouTube will display the entire width of your channel art but not the upper and lower part.

Here’s what our YouTube channel art example would look like on a large desktop monitor.
By following these dimensions in the design of your YouTube channel art/banner, you can be sure to have a responsive image that works best across different devices.
Have you ever had trouble with your YouTube banner size?
If you’d like to make your own channel art, check out our list of Top 9 YouTube Channel Art Makers .
Part 3: The Best YouTube Video Maker–Wondershare Filmora
Want to create a spectacular YouTube video with excellent graphics but lack the expertise? Don’t stress! Wondershare Filmora is here to save the day with its incredible video editing features. Despite the professional outcome it provides, it has been customized for easy use by the beginners.


Key Features:
- Supports GIF and 4K Resolution with advanced text editing features.
- Directly import files from any social media platform, for example, Facebook.
- Transform your video by layering multiple video clips and adding titles, filters, and overlays.
- Time-lapse, noise reduction, and split-screen preset available.
Compatibility:
- Windows: Microsoft Windows 7/Windows 8/Windows 10 (64 bit OS recommended).
- Processor: Intel i3 or better multicore processor, 2GHz or above.
- RAM: 4 GB RAM (8GB required for HD and 4K videos).
To Sum Up
So, are you ready to optimize your channel by following the YouTube banner size’s basic requirements? We hope you are now aware of the importance your YouTube channel art dimension has.
Also, for your channel to be distinctive and attractive enough, it must be edited, which is now relatively easy through video editing apps like the Wondershare Filmora. What are you waiting for? Invest in this pocket-friendly application to create stunning videos in no time and take your channel to the next level.
Richard Bennett
Richard Bennett is a writer and a lover of all things video.
Follow @Richard Bennett
Richard Bennett
Oct 26, 2023• Proven solutions
YouTube is a social platform that relies on visually exciting material to attract the audience. Just like a book with an appealing cover compels a person to pick it up and read, it is significant to display and advertise your YouTube channel in a way that makes viewers click and browse through the channel.
Despite creating a beautiful banner on your desktop screen, it might end up distorted on a mobile screen if the recommended sizes for all kinds of gadgets are not followed. Hence, choosing your YouTube channel art dimension is essential since it is the viewer’s first impression. To commence with, you must be careful about your YouTube banner size and channel art dimensions. Are you wondering how to create the perfect banner or cover photo as we know it? Worry not as we are going to tell you the exact details to achieve an ideal YouTube banner size that fits all devices from computers to phones.
- Part 1: The Recommended YouTube Banner Size
- Part 2: The Best YouTube Banner Size on Different Devices
- Part 3: The Best YouTube Video Maker–Wondershare Filmora
Part 1: The Recommended YouTube Banner Size
According to YouTube’s official standards, the recommended banner size is 2560×1440 pixels. However, the minimum image dimensions are 2048×1152 pixels. To ensure that your text is visible regardless of the screen size, sticking to the “safe area” of 2560×423 pixels is the best option. Why are these sizes significant? Well, it’s essential to keep in mind the fact that people worldwide will be using different kinds of gadgets to access YouTube, and it is crucial to optimize your YouTube banner size for it to be ideal.
Part 2: The Best YouTube Banner Size on Different Devices
For the best results on all devices, your YouTube banner size should be:
YouTube Channel Art/Banner Dimensions Displayed on TVs
2560 x 1440 px
YouTube will display your entire channel art on TVs
Here’s what our YouTube channel art example would look like on a TV.
YouTube Channel Art/Banner Dimensions Displayed on Smaller Desktop Monitors and Mobile Phones
1546 x 423 px
On small desktop monitors and mobile devices, YouTube will display less than 20% of your entire channel art, the center area measuring a width of 1546 pixels and a height of 423 pixels. You want to make sure that your text and logo make it into this part.
Here’s what our YouTube channel art example would look like on a mobile phone.
YouTube Channel Art/Banner Dimensions Displayed on Tablets
1855 x 423 px
On tablet devices, YouTube will display around 20% more of your channel art, just to the sides of your smaller desktop monitor and mobile device area.
Here’s what our YouTube channel art example would look like on a tablet device.
YouTube Channel Art/Banner Dimensions Displayed on Larger Desktop Monitors
2560 x 423 px
On larger desktop monitors, YouTube will display the entire width of your channel art but not the upper and lower part.
Here’s what our YouTube channel art example would look like on a large desktop monitor.
By following these dimensions in the design of your YouTube channel art/banner, you can be sure to have a responsive image that works best across different devices.
Have you ever had trouble with your YouTube banner size?
If you’d like to make your own channel art, check out our list of Top 9 YouTube Channel Art Makers .
Part 3: The Best YouTube Video Maker–Wondershare Filmora
Want to create a spectacular YouTube video with excellent graphics but lack the expertise? Don’t stress! Wondershare Filmora is here to save the day with its incredible video editing features. Despite the professional outcome it provides, it has been customized for easy use by the beginners.
Key Features:
- Supports GIF and 4K Resolution with advanced text editing features.
- Directly import files from any social media platform, for example, Facebook.
- Transform your video by layering multiple video clips and adding titles, filters, and overlays.
- Time-lapse, noise reduction, and split-screen preset available.
Compatibility:
- Windows: Microsoft Windows 7/Windows 8/Windows 10 (64 bit OS recommended).
- Processor: Intel i3 or better multicore processor, 2GHz or above.
- RAM: 4 GB RAM (8GB required for HD and 4K videos).
To Sum Up
So, are you ready to optimize your channel by following the YouTube banner size’s basic requirements? We hope you are now aware of the importance your YouTube channel art dimension has.
Also, for your channel to be distinctive and attractive enough, it must be edited, which is now relatively easy through video editing apps like the Wondershare Filmora. What are you waiting for? Invest in this pocket-friendly application to create stunning videos in no time and take your channel to the next level.
Richard Bennett
Richard Bennett is a writer and a lover of all things video.
Follow @Richard Bennett
Turbocharge Your YouTube Videos: Swift Render & Transfer Strategies
How to Render and Upload YouTube Videos Faster?
Richard Bennett
Oct 26, 2023• Proven solutions
You’ve shot a video you’re proud of and you can’t wait to post it! But, slow down, you have to edit all your clips together first. And then you have to export your video from the editing program, which can take a while. Then you have to wait for it to upload to YouTube, and once it’s up you have to write your description, add cards, and do a handful of other things.
The period between finishing a video and actually posting it for your subscribers to see can be long and tiresome. A lot of videos have probably died in these stages because their creators ran out of energy and patience.
Don’t let this happen to your videos! Here are 4 ways you can save time and avoid headaches during post-production:
3. Use default descriptions and tags
4. TubeBuddy’s bulk features and tagging tools
1. Create mini-projects
When you have alarge editing project with lots of different titles, animations, clip sequences, and PIP tracks it can get hard to keep track of everything. That’s especially true if you need to go back and make changes. A change to one part of your video could affect other parts of it.
Also, the more complex your video is the longer it will take to render/export.
There is a way you can keep your project more organized, save time making minor adjustments, and speed up rendering: create sub-projects of different segments of your video and import them into your main project as their own clips.
This helps you in 3 ways:
1. If there are a lot of effects it’ll be faster to render a shorter video.
2. If you import your sequence as its own clip you won’t have to worry about adjusting little parts of it whenever you change earlier sections of your video.
3. If you do want to make adjustments to your sequence you can open up your mini-project and change it without affecting anything in your main project.
2. Optimize your upload speed
At home, your videos will upload fastest if all of your internet resources are devoted to the upload. That means you should not have any other windows open on your computer while you are uploading. You should also make sure there aren’t other devices competing for wifi like smart tvs, cell phones, or really fancy coffee makers.
If you have neighbors on the same wifi signal as you and they are online at the same time, this will slow you down too.
Because there is so much that can interfere with wifi, you might want to consider a wired Ethernet cable. Ethernet connections are faster in general, and you won’t have any problems with other devices competing for resources like you get with wifi.
If you’re doing everything you can to optimize your upload speed at home and still find that it takes an unreasonable amount of time to upload videos to YouTube, go somewhere with a better connection. Save your video to a USB drive and take it to a library or college to upload. Connections in these kinds of places tend to be very strong.
3. Use default descriptions and tags
In your Creator Studio, go to Channel > Upload defaults. Here you can write in titles, descriptions, and tags which will automatically be applied to every video you upload.

Note: in the latest YouTube Studio, the upload interface is changed but the main process is similar.

You probably have tags you use for almost every video you post. For example, if your channel is about vegan cooking then every one of your videos is probably tagged ‘vegan’, ‘food’, and ‘cooking’. If you type those tags in here then you don’t have to keep adding them to every new video, and you can still add or remove tags from individual uploads so you aren’t stuck using the exact same set of tags every time.
Similarly, you probably have some default text that goes in the description of every one of your videos (i.e. a link to your personal website or a brief introduction of yourself). If you type in a default description then that text will appear automatically in every new video description and you can just add to it when you need to for individual videos.
Using defaults might only save you a couple of minutes per video, but those minutes add up.
4. TubeBuddy’s bulk features and tagging tools
TubeBuddy is a channel management tool for YouTube. Most of its features are more geared towards very large channels or companies with a YouTube presence, but there are also features that can help small or mid-sized YouTubers save time and stay organized.
Some of these tools include templates for things like cards and end screens and bulk processing tools for when you want to change a lot of things at once. For example, if you wanted to update the links in every card in every one of your videos at once then TubeBuddy could help with that.
Some of TubeBuddy’s best features for growing channels are the tagging features. TubeBuddy will help you discover tags, suggest new tags, and even copy whole lists of tags from rival videos.
There are different levels of pricing for TubeBuddy (including a free version, although it’s very limited) and you get a discount on the Pro version if you have less than 50,000 lifetime views on your channel. It ends up being $4.50USD a month (or $3.60 USD a month if you pay for a year in advance). It’s a good investment for someone who’s starting to see some growth on YouTube, but probably not if you’re still trying to reach milestones like 500 subs or 10,000 views.
You have to work hard to get anywhere on YouTube, but that doesn’t mean you should be toiling away at tedious stuff like typing in the same tags over and over. If you have any time-saving tips then make sure to share them with everyone in the comments!
Remember that your time is valuable =)

If you are using Filmora to edit YouTube videos, you can upload the video to YouTube directly from Filmora without download it again first, which can save you time. Besides, if you don’t want the video to be public, you can change Privacy to unlisted or private in Filmora.
Richard Bennett
Richard Bennett is a writer and a lover of all things video.
Follow @Richard Bennett
Richard Bennett
Oct 26, 2023• Proven solutions
You’ve shot a video you’re proud of and you can’t wait to post it! But, slow down, you have to edit all your clips together first. And then you have to export your video from the editing program, which can take a while. Then you have to wait for it to upload to YouTube, and once it’s up you have to write your description, add cards, and do a handful of other things.
The period between finishing a video and actually posting it for your subscribers to see can be long and tiresome. A lot of videos have probably died in these stages because their creators ran out of energy and patience.
Don’t let this happen to your videos! Here are 4 ways you can save time and avoid headaches during post-production:
3. Use default descriptions and tags
4. TubeBuddy’s bulk features and tagging tools
1. Create mini-projects
When you have alarge editing project with lots of different titles, animations, clip sequences, and PIP tracks it can get hard to keep track of everything. That’s especially true if you need to go back and make changes. A change to one part of your video could affect other parts of it.
Also, the more complex your video is the longer it will take to render/export.
There is a way you can keep your project more organized, save time making minor adjustments, and speed up rendering: create sub-projects of different segments of your video and import them into your main project as their own clips.
This helps you in 3 ways:
1. If there are a lot of effects it’ll be faster to render a shorter video.
2. If you import your sequence as its own clip you won’t have to worry about adjusting little parts of it whenever you change earlier sections of your video.
3. If you do want to make adjustments to your sequence you can open up your mini-project and change it without affecting anything in your main project.
2. Optimize your upload speed
At home, your videos will upload fastest if all of your internet resources are devoted to the upload. That means you should not have any other windows open on your computer while you are uploading. You should also make sure there aren’t other devices competing for wifi like smart tvs, cell phones, or really fancy coffee makers.
If you have neighbors on the same wifi signal as you and they are online at the same time, this will slow you down too.
Because there is so much that can interfere with wifi, you might want to consider a wired Ethernet cable. Ethernet connections are faster in general, and you won’t have any problems with other devices competing for resources like you get with wifi.
If you’re doing everything you can to optimize your upload speed at home and still find that it takes an unreasonable amount of time to upload videos to YouTube, go somewhere with a better connection. Save your video to a USB drive and take it to a library or college to upload. Connections in these kinds of places tend to be very strong.
3. Use default descriptions and tags
In your Creator Studio, go to Channel > Upload defaults. Here you can write in titles, descriptions, and tags which will automatically be applied to every video you upload.
Note: in the latest YouTube Studio, the upload interface is changed but the main process is similar.
You probably have tags you use for almost every video you post. For example, if your channel is about vegan cooking then every one of your videos is probably tagged ‘vegan’, ‘food’, and ‘cooking’. If you type those tags in here then you don’t have to keep adding them to every new video, and you can still add or remove tags from individual uploads so you aren’t stuck using the exact same set of tags every time.
Similarly, you probably have some default text that goes in the description of every one of your videos (i.e. a link to your personal website or a brief introduction of yourself). If you type in a default description then that text will appear automatically in every new video description and you can just add to it when you need to for individual videos.
Using defaults might only save you a couple of minutes per video, but those minutes add up.
4. TubeBuddy’s bulk features and tagging tools
TubeBuddy is a channel management tool for YouTube. Most of its features are more geared towards very large channels or companies with a YouTube presence, but there are also features that can help small or mid-sized YouTubers save time and stay organized.
Some of these tools include templates for things like cards and end screens and bulk processing tools for when you want to change a lot of things at once. For example, if you wanted to update the links in every card in every one of your videos at once then TubeBuddy could help with that.
Some of TubeBuddy’s best features for growing channels are the tagging features. TubeBuddy will help you discover tags, suggest new tags, and even copy whole lists of tags from rival videos.
There are different levels of pricing for TubeBuddy (including a free version, although it’s very limited) and you get a discount on the Pro version if you have less than 50,000 lifetime views on your channel. It ends up being $4.50USD a month (or $3.60 USD a month if you pay for a year in advance). It’s a good investment for someone who’s starting to see some growth on YouTube, but probably not if you’re still trying to reach milestones like 500 subs or 10,000 views.
You have to work hard to get anywhere on YouTube, but that doesn’t mean you should be toiling away at tedious stuff like typing in the same tags over and over. If you have any time-saving tips then make sure to share them with everyone in the comments!
Remember that your time is valuable =)
If you are using Filmora to edit YouTube videos, you can upload the video to YouTube directly from Filmora without download it again first, which can save you time. Besides, if you don’t want the video to be public, you can change Privacy to unlisted or private in Filmora.
Richard Bennett
Richard Bennett is a writer and a lover of all things video.
Follow @Richard Bennett
Also read:
- [New] 2024 Approved First Choice Firefox Recording Packages
- [New] Breaking Down Barriers to Inaccessible YouTube Content
- [New] Enjoy 9 Complete, Uncut Holiday Cine Classics for No Cost
- [New] In 2024, Wealth Accumulation Mr. Beast's Journey
- [Updated] 2024 Approved Journey to Visual Impact with Simple Lenses
- [Updated] In 2024, Top 10 Free Templates for Engaging Presentations and Slideshows
- In 2024, How to Use Google Assistant on Your Lock Screen Of Oppo Reno 11 Pro 5G Phone
- Mastering Time Management for YouTubers with Day Jobs
- The Science and Art Behind Powerful YouTube Thumbnails
- Top 10 YouTube Makeup Gurus for Stunning Looks
- Top-Rated Tablet Computers : Comprehensive Reviews by Tech Experts
- Ultimate Checklist Preparing Your Room and PC for Oculus Rift
- Warmth in Visuals Ideal Winter Backgrounds for YouTube
- Why Is My Realme 11 5G Offline? Troubleshooting Guide | Dr.fone
- Title: Crafting an Impactful Online Presence with Perfect YT Dimensions for 2024
- Author: Steven
- Created at : 2025-02-03 23:07:34
- Updated at : 2025-02-10 18:26:19
- Link: https://youtube-clips.techidaily.com/crafting-an-impactful-online-presence-with-perfect-yt-dimensions-for-2024/
- License: This work is licensed under CC BY-NC-SA 4.0.