
Craft an Inclusive Viewership Strategy for Youtube & Twitch Streaming
Craft an Inclusive Viewership Strategy for Youtube & Twitch Streaming
Youtube Video Maker - Wondershare Filmora
Provide abundant video effects - A creative video editor
Powerful color correction and grading
Detailed tutorials provided by the official channel
As the world has progressed, a great deal has changed, and it has transformed into a digital hub. People have started to use different platforms to entertain themselves, watch their favorite content online, gaming, music, sports, or any other form of entertainment.
Cross-platform streaming is a concept people have started to follow especially when it comes to gaming. The audience has a wide variety of choices when it comes to viewing live content online.
YouTube and Twitch are two major platforms streamers use to publish their content online for their targeted audience. They need to stream their content on YouTube and Twitch simultaneously as it engages a wider range of audiences worldwide, and newer streamers can benefit from it.
In this article
Part 1: How Can You Stream on Twitch and YouTube at the Same Time?
Part 2: How to Multi-stream using Streamlabs Prime
Part 3: Bonus Tips | Enlarge your Live Stream Performance!
Part 1: How Can You Stream on Twitch and YouTube at the Same Time?
To stream simultaneously on multiple platforms, a certain program or application is required to provide you with the required tools to enable you to broadcast your content. Several programs provide the option to stream to multiple websites at the same time e.g., Restream, Streamlabs Prime, and MelonApp.
Restream
Restream.io is a service that provides you with the option to broadcast your content to more than 30 different platforms including Twitch and YouTube. When you log in, you can choose the channels you wish to broadcast on and restream will issue a unique key for you.

After you have selected your desired selection, go to your broadcasting software, and choose Restream.io as your preferred service and insert your unique key provided by Restream.
Restream will let you use their services for free provided you use it with their watermark. It is recommended for newer users but if you wish to remove the watermark and go ad-free you will have to upgrade your plan.
Below is a step-by-step guide to help you stream using Restream.io
Step 1: Sign up or log in
The first step is to sign up on Restream. It will require you to choose a unique username, password and enter a valid email address.
Step 2: Choose your desired Platforms
From the list of different platforms, choose the ones you wish to stream to and add your channels by authorizing with the required credentials. Restream has an option of more than 30 platforms including YouTube, Twitch, Facebook, Twitter, and LinkedIn.

Step 3: Choose your subscription plan
Choose your desired plan that caters to your needs. Keep in mind that Restream is 100% free but free accounts do not come with recording or storage and will show a Restream watermark.

You can remove this watermark by upgrading your subscription plan to a Professional one from the dashboard.
Step 4: Choose the final streaming platforms
Connect all your channels so you can stream from a single platform. Click the platform icon and connect your preferred accounts with Restream.
Step 5: Tweak the settings according to your preference
Set up for streaming preferences and settings along with your streaming software. You can broadcast directly from your browser, multiple members from different locations, from your mobile phone, or even your GoPro. More available streaming features can be found on the Restream Help Center.

Restream also offers a wide range of services including the option to stream pre-recorded videos on Twitch at a preselected time and date. However, there is a caveat that you will not be able to multi-stream after you get an affiliate status on your Twitch channel.
Part 2: How to Multi-stream using Streamlabs Prime
Streamlabs Prime is the premium version of Streamlabs. It provides you with a range of 40+ apps that can also improve the quality of your streams and allow you to multi-stream. It is one of the best streaming software in the game currently.
Many content creators use Streamlabs to simultaneously run their streams on YouTube along with Twitch to grasp a wider range of audiences and get more views. One of the best things about Streamlabs is that you can connect to the broadcast services directly from the program without entering any stream key.
Streamlabs has included the option to Multi Stream on different platforms within its OBS client. Below are the steps required to set you up for streaming on YouTube and Twitch at the same time.
Step 1: Open the settings of your desired client
Click on the gear icon to open the settings on the bottom left of the client, click on the Stream tab where you will see the three main platforms for streaming.
Step 2: Add your preferred platforms
Add YouTube and Twitch by pressing the connect button; you can also add other services as well with the Add Destination feature.

Your stream will automatically be broadcast to all selected platforms when you go live. Although, you will be required to use the premium service of Streamlabs to ensure you can Multistream to different platforms at the same time.

Melon is a web-based service that lets you live-stream onto different platforms at the same time such as YouTube, Twitch, Facebook, and LinkedIn in just a matter of a few clicks. No downloads are required and there are umpteen options of customizations to personalize your feed according to your preference.
You can earn through donations from your live stream and are provided with the best customer support 24/7. Everything is hosted on a cloud-based setup and you can stream and record in 1080p.
Below are the steps to guide you on how to stream using the MelonApp.
Step 1: Login or Sign up
Login or Signup with your credentials into Melon and allow the required permissions i.e., microphone and camera.

Step 2: Choose your subscription plan
Choose your premium plan to avail of multi-streaming along with high-quality broadcasting, unlimited streaming, and tons of customization.

Step 3: Choose your desired platforms
Choose and connect the platforms you want to stream to from the Settings in the top right corner. If you have to reselect, simply click x, and reconnect to a different service.
Step 4: Finalize your preferences
Click on ‘Go Live’ and select the platforms for the current stream you wish to broadcast. Selected platforms will be highlighted.

Step 5: Go live
In the end, click next, put in the title of your stream and its description and you are all set to broadcast your content.
Part 3: Bonus Tips | Enlarge your Live Stream Performance
Now that you know how to stream on Twitch and YouTube, here are some tips to improve your live streams!
Tip # 1: Enhance Your Content
You can enhance your content in multiple ways to grasp a wider audience and get your message all around the globe.
Tip # 2: Introduce Graphics and Transitions
You can use interesting gifs, screens, intros, and outros for your streams. Announcing your streams beforehand can also help build up hype and make people anticipate your feed.
Tip # 3: Work More on Post Production
People stream different content on these streaming platforms including gaming, podcasts, educational and entertainment videos. Editing your content to near perfection is one of the most major aspects of a successful broadcast.
Tip # 4: Use Editing Tools to Make Your Videos Interesting
You can use different editing tools such as Wondershare Filmora which is a great video editing software that allows you to edit, trim, cut, add sounds and apply tons of effects to your content no matter what type or genre it is.
Tip # 5: Add Certain Effects to Appear Professional
You can also introduce motion tracking, keyframing, and use other powerful features, and that too for free using Wondershare Filmora. However, if you wish to go a step further you can always opt for their premium version and transcend into a world of endless options and opportunities to edit and enhance your content.
Tip # 6: Promote Your Content Using Social Media
Multi-streaming helps build up a wider community of fans as it is targeting different sets of people and you can also earn from your streams using advertisements and introducing click-on banners for brand endorsements.
Some platforms also let you promote and manage your merchandise, so it is always a good opportunity for these streaming clients and platforms.
Conclusion
Now you can also monetize your streams and broadcast on different platforms such as YouTube and Twitch at the same time. This will boost your reach and views in a very positive way. You can also tweak your content by editing it and inserting sound effects, gifs, and much more to make it more interesting and catchier.
And by multi-streaming on YouTube and Twitch, you will have a greater chance of being found by gaming sponsors and your growth will not be tied just to a single platform. You can also promote your streams on other social media platforms and your handles as well.
Pre-recorded videos are also a great way to present your content with perfection without any chances of being prone to any potential online mishaps.
As the world has progressed, a great deal has changed, and it has transformed into a digital hub. People have started to use different platforms to entertain themselves, watch their favorite content online, gaming, music, sports, or any other form of entertainment.
Cross-platform streaming is a concept people have started to follow especially when it comes to gaming. The audience has a wide variety of choices when it comes to viewing live content online.
YouTube and Twitch are two major platforms streamers use to publish their content online for their targeted audience. They need to stream their content on YouTube and Twitch simultaneously as it engages a wider range of audiences worldwide, and newer streamers can benefit from it.
In this article
Part 1: How Can You Stream on Twitch and YouTube at the Same Time?
Part 2: How to Multi-stream using Streamlabs Prime
Part 3: Bonus Tips | Enlarge your Live Stream Performance!
Part 1: How Can You Stream on Twitch and YouTube at the Same Time?
To stream simultaneously on multiple platforms, a certain program or application is required to provide you with the required tools to enable you to broadcast your content. Several programs provide the option to stream to multiple websites at the same time e.g., Restream, Streamlabs Prime, and MelonApp.
Restream
Restream.io is a service that provides you with the option to broadcast your content to more than 30 different platforms including Twitch and YouTube. When you log in, you can choose the channels you wish to broadcast on and restream will issue a unique key for you.
After you have selected your desired selection, go to your broadcasting software, and choose Restream.io as your preferred service and insert your unique key provided by Restream.
Restream will let you use their services for free provided you use it with their watermark. It is recommended for newer users but if you wish to remove the watermark and go ad-free you will have to upgrade your plan.
Below is a step-by-step guide to help you stream using Restream.io
Step 1: Sign up or log in
The first step is to sign up on Restream. It will require you to choose a unique username, password and enter a valid email address.
Step 2: Choose your desired Platforms
From the list of different platforms, choose the ones you wish to stream to and add your channels by authorizing with the required credentials. Restream has an option of more than 30 platforms including YouTube, Twitch, Facebook, Twitter, and LinkedIn.
Step 3: Choose your subscription plan
Choose your desired plan that caters to your needs. Keep in mind that Restream is 100% free but free accounts do not come with recording or storage and will show a Restream watermark.
You can remove this watermark by upgrading your subscription plan to a Professional one from the dashboard.
Step 4: Choose the final streaming platforms
Connect all your channels so you can stream from a single platform. Click the platform icon and connect your preferred accounts with Restream.
Step 5: Tweak the settings according to your preference
Set up for streaming preferences and settings along with your streaming software. You can broadcast directly from your browser, multiple members from different locations, from your mobile phone, or even your GoPro. More available streaming features can be found on the Restream Help Center.
Restream also offers a wide range of services including the option to stream pre-recorded videos on Twitch at a preselected time and date. However, there is a caveat that you will not be able to multi-stream after you get an affiliate status on your Twitch channel.
Part 2: How to Multi-stream using Streamlabs Prime
Streamlabs Prime is the premium version of Streamlabs. It provides you with a range of 40+ apps that can also improve the quality of your streams and allow you to multi-stream. It is one of the best streaming software in the game currently.
Many content creators use Streamlabs to simultaneously run their streams on YouTube along with Twitch to grasp a wider range of audiences and get more views. One of the best things about Streamlabs is that you can connect to the broadcast services directly from the program without entering any stream key.
Streamlabs has included the option to Multi Stream on different platforms within its OBS client. Below are the steps required to set you up for streaming on YouTube and Twitch at the same time.
Step 1: Open the settings of your desired client
Click on the gear icon to open the settings on the bottom left of the client, click on the Stream tab where you will see the three main platforms for streaming.
Step 2: Add your preferred platforms
Add YouTube and Twitch by pressing the connect button; you can also add other services as well with the Add Destination feature.
Your stream will automatically be broadcast to all selected platforms when you go live. Although, you will be required to use the premium service of Streamlabs to ensure you can Multistream to different platforms at the same time.
Melon is a web-based service that lets you live-stream onto different platforms at the same time such as YouTube, Twitch, Facebook, and LinkedIn in just a matter of a few clicks. No downloads are required and there are umpteen options of customizations to personalize your feed according to your preference.
You can earn through donations from your live stream and are provided with the best customer support 24/7. Everything is hosted on a cloud-based setup and you can stream and record in 1080p.
Below are the steps to guide you on how to stream using the MelonApp.
Step 1: Login or Sign up
Login or Signup with your credentials into Melon and allow the required permissions i.e., microphone and camera.
Step 2: Choose your subscription plan
Choose your premium plan to avail of multi-streaming along with high-quality broadcasting, unlimited streaming, and tons of customization.
Step 3: Choose your desired platforms
Choose and connect the platforms you want to stream to from the Settings in the top right corner. If you have to reselect, simply click x, and reconnect to a different service.
Step 4: Finalize your preferences
Click on ‘Go Live’ and select the platforms for the current stream you wish to broadcast. Selected platforms will be highlighted.
Step 5: Go live
In the end, click next, put in the title of your stream and its description and you are all set to broadcast your content.
Part 3: Bonus Tips | Enlarge your Live Stream Performance
Now that you know how to stream on Twitch and YouTube, here are some tips to improve your live streams!
Tip # 1: Enhance Your Content
You can enhance your content in multiple ways to grasp a wider audience and get your message all around the globe.
Tip # 2: Introduce Graphics and Transitions
You can use interesting gifs, screens, intros, and outros for your streams. Announcing your streams beforehand can also help build up hype and make people anticipate your feed.
Tip # 3: Work More on Post Production
People stream different content on these streaming platforms including gaming, podcasts, educational and entertainment videos. Editing your content to near perfection is one of the most major aspects of a successful broadcast.
Tip # 4: Use Editing Tools to Make Your Videos Interesting
You can use different editing tools such as Wondershare Filmora which is a great video editing software that allows you to edit, trim, cut, add sounds and apply tons of effects to your content no matter what type or genre it is.
Tip # 5: Add Certain Effects to Appear Professional
You can also introduce motion tracking, keyframing, and use other powerful features, and that too for free using Wondershare Filmora. However, if you wish to go a step further you can always opt for their premium version and transcend into a world of endless options and opportunities to edit and enhance your content.
Tip # 6: Promote Your Content Using Social Media
Multi-streaming helps build up a wider community of fans as it is targeting different sets of people and you can also earn from your streams using advertisements and introducing click-on banners for brand endorsements.
Some platforms also let you promote and manage your merchandise, so it is always a good opportunity for these streaming clients and platforms.
Conclusion
Now you can also monetize your streams and broadcast on different platforms such as YouTube and Twitch at the same time. This will boost your reach and views in a very positive way. You can also tweak your content by editing it and inserting sound effects, gifs, and much more to make it more interesting and catchier.
And by multi-streaming on YouTube and Twitch, you will have a greater chance of being found by gaming sponsors and your growth will not be tied just to a single platform. You can also promote your streams on other social media platforms and your handles as well.
Pre-recorded videos are also a great way to present your content with perfection without any chances of being prone to any potential online mishaps.
Reviving Old YouTube Videos: Steps for Online Reclamation
How to Watch Deleted YouTube Videos Online in 2 Ways | Ultimate Guide

Richard Bennett
Mar 27, 2024• Proven solutions


YouTube features a wide variety of corporate and user-generated content ranging from music to DIY videos. Along with all this massive inflow, there are scenarios where the video content that you like or wanted to watch gets deleted for any reason. Either the uploading channel deleted the video, or YouTube sometimes deletes videos for violating any of the platform’s rules – showing the dismal message “We’re sorry, this video is no longer available”. You’ll be thinking it is probably impossible to access deleted YouTube videos that you wanted to watch so badly. Though it may be true to some extent, in reality, nothing gets deleted from the internet. To help you watch deleted YouTube videos, we’ll dive into the two most handy methods down below. So, let get started.
You might be interested in How to Make a Playlist of Uploaded Videos and Others’ Video on YouTube>>>
- Part 1: Watch Deleted YouTube Videos with a URL
- Part 2: Watch Deleted YouTube Videos without a URL
- Part 3: Bonus Tip—Make Your Own YouTube Video with Wondershare FilmoraX
Part 1: Watch Deleted YouTube Videos with a URL
Internet Archive(known as the Wayback Machine) is a website archival system that has been collecting and cataloging websites since 1996. This means the system has effectively saved the site’s current layout and data. This enormous world archive of the Web’s past has amassed over 100 terabytes of storage with around 10 billion web pages.
On the archive.org website, you can find many of your favorite web site’s “snapshot” at a time in the past. For our case, we need to find and watch deleted YouTube videos, so for that, all we need is the link of the video, and we can most probably find it on archive.org. The steps for finding and restoring deleted YouTube videos are simple and as follows.
1. First of all, find the URL in your YouTube email, channel account if you’re searching for your uploaded video. You can find the link in browser history, in YouTube history, or you may have shared the link on social media.
If you want to watch a deleted YouTube video using the Wayback Machine, you must find the link to the video you want to access; without the URL, you won’t be able to access the deleted YouTube video.
2. Head over to the archive.org website and paste the YouTube video URL in the search bar and press return.
3. Once you find your video on the internet archive, you can see the details of the video.
4. You won’t be able to play the video directly, but you should be able to download it. Right, click the video to find the option to download the video.

This method works mostly as the Wayback machine is pretty active and regularly crawls the web to archive the sites. But sometimes, this method may not work and would require a more sophisticated way to watch deleted YouTube videos.
Part 2: Watch Deleted YouTube Videos without a URL
But what if you don’t have a URL for the deleted YouTube video? The internet is a global village network. Everything on the internet is connected, and that connection makes it more useful for example, even though a YouTube video might be deleted, you can somehow access and watch the deleted YouTube videos without a URL because people always replicate videos and share them on other YouTube channels or social media platforms. To make sure you get to watch your favorite YouTube video again, we will dive into the vast internet and find the deleted YouTube videos.
This method can be a bit complicated and would require you to give full attention to find the video you want to watch that badly that you’ve landed on this article.
1. Open a new tab in your browser and go to the Google search bar. We’re going to employ a technique from the SEO expert’s toolbox – Google Search Operators.
2. In the search bar, type “site:www.youtube.com + name Of TheVideo”
3. This way Google will crawl all the name relevant videos only from the YouTube databases and move us closer to finding our deleted YouTube video.
4. If you know the video was shared by someone on Facebook or any other social media platform, you can change the site URL in the search bar, replacing YouTube with Facebook, for example.
5. Once you find the video URL, you can simply go back to the first method that we discussed and paste the URL into the internet archive. The archive will give you the video and you can enjoy watching a deleted YouTube video.
Note: If you still cannot find the video using this method, I’m sorry to tell you the video may be completely deleted from the server, and you cannot access it anymore.
Part 3: Bonus Tip—Make Your Own YouTube Video with Wondershare Filmora
Want to make a YouTube video again? Wondershare Filmora is a relatively lightweight and powerful platform you get an intuitive interface and the power to create wonderful, unique content. To help you make your own YouTube video with Filmora, we’ll go through a short introduction of the flow and features first:
- Organize media with folders and projects
- Cutting and trimming raw footage
- Unlimited Layering
- Visual effects and filters
- Attach/detach audio and music
- Add creative text and icons with a wide range of templates to choose from
- Advanced color correction tools
- Export videos to YouTube directly and support various output formats
Make a YouTube video with several clicks using Wondershare Filmora:
1. Download and install Wondershare Filmora on your computer by tapping the download wizard below. Remember to join the Wondershare Video Community to connect with other video creators.
2. Launch Wondershare Filmora, add your videos to the Media Library. And you’ll also be greeted with a sleek and simple interface with controls for everything such as transitions, titles, layering clips, soundtrack, and more.

3. Add your video to the timeline, then go to the Titles tab, and you will see hundreds of titles and text templates. Select the template you love and add it to the video.
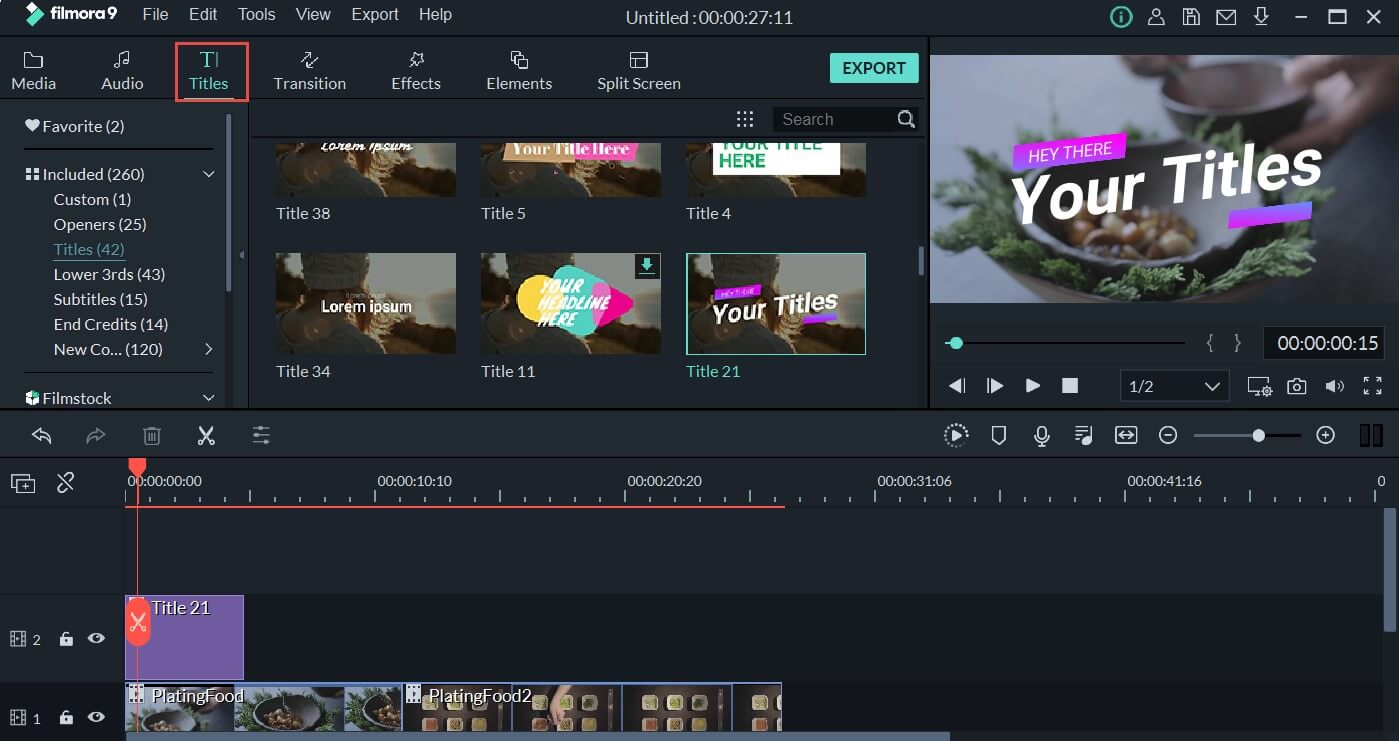
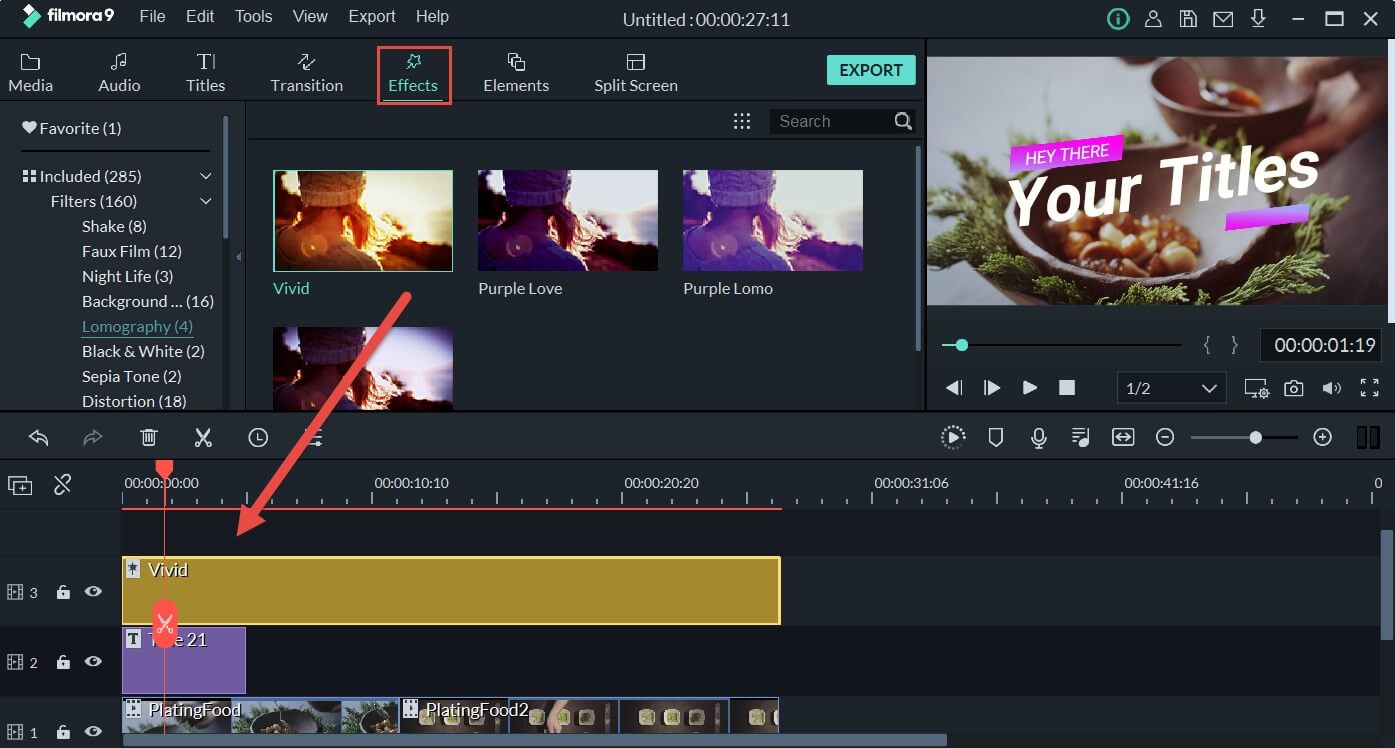
4. Then you can also go to the Effects tab and apply astonishing filters to the video
5. Once you’re done, you can click Export and upload your video to YouTube directly.
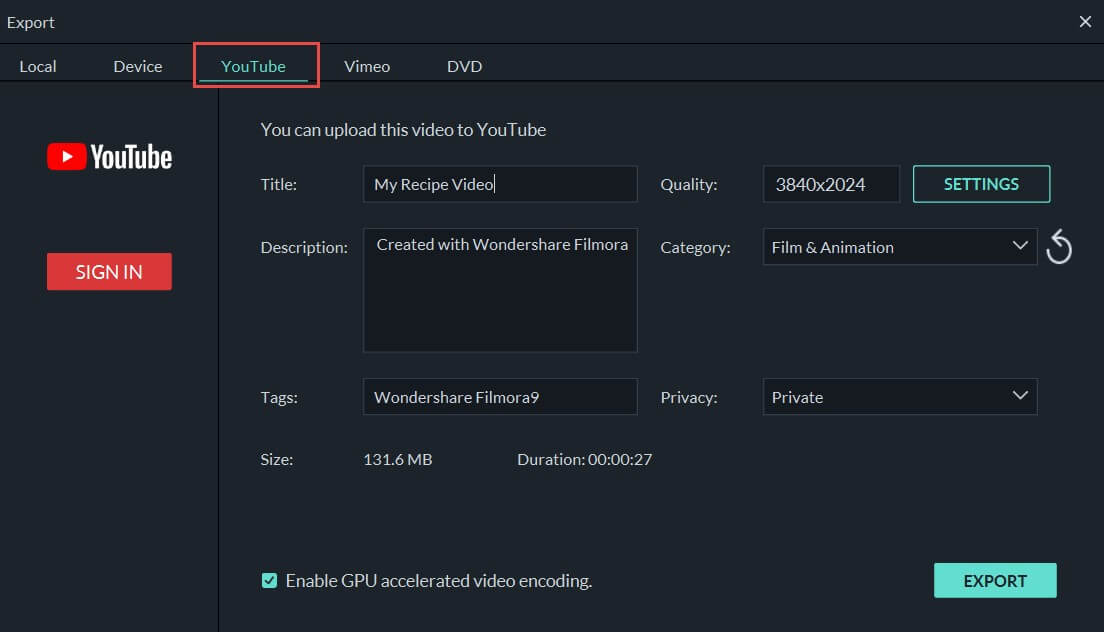
The free version will have a watermark on the exported video.
There’s nothing more delightful than to put your skills to work and save time by using Filmora. The time you save can be put into making more content and editing videos to boast of your creativity to friends.
Conclusion
YouTube has immersed so much in our day-to-day life that on average a mobile viewing session lasts more than 40 mins. To satiate our thirst for video content, YouTube has become the sole free platform. But even if your favorite song or movie gets deleted, you don’t have to worry as I’ve compiled the best solution to watch deleted YouTube videos and even be able to restore deleted YouTube videos to relish watching them with your friends and family. Leave your comments below if you love this article.
Richard Bennett
Richard Bennett is a writer and a lover of all things video.
Follow @Richard Bennett
Richard Bennett
Mar 27, 2024• Proven solutions
YouTube features a wide variety of corporate and user-generated content ranging from music to DIY videos. Along with all this massive inflow, there are scenarios where the video content that you like or wanted to watch gets deleted for any reason. Either the uploading channel deleted the video, or YouTube sometimes deletes videos for violating any of the platform’s rules – showing the dismal message “We’re sorry, this video is no longer available”. You’ll be thinking it is probably impossible to access deleted YouTube videos that you wanted to watch so badly. Though it may be true to some extent, in reality, nothing gets deleted from the internet. To help you watch deleted YouTube videos, we’ll dive into the two most handy methods down below. So, let get started.
You might be interested in How to Make a Playlist of Uploaded Videos and Others’ Video on YouTube>>>
- Part 1: Watch Deleted YouTube Videos with a URL
- Part 2: Watch Deleted YouTube Videos without a URL
- Part 3: Bonus Tip—Make Your Own YouTube Video with Wondershare FilmoraX
Part 1: Watch Deleted YouTube Videos with a URL
Internet Archive(known as the Wayback Machine) is a website archival system that has been collecting and cataloging websites since 1996. This means the system has effectively saved the site’s current layout and data. This enormous world archive of the Web’s past has amassed over 100 terabytes of storage with around 10 billion web pages.
On the archive.org website, you can find many of your favorite web site’s “snapshot” at a time in the past. For our case, we need to find and watch deleted YouTube videos, so for that, all we need is the link of the video, and we can most probably find it on archive.org. The steps for finding and restoring deleted YouTube videos are simple and as follows.
1. First of all, find the URL in your YouTube email, channel account if you’re searching for your uploaded video. You can find the link in browser history, in YouTube history, or you may have shared the link on social media.
If you want to watch a deleted YouTube video using the Wayback Machine, you must find the link to the video you want to access; without the URL, you won’t be able to access the deleted YouTube video.
2. Head over to the archive.org website and paste the YouTube video URL in the search bar and press return.
3. Once you find your video on the internet archive, you can see the details of the video.
4. You won’t be able to play the video directly, but you should be able to download it. Right, click the video to find the option to download the video.
This method works mostly as the Wayback machine is pretty active and regularly crawls the web to archive the sites. But sometimes, this method may not work and would require a more sophisticated way to watch deleted YouTube videos.
Part 2: Watch Deleted YouTube Videos without a URL
But what if you don’t have a URL for the deleted YouTube video? The internet is a global village network. Everything on the internet is connected, and that connection makes it more useful for example, even though a YouTube video might be deleted, you can somehow access and watch the deleted YouTube videos without a URL because people always replicate videos and share them on other YouTube channels or social media platforms. To make sure you get to watch your favorite YouTube video again, we will dive into the vast internet and find the deleted YouTube videos.
This method can be a bit complicated and would require you to give full attention to find the video you want to watch that badly that you’ve landed on this article.
1. Open a new tab in your browser and go to the Google search bar. We’re going to employ a technique from the SEO expert’s toolbox – Google Search Operators.
2. In the search bar, type “site:www.youtube.com + name Of TheVideo”
3. This way Google will crawl all the name relevant videos only from the YouTube databases and move us closer to finding our deleted YouTube video.
4. If you know the video was shared by someone on Facebook or any other social media platform, you can change the site URL in the search bar, replacing YouTube with Facebook, for example.
5. Once you find the video URL, you can simply go back to the first method that we discussed and paste the URL into the internet archive. The archive will give you the video and you can enjoy watching a deleted YouTube video.
Note: If you still cannot find the video using this method, I’m sorry to tell you the video may be completely deleted from the server, and you cannot access it anymore.
Part 3: Bonus Tip—Make Your Own YouTube Video with Wondershare Filmora
Want to make a YouTube video again? Wondershare Filmora is a relatively lightweight and powerful platform you get an intuitive interface and the power to create wonderful, unique content. To help you make your own YouTube video with Filmora, we’ll go through a short introduction of the flow and features first:
- Organize media with folders and projects
- Cutting and trimming raw footage
- Unlimited Layering
- Visual effects and filters
- Attach/detach audio and music
- Add creative text and icons with a wide range of templates to choose from
- Advanced color correction tools
- Export videos to YouTube directly and support various output formats
Make a YouTube video with several clicks using Wondershare Filmora:
1. Download and install Wondershare Filmora on your computer by tapping the download wizard below. Remember to join the Wondershare Video Community to connect with other video creators.
2. Launch Wondershare Filmora, add your videos to the Media Library. And you’ll also be greeted with a sleek and simple interface with controls for everything such as transitions, titles, layering clips, soundtrack, and more.
3. Add your video to the timeline, then go to the Titles tab, and you will see hundreds of titles and text templates. Select the template you love and add it to the video.
4. Then you can also go to the Effects tab and apply astonishing filters to the video
5. Once you’re done, you can click Export and upload your video to YouTube directly.
The free version will have a watermark on the exported video.
There’s nothing more delightful than to put your skills to work and save time by using Filmora. The time you save can be put into making more content and editing videos to boast of your creativity to friends.
Conclusion
YouTube has immersed so much in our day-to-day life that on average a mobile viewing session lasts more than 40 mins. To satiate our thirst for video content, YouTube has become the sole free platform. But even if your favorite song or movie gets deleted, you don’t have to worry as I’ve compiled the best solution to watch deleted YouTube videos and even be able to restore deleted YouTube videos to relish watching them with your friends and family. Leave your comments below if you love this article.
Richard Bennett
Richard Bennett is a writer and a lover of all things video.
Follow @Richard Bennett
Also read:
- 2024 Approved Crafting Illusions with Video Edits
- Affordable Options Selecting the Right Cam for Your Needs for 2024
- 2024 Approved Copycatting Charisma Making Ingenious Parodies
- 2024 Approved Channel Command Center Mastering Your Digital Domain
- Thriving Online Finding Compatible Co-Stars for YouTube
- [Updated] Essential Steps for Seamless YouTube Video Loops
- Audio Anomalies Top Disruptive Apps on the Go
- [New] Break Free From Linearity Mastering Jump Cut Transitions
- 2024 Approved 1-#5 Best Editors Apart From YouTube Platform
- Earning Mastery in Streams A Comprehensive Review for 2024
- In 2024, Effective Color Difference Filters in Film-Making
- In 2024, 2023'S Top Social Moment Infographics
- Effective YouTube Customization for Powerful Endings
- [Updated] Enhancing Engagement Through Thoughtful YouTube Tags
- Key YouTube Policies Every Channel Owner Must Understand
- Avoid YouTube? These Mobile App Alternatives Rank Among the Best for 2024
- Deep Dive Into the Rise of Online Performing Artists
- [New] Blueprinting Engaging Content Layouts on YouTube
- In 2024, Do YouTubers Get Paid Monthly?
- The Art of YouTube Trailers Using Filmora Tools
- Audio Visual Caption Builder
- In 2024, A Comprehensive Guide to Making GIFs From YouTube Tracks
- [Updated] 5 Effective Tricks for YouTube Subscriber Surges
- How Does YouTube Work After a Video Is Uploaded
- Captivating Subscription Making an Animated Button for YouTube with Filmora for 2024
- 2024 Approved Compact Content Leading 5 Services to Compress Video URLs
- Setup Essentials Prepping for a Thriving YouTube Channel
- In 2024, Blogging Basics for Business Beginnings
- [New] Apex Top YouTube Videos Watch Count Heaven
- Dazzling Deception YouTube's Editors Magic Showcase for 2024
- [New] Building Your Brand with a Sports YouTube Chain on macOS
- DJ Delight Choosing Ultimate Event Videos
- 2024 Approved Counterclockwise Content YouTube Replay Methods
- Essential List 7 Cost-Free Video Tags Extractors on YouTube
- Master Your Videos with These 10 Top-Rated Trimmers
- The Ultimate Strategy to Dominate YouTube Via Creator Hub
- Learn to Purge Your Device's YouTube Content Easily
- Simplifying iPhone/iPad Screen Captures for Online Sharing
- [Updated] Elevate Your Visibility with YouTube Branding Techniques
- [New] A Comprehensive Tutorial for Transforming Vids Into Dollars
- 2024 Approved Convert With Ease The Top 10 Best Tools for Flv to YouTubes
- Best 5 Video Editing Platforms That Don't Feature in YouToo for 2024
- Achieve More Engagement on YouTube Learn the Best Thumbnail Size for 2024
- [Updated] Elevating Success Channel Ideas to Spark Momentum
- Quiet Your Screen Three Strategies to Slow YouTube Videos Down (57 Chars)
- [Updated] Cutting-Edge Content Creation Premier Android Editors
- Beat the Heat Tips for Uploading Songs to YouTube for 2024
- Combine Audio Streams Into PowerPoint Flow for 2024
- In 2024, Complete Tutorial to Use GPS Joystick to Fake GPS Location On Realme Note 50 | Dr.fone
- [Updated] Elevating Your Instagram Presence with Optimized Video Sizes
- [Updated] X-Audio Capture PC Version
- Superior Storyteller's Sanctuary
- Complete Review & Guide to Techeligible FRP Bypass and More For OnePlus Ace 2
- In 2024, Here are Some of the Best Pokemon Discord Servers to Join On Vivo Y78+ (T1) Edition | Dr.fone
- Updated In 2024, Inside Splice Video Editor A Close-Up Look at Its Features and Functionality
- How to Get and Use Pokemon Go Promo Codes On Honor 80 Pro Straight Screen Edition | Dr.fone
- Best-in-Class Meme Layout Essentials for 2024
- In 2024, 11 Best Location Changers for Itel A05s | Dr.fone
- In 2024, Additional Tips About Sinnoh Stone For Honor X50i | Dr.fone
- New 2024 Approved 10 Best Video Editing Apps for Creating Mind-Bending Glitch Art on Mobile
- How to Retrieve deleted photos on Oppo
- In 2024, Expert Picks Top Online Vertical Video Editors
- FRP Hijacker by Hagard Download and Bypass your Xiaomi FRP Locks
- Title: Craft an Inclusive Viewership Strategy for Youtube & Twitch Streaming
- Author: Steven
- Created at : 2024-05-25 18:59:23
- Updated at : 2024-05-26 18:59:23
- Link: https://youtube-clips.techidaily.com/craft-an-inclusive-viewership-strategy-for-youtube-and-twitch-streaming/
- License: This work is licensed under CC BY-NC-SA 4.0.
