
"Charting Your Course in the World of YouTube Tracking Success & Monetary Value for 2024"
Charting Your Course in the World of YouTube: Tracking Success & Monetary Value
It’s not the easiest way to earn money online, but YouTube is one of the best ways. YouTube is a powerful channel to promote your video and get more traffic.
The most common question is how much YouTubers earn on 100, 1000, or 10,000 views. We’re going to answer that question in this article and explain how to calculate YouTube views to money.
First off, we’re going to talk about how YouTube works.
Next, we’ll examine the importance of YouTube views, plus how to calculate them.
- Estimated your YouTube earning by YouTube revenue reports
- How much money can you make on YouTube?
- Bonus tip: Increase YouTube earnings with a powerful video editing software
Part 1: The rules to know for each means earning money from YouTube
As a YouTube creator, finding ways to earn money from your content cannot be easy. Some creators make a living solely off their channels. Others supplement their income with affiliate marketing, sponsorships, and ad revenue. But if you want to earn money from YouTube truly, you need to understand which monetization methods work best for you and your content.
Here’s what you should know when using each method and why you should consider doing so:
| Methods | Viewers/Clicks/Impressions | Earnings/Commission |
|---|---|---|
| YouTube Ads $1 CPM | 1 million Ad views | Average rate per ad=0.18Total ~ $5000 |
| Brand Sponsorships | 5K Sub 5K-30K Sub 30K-500K Sub 500K-1M+ Sub | $300 $700 $950 $3500 |
| Affiliate Marketing 30%-35% commission | If 100 people buys $20 product through affiliate link. Total $2000 | $2000*35%= $700 |
| Crowdfunding (Patreon, Indiegogo, GoFundMe) $5 | 100 subscribers funds the channel | 100*5=$500 |
| Merchandise Shelf $5 Shirt | 100 subscribers purchases your merch | 100*5=$500 |
| Channel Memberships $5/month | 100 loyal subscribers join membership | 100*5=$500 |
YouTube Ads
The video ads on the platform aren’t lucrative and can be used to supplement your income in the form of AdSense earnings. An actual advertiser pays 0.18 per ad view on average (as shown above). That means 1000 ad views equals $18 and $3-$5 per 1000 views.
Brand Sponsorships
Brands can sponsor your videos to reach their target audience. YouTube videos are a big part of our lives, and brands are becoming increasingly aware of how useful these videos can be. To be eligible for sponsorship, your channel must be of 5000 subscribers.
Affiliate Marketing
YouTubers help brands increase sales by encouraging their viewers to shop at the company’s store or visit its specific product pages. They then earn a commission (30%-35%) on products that people buy after clicking an affiliate link.
Crowdfunding
Today many people use crowdfunding websites to raise money for personal, channel-related projects. Most YouTubers are doing it to generate steady cash flow. Some of them use this source to fund their YouTube videos so that it increases quality and engagement.
Merchandise Shelf
Your merchandise represents and feeds your audience’s connection with you. Your product is your business, so you’re first and foremost an entrepreneur. Then design your YouTube marketing strategy to sell your merchandise and generate income.
Channel Membership
YouTube has a plan that allows you to charge your subscribers for membership on your YouTube channel. Members get access to exclusive live chats, badges, emojis, etc. Subscribers must give a set amount every month to a channel that makes a steady monthly income for YouTubers.
Part 2: Calculate YouTube income by YouTube Money Calculator
How much money do you earn on YouTube? There is no simple way to answer this question, but a YouTube income calculator can give you a rough estimate. It shows you whether you’re getting enough money to keep producing videos or if you need to look for additional ways of making money from your channel.
The tools below provide a detailed breakdown of the earnings from a specific YouTube video or channel based on audience engagement, views, and other factors.
YouTube Money Calculator

Pros
- Does not ask for much information, just a URL
- It has flexibility to check earnings by channel and video separately
Cons
- Calculate earnings based on views only
How-to-steps
Step1 To check earnings by channel, import the channel URL and click the search icon.

Step2 You’ll see the result showing, ‘Number of total Subscribers’, ‘Number of Total Video Views’, ‘Total estimated earnings’, and ‘Average Earnings per Video’.

Step3 If you want to check earnings by video, below you’ll see another search bar where you can paste the specific video URL.

Step4 The result will show you the ‘Number of Total Video Views’, and ‘Estimated Video earnings’.

Aux mode
Pros
- Easy interface, with a view slider
- Does Not require any information
Cons
- Based on your video view count only
How-to-steps
Go to AUX MODE
Step1 You can type total video views or, increase or decrease total views with the arrows.
Step2 Below you’ll find a slider, you can slide forward to increase views and vice versa.

Step3 On your right, you’ll find estimated results in real time. You can also enter your email address to recieve the result in you inbox.

Tunepocket

Pros
- Slider interface shows real time result
- It shows all results based on views, existing video, and revenue of whole channel
Cons
- None
How-to-steps
Step1 The first calculator on the page is based on daily views. Drag the slider according to your video views and below you’ll find estimated earnings including daily, monthly, and annually.
Step2 Scroll down and you’ll find another calculator that requires specific video URL. Copy and paste the URL of YouTube video and get results based on views.

Step3 The last calculator is about the estimated revenue for a channel. You need to paste the channel URL to find the results. It includes, Number of Total Subscribers, Number of Total Videos, Number of Total Video Views, Channel Title, and Estimated Total Earnings

Part 3: Estimated your YouTube earning by YouTube revenue reports
To better understand the best strategies and tactics to optimize your video content, use YouTube analytic reports to help you get a clearer understanding of how your YouTube channel performs. To check your revenue report:
Step1 Login to your YouTube Studio

Step2 In the left menu, select Analytics.

Step3 From the top menu, select Revenue.

RPM
The RPM is calculated based on how much traffic you’re getting from YouTube compared to all your other sources combined. RPM is calculated as total revenue divided by total views times 1000.
Playback-based CPM
Your CPM (Cost Per Thousand) report tells you how much each ad was worth in terms of the percentage of each play a video was spent. The playback-based CPM report shows your estimated average gross revenue per 1000 playbacks where one or more ads are shown.
Monthly estimated revenue
This is a simple report showing the statistics of your video earnings over the last 6 months. It can fluctuate by invalid traffic, content disputes and ad campaign types.
Revenue sources
You must use this report to see your estimated revenue from each revenue source if you have different revenue sources.
Transaction revenue
The transactions reports show you how much your members and fans have spent in transactions. It shows estimated earnings from channel memberships and merch.
Top-earning videos
This top-earning videos report will show you the most profitable videos and their estimated revenue.
Ad type
If you use different types of Ads for your videos, this report will help you find the percentage of your Ads revenue from each ad type.
Part 4: How much money can you make on YouTube?
The answer to that question can vary widely depending on the type of content you produce and the demographics of your target market. However, we’ve found that a single video ad can be worth anywhere from around $100 to $5,000.
It’s safe to say that most YouTubers earn between $1,000 and $10,000 per month from their ads alone. But there are many other factors to take into consideration when calculating the money, you can make on YouTube:
The number of views your videos get
The key to making money from videos on YouTube is views. The more views you have, the more chance of getting paid will increase. So you need to create videos that will get viewers to click.
According to Forbes’s estimation, you can make $3-$5 per 1000 views. e.g., a video with 1,000,000 views can make around $5,000 on views only.
The engagement level of your audience
When building a YouTube channel, the key to success lies in engaging with your audience. After all, if they don’t like what you’re offering, they will not watch your videos. So you’ve got to have a message that resonates and is useful.
Your channel type
The YouTube algorithm is set up to favor channels with a high volume of views per video and high-quality content rather than low-quality channels that generate a lot of traffic but don’t produce quality videos. So, if you want to increase your revenue from your YouTube videos, try to focus on high-quality content.
Your monetization method
Several monetization methods exist, including Subscription, advertising, affiliate marketing, paid search, and sponsorships. Each monetization method requires a slightly different setup and management, resulting in different revenue.
The country you are in
It is important to know that in some countries, making money off YouTube is extremely difficult. For example, in certain countries, monetizing your videos is impossible without using illegal methods, which will get you into legal trouble.
Some other factors, e.g., it’s worth comparing the RPM of your country and other countries, different rules and prices of YouTube Ads depending on your country.
Bonus tip: Increase YouTube earnings with a powerful video editing software
Are you tired of your boring, run-of-the-mill videos? Are you looking for ways to improve your YouTube earnings? Then let’s look at some of the best editing software to help create your next great content.
Wondershare Filmora is a powerful yet easy-to-use video editing software that makes it easier than ever to make awesome videos. Filmora offers more than 50 cutting-edge tools and effects that make it easier to edit any media source, including videos, photos, and music and share the result in just minutes. Use Filmora’s powerful features like keyframing, motion tracking, split screen, instant mode, VFX, templates etc., to make your video stand out.
Here’s a demo of the software, editing YouTube Shorts:
Free Download For Win 7 or later(64-bit)
Free Download For macOS 10.14 or later
Step1 Open Filmora 11 application.

Step2 Open Project Settings

Step3 Change Aspect Ratio, Resolution, and Frame rate

Step4 Drag video to the timeline

Step5 Right-click and select Crop to Fit

Step6 Right-Click again and select Crop and Zoom

Step7 Adjust the frame

Step8 Lastly Export you file

Bottom line
People want to watch a video when searching for the answers to a question. The best videos are designed to help users accomplish their specific goals while providing them with something they can take away and use for themselves. You need to put up good videos to keep viewers coming back.
To do that, use the game-changing Filmora 11 (mentioned in the article) to create engaging YouTube videos and amaze your audience. Slowly but surely, your audience will increase and then all the guidance in this article will help you easily analyze, calculate and increase your YouTube revenue.
Free Download For Win 7 or later(64-bit)
Free Download For macOS 10.14 or later
Part 1: The rules to know for each means earning money from YouTube
As a YouTube creator, finding ways to earn money from your content cannot be easy. Some creators make a living solely off their channels. Others supplement their income with affiliate marketing, sponsorships, and ad revenue. But if you want to earn money from YouTube truly, you need to understand which monetization methods work best for you and your content.
Here’s what you should know when using each method and why you should consider doing so:
| Methods | Viewers/Clicks/Impressions | Earnings/Commission |
|---|---|---|
| YouTube Ads $1 CPM | 1 million Ad views | Average rate per ad=0.18Total ~ $5000 |
| Brand Sponsorships | 5K Sub 5K-30K Sub 30K-500K Sub 500K-1M+ Sub | $300 $700 $950 $3500 |
| Affiliate Marketing 30%-35% commission | If 100 people buys $20 product through affiliate link. Total $2000 | $2000*35%= $700 |
| Crowdfunding (Patreon, Indiegogo, GoFundMe) $5 | 100 subscribers funds the channel | 100*5=$500 |
| Merchandise Shelf $5 Shirt | 100 subscribers purchases your merch | 100*5=$500 |
| Channel Memberships $5/month | 100 loyal subscribers join membership | 100*5=$500 |
YouTube Ads
The video ads on the platform aren’t lucrative and can be used to supplement your income in the form of AdSense earnings. An actual advertiser pays 0.18 per ad view on average (as shown above). That means 1000 ad views equals $18 and $3-$5 per 1000 views.
Brand Sponsorships
Brands can sponsor your videos to reach their target audience. YouTube videos are a big part of our lives, and brands are becoming increasingly aware of how useful these videos can be. To be eligible for sponsorship, your channel must be of 5000 subscribers.
Affiliate Marketing
YouTubers help brands increase sales by encouraging their viewers to shop at the company’s store or visit its specific product pages. They then earn a commission (30%-35%) on products that people buy after clicking an affiliate link.
Crowdfunding
Today many people use crowdfunding websites to raise money for personal, channel-related projects. Most YouTubers are doing it to generate steady cash flow. Some of them use this source to fund their YouTube videos so that it increases quality and engagement.
Merchandise Shelf
Your merchandise represents and feeds your audience’s connection with you. Your product is your business, so you’re first and foremost an entrepreneur. Then design your YouTube marketing strategy to sell your merchandise and generate income.
Channel Membership
YouTube has a plan that allows you to charge your subscribers for membership on your YouTube channel. Members get access to exclusive live chats, badges, emojis, etc. Subscribers must give a set amount every month to a channel that makes a steady monthly income for YouTubers.
Part 2: Calculate YouTube income by YouTube Money Calculator
How much money do you earn on YouTube? There is no simple way to answer this question, but a YouTube income calculator can give you a rough estimate. It shows you whether you’re getting enough money to keep producing videos or if you need to look for additional ways of making money from your channel.
The tools below provide a detailed breakdown of the earnings from a specific YouTube video or channel based on audience engagement, views, and other factors.
YouTube Money Calculator
Pros
- Does not ask for much information, just a URL
- It has flexibility to check earnings by channel and video separately
Cons
- Calculate earnings based on views only
How-to-steps
Step1 To check earnings by channel, import the channel URL and click the search icon.
Step2 You’ll see the result showing, ‘Number of total Subscribers’, ‘Number of Total Video Views’, ‘Total estimated earnings’, and ‘Average Earnings per Video’.
Step3 If you want to check earnings by video, below you’ll see another search bar where you can paste the specific video URL.
Step4 The result will show you the ‘Number of Total Video Views’, and ‘Estimated Video earnings’.
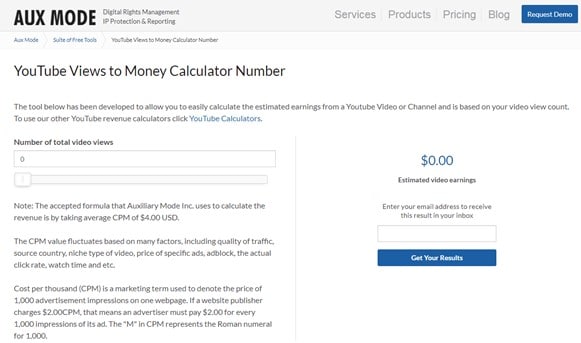
Aux mode
Pros
- Easy interface, with a view slider
- Does Not require any information
Cons
- Based on your video view count only
How-to-steps
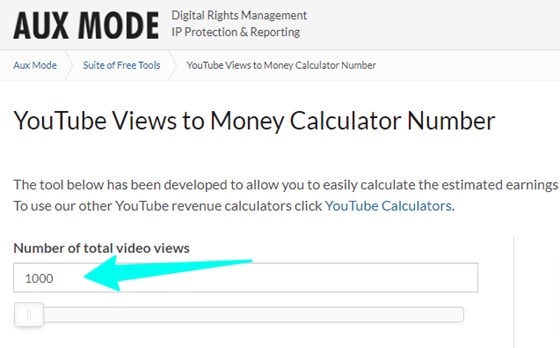
Go to AUX MODE
Step1 You can type total video views or, increase or decrease total views with the arrows.
Step2 Below you’ll find a slider, you can slide forward to increase views and vice versa.
Step3 On your right, you’ll find estimated results in real time. You can also enter your email address to recieve the result in you inbox.
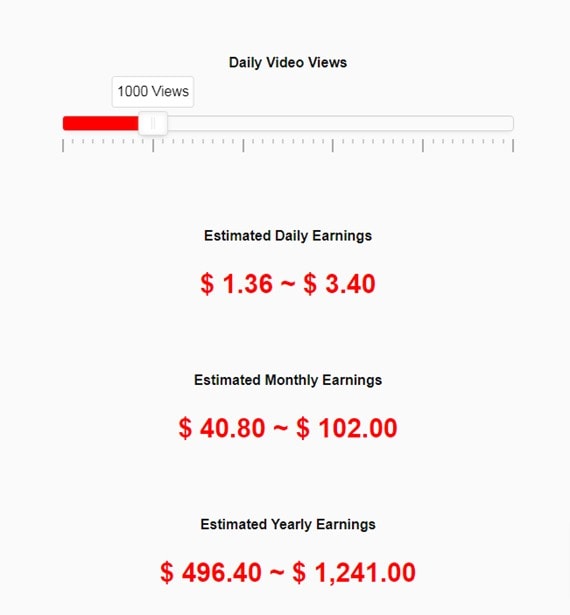
Tunepocket
Pros
- Slider interface shows real time result
- It shows all results based on views, existing video, and revenue of whole channel
Cons
- None
How-to-steps
Step1 The first calculator on the page is based on daily views. Drag the slider according to your video views and below you’ll find estimated earnings including daily, monthly, and annually.
Step2 Scroll down and you’ll find another calculator that requires specific video URL. Copy and paste the URL of YouTube video and get results based on views.
Step3 The last calculator is about the estimated revenue for a channel. You need to paste the channel URL to find the results. It includes, Number of Total Subscribers, Number of Total Videos, Number of Total Video Views, Channel Title, and Estimated Total Earnings
Part 3: Estimated your YouTube earning by YouTube revenue reports
To better understand the best strategies and tactics to optimize your video content, use YouTube analytic reports to help you get a clearer understanding of how your YouTube channel performs. To check your revenue report:
Step1 Login to your YouTube Studio
Step2 In the left menu, select Analytics.
Step3 From the top menu, select Revenue.
RPM
The RPM is calculated based on how much traffic you’re getting from YouTube compared to all your other sources combined. RPM is calculated as total revenue divided by total views times 1000.
Playback-based CPM
Your CPM (Cost Per Thousand) report tells you how much each ad was worth in terms of the percentage of each play a video was spent. The playback-based CPM report shows your estimated average gross revenue per 1000 playbacks where one or more ads are shown.
Monthly estimated revenue
This is a simple report showing the statistics of your video earnings over the last 6 months. It can fluctuate by invalid traffic, content disputes and ad campaign types.
Revenue sources
You must use this report to see your estimated revenue from each revenue source if you have different revenue sources.
Transaction revenue
The transactions reports show you how much your members and fans have spent in transactions. It shows estimated earnings from channel memberships and merch.
Top-earning videos
This top-earning videos report will show you the most profitable videos and their estimated revenue.
Ad type
If you use different types of Ads for your videos, this report will help you find the percentage of your Ads revenue from each ad type.
Part 4: How much money can you make on YouTube?
The answer to that question can vary widely depending on the type of content you produce and the demographics of your target market. However, we’ve found that a single video ad can be worth anywhere from around $100 to $5,000.
It’s safe to say that most YouTubers earn between $1,000 and $10,000 per month from their ads alone. But there are many other factors to take into consideration when calculating the money, you can make on YouTube:
The number of views your videos get
The key to making money from videos on YouTube is views. The more views you have, the more chance of getting paid will increase. So you need to create videos that will get viewers to click.
According to Forbes’s estimation, you can make $3-$5 per 1000 views. e.g., a video with 1,000,000 views can make around $5,000 on views only.
The engagement level of your audience
When building a YouTube channel, the key to success lies in engaging with your audience. After all, if they don’t like what you’re offering, they will not watch your videos. So you’ve got to have a message that resonates and is useful.
Your channel type
The YouTube algorithm is set up to favor channels with a high volume of views per video and high-quality content rather than low-quality channels that generate a lot of traffic but don’t produce quality videos. So, if you want to increase your revenue from your YouTube videos, try to focus on high-quality content.
Your monetization method
Several monetization methods exist, including Subscription, advertising, affiliate marketing, paid search, and sponsorships. Each monetization method requires a slightly different setup and management, resulting in different revenue.
The country you are in
It is important to know that in some countries, making money off YouTube is extremely difficult. For example, in certain countries, monetizing your videos is impossible without using illegal methods, which will get you into legal trouble.
Some other factors, e.g., it’s worth comparing the RPM of your country and other countries, different rules and prices of YouTube Ads depending on your country.
Bonus tip: Increase YouTube earnings with a powerful video editing software
Are you tired of your boring, run-of-the-mill videos? Are you looking for ways to improve your YouTube earnings? Then let’s look at some of the best editing software to help create your next great content.
Wondershare Filmora is a powerful yet easy-to-use video editing software that makes it easier than ever to make awesome videos. Filmora offers more than 50 cutting-edge tools and effects that make it easier to edit any media source, including videos, photos, and music and share the result in just minutes. Use Filmora’s powerful features like keyframing, motion tracking, split screen, instant mode, VFX, templates etc., to make your video stand out.
Here’s a demo of the software, editing YouTube Shorts:
Free Download For Win 7 or later(64-bit)
Free Download For macOS 10.14 or later
Step1 Open Filmora 11 application.
Step2 Open Project Settings
Step3 Change Aspect Ratio, Resolution, and Frame rate
Step4 Drag video to the timeline
Step5 Right-click and select Crop to Fit
Step6 Right-Click again and select Crop and Zoom
Step7 Adjust the frame
Step8 Lastly Export you file
Bottom line
People want to watch a video when searching for the answers to a question. The best videos are designed to help users accomplish their specific goals while providing them with something they can take away and use for themselves. You need to put up good videos to keep viewers coming back.
To do that, use the game-changing Filmora 11 (mentioned in the article) to create engaging YouTube videos and amaze your audience. Slowly but surely, your audience will increase and then all the guidance in this article will help you easily analyze, calculate and increase your YouTube revenue.
Free Download For Win 7 or later(64-bit)
Free Download For macOS 10.14 or later
Professional Videographer’s Guide to Efficient Color-Keying
The world of video-making owes much of its magic to small leaps of innovation. One of these leaps is the use of the chroma key background, which most people know by the more colloquial term—green screen.

Chroma key, also known as green screen or blue screen, is a cool hack for seamless visual storytelling, allowing content creators to replace backgrounds with any image or video they want. This technique is widely embraced in film, television, and online content, and has opened the door to limitless creative possibilities. Aside from its ability to maximize creativity, it is also cheap to employ and convenient to set up, which has made it a staple for everyone who works with visuals.
In this simple guide, we’ll delve into the fundamentals of the chroma key effect, how it is used for video making, and how to leverage that as you perfect your visual content.
YouTube Video Background Creating realistic video scenes at your will is easy to complete with Filmora green screen removal.
Create Video Backgrounds Create Video Backgrounds Learn Green Screen

How Does Chroma Key Work?

Chroma Keying is done by singling out a specific color (usually green or blue) from the foreground, removing it, and replacing it with a different background (for example, a sunset). This process typically follows a series of steps:
- Background Selection:
A solid, single-color background, often green or blue, that contrasts well with the subject must be used. The color chosen should not be present in the subject or any props in the camera field to avoid unintentional transparency.
- Color Keying:
This requires the use of specialized visual effects software to key out the chosen color. The green or blue background is designated as transparent, making everything of that color see-through. The software distinguishes between the keyed color and the subject, creating a mask for the transparent areas.
- Foreground Filming:
This involves filming the subject against the live chroma key background. During filming, the chosen background color (green or blue) won’t appear in the final result due to its transparency. The subject is captured as if separately from the isolated background.
- Post-Processing:
In post-production processing, the editor takes the keyed-out color and replaces it with the new background of their choice. This step creates the illusion that the subject is in a different setting or environment. The transparent areas become filled with the chosen background which, if done right, results in a cohesive and visually appealing composition.
Why Green?
Theoretically, the chroma key background can be any solid color. However, the most commonly used colors are studio blue and bright green, with the latter far more common.
The choice of background color depends on the specific requirements of the production and the colors present in the scenes being filmed.
Free Download For Win 7 or later(64-bit)
Free Download For macOS 10.14 or later
Contrast
The less similar your chosen background color is to natural skin tones, the easier to isolate and replace in your footage. Bright green provides a strong contrast to most human skin tones and is less likely to be present in costumes or natural surroundings, making it easier to isolate subjects during the color separation.
Luminance
The color green emits light with greater intensity than blue, allowing for far more effective isolation by cameras during filming. This also means that blue screens demand increased lighting for proper exposure compared to green. This situation may be less than ideal if you lack powerful lighting or you don’t have the big bucks for them.
Digital Sensors
Many digital cameras and sensors are more sensitive to green wavelengths, resulting in cleaner and more accurate color keying during post-processing. Modern technology has also evolved to optimize for a green background, making it a more practical choice for the chroma key effect.
Wardrobe and Set Design
Bright green occurs less naturally in costumes and set designs than other colors, making green the optimal choice for reducing the likelihood of color spill and keying issues. However, if you know your scene will have lots of green, it is probably best to film with a blue screen, so there’s less risk of color spill and less post-production work.
Setting up Your Own Chroma Key Studio
Setting up your chroma key is convenient and straightforward, but there are some key factors to consider while setting up to ensure maximal performance.
Choosing the Right Background Color
The first step in the chroma key setup is selecting the right background color to be keyed out. This choice determines your effective color separation and ensures a smooth keying process during editing. Choosing a chroma-key background color that contrasts distinctly with the subject’s colors is essential for effective color separation. This prevents unintentional transparency, color spill, and ensures a polished final result.
Lighting Considerations
Lighting is an important part of the chroma-keying process. Bold, uniform, and consistent lighting on both the subject and the background makes it easy to delineate one from the other fully. This minimizes shadows and variations in color, creating a smooth and seamless keying process. Multiple diffuse lights from different angles are often used to illuminate the green screen evenly.
Positioning/Camera
Proper subject and camera placement are necessary to ensure an even color-keying process during post-production. To prevent shadow interference, the green screen should be smooth, tense, and without wrinkles or shadows.
High-quality cameras are essential every time, especially for chroma keying. Images with better definition are easier to key, so camera quality significantly affects the outcome. Even if your camera isn’t the best, merely shooting well can ensure a clean color-keying process during editing, resulting in professional-looking visuals.
Recording Tips for Chroma Key
- Proper Lighting
Maintaining uniform and well-defined lighting during recording is essential for a successful chroma-keying process. This consistency ensures a seamless keying process during post-production.
- Keep Distance from the Green Screen
The optimal distance between the subject and the green screen minimizes color spill and allows for natural movements. Proper distance between subject and background allows for easier isolation of the background and much smoother post-editing. A recommended starting point for the issue is around 6 to 10 feet from the background.
- Subjects and Clothing
As mentioned before, the choice of costume for Selecting appropriate clothing that doesn’t match the chroma key color prevents transparency issues. Subjects also have to be positioned in such a way that there is minimal light interference and reflection. These contribute to a flawless chroma key outcome.
3 Basic Troubleshooting Strategies
- Color Spill
Sometimes, reflected light from your green background can be cast on your subject and may remain so when the background light is keyed out. This phenomenon is known as a color spill. It is usually because of uneven lighting or shooting around reflecting surfaces. Avoiding spill can differentiate between good and lousy chroma key aftereffects.
Human hair is one area where color spill can show up unsuspectingly. Due to the translucency of hair, it is common for some unintended light to seep through. This allows some background visibility, which you do not want with a chroma key. This is especially notable with lighter hair colors like blond hair.
There are ways to account for this. Many video-editing software have features such as spill suppression and screen matte adjustments that can enhance the final footage. Specialized plugins also go a long way in ensuring minimizing spill. Addressing spill correction tackles unwanted green artifacts and ensures a clean keying process.
- Poor Lighting
Suboptimal green screen lighting can lead to inconsistencies in keying and editing, undermining your product. One way to avoid this is to light the screen and subject separately. Another tip, although expensive, is using multiple diffuse light sources and trying to maintain even lighting across every square foot of your scene. Super bright or dark spots can ruin your output, so it’s worth the extra effort if you don’t want to deal with problematic post-production.
- Poorly Refined Edges
Chroma keying should leave your videos with crisp, defined, natural-looking edges. But post-production editing can make all the difference if it doesn’t come out to your taste. Softening and refining edges make a smoother transition between the foreground object and the new background. Light adjustments to edge thickness and screen matte settings can also help enhance overall visual quality and add finesse to your work.
Conclusion
Green screen photography produces excellent results, and its ease of use makes it indispensable for videographers of all levels. In this guide, we’ve discussed chroma key technology, its role in the industry, and how to apply it to your craft to elevate visual content.
Chroma key, also known as green screen or blue screen, is a cool hack for seamless visual storytelling, allowing content creators to replace backgrounds with any image or video they want. This technique is widely embraced in film, television, and online content, and has opened the door to limitless creative possibilities. Aside from its ability to maximize creativity, it is also cheap to employ and convenient to set up, which has made it a staple for everyone who works with visuals.
In this simple guide, we’ll delve into the fundamentals of the chroma key effect, how it is used for video making, and how to leverage that as you perfect your visual content.
YouTube Video Background Creating realistic video scenes at your will is easy to complete with Filmora green screen removal.
Create Video Backgrounds Create Video Backgrounds Learn Green Screen
How Does Chroma Key Work?
Chroma Keying is done by singling out a specific color (usually green or blue) from the foreground, removing it, and replacing it with a different background (for example, a sunset). This process typically follows a series of steps:
- Background Selection:
A solid, single-color background, often green or blue, that contrasts well with the subject must be used. The color chosen should not be present in the subject or any props in the camera field to avoid unintentional transparency.
- Color Keying:
This requires the use of specialized visual effects software to key out the chosen color. The green or blue background is designated as transparent, making everything of that color see-through. The software distinguishes between the keyed color and the subject, creating a mask for the transparent areas.
- Foreground Filming:
This involves filming the subject against the live chroma key background. During filming, the chosen background color (green or blue) won’t appear in the final result due to its transparency. The subject is captured as if separately from the isolated background.
- Post-Processing:
In post-production processing, the editor takes the keyed-out color and replaces it with the new background of their choice. This step creates the illusion that the subject is in a different setting or environment. The transparent areas become filled with the chosen background which, if done right, results in a cohesive and visually appealing composition.
Why Green?
Theoretically, the chroma key background can be any solid color. However, the most commonly used colors are studio blue and bright green, with the latter far more common.
The choice of background color depends on the specific requirements of the production and the colors present in the scenes being filmed.
Free Download For Win 7 or later(64-bit)
Free Download For macOS 10.14 or later
Contrast
The less similar your chosen background color is to natural skin tones, the easier to isolate and replace in your footage. Bright green provides a strong contrast to most human skin tones and is less likely to be present in costumes or natural surroundings, making it easier to isolate subjects during the color separation.
Luminance
The color green emits light with greater intensity than blue, allowing for far more effective isolation by cameras during filming. This also means that blue screens demand increased lighting for proper exposure compared to green. This situation may be less than ideal if you lack powerful lighting or you don’t have the big bucks for them.
Digital Sensors
Many digital cameras and sensors are more sensitive to green wavelengths, resulting in cleaner and more accurate color keying during post-processing. Modern technology has also evolved to optimize for a green background, making it a more practical choice for the chroma key effect.
Wardrobe and Set Design
Bright green occurs less naturally in costumes and set designs than other colors, making green the optimal choice for reducing the likelihood of color spill and keying issues. However, if you know your scene will have lots of green, it is probably best to film with a blue screen, so there’s less risk of color spill and less post-production work.
Setting up Your Own Chroma Key Studio
Setting up your chroma key is convenient and straightforward, but there are some key factors to consider while setting up to ensure maximal performance.
Choosing the Right Background Color
The first step in the chroma key setup is selecting the right background color to be keyed out. This choice determines your effective color separation and ensures a smooth keying process during editing. Choosing a chroma-key background color that contrasts distinctly with the subject’s colors is essential for effective color separation. This prevents unintentional transparency, color spill, and ensures a polished final result.
Lighting Considerations
Lighting is an important part of the chroma-keying process. Bold, uniform, and consistent lighting on both the subject and the background makes it easy to delineate one from the other fully. This minimizes shadows and variations in color, creating a smooth and seamless keying process. Multiple diffuse lights from different angles are often used to illuminate the green screen evenly.
Positioning/Camera
Proper subject and camera placement are necessary to ensure an even color-keying process during post-production. To prevent shadow interference, the green screen should be smooth, tense, and without wrinkles or shadows.
High-quality cameras are essential every time, especially for chroma keying. Images with better definition are easier to key, so camera quality significantly affects the outcome. Even if your camera isn’t the best, merely shooting well can ensure a clean color-keying process during editing, resulting in professional-looking visuals.
Recording Tips for Chroma Key
- Proper Lighting
Maintaining uniform and well-defined lighting during recording is essential for a successful chroma-keying process. This consistency ensures a seamless keying process during post-production.
- Keep Distance from the Green Screen
The optimal distance between the subject and the green screen minimizes color spill and allows for natural movements. Proper distance between subject and background allows for easier isolation of the background and much smoother post-editing. A recommended starting point for the issue is around 6 to 10 feet from the background.
- Subjects and Clothing
As mentioned before, the choice of costume for Selecting appropriate clothing that doesn’t match the chroma key color prevents transparency issues. Subjects also have to be positioned in such a way that there is minimal light interference and reflection. These contribute to a flawless chroma key outcome.
3 Basic Troubleshooting Strategies
- Color Spill
Sometimes, reflected light from your green background can be cast on your subject and may remain so when the background light is keyed out. This phenomenon is known as a color spill. It is usually because of uneven lighting or shooting around reflecting surfaces. Avoiding spill can differentiate between good and lousy chroma key aftereffects.
Human hair is one area where color spill can show up unsuspectingly. Due to the translucency of hair, it is common for some unintended light to seep through. This allows some background visibility, which you do not want with a chroma key. This is especially notable with lighter hair colors like blond hair.
There are ways to account for this. Many video-editing software have features such as spill suppression and screen matte adjustments that can enhance the final footage. Specialized plugins also go a long way in ensuring minimizing spill. Addressing spill correction tackles unwanted green artifacts and ensures a clean keying process.
- Poor Lighting
Suboptimal green screen lighting can lead to inconsistencies in keying and editing, undermining your product. One way to avoid this is to light the screen and subject separately. Another tip, although expensive, is using multiple diffuse light sources and trying to maintain even lighting across every square foot of your scene. Super bright or dark spots can ruin your output, so it’s worth the extra effort if you don’t want to deal with problematic post-production.
- Poorly Refined Edges
Chroma keying should leave your videos with crisp, defined, natural-looking edges. But post-production editing can make all the difference if it doesn’t come out to your taste. Softening and refining edges make a smoother transition between the foreground object and the new background. Light adjustments to edge thickness and screen matte settings can also help enhance overall visual quality and add finesse to your work.
Conclusion
Green screen photography produces excellent results, and its ease of use makes it indispensable for videographers of all levels. In this guide, we’ve discussed chroma key technology, its role in the industry, and how to apply it to your craft to elevate visual content.
Also read:
- [New] Constructing Attention-Grabbing Trailers for YouTube
- [New] Conveniently Remove Downloaded YouTube Media for Lightweight Devices
- [New] Converting In-Meeting Google Meet to YouTube Broadcasts Your Guide
- [New] Winning at Gaming Memory Capture Essentials on Windows 10 for 2024
- [Updated] 2024 Approved Hero Vs Hero Upgraded Edition
- [Updated] Broadview Networks Navigating MCN Choices
- 2024 Approved Comprehensive Guide to YouTube Content Moderation Rules
- 2024 Approved Crafting Compelling Stories The Art of Instagram Video Editing
- 2024 Approved Cutting and Compositing for YouTube Videos Using Premiere Pro
- 2024 Approved Elevating Slideshows Incorporate YouTube Videos
- Achieving Pristine Video Quality on YouTube
- Chatbot Showdown: Unveiling Our Findings on Le Chat versus ChatGPT From Mistral AI
- Ejecución Y Configuración De AOMEI Backupper: Cómo Hacerlo Correctamente
- In 2024, Boost Engagement on YouTube by Adding Emojis
- In 2024, Club Vibes Best DJ Template Video Selections
- In 2024, The Essential Guide to Zero-Cost Webinars on YouTube
- Navigating Download Land Free Photo Frames
- Schritt-Für-Schritt-Anleitung Zum Hinzufügen Von Untertiteln Zu MP4-Videodateien
- YL Tech's Spectacular Wallpaper Collection for Sun-Kissed Holiday Scenes and Vibes
- Title: Charting Your Course in the World of YouTube Tracking Success & Monetary Value for 2024
- Author: Steven
- Created at : 2025-02-05 17:43:55
- Updated at : 2025-02-11 02:38:57
- Link: https://youtube-clips.techidaily.com/charting-your-course-in-the-world-of-youtube-tracking-success-and-monetary-value-for-2024/
- License: This work is licensed under CC BY-NC-SA 4.0.