
:max_bytes(150000):strip_icc()/ScreenShot2021-03-10at10.51.34AM-4a21a62a72a545aa8fa3dc272db32713.png)
Charting the Course From AdSense Income to Savings
Charting the Course From AdSense Income to Savings
How To Get Paid on YouTube - From AdSense to your Bank Account

Richard Bennett
Oct 26, 2023• Proven solutions
YouTube is more than a video sharing social network; here’s how to get paid on YouTube. Having an active YouTube channel with decent monthly views can earn you income through advertising. If your channel is set up properly, Google can place ads over your YouTube videos and you can earn money based on how many people see or click on (depends on the ad) those ads while watching your videos.
- The Requirements for YouTube Monetization
- How to Enable Monetization for Your YouTube Channel
- Linking Your Bank Account to Your AdSense Account
- Receiving Payments
Many vloggers receive direct bank deposits of their ad-based revenues every month. In this article, we’ll show you how to monetize your YouTube Channel and how to receive payments to your bank account.
Making Your YouTube Videos Better with Filmora
If you want to earn more money with YouTube videos, your video should be stand out. To achieve that, you should use a powerful video editing software as well. Here, I recommend Wondershare Filmora video editor . As one of the most widely used video editing software among YouTubers, Filmora provides lots of templates and effects which allows you to edit faster and better.


Part 1: The Requirements for YouTube Monetization
Meeting the minimum requirement for YouTube monetization is probably the hardest part of this whole process. About a month ago, you had to have 10,000 lifetime views on your YouTube channel to qualify for monetization. However, earlier this year, Google changed their eligibility requirements and made them even tougher.
As of February 20, 2018, YouTube channels need to have accumulated 4000 hours of ‘watch time’ over the past 12 months and no less than 1000 subscribers to qualify for monetization. If you do not meet these requirements you cannot join the YouTube Partner Program and monetize your YouTube channel.
So, the first step to successful monetization on YouTube is to actually grow your channel. You need to create videos that will attract viewers and engage your audience. You also need to get people to subscribe because this is really what will grow your YouTube channel over time.
Part 2: How To Enable Monetization for Your YouTube Channel
Here’s the step-by-step process for monetizing your YouTube Channel, for those who are qualified.
- Log in to your YouTube account.
- Find your account icon in the top right corner. Click it to find the ‘Creator Studio’ button.
- Click the ‘Creator Studio’ button.
- Click the ‘Channel’ option in the left side menu.
- You’ll see a drop-down menu under ‘Channel’. Click on ‘Status and Features’. This is actually the first option on the menu. It should open by default once you click the ‘Channel’ button.
- Look through the ‘Status and Features’ page and click the ‘Enable’ button beside monetization.

- Clicking the ‘Enable’ button should lead you to another page where the guidelines for monetization are explained. Take the time to read through the guidelines and understand the dos and don’ts of YouTube monetization.
- Once you’ve looked through the guidelines, click the ‘Enable my account’ button to proceed. This will lead you to a page where you’ll be prompted to join the YouTube Partner Program.
- Read through the YouTube Partner Program terms, check the appropriate boxes, and click the ‘accept’ button.
- You’ll be prompted to link an AdSense account.
- Connect an existing AdSense account if you have one or create a new one.
- Once you’re done linking an AdSense account, you’ll be redirected to YouTube. There, select the type of ads you want to run under ‘Monetization Preferences’.
- Click the submit button and wait to find out if your account is approved for monetization.
According to YouTube, it can take up to a week for a decision to be reached on your application.
YouTube will not review your monetization application until you’ve met their eligibility criteria. Even then, your application may be declined if your videos do not follow the community guidelines (i.e. channels which simply repost content from other channels will not be monetized).
Not all videos can be monetized. While there are legal ways to create videos consisting of imagery and footage belonging to others, be aware that such videos are not always eligible for monetization. YouTube will only monetize videos that you own. So, posting videos which do not belong to you or which include copyrighted content can cause your monetization application to be declined.
Part 3: Linking Your Bank Account To Your AdSense Account
AdSense offers a variety of payment options including mailed checks and Western Union transfers. However, these options may not be available to you depending on where you’re based. AdSense does make payments through electronic wire transfer (EFT – Electronic funds transfer) to virtually every country in the world, and this is the preferred payment option for most people.
To have your earnings deposited directly into your account through EFT, you’ll need to link your bank account to your AdSense account.
Here’s a step-by-step guide for linking your bank account to your AdSense account.
- Log in to AdSense via: www.google.com/adsense/start
- Click the ‘Settings’ button in the left panel menu
- Under ‘Settings’, click ‘Payments’.
- On the ‘Payments’ page, click ‘Manage payment options’.
- Click ‘Add payment method’.
- Next, you’ll be prompted to add your bank account details. In general, you will be asked to provide the following:
- Name on the account / account holder’s name
- Bank account number
- Bank name
- Bank SWIFT code
- Depending on where you are based, additional information may be required.
- Ensure that the name on your AdSense account matches the name on the bank account you provide. To edit your AdSense name, click the ‘Manage settings’ button also on the Payments page.
Part 4: Receiving Payments
To get paid by AdSense, you need to reach the $100 threshold. You may wish to set a higher threshold but as a rule, earnings below the $100 will not be processed for payment (you will still receive the money, it will just keep adding up until it gets to $100 and then you’ll be paid).
Also, bear in mind that AdSense follows a monthly payment cycle. This means that a month’s earnings (assuming they meet the threshold requirement) will be paid next month. Usually, direct deposit payments will be processed between the 21st and 26th of every month. That said, it can take up to 10 days for electronic wire payments to be received.
In addition to reaching the payment threshold, be sure that you have no payment hold on your AdSense account. A payment hold can cause your earnings to be withheld even if it has reached the payment threshold.
To avoid a payment hold, be sure to provide the necessary tax information, verify your identity and your address, make sure the bank account linked to your AdSense is verified, and make sure you have not violated any of YouTube’s guidelines and community rules.
Conclusion
Depending on your vlogging skills and the nature of your content (some types of videos get more attention than others), it can take a while for you to be eligible for monetization. And even when you’ve successfully monetized your channel, getting enough views to reach the payment threshold can be tough.
Don’t let this discourage you from working towards earning income from your YouTube channel. Just focus on creating a YouTube channel people will want to watch. That’s how to get paid on YouTube - be sticking with your channel long enough for it to grow.
Richard Bennett
Richard Bennett is a writer and a lover of all things video.
Follow @Richard Bennett
Richard Bennett
Oct 26, 2023• Proven solutions
YouTube is more than a video sharing social network; here’s how to get paid on YouTube. Having an active YouTube channel with decent monthly views can earn you income through advertising. If your channel is set up properly, Google can place ads over your YouTube videos and you can earn money based on how many people see or click on (depends on the ad) those ads while watching your videos.
- The Requirements for YouTube Monetization
- How to Enable Monetization for Your YouTube Channel
- Linking Your Bank Account to Your AdSense Account
- Receiving Payments
Many vloggers receive direct bank deposits of their ad-based revenues every month. In this article, we’ll show you how to monetize your YouTube Channel and how to receive payments to your bank account.
Making Your YouTube Videos Better with Filmora
If you want to earn more money with YouTube videos, your video should be stand out. To achieve that, you should use a powerful video editing software as well. Here, I recommend Wondershare Filmora video editor . As one of the most widely used video editing software among YouTubers, Filmora provides lots of templates and effects which allows you to edit faster and better.
Part 1: The Requirements for YouTube Monetization
Meeting the minimum requirement for YouTube monetization is probably the hardest part of this whole process. About a month ago, you had to have 10,000 lifetime views on your YouTube channel to qualify for monetization. However, earlier this year, Google changed their eligibility requirements and made them even tougher.
As of February 20, 2018, YouTube channels need to have accumulated 4000 hours of ‘watch time’ over the past 12 months and no less than 1000 subscribers to qualify for monetization. If you do not meet these requirements you cannot join the YouTube Partner Program and monetize your YouTube channel.
So, the first step to successful monetization on YouTube is to actually grow your channel. You need to create videos that will attract viewers and engage your audience. You also need to get people to subscribe because this is really what will grow your YouTube channel over time.
Part 2: How To Enable Monetization for Your YouTube Channel
Here’s the step-by-step process for monetizing your YouTube Channel, for those who are qualified.
- Log in to your YouTube account.
- Find your account icon in the top right corner. Click it to find the ‘Creator Studio’ button.
- Click the ‘Creator Studio’ button.
- Click the ‘Channel’ option in the left side menu.
- You’ll see a drop-down menu under ‘Channel’. Click on ‘Status and Features’. This is actually the first option on the menu. It should open by default once you click the ‘Channel’ button.
- Look through the ‘Status and Features’ page and click the ‘Enable’ button beside monetization.
- Clicking the ‘Enable’ button should lead you to another page where the guidelines for monetization are explained. Take the time to read through the guidelines and understand the dos and don’ts of YouTube monetization.
- Once you’ve looked through the guidelines, click the ‘Enable my account’ button to proceed. This will lead you to a page where you’ll be prompted to join the YouTube Partner Program.
- Read through the YouTube Partner Program terms, check the appropriate boxes, and click the ‘accept’ button.
- You’ll be prompted to link an AdSense account.
- Connect an existing AdSense account if you have one or create a new one.
- Once you’re done linking an AdSense account, you’ll be redirected to YouTube. There, select the type of ads you want to run under ‘Monetization Preferences’.
- Click the submit button and wait to find out if your account is approved for monetization.
According to YouTube, it can take up to a week for a decision to be reached on your application.
YouTube will not review your monetization application until you’ve met their eligibility criteria. Even then, your application may be declined if your videos do not follow the community guidelines (i.e. channels which simply repost content from other channels will not be monetized).
Not all videos can be monetized. While there are legal ways to create videos consisting of imagery and footage belonging to others, be aware that such videos are not always eligible for monetization. YouTube will only monetize videos that you own. So, posting videos which do not belong to you or which include copyrighted content can cause your monetization application to be declined.
Part 3: Linking Your Bank Account To Your AdSense Account
AdSense offers a variety of payment options including mailed checks and Western Union transfers. However, these options may not be available to you depending on where you’re based. AdSense does make payments through electronic wire transfer (EFT – Electronic funds transfer) to virtually every country in the world, and this is the preferred payment option for most people.
To have your earnings deposited directly into your account through EFT, you’ll need to link your bank account to your AdSense account.
Here’s a step-by-step guide for linking your bank account to your AdSense account.
- Log in to AdSense via: www.google.com/adsense/start
- Click the ‘Settings’ button in the left panel menu
- Under ‘Settings’, click ‘Payments’.
- On the ‘Payments’ page, click ‘Manage payment options’.
- Click ‘Add payment method’.
- Next, you’ll be prompted to add your bank account details. In general, you will be asked to provide the following:
- Name on the account / account holder’s name
- Bank account number
- Bank name
- Bank SWIFT code
- Depending on where you are based, additional information may be required.
- Ensure that the name on your AdSense account matches the name on the bank account you provide. To edit your AdSense name, click the ‘Manage settings’ button also on the Payments page.
Part 4: Receiving Payments
To get paid by AdSense, you need to reach the $100 threshold. You may wish to set a higher threshold but as a rule, earnings below the $100 will not be processed for payment (you will still receive the money, it will just keep adding up until it gets to $100 and then you’ll be paid).
Also, bear in mind that AdSense follows a monthly payment cycle. This means that a month’s earnings (assuming they meet the threshold requirement) will be paid next month. Usually, direct deposit payments will be processed between the 21st and 26th of every month. That said, it can take up to 10 days for electronic wire payments to be received.
In addition to reaching the payment threshold, be sure that you have no payment hold on your AdSense account. A payment hold can cause your earnings to be withheld even if it has reached the payment threshold.
To avoid a payment hold, be sure to provide the necessary tax information, verify your identity and your address, make sure the bank account linked to your AdSense is verified, and make sure you have not violated any of YouTube’s guidelines and community rules.
Conclusion
Depending on your vlogging skills and the nature of your content (some types of videos get more attention than others), it can take a while for you to be eligible for monetization. And even when you’ve successfully monetized your channel, getting enough views to reach the payment threshold can be tough.
Don’t let this discourage you from working towards earning income from your YouTube channel. Just focus on creating a YouTube channel people will want to watch. That’s how to get paid on YouTube - be sticking with your channel long enough for it to grow.
Richard Bennett
Richard Bennett is a writer and a lover of all things video.
Follow @Richard Bennett
Expert Roundup: The Best Editing Software for YouTube Creators
YouTube is one of the most popular video-sharing social media websites. It offers a wide range of media, including music videos, trailers, live broadcasts, games, and how-to videos. It also has the greatest societal influence because most artists, musicians, and significant corporations utilize this platform to promote their work.
However, because of the growing consumer interest in media content, many providers utilize it to advertise businesses and products. These paid marketing videos aren’t always relevant to the material you want to see. With these circumstances in mind, this article will help you find an excellent YouTube Video Trimmer Online, which you may use to clip and trim YouTube videos.
In this article
01 Part 1: Best YouTube Video Trimmer Online
02 Part 2: FAQs About Online YouTube Video Trimmer
Part 1: Best YouTube Video Trimmer Online
YouTube is amongst the most frequently used social media platform. People get their content ideas and teach others about them. However, videos might contain some unnecessary parts, and it can be a problem if you want to save the video. The following YouTube trimmers online can assist you.
1. Filmora Instant Cutter Tool [Offline but More Powerful]
Before you try the below online tools, Filmora Instant Cutter tool will be another choice when you need more powerful features. It lets you input huge video clips in formats and rapidly reduce or combine them without re-encoding. This is a very valuable tool when working with high-resolution movies. It supports MP4/MOV and MTS/M2TS video files.It maintains the quality of the video It supports 4K UHD video formats It allows you to merge the videos You can trim massive files with ease.
You can download Youtube videos first and then make trimming or add effects on it.
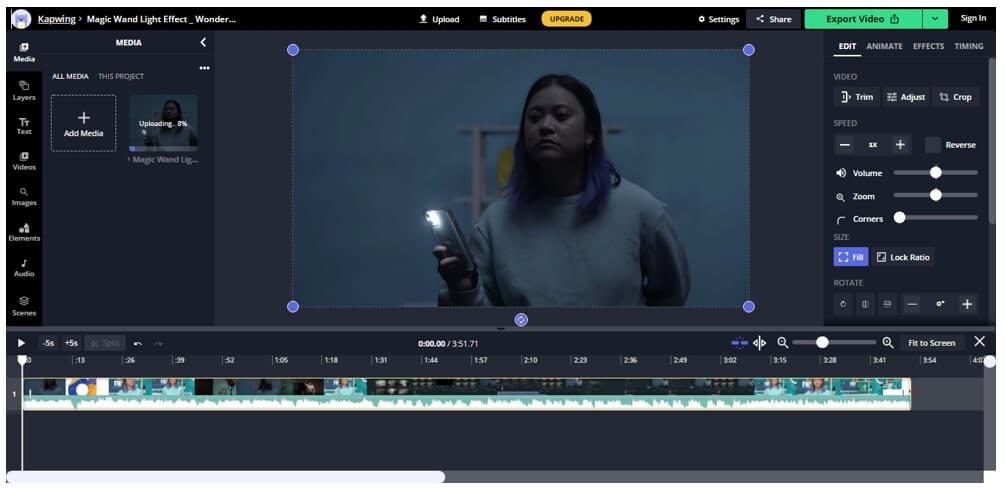
2. Kapwing
Kapwing is an online video editor that helps you edit videos without downloading the software. It features several editing tools with an easy-to-use interface. There’s no need to register yourself for editing the videos through Kapwing. That’s why it has millions of users worldwide.
Kapwing’s Video Trimmer makes it simple to trim YouTube videos. The service includes the same video cutting functionality as before but with a much prettier UI. After pasting the YouTube video URL to crop, you may use the easy-to-use timestamp slider to decide the sections of the YouTube video to edit.
Pros
- Different templates
- Multiple editing features
- Easy-to-use interface
- Fast
Cons
- Leaves a watermark if you don’t sign up
Find out more online video editors without a watermark.
3. VEED .iO
VEED.io video editor is a simple yet powerful video-editing program that allow s users to make stunning videos. VEED may be an important element of your sales funnel. With this program, you may edit, enhance, and add a lot of creativity to presentations, marketing videos, review videos, or video blogging.
You need to choose a file and start trimming it. After that, download the video with its easy-to-use interface. You need to sign up for editing the video with the VEED online tool. Moreover, there’s no watermark in the exported video.
Pros
- Fast and straightforward
- Multiple output options
- No watermark
Cons
- Minor bugs
4. Flixier
Flixier provides powerful video editing software with 1-minute exports to any device, easy collaboration, and enough cloud storage, all in one window. Flixier enables users to export any video, independent of technology. Cloud storage and complete version history are available, including feedback comments, sophisticated exporting, and email notifications.
Select a file and begin cutting it. Then, using the simple interface, download the video. No sign-up is required for the Flixier online tool to modify the video. In addition, there is no watermark in the exported video.
Pros
- 4x faster
- Cloud storage and history
- No registration
- Supports multiple operating systems
Cons
- Exports video up to one minute
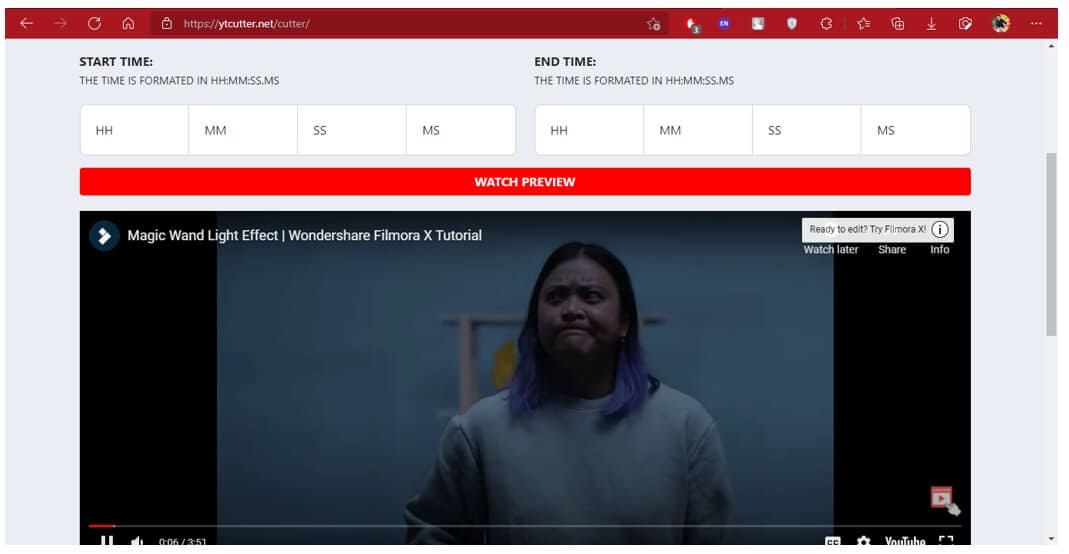
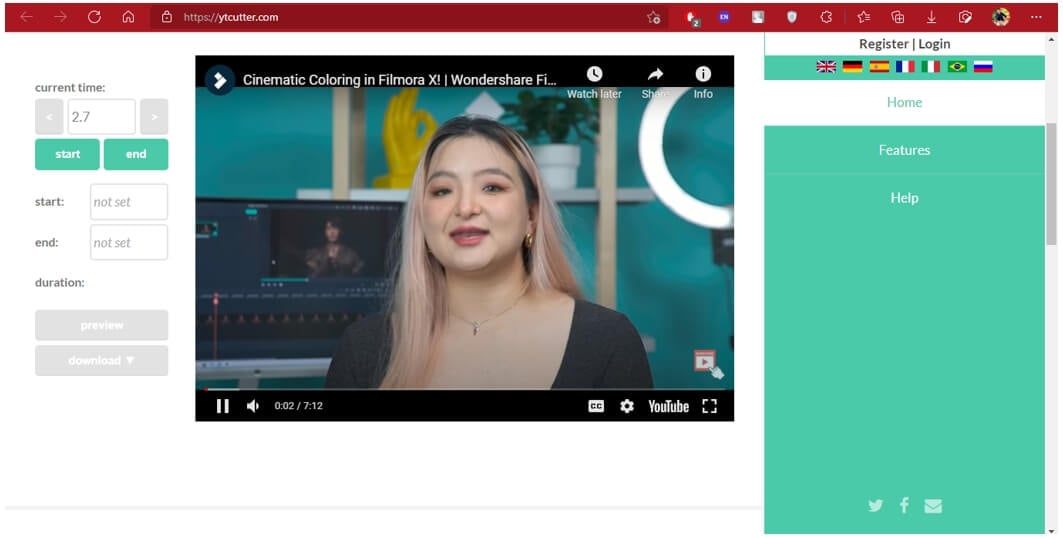
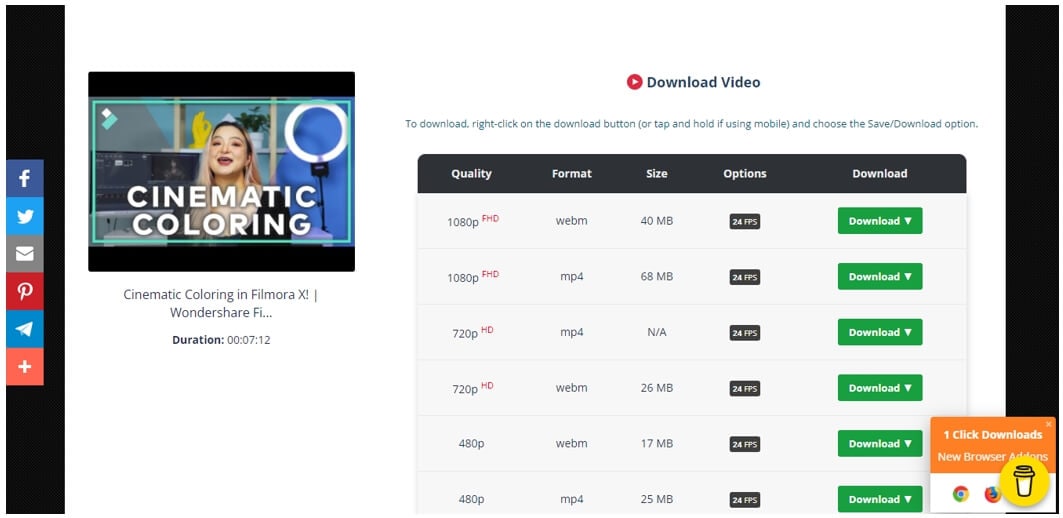
5. YTCutter.net
It is one of the best YouTube to mp3 converters online with trimmer available. YTCutter.net has various editing features that help you easily trim and modify the videos. It allows you to watch the video in preview mode before downloading it. It does not leave any watermark on the exported video.
You may extract favourite moments from YouTube videos with this ad-supported web tool. The app’s operation is rather simple. You have to paste a YouTube URL and set the start and end times. After that, you may download the cropped video, audio, or GIF. However, you need to register yourself for downloading the video through this tool.
Pros
- No watermark
- Simple interface
- Several editing features
Cons
- Requires an account to save the video to your profile or your device
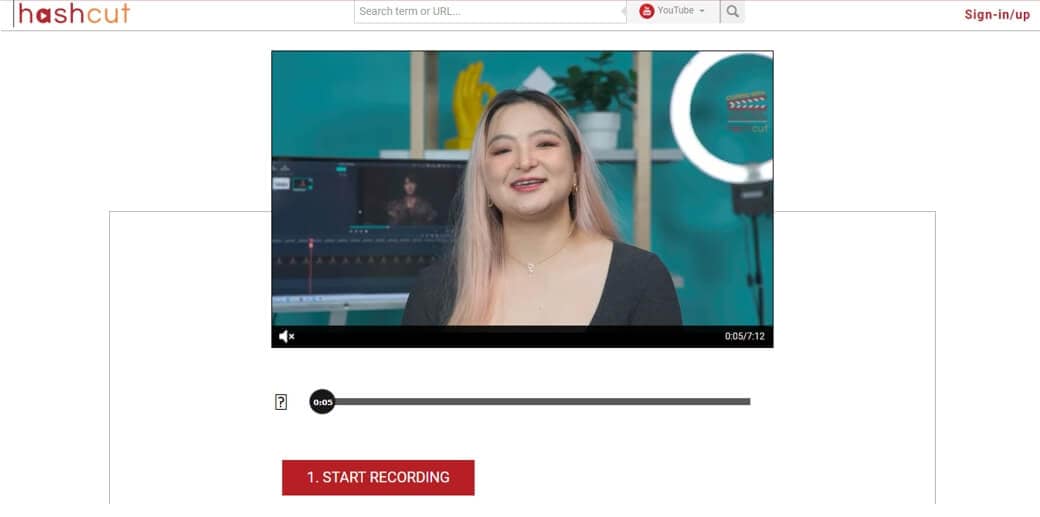
6. HashCut
HashCut is a unique YouTube online trimmer that allows you to save the highlights. It is possible to extract a segment from a YouTube video by tracing the section you require. Even better, you may customize the text and stickers with your tastes.
To begin, open your favourite web browser and navigate to the online YouTube trimmer. Paste the URL and specify the start and finish points of the clip you wish to obtain. Then, save the video. Furthermore, you may use its many capabilities to enhance the video, such as previewing footage, adding annotation, and embedding stickers on the film. It requires sign-up to edit the video and leaves a watermark on the exported one.
Pros
- Adds text and animations
- Chrome extension
- Preview Mode
- Embeds stickers
Cons
- Slow uploading procedure
7. YT Cutter
As the name indicates, YT Cutter is a YouTube video trimmer and downloader online that allows you to remove specific segments from YouTube videos. It can operate successfully online without any registration. Furthermore, you may accurately clip YouTube videos to 0.1 seconds, capture screenshots, and output files to video, animation GIF, or audio.
Paste the URL into the YT Cutter search field and wait for the video to refresh. Then, press the start and finish buttons to give your movie a beginning and an endpoint. Then, save the movie to your device in the format of your choice. Moreover, it does not leave any watermark on the exported video.
Pros
- No watermark
- User-friendly interface
- Supports multiple output formats
Cons
- Limited input formats
8. YouTube4kDownloader
Because of its simple interface, YouTube4kdownloader is a thorough and simple online YouTube video trimmer. It has a tool that allows you to trim or edit video segments from YouTube videos. One of its cutting features includes the ability to go to the beginning and conclusion of the choice for fast and easy clip trimming.
It also features a play and stop button that allows you to crop a specific scene from a YouTube video. Aside from that, it demonstrates three methods for sharing the cropped video link, including copying the plugin, the URL or media link, and watching the trimmed video on the YouTube website. It does not require sign-up for editing the video and leaves a watermark on the exported one.
Pros
- Trim specific segments
- No sign-up
- No watermark
Cons
- Completely web-based
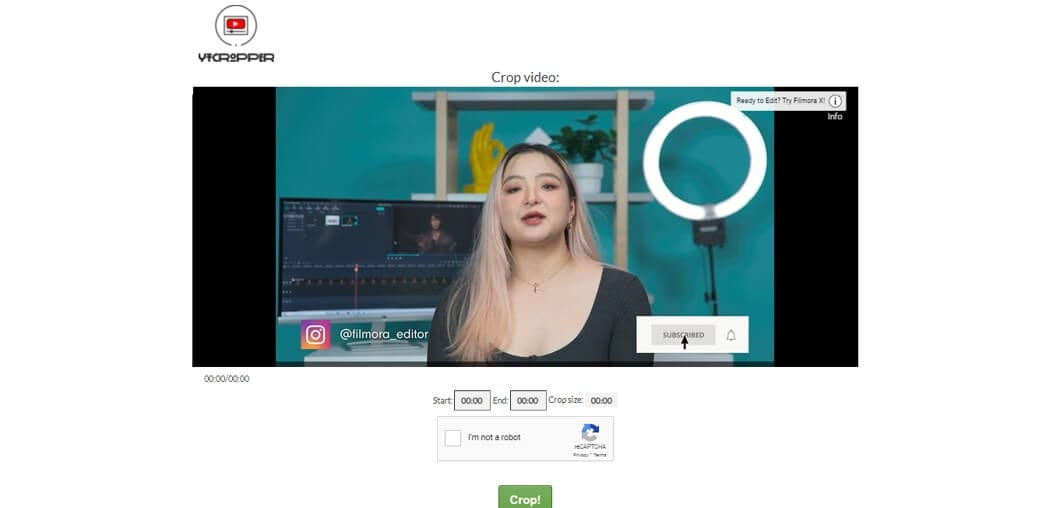
9. YT Cropper
Another YouTube video clipper online is YT Cropper, allowing users to extract particular clips from YouTube videos. Its Drag function allows users to choose a beginning and finishing point for the clips, and the markers will assist users in locating the clips that can be obtained that they desire. Users can make use of a one-of-a-kind feature known as looping.
Copy and paste the URL into the search field. Wait for the system to evaluate the video. Finally, use the markers to crop a select scene from a YouTube video. Then, to evaluate your clips, click the trim button. No sign-up and watermark are required for this YouTube trimmer.
Pros
- Looping feature
- Drag and drop function
- Easy trimming
Cons
- Slow
10. Odownloader
Odownloader Is another ad-supported YouTube trimmer that allows you to chop YouTube videos quickly. It allows you to download either audio alone or complete video. You may also choose between .webm and.mp4 formats.
Paste the link or URL into the search field and wait for the video to refresh. Then, press the start and finish buttons to give your movie a beginning and an endpoint. Then, save the movie to your device in the format of your choice. Moreover, it does not leave any watermark on the exported video.
Pros
- Exports in audio format as well
- Multiple output formats
- Easy-to-use
Cons
- Several ads
11. VideoCrops
It allows users to crop YouTube videos by dragging the two marks to the beginning and conclusion of the clip. It provides a high level of security, as only the users can access their data, which cannot be viewed by other users or on any site.
Cropping a video entails three steps. The video is first downloaded to the server. This may potentially take some time, depending on the length of the video. Second, the video has been trimmed. Finally, the video is saved as.MP4. You should also consider that this is a free site with limited resources.
Pros
- Easy trimming
- No watermark
- Free website
- High-level security
Cons
- Limited resources

Part 2: FAQs About Online YouTube Video Trimmer
Does YouTube have a trimmer?
Yes, you may cut videos after they’ve been uploaded to the YouTube site. You may chop off the beginning, middle, or ending of your movie on a computer. It is not necessary to re-upload a video to cut it. The video’s URL, view counts, and comments will remain unchanged. This functionality is only accessible for less than 6 hours long videos.
What is the difference between cut and trim in video editing?
Cutting is the process of separating pieces of a clip. You can reuse these portions in another video or delete them entirely. On the other hand, trimming is the process of eliminating or expanding the duration of a video clip’s front or tail regions in video editing.
Conclusion
Numerous programs will swiftly upload and trim your tiny movies, ideal for folks who make YouTube videos. Then, some tools can handle huge and bulky files and are ideal for file output and video quality. It’s a shame that some of these tools need payment to access their additional editing features. However, you have an excellent YouTube Video Trimmer Online, which is completely free and listed in detail within this article.
02 Part 2: FAQs About Online YouTube Video Trimmer
Part 1: Best YouTube Video Trimmer Online
YouTube is amongst the most frequently used social media platform. People get their content ideas and teach others about them. However, videos might contain some unnecessary parts, and it can be a problem if you want to save the video. The following YouTube trimmers online can assist you.
1. Filmora Instant Cutter Tool [Offline but More Powerful]
Before you try the below online tools, Filmora Instant Cutter tool will be another choice when you need more powerful features. It lets you input huge video clips in formats and rapidly reduce or combine them without re-encoding. This is a very valuable tool when working with high-resolution movies. It supports MP4/MOV and MTS/M2TS video files.It maintains the quality of the video It supports 4K UHD video formats It allows you to merge the videos You can trim massive files with ease.
You can download Youtube videos first and then make trimming or add effects on it.
2. Kapwing
Kapwing is an online video editor that helps you edit videos without downloading the software. It features several editing tools with an easy-to-use interface. There’s no need to register yourself for editing the videos through Kapwing. That’s why it has millions of users worldwide.
Kapwing’s Video Trimmer makes it simple to trim YouTube videos. The service includes the same video cutting functionality as before but with a much prettier UI. After pasting the YouTube video URL to crop, you may use the easy-to-use timestamp slider to decide the sections of the YouTube video to edit.
Pros
- Different templates
- Multiple editing features
- Easy-to-use interface
- Fast
Cons
- Leaves a watermark if you don’t sign up
Find out more online video editors without a watermark.
3. VEED .iO
VEED.io video editor is a simple yet powerful video-editing program that allow s users to make stunning videos. VEED may be an important element of your sales funnel. With this program, you may edit, enhance, and add a lot of creativity to presentations, marketing videos, review videos, or video blogging.
You need to choose a file and start trimming it. After that, download the video with its easy-to-use interface. You need to sign up for editing the video with the VEED online tool. Moreover, there’s no watermark in the exported video.
Pros
- Fast and straightforward
- Multiple output options
- No watermark
Cons
- Minor bugs
4. Flixier
Flixier provides powerful video editing software with 1-minute exports to any device, easy collaboration, and enough cloud storage, all in one window. Flixier enables users to export any video, independent of technology. Cloud storage and complete version history are available, including feedback comments, sophisticated exporting, and email notifications.
Select a file and begin cutting it. Then, using the simple interface, download the video. No sign-up is required for the Flixier online tool to modify the video. In addition, there is no watermark in the exported video.
Pros
- 4x faster
- Cloud storage and history
- No registration
- Supports multiple operating systems
Cons
- Exports video up to one minute
5. YTCutter.net
It is one of the best YouTube to mp3 converters online with trimmer available. YTCutter.net has various editing features that help you easily trim and modify the videos. It allows you to watch the video in preview mode before downloading it. It does not leave any watermark on the exported video.
You may extract favourite moments from YouTube videos with this ad-supported web tool. The app’s operation is rather simple. You have to paste a YouTube URL and set the start and end times. After that, you may download the cropped video, audio, or GIF. However, you need to register yourself for downloading the video through this tool.
Pros
- No watermark
- Simple interface
- Several editing features
Cons
- Requires an account to save the video to your profile or your device
6. HashCut
HashCut is a unique YouTube online trimmer that allows you to save the highlights. It is possible to extract a segment from a YouTube video by tracing the section you require. Even better, you may customize the text and stickers with your tastes.
To begin, open your favourite web browser and navigate to the online YouTube trimmer. Paste the URL and specify the start and finish points of the clip you wish to obtain. Then, save the video. Furthermore, you may use its many capabilities to enhance the video, such as previewing footage, adding annotation, and embedding stickers on the film. It requires sign-up to edit the video and leaves a watermark on the exported one.
Pros
- Adds text and animations
- Chrome extension
- Preview Mode
- Embeds stickers
Cons
- Slow uploading procedure
7. YT Cutter
As the name indicates, YT Cutter is a YouTube video trimmer and downloader online that allows you to remove specific segments from YouTube videos. It can operate successfully online without any registration. Furthermore, you may accurately clip YouTube videos to 0.1 seconds, capture screenshots, and output files to video, animation GIF, or audio.
Paste the URL into the YT Cutter search field and wait for the video to refresh. Then, press the start and finish buttons to give your movie a beginning and an endpoint. Then, save the movie to your device in the format of your choice. Moreover, it does not leave any watermark on the exported video.
Pros
- No watermark
- User-friendly interface
- Supports multiple output formats
Cons
- Limited input formats
8. YouTube4kDownloader
Because of its simple interface, YouTube4kdownloader is a thorough and simple online YouTube video trimmer. It has a tool that allows you to trim or edit video segments from YouTube videos. One of its cutting features includes the ability to go to the beginning and conclusion of the choice for fast and easy clip trimming.
It also features a play and stop button that allows you to crop a specific scene from a YouTube video. Aside from that, it demonstrates three methods for sharing the cropped video link, including copying the plugin, the URL or media link, and watching the trimmed video on the YouTube website. It does not require sign-up for editing the video and leaves a watermark on the exported one.
Pros
- Trim specific segments
- No sign-up
- No watermark
Cons
- Completely web-based
9. YT Cropper
Another YouTube video clipper online is YT Cropper, allowing users to extract particular clips from YouTube videos. Its Drag function allows users to choose a beginning and finishing point for the clips, and the markers will assist users in locating the clips that can be obtained that they desire. Users can make use of a one-of-a-kind feature known as looping.
Copy and paste the URL into the search field. Wait for the system to evaluate the video. Finally, use the markers to crop a select scene from a YouTube video. Then, to evaluate your clips, click the trim button. No sign-up and watermark are required for this YouTube trimmer.
Pros
- Looping feature
- Drag and drop function
- Easy trimming
Cons
- Slow
10. Odownloader
Odownloader Is another ad-supported YouTube trimmer that allows you to chop YouTube videos quickly. It allows you to download either audio alone or complete video. You may also choose between .webm and.mp4 formats.
Paste the link or URL into the search field and wait for the video to refresh. Then, press the start and finish buttons to give your movie a beginning and an endpoint. Then, save the movie to your device in the format of your choice. Moreover, it does not leave any watermark on the exported video.
Pros
- Exports in audio format as well
- Multiple output formats
- Easy-to-use
Cons
- Several ads
11. VideoCrops
It allows users to crop YouTube videos by dragging the two marks to the beginning and conclusion of the clip. It provides a high level of security, as only the users can access their data, which cannot be viewed by other users or on any site.
Cropping a video entails three steps. The video is first downloaded to the server. This may potentially take some time, depending on the length of the video. Second, the video has been trimmed. Finally, the video is saved as.MP4. You should also consider that this is a free site with limited resources.
Pros
- Easy trimming
- No watermark
- Free website
- High-level security
Cons
- Limited resources
Part 2: FAQs About Online YouTube Video Trimmer
Does YouTube have a trimmer?
Yes, you may cut videos after they’ve been uploaded to the YouTube site. You may chop off the beginning, middle, or ending of your movie on a computer. It is not necessary to re-upload a video to cut it. The video’s URL, view counts, and comments will remain unchanged. This functionality is only accessible for less than 6 hours long videos.
What is the difference between cut and trim in video editing?
Cutting is the process of separating pieces of a clip. You can reuse these portions in another video or delete them entirely. On the other hand, trimming is the process of eliminating or expanding the duration of a video clip’s front or tail regions in video editing.
Conclusion
Numerous programs will swiftly upload and trim your tiny movies, ideal for folks who make YouTube videos. Then, some tools can handle huge and bulky files and are ideal for file output and video quality. It’s a shame that some of these tools need payment to access their additional editing features. However, you have an excellent YouTube Video Trimmer Online, which is completely free and listed in detail within this article.
Also read:
- Streamline Your Content YouTube to Dailymotion Shift
- In 2024, Converting Your Twitch Showcase Into a YouTube Hit
- 2024 Approved A Comprehensive Rundown Longer Videos on YouTube
- How Much Could You Make on YouTube Snippets?
- YouTube's Updated Monetization Playbook
- 2024 Approved Easy-to-Follow Guide to Using YouTube TV Effectively
- Igniting Online Frenzy Essential Trending Hashes
- Revenue Rise at the Half-Million Club 500 Subs Count
- [New] How To Add Custom Thumbnails to Your YouTube Videos
- Innovative Tactics Starting Your YouTube Enterprise From Mobile
- Choosing the Right Platform A Look at Vimeo, YouTube & DailyMotion for 2024
- [New] Become the Brand You Want With Our Exclusive Set of FREE Graphics
- [New] A Guide to the Best Tools for Shortening Video Content Online
- [New] Essential Guide to Creating Popularity with YouTube Opens
- Winning Strategies & Hashtags for YouTube's Best FreeFirers
- [New] Comprehending the Language of YouTube SEO
- How to identify malfunctioning hardware drivers with Windows Device Manager on Windows 11/10/7
- Top 6 Online Webcam Recorders for 2024
- 2024 Approved Have You a Desire to Imbibe Your PowerPoint Presentations with Custom Effects and Tools? Be There to Learn All About Creating Custom Slideshows in PowerPoint with Utmost Ease
- Essential Steps to Employing Premium Videography Talent
- [Updated] Vidma to Go Screen Record and Beyond Alternatives for 2024
- [Updated] In 2024, Prime Captures of Apple's HD Video Screenshots (Under 156 Chars)
- In 2024, Have You Ever Created a Slow Motion Video on Your Phonr or Camera? This Article Will Show You some Knowledge About Slow Motion Photography
- [Updated] Maximizing Discord Connectivity Through Media Transfer
- Best Android Data Recovery - Undelete Lost Messages from Itel S23
- Top 12 Prominent Itel P55T Fingerprint Not Working Solutions
- [New] Precision Cutting Editor That Perfects Vimeo Videos
- Title: Charting the Course From AdSense Income to Savings
- Author: Steven
- Created at : 2024-05-25 18:56:26
- Updated at : 2024-05-26 18:56:26
- Link: https://youtube-clips.techidaily.com/charting-the-course-from-adsense-income-to-savings/
- License: This work is licensed under CC BY-NC-SA 4.0.
