
"Channel Visuals Hub Icon & Banner Crafting Tips"
Channel Visuals Hub: Icon & Banner Crafting Tips
YouTube Channel Art: How to Make Banners, Icons, and Thumbnails?

Shanoon Cox
Oct 26, 2023• Proven solutions
YouTube channel art refers to your banner, icon, and watermark along with the thumbnails of your videos. Creating custom channel art is a great way to express yourself and communicate the tone of your videos.
YouTube supports JPG, GIF, BMP, and PNG files for channel art, although they do not allow animated GIFs.
Part 1: Top Sites for YouTube Channel Art
You can make your channel art in Photoshop, or another photo editing program, but there are also some excellent tools online which you can access for free. Here are two of the best:
Canva.com
Canva has templates for YouTube banners as well as a variety of stock images. You can also upload and edit your own images on Canva. It is a free service, but they do have some premium features which cost $1 each. Canva has a desktop version and an iPad app.
PicMonkey.com
PicMonkey lets you import images from your computer or social media accounts, edit them, and use them in templates for YouTube banners or other kinds of social media graphics. It’s free to use, but you can only access their more advanced editing tools if you buy a paid subscription for either $4.99 a month, or $2.75 a month for a year.
Part 2: Banners
Your banner is the header for your channel page. Its dimensions are 2560 x 1440 px.
Not all of your banner will be visible on all devices. The full 2560 x 1440 px image will only be seen by viewers watching on tv screens.
Only 1546 x 423 px of your banner will be visible on computers, and this ‘safe area’ can vary for different tablets and smartphones depending on the width of their screens. Make sure any important text or logos are placed in a central location so everybody can see them.
Also, keep in mind that your icon will hover over the top left corner of your banner and that your social media icons will be located in the bottom right corner.
The file size of your banner cannot be over 4MB.
Part 3: Icons
Your icon is the avatar you use when leaving and replying to comments on YouTube. It also hovers over your banner on your channel page.
By default, your icon will be the picture associated with your Google account.
If you upload a new icon, it will render down to 98 x 98 px. So, any square image larger than 98 x 98 px will work. However, YouTube recommends you use one as large as 800 x 800 px. This will give you a sharper, higher quality, image.
Part 4: Thumbnails
Thumbnails are the images that represent your videos on your channel page and in search results.
You can browse through your video and choose a still frame you want to use as your video’s thumbnail. Or, you can upload a custom image.
Custom thumbnails should have an aspect ratio of 16:9, the same as YouTube’s video player. The files should be under 2MB and have a resolution of 1280 x 720.
To upload a custom thumbnail, select the custom thumbnail option under Video Thumbnails at the end of the video uploading process. You can also change the thumbnails of your existing videos to custom ones through Video Manager.
Remember that your thumbnail will be rendered down to a much smaller size. If you use text, like the title of your video, then you should make it really big so that it is easy to read when it gets shrunk down.
Part 5: Watermarks
A watermark is a small, usually 50 x 50 px image displayed in the bottom right corner of your video.
Watermarks protect your videos by making them harder for others to steal and take credit for.
Ideally, your watermark will be a transparent version of your logo. Try not to use more than three colors – you do not want your watermark to distract your viewers.
If you add a branding watermark through YouTube then that watermark will also double as a subscribe link.
Here is how you can add a branding watermark through YouTube:
- On YouTube, go to your Creator Studio and select Branding under the Channel menu.
- Click the blue add a watermark button on the Branding page.
- An upload of a watermark window will pop up. Select your image file and click Save.
- Choose between having a start time for your watermark, making it appear only at the end of your videos, or having it there for the entire length of your videos. The popular choice is to have it visible through the entire video.
- Click Update. Your watermark will be applied to all of your videos.
If you want to find a video editing solution that empowers your imagination and creativity yet takes less effort, please try this robust and user-friendly video editing software Filmora, which is equipped with its own footage stock Wondershare Filmstock and will definitely enhance your productivity and helps you to make money by making videos much easier.


Shanoon Cox
Shanoon Cox is a writer and a lover of all things video.
Follow @Shanoon Cox
Shanoon Cox
Oct 26, 2023• Proven solutions
YouTube channel art refers to your banner, icon, and watermark along with the thumbnails of your videos. Creating custom channel art is a great way to express yourself and communicate the tone of your videos.
YouTube supports JPG, GIF, BMP, and PNG files for channel art, although they do not allow animated GIFs.
Part 1: Top Sites for YouTube Channel Art
You can make your channel art in Photoshop, or another photo editing program, but there are also some excellent tools online which you can access for free. Here are two of the best:
Canva.com
Canva has templates for YouTube banners as well as a variety of stock images. You can also upload and edit your own images on Canva. It is a free service, but they do have some premium features which cost $1 each. Canva has a desktop version and an iPad app.
PicMonkey.com
PicMonkey lets you import images from your computer or social media accounts, edit them, and use them in templates for YouTube banners or other kinds of social media graphics. It’s free to use, but you can only access their more advanced editing tools if you buy a paid subscription for either $4.99 a month, or $2.75 a month for a year.
Part 2: Banners
Your banner is the header for your channel page. Its dimensions are 2560 x 1440 px.
Not all of your banner will be visible on all devices. The full 2560 x 1440 px image will only be seen by viewers watching on tv screens.
Only 1546 x 423 px of your banner will be visible on computers, and this ‘safe area’ can vary for different tablets and smartphones depending on the width of their screens. Make sure any important text or logos are placed in a central location so everybody can see them.
Also, keep in mind that your icon will hover over the top left corner of your banner and that your social media icons will be located in the bottom right corner.
The file size of your banner cannot be over 4MB.
Part 3: Icons
Your icon is the avatar you use when leaving and replying to comments on YouTube. It also hovers over your banner on your channel page.
By default, your icon will be the picture associated with your Google account.
If you upload a new icon, it will render down to 98 x 98 px. So, any square image larger than 98 x 98 px will work. However, YouTube recommends you use one as large as 800 x 800 px. This will give you a sharper, higher quality, image.
Part 4: Thumbnails
Thumbnails are the images that represent your videos on your channel page and in search results.
You can browse through your video and choose a still frame you want to use as your video’s thumbnail. Or, you can upload a custom image.
Custom thumbnails should have an aspect ratio of 16:9, the same as YouTube’s video player. The files should be under 2MB and have a resolution of 1280 x 720.
To upload a custom thumbnail, select the custom thumbnail option under Video Thumbnails at the end of the video uploading process. You can also change the thumbnails of your existing videos to custom ones through Video Manager.
Remember that your thumbnail will be rendered down to a much smaller size. If you use text, like the title of your video, then you should make it really big so that it is easy to read when it gets shrunk down.
Part 5: Watermarks
A watermark is a small, usually 50 x 50 px image displayed in the bottom right corner of your video.
Watermarks protect your videos by making them harder for others to steal and take credit for.
Ideally, your watermark will be a transparent version of your logo. Try not to use more than three colors – you do not want your watermark to distract your viewers.
If you add a branding watermark through YouTube then that watermark will also double as a subscribe link.
Here is how you can add a branding watermark through YouTube:
- On YouTube, go to your Creator Studio and select Branding under the Channel menu.
- Click the blue add a watermark button on the Branding page.
- An upload of a watermark window will pop up. Select your image file and click Save.
- Choose between having a start time for your watermark, making it appear only at the end of your videos, or having it there for the entire length of your videos. The popular choice is to have it visible through the entire video.
- Click Update. Your watermark will be applied to all of your videos.
If you want to find a video editing solution that empowers your imagination and creativity yet takes less effort, please try this robust and user-friendly video editing software Filmora, which is equipped with its own footage stock Wondershare Filmstock and will definitely enhance your productivity and helps you to make money by making videos much easier.
Shanoon Cox
Shanoon Cox is a writer and a lover of all things video.
Follow @Shanoon Cox
Transform Your Games Into a Live Stream Spectacle
How to Live Stream on YouTube Gaming?

Richard Bennett
Mar 27, 2024• Proven solutions
1. Live Stream on YouTube Gaming with OBS
You need to follow these simple Step s to use OBS for YouTube Live Streaming:
**Step 1:**First of all you need to login to your YouTube account. You might be aware of the fact that same YouTube account is used for YouTube gaming needs.
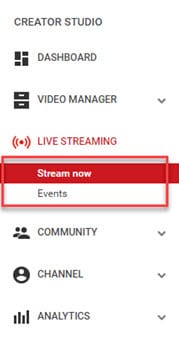
**Step 2:**Once entered inside your account then you need to visit the Go live streaming options and then from drop down menu simply choose Stream Now option.
**Step 3:**It is time to fill the details on screen; put impressive words for your live stream description so that it can grab attention of more viewers. Then select category as ‘Gaming’.

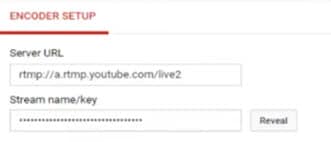
**Step 4:**Now you need to copy the stream key.
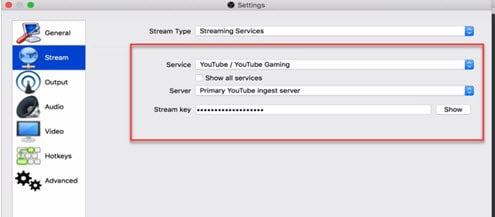
**Step 5:**Now open your OBS tool and then select YouTube as your active game streaming service. Users here need to paste that copied streaming key of Step 5 into the space provided on OBS settings page.
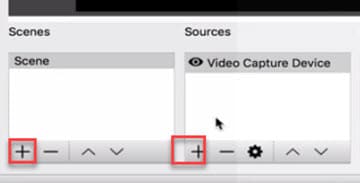
**Step 6:**It is time to make your desktop a video source.
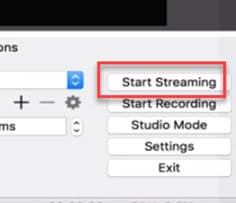
**Step 7:**Once all these settings are completed then you need to hit the start streaming option.
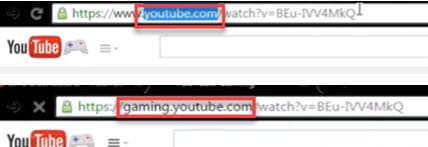
**Step 8:**The service may take few seconds to bring your live on YouTube and after this small duration you will be connected to your channel with your streamed content. Then change your url from youtube.com to gaming.youtube.com
**Step 9:**You are all set to be live on your YouTube gaming profile.
2. Live Stream on YouTube with Elgato Game Capture HD
A: Basic Settings for Elgato Game Capture HD
The Step s below will help you to get ready for streaming with all basic settings that are required by Elgato Game Capture HD tool.
**Step 1:**First of all, you need to open your browser, search for Elgato Game Capture HD software on its official website and then download it for your system. Get it installed.
**Step 2:**Once installation process is complete then launch your software.
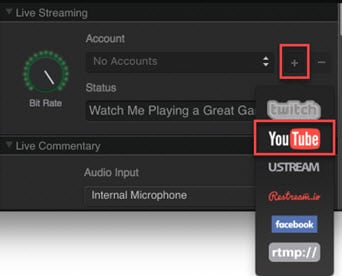
**Step 3:**Now you need to hit the add button on screen and select YouTube from drop down menu.
Step 4: It is time to sign in with your Google Account.
**Step 5:**After sign up process, allow the Elgato Game Capture tool to make connection with your YouTube account.

**Step 6:**Soon you will be able to access you account from Elgato platform.

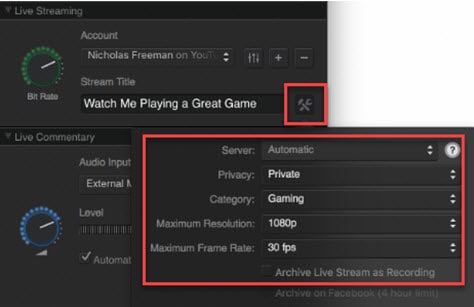
**Step 7:**It is time to make adjustments for streaming settings.
B: Test your Bandwidth and make adjustments for Stream settings
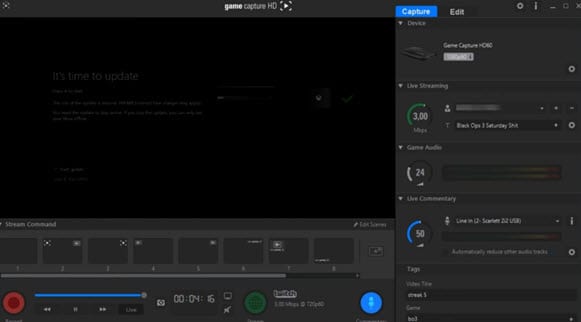
It is essential to check speed of your internet connection during live streaming because if it goes slow then your content will become annoying to viewers and it will decay the reputation of your channel. So prefer to use following Step s to complete the basic settings and to test your internet connection.
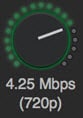
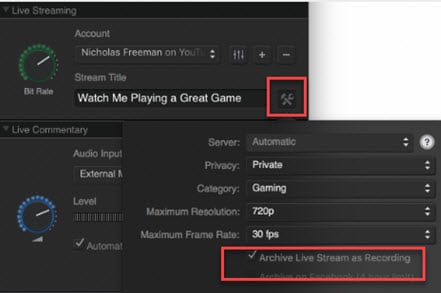
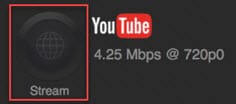
**Step 1:**Open your browser and then visit the speedtest.net platform. You can also use other similar kind of websites to ensure the speed of your internet. Note that you will find a Bit Rate dial in the live streaming section, here you can make adjustments for bit rates to bring it to desired level.
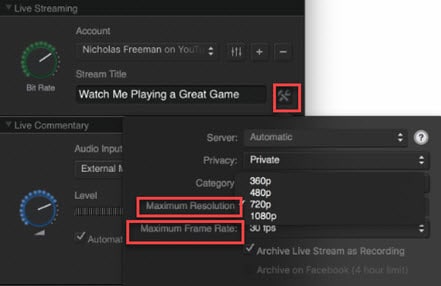
**Step 2:**It is also possible to make customized settings for frame rate and resolution as per need of your stream content.
**Step 3:**One can also prefer to archive his streaming.
**Step 4:**As soon as you have completed all above settings then you need to hit the stream button on screen.
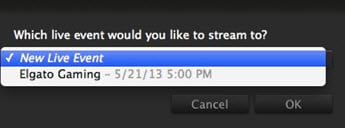
**Step 5:**Soon your software will ask you to select the event that you want to stream, choose your desired event and then press Ok. Soon you will be live on YouTube.
Richard Bennett
Richard Bennett is a writer and a lover of all things video.
Follow @Richard Bennett
Richard Bennett
Mar 27, 2024• Proven solutions
1. Live Stream on YouTube Gaming with OBS
You need to follow these simple Step s to use OBS for YouTube Live Streaming:
**Step 1:**First of all you need to login to your YouTube account. You might be aware of the fact that same YouTube account is used for YouTube gaming needs.
**Step 2:**Once entered inside your account then you need to visit the Go live streaming options and then from drop down menu simply choose Stream Now option.
**Step 3:**It is time to fill the details on screen; put impressive words for your live stream description so that it can grab attention of more viewers. Then select category as ‘Gaming’.
**Step 4:**Now you need to copy the stream key.
**Step 5:**Now open your OBS tool and then select YouTube as your active game streaming service. Users here need to paste that copied streaming key of Step 5 into the space provided on OBS settings page.
**Step 6:**It is time to make your desktop a video source.
**Step 7:**Once all these settings are completed then you need to hit the start streaming option.
**Step 8:**The service may take few seconds to bring your live on YouTube and after this small duration you will be connected to your channel with your streamed content. Then change your url from youtube.com to gaming.youtube.com
**Step 9:**You are all set to be live on your YouTube gaming profile.
2. Live Stream on YouTube with Elgato Game Capture HD
A: Basic Settings for Elgato Game Capture HD
The Step s below will help you to get ready for streaming with all basic settings that are required by Elgato Game Capture HD tool.
**Step 1:**First of all, you need to open your browser, search for Elgato Game Capture HD software on its official website and then download it for your system. Get it installed.
**Step 2:**Once installation process is complete then launch your software.
**Step 3:**Now you need to hit the add button on screen and select YouTube from drop down menu.
Step 4: It is time to sign in with your Google Account.
**Step 5:**After sign up process, allow the Elgato Game Capture tool to make connection with your YouTube account.
**Step 6:**Soon you will be able to access you account from Elgato platform.
**Step 7:**It is time to make adjustments for streaming settings.
B: Test your Bandwidth and make adjustments for Stream settings
It is essential to check speed of your internet connection during live streaming because if it goes slow then your content will become annoying to viewers and it will decay the reputation of your channel. So prefer to use following Step s to complete the basic settings and to test your internet connection.
**Step 1:**Open your browser and then visit the speedtest.net platform. You can also use other similar kind of websites to ensure the speed of your internet. Note that you will find a Bit Rate dial in the live streaming section, here you can make adjustments for bit rates to bring it to desired level.
**Step 2:**It is also possible to make customized settings for frame rate and resolution as per need of your stream content.
**Step 3:**One can also prefer to archive his streaming.
**Step 4:**As soon as you have completed all above settings then you need to hit the stream button on screen.
**Step 5:**Soon your software will ask you to select the event that you want to stream, choose your desired event and then press Ok. Soon you will be live on YouTube.
Richard Bennett
Richard Bennett is a writer and a lover of all things video.
Follow @Richard Bennett
Also read:
- [Updated] Comedy in Code Transformative Steps for Tailoring GIF Laughter for 2024
- [Updated] How to Enhance Video Rankings on YouTube Through SEO for 2024
- [Updated] Key Elements to Successful Mobile App Design for 2024
- [Updated] Quick Realignment YouTube on Mac Display Ratio
- 2024 Approved A Stepwise Approach to Designing Powerful Edu-Vids on Social Media
- 2024 Approved Building Brands Together A Guide to Selecting YouTube Teams
- 2024 Approved Charting Updates YouTube Money Standards
- 2024 Approved Transform Your Games Into a Live Stream Spectacle
- Essential Business YouTube Sites You Must Follow
- How To Transfer Data From iPhone 8 To Other iPhone 14 Pro Max devices? | Dr.fone
- In 2024, A Step-by-Step Guide to Forming Effective YouTube Partner Relationships
- IPhone Tips Efficiently Trim and Modify Videos
- Master Class in Live Streaming Your Pathway to Successful Youtube Channels via WireCast
- Optimize YouTube Watch Experience Boost/Slow Down Feature Usage
- Title: Channel Visuals Hub Icon & Banner Crafting Tips
- Author: Steven
- Created at : 2025-02-07 01:16:20
- Updated at : 2025-02-10 20:20:36
- Link: https://youtube-clips.techidaily.com/channel-visuals-hub-icon-and-banner-crafting-tips/
- License: This work is licensed under CC BY-NC-SA 4.0.