
:max_bytes(150000):strip_icc()/Google-TV-vs-YouTube-TV-459482eb01f54610952183b5233688fd.jpg)
"Carminati's Gig Economy AJay's YouTube Wealth Stream for 2024"
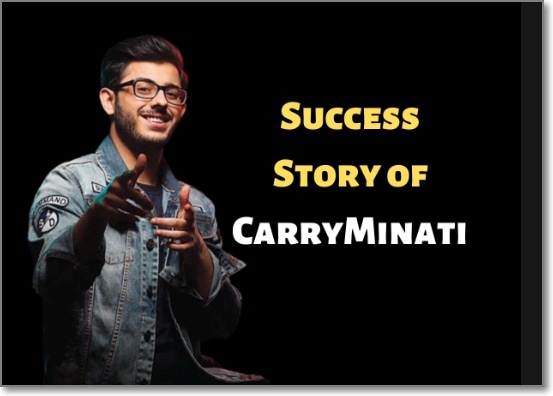
Carminati’s Gig Economy: AJay’s YouTube Wealth Stream
If you have been following the who’s who of YouTube, then Ajey Nagar, also popularly known as CarryMinati is definitely not a new name for you and you must also be well aware of CarryMinati YouTube income. And, if you have not heard of this name before, then it is high time to know about this YouTube influencer who is an Asian and Indian sensation.
Getting excited, we too!!! So, in this article, we will learn all about who is Ajey Nagar, what is CarryMinati, what makes this man so popular, what is his CarryMinati monthly income, his personal life, and much more.
Part 1: Who is CarryMinati?
You may wonder who this simple-looking, young boy is, right?
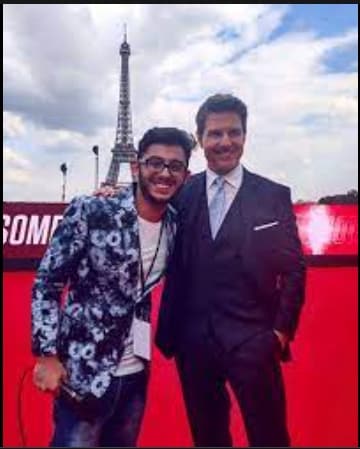
Yes, he is one of the India’s biggest YouTuber- Ajey Nagar. He shared a shoulder with Tom Cruise while promoting Mission Impossible 6 in Paris.
In this part of the topic, we are going to get deep knowledge about the personal, professional and financial information related to Carryminati.
| Nickname | CarryMinati |
|---|---|
| Real Name | Ajey Nagar |
| Net Worth (2022) | 31 Crores ($4 Million) |
| Monthly Income | Rs. 16+ Lakh |
| Yearly Income | Rs. 3+ Crore |
| Biography | |
| Date of Birth | 12th June 1999 |
| Gender | Male |
| Nationality | Indian |
| Height | 165 cm |
| Profession | YouTube |
| YouTube Channel | CarryMinati and CarryisLive |
| Awards and Recognition | Listed in TIME’s 10 next-generation leaders in the year 2019Listed in Forbes 30 Under 30 Asia in 2020 |
So, by now we know that CarryMinati aka Ajay Nagar is quite popular on YouTube. But, what does this popularity gets him in terms of money? Yes, this is an interesting question and the answer for this, you can check out in the next part of the topic.
Part 2: CarryMinati YouTube earning and stats
Let’s now deep digger into the financial aspects and other related stats related to CarryMinati. So, if you are eager to know how much CarryMinati earn from YouTube, we will give you to the nearest exact figures. Who does not like numbers, they are interesting facts, isn’tead.
A major part of Ajay Nagar’s income comes from YouTube videos and in addition to this, his popularity makes him earn from YouTube sponsors, collaborations, tie-up videos, brand endorsements, and advertising.
| Estimated Monthly Earnings in USD/Indian Rupees | Rs. 16+ Lakhs |
|---|---|
| Estimated yearly Earnings in USD/Indian Rupees | $ 4 Million/ Rs. 3+ Crores |
| Videos About | Roasting, Comedy, Sketches, Satire, and Gaming |
| Total Video Uploads | Over 176 |
| Subscribers | CarryMinati- 36.6millionCarryisLive- 11.3 million |
| Video Views | CarryMinati- 2.9 billion+CarryisLive- 1.3 billion+ |
| Last 30 Days Views | 35 M+ |
The statistics related to the views and income about CarryMinati are quite interesting and this makes everyone curious about what makes the channel and this person so popular on YouTube. If you too have been curious about the same, head to our next section.
Part 3: Why is Carry Minati trending on YouTube?
Just like the statistics, the facts related to CarryMinati’s popularity are equally interesting. Every YouTube channel or an influencer who is popular and trending have their own uniqueness and when it comes to CarrayMinati aka Ajay Nagar, there are several factors that makes him a sensation. Shortlisted some of them are as below.
Exclusive personality of Ajay Naga
Ajay Nagar has an exclusive personality that acts like a magnet that attracts viewers. His way of speaking and interacting with the audience has earned him a fan base across the globe.
Engaging and interactive video
The videos of CarryMinati are engaging and interactive which keeps the audience interested throughout.
Rib-tickling humour
The way the humour is added to the videos is simply amazing and definitely makes the viewers laugh a lot.
Relatable and authentic video content
Viewers of different ages and genres can easily relate to the videos created by CarryMinati and also found them to be authentic and different from the other channels.
Checkout his video on Social Media Culture that how interestingly he engages people with the relatable topics, and you will know what makes this man different from the others.
Most popular videos of CarryMinati
Though almost all videos by CarryMinati gain popularity, listed below are the top ones to date.
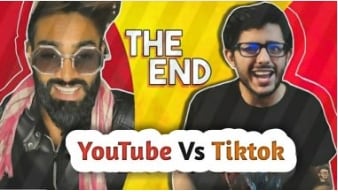
The End (The video was uploaded on 8th May 2020 and had over 65 million views with 8 lacs comments and over 10 million likes.) This was a roasting video by CarryMinati that gained immense popularity, but was later pulled down by YouTube stating it to be against the harassment policy of YouTube and for violating the guidelines of the community.
This video is about the Indian Film Industry and the awards given to the stars. Carryinati has interesting roasted the stars and receiving awards.
PUBG India: Life Battle Royale
https://www.youtube.com/embed/10y9yefd%5FxY
It is an interesting video of around 17 minutes where Ajay Nagar has acted along with other people to create a fun plot based of PUBG game.
Bonus Tip: How to be a YouTuber and Make Videos like Carryminati
We have learned that CarryMinati has become the name it is, all because of the excellent videos it creates. Though it may sound simple, video creation requires a lot of skills, patience, and the help of expert tools.
A lot of people have some excellent themes and ideas in their minds, but they do not know how to weave them all into an interesting video and here the need for an expert tool like Wondershare Filmora arises. So, if you also have some video creation plans in mind but have been holding them back, it’s time to bring them to reality using Filmora.
Wondershare Filmora is an excellent Windows and Mac-based software that helps in creating eye-catchy videos using multiple features supported by the program. From basic to advanced, no matter what type of video creation requirements you are looking for, Wondershare Filmora will take due care of the same.
Key features of the software
- Support to all types of video files and formats including 4K and also comes with a huge collection of stock footage.
- Support advanced features like PIP, green screen, split-screen, AI portrait, auto reframe, screen recorder, speed ramping, masking, and more.
- Allows adding visual effects and transitions and also allows uploading the created videos to YouTube and Facebook.
Wondershare Filmora supports a wide range of video editing features including basic editing, advanced editing, AI-based tools, and much more. The complete features can be checked in the Wondershare Filmora Video Editing Guide.
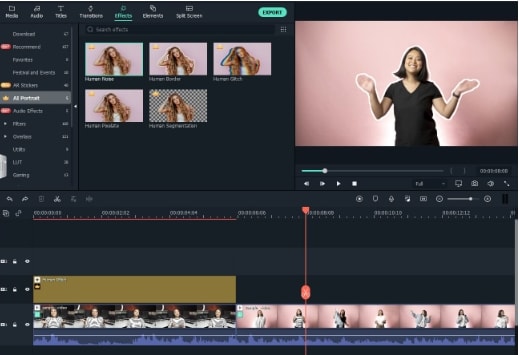
AI-based features are the highlight of this software and for your reference, listed below are the steps for the AI Portrait function. Using this feature, the background of a video can be removed easily without using the green screen or the chroma key.
Steps to use AI Portrait in Wondershare Filmora
Free Download For Win 7 or later(64-bit)
Free Download For macOS 10.14 or later
Step1 Launch the installed software on your system and add the media file to the software timeline.

Step2 Next, go to Effects > Ai Portrait, and the options of the features can be checked here. Click on the thumbnail and the feature can be viewed in the preview window.
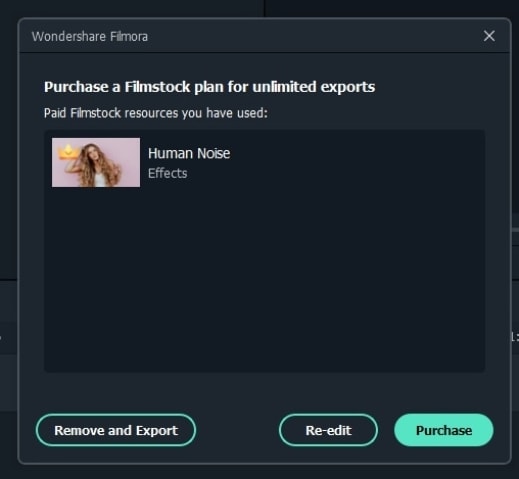
Step3 Drag the selected Portrait to the timeline and from the pop-up window choose to Purchase the additional module. You can check the result by playing the video. If needed multiple AI Portraits can be added to the video.
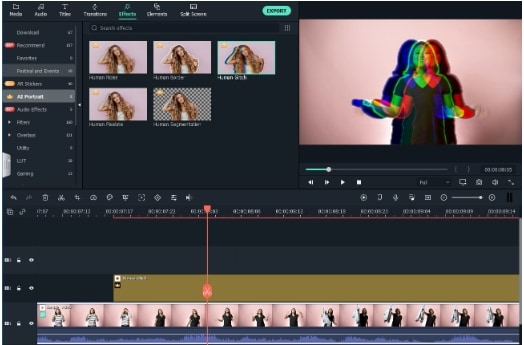
Step4 If further customization is needed, you can even adjust the AI Portrait settings.
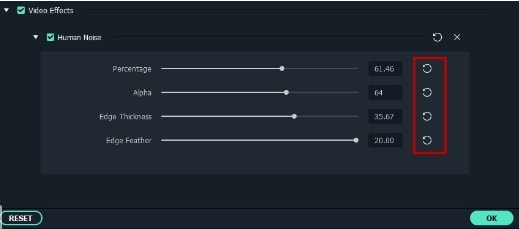
Step5 When finally, all the settings are done, click on the Export button to save the file.
Hot FAQs on CarryMinati
Below we have answered some hot frequently asked questions about CarryMinati.
1. Is Carry Minati married?
No, till date, CarryMinati aka Ajay Nagar is not married.
2. How much CarryMinati earn from 1 video?
Calculating the income from a YouTube video can be a complicated task that depends on several factors like views, likes, ads in the video, and more.
3. Which actors has Carry Minati interviewed?
Carry Minati has interviewed popular actors like Tom Cruise, Tessa Thompson, Henry Cavil, and others celebrities.
Final Words
Gone are the days when only high posts at big-shot companies can bring in money and proving this right is CarryMinati who is not only earning big but has also earned worldwide fans and has created a name for himself. With his comic skits and engaging videos, this popular YouTube influencer is growing and stretching his wings.
If you too have got inspired and looking forward to starting with some interesting videos, we suggest downloading Wondershare Filmora which will let you create a professional video with ease.
Free Download For Win 7 or later(64-bit)
Free Download For macOS 10.14 or later
So, by now we know that CarryMinati aka Ajay Nagar is quite popular on YouTube. But, what does this popularity gets him in terms of money? Yes, this is an interesting question and the answer for this, you can check out in the next part of the topic.
Part 2: CarryMinati YouTube earning and stats
Let’s now deep digger into the financial aspects and other related stats related to CarryMinati. So, if you are eager to know how much CarryMinati earn from YouTube, we will give you to the nearest exact figures. Who does not like numbers, they are interesting facts, isn’tead.
A major part of Ajay Nagar’s income comes from YouTube videos and in addition to this, his popularity makes him earn from YouTube sponsors, collaborations, tie-up videos, brand endorsements, and advertising.
| Estimated Monthly Earnings in USD/Indian Rupees | Rs. 16+ Lakhs |
|---|---|
| Estimated yearly Earnings in USD/Indian Rupees | $ 4 Million/ Rs. 3+ Crores |
| Videos About | Roasting, Comedy, Sketches, Satire, and Gaming |
| Total Video Uploads | Over 176 |
| Subscribers | CarryMinati- 36.6millionCarryisLive- 11.3 million |
| Video Views | CarryMinati- 2.9 billion+CarryisLive- 1.3 billion+ |
| Last 30 Days Views | 35 M+ |
The statistics related to the views and income about CarryMinati are quite interesting and this makes everyone curious about what makes the channel and this person so popular on YouTube. If you too have been curious about the same, head to our next section.
Part 3: Why is Carry Minati trending on YouTube?
Just like the statistics, the facts related to CarryMinati’s popularity are equally interesting. Every YouTube channel or an influencer who is popular and trending have their own uniqueness and when it comes to CarrayMinati aka Ajay Nagar, there are several factors that makes him a sensation. Shortlisted some of them are as below.
Exclusive personality of Ajay Naga
Ajay Nagar has an exclusive personality that acts like a magnet that attracts viewers. His way of speaking and interacting with the audience has earned him a fan base across the globe.
Engaging and interactive video
The videos of CarryMinati are engaging and interactive which keeps the audience interested throughout.
Rib-tickling humour
The way the humour is added to the videos is simply amazing and definitely makes the viewers laugh a lot.
Relatable and authentic video content
Viewers of different ages and genres can easily relate to the videos created by CarryMinati and also found them to be authentic and different from the other channels.
Checkout his video on Social Media Culture that how interestingly he engages people with the relatable topics, and you will know what makes this man different from the others.
Most popular videos of CarryMinati
Though almost all videos by CarryMinati gain popularity, listed below are the top ones to date.
The End (The video was uploaded on 8th May 2020 and had over 65 million views with 8 lacs comments and over 10 million likes.) This was a roasting video by CarryMinati that gained immense popularity, but was later pulled down by YouTube stating it to be against the harassment policy of YouTube and for violating the guidelines of the community.
This video is about the Indian Film Industry and the awards given to the stars. Carryinati has interesting roasted the stars and receiving awards.
PUBG India: Life Battle Royale
https://www.youtube.com/embed/10y9yefd%5FxY
It is an interesting video of around 17 minutes where Ajay Nagar has acted along with other people to create a fun plot based of PUBG game.
Bonus Tip: How to be a YouTuber and Make Videos like Carryminati
We have learned that CarryMinati has become the name it is, all because of the excellent videos it creates. Though it may sound simple, video creation requires a lot of skills, patience, and the help of expert tools.
A lot of people have some excellent themes and ideas in their minds, but they do not know how to weave them all into an interesting video and here the need for an expert tool like Wondershare Filmora arises. So, if you also have some video creation plans in mind but have been holding them back, it’s time to bring them to reality using Filmora.
Wondershare Filmora is an excellent Windows and Mac-based software that helps in creating eye-catchy videos using multiple features supported by the program. From basic to advanced, no matter what type of video creation requirements you are looking for, Wondershare Filmora will take due care of the same.
Key features of the software
- Support to all types of video files and formats including 4K and also comes with a huge collection of stock footage.
- Support advanced features like PIP, green screen, split-screen, AI portrait, auto reframe, screen recorder, speed ramping, masking, and more.
- Allows adding visual effects and transitions and also allows uploading the created videos to YouTube and Facebook.
Wondershare Filmora supports a wide range of video editing features including basic editing, advanced editing, AI-based tools, and much more. The complete features can be checked in the Wondershare Filmora Video Editing Guide.
AI-based features are the highlight of this software and for your reference, listed below are the steps for the AI Portrait function. Using this feature, the background of a video can be removed easily without using the green screen or the chroma key.
Steps to use AI Portrait in Wondershare Filmora
Free Download For Win 7 or later(64-bit)
Free Download For macOS 10.14 or later
Step1 Launch the installed software on your system and add the media file to the software timeline.
Step2 Next, go to Effects > Ai Portrait, and the options of the features can be checked here. Click on the thumbnail and the feature can be viewed in the preview window.
Step3 Drag the selected Portrait to the timeline and from the pop-up window choose to Purchase the additional module. You can check the result by playing the video. If needed multiple AI Portraits can be added to the video.
Step4 If further customization is needed, you can even adjust the AI Portrait settings.
Step5 When finally, all the settings are done, click on the Export button to save the file.
Hot FAQs on CarryMinati
Below we have answered some hot frequently asked questions about CarryMinati.
1. Is Carry Minati married?
No, till date, CarryMinati aka Ajay Nagar is not married.
2. How much CarryMinati earn from 1 video?
Calculating the income from a YouTube video can be a complicated task that depends on several factors like views, likes, ads in the video, and more.
3. Which actors has Carry Minati interviewed?
Carry Minati has interviewed popular actors like Tom Cruise, Tessa Thompson, Henry Cavil, and others celebrities.
Final Words
Gone are the days when only high posts at big-shot companies can bring in money and proving this right is CarryMinati who is not only earning big but has also earned worldwide fans and has created a name for himself. With his comic skits and engaging videos, this popular YouTube influencer is growing and stretching his wings.
If you too have got inspired and looking forward to starting with some interesting videos, we suggest downloading Wondershare Filmora which will let you create a professional video with ease.
Free Download For Win 7 or later(64-bit)
Free Download For macOS 10.14 or later
Unlocking the Secrets to High Clickthrough Rates in Thumbnails
The Ultimate Guide to YouTube Thumbnails that Get Views

Richard Bennett
Oct 26, 2023• Proven solutions
Search for any topic on YouTube and you’ll find thousands of videos. How do you decide which of them to watch? Thumbnails play a major role in what viewers decide to click on. They’re often more important than video titles.
Viewers click on thumbnails that both standout and feel relevant to their search. Your task when it comes to creating YouTube thumbnails is to make something that does both of those things while also maintaining your personal style.
- How to Make a YouTube Thumbnail
- How to Upload a YouTube Thumbnail
- YouTube Thumbnail Makers
- How to Make Thumbnails that Get Clicks (Without Clickbait!)
- Animated YouTube Thumbnails
Part 1: How to Make a YouTube Thumbnail
In order to create a custom video thumbnail, you’ll need a program to put it together in. You can use an image editing program like Photoshop if you have one, but if you don’t you can check out these free thumbnail makers.
Here are some examples of popular thumbnail styles.

1. The Classic Thumbnail (Photo or Screenshot)
A photo that shows what happens in your video – whether that means the finished ‘look’ from your makeup tutorial or you posing in front of the landmark you shot your travel vlog in front of – is a great way to let viewers know what to expect. While curiosity can be a big motive behind clicking on a video thumbnail (or anything online), when people have searched for a specific topic they want to be convinced that your video has what they’re looking for.
#1. Choose Your Photo
To start off, either choose a still frame from your video or take a photograph while you’re still set up from your video. A separate photograph is usually a better idea because your video editor might not be able to export a high-quality snapshot, and also because you’re able to choose your facial expression.
Aim to make this shot a close-up or medium close-up and make sure you’re either in the center of the screen or off to one side, as per the ‘rule of thirds’. Many cameras allow you to bring an optional grid up onto your viewfinder. This will divide your screen into three equal segments both vertically and horizontally. Try to make sure your eyes line up with the top line, and if you’re going to be off to one side then make sure you’re on one of the vertical lines. This will ensure your image is visually appealing.
If you want to add text later, it’s a good idea to be off to one side.
Including your face is important for most types of YouTube videos. People are attracted to eye contact and are more likely to click on thumbnails that feature a face. Gamers might choose to use a picture of a video game character instead and it will have the same effect.
Some situations where it isn’t essential to include your face include tech reviews, where viewers will be more interested in seeing the product, and cooking videos where people are looking to be tempted by a yummy food pic.
#2. Add Text and/or Images
This part isn’t essential – in some cases, a photo is enough – but a lot of the thumbnails for the videos ranked highest in YouTube’s search results include either a couple of words of text, a simple graphic (i.e. an emoji), or both.
In some cases you might use text to make it clear what type of video you’ve made, i.e. ‘review’ or ‘tutorial’. It’s best to keep any text you use brief, but you could get a bit more descriptive and write something like ‘fall makeup tutorial’. Three words is probably the most you can get away with. Remember that your text will be shrunk down with the rest of your image; you need to make it big enough to read easily once it’s shrunk, and that means you don’t have a ton of room for text.
You should also avoid fonts that are harder to read. Fonts with a lot of curves can be harder to read, and you want to make sure you choose a color that stands out from your background. Yellow might work against black, but it probably won’t work against the beige wall of your sunny bedroom. Sans serif fonts tend to be best.
Another tactic used in successful thumbnails is to add small graphics, like emojis or small images (i.e. pumpkins for a Halloween video), which are related to your video’s content. As with text, you don’t want to overload your thumbnail with images, but they’re a great way to add something eye-catching that’s a bit different from competing thumbnails.
2. The Emotional Laser (Background + Face Reacting)
One increasingly popular style of YouTube thumbnail is what we’re going to call the ‘Emotional Laser’. It’s bright (like, blindingly bright), it communicates a clear feeling, and it creates high expectations for how exciting the video’s content is going to be.
The three main elements of the Emotional Laser thumbnail are a background (usually bright), your face on the right wearing an over-pronounced expression, and either the thing your expression is in reaction to (i.e. food, a product, the topic of your video in text) or reinforcement of your emotion (i.e an emoji or question marks) on the left.


#1. Ham It Up (Take Your Reaction Photo)
Take a high-quality photograph of yourself conveying strong emotion. Generally, you want to look extremely excited, disgusted, angry, or shocked depending on the theme of the video.
If there’s an object you want to include in your thumbnail, like a product you’ll be talking about, then it’s a good idea to hold it for this photo. Hold it to one side of your head, turn towards it slightly (but not so much that the camera can only see the side of your face) and put on the expression that’s supposed to be a reaction to the object.
It can be a good idea to take this photo in front of a solid color so you can remove the background easily with chroma key.
#2. Choose Your Background
Your background might be scenery, a solid color, or even the room you filmed the video in. Light or bright colors are popular. Make sure there’s nothing that will distract from your expression. If your background is a room, or anything else where there could be things like pictures hanging, you may want to add a blur effect in the next step.
#3. Put It Together
In your thumbnail maker or a program like Photoshop, you’ll need to put your photo and your background together. This will work differently depending on what program you use. If your program has a chroma key tool and your reaction photo was taken against a solid color then you can make that solid color transparent.
What if I don’t have a separate background? If you don’t have a background you want to use, but you still want your reaction to stand out the same way it would if you did, then you can use your photo editor’s blur tool to turn the normal background of your photo into something you can pop-out from.
#4. Add Extras (Text, Emojis, etc.)
If instead of an object you plan to fill the other side of your thumbnail with text, question marks, emojis, or some other graphic element then now is the time to add it.
Part 2: How to Upload a YouTube Thumbnail
When you upload a new video to YouTube, you will see a Custom thumbnail option under Video thumbnails after your upload is complete.
If you want to add a custom thumbnail to a video that’s already up, that’s easy too.
- Go to your Video Manager in the Creator Studio.
- Find the video you want to change the thumbnail for and click Edit next to it.
- Click Custom thumbnail on the right of the preview screen.
- Upload your thumbnail and click Save changes.
Remember when you’re uploading custom thumbnails that you need to use a .JPG, .GIF, .BMP, or .PNG image with an aspect ratio of 16:9 and that your file size has to be under 2MB.
YouTube recommends that thumbnail images have a resolution of 1280x720px, and you cannot upload an image with a width of less than 640 pixels.
Make sure that all of your thumbnails adhere to YouTube’s Community guidelines. Anything sexually suggestive, violent, or otherwise graphic could result in your video being age-restricted.
Part 3: YouTube Thumbnail Makers
You don’t have to go out and buy a photo editor like Photoshop to make custom video thumbnails (although it’s a good thing to use if you already have it). Here are two free online programs you can use instead:
Canva is an intuitive option with templates for Thumbnails, Channel Art, and other social media graphics. There are stock photos and graphics provided, but not all of them are free (paid options cost $1 each). Canva’s templates do tend to include paid resources, so you may want to use them mostly for their layouts or as inspiration and replace everything they provide with your own images.
Generally, using Canva is as easy as dragging and dropping things where you want them. You’ll be able to set the dimensions for your project so the image you export is a perfect size. Adding text and changing the size, font, or color is easy too.
Adobe Spark also has templates for channel art, and it’s also very easy to use. The first time you use it helpful notes will pop up to guide you through the process. Using templates is especially simple because you just click on the elements in the pre-made thumbnail and replace them with your own photos/text.
You can make changes to the colors in your Spark thumbnail easily by selecting a new color scheme or filter. You can even toggle through layouts easily. When you choose a new layout, Spark will rearrange all the pieces of your current thumbnail to align with the new layout so you can quickly see what it looks like instead of having to rebuild.
Click to check more YouTube thumbnail makers
Part 4: How to Make Thumbnails That Get Clicks (Without Clickbait!)
Here are the top 10 best practices for creating effective YouTube thumbnails:
#1. Show What Your Video Is About
Being mysterious and clickbaity can get you views, if you’re already big. For small YouTubers, it pays off to be clear about your video’s topic. You want people to click who want to watch the actual content of your video. Even if you manage to get some clicks by being mysterious, you’ll probably end up with low viewer retention because people are clicking away when they realize your video isn’t what they were looking for. That will make YouTube’s algorithm rank your video lower, and then even fewer people will find it.
If your video is a product review, show the product in the thumbnail and maybe even write ‘review’ on it. If your video is a makeup tutorial, show your face with the finished makeup and maybe even include pictures of the products you used. People want to know what they’re clicking on before they click.
#2. Use a Consistent Layout
As you grow, you’ll want people to be able to see one of your thumbnails and instantly know it’s yours. Building a recognizable brand is about consistency. Try to stick with one basic layout for all of your videos. You can still customize every individual thumbnail by using different facial expressions and different graphics, but try to use similar backgrounds, fonts, and general layouts (i.e. you to the right of the thumbnails, text to the left) over and over.
#3. Use Your Face
Why should people want to watch your videos? If the answer is ‘because I can teach them to create delicious food’ or ‘because they want to learn about the latest iPhone’ then your thumbnail should include that food or that iPhone.
If part of the reason people want to watch your videos is you – your personality and your sense of humor – then you should be in your thumbnail.
Viewers who are on YouTube because they like seeing a creator’s personality like to feel the presence of that personality in the video thumbnail, and eye contact naturally draws attention and clicks.
#4. Add Small Graphics
Adding small graphics, like emojis or hearts, to your thumbnail can help you stand out in a couple different ways. First, if they’re being compared to thumbnails that are just screenshots from the video, your thumbnails will look a lot more polished. Second, they’ll add a splash of color which can draw eyes to your video in a search where other thumbnails are not using those same colors.
#5. Your Text Should Be Huge
Your thumbnail will end up being a fraction of the size it is while you’re creating it in your thumbnail maker, and that means that any text you use will end up being shrunk down. You could probably type a six-word sentence in a size 18 font and have it look fine while you’re making your thumbnail, but after you upload it there’s no way people will be able to read it at a glance.
Aim for a huge font size, and 3 words or less (so your thumbnail doesn’t end up looking crowded).
#6. Check Out The Competition
Type your video’s title or topic into the search engine on YouTube and look at the thumbnails for the videos that come up. These are your competition. You want to make a thumbnail that is similar enough to what comes up that viewers know it’s on the same topic, but different enough that it stands out.
Generally, if most of the thumbnails have the same layout, you’ll want to mimic that layout. Where you can break from the crowd is in the colors, fonts, and graphics you use.
Part 5: Animated YouTube Thumbnails
Whether or not you upload a custom thumbnail to YouTube, YouTube’s A.I will choose what it thinks are the 3 juiciest seconds of your video (you cannot choose for yourself) and play them as a GIF-like animation when people mouseover your video thumbnails.
As of now, this only works in the Google Chrome desktop browser. Videos have to be at least 30 seconds long to get moving thumbnails.
Alright, now that you know everything about YouTube thumbnails, go make one! Tell us in the comments what you’re going to do to make your video thumbnails stand out.
Touch Up YouTube Videos with Effects & Elements in Filmora
As one of the most widely used video editing software in YouTube video editing, Filmora provides lots of templates and effects with an intuitive interface. Download the free trial version and get started now.
Richard Bennett
Richard Bennett is a writer and a lover of all things video.
Follow @Richard Bennett
Richard Bennett
Oct 26, 2023• Proven solutions
Search for any topic on YouTube and you’ll find thousands of videos. How do you decide which of them to watch? Thumbnails play a major role in what viewers decide to click on. They’re often more important than video titles.
Viewers click on thumbnails that both standout and feel relevant to their search. Your task when it comes to creating YouTube thumbnails is to make something that does both of those things while also maintaining your personal style.
- How to Make a YouTube Thumbnail
- How to Upload a YouTube Thumbnail
- YouTube Thumbnail Makers
- How to Make Thumbnails that Get Clicks (Without Clickbait!)
- Animated YouTube Thumbnails
Part 1: How to Make a YouTube Thumbnail
In order to create a custom video thumbnail, you’ll need a program to put it together in. You can use an image editing program like Photoshop if you have one, but if you don’t you can check out these free thumbnail makers.
Here are some examples of popular thumbnail styles.
1. The Classic Thumbnail (Photo or Screenshot)
A photo that shows what happens in your video – whether that means the finished ‘look’ from your makeup tutorial or you posing in front of the landmark you shot your travel vlog in front of – is a great way to let viewers know what to expect. While curiosity can be a big motive behind clicking on a video thumbnail (or anything online), when people have searched for a specific topic they want to be convinced that your video has what they’re looking for.
#1. Choose Your Photo
To start off, either choose a still frame from your video or take a photograph while you’re still set up from your video. A separate photograph is usually a better idea because your video editor might not be able to export a high-quality snapshot, and also because you’re able to choose your facial expression.
Aim to make this shot a close-up or medium close-up and make sure you’re either in the center of the screen or off to one side, as per the ‘rule of thirds’. Many cameras allow you to bring an optional grid up onto your viewfinder. This will divide your screen into three equal segments both vertically and horizontally. Try to make sure your eyes line up with the top line, and if you’re going to be off to one side then make sure you’re on one of the vertical lines. This will ensure your image is visually appealing.
If you want to add text later, it’s a good idea to be off to one side.
Including your face is important for most types of YouTube videos. People are attracted to eye contact and are more likely to click on thumbnails that feature a face. Gamers might choose to use a picture of a video game character instead and it will have the same effect.
Some situations where it isn’t essential to include your face include tech reviews, where viewers will be more interested in seeing the product, and cooking videos where people are looking to be tempted by a yummy food pic.
#2. Add Text and/or Images
This part isn’t essential – in some cases, a photo is enough – but a lot of the thumbnails for the videos ranked highest in YouTube’s search results include either a couple of words of text, a simple graphic (i.e. an emoji), or both.
In some cases you might use text to make it clear what type of video you’ve made, i.e. ‘review’ or ‘tutorial’. It’s best to keep any text you use brief, but you could get a bit more descriptive and write something like ‘fall makeup tutorial’. Three words is probably the most you can get away with. Remember that your text will be shrunk down with the rest of your image; you need to make it big enough to read easily once it’s shrunk, and that means you don’t have a ton of room for text.
You should also avoid fonts that are harder to read. Fonts with a lot of curves can be harder to read, and you want to make sure you choose a color that stands out from your background. Yellow might work against black, but it probably won’t work against the beige wall of your sunny bedroom. Sans serif fonts tend to be best.
Another tactic used in successful thumbnails is to add small graphics, like emojis or small images (i.e. pumpkins for a Halloween video), which are related to your video’s content. As with text, you don’t want to overload your thumbnail with images, but they’re a great way to add something eye-catching that’s a bit different from competing thumbnails.
2. The Emotional Laser (Background + Face Reacting)
One increasingly popular style of YouTube thumbnail is what we’re going to call the ‘Emotional Laser’. It’s bright (like, blindingly bright), it communicates a clear feeling, and it creates high expectations for how exciting the video’s content is going to be.
The three main elements of the Emotional Laser thumbnail are a background (usually bright), your face on the right wearing an over-pronounced expression, and either the thing your expression is in reaction to (i.e. food, a product, the topic of your video in text) or reinforcement of your emotion (i.e an emoji or question marks) on the left.
#1. Ham It Up (Take Your Reaction Photo)
Take a high-quality photograph of yourself conveying strong emotion. Generally, you want to look extremely excited, disgusted, angry, or shocked depending on the theme of the video.
If there’s an object you want to include in your thumbnail, like a product you’ll be talking about, then it’s a good idea to hold it for this photo. Hold it to one side of your head, turn towards it slightly (but not so much that the camera can only see the side of your face) and put on the expression that’s supposed to be a reaction to the object.
It can be a good idea to take this photo in front of a solid color so you can remove the background easily with chroma key.
#2. Choose Your Background
Your background might be scenery, a solid color, or even the room you filmed the video in. Light or bright colors are popular. Make sure there’s nothing that will distract from your expression. If your background is a room, or anything else where there could be things like pictures hanging, you may want to add a blur effect in the next step.
#3. Put It Together
In your thumbnail maker or a program like Photoshop, you’ll need to put your photo and your background together. This will work differently depending on what program you use. If your program has a chroma key tool and your reaction photo was taken against a solid color then you can make that solid color transparent.
What if I don’t have a separate background? If you don’t have a background you want to use, but you still want your reaction to stand out the same way it would if you did, then you can use your photo editor’s blur tool to turn the normal background of your photo into something you can pop-out from.
#4. Add Extras (Text, Emojis, etc.)
If instead of an object you plan to fill the other side of your thumbnail with text, question marks, emojis, or some other graphic element then now is the time to add it.
Part 2: How to Upload a YouTube Thumbnail
When you upload a new video to YouTube, you will see a Custom thumbnail option under Video thumbnails after your upload is complete.
If you want to add a custom thumbnail to a video that’s already up, that’s easy too.
- Go to your Video Manager in the Creator Studio.
- Find the video you want to change the thumbnail for and click Edit next to it.
- Click Custom thumbnail on the right of the preview screen.
- Upload your thumbnail and click Save changes.
Remember when you’re uploading custom thumbnails that you need to use a .JPG, .GIF, .BMP, or .PNG image with an aspect ratio of 16:9 and that your file size has to be under 2MB.
YouTube recommends that thumbnail images have a resolution of 1280x720px, and you cannot upload an image with a width of less than 640 pixels.
Make sure that all of your thumbnails adhere to YouTube’s Community guidelines. Anything sexually suggestive, violent, or otherwise graphic could result in your video being age-restricted.
Part 3: YouTube Thumbnail Makers
You don’t have to go out and buy a photo editor like Photoshop to make custom video thumbnails (although it’s a good thing to use if you already have it). Here are two free online programs you can use instead:
Canva is an intuitive option with templates for Thumbnails, Channel Art, and other social media graphics. There are stock photos and graphics provided, but not all of them are free (paid options cost $1 each). Canva’s templates do tend to include paid resources, so you may want to use them mostly for their layouts or as inspiration and replace everything they provide with your own images.
Generally, using Canva is as easy as dragging and dropping things where you want them. You’ll be able to set the dimensions for your project so the image you export is a perfect size. Adding text and changing the size, font, or color is easy too.
Adobe Spark also has templates for channel art, and it’s also very easy to use. The first time you use it helpful notes will pop up to guide you through the process. Using templates is especially simple because you just click on the elements in the pre-made thumbnail and replace them with your own photos/text.
You can make changes to the colors in your Spark thumbnail easily by selecting a new color scheme or filter. You can even toggle through layouts easily. When you choose a new layout, Spark will rearrange all the pieces of your current thumbnail to align with the new layout so you can quickly see what it looks like instead of having to rebuild.
Click to check more YouTube thumbnail makers
Part 4: How to Make Thumbnails That Get Clicks (Without Clickbait!)
Here are the top 10 best practices for creating effective YouTube thumbnails:
#1. Show What Your Video Is About
Being mysterious and clickbaity can get you views, if you’re already big. For small YouTubers, it pays off to be clear about your video’s topic. You want people to click who want to watch the actual content of your video. Even if you manage to get some clicks by being mysterious, you’ll probably end up with low viewer retention because people are clicking away when they realize your video isn’t what they were looking for. That will make YouTube’s algorithm rank your video lower, and then even fewer people will find it.
If your video is a product review, show the product in the thumbnail and maybe even write ‘review’ on it. If your video is a makeup tutorial, show your face with the finished makeup and maybe even include pictures of the products you used. People want to know what they’re clicking on before they click.
#2. Use a Consistent Layout
As you grow, you’ll want people to be able to see one of your thumbnails and instantly know it’s yours. Building a recognizable brand is about consistency. Try to stick with one basic layout for all of your videos. You can still customize every individual thumbnail by using different facial expressions and different graphics, but try to use similar backgrounds, fonts, and general layouts (i.e. you to the right of the thumbnails, text to the left) over and over.
#3. Use Your Face
Why should people want to watch your videos? If the answer is ‘because I can teach them to create delicious food’ or ‘because they want to learn about the latest iPhone’ then your thumbnail should include that food or that iPhone.
If part of the reason people want to watch your videos is you – your personality and your sense of humor – then you should be in your thumbnail.
Viewers who are on YouTube because they like seeing a creator’s personality like to feel the presence of that personality in the video thumbnail, and eye contact naturally draws attention and clicks.
#4. Add Small Graphics
Adding small graphics, like emojis or hearts, to your thumbnail can help you stand out in a couple different ways. First, if they’re being compared to thumbnails that are just screenshots from the video, your thumbnails will look a lot more polished. Second, they’ll add a splash of color which can draw eyes to your video in a search where other thumbnails are not using those same colors.
#5. Your Text Should Be Huge
Your thumbnail will end up being a fraction of the size it is while you’re creating it in your thumbnail maker, and that means that any text you use will end up being shrunk down. You could probably type a six-word sentence in a size 18 font and have it look fine while you’re making your thumbnail, but after you upload it there’s no way people will be able to read it at a glance.
Aim for a huge font size, and 3 words or less (so your thumbnail doesn’t end up looking crowded).
#6. Check Out The Competition
Type your video’s title or topic into the search engine on YouTube and look at the thumbnails for the videos that come up. These are your competition. You want to make a thumbnail that is similar enough to what comes up that viewers know it’s on the same topic, but different enough that it stands out.
Generally, if most of the thumbnails have the same layout, you’ll want to mimic that layout. Where you can break from the crowd is in the colors, fonts, and graphics you use.
Part 5: Animated YouTube Thumbnails
Whether or not you upload a custom thumbnail to YouTube, YouTube’s A.I will choose what it thinks are the 3 juiciest seconds of your video (you cannot choose for yourself) and play them as a GIF-like animation when people mouseover your video thumbnails.
As of now, this only works in the Google Chrome desktop browser. Videos have to be at least 30 seconds long to get moving thumbnails.
Alright, now that you know everything about YouTube thumbnails, go make one! Tell us in the comments what you’re going to do to make your video thumbnails stand out.
Touch Up YouTube Videos with Effects & Elements in Filmora
As one of the most widely used video editing software in YouTube video editing, Filmora provides lots of templates and effects with an intuitive interface. Download the free trial version and get started now.
Richard Bennett
Richard Bennett is a writer and a lover of all things video.
Follow @Richard Bennett
Also read:
- Enduring Removal Protocol Say No to YouTube Shorts
- Drafting Dynamic News Endings
- [New] Deciphering the World of YouTube Media Conglomerates
- In 2024, Boost Views Through Effective YouTube Thumbnail Selection
- In 2024, Deciphering How TSeries Benefits From YouTube
- In 2024, Essential Video Marketing Strategies Top 8 Verified Services
- In 2024, Deep Dive The Economy and Impact of Online Stars
- Delightful Yuletide Cinema on YouTube Savor Nine Whole-Film Gems for 2024
- [New] Elevate Your Edits A Selection of Top 9 Free Software Choices
- YouTube Snippet Income Breakdown What's Your Profit Share?
- 2024 Approved Enhance Visibility Essential YouTube SEO Strategies Revealed
- [Updated] Creative Freedom on a Budget Essential Green Screen Effects From Top 4 Tutorial Sources
- The Right Approach to Partial YouTube Downloads
- [Updated] Audio Improvement for Effective Online Communication
- In 2024, Channel-Specific Choices Top Microphone Picks Adapted To Each YouTube Niche
- Unleashing the Power of Playback Turning YouTube Content Into Engaging GIFs (PC/Mobile)
- [Updated] Are There Risks to Influencing View Counts Financially?
- [Updated] Elevate Your Videos with YouTube Studio's Editing Mastery
- Easy Loop Keeping iPhone Videos Running for 2024
- [Updated] Awaken the Peaceful Warrior Within - Discover the Ultimate Channels
- Decoding YouTube's Earning Rules Update
- 2024 Approved Enhancing Engagement Through YouTube Advertising
- Icon & Logo Havens A Guide to 6 Unique Online Resources
- Exclusive Access Prime Video Downloader Picks
- A Beginner's Guide to Making Attractive Video Thumbnails for Social Media Platforms
- Learn YouTube Video Ad Building at No Cost
- Easier Than Ever Top 9 Uncomplicated, No-Cost Video Tools for You
- Mastering Multitasking Sync Many YT Videos Simultaneously
- Top 10 YouTubers with the Most Subscribers
- In 2024, Brand Battlegrounds Mastery of Marketing Metrics on YouTube
- In 2024, Conveniently Connect with Others via Your Playlist
- The Art of Attention Secrets to Making Your YouTube Ads Stand Out
- Boost Your Videos' Impact with Top-Ranking Software Solutions
- Maximizing Video Impact Selecting the Best Rank Trackers for YouTubers
- 2024 Approved 15 Best YouTube Anime Channels to Make Your Day
- Spellbinding Spectacle YouTube's Finest Magic Tricks Edited
- New Essential Voice Dampening Tech A List of the Top 10 Tools for 2024
- [Updated] Elevate Snappy Moments with Convenient Voice Customization Tips
- [New] 2024 Approved Innovative Approaches to Enhancing Google Meet Visibility
- New Say Goodbye to Shaky Footage Video Stabilization in Adobe Premiere Pro Made Easy
- [Updated] How to Undo a TikTok Refresh Blunder for 2024
- Possible solutions to restore deleted contacts from Nokia 105 Classic.
- In 2024, Leveraging Virtual Board Features for Enhanced Collaboration in Zoom
- In 2024, How To Open Your Apple iPhone 8 Without a Home Button | Dr.fone
- Updated HD Video Essentials A Beginners Guide to Pixel Size and Resolution for 2024
- [New] Top iOS PSP Games & Emulators Revealed for 2024
- 2024 Approved Best Live Streaming Services Ranked Your In-Depth Comparison
- In 2024, ACID Pro Examined & Open-Source Software Comparison
- [New] In 2024, VCS Vision Recorder Check Detailed Scrutiny
- 2024 Approved TikTok to MP4 Quick and Easy File Download & Conversion
- [New] Navigating the Process of Embedding Vimeo Media in PPTs for 2024
- In 2024, Selecting the Ideal AIFF Converter A Beginners Guide
- Unlocking the Power of Smart Lock A Beginners Guide for Realme GT Neo 5 Users
- [New] In 2024, Expressive Artistry on Snapchat Simplified Lenses Methods
- 9 Best Phone Monitoring Apps for Motorola Moto G34 5G | Dr.fone
- [Updated] Propel Your Passion Profits Joining the Elite of TikTok Creators for 2024
- [Updated] Streamline Control Switch Pro in Steam Play for 2024
- [Updated] The Ultimate Meme List Social Media Giants Clash for 2024
- 6 Ways to Change Spotify Location On Your Poco C65 | Dr.fone
- Top IMEI Unlokers for Your Motorola Edge 40 Pro Phone
- Sound Sleuths Exceptional Music Detection Software to Uncover Your Favorite Tunes on Android
- In 2024, Unlock Apple ID without Phone Number From iPhone 15
- Amplify Your Footage The Power of Enhancer 2.2
- [Updated] In 2024, Cutting-Edge Techniques for Live Videos From Your Smartphone
- [Updated] Unveiling the Latest in Non-FBX Gameplay Tracking
- [New] Becoming a Voice Alteration Virtuoso with MorphVOX
- Updated 2024 Approved Top 10 Real-Time Audio Amplifiers for Windows OS
- In 2024, How to Unlock Realme 10T 5G Phone Password Without Factory Reset?
- In 2024, How to fix iCloud lock from your iPhone XS Max and iPad
- Title: "Carminati's Gig Economy AJay's YouTube Wealth Stream for 2024"
- Author: Steven
- Created at : 2024-05-25 18:54:50
- Updated at : 2024-05-26 18:54:50
- Link: https://youtube-clips.techidaily.com/carminatis-gig-economy-ajays-youtube-wealth-stream-for-2024/
- License: This work is licensed under CC BY-NC-SA 4.0.
