
:max_bytes(150000):strip_icc()/GettyImages-469187056-57cdf0a45f9b5829f4457c9a.jpg)
Bringing YouTube to Life on Google Slides
Bringing YouTube to Life on Google Slides
Create High-Quality Video - Wondershare Filmora
An easy and powerful YouTube video editor
Numerous video and audio effects to choose from
Detailed tutorials provided by the official channel
Google Slide presentation is a powerful tool for creators to keep their audience engaged. This online platform lets you create and demonstrate your ideas. It will capture your viewers’ attention from the very beginning. It also doesn’t matter whatever learning style you engage. Adding YouTube videos to Google Slide will appeal to all levels of individuals.
More so, it is the best way to provide a break for both the audience and the creator. You can break Google Slide presentations with videos to offer some break. Viewers and the presenter get a breather in the process. The presenter can take a short break from speaking while the video plays. Let’s now dive into how to embed a YouTube video in Google Slides.

In this article
01 Why should we add a video to Google Slides?
02 How to add a YouTube video to Google Slide
03 How to choose the right video for your Slides?
Why should we add a video to Google Slides?
There is a great impact of adding video to Google Slides.
For attention
Videos will automatically awaken you, especially if your thoughts have started to sway during a presentation. A video has a direct way of showing creativity. The audience automatically connects the dots between the video and the presentation lines alike.
To stimulate discussion
A picture is worth a thousand words. There is a way that an added video will help the audience connect to the day’s topic. It will bring up several ideas and stir up discussion with the presenter.
Easy following
With videos embedded in Google Slide, viewers will find it easy to understand and digest. Videos automatically eliminate boredom and make any topic interesting.
How to add a YouTube video to Google Slide
Use these two methods to add a YouTube video to Google Slides. Via the Search and Direct link.
Method 1. Embed YouTube video to Google Slide by search and selection
Google has owned YouTube since the year 2006. You can, therefore, integrate Google’s products with YouTube easily.
Step 1. First, go to the slide where you want to embed your video.
Step 2. Then choose the “Insert” option from the menu bar and hit the “Video” option.

Step 3. It would be best if you now viewed the “YouTube” search bar to type in the video you want to embed. You can use keywords to search for the video in question and view instant search results.
Step 4. Then select the video you want to embed, and you’ll see it appear on the “Slide.”

Step 5. Format your video. Remember that the entire video will be embedded. You don’t necessarily need the whole video. It is time to select just a brief but relevant clip from the video to use. Then position your video to the right point using the axes from the exact starting point to the finished part you want the video to appear in.
Method 2. Embed YouTube video to Google Slide by direct link
You can engage this method if you want to include the entire video.
Step 1. Get the URL of the specific YouTube video that you want to use.

Step 2. Then go to your browser’s “Address bar” to copy the YouTube link.
Step 3. Next, open the “Presentation” slide to put your video to.
Step 4. Choose the “Insert” tab from the menu bar.
Step 5. Then hit on the “Video” option from the drop-down menu that appears.
Step 6. A new window will open automatically. Choose the “By URL” tab.
Step 7. Then paste the YouTube video URL in the “Paste YouTube URL Here” bar section.

Step 8. Wait for the video file to load and press the “Select” option. The video will immediately appear in the presentation slide. Just drag and drop the video in your preferred position.
Note: You can do a few edits inside the application. Set the timer when your video should start and when to stop. You can also adjust the video player size.
How to choose the right video for your Slides?
Not all videos will make an impact on your Google Slide. You need to use the best shot that adds value to your presentation. These guidelines will help you to settle on the best video.
Be Professional – choose the best video for your presentation. Remember that the video is part of the presentation and carries more weight. Settling for quality video will bring out the professionalism in you.
Relevant – how do you know that what you are showing your audience corresponds to the presentation piece? Ensure that the video you add has something to do with the Google Slide presentation topic. The two should naturally flow to make it easy to understand the whole concept.
Precise – your presentation is not about the video. The ideal length should not exceed 60 seconds. The longer the video, the greater the chance for your audience to lose track along the way.
Know every footage you are working with – this will help you pick the best shots for your presentation. So, learn every aspect of the video before settling down to use it.
Add new content – even though one content may suit several presentations, don’t rely on the same piece each time. Your audience will want to feel something fresh each time you are presenting. So, compose different videos for different scenarios to make that big impact.
Create an eye-catching video for your Slides with Filmora
The video quality matters when it comes to creating your Slides. The best video creator – Filmora – works in simple steps to give you an eye-catching video. It will create videos for all scenarios like marketing, tutorial, gaming, etc.
Key features of Filmora
- It offers you advanced video effects like filters, motion elements, etc
- You can multiply your fun with multiple screens with the Split Screen feature
- Easily change backgrounds using the Green Screen feature
- The speed control lets you fast forward or slow down a special moment
- Import your video clips to social media platforms
- You can also adjust the audio of your tracks using the Audio Mixer feature
Follow this guide to create a video for your slide with Filmora
Step 1. Launch Filmora
First, begin by downloading and installing Filmora on your computer device. Once installed, launch it and allow it to run. You can either create a new project or open an existing project to work on.
Step 2. Create a new project
Here, click on the “New Project” tab on the app’s welcome screen. The editor should load immediately. Then proceed to register the product. Just hit on the “Register” tab.
Step 3. Import video
Check the upper left corner of your screen to see the “Import” tab. Click on it and choose the “Import Media Files” option. Next, navigate to the location of your computer’s local list to select the clip or video you want to edit. Then, hit the “Import” button to add the video to the timeline for editing.
Step 4. Edit video
Drag and drop the raw footage to Filmora’s timeline to begin editing. Here, you can trim, add other video clips, merge, and add effects as you wish. Likewise, you can add opening titles, subtitles, and end credits to your video. More so, this tool offers different templates to use. Just drag and drop the templates you wish to use to a specific location on the timeline.
Step 5. Preview your file
Last but not least, you can preview your files. Click on the “Play” tab to start previewing your video clips. The main essence of this part is to allow you to make the necessary changes to your clips if there is a need.
Step 6. Export and Share
With Filmora, you can export your file to various social media platforms. But first, go to the “Output window” and select the video file format to use. This software supports several output formats to apply to any platform and device. Just click on the “Format” tab and choose the file format to use. Then also change the resolution and other parameters like frame rate and channel of your video in the “Settings” section. Finally, share your video to your YouTube channel and get ready to add the video to the Google Slide presentation.
For Win 7 or later (64-bit)
For macOS 10.12 or later
Conclusion
● You now know how to put a YouTube video in Google Slides the simple way. You can search for your YouTube videos or directly use the URL link. Whatever the case, remember that it’s the quality of your video that carries more weight. Thanks to the availability of third-party apps that you can use to create and improve the quality of your videos.
● Filmora is at your service to create high-resolution videos that you can export in any format to your YouTube channel. The tool is intuitive, and it won’t matter whether you haven’t tried it before. It is a perfect choice for both professionals and first-time users.
Google Slide presentation is a powerful tool for creators to keep their audience engaged. This online platform lets you create and demonstrate your ideas. It will capture your viewers’ attention from the very beginning. It also doesn’t matter whatever learning style you engage. Adding YouTube videos to Google Slide will appeal to all levels of individuals.
More so, it is the best way to provide a break for both the audience and the creator. You can break Google Slide presentations with videos to offer some break. Viewers and the presenter get a breather in the process. The presenter can take a short break from speaking while the video plays. Let’s now dive into how to embed a YouTube video in Google Slides.
In this article
01 Why should we add a video to Google Slides?
02 How to add a YouTube video to Google Slide
03 How to choose the right video for your Slides?
Why should we add a video to Google Slides?
There is a great impact of adding video to Google Slides.
For attention
Videos will automatically awaken you, especially if your thoughts have started to sway during a presentation. A video has a direct way of showing creativity. The audience automatically connects the dots between the video and the presentation lines alike.
To stimulate discussion
A picture is worth a thousand words. There is a way that an added video will help the audience connect to the day’s topic. It will bring up several ideas and stir up discussion with the presenter.
Easy following
With videos embedded in Google Slide, viewers will find it easy to understand and digest. Videos automatically eliminate boredom and make any topic interesting.
How to add a YouTube video to Google Slide
Use these two methods to add a YouTube video to Google Slides. Via the Search and Direct link.
Method 1. Embed YouTube video to Google Slide by search and selection
Google has owned YouTube since the year 2006. You can, therefore, integrate Google’s products with YouTube easily.
Step 1. First, go to the slide where you want to embed your video.
Step 2. Then choose the “Insert” option from the menu bar and hit the “Video” option.
Step 3. It would be best if you now viewed the “YouTube” search bar to type in the video you want to embed. You can use keywords to search for the video in question and view instant search results.
Step 4. Then select the video you want to embed, and you’ll see it appear on the “Slide.”
Step 5. Format your video. Remember that the entire video will be embedded. You don’t necessarily need the whole video. It is time to select just a brief but relevant clip from the video to use. Then position your video to the right point using the axes from the exact starting point to the finished part you want the video to appear in.
Method 2. Embed YouTube video to Google Slide by direct link
You can engage this method if you want to include the entire video.
Step 1. Get the URL of the specific YouTube video that you want to use.
Step 2. Then go to your browser’s “Address bar” to copy the YouTube link.
Step 3. Next, open the “Presentation” slide to put your video to.
Step 4. Choose the “Insert” tab from the menu bar.
Step 5. Then hit on the “Video” option from the drop-down menu that appears.
Step 6. A new window will open automatically. Choose the “By URL” tab.
Step 7. Then paste the YouTube video URL in the “Paste YouTube URL Here” bar section.
Step 8. Wait for the video file to load and press the “Select” option. The video will immediately appear in the presentation slide. Just drag and drop the video in your preferred position.
Note: You can do a few edits inside the application. Set the timer when your video should start and when to stop. You can also adjust the video player size.
How to choose the right video for your Slides?
Not all videos will make an impact on your Google Slide. You need to use the best shot that adds value to your presentation. These guidelines will help you to settle on the best video.
Be Professional – choose the best video for your presentation. Remember that the video is part of the presentation and carries more weight. Settling for quality video will bring out the professionalism in you.
Relevant – how do you know that what you are showing your audience corresponds to the presentation piece? Ensure that the video you add has something to do with the Google Slide presentation topic. The two should naturally flow to make it easy to understand the whole concept.
Precise – your presentation is not about the video. The ideal length should not exceed 60 seconds. The longer the video, the greater the chance for your audience to lose track along the way.
Know every footage you are working with – this will help you pick the best shots for your presentation. So, learn every aspect of the video before settling down to use it.
Add new content – even though one content may suit several presentations, don’t rely on the same piece each time. Your audience will want to feel something fresh each time you are presenting. So, compose different videos for different scenarios to make that big impact.
Create an eye-catching video for your Slides with Filmora
The video quality matters when it comes to creating your Slides. The best video creator – Filmora – works in simple steps to give you an eye-catching video. It will create videos for all scenarios like marketing, tutorial, gaming, etc.
Key features of Filmora
- It offers you advanced video effects like filters, motion elements, etc
- You can multiply your fun with multiple screens with the Split Screen feature
- Easily change backgrounds using the Green Screen feature
- The speed control lets you fast forward or slow down a special moment
- Import your video clips to social media platforms
- You can also adjust the audio of your tracks using the Audio Mixer feature
Follow this guide to create a video for your slide with Filmora
Step 1. Launch Filmora
First, begin by downloading and installing Filmora on your computer device. Once installed, launch it and allow it to run. You can either create a new project or open an existing project to work on.
Step 2. Create a new project
Here, click on the “New Project” tab on the app’s welcome screen. The editor should load immediately. Then proceed to register the product. Just hit on the “Register” tab.
Step 3. Import video
Check the upper left corner of your screen to see the “Import” tab. Click on it and choose the “Import Media Files” option. Next, navigate to the location of your computer’s local list to select the clip or video you want to edit. Then, hit the “Import” button to add the video to the timeline for editing.
Step 4. Edit video
Drag and drop the raw footage to Filmora’s timeline to begin editing. Here, you can trim, add other video clips, merge, and add effects as you wish. Likewise, you can add opening titles, subtitles, and end credits to your video. More so, this tool offers different templates to use. Just drag and drop the templates you wish to use to a specific location on the timeline.
Step 5. Preview your file
Last but not least, you can preview your files. Click on the “Play” tab to start previewing your video clips. The main essence of this part is to allow you to make the necessary changes to your clips if there is a need.
Step 6. Export and Share
With Filmora, you can export your file to various social media platforms. But first, go to the “Output window” and select the video file format to use. This software supports several output formats to apply to any platform and device. Just click on the “Format” tab and choose the file format to use. Then also change the resolution and other parameters like frame rate and channel of your video in the “Settings” section. Finally, share your video to your YouTube channel and get ready to add the video to the Google Slide presentation.
For Win 7 or later (64-bit)
For macOS 10.12 or later
Conclusion
● You now know how to put a YouTube video in Google Slides the simple way. You can search for your YouTube videos or directly use the URL link. Whatever the case, remember that it’s the quality of your video that carries more weight. Thanks to the availability of third-party apps that you can use to create and improve the quality of your videos.
● Filmora is at your service to create high-resolution videos that you can export in any format to your YouTube channel. The tool is intuitive, and it won’t matter whether you haven’t tried it before. It is a perfect choice for both professionals and first-time users.
Generate Interest: Making Your Own YouTube Intros
How to Make a Cool Intro for YouTube? [+Free Templates]

Richard Bennett
Mar 27, 2024• Proven solutions
For a professional presence on YouTube intro is a must. It is for the same reason that how to make an intro is one of the most popular topic now.
It is the impression that will make sure that the users are attracted. The video’s success greatly depends upon the intro as it will allow the users to get the idea.
The good news is that YouTube intro making is not a complex process due to some software and websites offering the services, which we will discuss in this article.
You will learn :
- What Is YouTube Intro?
- Why You Need a YouTube Intro?
- How to Make Your Own Perfect YouTube Intro Easily?
- Key Takeaways to Create Great Attractive YouTube Intro
- Popular YouTube Intro Styles and Templates
Wondershare Filmstock Gaming Video Editing Skils ](https://filmstock.wondershare.com/creative-theme-game?source%5Fchannel=seo%5Farticle?spm=rs.filmora%5Fweb )
What Is YouTube Intro?
YouTube Intro is a short clip at the start of the video that introduces the maker as well as the topic under discussion. It can be rightfully called as the trademark of your channel. The intro tells the user who you really are. This is the only part of the video that is brief and allows the users to get the first impact of you.
There are thousands of software programs and websites that allow you to get breathtaking animated intros. You can use any of the intro templates to make your first impression the best of all. The user will get to know more about you and will also subscribe to your channel.
There are certain creators that divide the intro into different sections.
Making an intro has never been as easy as it is now. Kudos to the programs that are available online as well as offline.
Why You Need a YouTube Intro?
There are many reasons for which you need YouTube intro. Some reasons are mentioned as under for you better understanding.
- It will get you the relevant traffic
The intro will let the users know what your channel is all about. It will, in turn, get you the best and the most relevant leads. If you are running eCommerce business then the intro will get you into the limelight that you deserve.
- It makes a difference
It simply means that you will see a change in traffic as well as in the overall growth of your channel. You will also see the difference in the working of the channel. A good intro will bring in the relevant audience and this, in turn, will make sure that you get new ideas to make your channel stand out.
- Recognition
An intro makes sure that you get the recognition that you desire. It will also make sure that you get the best and the most advanced outcome that is related to your business. Getting recognition is like a dream come true for the vloggers.
It will make sure that the revenue bases, as well as the sales, are increased. The potential customers will only subscribe to your services and channel if your intro is relevant. Also, you need to keep it short and highly targeted.
How to Make Your Own Perfect YouTube Intro Using Filmora?
With the best and the most advanced techniques, Filmora is a program that will let you create the intro which is just awesome. The program is easy to use and will also make sure that you get to know its features in great detail. The interface, as well as the format support, is awesome.
You need not be a tech-savvy person to operate the program as it is self-explanatory. Fimora has been highly regarded as one of the best programs. It is all because of the viability that it provides to its users.
Features of the program
- The program supports a wide range of formats. You can export as well as import files in a wide range of formats.
- The user interface is intuitive and easy to understand. The graphical properties will make sure that you understand the working of it easily.
- There are more than 300 effects on the program that will make sure to get you the specialized experience you want to have with your channel.
- The intro can be directly uploaded to YouTube and there is no need to export and upload separately.
- The tech specialties of the program are highly in line with the current trends. Apart from intro making, there is a wide range of functions that the program can perform.


The Process to create your own YouTube intro by Filmora?
If you want to make intro using Filmora then it is advised to follow the steps as under to get the best outcome.
Step 1: Click on import or import media files on the main interface to make sure that the intro material is imported to the program.

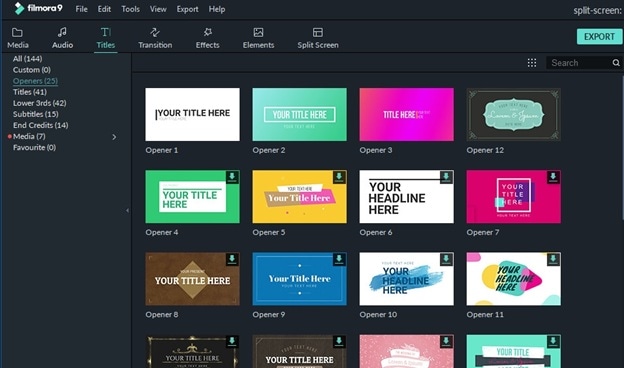
Step 2: Head over to “Title” and you can add them to you YouTube intro with ease:
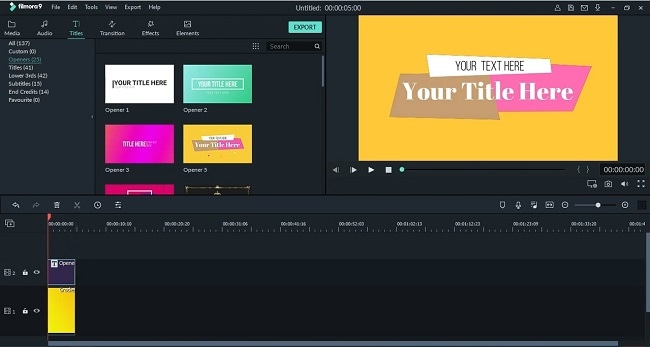
Step 3: To add opener you need to head to “Opener” under Titles and right-click the one you want to select. Click apply and it will be added to the timeline.
Step 4: You can also change the duration of the title effects. Drag its edge on the timeline you can also click the clock icon and enter new duration.
Step 5: Under the style tab you can change the font, text type, and other settings.

Step 6: To edit the intro, even more, click the “Advanced” button to access the advanced editing panel. Add text boxes, shapes and other effects from here.
Step 7: Under “Effects” you can access the filters and overlays to add to your project.
Step 8: The default length of the filter is 5 seconds that can be extended by dragging its corners on to the timeline.
Step 9: Under the audio heading you can change the volume of the sound of your intro to the level you want.
Step 10: You can also stabilize the video by right-clicking it in the timeline and then going to properties. You will see the stabilization editing panel.
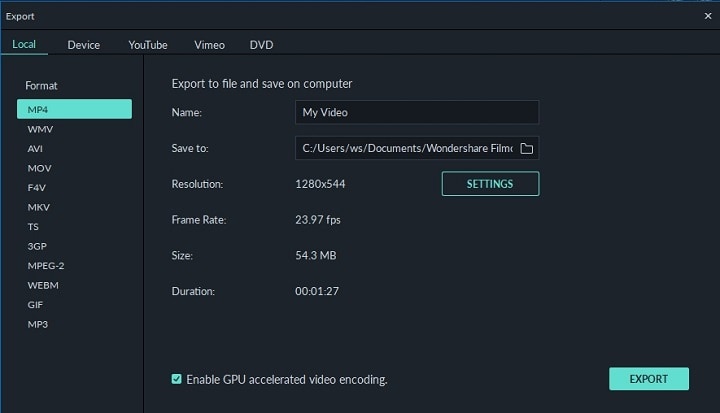
Step 11: Once the editing has been done you just need to click Export on the toolbar. Under the window that appears you can export the intro with respect to device, format, and can also burn it onto the DVD. If you want you can also directly upload the intro to YouTube and other social media platforms.
It’s very easy right? Download Filmora and make a click-driven intro now!
Key Takeaways to Create Great Attractive YouTube Intro
There are certain sections that will make sure that you get the best YouTube intro of all time. It is also important as the intro is regarded as the face of your channel. It will allow you to get the attention for your channel. Some important points are as under.
1. It must be to the point
If you want to impress your audience then remember that you only have 10 – 20 seconds. The longer the intro the bore it is. It must be highly relevant and must make sure that the users get the point of your channel. It will let you thrive a lot.
If for any reason there is an element of confusion within your intro it will never do well. If you want to know how to make an intro for YouTube then it is advised to keep reading on. This article will surely help you a lot.
2. Short means Sweet
The point is that your intro should be to the point. It means that you must never prolong your intro for any reason. Again here comes the element of relevancy.
It means that you must keep your intro as short as possible as it allows you to capture the audience in a far better manner. A short intro will make sure that you are getting the attention that you need when it comes to your channel. So it will boost your channel traffic a lot.
3. It must be in line with your channel theme
Again it is critical that your intro is relevant to your channel. It means that the intro made should represent your channel’s content instead of anything else. It will make sure that you get the best and most relevant audience.
This will once again boost your channel as well as traffic surge will also occur. You will get the best outcome that will make it possible for you to channel the traffic wherever you want. This, in turn, will also boost your channel revenue in case of monetization.
4. Awesome Music
It is the most important part that will impact your YouTube intro. Good music will make sure that you get the best outcome and the users are attracted. There are many YouTube channels that were only recognized as their music was awesome.
5. Clean Visuals
HD and the high quality intro is the key to your channel’s success. It is highly regarded as the best way to attract people. You must spend time to make sure that it looks great and to the point. This is one of the ways to make sure that your intro looks good and awesome.
6. Technically Sound
It is again important to note that technically the intro that has been made is sound and is to the point. From transitions to fade and from animations to PIP there are a lot of details that should be taken care of. It will make sure that you get the intro that is highly professional and specialized.
Popular YouTube Intro Styles and Templates
If you think making a intro yourself is too complex and time-consuming, I also find some popular YouTube intro templates for you. Some of the coolest YouTube intro styles are as follows.
1. Logo and URL Style
This is one of the most common and frequently used YouTube intro style. There are many templates that are associated with it. Some of these are mentioned as under. These effects are mostly used if you are running a tech channel but the use is not limited to this alone.
- Logo & URL Liquid effect Intro Video Template
- Logo Focus Intro Video Template
- Unveiling Logo & URL Intro Video Template
- Logo Sketch Intro Video Template
- Logo Art Intro Video Template
2. Promotional Style
For promotion, there are tons of intros that are available online and anyone can be used. The content creation with such templates is easy. It is because there are many changes that can be done to promote your channel. The best part of these templates is that they are highly customizable.
These templates can also be used to create art for the outros as well that will further solidify the channel. Promoting products at the start and end of the YouTube channel is simply an awesome and fun factor. Some of the coolest templates that can be used in this regard are as follows.
- YouTube Promo Kit by Pixrate
- Broadcast Package by Motionbear
- Typo Opener by BLAQMATRIX
- Promo Intro by 7 Roads
- Upbeat Opener by MBR effects
3. Gaming Intro Styles
It is s well-known fact that the gaming industry is booming. There are literally hundreds of gaming channels on YouTube that are working just awesome. The kiddos are earning are a lot with the channel and the future is also bright.
To get the best gaming intro you need to focus on the outcome on the gaming brand you are trying to promote. Some of the coolest gaming channel intros that could be used to get the work done are as follows.
Conclusion
This article has taught you well how to make an intro with ease and perfection. The different templates are available online which can be used to make awesome YouTube intros. The best software that you can find on the market is the Wondershare Filmora which makes the process a lot easier.
The program is known for the awesome workability as well as viability kudos to the developers of this awesome software. It is also recommended sharing this article on social media such as Facebook and Twitter so that the others can also benefit from it. It will also help others in creating awesome YouTube tutorials.
Richard Bennett
Richard Bennett is a writer and a lover of all things video.
Follow @Richard Bennett
Richard Bennett
Mar 27, 2024• Proven solutions
For a professional presence on YouTube intro is a must. It is for the same reason that how to make an intro is one of the most popular topic now.
It is the impression that will make sure that the users are attracted. The video’s success greatly depends upon the intro as it will allow the users to get the idea.
The good news is that YouTube intro making is not a complex process due to some software and websites offering the services, which we will discuss in this article.
You will learn :
- What Is YouTube Intro?
- Why You Need a YouTube Intro?
- How to Make Your Own Perfect YouTube Intro Easily?
- Key Takeaways to Create Great Attractive YouTube Intro
- Popular YouTube Intro Styles and Templates
Wondershare Filmstock Gaming Video Editing Skils ](https://filmstock.wondershare.com/creative-theme-game?source%5Fchannel=seo%5Farticle?spm=rs.filmora%5Fweb )
What Is YouTube Intro?
YouTube Intro is a short clip at the start of the video that introduces the maker as well as the topic under discussion. It can be rightfully called as the trademark of your channel. The intro tells the user who you really are. This is the only part of the video that is brief and allows the users to get the first impact of you.
There are thousands of software programs and websites that allow you to get breathtaking animated intros. You can use any of the intro templates to make your first impression the best of all. The user will get to know more about you and will also subscribe to your channel.
There are certain creators that divide the intro into different sections.
Making an intro has never been as easy as it is now. Kudos to the programs that are available online as well as offline.
Why You Need a YouTube Intro?
There are many reasons for which you need YouTube intro. Some reasons are mentioned as under for you better understanding.
- It will get you the relevant traffic
The intro will let the users know what your channel is all about. It will, in turn, get you the best and the most relevant leads. If you are running eCommerce business then the intro will get you into the limelight that you deserve.
- It makes a difference
It simply means that you will see a change in traffic as well as in the overall growth of your channel. You will also see the difference in the working of the channel. A good intro will bring in the relevant audience and this, in turn, will make sure that you get new ideas to make your channel stand out.
- Recognition
An intro makes sure that you get the recognition that you desire. It will also make sure that you get the best and the most advanced outcome that is related to your business. Getting recognition is like a dream come true for the vloggers.
It will make sure that the revenue bases, as well as the sales, are increased. The potential customers will only subscribe to your services and channel if your intro is relevant. Also, you need to keep it short and highly targeted.
How to Make Your Own Perfect YouTube Intro Using Filmora?
With the best and the most advanced techniques, Filmora is a program that will let you create the intro which is just awesome. The program is easy to use and will also make sure that you get to know its features in great detail. The interface, as well as the format support, is awesome.
You need not be a tech-savvy person to operate the program as it is self-explanatory. Fimora has been highly regarded as one of the best programs. It is all because of the viability that it provides to its users.
Features of the program
- The program supports a wide range of formats. You can export as well as import files in a wide range of formats.
- The user interface is intuitive and easy to understand. The graphical properties will make sure that you understand the working of it easily.
- There are more than 300 effects on the program that will make sure to get you the specialized experience you want to have with your channel.
- The intro can be directly uploaded to YouTube and there is no need to export and upload separately.
- The tech specialties of the program are highly in line with the current trends. Apart from intro making, there is a wide range of functions that the program can perform.
The Process to create your own YouTube intro by Filmora?
If you want to make intro using Filmora then it is advised to follow the steps as under to get the best outcome.
Step 1: Click on import or import media files on the main interface to make sure that the intro material is imported to the program.
Step 2: Head over to “Title” and you can add them to you YouTube intro with ease:
Step 3: To add opener you need to head to “Opener” under Titles and right-click the one you want to select. Click apply and it will be added to the timeline.
Step 4: You can also change the duration of the title effects. Drag its edge on the timeline you can also click the clock icon and enter new duration.
Step 5: Under the style tab you can change the font, text type, and other settings.
Step 6: To edit the intro, even more, click the “Advanced” button to access the advanced editing panel. Add text boxes, shapes and other effects from here.
Step 7: Under “Effects” you can access the filters and overlays to add to your project.
Step 8: The default length of the filter is 5 seconds that can be extended by dragging its corners on to the timeline.
Step 9: Under the audio heading you can change the volume of the sound of your intro to the level you want.
Step 10: You can also stabilize the video by right-clicking it in the timeline and then going to properties. You will see the stabilization editing panel.
Step 11: Once the editing has been done you just need to click Export on the toolbar. Under the window that appears you can export the intro with respect to device, format, and can also burn it onto the DVD. If you want you can also directly upload the intro to YouTube and other social media platforms.
It’s very easy right? Download Filmora and make a click-driven intro now!
Key Takeaways to Create Great Attractive YouTube Intro
There are certain sections that will make sure that you get the best YouTube intro of all time. It is also important as the intro is regarded as the face of your channel. It will allow you to get the attention for your channel. Some important points are as under.
1. It must be to the point
If you want to impress your audience then remember that you only have 10 – 20 seconds. The longer the intro the bore it is. It must be highly relevant and must make sure that the users get the point of your channel. It will let you thrive a lot.
If for any reason there is an element of confusion within your intro it will never do well. If you want to know how to make an intro for YouTube then it is advised to keep reading on. This article will surely help you a lot.
2. Short means Sweet
The point is that your intro should be to the point. It means that you must never prolong your intro for any reason. Again here comes the element of relevancy.
It means that you must keep your intro as short as possible as it allows you to capture the audience in a far better manner. A short intro will make sure that you are getting the attention that you need when it comes to your channel. So it will boost your channel traffic a lot.
3. It must be in line with your channel theme
Again it is critical that your intro is relevant to your channel. It means that the intro made should represent your channel’s content instead of anything else. It will make sure that you get the best and most relevant audience.
This will once again boost your channel as well as traffic surge will also occur. You will get the best outcome that will make it possible for you to channel the traffic wherever you want. This, in turn, will also boost your channel revenue in case of monetization.
4. Awesome Music
It is the most important part that will impact your YouTube intro. Good music will make sure that you get the best outcome and the users are attracted. There are many YouTube channels that were only recognized as their music was awesome.
5. Clean Visuals
HD and the high quality intro is the key to your channel’s success. It is highly regarded as the best way to attract people. You must spend time to make sure that it looks great and to the point. This is one of the ways to make sure that your intro looks good and awesome.
6. Technically Sound
It is again important to note that technically the intro that has been made is sound and is to the point. From transitions to fade and from animations to PIP there are a lot of details that should be taken care of. It will make sure that you get the intro that is highly professional and specialized.
Popular YouTube Intro Styles and Templates
If you think making a intro yourself is too complex and time-consuming, I also find some popular YouTube intro templates for you. Some of the coolest YouTube intro styles are as follows.
1. Logo and URL Style
This is one of the most common and frequently used YouTube intro style. There are many templates that are associated with it. Some of these are mentioned as under. These effects are mostly used if you are running a tech channel but the use is not limited to this alone.
- Logo & URL Liquid effect Intro Video Template
- Logo Focus Intro Video Template
- Unveiling Logo & URL Intro Video Template
- Logo Sketch Intro Video Template
- Logo Art Intro Video Template
2. Promotional Style
For promotion, there are tons of intros that are available online and anyone can be used. The content creation with such templates is easy. It is because there are many changes that can be done to promote your channel. The best part of these templates is that they are highly customizable.
These templates can also be used to create art for the outros as well that will further solidify the channel. Promoting products at the start and end of the YouTube channel is simply an awesome and fun factor. Some of the coolest templates that can be used in this regard are as follows.
- YouTube Promo Kit by Pixrate
- Broadcast Package by Motionbear
- Typo Opener by BLAQMATRIX
- Promo Intro by 7 Roads
- Upbeat Opener by MBR effects
3. Gaming Intro Styles
It is s well-known fact that the gaming industry is booming. There are literally hundreds of gaming channels on YouTube that are working just awesome. The kiddos are earning are a lot with the channel and the future is also bright.
To get the best gaming intro you need to focus on the outcome on the gaming brand you are trying to promote. Some of the coolest gaming channel intros that could be used to get the work done are as follows.
Conclusion
This article has taught you well how to make an intro with ease and perfection. The different templates are available online which can be used to make awesome YouTube intros. The best software that you can find on the market is the Wondershare Filmora which makes the process a lot easier.
The program is known for the awesome workability as well as viability kudos to the developers of this awesome software. It is also recommended sharing this article on social media such as Facebook and Twitter so that the others can also benefit from it. It will also help others in creating awesome YouTube tutorials.
Richard Bennett
Richard Bennett is a writer and a lover of all things video.
Follow @Richard Bennett
Also read:
- Seamlessly Transferring YouTube Videos to Your Instagram Account
- Unveiling Excellent Video Keywords on YouTube
- Securing the Perfect Upload of Ultra HD Videos on YouTube Platform
- In 2024, Celebrating Clickers Channel & Buttons Incentives
- [New] Dominate YouTube Traffic with Proficient Use of Creator Studio
- Streamer Soundscape The Top 5 Headset Guidebook
- Platform Selection Guide Determining the Best for Individual Creators
- [New] Become a Youtube Gif Wizard Your Complete Online Transformation Tutorial
- Flair and Finesse in Your Gaming YouTube Channel
- Decoding YouTube's Strategic Approach to Short-Form Video Promotion for 2024
- Streamline Marketing with Top-Rated Video Tags Generators
- Stand Out on YouTube Innovative Title Brainstroms
- Top 5 Ultimate Camera & Video Recording Apps IPhone/Android Edition
- [Updated] Efficient Thumbnail Generation with Your Phone for Video Content
- Master the Map Locating YouTube Studio, Content Architect’s Toolbox
- In 2024, Binge-Watching to Billions Jake Paul's Video Venture
- YouTube to WebM The 10 Best YouTube to WebM Converters
- Digital Dominance The Top Global YouTube Creators
- Unlock the Power of Persuasion Perfecting Your Shorts' Visual Hook
- YouTube Studio Validating Earnings Flow
- Mastering YouTube's Aesthetics Enhancing Your Videos
- 2024 Approved A Step-by-Step Guide to Crafting an Effective YouTube Watch Later Playlist
- Dish on Titles Creative Concepts for Cookery Vids for 2024
- Breakdown of Profit From a Million Youtube Watches
- Channel Trailers that Convert Viewers Into Customers for 2024
- Essential Guide to Mastering ASMR Experience
- The Efficacy of VLC's Screen Recording
- [Updated] In 2024, TweetVid to MP4 - Quick Conversion Tool
- How to Instantly Recover Lost Reddit Posts
- In 2024, Immerse in Imagination The BestDiscord’s 10 Creations
- In 2024, iSpoofer is not working On Vivo S17 Pro? Fixed | Dr.fone
- Parrot's Next-Gen AR Drone Evaluation
- [Updated] In 2024, Upload Ubiquity From Twitter to Snapchat Videos
- Process of Screen Sharing Samsung Galaxy F15 5G to PC- Detailed Steps | Dr.fone
- In 2024, Dont Miss Out The Most Astounding 4K Video Samples Available
- New Ways to Merge Videos in HandBrake? Expectation Vs. Reality
- 2024 Approved OBS Revived Camera Back to Life
- [Updated] In 2024, Forging a Massive Online Following on Facebook
- Top Apps and Online Tools To Track Itel P55T Phone With/Without IMEI Number
- Top 15 4K Video Cameras/Camcorders
- What Is AI Influencer, In 2024
- 7 Fixes for Unfortunately, Phone Has Stopped on Lava Blaze 2 5G | Dr.fone
- New In 2024, The Great DVR Debate TiVo vs Comcast - Which One Reigns Supreme?
- 2024 Approved Economic Approaches to Online Educational Broadcasting
- [New] In 2024, Next-Gen Display Top 5 HDMI 2.1 Infinity Refresh Monitors [PS5]
- [New] In 2024, The Best HD Video Screen Recorders
- [Updated] Expert's Picks Top 5 Webcams Revolutionizing Game Streaming
- In 2024, The Ultimate Guide to Get the Rare Candy on Pokemon Go Fire Red On Xiaomi Redmi Note 12T Pro | Dr.fone
- In 2024, Complete Tutorial to Use GPS Joystick to Fake GPS Location On OnePlus Ace 2 | Dr.fone
- Title: Bringing YouTube to Life on Google Slides
- Author: Steven
- Created at : 2024-05-25 18:53:14
- Updated at : 2024-05-26 18:53:14
- Link: https://youtube-clips.techidaily.com/bringing-youtube-to-life-on-google-slides/
- License: This work is licensed under CC BY-NC-SA 4.0.
