
:max_bytes(150000):strip_icc():format(webp)/GettyImages-917461864-7141ebd3ec944ce6a431b8d485cc9cdb.jpg)
"Bridging the Gap YouTube Editing Mastered in iMovie Workflows for 2024"
Bridging the Gap: YouTube Editing Mastered in iMovie Workflows
Easy Way to Edit YouTube Videos in iMovie

Richard Bennett
Mar 27, 2024• Proven solutions
iMovie is the built-in video editor that allows you to combine several video clips. It is available for both Mac and iOS devices. This app was first released in 1999 when it came with the iMac DV model.
With the use of the iMovie, you are able to create movies that include sound effects, menus, transitions, titles, themes, and music, just to name a few. The resulting movie can be saved onto physical media or as a file on the hard drive.
If you are a Mac user, then you can easily edit YouTube videos in iMovie. All you need to do is to follow the simple steps below. In this article, you will learn how to import videos, organize videos, add YouTube titles and add transitions.
Part 1. Steps on Editing YouTube Videos Using iMovie
To edit a video for YouTube with iMovie, you can follow these steps.
Step 1: Import Video Clips into iMovie
If you have recorded the video clips with the use of a videocam, then connect the camera to the Mac and open the app. You can import the videos by manually selecting the clips that will be part of the YouTube video.
Note: If you want to import videos that you have already published on your YouTube channel, then you can download them from the channel, and save them as MP4. However, if the videos were uploaded by other users, then you need to use a video converter, this article will let you know the 8 best video converters to convert video to MP4.
Step 2: Edit the Video Clips
Once you have all the clips that you need, the next step is to edit YouTube videos in iMovie. When you import the clips, you have created an Event in the app. If you want to include a clip in your final video, just drag the file to the project browser, where you can edit the video.

You can also add videos from other Events into the current project. You can select the parts of the video by dragging across the video from the chosen start to stop points. Edit the video until you are satisfied with the results.
Step 3: Enhance the Video
Once you have edited the video, you can then add background music, themes, sound effects, onscreen text, transitions between clips, and photos. The best thing about iMovie is that it comes with a sound effects library. It also allows you to upload audio from your iTunes library, iLife, and GarageBand.
iMovie allows you to add text to any part of the video, whether it is a title screen at the start, credits at the end, and everything in between. Try to enhance the video until you think it is ready to be uploaded to YouTube.
- Add YouTube title : If you want to add a title for YouTube Video, all you need to do is click Title in the toolbar, and then highlight My Movie on the left. From here, enter the title you like.
- Organize videos : You also can rearrange video clips in the timeline. Just drag the video on the timeline to wherever you want.
- Add transitions : If you have more than one video clip, you definitely need transitions between them. Click the Transitions tab, and then select one transition you like. In the end, drag it to stop between two clips.
Step 4: Export and Upload the Video to YouTube

When you edit YouTube videos in iMovie, you have the option to export the video straight to the video streaming website. All you need to do is to click on the Share button found at the top of the screen. Then select YouTube. Add your YouTube account in iMovie by entering your username and password. Then you choose a title, description, and tags for the video.
You can choose the resolution and size of the video that includes HD 720p and HD 1080p, mobile, medium, and large. Click on Publish to upload the video to YouTube. Uploading the video will take several minutes to a couple of hours, depending on the resolution and size of the video.
Part 2. A Better Choice to Edit YouTube Videos
There’s a better way to edit YouTube videos. It involves the use of Wondershare Filmora . It is user-friendly and allows beginners to make videos professional-looking videos.


This software has more than 300 video effects for family, weddings, love, and travel, etc. You can also add animated captions to photos that will help tell the story. It comes with an array of intro and credit templates that will enhance your video.
Lastly, you can easily share the resulting movie on YouTube, DVD, other devices, and a lot more.
Richard Bennett
Richard Bennett is a writer and a lover of all things video.
Follow @Richard Bennett
Richard Bennett
Mar 27, 2024• Proven solutions
iMovie is the built-in video editor that allows you to combine several video clips. It is available for both Mac and iOS devices. This app was first released in 1999 when it came with the iMac DV model.
With the use of the iMovie, you are able to create movies that include sound effects, menus, transitions, titles, themes, and music, just to name a few. The resulting movie can be saved onto physical media or as a file on the hard drive.
If you are a Mac user, then you can easily edit YouTube videos in iMovie. All you need to do is to follow the simple steps below. In this article, you will learn how to import videos, organize videos, add YouTube titles and add transitions.
Part 1. Steps on Editing YouTube Videos Using iMovie
To edit a video for YouTube with iMovie, you can follow these steps.
Step 1: Import Video Clips into iMovie
If you have recorded the video clips with the use of a videocam, then connect the camera to the Mac and open the app. You can import the videos by manually selecting the clips that will be part of the YouTube video.
Note: If you want to import videos that you have already published on your YouTube channel, then you can download them from the channel, and save them as MP4. However, if the videos were uploaded by other users, then you need to use a video converter, this article will let you know the 8 best video converters to convert video to MP4.
Step 2: Edit the Video Clips
Once you have all the clips that you need, the next step is to edit YouTube videos in iMovie. When you import the clips, you have created an Event in the app. If you want to include a clip in your final video, just drag the file to the project browser, where you can edit the video.
You can also add videos from other Events into the current project. You can select the parts of the video by dragging across the video from the chosen start to stop points. Edit the video until you are satisfied with the results.
Step 3: Enhance the Video
Once you have edited the video, you can then add background music, themes, sound effects, onscreen text, transitions between clips, and photos. The best thing about iMovie is that it comes with a sound effects library. It also allows you to upload audio from your iTunes library, iLife, and GarageBand.
iMovie allows you to add text to any part of the video, whether it is a title screen at the start, credits at the end, and everything in between. Try to enhance the video until you think it is ready to be uploaded to YouTube.
- Add YouTube title : If you want to add a title for YouTube Video, all you need to do is click Title in the toolbar, and then highlight My Movie on the left. From here, enter the title you like.
- Organize videos : You also can rearrange video clips in the timeline. Just drag the video on the timeline to wherever you want.
- Add transitions : If you have more than one video clip, you definitely need transitions between them. Click the Transitions tab, and then select one transition you like. In the end, drag it to stop between two clips.
Step 4: Export and Upload the Video to YouTube
When you edit YouTube videos in iMovie, you have the option to export the video straight to the video streaming website. All you need to do is to click on the Share button found at the top of the screen. Then select YouTube. Add your YouTube account in iMovie by entering your username and password. Then you choose a title, description, and tags for the video.
You can choose the resolution and size of the video that includes HD 720p and HD 1080p, mobile, medium, and large. Click on Publish to upload the video to YouTube. Uploading the video will take several minutes to a couple of hours, depending on the resolution and size of the video.
Part 2. A Better Choice to Edit YouTube Videos
There’s a better way to edit YouTube videos. It involves the use of Wondershare Filmora . It is user-friendly and allows beginners to make videos professional-looking videos.
This software has more than 300 video effects for family, weddings, love, and travel, etc. You can also add animated captions to photos that will help tell the story. It comes with an array of intro and credit templates that will enhance your video.
Lastly, you can easily share the resulting movie on YouTube, DVD, other devices, and a lot more.
Richard Bennett
Richard Bennett is a writer and a lover of all things video.
Follow @Richard Bennett
Ultimate Choice 5 Sound Devices for Streamers
Top 5 Gaming Headsets for YouTube in 2024
Richard Bennett
Feb 20, 2024• Proven solutions
Need a gaming headset? The number of gamers is growing every day, and that means more and more people are looking for content from experienced gamers on YouTube and Twitch. To produce great YouTube gaming videos, you’ll need a lot of gaming knowledge and a few pieces of high-quality equipment, including a good headset. Without a headset, it might be hard to keep track of in-game audio cues while entertaining your audience.
Most hardware manufacturers are actively targeting the gaming market, releasing specialized headset models for 2024. Here is a quick overview of the five best candidates for the title of the best gaming headset for 2024:
2. Audio Technica ATH-ADG1 Open Air High Fidelity Headset
3. Logitec Surround Sound Gaming Headset G430
4. Razer Kraken 7.1 Chroma Gaming Headset
5. HyperX Cloud II Gaming Headset
1. Razer Man O’ War 7.1
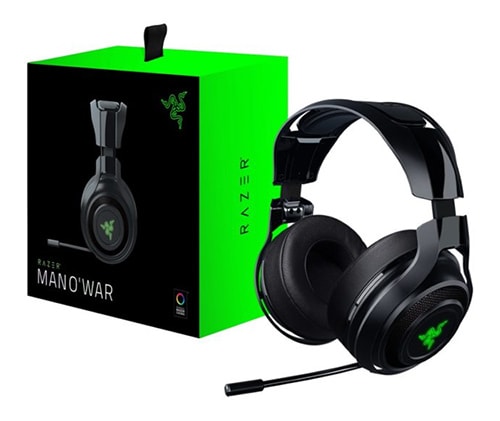
Price: $222.48
Compatible with: PC, Mac (with USB), PlayStation, Xbox
This wireless headset has an impressive surround sound engine that allows for an immersive gaming experience and convincing positional audio. The headset features a modern ergonomic design with earcups that fit very tightly and completely seal off the outside world. Razer Man O’War looks bulky, but it weighs just over 330 grams and uses an analog 3.5 mm connector.
The microphone boom extends from the left ear cup and can be easily adjusted or retracted. Most importantly, microphone controls are very sophisticated allowing for in-game switching between channels without disruption. When used for talking, the microphone will ensure absolute clarity, which comes handy for those who broadcast their games on YouTube.
Pros:
- Wireless setup for maximum freedom
- Minimizes ambient noise with cushion-like ear cups
- Lightweight and comfortable to wear
- Fully retractable, high-quality MEMS microphone
- Long-lasting batteries – up to 14 hours
Cons:
- Occasional loss of connectivity
- Slightly expensive for a plastic build
2. Audio Technica ATH-ADG1 Open Air High Fidelity Headset
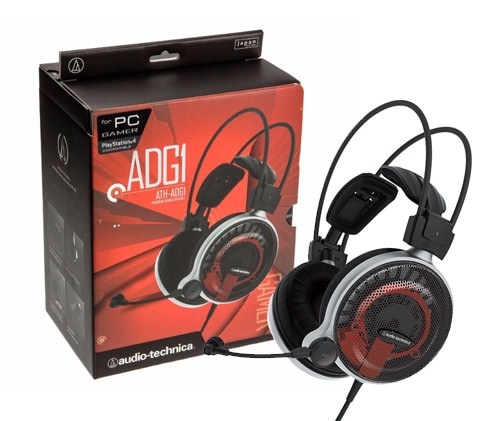
Price: $299
Compatible with: PC, PS4, iPad, iPhone, Xbox (with adapter)
For a gaming headset, this model boasts a really impressive audio quality. This characteristic is a huge strength, especially when coupled with its broad compatibility and innovative design. The structure of this headset is unique, with an open-air setup that allows for the circulation of air under the set, which is useful during long gaming sessions. This comes at a price since the isolation against ambient noise is less than perfect and the feeling might be a bit awkward until you get used to it.
As for the microphone, it is permanently attached to the left side of the headset with a flexible stem, so it can be easily adjusted to the desired position. This implies that ATH-ADG1 was made specifically for those who need to communicate while receiving the high-quality audio feed, such as gaming streamers.
Pros:
- Extremely light and uniquely built for comfort
- Top-notch audio quality above its class
- Innovative, self-adjusting frame
- Comfortable ear cups
Cons:
- Analog headset, so the quality depends on the connected device
- Specialized product with a narrow range of applications
- Fragile build that can easily be damaged
- Very expensive
3. Logitec Surround Sound Gaming Headset G430
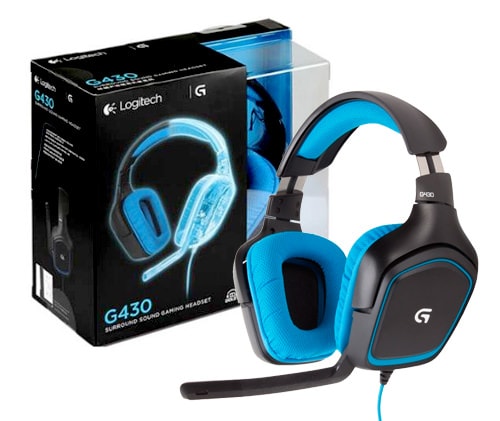
Price: $79.99
Compatible with: PC, PS4
Logitec is well known for producing high-quality peripherals, and this model lives up to that standard despite its affordable price. Its most touted feature is the surround sound system, which is not common in this price range. This allows for very realistic in-game audio, particularly because the headset has an excellent bass channel. In addition to solid audio performance, the Logitec gaming headset is characterized by low weight rotating ear cups with a protective cloth and vibrant coloring.
A standard 3.5 mm connector is used for the microphone, which is conveniently positioned and capable of clearly capturing speech while blocking out other sounds. Unfortunately, the microphone can’t be easily manipulated and doesn’t offer the option to be muted automatically, although a manual switch is available to turn it off. For a budget gaming headset, that’s a fair compromise.
Pros:
- Realistic, immersive sound
- Smart design optimized to decrease weight
- The Durable cloth covering the ear cups
- Surround effect on a cheap gaming headset
- Excellent price-to-quality ratio
Cons:
- Lack of programmable commands
- Poor protection against ambient noise
- Less than impressive visually
4. Razer Kraken 7.1 Chroma Gaming Headset
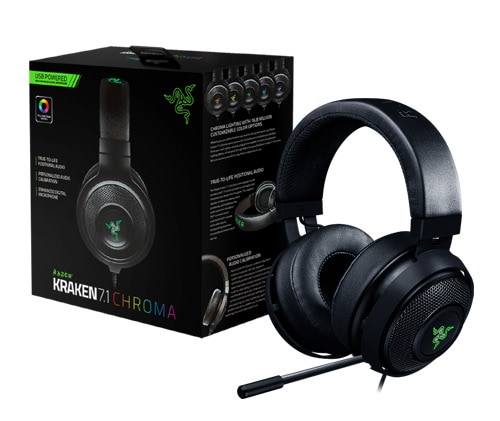
Price: $96.77
Compatible with : PC, PS4
If you are looking for the best gaming headset with a microphone, this is a very b candidate. It is pretty affordable compared to the other Razer headset on this list (the Man O’ War), but it is equally robust when it comes to performance, including high-quality surround audio. This is a rather large headset with thick ear cups decorated with a glowing logo of the brand, but its size is not a problem since Kraken is very comfortable even when worn continually for hours.
Kraken’s fully retractable and flexible microphone can be hidden under the left cup when not in use, giving this model a bit of versatility. It picks up your voice even when it’s bent sideways, so YouTube professionals won’t have to worry about the exact positioning while engaged in a fierce battle. It’s also possible to use a toggle switch to mute the microphone quickly.
Pros:
- Excellent audio for its price range
- Surround audio contributes to the more complete gaming experience
- Completely isolates any ambient sounds
- Flexible mic that can be moved out of the way
- Access to Synapse 2.0 software
Cons:
- USB only, no 3.5 mm jacks
- Lack of preset settings for gaming
- A sensitive microphone that sometimes picks up unwanted sounds
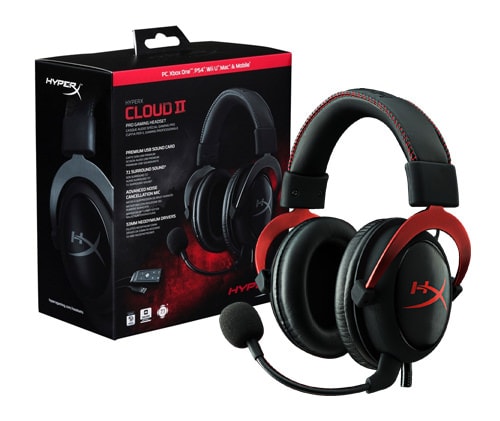
5. HyperX Cloud II Gaming Headset
Price: $99.88
Compatible with: PC, Mac, Xbox, PS4, Mobile
Well designed, packed with advanced features and moderately priced, this gaming headset offers a lot of value to the YouTube crowd. It comes with optional surround audio that can be plugged in via sound card, or disconnected when this effect is not needed. The headset was originally designed to work perfectly on the Xbox, but it retains compatibility with most desktops, laptops, and consoles.
The detachable microphone is very solid and particularly effective in filtering noise and eliminating echo. It can be easily moved into any position or removed altogether when the headset is used for any purpose other than game streaming.
Pros:
- b and elegant aluminum frame
- Advanced audio control box
- Virtual 7.1 surround audio
- Interchangeable ear pads
- Premium look and feel at an affordable price
Cons:
- Inconveniently positioned mute switch
- Relatively short cord limiting movement
Best Video Editing Software for Gamers- Wondershare Filmora9
No doubt gamers would need a lot of effects and overlays to edit a live stream video to show the best effects on the game screen. High bass music syncing with the scene is very important for a game video. The sky is the limit to add effects and background to the game videos with Wondershare Filmora9 as it’s the best video editor for professionals and newcomers who are interested in gaming and pursuing a YouTube channel. Filmora9 provides you with a green screen, PIP, scene detection, play video in reverse, add voice over, royalty-free music, overlays, and transitions that you can use to make a gaming video like a pro.
Richard Bennett
Richard Bennett is a writer and a lover of all things video.
Follow @Richard Bennett
Richard Bennett
Feb 20, 2024• Proven solutions
Need a gaming headset? The number of gamers is growing every day, and that means more and more people are looking for content from experienced gamers on YouTube and Twitch. To produce great YouTube gaming videos, you’ll need a lot of gaming knowledge and a few pieces of high-quality equipment, including a good headset. Without a headset, it might be hard to keep track of in-game audio cues while entertaining your audience.
Most hardware manufacturers are actively targeting the gaming market, releasing specialized headset models for 2024. Here is a quick overview of the five best candidates for the title of the best gaming headset for 2024:
2. Audio Technica ATH-ADG1 Open Air High Fidelity Headset
3. Logitec Surround Sound Gaming Headset G430
4. Razer Kraken 7.1 Chroma Gaming Headset
5. HyperX Cloud II Gaming Headset
1. Razer Man O’ War 7.1
Price: $222.48
Compatible with: PC, Mac (with USB), PlayStation, Xbox
This wireless headset has an impressive surround sound engine that allows for an immersive gaming experience and convincing positional audio. The headset features a modern ergonomic design with earcups that fit very tightly and completely seal off the outside world. Razer Man O’War looks bulky, but it weighs just over 330 grams and uses an analog 3.5 mm connector.
The microphone boom extends from the left ear cup and can be easily adjusted or retracted. Most importantly, microphone controls are very sophisticated allowing for in-game switching between channels without disruption. When used for talking, the microphone will ensure absolute clarity, which comes handy for those who broadcast their games on YouTube.
Pros:
- Wireless setup for maximum freedom
- Minimizes ambient noise with cushion-like ear cups
- Lightweight and comfortable to wear
- Fully retractable, high-quality MEMS microphone
- Long-lasting batteries – up to 14 hours
Cons:
- Occasional loss of connectivity
- Slightly expensive for a plastic build
2. Audio Technica ATH-ADG1 Open Air High Fidelity Headset
Price: $299
Compatible with: PC, PS4, iPad, iPhone, Xbox (with adapter)
For a gaming headset, this model boasts a really impressive audio quality. This characteristic is a huge strength, especially when coupled with its broad compatibility and innovative design. The structure of this headset is unique, with an open-air setup that allows for the circulation of air under the set, which is useful during long gaming sessions. This comes at a price since the isolation against ambient noise is less than perfect and the feeling might be a bit awkward until you get used to it.
As for the microphone, it is permanently attached to the left side of the headset with a flexible stem, so it can be easily adjusted to the desired position. This implies that ATH-ADG1 was made specifically for those who need to communicate while receiving the high-quality audio feed, such as gaming streamers.
Pros:
- Extremely light and uniquely built for comfort
- Top-notch audio quality above its class
- Innovative, self-adjusting frame
- Comfortable ear cups
Cons:
- Analog headset, so the quality depends on the connected device
- Specialized product with a narrow range of applications
- Fragile build that can easily be damaged
- Very expensive
3. Logitec Surround Sound Gaming Headset G430
Price: $79.99
Compatible with: PC, PS4
Logitec is well known for producing high-quality peripherals, and this model lives up to that standard despite its affordable price. Its most touted feature is the surround sound system, which is not common in this price range. This allows for very realistic in-game audio, particularly because the headset has an excellent bass channel. In addition to solid audio performance, the Logitec gaming headset is characterized by low weight rotating ear cups with a protective cloth and vibrant coloring.
A standard 3.5 mm connector is used for the microphone, which is conveniently positioned and capable of clearly capturing speech while blocking out other sounds. Unfortunately, the microphone can’t be easily manipulated and doesn’t offer the option to be muted automatically, although a manual switch is available to turn it off. For a budget gaming headset, that’s a fair compromise.
Pros:
- Realistic, immersive sound
- Smart design optimized to decrease weight
- The Durable cloth covering the ear cups
- Surround effect on a cheap gaming headset
- Excellent price-to-quality ratio
Cons:
- Lack of programmable commands
- Poor protection against ambient noise
- Less than impressive visually
4. Razer Kraken 7.1 Chroma Gaming Headset
Price: $96.77
Compatible with : PC, PS4
If you are looking for the best gaming headset with a microphone, this is a very b candidate. It is pretty affordable compared to the other Razer headset on this list (the Man O’ War), but it is equally robust when it comes to performance, including high-quality surround audio. This is a rather large headset with thick ear cups decorated with a glowing logo of the brand, but its size is not a problem since Kraken is very comfortable even when worn continually for hours.
Kraken’s fully retractable and flexible microphone can be hidden under the left cup when not in use, giving this model a bit of versatility. It picks up your voice even when it’s bent sideways, so YouTube professionals won’t have to worry about the exact positioning while engaged in a fierce battle. It’s also possible to use a toggle switch to mute the microphone quickly.
Pros:
- Excellent audio for its price range
- Surround audio contributes to the more complete gaming experience
- Completely isolates any ambient sounds
- Flexible mic that can be moved out of the way
- Access to Synapse 2.0 software
Cons:
- USB only, no 3.5 mm jacks
- Lack of preset settings for gaming
- A sensitive microphone that sometimes picks up unwanted sounds
5. HyperX Cloud II Gaming Headset
Price: $99.88
Compatible with: PC, Mac, Xbox, PS4, Mobile
Well designed, packed with advanced features and moderately priced, this gaming headset offers a lot of value to the YouTube crowd. It comes with optional surround audio that can be plugged in via sound card, or disconnected when this effect is not needed. The headset was originally designed to work perfectly on the Xbox, but it retains compatibility with most desktops, laptops, and consoles.
The detachable microphone is very solid and particularly effective in filtering noise and eliminating echo. It can be easily moved into any position or removed altogether when the headset is used for any purpose other than game streaming.
Pros:
- b and elegant aluminum frame
- Advanced audio control box
- Virtual 7.1 surround audio
- Interchangeable ear pads
- Premium look and feel at an affordable price
Cons:
- Inconveniently positioned mute switch
- Relatively short cord limiting movement
Best Video Editing Software for Gamers- Wondershare Filmora9
No doubt gamers would need a lot of effects and overlays to edit a live stream video to show the best effects on the game screen. High bass music syncing with the scene is very important for a game video. The sky is the limit to add effects and background to the game videos with Wondershare Filmora9 as it’s the best video editor for professionals and newcomers who are interested in gaming and pursuing a YouTube channel. Filmora9 provides you with a green screen, PIP, scene detection, play video in reverse, add voice over, royalty-free music, overlays, and transitions that you can use to make a gaming video like a pro.
Richard Bennett
Richard Bennett is a writer and a lover of all things video.
Follow @Richard Bennett
Also read:
- In 2024, Comedy Canvas Painting Laughter with Top 10 Video Concepts
- Speedy Tutorial Crafting YouTube Image Thumbnails From Scratch
- [Updated] Aural and Visual Summary Synthesizer
- [Updated] Boost Engagement Adding Dynamic Backgrounds to Your Thumbnails
- [New] Enhancing Viewability Creating Custom YouTube Thumbnails
- Affordable Mic Picks for Aspiring YT Bands for 2024
- [New] EditCanvas Solutions
- Brand Your Content Download Complimentary Templates for YouTube Makers for 2024
- Best 3D Entrance Makers for YouTube Creators
- In 2024, Creating Engaging YouTube Openings & Closers for Free
- YouTube Video Links Made Better with Desktop & Mobile Timestamping
- 2024 Approved Blurring Identity Erasing Faces From Video Content
- 2024 Approved Cinematic Evolution The Best YouTube Guides for New Filmmakers
- In 2024, Dynamic Subtitle Artisan
- In 2024, Earnings Expertise on Streaming Services The Ultimate Guide
- Locking Out Youtube Channels on Computers and Phones
- In the Visionary Vanguard High Subscribers
- [Updated] Elevate Your Channels - Templates at No Charge
- Crafting Classic Cinematography Step-by-Step Guide
- In 2024, A Comprehensive Walkthrough for iMovie and YouTube Collaboration
- [New] Android's Best YouTube Video Downloaders Reviewed
- Capturing Moving Images Mirrorless Versus DSLR for 2024
- The Influence of Thumbnail Size on Viewership Numbers
- Diving Into Video Quality DSLR vs Mirrorless Cameras
- In 2024, Boost Your Blogging Bravery Following YouTuber Leaders
- Exploring YouTube’s Functionality Following Uploaded Videos
- 2024 Approved Captioning Techniques for Professional YouTube Content
- In 2024, Discover the Joy of Animated Journeys YouTube's Best for Everyday
- Laughter Lab Top 7 Sketches & Vignettes for YouTubers
- Getting Started with Pro-Level YouTube Tech
- Dreamy Thumbnails Captivating Borders for 2024
- In 2024, Elevate Your Streaming Experience Six Insightful Quizzes for Fandom Enthusiasts
- 10 Premier Travel Blogs to Watch Online for 2024
- 2024 Approved 5 Steps to Crafting Engaging, Cost-Effective YouTube Ads
- In 2024, Engaging Viewers Best Practices & Pitfalls in Dayly Blogging
- Social Media Sovereigns Ranked by YouTube Subscribers
- The Ultimate DIY Guide for Building Powerful YouTube Ad Videos
- Professional Selfies Elevating Your Online Presence
- [Updated] Adjust Your Video Feedback Control in YouTube
- Elevate Your Edits Top 10 YouTube Editing Strategies
- Channel Buying Made Simple A Beginner’s Toolkit for 2024
- 2024 Approved Demystifying YouTube's Video Editing Power
- 2024 Approved DSLR or Mirrorless for High-Quality Video Recording?
- Unlocking the Full Potential Innovative Techniques for Youtube End Screen Designs
- [New] A Guide to Understanding and Joining a YouTube Media Company
- The Year's Most Loved YouTube Music Video Responses
- 2024 Approved Charting Financial Success The Tale of Ajey (CarryMinati) and YouTube
- New Top-Rated Video Editors Compatible with Windows 11
- [New] Unlocking Facebook's Hidden Vault of High-Def Media
- [New] Are Video Selfies on Instagram Really Genuine, In 2024
- Camtasia Tutorial Change Video Speed
- Voice Overhaul Hacks for Discord Chatters - Top Free Solutions for 2024
- [Updated] Tweet to Facebook A Step-by-Step Guide
- 6 Proven Ways to Unlock Xiaomi 14 Ultra Phone When You Forget the Password
- [New] 2024 Approved Unleash Flawless Footage Overcome Instagram Video Hurdles
- [Updated] TikTok Rave Review 2024
- In 2024, Ultimate guide to get the meltan box pokemon go For Tecno Spark Go (2024) | Dr.fone
- Google Play Services Wont Update? 12 Fixes are Here on Infinix Note 30 | Dr.fone
- [New] 2024 Approved LibertyCam Pro Live Stream Review Explored
- Title: "Bridging the Gap YouTube Editing Mastered in iMovie Workflows for 2024"
- Author: Steven
- Created at : 2024-05-25 18:52:57
- Updated at : 2024-05-26 18:52:57
- Link: https://youtube-clips.techidaily.com/bridging-the-gap-youtube-editing-mastered-in-imovie-workflows-for-2024/
- License: This work is licensed under CC BY-NC-SA 4.0.
