
:max_bytes(150000):strip_icc():format(webp)/178665671_HighRes-56a532a83df78cf77286de1b.jpg)
Bridging the Gap Between Classic and Contemporary Videos
Bridging the Gap Between Classic and Contemporary Videos
How to Create Vintage Videos: A Comprehensive Tutorial

Richard Bennett
Mar 27, 2024• Proven solutions
“Every accomplishment starts with a decision to try.” – A Vintage Thought

Vintage videos are ultimately the retro videos you have ever imagined. The look is highly inspirational in itself. The vintage effect in photography and videos results in a must-see look that everyone wants to capture all day long. The meaning of vintage is ‘the time when something of quality was produced.’ When something is called retro, it means old, recognized, and essential. Vintage also resembles love apart from videos and photos. All in all, it’s a positive and result-oriented thing to carry on in your videos. And this is what we want to mention in this post relating to the creation of vintage videos.
Here are some vintage-style video ideas for you to have a look at.
- Part 1: What to Consider When Shooting a Vintage Video?
- Part 2: How to Create a Stunning Vintage Video?
- Part 3: Tips to Make Your Vintage Videos Stand Out
What to Consider When Shooting a Vintage Video?
Vintage videos are kind of old school vibes and must be shooting accordingly by keeping in mind the following points. These are a sort of expert tips given by photographers based on their practical experience. First of all, you have to understand that a video can be made vintage, but you can’t change the actual environment of shooting. Some editing always involves there in every project out there. Still, the tips given below will help you a lot in creating a retro look.
Use Vintage Lenses
The very first helpful tip is to use a vintage lens. They allow chromatic aberration by distorting colors around the frame. Furthermore, you can find various kinds of lenses in terms of a vintage effect.
Decrease Contrast
Do the correct color grading by reducing the contrast a little bit. You must not level the retro videos in black or white or like-new videos. You can simply add a contrasting effect and then reduce it to have that vintage look.
Keep it a little soft
If you have ever noticed, the vintage videos are a little soft and look like degraded with time. It’s a result of decreased sharpness in the camera’s menu settings. You can even add a slight blur to the final video or simply use recognized software made for video editing .
Brighten up the black levels
Lots of black points in the video are not ideal for a vintage effect. The suitable approach is to bring up black levels and make it dark gray instead of inky black. This look can be achieved either by levels effect or curves effect in your editing software.
Reduce Saturation levels
Bringing down the saturation levels is another tip to create a vintage effect. The old videos are also absent in bright colors. Don’t go too crazy about reduction as 20%-30% saturation level is more than enough.
How to Create a Stunning Vintage Video?
What you need to get started as both beginner and professional is Wondershare Filmora Video Editor. It is a highly recommended software to create vintage videos. The intuitive user interface and lots of editing functions are helpful for a video editor. It has both primary as well as advanced editing programs to check. It has various advanced color tuning tools to promote the making of original videos. It features tint, temperature, Vignette, 3D Luts, Lights, and so on.


Steps for the vintage effect to videos on Wondershare Filmora Video Editor
Step 1: Upload video & make specific changes

The very step is to add the video by clicking the + icon. We have added the three sample videos from the library of Wondershare Filmora itself. Adjust them in the timeline as per your requirements.
After doing all the essential editing functions, click on the Effects tab given at the upper-left corner. Simply type the word Old in the Search tab.
The Old Video filter will immediately appear in the list of filters. Tap the “+” icon in Old Video filter to add to the timeline. Drag its ends right or left to adjust the duration.
Step 2: Apply White & Black Filters

The second step is to apply the Black & White filters. Go to the Effects tab and explore five Black & White filters available. Each of these filters is quite different and must be applied accordingly. Check the aesthetic of your video clip before any filter application to retro videos.
Step 3: Add the Sun Kissed or Sepia Tone Rise Filters to the video clip

There are various other categories of filters you can apply, such as Retro, Sun Kissed, and Sepia Tone, etc. The features of Filmora also present several subcategories such as Faux Film or Shake.

On the other hand, the subcategory of Sepia Tone features Sun-Kissed & Rise Filters to stimulate sepia-tinted texture and recreate the old visual style. The Sun Kissed filter presents brown and red colors to give that warm image atmosphere.
Step 4: Desaturate Video Clip

Now, you need to desaturate the video clip with Ash & Willow filters. We have typed Ash in the Search bar, and you can see the filter below. These filters are essential to desaturate the video with preset contrast, brightness, or exposure values.

Then, we have combined the black & white filter with an overlay of Film Reel Horizontal. It will help you sell the effect and make the video look more authentic. However, the only application of Black & White or Ash & Willow filters is not going to make any creative thing in terms of vintage videos. You have to mix overlays with features such as Random Dust or Film Reel Horizontal.
Step 5: Apply Black & White and Old Film Color Correction Presets to the video
You can also access the Advanced color correction Tab of Filmora from the Color button. It also features Preset and Adjusts Tabs to desaturate footage. The Preset presents a variety of options, including Black & White and Old Film. You just need to right-click the particular preset and select the Apply option.

Tips to Make Your Vintage Videos Stand Out
Following the helpful tips would assist you in creating awesome retro videos.
- You can use various vintage apps such as Retro VHS, RTRO Camera, 8mm, Camcorder, VSCO, etc. Or, despite using these limited apps, you can directly use our preferred video editing software called Wondershare Filmora.
- If you use a specific vintage camera, keep it on low highlights and low contrasts. Use color grading, as we have discussed above. They help to provide the ultimate old-school effect.
- Always keep low saturation settings for shooting vintage videos. Take control over Saturation, Hue, and Luminance of video.
- Add overlays and respective filters to recreate a required vintage look. You must add things that dust, scratch, and grain the heck out from the video that you have created.
- Lower the frame rate or FPS to create an excellent vintage look. You can make it to 18 or 14 FPS depending upon the aesthetic requirements.
- Keep an eye on black and white filters you have used. It’s because more of a black and white can ruin the actual vintage experience.
Conclusion
So, this is an ultimate tutorial on the creation of vintage videos. We Hope you have admired the steps and our recommended video editing software. Vintage means grand, and thus you should make it amazing as well. It is the reason we have stated all facts regarding the vintage effect in our post above. Wondering how to add such effect in FCPX? check this article:How to Create a Vignette in Final Cut Pro X?
Surely give a read and thank us later!
Richard Bennett
Richard Bennett is a writer and a lover of all things video.
Follow @Richard Bennett
Richard Bennett
Mar 27, 2024• Proven solutions
“Every accomplishment starts with a decision to try.” – A Vintage Thought
Vintage videos are ultimately the retro videos you have ever imagined. The look is highly inspirational in itself. The vintage effect in photography and videos results in a must-see look that everyone wants to capture all day long. The meaning of vintage is ‘the time when something of quality was produced.’ When something is called retro, it means old, recognized, and essential. Vintage also resembles love apart from videos and photos. All in all, it’s a positive and result-oriented thing to carry on in your videos. And this is what we want to mention in this post relating to the creation of vintage videos.
Here are some vintage-style video ideas for you to have a look at.
- Part 1: What to Consider When Shooting a Vintage Video?
- Part 2: How to Create a Stunning Vintage Video?
- Part 3: Tips to Make Your Vintage Videos Stand Out
What to Consider When Shooting a Vintage Video?
Vintage videos are kind of old school vibes and must be shooting accordingly by keeping in mind the following points. These are a sort of expert tips given by photographers based on their practical experience. First of all, you have to understand that a video can be made vintage, but you can’t change the actual environment of shooting. Some editing always involves there in every project out there. Still, the tips given below will help you a lot in creating a retro look.
Use Vintage Lenses
The very first helpful tip is to use a vintage lens. They allow chromatic aberration by distorting colors around the frame. Furthermore, you can find various kinds of lenses in terms of a vintage effect.
Decrease Contrast
Do the correct color grading by reducing the contrast a little bit. You must not level the retro videos in black or white or like-new videos. You can simply add a contrasting effect and then reduce it to have that vintage look.
Keep it a little soft
If you have ever noticed, the vintage videos are a little soft and look like degraded with time. It’s a result of decreased sharpness in the camera’s menu settings. You can even add a slight blur to the final video or simply use recognized software made for video editing .
Brighten up the black levels
Lots of black points in the video are not ideal for a vintage effect. The suitable approach is to bring up black levels and make it dark gray instead of inky black. This look can be achieved either by levels effect or curves effect in your editing software.
Reduce Saturation levels
Bringing down the saturation levels is another tip to create a vintage effect. The old videos are also absent in bright colors. Don’t go too crazy about reduction as 20%-30% saturation level is more than enough.
How to Create a Stunning Vintage Video?
What you need to get started as both beginner and professional is Wondershare Filmora Video Editor. It is a highly recommended software to create vintage videos. The intuitive user interface and lots of editing functions are helpful for a video editor. It has both primary as well as advanced editing programs to check. It has various advanced color tuning tools to promote the making of original videos. It features tint, temperature, Vignette, 3D Luts, Lights, and so on.
Steps for the vintage effect to videos on Wondershare Filmora Video Editor
Step 1: Upload video & make specific changes
The very step is to add the video by clicking the + icon. We have added the three sample videos from the library of Wondershare Filmora itself. Adjust them in the timeline as per your requirements.
After doing all the essential editing functions, click on the Effects tab given at the upper-left corner. Simply type the word Old in the Search tab.
The Old Video filter will immediately appear in the list of filters. Tap the “+” icon in Old Video filter to add to the timeline. Drag its ends right or left to adjust the duration.
Step 2: Apply White & Black Filters
The second step is to apply the Black & White filters. Go to the Effects tab and explore five Black & White filters available. Each of these filters is quite different and must be applied accordingly. Check the aesthetic of your video clip before any filter application to retro videos.
Step 3: Add the Sun Kissed or Sepia Tone Rise Filters to the video clip
There are various other categories of filters you can apply, such as Retro, Sun Kissed, and Sepia Tone, etc. The features of Filmora also present several subcategories such as Faux Film or Shake.
On the other hand, the subcategory of Sepia Tone features Sun-Kissed & Rise Filters to stimulate sepia-tinted texture and recreate the old visual style. The Sun Kissed filter presents brown and red colors to give that warm image atmosphere.
Step 4: Desaturate Video Clip
Now, you need to desaturate the video clip with Ash & Willow filters. We have typed Ash in the Search bar, and you can see the filter below. These filters are essential to desaturate the video with preset contrast, brightness, or exposure values.
Then, we have combined the black & white filter with an overlay of Film Reel Horizontal. It will help you sell the effect and make the video look more authentic. However, the only application of Black & White or Ash & Willow filters is not going to make any creative thing in terms of vintage videos. You have to mix overlays with features such as Random Dust or Film Reel Horizontal.
Step 5: Apply Black & White and Old Film Color Correction Presets to the video
You can also access the Advanced color correction Tab of Filmora from the Color button. It also features Preset and Adjusts Tabs to desaturate footage. The Preset presents a variety of options, including Black & White and Old Film. You just need to right-click the particular preset and select the Apply option.
Tips to Make Your Vintage Videos Stand Out
Following the helpful tips would assist you in creating awesome retro videos.
- You can use various vintage apps such as Retro VHS, RTRO Camera, 8mm, Camcorder, VSCO, etc. Or, despite using these limited apps, you can directly use our preferred video editing software called Wondershare Filmora.
- If you use a specific vintage camera, keep it on low highlights and low contrasts. Use color grading, as we have discussed above. They help to provide the ultimate old-school effect.
- Always keep low saturation settings for shooting vintage videos. Take control over Saturation, Hue, and Luminance of video.
- Add overlays and respective filters to recreate a required vintage look. You must add things that dust, scratch, and grain the heck out from the video that you have created.
- Lower the frame rate or FPS to create an excellent vintage look. You can make it to 18 or 14 FPS depending upon the aesthetic requirements.
- Keep an eye on black and white filters you have used. It’s because more of a black and white can ruin the actual vintage experience.
Conclusion
So, this is an ultimate tutorial on the creation of vintage videos. We Hope you have admired the steps and our recommended video editing software. Vintage means grand, and thus you should make it amazing as well. It is the reason we have stated all facts regarding the vintage effect in our post above. Wondering how to add such effect in FCPX? check this article:How to Create a Vignette in Final Cut Pro X?
Surely give a read and thank us later!
Richard Bennett
Richard Bennett is a writer and a lover of all things video.
Follow @Richard Bennett
From Video to Music: Selecting the Cheapest Online Converters
YouTube to WAV File: 4 Best Free Convert Solutions
Richard Bennett
Mar 27, 2024• Proven solutions
YouTube to WAV converter is a very common phenomenon. This is done by the users as they want to play the video on selected devices.
In this article, we will help you manage to convert YouTube to WAV file with ease.
You will Learn :
- What is WAV?
- How to Convert YouTube to WAV Format? (4 Options)
- Tips to Convert YouTube to WAV
- Beside WAV Other Popular Formats for YouTube Videos
What is WAV?
WAV, known as Wave Form Audio File Format and is fully supported by Windows, is a common format that was launched back in 1991, which supports most of the older devices as well.
For the users that want uncompressed and lossless quality prefer to use WAV format. It is extended from the RIFF format to the RF64 format.
How to Convert YouTube to WAV Format?
Some many ways and programs can be used as YouTube to WAV converter. All these programs are easy to use and definitive guides are also available online. Some of the best ways are mentioned below.
Option 1: Convert YouTube to WAV by Wondershare Filmora
Filmora is by far the best program that can be used to convert YouTube to WAV format. YouTube to WAV file conversion has never been as easy as it is with this program. The program is easy to use and allows the users to overcome the issues which other programs present.
Features of the Program
- It is one of the very few programs that come with split-screen functionality. It means that the video and audio can be played simultaneously on a single interface.
- The audio equalizer ensures that the tuning is done as per the requirements.
- There is an advanced functionality of text editing which allows the users to mention the text onto the converted video as well.
- The UI of the program is graphical and hence it is easy to use. The independent reviews have granted a score of 9.5 based on this functionality of the program.
- The part selection is available in the program. It means that multiple conversions can be done at the same time without losing quality.
How to Convert YouTube to WAV Using Filmora?
This YouTube WAV converter is easy to use. The best part is that it is compatible with major platforms i.e. Windows and Mac. The processes for both will be explained in detail so that you can understand the program better.
The Process to Convert YouTube to WAV:
Step 1: Download Filmora for Windows or Mac (depends on your operating system).
If you want to download the program for Windows then click below download icon:
For Mac version download click below icon:
Step 2: There are three ways to import media into the program.
Methond 1: Click File > Import Media. Choose the YouTube file that you want to convert to WAV format. If the file is on another device then you can get it from there as well.

Method 2: Click Import Media on the main interface and select the file from the window that pops up.
Method 3: You can also drag and drop the files onto the interface to make sure that they are imported.
Step 3: You now just need to export the video in the WAV format. Click the Export button and then go for the Local tab. The export formats that are currently supported by the program are WMV, MP4, AVI, MOV, F4V, MKV, TS, 3GP, MPEG-2, WEBM, GIF and MP3.

Step 4: You can then alter the settings within the settings tab. The bit rate is the main thing that defines the quality of the video. Once the settings are done press OK
Step 5: You can also export the video as per the device that you want to play it on.
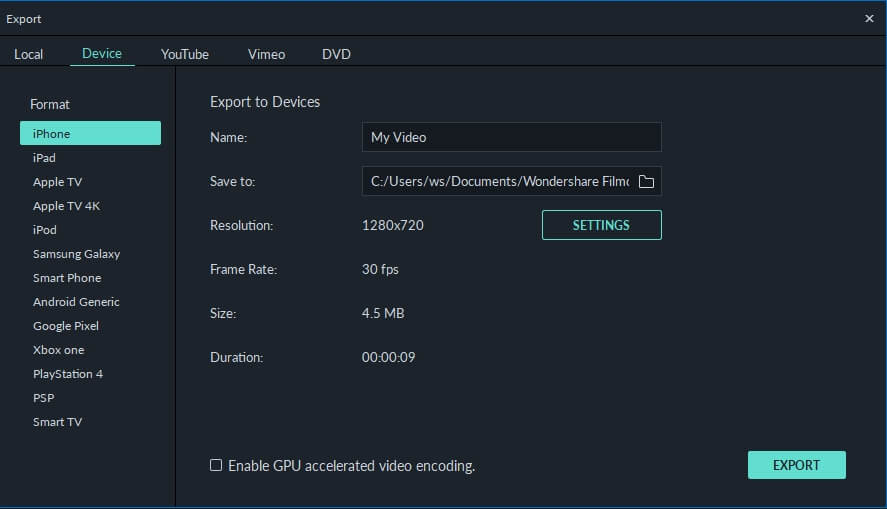
Step 6: You can also upload the video to social media platforms such as YouTube and Vimeo.
Step 7: You can also burn the converted format onto a DVD. Select the appropriate settings and press Export.
The process is explained as under. For video guides please visit Filmora 101 as it will get you the complete knowledge thoroughly.
You may also like: How to Convert YouTube to MP4 Safely? [Step by Step Guide] >>
Option 2: Other Way to Convert YouTube to WAV on Windows
5K Player is one of the best and the most used players that also work as YouTube to WAV conversion platform as well. The process is very easy to follow and is mentioned as under.
Step 1: Copy and paste the URL of the video on the desired location within the player. Click download and the process starts.

Step 2: Click “To Music” and select the WAV format from the drop-down that appears. You can also choose the bit rate, frame rate, and resolution. Once the conversion is completed you can save the file and the process ends here.
You may also like: >> How to to Convert WMV to MP4 Easily?
Option 3: Other Way to Convert YouTube to WAV on Mac
The Allavsoft is one of the best converters that can be used to convert YouTube to WAV on Mac. The process is simple and has been explained as under.
Step 1: Paste the URL of the YouTube video that you want to convert. You can also select the download quality and can access the file once the download has been completed.

Step 2: You can then select the format and once the conversion has been completed click the download button. The same has been depicted by numbers 2 and 3 in the picture below. WAV lossless quality should be selected from the dropdown to make sure that the work is done without any issue and problem.
Right format selection is important as the conversion is done instantly.
Option 4: YouTube to WAV Conversion Online
The process that you need to follow is explained as under.
Step 1: Visit https.//www.savethevideo.com/convert to access the converter.
Step 2: Paste the URL of the YouTube video that you want to convert and click the “Convert” button:

Step 3: Wait till the converter fetches the information.
Step 4: From the drop-down make sure that you select the WAV format.
Step 5: Click “Convert” once again and the process of conversion starts.
Step 6: The video then starts to download in the desired format.
Step 7: Click “Download” and save the file to the desired location. This concludes the process in full.
Tips to Convert YouTube to WAV
Below are some tips that would be useful for the users that want to convert YouTube to WAV format.
1. Always use the multipurpose software. It will allow you to download and convert the video at the same time-saving time.
2. Lossless quality is always to be selected while you are converting the format. It will make sure that the video is never compressed at all.
3. One of the best ways to convert the video is to disable the background noise. This will lead to awesome results.
4. Converting from YouTube to WAV also requires you to choose the software that is fast and reliable or else you will get the outcome which is not as per your requirements.
5. Free software programs can also get the malware to your system and therefore these are not recommended at all.
6. WAV is a format that is of high quality as the converters have loads of options so it is advised to use these carefully.
7. Make sure that the converters that are used are the ones that are highly rated and have a graphical user interface.
8. The YouTube to WAV downloader should be there on with the converter as it will make the process easy and you don’t need tons of software programs for a single purpose.
9. Always go for the program that supports the containers instead of just the format. If a program supports the containers then it is easy to convert a number of formats.
10. The conversion should be done with converters that do not cause any type of loss to enhance the quality as well.
Beside WAV Other Popular Formats for YouTube Videos
Many other video formats should be used to make sure that the best and the most advanced outcome is generated. Some of the most popular formats are as under.
- Audio Video Interleave Format, AVI
It is one of the oldest formats that are on the market. It was developed by Microsoft as a part of their video processing format for Windows. It was made publically available in 1992.
This one of the oldest formats is used universally. Many people consider it the standard to save videos. The AVI files are simple to use and are supported by almost every video player currently on the market.
It is easy to store as it takes less space than many other formats that are on the market. It will also let you transfer the files relatively faster due to the small size.
- Flash Video Format, FLV
The flash player by Adobe is one of the most common software programs on the system. This has made this video format one of the common ones on the market. The format can be played with ease as the supported plugins are there for other apps as well.
The flash content is supported by all browsers and therefore it is common to play these videos without any additional plugins. The best part of this format is the lossless quality that it provides to its users. Even if you compress these videos they remain HD as the quality remains the same.
- Apple QuickTime Movie, MOV
Among the Mac users, it is one of the most used formats. Developed by Apple it is a format that allows the users to overcome issues such as playback errors. The new version has also been launched which is known as QuickTime X.
The best part of this format is that it is available for Windows users as well. The files of the MOV format are usually of high quality. It is for the same that the size of such files is large as compared to other formats.
- Moving Pictures Expert Group 4, MP4
Introduced in 1998 it is a format that is used by the motion pictures association responsible for setting the standards. The format is widely used and is supported by various platforms as well as devices.
Even after the MP4 file is compressed it remains lossless and the quality remains the same. The HTML5 that has been launched currently also supports this format. It is compatible with almost all of the browsers that are on the market.
- 264
As the name suggests it is one of the best and the most used formats for HD videos. The compression remains lossless and even if the resolution is low the quality is maintained. The MP4 container is the one that is used to contain this format.
Most of the streaming devices, as well as the services, use this format while referring to HD video. The best part is that the format is widely accepted as industry standards for HD videos. Most of the users all over the world use this format to save their HD videos with ease.
- OGG
It is one of the most used video formats. It has been developed by the Xiph.org foundation to maintain the video as well as the audio quality on different platforms. The format is free and the documentation, as well as the configuration, can be downloaded by anyone.
- Advanced Systems Format, .ASF
If you want to stream videos then this is the format that is considered to be the best. It is still being used by the major popular streaming platforms of the world. The .ASF format is one of the best and it allows the users to overcome issues such as quality loss as well as streaming related issues.
You may also like: How to Post/Share a Video From YouTube on Instagram >>
Conclusion
If you require lossless compression then YouTube to WAV conversion is something that is required. Some many ways and means can be used to make sure that the idea is approached. The best way is to use Filmora as it is an easy and efficient operation.
The best way to get around the issue is to always use the service that is embedded with quality.
If you like this article then it is requested to comment and share it on social media. It will not only help others but will also let them have knowledgeable ideas.
Richard Bennett
Richard Bennett is a writer and a lover of all things video.
Follow @Richard Bennett
Richard Bennett
Mar 27, 2024• Proven solutions
YouTube to WAV converter is a very common phenomenon. This is done by the users as they want to play the video on selected devices.
In this article, we will help you manage to convert YouTube to WAV file with ease.
You will Learn :
- What is WAV?
- How to Convert YouTube to WAV Format? (4 Options)
- Tips to Convert YouTube to WAV
- Beside WAV Other Popular Formats for YouTube Videos
What is WAV?
WAV, known as Wave Form Audio File Format and is fully supported by Windows, is a common format that was launched back in 1991, which supports most of the older devices as well.
For the users that want uncompressed and lossless quality prefer to use WAV format. It is extended from the RIFF format to the RF64 format.
How to Convert YouTube to WAV Format?
Some many ways and programs can be used as YouTube to WAV converter. All these programs are easy to use and definitive guides are also available online. Some of the best ways are mentioned below.
Option 1: Convert YouTube to WAV by Wondershare Filmora
Filmora is by far the best program that can be used to convert YouTube to WAV format. YouTube to WAV file conversion has never been as easy as it is with this program. The program is easy to use and allows the users to overcome the issues which other programs present.
Features of the Program
- It is one of the very few programs that come with split-screen functionality. It means that the video and audio can be played simultaneously on a single interface.
- The audio equalizer ensures that the tuning is done as per the requirements.
- There is an advanced functionality of text editing which allows the users to mention the text onto the converted video as well.
- The UI of the program is graphical and hence it is easy to use. The independent reviews have granted a score of 9.5 based on this functionality of the program.
- The part selection is available in the program. It means that multiple conversions can be done at the same time without losing quality.
How to Convert YouTube to WAV Using Filmora?
This YouTube WAV converter is easy to use. The best part is that it is compatible with major platforms i.e. Windows and Mac. The processes for both will be explained in detail so that you can understand the program better.
The Process to Convert YouTube to WAV:
Step 1: Download Filmora for Windows or Mac (depends on your operating system).
If you want to download the program for Windows then click below download icon:
For Mac version download click below icon:
Step 2: There are three ways to import media into the program.
Methond 1: Click File > Import Media. Choose the YouTube file that you want to convert to WAV format. If the file is on another device then you can get it from there as well.
Method 2: Click Import Media on the main interface and select the file from the window that pops up.
Method 3: You can also drag and drop the files onto the interface to make sure that they are imported.
Step 3: You now just need to export the video in the WAV format. Click the Export button and then go for the Local tab. The export formats that are currently supported by the program are WMV, MP4, AVI, MOV, F4V, MKV, TS, 3GP, MPEG-2, WEBM, GIF and MP3.
Step 4: You can then alter the settings within the settings tab. The bit rate is the main thing that defines the quality of the video. Once the settings are done press OK
Step 5: You can also export the video as per the device that you want to play it on.
Step 6: You can also upload the video to social media platforms such as YouTube and Vimeo.
Step 7: You can also burn the converted format onto a DVD. Select the appropriate settings and press Export.
The process is explained as under. For video guides please visit Filmora 101 as it will get you the complete knowledge thoroughly.
You may also like: How to Convert YouTube to MP4 Safely? [Step by Step Guide] >>
Option 2: Other Way to Convert YouTube to WAV on Windows
5K Player is one of the best and the most used players that also work as YouTube to WAV conversion platform as well. The process is very easy to follow and is mentioned as under.
Step 1: Copy and paste the URL of the video on the desired location within the player. Click download and the process starts.
Step 2: Click “To Music” and select the WAV format from the drop-down that appears. You can also choose the bit rate, frame rate, and resolution. Once the conversion is completed you can save the file and the process ends here.
You may also like: >> How to to Convert WMV to MP4 Easily?
Option 3: Other Way to Convert YouTube to WAV on Mac
The Allavsoft is one of the best converters that can be used to convert YouTube to WAV on Mac. The process is simple and has been explained as under.
Step 1: Paste the URL of the YouTube video that you want to convert. You can also select the download quality and can access the file once the download has been completed.
Step 2: You can then select the format and once the conversion has been completed click the download button. The same has been depicted by numbers 2 and 3 in the picture below. WAV lossless quality should be selected from the dropdown to make sure that the work is done without any issue and problem.
Right format selection is important as the conversion is done instantly.
Option 4: YouTube to WAV Conversion Online
The process that you need to follow is explained as under.
Step 1: Visit https.//www.savethevideo.com/convert to access the converter.
Step 2: Paste the URL of the YouTube video that you want to convert and click the “Convert” button:
Step 3: Wait till the converter fetches the information.
Step 4: From the drop-down make sure that you select the WAV format.
Step 5: Click “Convert” once again and the process of conversion starts.
Step 6: The video then starts to download in the desired format.
Step 7: Click “Download” and save the file to the desired location. This concludes the process in full.
Tips to Convert YouTube to WAV
Below are some tips that would be useful for the users that want to convert YouTube to WAV format.
1. Always use the multipurpose software. It will allow you to download and convert the video at the same time-saving time.
2. Lossless quality is always to be selected while you are converting the format. It will make sure that the video is never compressed at all.
3. One of the best ways to convert the video is to disable the background noise. This will lead to awesome results.
4. Converting from YouTube to WAV also requires you to choose the software that is fast and reliable or else you will get the outcome which is not as per your requirements.
5. Free software programs can also get the malware to your system and therefore these are not recommended at all.
6. WAV is a format that is of high quality as the converters have loads of options so it is advised to use these carefully.
7. Make sure that the converters that are used are the ones that are highly rated and have a graphical user interface.
8. The YouTube to WAV downloader should be there on with the converter as it will make the process easy and you don’t need tons of software programs for a single purpose.
9. Always go for the program that supports the containers instead of just the format. If a program supports the containers then it is easy to convert a number of formats.
10. The conversion should be done with converters that do not cause any type of loss to enhance the quality as well.
Beside WAV Other Popular Formats for YouTube Videos
Many other video formats should be used to make sure that the best and the most advanced outcome is generated. Some of the most popular formats are as under.
- Audio Video Interleave Format, AVI
It is one of the oldest formats that are on the market. It was developed by Microsoft as a part of their video processing format for Windows. It was made publically available in 1992.
This one of the oldest formats is used universally. Many people consider it the standard to save videos. The AVI files are simple to use and are supported by almost every video player currently on the market.
It is easy to store as it takes less space than many other formats that are on the market. It will also let you transfer the files relatively faster due to the small size.
- Flash Video Format, FLV
The flash player by Adobe is one of the most common software programs on the system. This has made this video format one of the common ones on the market. The format can be played with ease as the supported plugins are there for other apps as well.
The flash content is supported by all browsers and therefore it is common to play these videos without any additional plugins. The best part of this format is the lossless quality that it provides to its users. Even if you compress these videos they remain HD as the quality remains the same.
- Apple QuickTime Movie, MOV
Among the Mac users, it is one of the most used formats. Developed by Apple it is a format that allows the users to overcome issues such as playback errors. The new version has also been launched which is known as QuickTime X.
The best part of this format is that it is available for Windows users as well. The files of the MOV format are usually of high quality. It is for the same that the size of such files is large as compared to other formats.
- Moving Pictures Expert Group 4, MP4
Introduced in 1998 it is a format that is used by the motion pictures association responsible for setting the standards. The format is widely used and is supported by various platforms as well as devices.
Even after the MP4 file is compressed it remains lossless and the quality remains the same. The HTML5 that has been launched currently also supports this format. It is compatible with almost all of the browsers that are on the market.
- 264
As the name suggests it is one of the best and the most used formats for HD videos. The compression remains lossless and even if the resolution is low the quality is maintained. The MP4 container is the one that is used to contain this format.
Most of the streaming devices, as well as the services, use this format while referring to HD video. The best part is that the format is widely accepted as industry standards for HD videos. Most of the users all over the world use this format to save their HD videos with ease.
- OGG
It is one of the most used video formats. It has been developed by the Xiph.org foundation to maintain the video as well as the audio quality on different platforms. The format is free and the documentation, as well as the configuration, can be downloaded by anyone.
- Advanced Systems Format, .ASF
If you want to stream videos then this is the format that is considered to be the best. It is still being used by the major popular streaming platforms of the world. The .ASF format is one of the best and it allows the users to overcome issues such as quality loss as well as streaming related issues.
You may also like: How to Post/Share a Video From YouTube on Instagram >>
Conclusion
If you require lossless compression then YouTube to WAV conversion is something that is required. Some many ways and means can be used to make sure that the idea is approached. The best way is to use Filmora as it is an easy and efficient operation.
The best way to get around the issue is to always use the service that is embedded with quality.
If you like this article then it is requested to comment and share it on social media. It will not only help others but will also let them have knowledgeable ideas.
Richard Bennett
Richard Bennett is a writer and a lover of all things video.
Follow @Richard Bennett
Also read:
- Expert Advice on YouTube Short Pitfalls
- [Updated] A Comparative Analysis of Youtube's Ownership Vs. CC Licenses
- [New] Adding Richness YouTube Videos in Slideshows
- In 2024, Boost Your Blogging Bravery Following YouTuber Leaders
- Craft the Perfect Stream A Comprehensive Guide to YouTube’s Full-Rotation Videos
- 2024 Approved Charting Success Top Online Video Channels
- 2024 Approved Automate Playlist Retrieval From YouTube Directly
- Video Venture Validation Benchmarking Against Business Rivals
- The Ultimate Guide to Effective YouTube Banners for 2024
- [New] Building a Cross-Platform Social Media Presence
- Integrating Playlist Videos From YouTube on Websites
- YouTube TV - Everything You Need to Know
- Master iPhone/iPad Video Posting to YouTube
- Creating a Viral Traction with 6 Strategic Steps in YouTube Marketing for 2024
- Chorus of Creators Guidelines for Sharing Sounds Online for 2024
- In 2024, Elevate Your Content With These 20 Pro Video Shortcuts
- [New] Avoiding Content ID Alerts Strategies on YouTube
- In 2024, Analytics Unlocked Your Step-by-Step YouTube Guide
- [Updated] Designing a Personalized YouTube Subscribe Link
- Dodge Digital Watchers Accelerating View Count Growth
- [Updated] Audio-to-Video Bridge Easy 3-Step Guide for MP3 to YouTube Uploads
- 2024 Approved Calculating Earnings The Essence of YouTube Short Revenue Split
- [Updated] Adding Impact Strategies for Youtubes' Last Impressions
- The Chef's Roadmap Creating Culinary Content
- 2024 Approved Complete Annihilation of YouTube Shorts Accessibility
- [Updated] CarryMinati Financial Triumphs with Ajey Nagar
- In 2024, Content Creation Battleground Choosing Between Vimeo, YouTube, DailyMotion
- [Updated] Decoding Veiled Content on YouTube
- In 2024, Creating Cost-Effective YouTube Closure Elements
- Avoiding Common Pitfalls in PC-Based YouTube Video Editing for 2024
- [New] Best Voice Conversion Tools for Vlogging Professionals
- Making the Leap Set Up a Sports Vlog on macOS
- Culinary Carousel Swirling Up Top Food Network Names
- The Art of Acoustic Capture Secrets to High-End Home Recordings
- Is Channel Growth Primarily a Product of Organic Effort or Paid Strategies?
- [Updated] Essential Elements for Implementing Channel Banners in Games
- The Smartest Approach to Launching Your YouTube Business/Personal Brand From Phone
- In 2024, Achieving Peak Performance in Video Submissions on YouTube
- [New] Economical Camera Options Best Deals for DIY Vloggers
- 2024 Approved Crafting an Engaging Online Presence The Complete Guide to YouTube Submissions
- Ensuring Visibility Fixing Missing Shorts Thumbnails for 2024
- Elevating Views, Amplifying Impact A Youtube Case Study for 2024
- How to Create GIFs From YouTube Videos on Desktop and Mobile Devices for 2024
- In 2024, Achieve Professional-Level YouTube Transcription Without Spending
- Streaming to Profit YouTube Policy Changes
- In 2024, Visual Polishing in Meetings Blurring Backgrounds on TeamMeeting
- Updated Find the Fastest YouTube to MP4 Converter A Comprehensive Review
- [New] 10 Awesome Ideas for IGTV Videos Brands Shouldn't Miss Out On
- [Updated] 2024 Approved Enhanced Video Clarity on iPhone & Android Platforms
- In 2024, Unleash Potential with Live Audio Modification Tools The Ultimate Guide to 25 Innovative Technologies
- 2024 Approved Android App Chart-Toppers The Most Popular Downloads
- How To Restore Missing Messages Files from Infinix Note 30
- Repair Video Tool - Repair all your damaged video files of Itel A60s on Windows
- In 2024, Elevate Your Videos Advanced Recording in Adobe Presenter
- New 2024 Approved Edit Like a Pro Top iPhone Video Editing Apps
- Gmail Not Working on Honor X50 7 Common Problems & Fixes | Dr.fone
- New Simplify 4K Video Post-Production The Top Proxy Video Editing Apps
- How To Unlock a Oppo Find N3 Flip Easily?
- Pokemon Go No GPS Signal? Heres Every Possible Solution On Apple iPhone X | Dr.fone
- [New] 2024 Approved Screen Capture Central Apowsort vs Competitors Explored
- Super Easy Ways To Deal with Honor Magic Vs 2 Unresponsive Screen | Dr.fone
- A Detailed VPNa Fake GPS Location Free Review On Itel P55 5G | Dr.fone
- Updated Becoming a Voice Removal Specialist A Step-by-Step Approach
- Title: Bridging the Gap Between Classic and Contemporary Videos
- Author: Steven
- Created at : 2024-05-25 18:52:57
- Updated at : 2024-05-26 18:52:57
- Link: https://youtube-clips.techidaily.com/bridging-the-gap-between-classic-and-contemporary-videos/
- License: This work is licensed under CC BY-NC-SA 4.0.
