
:max_bytes(150000):strip_icc()/GettyImages-641174594-bdeb3169be1f4334a6a40ad7934fdd97.jpg)
Best YouTube Video to Text Converters Online
Best YouTube Video to Text Converters Online
Have you ever wondered why there is a need to transcribe YouTube videos? Well, let us enlighten you! Turning content from YouTube to text is essential for numerous content creators as it allows them to gain more views. Recent studies have shown that around 33% of the audience watching YouTube videos do not necessarily watch them in English. So, by converting them to text, translation becomes a whole lot easier and subtitles can be generated more efficiently.
In this article, we will explore the procedure through how one can convert a YouTube video to text, and learn about numerous effective online YouTube video to text software.
In this article
01 How to Convert YouTube Video to Texts by Copy/Paste YouTube Transcript
02 Best YouTube Video to Text Converters Online
Part 1: How to Convert YouTube Video to Texts by Copy/Paste YouTube Transcript
When people think “Get the transcript from YouTube” they believe it is going to be a daunting and lengthy procedure. Well, let us tell you that it is certainly not! All you have to do is follow the steps outlined below to transcribe YouTube video to text - that too through the YouTube player itself.
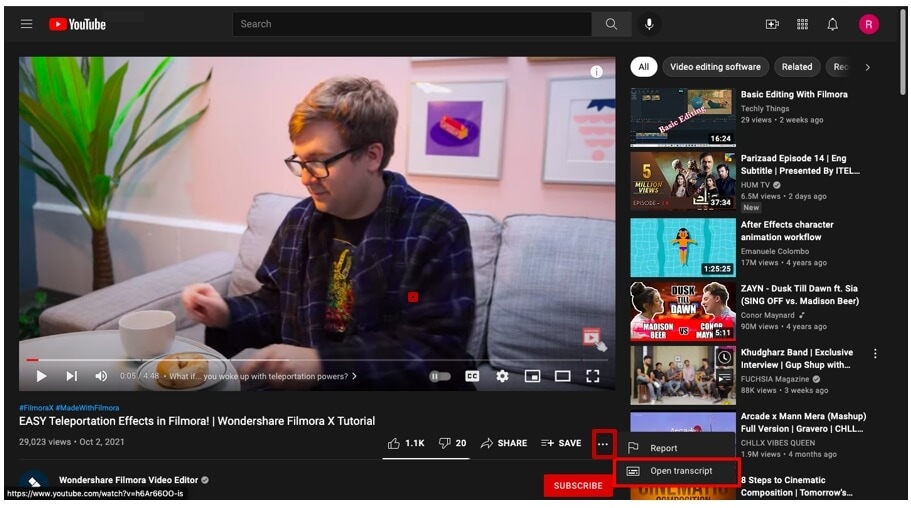
First what you have to do is open YouTube and select any video for which you require the transcript. Once you have selected the video, wait for it to load and then click the three dots located beneath the video, as shown in the image below.
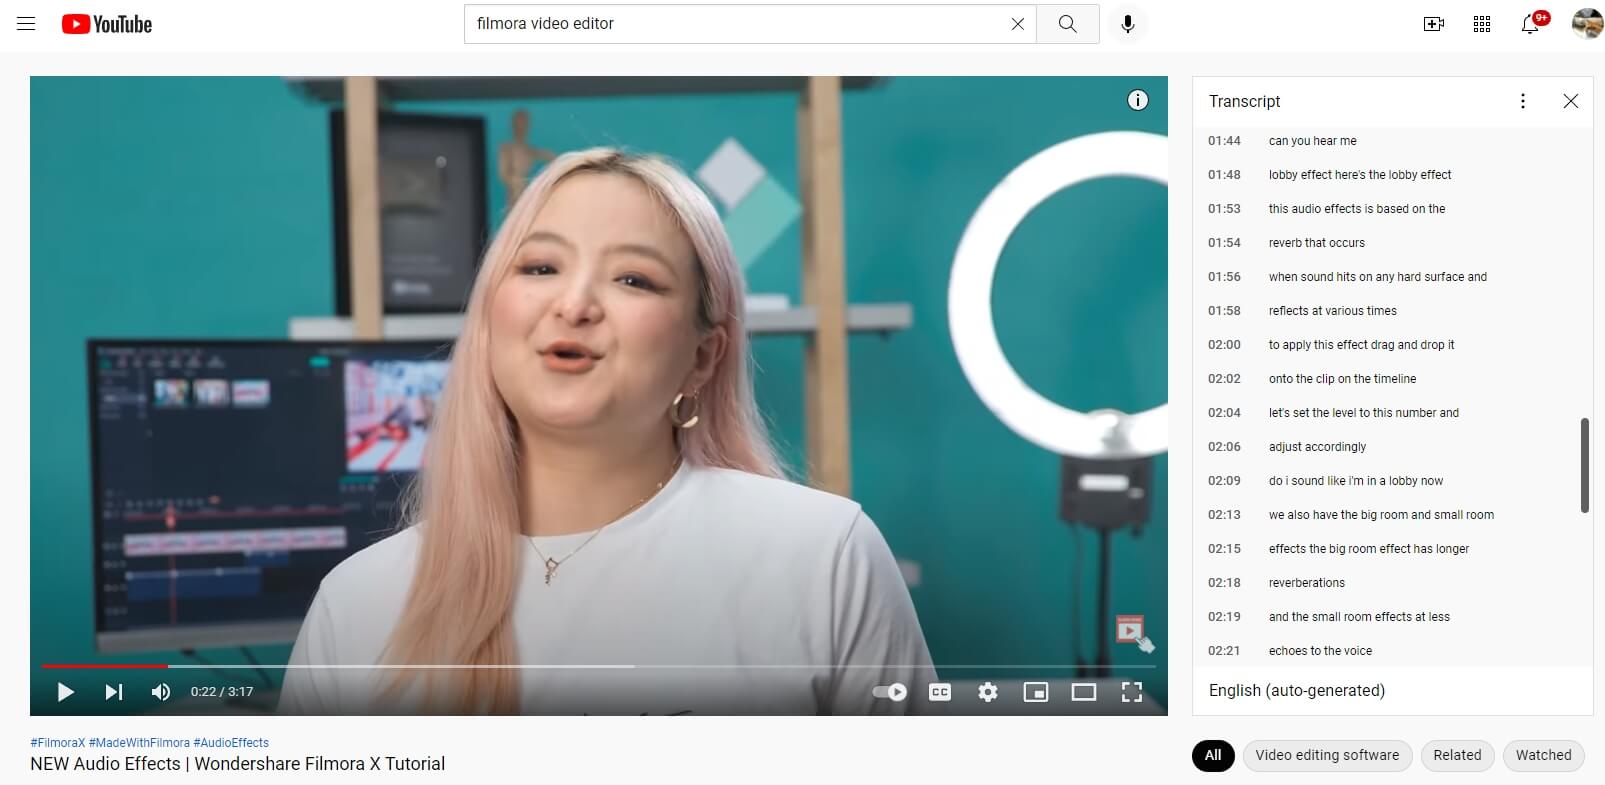
Following that, a menu will appear, just select the “Open Transcript” option and the transcription will open on the top right side of your screen.
Simply select the entire transcript using your mouse, then copy and paste it into a new Word Document or Google Document. If you don’t need the timestamps, you can click the three-dot icon to toggle timestamps off.

By following the steps outlined above, you can convert a YouTube video to text in less than five seconds!
Part 2: Best YouTube Video to Text Converters Online
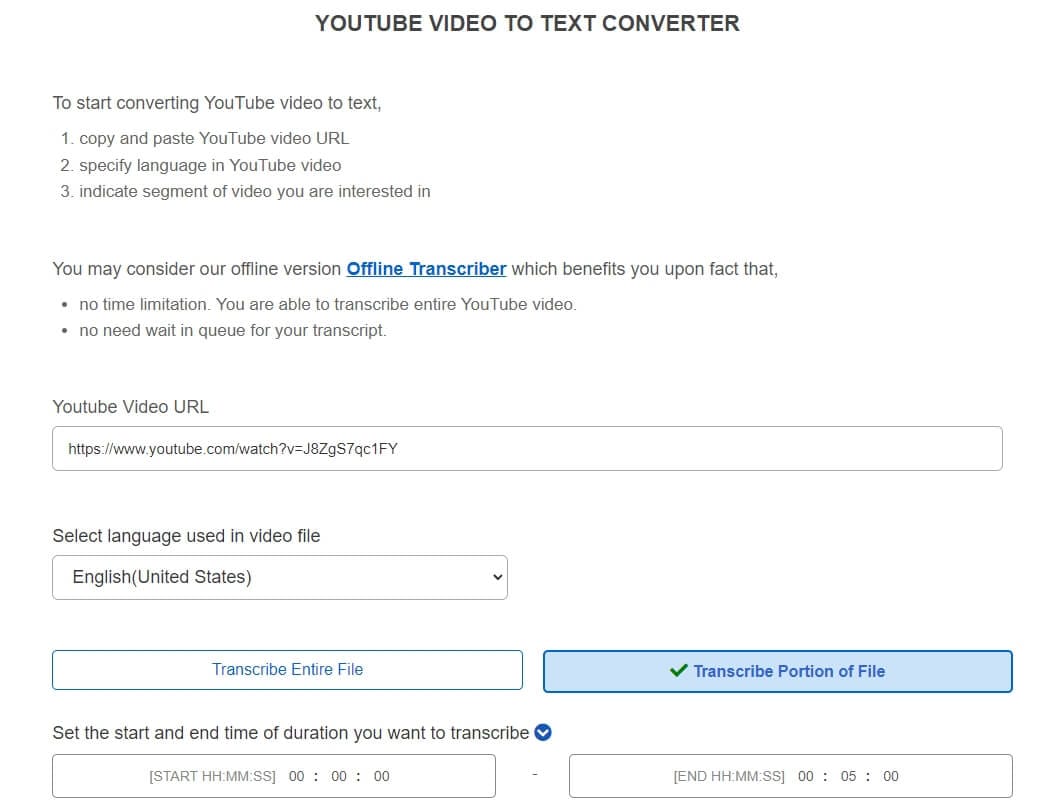
Aside from the basic method of getting the transcription from YouTube itself, many individuals make use of effective YouTube video to text converter online free. This allows them to get the complete video into text, small parts of the video to text, as well as options to convert the text into multiple languages. Below are some of the best software to convert YouTube video to text online.
1. Inqscribe
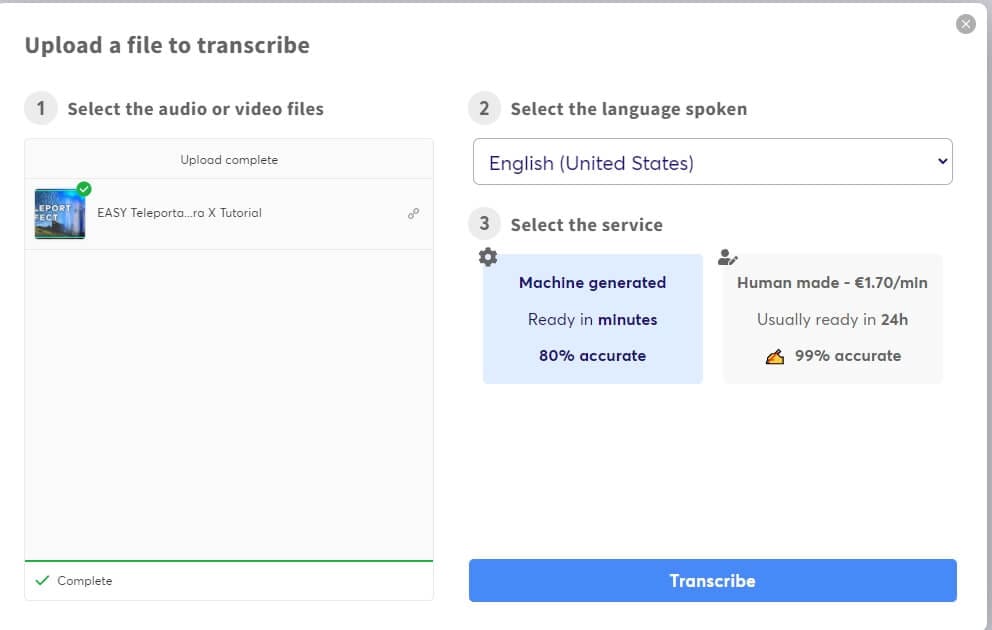
This high-quality cross-platform tool allows users to transcribe audio and video files into text . Whether it is a meeting recording or a YouTube video - you can convert them all to text. Making use of this free online software is extremely easy, all one has to do is just upload their file and click the process. Then the system will automatically transcribe the video into a text document for you. The software is uni code so all file formats are supported such as txt, XML, HTML, WebVTT, and more. The only drawback of this online software is that video files that are larger than a certain limit cannot be accepted.
2. Sonix
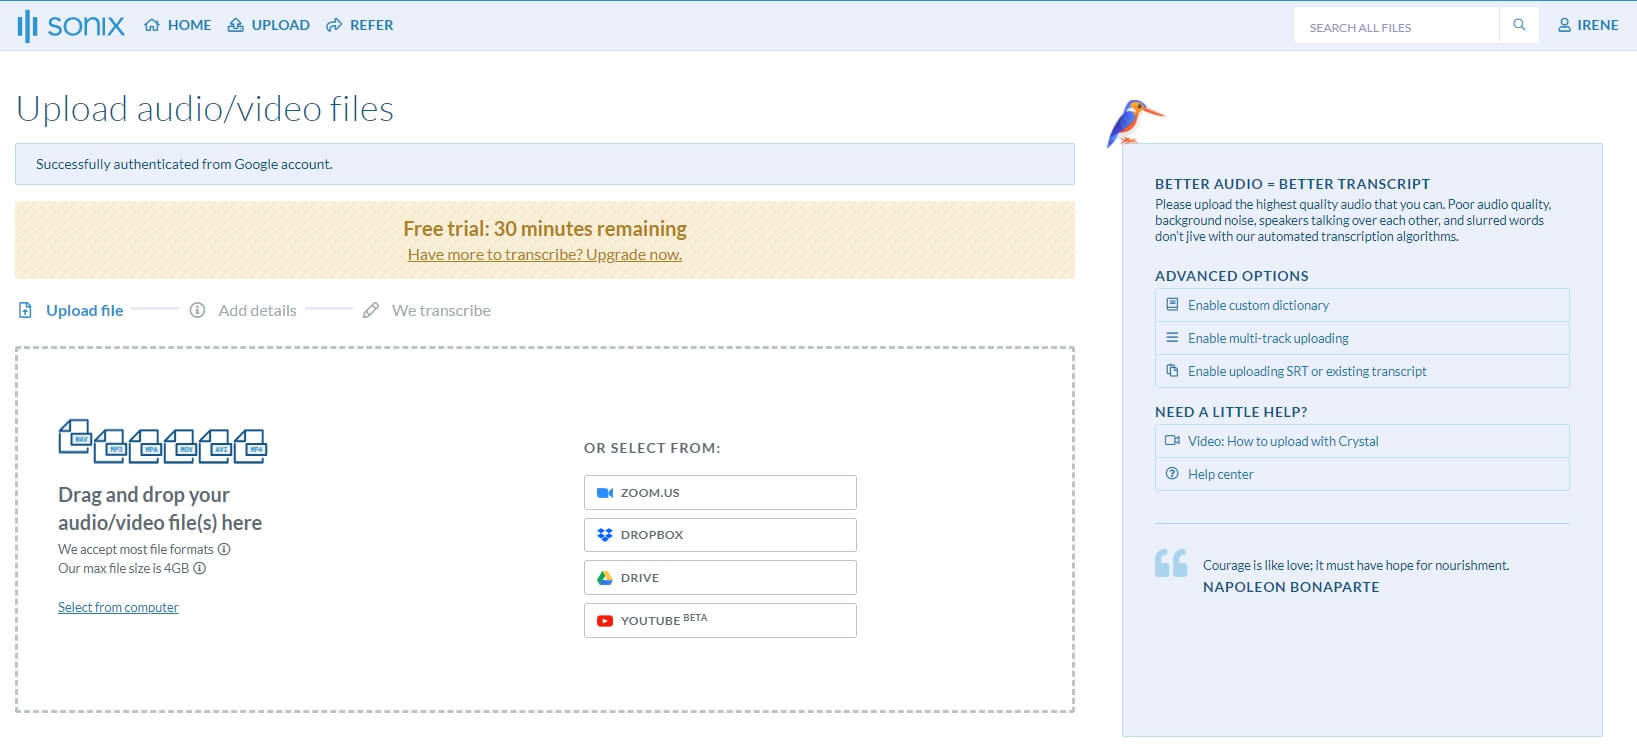
For individuals who have premium quality audio transcription, a tool by the name of Sonix is the right choice for you. This tool enables users to turn all types of YouTube videos into text. All they have to do is simply download the YouTube video they need to transcribe and then upload it to the online interface. From there, this software uses its comprehensive text reader to convert the video to text. This platform supports more than 40 different language choice inputs and outputs. Users are allowed to transcribe up to five videos for free, then they must pay a subscription fee.
3. Otter
This video-to-text converter works best in real-time. Simply play the audio of a YouTube video and let Otter do its magic. In real-time it will convert audio into text. Moreover, if you would like to only convert some parts of the audio to text, that is possible with this tool as well.
All you need to do is play the audio accordingly and the text will automatically generate itself. The AVI (Ambient Voice Intelligence) of this tool allows it to accurately understand what the audio is saying to transcribe the video. While many do find this tool handy, learning how to use it can be a tiny bit tedious and confusing.
Note: Currently, Otter doesn’t support uploading YouTube video link, you may need to download the YouTube video first and then upload it from desktop.
4. oTranscribe
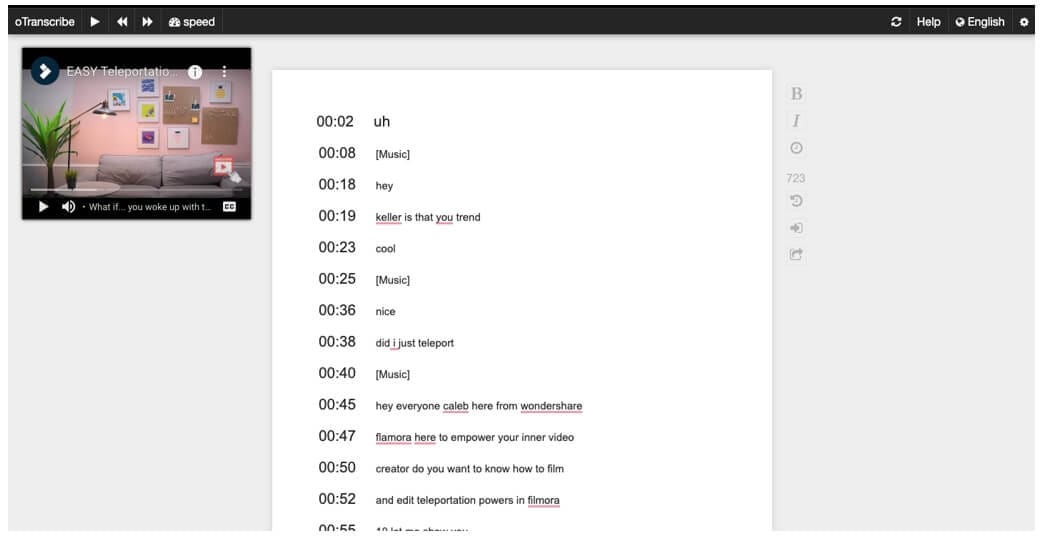
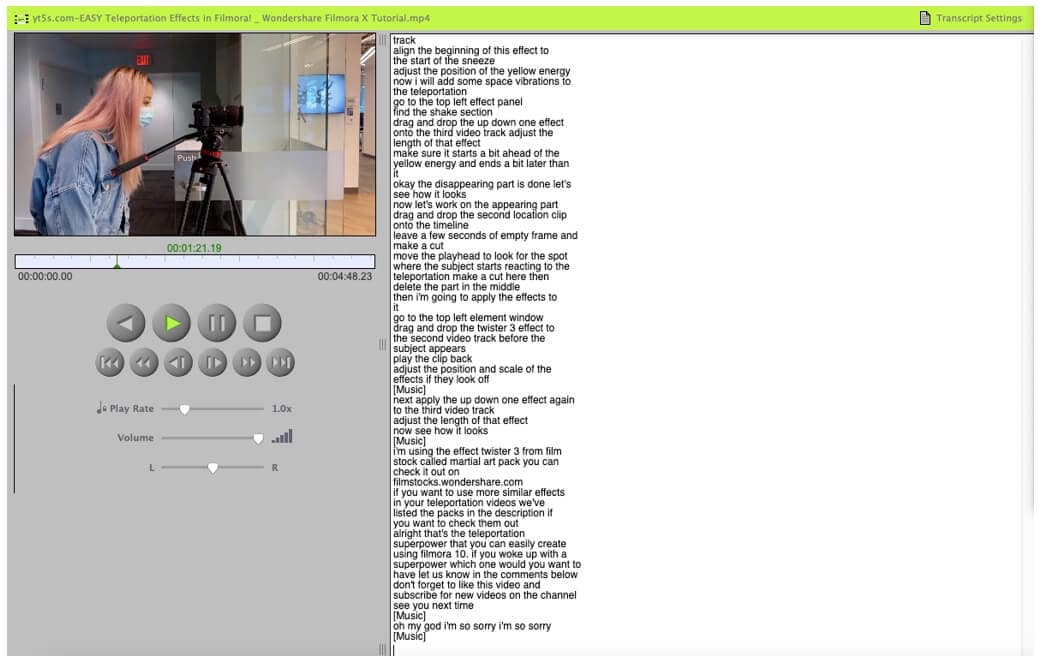
This online transcription tool is extremely easy and convenient to use - and it is entirely free! All you need to do is head on over to its homepage and drop a link to the YouTube video that you would like to transcribe. Then from there, you can access the video and text all at the same time, without having to switch between videos.
The best part is that you can record and translate text according to your need, cut and miss parts that you do not require. This tool supports all file formats which just adds to convince. The only challenge is that it will only accept videos and translate them into English.
5. Go Transcribe
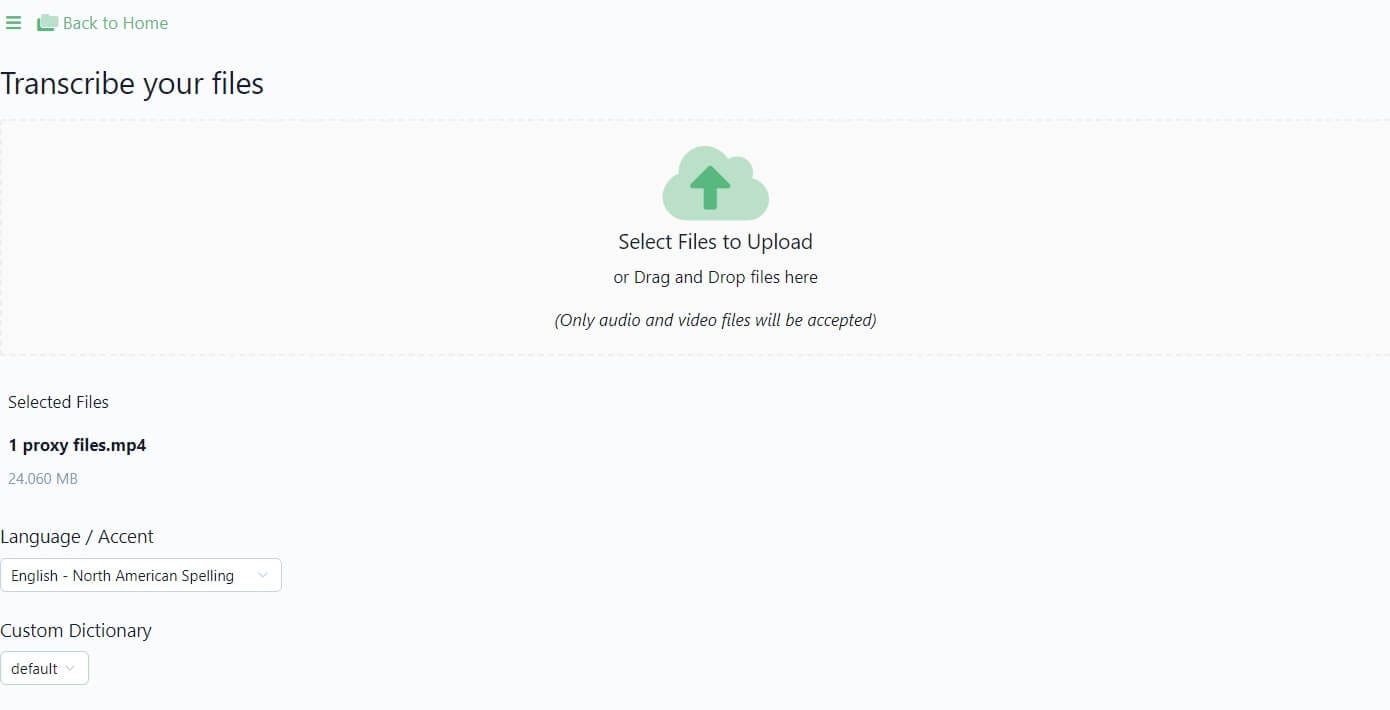
If you are looking to convert any sort of video format to text, then Go Transcribe might just be the tool that you require. This tool makes use of the latest voice technology to convert videos to text - and gives you the output in the form of an SRT, PDF, or DOC, which are all editable. All you need to do is upload the video in one of the formats below,
- 3PG
- FLV
- AVI
- MOV
- MPG
- MPEG
Then simply click the processing options and your video will be generated into a text file within minutes. However, this software may require a subscription fee.
files. Moreover, the output format is PDF which individuals cannot edit unless they convert the PDF to a TXT file online using different software.
6. Trint
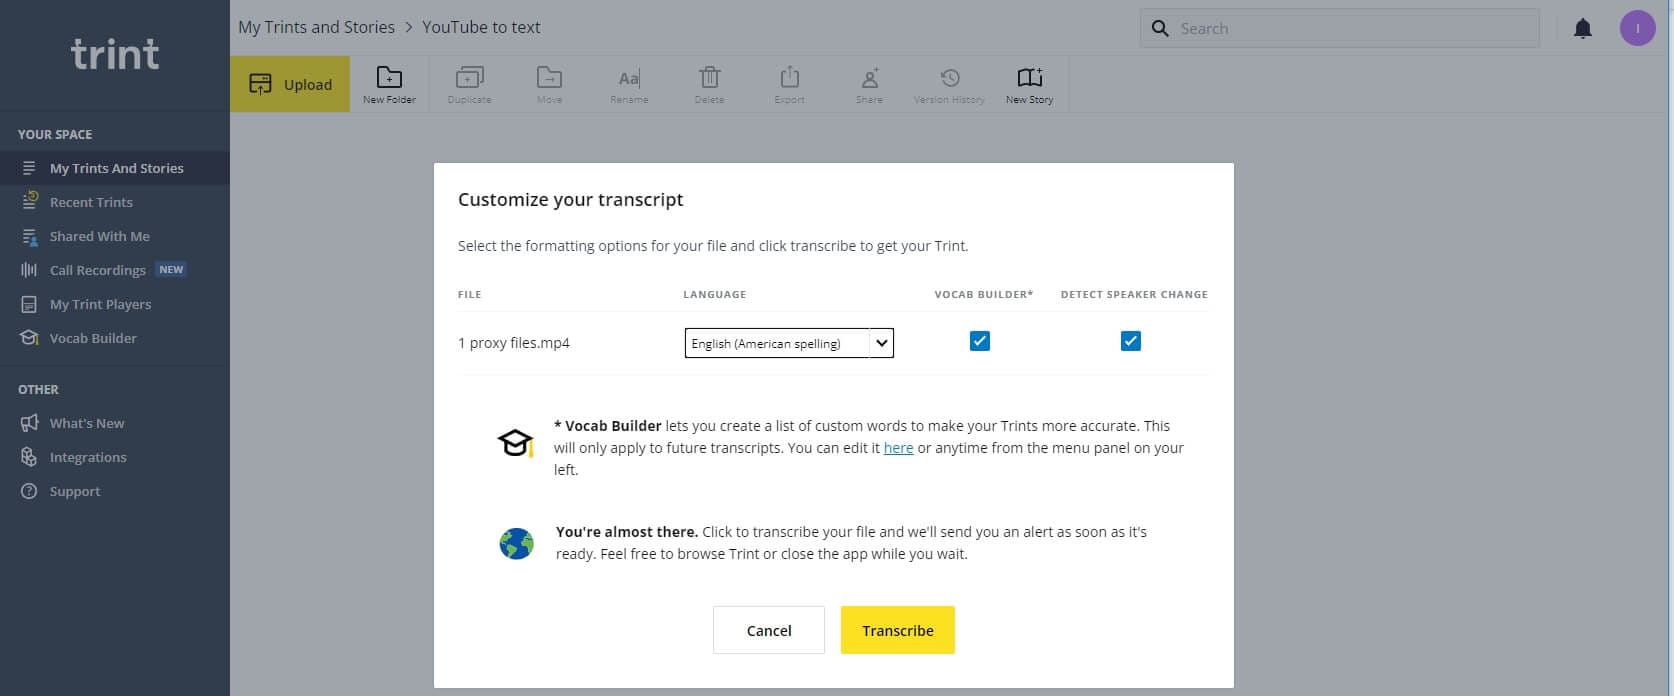
Turn your speech to text through magic - or in other words, through state-of-the-art technology. Trint is an online transcription tool that allows individuals to turn video files into text. People can download and upload numerous video files at once and turn them into text documents.
This is an extremely handy tool to have considering it comes with numerous options such as editing the text, only inducing certain parts of the video in the text, and so much more. This tool only has one shortcoming, it only accepts English language videos.
7. Happy Scribe
If you are wondering how, you will convert YouTube video to text, then we have just the answer for you. Make use of Happy Scribe to automatically transcribe all sorts of audio and video into comprehensive and readable text. You can get numerous features and options in this tool such as advanced grammatical functions as well as timestamps.
If your videos are in different languages, do not worry because Happy Scribe has more than 60 language formats. However, to make use of added features, individuals will need to pay for the tool and upgrade to the pro version.
8. 360Converter
360Converter, as its name suggests is a video to text converter which individuals can use online and offline. All you need to do is download and then upload the YouTube video that you would like to transcribe and the tool will automatically generate the text for you. The supported video formats include 3GP, MP4, MOV, AVI, and many more. This tool uses advanced technology to get accurate language and grammatical transcriptions, so everything is word to word - the exact same as the video. While this tool is extremely user-friendly, many state that it takes a while to process videos to text.
Key Takeaways!
Technology has come a long way which is why we now have numerous options available online to help us convert YouTube videos to text in less than 5-10 minutes. All you have to do is upload the file and let the tool do its magic! You can transcribe in different languages, segments, and so much more now!
Transform Long Videos into Short Ones Instantly
Turn long videos into viral clips. Effortlessly transform lengthy videos into engaging, shareable clips.

02 Best YouTube Video to Text Converters Online
Part 1: How to Convert YouTube Video to Texts by Copy/Paste YouTube Transcript
When people think “Get the transcript from YouTube” they believe it is going to be a daunting and lengthy procedure. Well, let us tell you that it is certainly not! All you have to do is follow the steps outlined below to transcribe YouTube video to text - that too through the YouTube player itself.
First what you have to do is open YouTube and select any video for which you require the transcript. Once you have selected the video, wait for it to load and then click the three dots located beneath the video, as shown in the image below.
Following that, a menu will appear, just select the “Open Transcript” option and the transcription will open on the top right side of your screen.
Simply select the entire transcript using your mouse, then copy and paste it into a new Word Document or Google Document. If you don’t need the timestamps, you can click the three-dot icon to toggle timestamps off.
By following the steps outlined above, you can convert a YouTube video to text in less than five seconds!
Part 2: Best YouTube Video to Text Converters Online
Aside from the basic method of getting the transcription from YouTube itself, many individuals make use of effective YouTube video to text converter online free. This allows them to get the complete video into text, small parts of the video to text, as well as options to convert the text into multiple languages. Below are some of the best software to convert YouTube video to text online.
1. Inqscribe
This high-quality cross-platform tool allows users to transcribe audio and video files into text . Whether it is a meeting recording or a YouTube video - you can convert them all to text. Making use of this free online software is extremely easy, all one has to do is just upload their file and click the process. Then the system will automatically transcribe the video into a text document for you. The software is uni code so all file formats are supported such as txt, XML, HTML, WebVTT, and more. The only drawback of this online software is that video files that are larger than a certain limit cannot be accepted.
2. Sonix
For individuals who have premium quality audio transcription, a tool by the name of Sonix is the right choice for you. This tool enables users to turn all types of YouTube videos into text. All they have to do is simply download the YouTube video they need to transcribe and then upload it to the online interface. From there, this software uses its comprehensive text reader to convert the video to text. This platform supports more than 40 different language choice inputs and outputs. Users are allowed to transcribe up to five videos for free, then they must pay a subscription fee.
3. Otter
This video-to-text converter works best in real-time. Simply play the audio of a YouTube video and let Otter do its magic. In real-time it will convert audio into text. Moreover, if you would like to only convert some parts of the audio to text, that is possible with this tool as well.
All you need to do is play the audio accordingly and the text will automatically generate itself. The AVI (Ambient Voice Intelligence) of this tool allows it to accurately understand what the audio is saying to transcribe the video. While many do find this tool handy, learning how to use it can be a tiny bit tedious and confusing.
Note: Currently, Otter doesn’t support uploading YouTube video link, you may need to download the YouTube video first and then upload it from desktop.
4. oTranscribe
This online transcription tool is extremely easy and convenient to use - and it is entirely free! All you need to do is head on over to its homepage and drop a link to the YouTube video that you would like to transcribe. Then from there, you can access the video and text all at the same time, without having to switch between videos.
The best part is that you can record and translate text according to your need, cut and miss parts that you do not require. This tool supports all file formats which just adds to convince. The only challenge is that it will only accept videos and translate them into English.
5. Go Transcribe
If you are looking to convert any sort of video format to text, then Go Transcribe might just be the tool that you require. This tool makes use of the latest voice technology to convert videos to text - and gives you the output in the form of an SRT, PDF, or DOC, which are all editable. All you need to do is upload the video in one of the formats below,
- 3PG
- FLV
- AVI
- MOV
- MPG
- MPEG
Then simply click the processing options and your video will be generated into a text file within minutes. However, this software may require a subscription fee.
files. Moreover, the output format is PDF which individuals cannot edit unless they convert the PDF to a TXT file online using different software.
6. Trint
Turn your speech to text through magic - or in other words, through state-of-the-art technology. Trint is an online transcription tool that allows individuals to turn video files into text. People can download and upload numerous video files at once and turn them into text documents.
This is an extremely handy tool to have considering it comes with numerous options such as editing the text, only inducing certain parts of the video in the text, and so much more. This tool only has one shortcoming, it only accepts English language videos.
7. Happy Scribe
If you are wondering how, you will convert YouTube video to text, then we have just the answer for you. Make use of Happy Scribe to automatically transcribe all sorts of audio and video into comprehensive and readable text. You can get numerous features and options in this tool such as advanced grammatical functions as well as timestamps.
If your videos are in different languages, do not worry because Happy Scribe has more than 60 language formats. However, to make use of added features, individuals will need to pay for the tool and upgrade to the pro version.
8. 360Converter
360Converter, as its name suggests is a video to text converter which individuals can use online and offline. All you need to do is download and then upload the YouTube video that you would like to transcribe and the tool will automatically generate the text for you. The supported video formats include 3GP, MP4, MOV, AVI, and many more. This tool uses advanced technology to get accurate language and grammatical transcriptions, so everything is word to word - the exact same as the video. While this tool is extremely user-friendly, many state that it takes a while to process videos to text.
Key Takeaways!
Technology has come a long way which is why we now have numerous options available online to help us convert YouTube videos to text in less than 5-10 minutes. All you have to do is upload the file and let the tool do its magic! You can transcribe in different languages, segments, and so much more now!
Transform Long Videos into Short Ones Instantly
Turn long videos into viral clips. Effortlessly transform lengthy videos into engaging, shareable clips.
The Ultimate Tripod Techniques for Video Creators
How To Use a Tripod for Vlogging

Richard Bennett
Mar 27, 2024• Proven solutions
As you grow into a serious vlogger, a tripod will become an essential piece of equipment. You can get by for a long time setting your camera up on a stack of books, or an upside-down laundry hamper, but not forever. While these setups are great for a beginner, an intermediate vlogger will start to find them limiting. Even if you are an amazingly creative person who can create any camera setup without a tripod there will come a point where you will decide your creative energy is better spent on your video content.
This article will explain how to use a tripod and then introduce you to four different types.
Part 1: How To Set a Tripod for Vlogging
1. Setting Up Your Tripod
Step 1 – Pull out all three legs of your tripod and make sure it is standing stably. There will be tensioners on the legs which you can release in order to adjust your height. Once your legs are extended to the height you want continue adjusting them until your tripod is level. Some tripods have a built in bubble level, but if yours does not you can use a separate bubble level or make a guestimate.
Make sure when you are setting up your tripod that you point one of its legs towards your subject. This will give you room to stand behind your camera, in-between the other two legs. If you have one leg pointed directly behind your camera then you may trip over it. Or, you may knock over and damage your camera.
Step 2 – On the top of your tripod there will be a plate with a small hole and a screw. Remove this plate using either a clip or lever, depending on your tripod. Once your plate is detached screw it into the bottom of your camera. It should be tight, but not too tight or you risk damaging your camera.
Step 3 – Attach your plate, which now has your camera mounted to it, back onto your tripod.
Your tripod comes with a ‘head’. Your tripod’s head is what your camera is mounted on top of. There are several different types of tripod heads and mounts which are all useful for different things.
Ball Heads and Pan/Tilt Heads are the two most common types of tripod heads. Ball Heads allow you to adjust your camera’s position quite a bit before you start shooting. They are not good for adding in camera movements while you are filming, however, because you need to lock them in place. Pan/Tilt heads are great for creating camera movement. Most Pan/Tilt heads have a handle which you can use to make a smooth panning motion.
Part 2: Why Do You Need a Tripod: Benefits of Using Tripod
Why can’t you just hold a camera in your hand while shooting vlog entries for your YouTube channel? Honestly, you can, but the camera may shake a lot and your footage might end up being unusable. Putting a camera on a tripod reduces the probability of camera shake to the minimum and that is just the tip of the iceberg.
A huge amount of vlogs can be described as sit down videos, in which the host of the video sits in front of a camera and talks to the audience. Holding a camera while talking or trying to present a product to the viewers is next to impossible, so in order to avoid having to deal with a camera, you can simply put it on a tripod, find the best angle, and push the record button.
On the go videos, are recorded at exterior locations, and a lot of YouTubers choose to shoot these types of videos handheld, but this approach makes it difficult to maintain the same shot composition for long. A Monopod, Gorillapod or just a simple selfie stick can make your job much easier because they stabilize the camera. In addition, shooting smooth panning shots without a tripod is as difficult as it sounds.
Part 3: A Few Things You’ll Need to Consider Before You Buy a Tripod
There are thousands of different tripod models you can use for vlogging, but which model you’re going to choose depends mostly on the type of vlog you want to make. If you are planning on shooting all of your videos in the studio-like conditions, then portability isn’t such an important feature, while quite the opposite is true if you intend on filming all of your footage on outdoor locations.
However, there are certain traits you have to consider when choosing a tripod you’re going to use while recording your vlog entries.
Sturdiness: There is absolutely no point in spending money on a tripod that breaks easily. Although if your plan is to shoot vlogs at home or in a studio, then buying a cheaper plastic tripod isn’t such a bad option, since the clamps and joints won’t have to endure a lot of wear and tear. Consider buying a more durable tripod if you are going to be traveling a lot while working on your vlogs.
The Type of Camera: A number of factors can contribute to the weight of a camera, including battery grips or lenses, so before you buy a tripod make sure that it can support the weight of the camera you want to use to record your videos.
The Maximum Height: Most vloggers don’t really have to worry about how tall their tripod is, because they are not on their feet in any of the shots featured in the video. Vloggers working on DIY videos, cooking tutorials or any other type of vlog that involves movement and action should pay attention to this trait.
Photo or Video Tripods: Do you want to take beautiful panning shots? If the answer is yes then you should get a video tripod that enables you to move the camera smoothly in any direction. Photo tripods are a great option for static shots that don’t involve a lot of camera movement.
Mobility: The heavier a tripod is, the more stability it can provide, but carrying a tripod that weighs over 10 pounds to shoot sports or adventure vlogs can be a tiring endeavor. Although portability is a factor, it shouldn’t prevent you from buying a high-quality tripod that will ensure your footage is perfectly smooth and stable.
Part 4: 4 Types of Tripods
Full-Sized Tripods: are very sturdy, and as a result can be fairly heavy. Although you can take them a lot of places they are not convenient to carry for extended periods of time. They are the most reliable way to ensure you have absolutely no camera shake.
Compact Tripods: appear to be the same size as Full-Sized tripods, but they are actually much lighter. You can get the same height with a Compact Tripod as a Full-Sized tripod and it will be much easier to travel with. However, Compact Tripods are not as stable. If you are shooting for an extended period of time you may need to weigh your Compact Tripod down with sandbags to keep it steady.
Gorillapods: have flexible legs which can be wrapped around posts, fences, or anything else you may want to mount your camera on. They are also lightweight enough that you can carry them around while you shoot. If you bend it right you can essentially use your Gorillapod as a heavy-duty selfie-stick for your camera.
Table-Top Tripods: are very small and easy to travel with. You can leave one in your camera bag or your glove box. Table-Top Tripods are meant to be set up on top of desks or other stable surfaces and may not be ideal for heavier cameras.
Part 5: The 5 Best Tripods For YouTube Vlogging
Even if you know everything there is to know about tripods, the selection process can be daunting. That’s why we’ve shortlisted the top 5 tripods on the market, in an effort to make finding the right tripod for your vlog videos as quick an easy as it can possibly be. Let’s have a look.
1. CamRah Smartphone Tripod
Price: $24.99

An increasing number of Smartphones features powerful cameras that can record videos at high resolutions. Unfortunately, most iPhones and Android devices are lightweight, which makes it difficult to hold them perfectly still while shooting a video. CamRah Smartphone Tripod offers a perfect solution to this problem because it is easy to pack and you can carry it wherever you go, without needing the extra space.
It weighs just 0.6lbs and it is 10.8 inches tall. The tripod has a maximum load of 11lbs which means that besides Smartphones, you can also mount action cameras, webcams, or even smaller DSLR cameras onto it. The flexible legs made from high-density foam offer stability even when the CamRah Tripod is placed on an uneven surface.
Pros:
- Easily portable
- Affordable
- Jaws technology provides an extra strong grip of the camera
Cons:
- The tripod’s legs can’t be extended
- Can’t be used with professional cameras
2. Manfrotto Mini Travel Tripod
Price: $34.99

Yet another great option for shooting vlogs with a Smartphone. The Manfrotto Mini Travel Tripod kit is also an excellent choice for all vloggers who shoot their videos with compact cameras. The tripod weighs just 0.51lbs and it is 5.31 inches tall, which makes it a perfect travel companion. However, it can’t support cameras heavier than 2.2lbs, so you have to carefully choose the camera you want to put on this tripod.
The tripod’s rotatable head features a lock button that enables you to fix the camera at a certain position and to shoot a video from an angle you selected. You can’t extend the legs on this tripod so shooting high angle shots is not an option.
Pros:
- Small and durable
- Allows you to mount almost any Smartphone model
- Compatible with compact cameras
Cons:
- Limits your shot selection
- Tripod’s legs can’t be extended
3. Joby Gorilla Pod
Price: $22.50

This tripod is a superstar in the vlogging community because it is flexible, easy to set up and it fits into a pocket. Joby Gorilla Pod’s legs are segmented, so you can freely choose an angle from which you want to shoot, without having to worry about the camera’s stability. You can use this tripod on flat and uneven surfaces equally effectively.
Joby Gorilla weighs just 1lbs and its maximum height 11.6 inches, which makes it perfectly suited for talking heads videos. Using this tripod while you are on the go is also an option if you have a camera that weighs less than 3lbs.
Pros:
- Highly adjustable
- Sturdy and Lightweight
- Made from stainless steel
Cons:
- Can’t be used for panning shots
- Legs can be extended for just one inch
4. Manfrotto Compact Action Tripod
Price: $64.49
If you love shooting your vlogs at night or if you simply want a tripod you can use in the studio an outdoor conditions, then Manfrotto’s Compact Action Tripod is one the best options you have at your disposal. The ergonomic head features a mounting plate that is easy to use and which provides a perfect grip of a camera.
This tripod is designed to be used with consumer-level DSLR cameras, but you can use it to shoot videos with almost all types of cameras. The Compact Action Tripod has a maximum height of 51.57 inches, and it can’t hold cameras heavier than 3.30lbs.
Pros:
- Suitable for both photography and video
- Great for outdoor use
- Allows you to take a wide variety of shots
Cons:
- Can’t support a lot of weight
- Not perfectly suited for professional-level cameras
5. Magnus VT-4000 Fluid Head Tripod
Price: $159.95
Experienced vloggers who record their videos with professional cameras, will enjoy using the Magnus VT-4000 Fluid Head Tripod. The 59-inch tall tripod can support as much as 8.8lbs of weight, and it is designed to help you create perfectly stable shots. The superb panning and tilting option enable you to move your camera freely while recording smooth shots, free of camera shakes.
The quick release mounting plate is compatible with a wide range of cameras, so you can experiment and work with several different cameras while using the same tripod. You can hardly make a mistake if you choose to buy this tripod because you’ll be able to use it to record vlogs at interior and exterior locations.
Pros:
- Easily adjustable to any surface
- Perfect for high angle shots
- Heavy-duty locks
Cons:
- Weighs 7.9lbs
- Not the best choice for action and adventure vlogs
Richard Bennett
Richard Bennett is a writer and a lover of all things video.
Follow @Richard Bennett
Richard Bennett
Mar 27, 2024• Proven solutions
As you grow into a serious vlogger, a tripod will become an essential piece of equipment. You can get by for a long time setting your camera up on a stack of books, or an upside-down laundry hamper, but not forever. While these setups are great for a beginner, an intermediate vlogger will start to find them limiting. Even if you are an amazingly creative person who can create any camera setup without a tripod there will come a point where you will decide your creative energy is better spent on your video content.
This article will explain how to use a tripod and then introduce you to four different types.
Part 1: How To Set a Tripod for Vlogging
1. Setting Up Your Tripod
Step 1 – Pull out all three legs of your tripod and make sure it is standing stably. There will be tensioners on the legs which you can release in order to adjust your height. Once your legs are extended to the height you want continue adjusting them until your tripod is level. Some tripods have a built in bubble level, but if yours does not you can use a separate bubble level or make a guestimate.
Make sure when you are setting up your tripod that you point one of its legs towards your subject. This will give you room to stand behind your camera, in-between the other two legs. If you have one leg pointed directly behind your camera then you may trip over it. Or, you may knock over and damage your camera.
Step 2 – On the top of your tripod there will be a plate with a small hole and a screw. Remove this plate using either a clip or lever, depending on your tripod. Once your plate is detached screw it into the bottom of your camera. It should be tight, but not too tight or you risk damaging your camera.
Step 3 – Attach your plate, which now has your camera mounted to it, back onto your tripod.
Your tripod comes with a ‘head’. Your tripod’s head is what your camera is mounted on top of. There are several different types of tripod heads and mounts which are all useful for different things.
Ball Heads and Pan/Tilt Heads are the two most common types of tripod heads. Ball Heads allow you to adjust your camera’s position quite a bit before you start shooting. They are not good for adding in camera movements while you are filming, however, because you need to lock them in place. Pan/Tilt heads are great for creating camera movement. Most Pan/Tilt heads have a handle which you can use to make a smooth panning motion.
Part 2: Why Do You Need a Tripod: Benefits of Using Tripod
Why can’t you just hold a camera in your hand while shooting vlog entries for your YouTube channel? Honestly, you can, but the camera may shake a lot and your footage might end up being unusable. Putting a camera on a tripod reduces the probability of camera shake to the minimum and that is just the tip of the iceberg.
A huge amount of vlogs can be described as sit down videos, in which the host of the video sits in front of a camera and talks to the audience. Holding a camera while talking or trying to present a product to the viewers is next to impossible, so in order to avoid having to deal with a camera, you can simply put it on a tripod, find the best angle, and push the record button.
On the go videos, are recorded at exterior locations, and a lot of YouTubers choose to shoot these types of videos handheld, but this approach makes it difficult to maintain the same shot composition for long. A Monopod, Gorillapod or just a simple selfie stick can make your job much easier because they stabilize the camera. In addition, shooting smooth panning shots without a tripod is as difficult as it sounds.
Part 3: A Few Things You’ll Need to Consider Before You Buy a Tripod
There are thousands of different tripod models you can use for vlogging, but which model you’re going to choose depends mostly on the type of vlog you want to make. If you are planning on shooting all of your videos in the studio-like conditions, then portability isn’t such an important feature, while quite the opposite is true if you intend on filming all of your footage on outdoor locations.
However, there are certain traits you have to consider when choosing a tripod you’re going to use while recording your vlog entries.
Sturdiness: There is absolutely no point in spending money on a tripod that breaks easily. Although if your plan is to shoot vlogs at home or in a studio, then buying a cheaper plastic tripod isn’t such a bad option, since the clamps and joints won’t have to endure a lot of wear and tear. Consider buying a more durable tripod if you are going to be traveling a lot while working on your vlogs.
The Type of Camera: A number of factors can contribute to the weight of a camera, including battery grips or lenses, so before you buy a tripod make sure that it can support the weight of the camera you want to use to record your videos.
The Maximum Height: Most vloggers don’t really have to worry about how tall their tripod is, because they are not on their feet in any of the shots featured in the video. Vloggers working on DIY videos, cooking tutorials or any other type of vlog that involves movement and action should pay attention to this trait.
Photo or Video Tripods: Do you want to take beautiful panning shots? If the answer is yes then you should get a video tripod that enables you to move the camera smoothly in any direction. Photo tripods are a great option for static shots that don’t involve a lot of camera movement.
Mobility: The heavier a tripod is, the more stability it can provide, but carrying a tripod that weighs over 10 pounds to shoot sports or adventure vlogs can be a tiring endeavor. Although portability is a factor, it shouldn’t prevent you from buying a high-quality tripod that will ensure your footage is perfectly smooth and stable.
Part 4: 4 Types of Tripods
Full-Sized Tripods: are very sturdy, and as a result can be fairly heavy. Although you can take them a lot of places they are not convenient to carry for extended periods of time. They are the most reliable way to ensure you have absolutely no camera shake.
Compact Tripods: appear to be the same size as Full-Sized tripods, but they are actually much lighter. You can get the same height with a Compact Tripod as a Full-Sized tripod and it will be much easier to travel with. However, Compact Tripods are not as stable. If you are shooting for an extended period of time you may need to weigh your Compact Tripod down with sandbags to keep it steady.
Gorillapods: have flexible legs which can be wrapped around posts, fences, or anything else you may want to mount your camera on. They are also lightweight enough that you can carry them around while you shoot. If you bend it right you can essentially use your Gorillapod as a heavy-duty selfie-stick for your camera.
Table-Top Tripods: are very small and easy to travel with. You can leave one in your camera bag or your glove box. Table-Top Tripods are meant to be set up on top of desks or other stable surfaces and may not be ideal for heavier cameras.
Part 5: The 5 Best Tripods For YouTube Vlogging
Even if you know everything there is to know about tripods, the selection process can be daunting. That’s why we’ve shortlisted the top 5 tripods on the market, in an effort to make finding the right tripod for your vlog videos as quick an easy as it can possibly be. Let’s have a look.
1. CamRah Smartphone Tripod
Price: $24.99
An increasing number of Smartphones features powerful cameras that can record videos at high resolutions. Unfortunately, most iPhones and Android devices are lightweight, which makes it difficult to hold them perfectly still while shooting a video. CamRah Smartphone Tripod offers a perfect solution to this problem because it is easy to pack and you can carry it wherever you go, without needing the extra space.
It weighs just 0.6lbs and it is 10.8 inches tall. The tripod has a maximum load of 11lbs which means that besides Smartphones, you can also mount action cameras, webcams, or even smaller DSLR cameras onto it. The flexible legs made from high-density foam offer stability even when the CamRah Tripod is placed on an uneven surface.
Pros:
- Easily portable
- Affordable
- Jaws technology provides an extra strong grip of the camera
Cons:
- The tripod’s legs can’t be extended
- Can’t be used with professional cameras
2. Manfrotto Mini Travel Tripod
Price: $34.99
Yet another great option for shooting vlogs with a Smartphone. The Manfrotto Mini Travel Tripod kit is also an excellent choice for all vloggers who shoot their videos with compact cameras. The tripod weighs just 0.51lbs and it is 5.31 inches tall, which makes it a perfect travel companion. However, it can’t support cameras heavier than 2.2lbs, so you have to carefully choose the camera you want to put on this tripod.
The tripod’s rotatable head features a lock button that enables you to fix the camera at a certain position and to shoot a video from an angle you selected. You can’t extend the legs on this tripod so shooting high angle shots is not an option.
Pros:
- Small and durable
- Allows you to mount almost any Smartphone model
- Compatible with compact cameras
Cons:
- Limits your shot selection
- Tripod’s legs can’t be extended
3. Joby Gorilla Pod
Price: $22.50
This tripod is a superstar in the vlogging community because it is flexible, easy to set up and it fits into a pocket. Joby Gorilla Pod’s legs are segmented, so you can freely choose an angle from which you want to shoot, without having to worry about the camera’s stability. You can use this tripod on flat and uneven surfaces equally effectively.
Joby Gorilla weighs just 1lbs and its maximum height 11.6 inches, which makes it perfectly suited for talking heads videos. Using this tripod while you are on the go is also an option if you have a camera that weighs less than 3lbs.
Pros:
- Highly adjustable
- Sturdy and Lightweight
- Made from stainless steel
Cons:
- Can’t be used for panning shots
- Legs can be extended for just one inch
4. Manfrotto Compact Action Tripod
Price: $64.49
If you love shooting your vlogs at night or if you simply want a tripod you can use in the studio an outdoor conditions, then Manfrotto’s Compact Action Tripod is one the best options you have at your disposal. The ergonomic head features a mounting plate that is easy to use and which provides a perfect grip of a camera.
This tripod is designed to be used with consumer-level DSLR cameras, but you can use it to shoot videos with almost all types of cameras. The Compact Action Tripod has a maximum height of 51.57 inches, and it can’t hold cameras heavier than 3.30lbs.
Pros:
- Suitable for both photography and video
- Great for outdoor use
- Allows you to take a wide variety of shots
Cons:
- Can’t support a lot of weight
- Not perfectly suited for professional-level cameras
5. Magnus VT-4000 Fluid Head Tripod
Price: $159.95
Experienced vloggers who record their videos with professional cameras, will enjoy using the Magnus VT-4000 Fluid Head Tripod. The 59-inch tall tripod can support as much as 8.8lbs of weight, and it is designed to help you create perfectly stable shots. The superb panning and tilting option enable you to move your camera freely while recording smooth shots, free of camera shakes.
The quick release mounting plate is compatible with a wide range of cameras, so you can experiment and work with several different cameras while using the same tripod. You can hardly make a mistake if you choose to buy this tripod because you’ll be able to use it to record vlogs at interior and exterior locations.
Pros:
- Easily adjustable to any surface
- Perfect for high angle shots
- Heavy-duty locks
Cons:
- Weighs 7.9lbs
- Not the best choice for action and adventure vlogs
Richard Bennett
Richard Bennett is a writer and a lover of all things video.
Follow @Richard Bennett
Also read:
- Dial Up the Impact with 50 FREE Branding Graphics for 2024
- In 2024, Adapting Shorts Strategy for Multiple Platforms
- 2024 Approved A Compre Written By Dr. John Smith, PhD in Environmental Science
- Financial Outcomes Dailymotion versus YouTube Earning Potential
- [Updated] Essentials Checklist - What You Must Know Before Sharing 4K Videos on Youtube
- The Premier 7 Apps Transforming Mobile Video Streaming on YouTube
- Top 5 Essential Filming Accessories for Online Creators
- Guide to Make Your Shorts' Thumbnail Pop Up
- [Updated] Are There Legal Constraints in Capturing Online Video Screenshots?
- In 2024, Enhance Your Content Creation with These Top 12 Cameras
- Master iPhone/iPad Video Posting to YouTube
- [New] Daily Digital Deluge YouTube's Prime Videos Ranked #1-10
- 2024 Approved Boosting Engagement From the Start Premium, Paid-Free Intra Creators
- [New] Adapting Your Favorite Songs From Spotify to YouTube Music Service
- 2024 Approved Channeling Success The Essential Elements for Profitable Video Trailers
- [Updated] Cultivating a Sustainable Advertising Ecosystem FameBit’s Strategies
- Creative Channel Titling Techniques for Growth for 2024
- Inside Track on Calculating Your YouTube Impact and Income
- [Updated] A Quick Guide to Purging Watched YouTube Videos
- 2024 Approved Essential YouTube Yoga Channels for Fitness Enthusiasts
- [New] Elevate Viewing Experience Activating AV1 Codec on YouTube
- [Updated] Effortlessly Journey to Your Custom-Designed Music Library on Youtube
- Quick Record & Publish Screen Images for Mac/PC and YouTube
- YouTube Shorts Showing Up After Fix
- Deep Dive Into the Rise of Online Performing Artists for 2024
- In 2024, Compliance in Recording Video Streams on YouTube
- Efficiently Isolate Key Moments in YouTube Footage for 2024
- YouTube Movie Maker Unleashed Creative Possibilities Explored
- Cutting Techniques for Sports Entertainment Films
- [New] A Complete Guide to YouTube's Live Image Lore
- In 2024, Double Delight Endless Looping of YouTube Videos for TVs
- Video Masterclass Crafting YouTube Trailers Using Filmora
- Shot Securement Keeping Cameras Still on Arms Only
- Unlock Your Marketing Potential with Our 50+ Free YouTube Banners
- [Updated] Easy and Inexpensive Techniques for YouTube Cards
- Elevate Video Playback Embrace the Power of AV1 in YouTube for 2024
- From Humble Beginnings to Sponsored Success Channels' Blueprint
- The Ultimate Selection of YouTube's Finest Cosmetics Vloggers
- 2024 Approved Audible Savings The Essential Guide to Using These 24 No-Cost Splitters on YouTube
- [Updated] Embrace Serenity The 10 Best Online Yoga Masters Today
- A Practical Guide To Applying Creative Commons Rights for 2024
- Epic Soundscape Trending Audio for Cutting-Edge YouTube Short Videos
- Achieving Comprehensive Participant Visualization on Meet for 2024
- [Updated] The Essential Art of Editing Boost Your Instagram Videography
- 2024 Approved REVIEW Whats Top 10 Software to Make AI Upscaling Video
- The Ultimate Guide to Recording Your LOL Adventures (3 Ways)
- In 2024, Detailed guide of ispoofer for pogo installation On Vivo Y100i Power 5G | Dr.fone
- Updated The Audio Artists Toolkit for Podcast Production 11 Pioneering Soundscape Retreats
- [Updated] Breaking Down Barriers to Affordable Editing Power
- [Updated] Learn the Insider Tricks of Screening Instagram Stories for 2024
- AddROM Bypass An Android Tool to Unlock FRP Lock Screen For your Samsung Galaxy M34
- 2024 Approved Add Emoji to Linkedin Post – 5 Tips You Would Like to Know
- [Updated] In 2024, Master OBS on macOS Download, Setup & Get to Work
- Transform YouTube Live with These Must-Know Secrets for 2024
- [Updated] 2024 Approved A+ Mobile, Desktop Discord Video Capturing Apps
- Sim Unlock Vivo Y36 Phones without Code 2 Ways to Remove Android Sim Lock
- Preparation to Beat Giovani in Pokemon Go For Vivo S17 | Dr.fone
- How to Restore Deleted Vivo Pictures An Easy Method Explained.
- Master Multitask Media with Ease Expertly Using Netflix’s Picture-In-Picture Feature
- In 2024, How to Use Google Assistant on Your Lock Screen Of Realme GT 5 Pro Phone
- Updated Top Tips for Effortless Unity 3D Animation for 2024
- [Updated] 2024 Approved Premier Game Snapshot Software
- Want to Uninstall Google Play Service from OnePlus Nord CE 3 Lite 5G? Here is How | Dr.fone
- Updated 2024 Approved Create Unforgettable Videos Insider Tips for Home Editors
- 2024 Approved The Comprehensive Guide to Screencasting Techniques
- Precision in Photos IPhone Apps for Accurate Cropping
- In 2024, Creating Collages on Canva Is Simple and Quick. The Tool Lets You Create some Amazing Customized Collages as Needed. So, Get Ready to Explore the World of Canva Collages
- In 2024, Prime Video Hits on Twitter The Most Popular Watches of '23
- Gone Sticker Refining Vids for a Slick TikTok Presence
- 2024 Approved Crafting Compelling Podcast Teasers
- Is your Itel A70 working too slow? Heres how you can hard reset it | Dr.fone
- [Updated] Turning Snapchat Videos Inside Out Easily
- Title: Best YouTube Video to Text Converters Online
- Author: Steven
- Created at : 2024-05-25 18:50:36
- Updated at : 2024-05-26 18:50:36
- Link: https://youtube-clips.techidaily.com/best-youtube-video-to-text-converters-online/
- License: This work is licensed under CC BY-NC-SA 4.0.
