
:max_bytes(150000):strip_icc()/daniel-romero-ArcRAMb_YZI-unsplash-b863b8b760974031be58ad9932c0fcb0.jpg)
"Best 10 Sound Boosting Software PC, Mac & Mobile for 2024"
Best 10 Sound Boosting Software: PC, Mac & Mobile
Best 10 YouTube Volume Boosters for Windows, macOS, Android, and iPhone

Shanoon Cox
Mar 27, 2024• Proven solutions
Have you ever listened to a YouTube video on max volume but still the sound wasn’t audible - even after turning up the YouTube volume as well as device audio? It is super annoying and inconvenient when you increase volume to max yet the video remains inaudible. YouTube volume issue could be due to various reasons such as poor audio quality of the built-in speakers or low original video sound. Well, there is a simple way to combat this problem i.e., sound booster. You can set different volume levels for the YouTube app on your PC or smartphone’s native volume controls. There are different YouTube volume boosters for Android, Windows, macOS, and iOS devices.
From listening to your favorite podcast to watching vlogs with your friends, you can use the best volume booster apps to increase the media sound volume and quality!
- Part 1: Best YouTube Volume Boosters for Windows and macOS
- Part 2: Best YouTube Volume Boosters for Android and iOS
- Part 3: Best YouTube Video Editing Software-Wondershare Filmora (Bonus Tip)
Part 1: Best YouTube Volume Boosters for Windows and macOS
Let’s introduce the best YouTube volume boosters for Windows and macOS:
1. FxSound (Windows and Mac)
FxSound is a very powerful tool that is made for Windows and macOS to enhance and boost the quality and volume of sound. This app comes with many features. For example, this audio software provides better sound quality, volume booster, and sound effects. Now you can listen to music, watch movies and play games without any distortion. Easily boost base, get customized effects and play with custom presets. You can download this app for your PC for free through the official website. People like this equalizer because it can make any audio format sound good even if it is 100 years old!

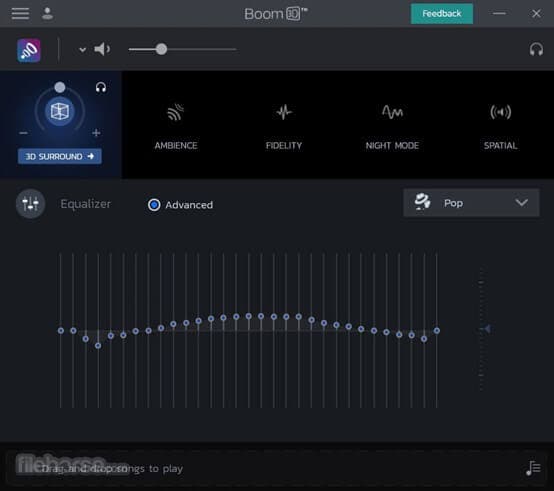
2. Boom 3D (Windows and macOS)
Boom 3D is a very popular app among many Windows and macOS users. This software is designed to help improve the audio on speakers or headphones that are connected to your computer. Boom 3D audio booster software also works with the Bluetooth devices that are connected to your PC. It can make any sound louder, clearer, and much better without buying any external devices. It provides us a 3D audio experience and works with any music player, video player, etc.!
3. Chrome Volume Booster Plugin (Windows)
This plugin has been rated 5 stars on the chrome web store as it is the best plugin for boosting up your volume on windows PC. This booster is so easy to download; you just have to go to the chrome web store and add the extension to your Google Chrome Browser. After adding it you can simply click on the icon and boost your volume up to 1000%! This plugin is free in the chrome store, just add it and choose how much louder you want your sound to be.

4. Letasoft Sound Booster (Windows)
Letasoft Sound Booster can only be used on windows. You can download it through the official website of Letasoft. It comes with a 14 days free trial period but after that, you have to buy their license to keep using it. This software is made to be used as an extra amplifier to boost up the volume of your audio or video if you think it is too low. The Letasoft Sound Booster app is very easy to use as you can control the volume from the slider. Moreover, it auto-starts and has no sound distortion.

5. Froyosoft Sound Booster (Mac)
Froyosoft Sound Booster is made for macOS users so they can boost video and audio file volumes. Individual application volumes can also be adjusted with the help of the Froyosoft Sound Booster. The good thing about this booster is that it is free for all users and it is 100% safe - you will not get any virus on your PC. You can download it from their website and increase the volume as high as you want to. So, get ready to get a clear and enhanced sound with the help of this app!

Part 2: Best YouTube Volume Boosters for Android and iOS
Following are the best YouTube sound boosters for Android and iOS devices:
1. AmpMe (Android and iOS)
With the help of AmpMe, you can start your little party through music apps. You don’t just get to listen to music but you can also chat with your friends - yup that’s right, it is a two-in-one app! The AmpMe app helps you to play the same music with your friends at the same time. It is one of the best volume booster apps that is available for both Android and iOS. It uses Bluetooth to connect with several devices, and the more the devices the higher the volume of the music. AmpMe offers a free trial and it costs $9.99 per week.

2. Super Volume Booster (Android)
To enjoy your music more than ever, you need a good volume enhancer. And, what can be better than an app that is free and boosts your audio? Android users are in luck because Super Volume Booster is a user-friendly app that allows you to increase the volume of YouTube and other apps. It gives you the best music experience. Moreover, it is clean, simple and has a one-touch operation. Not to forget that it has amazing reviews on Playstore. This app also increases the bass and also supports headphones and Bluetooth.

3. Volume Booster GOODEV (Android)
Volume Booster GOODEV is another app that boosts up the audio for you from 20 to 30% more! If you want to listen to an audiobook, watch a YouTube video or a movie on Netflix, volume Booster GOODEV can help you increase the volume of any media on any app! The volume can get so high that it might be dangerous for your ears so be careful. It offers a sound equalizer and is simple to use.

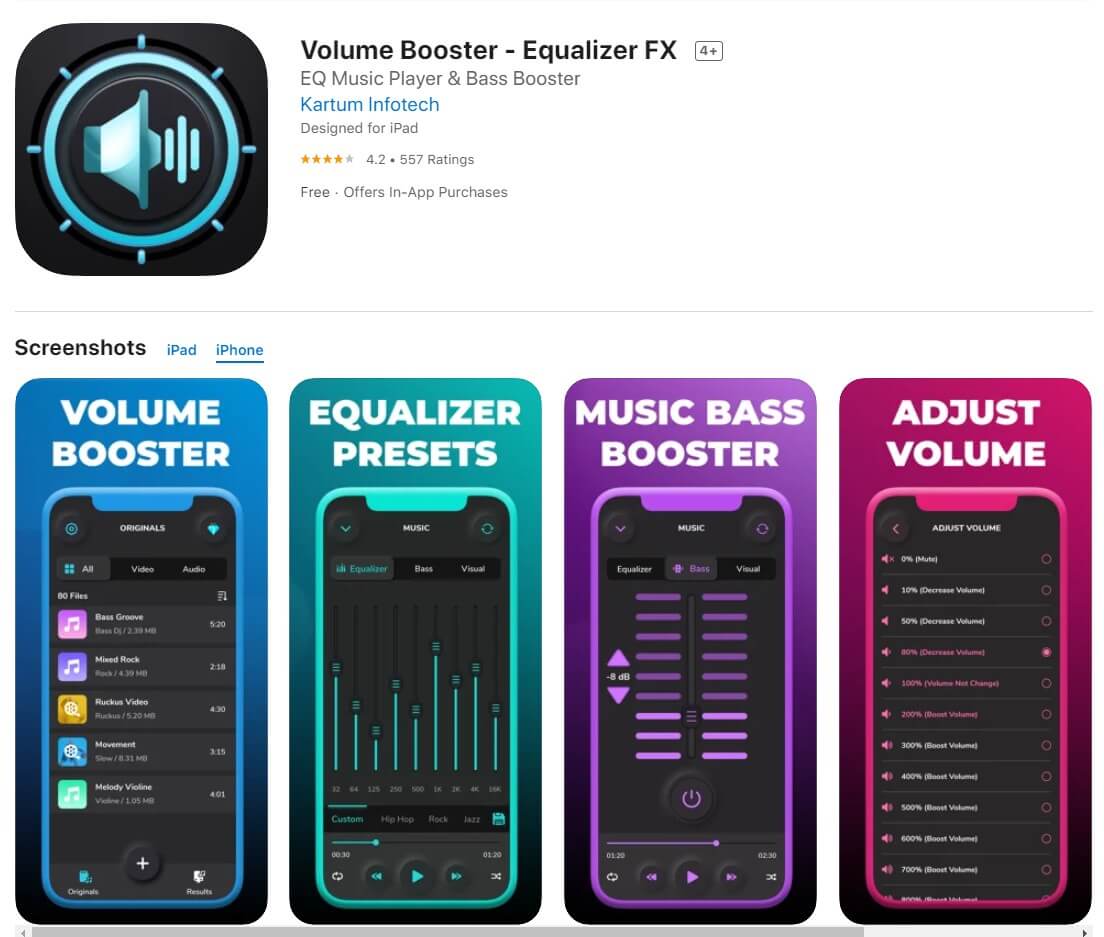
4. Volume Booster - Equalizer FX (iOS)
Volume Booster Equalizer FX can increase your volume higher than the default audio controller. With the help of this app, your device’s speaker will give the best result. You can adjust the sound effect levels according to your need. It makes the sound quality better and boosts up the volume with a single tap. You can get a weekly, monthly or yearly subscription. It is a great premium YouTube Volume booster for all iOS devices.
5. Max Volume Booster (iOS)
Max Volume Booster, as the name shows, boosts the volume to the maximum. You can find this app in the AppStore for free but it offers a premium version as well. With the help of the premium version, you can get an ad-free experience with no time limit. You can decrease or increase the volume based on your needs. Max Volume Booster gives you the experience and you will get addicted to it because it is a high-quality YouTube volume booster.

Part 3: Best YouTube Video Editing Software-Wondershare Filmora (Bonus Tip)
Wondershare Filmora is one of the most popular and user-friendly video editing software available. From beginners to pros, this app world for all. With Filmora you can create home videos, vlogs, Instagram reels, tutorials, guides, podcasts, and more! Wondershare Filmora is also the best YouTube video editor you will find! From editing to volume booster, you will find all the tools to create the perfect YouTube videos.


Here are some of the key features of Filmora that can help YouTubers make their YouTube videos:
- Offers multiple drawing video editing tools like speed control, volume booster, and color grading
- Offers special effects to enhance the appearance of your videos
- Allows you to custom create different animations
- Green Screen feature to help you change backgrounds and make the perfect videos
- Cross-platform accessibility as you can use it on both Windows and Mac
- Supports multiple file formats
- Ultra 4k HD support for the best quality of videos
- Free download and super easy to use with an intuitive interface
- Anyone can use it whether beginner or pro
- Online customer support available 24/7
Summing up
Stop worrying about low audio. Use one of the YouTube volume booster apps mentioned in this article. If you are making vlogs, tutorials, and other YouTube content, you can increase volume and create ideal videos with Wondershare video editor. So, to create the perfect videos with high-quality sound get Wondershare Filmora!
Shanoon Cox
Shanoon Cox is a writer and a lover of all things video.
Follow @Shanoon Cox
Shanoon Cox
Mar 27, 2024• Proven solutions
Have you ever listened to a YouTube video on max volume but still the sound wasn’t audible - even after turning up the YouTube volume as well as device audio? It is super annoying and inconvenient when you increase volume to max yet the video remains inaudible. YouTube volume issue could be due to various reasons such as poor audio quality of the built-in speakers or low original video sound. Well, there is a simple way to combat this problem i.e., sound booster. You can set different volume levels for the YouTube app on your PC or smartphone’s native volume controls. There are different YouTube volume boosters for Android, Windows, macOS, and iOS devices.
From listening to your favorite podcast to watching vlogs with your friends, you can use the best volume booster apps to increase the media sound volume and quality!
- Part 1: Best YouTube Volume Boosters for Windows and macOS
- Part 2: Best YouTube Volume Boosters for Android and iOS
- Part 3: Best YouTube Video Editing Software-Wondershare Filmora (Bonus Tip)
Part 1: Best YouTube Volume Boosters for Windows and macOS
Let’s introduce the best YouTube volume boosters for Windows and macOS:
1. FxSound (Windows and Mac)
FxSound is a very powerful tool that is made for Windows and macOS to enhance and boost the quality and volume of sound. This app comes with many features. For example, this audio software provides better sound quality, volume booster, and sound effects. Now you can listen to music, watch movies and play games without any distortion. Easily boost base, get customized effects and play with custom presets. You can download this app for your PC for free through the official website. People like this equalizer because it can make any audio format sound good even if it is 100 years old!
2. Boom 3D (Windows and macOS)
Boom 3D is a very popular app among many Windows and macOS users. This software is designed to help improve the audio on speakers or headphones that are connected to your computer. Boom 3D audio booster software also works with the Bluetooth devices that are connected to your PC. It can make any sound louder, clearer, and much better without buying any external devices. It provides us a 3D audio experience and works with any music player, video player, etc.!
3. Chrome Volume Booster Plugin (Windows)
This plugin has been rated 5 stars on the chrome web store as it is the best plugin for boosting up your volume on windows PC. This booster is so easy to download; you just have to go to the chrome web store and add the extension to your Google Chrome Browser. After adding it you can simply click on the icon and boost your volume up to 1000%! This plugin is free in the chrome store, just add it and choose how much louder you want your sound to be.
4. Letasoft Sound Booster (Windows)
Letasoft Sound Booster can only be used on windows. You can download it through the official website of Letasoft. It comes with a 14 days free trial period but after that, you have to buy their license to keep using it. This software is made to be used as an extra amplifier to boost up the volume of your audio or video if you think it is too low. The Letasoft Sound Booster app is very easy to use as you can control the volume from the slider. Moreover, it auto-starts and has no sound distortion.
5. Froyosoft Sound Booster (Mac)
Froyosoft Sound Booster is made for macOS users so they can boost video and audio file volumes. Individual application volumes can also be adjusted with the help of the Froyosoft Sound Booster. The good thing about this booster is that it is free for all users and it is 100% safe - you will not get any virus on your PC. You can download it from their website and increase the volume as high as you want to. So, get ready to get a clear and enhanced sound with the help of this app!
Part 2: Best YouTube Volume Boosters for Android and iOS
Following are the best YouTube sound boosters for Android and iOS devices:
1. AmpMe (Android and iOS)
With the help of AmpMe, you can start your little party through music apps. You don’t just get to listen to music but you can also chat with your friends - yup that’s right, it is a two-in-one app! The AmpMe app helps you to play the same music with your friends at the same time. It is one of the best volume booster apps that is available for both Android and iOS. It uses Bluetooth to connect with several devices, and the more the devices the higher the volume of the music. AmpMe offers a free trial and it costs $9.99 per week.
2. Super Volume Booster (Android)
To enjoy your music more than ever, you need a good volume enhancer. And, what can be better than an app that is free and boosts your audio? Android users are in luck because Super Volume Booster is a user-friendly app that allows you to increase the volume of YouTube and other apps. It gives you the best music experience. Moreover, it is clean, simple and has a one-touch operation. Not to forget that it has amazing reviews on Playstore. This app also increases the bass and also supports headphones and Bluetooth.
3. Volume Booster GOODEV (Android)
Volume Booster GOODEV is another app that boosts up the audio for you from 20 to 30% more! If you want to listen to an audiobook, watch a YouTube video or a movie on Netflix, volume Booster GOODEV can help you increase the volume of any media on any app! The volume can get so high that it might be dangerous for your ears so be careful. It offers a sound equalizer and is simple to use.
4. Volume Booster - Equalizer FX (iOS)
Volume Booster Equalizer FX can increase your volume higher than the default audio controller. With the help of this app, your device’s speaker will give the best result. You can adjust the sound effect levels according to your need. It makes the sound quality better and boosts up the volume with a single tap. You can get a weekly, monthly or yearly subscription. It is a great premium YouTube Volume booster for all iOS devices.
5. Max Volume Booster (iOS)
Max Volume Booster, as the name shows, boosts the volume to the maximum. You can find this app in the AppStore for free but it offers a premium version as well. With the help of the premium version, you can get an ad-free experience with no time limit. You can decrease or increase the volume based on your needs. Max Volume Booster gives you the experience and you will get addicted to it because it is a high-quality YouTube volume booster.
Part 3: Best YouTube Video Editing Software-Wondershare Filmora (Bonus Tip)
Wondershare Filmora is one of the most popular and user-friendly video editing software available. From beginners to pros, this app world for all. With Filmora you can create home videos, vlogs, Instagram reels, tutorials, guides, podcasts, and more! Wondershare Filmora is also the best YouTube video editor you will find! From editing to volume booster, you will find all the tools to create the perfect YouTube videos.
Here are some of the key features of Filmora that can help YouTubers make their YouTube videos:
- Offers multiple drawing video editing tools like speed control, volume booster, and color grading
- Offers special effects to enhance the appearance of your videos
- Allows you to custom create different animations
- Green Screen feature to help you change backgrounds and make the perfect videos
- Cross-platform accessibility as you can use it on both Windows and Mac
- Supports multiple file formats
- Ultra 4k HD support for the best quality of videos
- Free download and super easy to use with an intuitive interface
- Anyone can use it whether beginner or pro
- Online customer support available 24/7
Summing up
Stop worrying about low audio. Use one of the YouTube volume booster apps mentioned in this article. If you are making vlogs, tutorials, and other YouTube content, you can increase volume and create ideal videos with Wondershare video editor. So, to create the perfect videos with high-quality sound get Wondershare Filmora!
Shanoon Cox
Shanoon Cox is a writer and a lover of all things video.
Follow @Shanoon Cox
Step-by-Step: Applying Color Grading and Keying
The world of video-making owes much of its magic to small leaps of innovation. One of these leaps is the use of the chroma key background, which most people know by the more colloquial term—green screen.

Chroma key, also known as green screen or blue screen, is a cool hack for seamless visual storytelling, allowing content creators to replace backgrounds with any image or video they want. This technique is widely embraced in film, television, and online content, and has opened the door to limitless creative possibilities. Aside from its ability to maximize creativity, it is also cheap to employ and convenient to set up, which has made it a staple for everyone who works with visuals.
In this simple guide, we’ll delve into the fundamentals of the chroma key effect, how it is used for video making, and how to leverage that as you perfect your visual content.
YouTube Video Background Creating realistic video scenes at your will is easy to complete with Filmora green screen removal.
Create Video Backgrounds Create Video Backgrounds Learn Green Screen

How Does Chroma Key Work?

Chroma Keying is done by singling out a specific color (usually green or blue) from the foreground, removing it, and replacing it with a different background (for example, a sunset). This process typically follows a series of steps:
- Background Selection:
A solid, single-color background, often green or blue, that contrasts well with the subject must be used. The color chosen should not be present in the subject or any props in the camera field to avoid unintentional transparency.
- Color Keying:
This requires the use of specialized visual effects software to key out the chosen color. The green or blue background is designated as transparent, making everything of that color see-through. The software distinguishes between the keyed color and the subject, creating a mask for the transparent areas.
- Foreground Filming:
This involves filming the subject against the live chroma key background. During filming, the chosen background color (green or blue) won’t appear in the final result due to its transparency. The subject is captured as if separately from the isolated background.
- Post-Processing:
In post-production processing, the editor takes the keyed-out color and replaces it with the new background of their choice. This step creates the illusion that the subject is in a different setting or environment. The transparent areas become filled with the chosen background which, if done right, results in a cohesive and visually appealing composition.
Why Green?
Theoretically, the chroma key background can be any solid color. However, the most commonly used colors are studio blue and bright green, with the latter far more common.
The choice of background color depends on the specific requirements of the production and the colors present in the scenes being filmed.
Free Download For Win 7 or later(64-bit)
Free Download For macOS 10.14 or later
Contrast
The less similar your chosen background color is to natural skin tones, the easier to isolate and replace in your footage. Bright green provides a strong contrast to most human skin tones and is less likely to be present in costumes or natural surroundings, making it easier to isolate subjects during the color separation.
Luminance
The color green emits light with greater intensity than blue, allowing for far more effective isolation by cameras during filming. This also means that blue screens demand increased lighting for proper exposure compared to green. This situation may be less than ideal if you lack powerful lighting or you don’t have the big bucks for them.
Digital Sensors
Many digital cameras and sensors are more sensitive to green wavelengths, resulting in cleaner and more accurate color keying during post-processing. Modern technology has also evolved to optimize for a green background, making it a more practical choice for the chroma key effect.
Wardrobe and Set Design
Bright green occurs less naturally in costumes and set designs than other colors, making green the optimal choice for reducing the likelihood of color spill and keying issues. However, if you know your scene will have lots of green, it is probably best to film with a blue screen, so there’s less risk of color spill and less post-production work.
Setting up Your Own Chroma Key Studio
Setting up your chroma key is convenient and straightforward, but there are some key factors to consider while setting up to ensure maximal performance.
Choosing the Right Background Color
The first step in the chroma key setup is selecting the right background color to be keyed out. This choice determines your effective color separation and ensures a smooth keying process during editing. Choosing a chroma-key background color that contrasts distinctly with the subject’s colors is essential for effective color separation. This prevents unintentional transparency, color spill, and ensures a polished final result.
Lighting Considerations
Lighting is an important part of the chroma-keying process. Bold, uniform, and consistent lighting on both the subject and the background makes it easy to delineate one from the other fully. This minimizes shadows and variations in color, creating a smooth and seamless keying process. Multiple diffuse lights from different angles are often used to illuminate the green screen evenly.
Positioning/Camera
Proper subject and camera placement are necessary to ensure an even color-keying process during post-production. To prevent shadow interference, the green screen should be smooth, tense, and without wrinkles or shadows.
High-quality cameras are essential every time, especially for chroma keying. Images with better definition are easier to key, so camera quality significantly affects the outcome. Even if your camera isn’t the best, merely shooting well can ensure a clean color-keying process during editing, resulting in professional-looking visuals.
Recording Tips for Chroma Key
- Proper Lighting
Maintaining uniform and well-defined lighting during recording is essential for a successful chroma-keying process. This consistency ensures a seamless keying process during post-production.
- Keep Distance from the Green Screen
The optimal distance between the subject and the green screen minimizes color spill and allows for natural movements. Proper distance between subject and background allows for easier isolation of the background and much smoother post-editing. A recommended starting point for the issue is around 6 to 10 feet from the background.
- Subjects and Clothing
As mentioned before, the choice of costume for Selecting appropriate clothing that doesn’t match the chroma key color prevents transparency issues. Subjects also have to be positioned in such a way that there is minimal light interference and reflection. These contribute to a flawless chroma key outcome.
3 Basic Troubleshooting Strategies
- Color Spill
Sometimes, reflected light from your green background can be cast on your subject and may remain so when the background light is keyed out. This phenomenon is known as a color spill. It is usually because of uneven lighting or shooting around reflecting surfaces. Avoiding spill can differentiate between good and lousy chroma key aftereffects.
Human hair is one area where color spill can show up unsuspectingly. Due to the translucency of hair, it is common for some unintended light to seep through. This allows some background visibility, which you do not want with a chroma key. This is especially notable with lighter hair colors like blond hair.
There are ways to account for this. Many video-editing software have features such as spill suppression and screen matte adjustments that can enhance the final footage. Specialized plugins also go a long way in ensuring minimizing spill. Addressing spill correction tackles unwanted green artifacts and ensures a clean keying process.
- Poor Lighting
Suboptimal green screen lighting can lead to inconsistencies in keying and editing, undermining your product. One way to avoid this is to light the screen and subject separately. Another tip, although expensive, is using multiple diffuse light sources and trying to maintain even lighting across every square foot of your scene. Super bright or dark spots can ruin your output, so it’s worth the extra effort if you don’t want to deal with problematic post-production.
- Poorly Refined Edges
Chroma keying should leave your videos with crisp, defined, natural-looking edges. But post-production editing can make all the difference if it doesn’t come out to your taste. Softening and refining edges make a smoother transition between the foreground object and the new background. Light adjustments to edge thickness and screen matte settings can also help enhance overall visual quality and add finesse to your work.
Conclusion
Green screen photography produces excellent results, and its ease of use makes it indispensable for videographers of all levels. In this guide, we’ve discussed chroma key technology, its role in the industry, and how to apply it to your craft to elevate visual content.
Chroma key, also known as green screen or blue screen, is a cool hack for seamless visual storytelling, allowing content creators to replace backgrounds with any image or video they want. This technique is widely embraced in film, television, and online content, and has opened the door to limitless creative possibilities. Aside from its ability to maximize creativity, it is also cheap to employ and convenient to set up, which has made it a staple for everyone who works with visuals.
In this simple guide, we’ll delve into the fundamentals of the chroma key effect, how it is used for video making, and how to leverage that as you perfect your visual content.
YouTube Video Background Creating realistic video scenes at your will is easy to complete with Filmora green screen removal.
Create Video Backgrounds Create Video Backgrounds Learn Green Screen
How Does Chroma Key Work?
Chroma Keying is done by singling out a specific color (usually green or blue) from the foreground, removing it, and replacing it with a different background (for example, a sunset). This process typically follows a series of steps:
- Background Selection:
A solid, single-color background, often green or blue, that contrasts well with the subject must be used. The color chosen should not be present in the subject or any props in the camera field to avoid unintentional transparency.
- Color Keying:
This requires the use of specialized visual effects software to key out the chosen color. The green or blue background is designated as transparent, making everything of that color see-through. The software distinguishes between the keyed color and the subject, creating a mask for the transparent areas.
- Foreground Filming:
This involves filming the subject against the live chroma key background. During filming, the chosen background color (green or blue) won’t appear in the final result due to its transparency. The subject is captured as if separately from the isolated background.
- Post-Processing:
In post-production processing, the editor takes the keyed-out color and replaces it with the new background of their choice. This step creates the illusion that the subject is in a different setting or environment. The transparent areas become filled with the chosen background which, if done right, results in a cohesive and visually appealing composition.
Why Green?
Theoretically, the chroma key background can be any solid color. However, the most commonly used colors are studio blue and bright green, with the latter far more common.
The choice of background color depends on the specific requirements of the production and the colors present in the scenes being filmed.
Free Download For Win 7 or later(64-bit)
Free Download For macOS 10.14 or later
Contrast
The less similar your chosen background color is to natural skin tones, the easier to isolate and replace in your footage. Bright green provides a strong contrast to most human skin tones and is less likely to be present in costumes or natural surroundings, making it easier to isolate subjects during the color separation.
Luminance
The color green emits light with greater intensity than blue, allowing for far more effective isolation by cameras during filming. This also means that blue screens demand increased lighting for proper exposure compared to green. This situation may be less than ideal if you lack powerful lighting or you don’t have the big bucks for them.
Digital Sensors
Many digital cameras and sensors are more sensitive to green wavelengths, resulting in cleaner and more accurate color keying during post-processing. Modern technology has also evolved to optimize for a green background, making it a more practical choice for the chroma key effect.
Wardrobe and Set Design
Bright green occurs less naturally in costumes and set designs than other colors, making green the optimal choice for reducing the likelihood of color spill and keying issues. However, if you know your scene will have lots of green, it is probably best to film with a blue screen, so there’s less risk of color spill and less post-production work.
Setting up Your Own Chroma Key Studio
Setting up your chroma key is convenient and straightforward, but there are some key factors to consider while setting up to ensure maximal performance.
Choosing the Right Background Color
The first step in the chroma key setup is selecting the right background color to be keyed out. This choice determines your effective color separation and ensures a smooth keying process during editing. Choosing a chroma-key background color that contrasts distinctly with the subject’s colors is essential for effective color separation. This prevents unintentional transparency, color spill, and ensures a polished final result.
Lighting Considerations
Lighting is an important part of the chroma-keying process. Bold, uniform, and consistent lighting on both the subject and the background makes it easy to delineate one from the other fully. This minimizes shadows and variations in color, creating a smooth and seamless keying process. Multiple diffuse lights from different angles are often used to illuminate the green screen evenly.
Positioning/Camera
Proper subject and camera placement are necessary to ensure an even color-keying process during post-production. To prevent shadow interference, the green screen should be smooth, tense, and without wrinkles or shadows.
High-quality cameras are essential every time, especially for chroma keying. Images with better definition are easier to key, so camera quality significantly affects the outcome. Even if your camera isn’t the best, merely shooting well can ensure a clean color-keying process during editing, resulting in professional-looking visuals.
Recording Tips for Chroma Key
- Proper Lighting
Maintaining uniform and well-defined lighting during recording is essential for a successful chroma-keying process. This consistency ensures a seamless keying process during post-production.
- Keep Distance from the Green Screen
The optimal distance between the subject and the green screen minimizes color spill and allows for natural movements. Proper distance between subject and background allows for easier isolation of the background and much smoother post-editing. A recommended starting point for the issue is around 6 to 10 feet from the background.
- Subjects and Clothing
As mentioned before, the choice of costume for Selecting appropriate clothing that doesn’t match the chroma key color prevents transparency issues. Subjects also have to be positioned in such a way that there is minimal light interference and reflection. These contribute to a flawless chroma key outcome.
3 Basic Troubleshooting Strategies
- Color Spill
Sometimes, reflected light from your green background can be cast on your subject and may remain so when the background light is keyed out. This phenomenon is known as a color spill. It is usually because of uneven lighting or shooting around reflecting surfaces. Avoiding spill can differentiate between good and lousy chroma key aftereffects.
Human hair is one area where color spill can show up unsuspectingly. Due to the translucency of hair, it is common for some unintended light to seep through. This allows some background visibility, which you do not want with a chroma key. This is especially notable with lighter hair colors like blond hair.
There are ways to account for this. Many video-editing software have features such as spill suppression and screen matte adjustments that can enhance the final footage. Specialized plugins also go a long way in ensuring minimizing spill. Addressing spill correction tackles unwanted green artifacts and ensures a clean keying process.
- Poor Lighting
Suboptimal green screen lighting can lead to inconsistencies in keying and editing, undermining your product. One way to avoid this is to light the screen and subject separately. Another tip, although expensive, is using multiple diffuse light sources and trying to maintain even lighting across every square foot of your scene. Super bright or dark spots can ruin your output, so it’s worth the extra effort if you don’t want to deal with problematic post-production.
- Poorly Refined Edges
Chroma keying should leave your videos with crisp, defined, natural-looking edges. But post-production editing can make all the difference if it doesn’t come out to your taste. Softening and refining edges make a smoother transition between the foreground object and the new background. Light adjustments to edge thickness and screen matte settings can also help enhance overall visual quality and add finesse to your work.
Conclusion
Green screen photography produces excellent results, and its ease of use makes it indispensable for videographers of all levels. In this guide, we’ve discussed chroma key technology, its role in the industry, and how to apply it to your craft to elevate visual content.
Also read:
- Harnessing YouTube's Power for Personal Image Amplification
- In 2024, Crafting News End Credits A Step-by-Step Guide
- 2024 Approved Conquer Massive Content Views on YouTube Efficiently
- [Updated] Earnings Insights for Video Content Surpassing 1 Million Views
- In 2024, Elite Selection Top 9 Free YouTube Channel Branding Apps
- [New] Dismantle Bots, Elevate YouTube Watch Time
- The Art of Choosing Perfect Thumbnails
- 2024 Approved Boosting Channel Earnings The Step-by-Step FameBit Guide to Affiliates
- In 2024, Best Free Video Cutting Apps Your Go-To List
- How to Create A YouTube Channel Today
- Demystifying Creator Studio A Practical Handbook
- Content Spotlight Platform Perks Compared
- The Complete Blueprint to Tally Your YouTube Growth and Income
- Winning at FreeFire Top Strategies and Hashtags Shared
- The Next Generation of Video Communities Post-YouTube
- Everything You Need to Know About YouTube Shorts
- 2024 Approved Channel Personality Complimentary YouTube Graphics
- Storytelling Steps for YouTube Ascension
- Dive Into YouTube TV Tips & Tricks for Optimal Viewing
- 2024 Approved Enhancing Viewership with Informative YouTube Video Captions
- In 2024, Building an Auto-Subscribe Direct Link for Youtube
- From Snippets to Stars The Essence of Video Musical Success
- Gaming History Told by Top Video Makers
- [New] Building Your Brand with a Sports YouTube Chain on macOS
- Unraveling the Secrets of Viral Content Creation
- [New] A Step-by-Step Guide Through YouTube's Aspect Ratio Landscapes
- 2024 Approved Enhance Privacy & Speed The Best 7 Android AdBlocks
- Essentials for Efficient YouTube Content Trimming for 2024
- [Updated] Crafting Video Magic Summit
- 2024 Approved Direct YouTube File Access Tips
- In 2024, Elevating Youtube Prominence with Expert Use of the Hub
- [Updated] Effortless Entertainment Looping YouTube Videos for TV Viewers
- In 2024, Evaluating the Top Video Streaming Apps for Phones
- Pinnacle of Presence A Strategic Approach for Live Video Graphics
- Best Starting Points on YouTube Top 16 Opener List for Growth
- [Updated] Decoding the Economic Incentives Behind YouTube's Shorts Programme
- [Updated] Affordable Methods for Video and Text Synergy
- [New] Behind the Scenes The Genesis of a Mukbang Video
- Seamless Audio Transfer Best iPhone Tools for YouTube-to-MP3
- [Updated] Elevate Your Youtube Profitability Anywhere, Anytime
- [New] Enhancing YouTube Visibility with TubeBuddy
- Innovative YouTube Channel Names for the Next Gen Vloggers and Film Makers (Keep It Under or at 156 Characters)
- Free Yourself From Paywalls with These Subtitle Getters
- [Updated] Chart-Toppers Unveiled Top YouTube Stars and Their Subs
- From Freezing Points to Inviting Landscapes
- [Updated] Best Talker Alteration Apps for Video Content Makers
- Channel Expansion Through Smart YouTube Link-Building Methods
- Streamline Your YouTube Shorts Thumbnail Process
- 2024 Approved Editing GoPro Videos on Mac Best Practices and Software
- In 2024, Is GSM Flasher ADB Legit? Full Review To Bypass Your Infinix Smart 7 Phone FRP Lock
- In 2024, 3 Things You Must Know about Fake Snapchat Location On Samsung Galaxy S23 | Dr.fone
- Updated In 2024, Windows 11/10 Video Editing Best iMovie-Like Software Options
- Cutting-Edge Green Screen Strategies for Professional Streamers
- [Updated] In 2024, Master Guide Implementing Chapters in Vimeo
- [New] Streamline Broadcasting Going From Xbox to FB Live for 2024
- New Mastering Your PCs Sounds A Look at the Leading Recorders
- New Must-Have Apps for Real-Time Video Translation
- In 2024, Unlock Apple iPhone 7 Plus With Forgotten Passcode Different Methods You Can Try | Dr.fone
- [New] Unleash Flawless Footage Overcome Instagram Video Hurdles for 2024
- [New] In 2024, Action Sequence Alerts Mastering 4 Techniques on the Xbox One
- New In 2024, Useful Tips for Canva Animated Elements
- Updated Comprehensive Methods for Adding Sound to Modernized AVI Videos
- The Magnificent Art of Pokemon Go Streaming On Samsung Galaxy F15 5G? | Dr.fone
- How to Change Lock Screen Wallpaper on Oppo F23 5G
- Jaycut Essentials Learn How to Edit Videos Online for Free
- Updated The Essence of Clubhouse Uncovered Insights Into Its Core Values, User Experience, and Impact on Digital Interactions
- [New] 2024 Approved OBS Direct Stream to Instagram
- Story Keepers at the Click, No Limits Allowed for 2024
- [New] Enhance Skype Videocalls with OBS Capture
- In-Depth Analysis Complete Revamp of Facetune App
- 2024 Approved SnapChat's Secret Crafting Boomerang Masterpieces
- Updated In 2024, Final Cut Pro for Free Your 90-Day Trial Awaits
- [Updated] Clearer Views The Top 10 Online Photo Fixes
- New In 2024, Streamlining Speaker Audio in Microsoft PowerPoint Cross-Platform Solutions for Windows and Mac
- The Invisible Trail Hidden Steps for Tracking WhatsApp Calls
- A Detailed Guide on Faking Your Location in Mozilla Firefox On Itel P55 | Dr.fone
- [New] Enhancing Televisual Engagement Through FB Live for 2024
- [New] 2024 Approved Simplified Systems for Saving Screen Calls
- Updated 2024 Approved S Top Free Video Editing Tools for MP4 Files
- [Updated] 6 Vital Video Forms for Captivated Viewers
- Top Sports Cameras for High Pace Activities
- In 2024, A Step-by-Step Guide on Using ADB and Fastboot to Remove FRP Lock on your Huawei P60
- Title: "Best 10 Sound Boosting Software PC, Mac & Mobile for 2024"
- Author: Steven
- Created at : 2024-05-25 18:49:16
- Updated at : 2024-05-26 18:49:16
- Link: https://youtube-clips.techidaily.com/best-10-sound-boosting-software-pc-mac-and-mobile-for-2024/
- License: This work is licensed under CC BY-NC-SA 4.0.
