
:max_bytes(150000):strip_icc():format(webp)/laptop-569944733df78cafda90169f.jpg)
Beginner's Guide to Choosing Lenses and Cameras for YouTube Vloggers
Beginner’s Guide to Choosing Lenses and Cameras for YouTube Vloggers
A Vlogger’s Guide To Camera Lenses

Richard Bennett
Nov 01, 2022• Proven solutions
The staple of any vlog is the talking headshot, a shot of the speaker talking directly to the audience. You can compose this shot with different kinds of lenses for your interchangeable lens camera.
But which kind of lens is the right lens for you as a vlogger?
In this article, I’m going to help you figure that out.
- Part 1: Three Focal Length Groups: Wide, Standard, Telephoto
- Part 2: Vlogging With Each Focal Length Group
- Part 3: Crop Factor
- Part 4: Focal Length Equivalency Table
- Part 5: Aperture
- Part 6: Vlogging With a Fast Lens
- Part 7: Optical Image Stabilization
Three Focal Length Groups: Wide, Standard, Telephoto
There are three main ranges in focal lengths that camera lenses can be categorized into wide, standard, and telephoto.
Wide-Angle Lens
Wide-angle lenses can “see more.” They allow more of your scene to fit inside your frame. Objects that are closer to the lens appear much bigger while objects that are further away appear even smaller. Perspectives are also enhanced, making close objects and people that just make it into the sides of the frame appear more stretched out. Out of all the other ranges in focal lengths, wide-angle lenses will appear the least zoomed in.
Standard Lens
With standard lenses or normal lenses, you won’t get the stretched out objects or enhanced perspectives that you get from wide-angle lenses. Instead, standard lenses are meant to see scenes as the natural human eye is meant to see them. If you shoot a scene with both a wide-angle lens and a standard lens from the same position, you’ll notice that less of the scene fits into your frame. Standard lenses will appear more zoomed-in than wide-angle lenses, but less zoomed-in than telephoto lenses.
Telephoto Lens
Out of all the other ranges in focal lengths, telephoto lenses will appear the most zoomed in. This can be beneficial for the shooter who wants to get a closer shot of a scene without having to physically be in close proximity to the scene. Objects that are further away in the background also appear larger and closer than they would appear on wide-angle or standard lenses.
Vlogging With Each Focal Length Group
You can get your talking head footage using lenses from any of the three focal length groups. Depending on how you plan to vlog most of the time, though, one of the three focal lengths might be more suitable for you.
When to vlog with a wide-angle lens
Wide-angle lenses are the most commonly used lenses for vlogging. Wide-angle lenses are great when you need to be close to your camera. This might be the case for you if your recording space is small or if you want to film yourself as you hold your camera up with your own hand.
Being close to your camera not only gives you the option to use your camera’s built-in microphone, but it also gives you the option to make use of camera-mounted shotgun microphones.
When to vlog with a standard lens
Standard lenses are great when you have more space to be further away from your camera. The perspectives in your shot will look more natural through a standard lens, making your talking head footage feel more corporate or professional. You’ll also be able to get blurrier backgrounds using a standard lens versus a wide-angle lens.
Being further away from your camera, however, means that you’ll have to use a separate microphone positioned closer to you.
When to vlog with a telephoto lens
As telephoto lenses are even more zoomed in, you’ll need to be even further away from your camera to fit yourself inside your camera frame. Why would any vlogger ever need to be that far away from their camera? One word… teleprompter. If you want or need to stick to a script, you’ll have to be far away enough from your camera that it doesn’t appear like your eyes are scanning left to right. You then close in the distance with a telephoto lens.
In the above video, Marcos Rocha compares different focal lengths for talking head videos. Which focal length range do you like the look of?
Crop Factor
Focal lengths in camera lenses are measured in millimeters. You can vlog yourself handheld with a 24mm lens on a camera with a full-frame sensor (the sensor is the piece of hardware inside your camera that turns the light it receives into a digital image). But if you use a 24mm lens on a camera with a smaller sensor, like an APS-C sensor or even smaller Micro 4/3 sensor, more of you will get cropped out (see below).

In order to make up for the cropping that occurs, you will need to use a wider lens on cameras with smaller sensors to get the same shot you’d get with a full-frame camera.
Focal Length Equivalency Table
This table shows you the focal lengths needed to achieve the same shot between cameras with different sensor sizes. In order to take a shot as wide as the shot I took of myself with the 24mm lens on my full-frame camera, I would need a 15mm lens on an APS-C sensor camera or a 12mm lens on a micro 4/3 camera.
| Focal Length / Sensor | Full Frame | APS-C | Micro 4/3 |
|---|---|---|---|
| Wide (Handheld Selfie-Safe) | 16mm | 10mm | 8mm |
| Wide (Handheld Selfie-Safe) | 18mm | 11mm | 9mm |
| Wide (Handheld Selfie-Safe) | 24mm | 15mm | 12mm |
| Wide | 35mm | 22mm | 18mm |
| Standard | 50mm | 31mm | 25mm |
| Telephoto | 70mm | 44mm | 35mm |
| Telephoto | 100mm | 63mm | 50mm |
| Telephoto | 200mm | 125mm | 100mm |
Aperture

The next thing to consider when you’re looking for a lens is the aperture, the hole (often adjustable) within the lens that lets light in. Aperture for camera lenses is measured in f-stops (f/1.4, f/1.8, f/2.0) - the smaller the f-stop number, the larger the aperture (bigger hole letting even more light in).

Because larger aperture lenses let more light in, they need a shorter time for cameras to compose an image. This is why larger aperture lenses are also called “fast” lenses.
Fast lenses are more expensive because they cost more to produce. There’s a lot more that goes into them, including larger and higher quality glass elements.
But do you even need a fast lens?
Vlogging With a Fast Lens
Pros of Vlogging With a Fast Lens
- Better low-light performance
- Better autofocus performance
- Better “bokeh” (out-of-focus areas, like your background, having that nice blurry look that you see in a lot of movies)
Cons of Vlogging With a Fast Lens
- More expensive
- Moving subjects more likely to get out of focus when shooting with a large aperture
- Better continuous autofocus performance needed when shooting moving subjects with a large aperture
Optical Image Stabilization
Finally, you’ll have to decide whether or not you want your lens to have built-in optical image stabilization (OIS).
OIS is very beneficial to have on a lens if you’re a vlogger who films mostly handheld footage. Although this technology adds to the price of your lens as well, it can greatly help you to capture smoother footage that may otherwise be shaky. Nikon calls this technology “Vibration Reduction” (VR) for their lenses.
In the above video, you can see how much OIS can help to stabilize your footage. MicBergsma simultaneously compares the footage between two GoPro Hero5 Blacks, one with OIS on and one with OIS off.
If, however, you are shooting most of your vlogs on a tripod, you won’t need a lens with OIS.
Looking for ways to set up your talking-head shot for YouTube with any of these lenses? Check out our post on 4 Ways To Set Up Your Talking-Head Shots For YouTube .
Richard Bennett
Richard Bennett is a writer and a lover of all things video.
Follow @Richard Bennett
Richard Bennett
Nov 01, 2022• Proven solutions
The staple of any vlog is the talking headshot, a shot of the speaker talking directly to the audience. You can compose this shot with different kinds of lenses for your interchangeable lens camera.
But which kind of lens is the right lens for you as a vlogger?
In this article, I’m going to help you figure that out.
- Part 1: Three Focal Length Groups: Wide, Standard, Telephoto
- Part 2: Vlogging With Each Focal Length Group
- Part 3: Crop Factor
- Part 4: Focal Length Equivalency Table
- Part 5: Aperture
- Part 6: Vlogging With a Fast Lens
- Part 7: Optical Image Stabilization
Three Focal Length Groups: Wide, Standard, Telephoto
There are three main ranges in focal lengths that camera lenses can be categorized into wide, standard, and telephoto.
Wide-Angle Lens
Wide-angle lenses can “see more.” They allow more of your scene to fit inside your frame. Objects that are closer to the lens appear much bigger while objects that are further away appear even smaller. Perspectives are also enhanced, making close objects and people that just make it into the sides of the frame appear more stretched out. Out of all the other ranges in focal lengths, wide-angle lenses will appear the least zoomed in.
Standard Lens
With standard lenses or normal lenses, you won’t get the stretched out objects or enhanced perspectives that you get from wide-angle lenses. Instead, standard lenses are meant to see scenes as the natural human eye is meant to see them. If you shoot a scene with both a wide-angle lens and a standard lens from the same position, you’ll notice that less of the scene fits into your frame. Standard lenses will appear more zoomed-in than wide-angle lenses, but less zoomed-in than telephoto lenses.
Telephoto Lens
Out of all the other ranges in focal lengths, telephoto lenses will appear the most zoomed in. This can be beneficial for the shooter who wants to get a closer shot of a scene without having to physically be in close proximity to the scene. Objects that are further away in the background also appear larger and closer than they would appear on wide-angle or standard lenses.
Vlogging With Each Focal Length Group
You can get your talking head footage using lenses from any of the three focal length groups. Depending on how you plan to vlog most of the time, though, one of the three focal lengths might be more suitable for you.
When to vlog with a wide-angle lens
Wide-angle lenses are the most commonly used lenses for vlogging. Wide-angle lenses are great when you need to be close to your camera. This might be the case for you if your recording space is small or if you want to film yourself as you hold your camera up with your own hand.
Being close to your camera not only gives you the option to use your camera’s built-in microphone, but it also gives you the option to make use of camera-mounted shotgun microphones.
When to vlog with a standard lens
Standard lenses are great when you have more space to be further away from your camera. The perspectives in your shot will look more natural through a standard lens, making your talking head footage feel more corporate or professional. You’ll also be able to get blurrier backgrounds using a standard lens versus a wide-angle lens.
Being further away from your camera, however, means that you’ll have to use a separate microphone positioned closer to you.
When to vlog with a telephoto lens
As telephoto lenses are even more zoomed in, you’ll need to be even further away from your camera to fit yourself inside your camera frame. Why would any vlogger ever need to be that far away from their camera? One word… teleprompter. If you want or need to stick to a script, you’ll have to be far away enough from your camera that it doesn’t appear like your eyes are scanning left to right. You then close in the distance with a telephoto lens.
In the above video, Marcos Rocha compares different focal lengths for talking head videos. Which focal length range do you like the look of?
Crop Factor
Focal lengths in camera lenses are measured in millimeters. You can vlog yourself handheld with a 24mm lens on a camera with a full-frame sensor (the sensor is the piece of hardware inside your camera that turns the light it receives into a digital image). But if you use a 24mm lens on a camera with a smaller sensor, like an APS-C sensor or even smaller Micro 4/3 sensor, more of you will get cropped out (see below).
In order to make up for the cropping that occurs, you will need to use a wider lens on cameras with smaller sensors to get the same shot you’d get with a full-frame camera.
Focal Length Equivalency Table
This table shows you the focal lengths needed to achieve the same shot between cameras with different sensor sizes. In order to take a shot as wide as the shot I took of myself with the 24mm lens on my full-frame camera, I would need a 15mm lens on an APS-C sensor camera or a 12mm lens on a micro 4/3 camera.
| Focal Length / Sensor | Full Frame | APS-C | Micro 4/3 |
|---|---|---|---|
| Wide (Handheld Selfie-Safe) | 16mm | 10mm | 8mm |
| Wide (Handheld Selfie-Safe) | 18mm | 11mm | 9mm |
| Wide (Handheld Selfie-Safe) | 24mm | 15mm | 12mm |
| Wide | 35mm | 22mm | 18mm |
| Standard | 50mm | 31mm | 25mm |
| Telephoto | 70mm | 44mm | 35mm |
| Telephoto | 100mm | 63mm | 50mm |
| Telephoto | 200mm | 125mm | 100mm |
Aperture
The next thing to consider when you’re looking for a lens is the aperture, the hole (often adjustable) within the lens that lets light in. Aperture for camera lenses is measured in f-stops (f/1.4, f/1.8, f/2.0) - the smaller the f-stop number, the larger the aperture (bigger hole letting even more light in).
Because larger aperture lenses let more light in, they need a shorter time for cameras to compose an image. This is why larger aperture lenses are also called “fast” lenses.
Fast lenses are more expensive because they cost more to produce. There’s a lot more that goes into them, including larger and higher quality glass elements.
But do you even need a fast lens?
Vlogging With a Fast Lens
Pros of Vlogging With a Fast Lens
- Better low-light performance
- Better autofocus performance
- Better “bokeh” (out-of-focus areas, like your background, having that nice blurry look that you see in a lot of movies)
Cons of Vlogging With a Fast Lens
- More expensive
- Moving subjects more likely to get out of focus when shooting with a large aperture
- Better continuous autofocus performance needed when shooting moving subjects with a large aperture
Optical Image Stabilization
Finally, you’ll have to decide whether or not you want your lens to have built-in optical image stabilization (OIS).
OIS is very beneficial to have on a lens if you’re a vlogger who films mostly handheld footage. Although this technology adds to the price of your lens as well, it can greatly help you to capture smoother footage that may otherwise be shaky. Nikon calls this technology “Vibration Reduction” (VR) for their lenses.
In the above video, you can see how much OIS can help to stabilize your footage. MicBergsma simultaneously compares the footage between two GoPro Hero5 Blacks, one with OIS on and one with OIS off.
If, however, you are shooting most of your vlogs on a tripod, you won’t need a lens with OIS.
Looking for ways to set up your talking-head shot for YouTube with any of these lenses? Check out our post on 4 Ways To Set Up Your Talking-Head Shots For YouTube .
Richard Bennett
Richard Bennett is a writer and a lover of all things video.
Follow @Richard Bennett
The Ultimate Calculus of Cashflow From Creativity: Measuring Your YouTube Earnings and Impact
It’s not the easiest way to earn money online, but YouTube is one of the best ways. YouTube is a powerful channel to promote your video and get more traffic.
The most common question is how much YouTubers earn on 100, 1000, or 10,000 views. We’re going to answer that question in this article and explain how to calculate YouTube views to money.
First off, we’re going to talk about how YouTube works.
Next, we’ll examine the importance of YouTube views, plus how to calculate them.
- Estimated your YouTube earning by YouTube revenue reports
- How much money can you make on YouTube?
- Bonus tip: Increase YouTube earnings with a powerful video editing software
Part 1: The rules to know for each means earning money from YouTube
As a YouTube creator, finding ways to earn money from your content cannot be easy. Some creators make a living solely off their channels. Others supplement their income with affiliate marketing, sponsorships, and ad revenue. But if you want to earn money from YouTube truly, you need to understand which monetization methods work best for you and your content.
Here’s what you should know when using each method and why you should consider doing so:
| Methods | Viewers/Clicks/Impressions | Earnings/Commission |
|---|---|---|
| YouTube Ads $1 CPM | 1 million Ad views | Average rate per ad=0.18Total ~ $5000 |
| Brand Sponsorships | 5K Sub 5K-30K Sub 30K-500K Sub 500K-1M+ Sub | $300 $700 $950 $3500 |
| Affiliate Marketing 30%-35% commission | If 100 people buys $20 product through affiliate link. Total $2000 | $2000*35%= $700 |
| Crowdfunding (Patreon, Indiegogo, GoFundMe) $5 | 100 subscribers funds the channel | 100*5=$500 |
| Merchandise Shelf $5 Shirt | 100 subscribers purchases your merch | 100*5=$500 |
| Channel Memberships $5/month | 100 loyal subscribers join membership | 100*5=$500 |
YouTube Ads
The video ads on the platform aren’t lucrative and can be used to supplement your income in the form of AdSense earnings. An actual advertiser pays 0.18 per ad view on average (as shown above). That means 1000 ad views equals $18 and $3-$5 per 1000 views.
Brand Sponsorships
Brands can sponsor your videos to reach their target audience. YouTube videos are a big part of our lives, and brands are becoming increasingly aware of how useful these videos can be. To be eligible for sponsorship, your channel must be of 5000 subscribers.
Affiliate Marketing
YouTubers help brands increase sales by encouraging their viewers to shop at the company’s store or visit its specific product pages. They then earn a commission (30%-35%) on products that people buy after clicking an affiliate link.
Crowdfunding
Today many people use crowdfunding websites to raise money for personal, channel-related projects. Most YouTubers are doing it to generate steady cash flow. Some of them use this source to fund their YouTube videos so that it increases quality and engagement.
Merchandise Shelf
Your merchandise represents and feeds your audience’s connection with you. Your product is your business, so you’re first and foremost an entrepreneur. Then design your YouTube marketing strategy to sell your merchandise and generate income.
Channel Membership
YouTube has a plan that allows you to charge your subscribers for membership on your YouTube channel. Members get access to exclusive live chats, badges, emojis, etc. Subscribers must give a set amount every month to a channel that makes a steady monthly income for YouTubers.
Part 2: Calculate YouTube income by YouTube Money Calculator
How much money do you earn on YouTube? There is no simple way to answer this question, but a YouTube income calculator can give you a rough estimate. It shows you whether you’re getting enough money to keep producing videos or if you need to look for additional ways of making money from your channel.
The tools below provide a detailed breakdown of the earnings from a specific YouTube video or channel based on audience engagement, views, and other factors.
YouTube Money Calculator

Pros
- Does not ask for much information, just a URL
- It has flexibility to check earnings by channel and video separately
Cons
- Calculate earnings based on views only
How-to-steps
Step1 To check earnings by channel, import the channel URL and click the search icon.

Step2 You’ll see the result showing, ‘Number of total Subscribers’, ‘Number of Total Video Views’, ‘Total estimated earnings’, and ‘Average Earnings per Video’.

Step3 If you want to check earnings by video, below you’ll see another search bar where you can paste the specific video URL.

Step4 The result will show you the ‘Number of Total Video Views’, and ‘Estimated Video earnings’.

Aux mode
Pros
- Easy interface, with a view slider
- Does Not require any information
Cons
- Based on your video view count only
How-to-steps
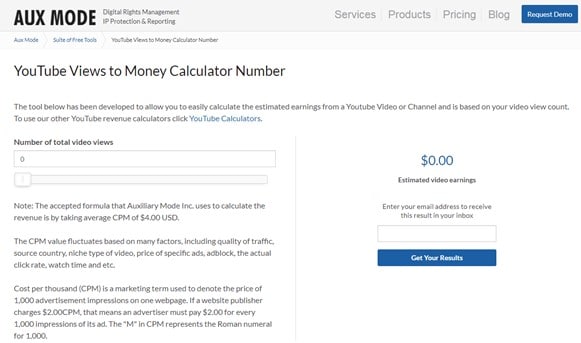
Go to AUX MODE
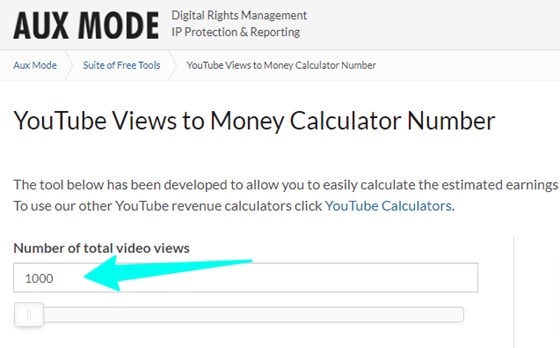
Step1 You can type total video views or, increase or decrease total views with the arrows.
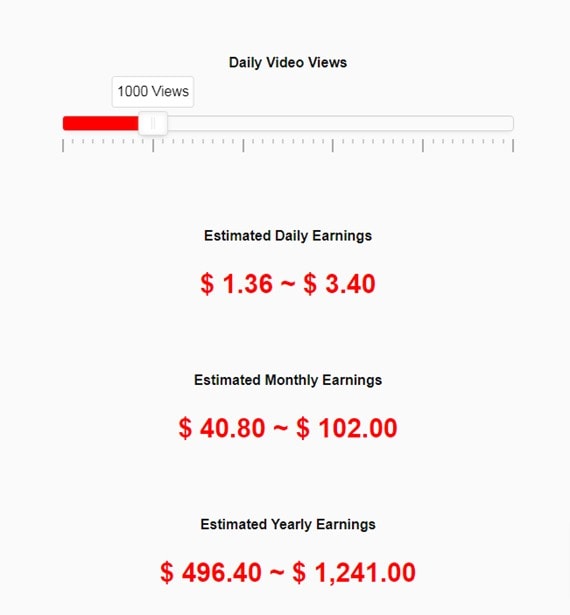
Step2 Below you’ll find a slider, you can slide forward to increase views and vice versa.

Step3 On your right, you’ll find estimated results in real time. You can also enter your email address to recieve the result in you inbox.

Tunepocket

Pros
- Slider interface shows real time result
- It shows all results based on views, existing video, and revenue of whole channel
Cons
- None
How-to-steps
Step1 The first calculator on the page is based on daily views. Drag the slider according to your video views and below you’ll find estimated earnings including daily, monthly, and annually.
Step2 Scroll down and you’ll find another calculator that requires specific video URL. Copy and paste the URL of YouTube video and get results based on views.

Step3 The last calculator is about the estimated revenue for a channel. You need to paste the channel URL to find the results. It includes, Number of Total Subscribers, Number of Total Videos, Number of Total Video Views, Channel Title, and Estimated Total Earnings

Part 3: Estimated your YouTube earning by YouTube revenue reports
To better understand the best strategies and tactics to optimize your video content, use YouTube analytic reports to help you get a clearer understanding of how your YouTube channel performs. To check your revenue report:
Step1 Login to your YouTube Studio

Step2 In the left menu, select Analytics.

Step3 From the top menu, select Revenue.

RPM
The RPM is calculated based on how much traffic you’re getting from YouTube compared to all your other sources combined. RPM is calculated as total revenue divided by total views times 1000.
Playback-based CPM
Your CPM (Cost Per Thousand) report tells you how much each ad was worth in terms of the percentage of each play a video was spent. The playback-based CPM report shows your estimated average gross revenue per 1000 playbacks where one or more ads are shown.
Monthly estimated revenue
This is a simple report showing the statistics of your video earnings over the last 6 months. It can fluctuate by invalid traffic, content disputes and ad campaign types.
Revenue sources
You must use this report to see your estimated revenue from each revenue source if you have different revenue sources.
Transaction revenue
The transactions reports show you how much your members and fans have spent in transactions. It shows estimated earnings from channel memberships and merch.
Top-earning videos
This top-earning videos report will show you the most profitable videos and their estimated revenue.
Ad type
If you use different types of Ads for your videos, this report will help you find the percentage of your Ads revenue from each ad type.
Part 4: How much money can you make on YouTube?
The answer to that question can vary widely depending on the type of content you produce and the demographics of your target market. However, we’ve found that a single video ad can be worth anywhere from around $100 to $5,000.
It’s safe to say that most YouTubers earn between $1,000 and $10,000 per month from their ads alone. But there are many other factors to take into consideration when calculating the money, you can make on YouTube:
The number of views your videos get
The key to making money from videos on YouTube is views. The more views you have, the more chance of getting paid will increase. So you need to create videos that will get viewers to click.
According to Forbes’s estimation, you can make $3-$5 per 1000 views. e.g., a video with 1,000,000 views can make around $5,000 on views only.
The engagement level of your audience
When building a YouTube channel, the key to success lies in engaging with your audience. After all, if they don’t like what you’re offering, they will not watch your videos. So you’ve got to have a message that resonates and is useful.
Your channel type
The YouTube algorithm is set up to favor channels with a high volume of views per video and high-quality content rather than low-quality channels that generate a lot of traffic but don’t produce quality videos. So, if you want to increase your revenue from your YouTube videos, try to focus on high-quality content.
Your monetization method
Several monetization methods exist, including Subscription, advertising, affiliate marketing, paid search, and sponsorships. Each monetization method requires a slightly different setup and management, resulting in different revenue.
The country you are in
It is important to know that in some countries, making money off YouTube is extremely difficult. For example, in certain countries, monetizing your videos is impossible without using illegal methods, which will get you into legal trouble.
Some other factors, e.g., it’s worth comparing the RPM of your country and other countries, different rules and prices of YouTube Ads depending on your country.
Bonus tip: Increase YouTube earnings with a powerful video editing software
Are you tired of your boring, run-of-the-mill videos? Are you looking for ways to improve your YouTube earnings? Then let’s look at some of the best editing software to help create your next great content.
Wondershare Filmora is a powerful yet easy-to-use video editing software that makes it easier than ever to make awesome videos. Filmora offers more than 50 cutting-edge tools and effects that make it easier to edit any media source, including videos, photos, and music and share the result in just minutes. Use Filmora’s powerful features like keyframing, motion tracking, split screen, instant mode, VFX, templates etc., to make your video stand out.
Here’s a demo of the software, editing YouTube Shorts:
Free Download For Win 7 or later(64-bit)
Free Download For macOS 10.14 or later
Step1 Open Filmora 11 application.

Step2 Open Project Settings

Step3 Change Aspect Ratio, Resolution, and Frame rate

Step4 Drag video to the timeline

Step5 Right-click and select Crop to Fit

Step6 Right-Click again and select Crop and Zoom

Step7 Adjust the frame

Step8 Lastly Export you file

Bottom line
People want to watch a video when searching for the answers to a question. The best videos are designed to help users accomplish their specific goals while providing them with something they can take away and use for themselves. You need to put up good videos to keep viewers coming back.
To do that, use the game-changing Filmora 11 (mentioned in the article) to create engaging YouTube videos and amaze your audience. Slowly but surely, your audience will increase and then all the guidance in this article will help you easily analyze, calculate and increase your YouTube revenue.
Free Download For Win 7 or later(64-bit)
Free Download For macOS 10.14 or later
Part 1: The rules to know for each means earning money from YouTube
As a YouTube creator, finding ways to earn money from your content cannot be easy. Some creators make a living solely off their channels. Others supplement their income with affiliate marketing, sponsorships, and ad revenue. But if you want to earn money from YouTube truly, you need to understand which monetization methods work best for you and your content.
Here’s what you should know when using each method and why you should consider doing so:
| Methods | Viewers/Clicks/Impressions | Earnings/Commission |
|---|---|---|
| YouTube Ads $1 CPM | 1 million Ad views | Average rate per ad=0.18Total ~ $5000 |
| Brand Sponsorships | 5K Sub 5K-30K Sub 30K-500K Sub 500K-1M+ Sub | $300 $700 $950 $3500 |
| Affiliate Marketing 30%-35% commission | If 100 people buys $20 product through affiliate link. Total $2000 | $2000*35%= $700 |
| Crowdfunding (Patreon, Indiegogo, GoFundMe) $5 | 100 subscribers funds the channel | 100*5=$500 |
| Merchandise Shelf $5 Shirt | 100 subscribers purchases your merch | 100*5=$500 |
| Channel Memberships $5/month | 100 loyal subscribers join membership | 100*5=$500 |
YouTube Ads
The video ads on the platform aren’t lucrative and can be used to supplement your income in the form of AdSense earnings. An actual advertiser pays 0.18 per ad view on average (as shown above). That means 1000 ad views equals $18 and $3-$5 per 1000 views.
Brand Sponsorships
Brands can sponsor your videos to reach their target audience. YouTube videos are a big part of our lives, and brands are becoming increasingly aware of how useful these videos can be. To be eligible for sponsorship, your channel must be of 5000 subscribers.
Affiliate Marketing
YouTubers help brands increase sales by encouraging their viewers to shop at the company’s store or visit its specific product pages. They then earn a commission (30%-35%) on products that people buy after clicking an affiliate link.
Crowdfunding
Today many people use crowdfunding websites to raise money for personal, channel-related projects. Most YouTubers are doing it to generate steady cash flow. Some of them use this source to fund their YouTube videos so that it increases quality and engagement.
Merchandise Shelf
Your merchandise represents and feeds your audience’s connection with you. Your product is your business, so you’re first and foremost an entrepreneur. Then design your YouTube marketing strategy to sell your merchandise and generate income.
Channel Membership
YouTube has a plan that allows you to charge your subscribers for membership on your YouTube channel. Members get access to exclusive live chats, badges, emojis, etc. Subscribers must give a set amount every month to a channel that makes a steady monthly income for YouTubers.
Part 2: Calculate YouTube income by YouTube Money Calculator
How much money do you earn on YouTube? There is no simple way to answer this question, but a YouTube income calculator can give you a rough estimate. It shows you whether you’re getting enough money to keep producing videos or if you need to look for additional ways of making money from your channel.
The tools below provide a detailed breakdown of the earnings from a specific YouTube video or channel based on audience engagement, views, and other factors.
YouTube Money Calculator
Pros
- Does not ask for much information, just a URL
- It has flexibility to check earnings by channel and video separately
Cons
- Calculate earnings based on views only
How-to-steps
Step1 To check earnings by channel, import the channel URL and click the search icon.
Step2 You’ll see the result showing, ‘Number of total Subscribers’, ‘Number of Total Video Views’, ‘Total estimated earnings’, and ‘Average Earnings per Video’.
Step3 If you want to check earnings by video, below you’ll see another search bar where you can paste the specific video URL.
Step4 The result will show you the ‘Number of Total Video Views’, and ‘Estimated Video earnings’.
Aux mode
Pros
- Easy interface, with a view slider
- Does Not require any information
Cons
- Based on your video view count only
How-to-steps
Go to AUX MODE
Step1 You can type total video views or, increase or decrease total views with the arrows.
Step2 Below you’ll find a slider, you can slide forward to increase views and vice versa.
Step3 On your right, you’ll find estimated results in real time. You can also enter your email address to recieve the result in you inbox.
Tunepocket
Pros
- Slider interface shows real time result
- It shows all results based on views, existing video, and revenue of whole channel
Cons
- None
How-to-steps
Step1 The first calculator on the page is based on daily views. Drag the slider according to your video views and below you’ll find estimated earnings including daily, monthly, and annually.
Step2 Scroll down and you’ll find another calculator that requires specific video URL. Copy and paste the URL of YouTube video and get results based on views.
Step3 The last calculator is about the estimated revenue for a channel. You need to paste the channel URL to find the results. It includes, Number of Total Subscribers, Number of Total Videos, Number of Total Video Views, Channel Title, and Estimated Total Earnings
Part 3: Estimated your YouTube earning by YouTube revenue reports
To better understand the best strategies and tactics to optimize your video content, use YouTube analytic reports to help you get a clearer understanding of how your YouTube channel performs. To check your revenue report:
Step1 Login to your YouTube Studio
Step2 In the left menu, select Analytics.
Step3 From the top menu, select Revenue.
RPM
The RPM is calculated based on how much traffic you’re getting from YouTube compared to all your other sources combined. RPM is calculated as total revenue divided by total views times 1000.
Playback-based CPM
Your CPM (Cost Per Thousand) report tells you how much each ad was worth in terms of the percentage of each play a video was spent. The playback-based CPM report shows your estimated average gross revenue per 1000 playbacks where one or more ads are shown.
Monthly estimated revenue
This is a simple report showing the statistics of your video earnings over the last 6 months. It can fluctuate by invalid traffic, content disputes and ad campaign types.
Revenue sources
You must use this report to see your estimated revenue from each revenue source if you have different revenue sources.
Transaction revenue
The transactions reports show you how much your members and fans have spent in transactions. It shows estimated earnings from channel memberships and merch.
Top-earning videos
This top-earning videos report will show you the most profitable videos and their estimated revenue.
Ad type
If you use different types of Ads for your videos, this report will help you find the percentage of your Ads revenue from each ad type.
Part 4: How much money can you make on YouTube?
The answer to that question can vary widely depending on the type of content you produce and the demographics of your target market. However, we’ve found that a single video ad can be worth anywhere from around $100 to $5,000.
It’s safe to say that most YouTubers earn between $1,000 and $10,000 per month from their ads alone. But there are many other factors to take into consideration when calculating the money, you can make on YouTube:
The number of views your videos get
The key to making money from videos on YouTube is views. The more views you have, the more chance of getting paid will increase. So you need to create videos that will get viewers to click.
According to Forbes’s estimation, you can make $3-$5 per 1000 views. e.g., a video with 1,000,000 views can make around $5,000 on views only.
The engagement level of your audience
When building a YouTube channel, the key to success lies in engaging with your audience. After all, if they don’t like what you’re offering, they will not watch your videos. So you’ve got to have a message that resonates and is useful.
Your channel type
The YouTube algorithm is set up to favor channels with a high volume of views per video and high-quality content rather than low-quality channels that generate a lot of traffic but don’t produce quality videos. So, if you want to increase your revenue from your YouTube videos, try to focus on high-quality content.
Your monetization method
Several monetization methods exist, including Subscription, advertising, affiliate marketing, paid search, and sponsorships. Each monetization method requires a slightly different setup and management, resulting in different revenue.
The country you are in
It is important to know that in some countries, making money off YouTube is extremely difficult. For example, in certain countries, monetizing your videos is impossible without using illegal methods, which will get you into legal trouble.
Some other factors, e.g., it’s worth comparing the RPM of your country and other countries, different rules and prices of YouTube Ads depending on your country.
Bonus tip: Increase YouTube earnings with a powerful video editing software
Are you tired of your boring, run-of-the-mill videos? Are you looking for ways to improve your YouTube earnings? Then let’s look at some of the best editing software to help create your next great content.
Wondershare Filmora is a powerful yet easy-to-use video editing software that makes it easier than ever to make awesome videos. Filmora offers more than 50 cutting-edge tools and effects that make it easier to edit any media source, including videos, photos, and music and share the result in just minutes. Use Filmora’s powerful features like keyframing, motion tracking, split screen, instant mode, VFX, templates etc., to make your video stand out.
Here’s a demo of the software, editing YouTube Shorts:
Free Download For Win 7 or later(64-bit)
Free Download For macOS 10.14 or later
Step1 Open Filmora 11 application.
Step2 Open Project Settings
Step3 Change Aspect Ratio, Resolution, and Frame rate
Step4 Drag video to the timeline
Step5 Right-click and select Crop to Fit
Step6 Right-Click again and select Crop and Zoom
Step7 Adjust the frame
Step8 Lastly Export you file
Bottom line
People want to watch a video when searching for the answers to a question. The best videos are designed to help users accomplish their specific goals while providing them with something they can take away and use for themselves. You need to put up good videos to keep viewers coming back.
To do that, use the game-changing Filmora 11 (mentioned in the article) to create engaging YouTube videos and amaze your audience. Slowly but surely, your audience will increase and then all the guidance in this article will help you easily analyze, calculate and increase your YouTube revenue.
Free Download For Win 7 or later(64-bit)
Free Download For macOS 10.14 or later
Also read:
- [New] Cutting Edge Cadence Exclusive, Perfected DJ Templates Online
- Seamless Playlist Transfer Migrating From Spotify to YouTube Music Service
- In 2024, Beginner's Guide to Video Production Free Course Series
- Turn Viewers Into Cashflow Your Online Income Plan
- 2024 Approved Discovering All in YouTube Shorts Guide
- Best Livestream Capturing Solutions for Content Makers
- The Economic Sphere of the Philanthropic Mr. Beast
- 2024 Approved Charting the Course to Prodigy Status for Ajey (CarryMinati)
- 2024 Approved Audiovisual Powerhouses Select Best Laptops for Editing
- Becoming a Trendsetter YouTube Video Tactics for 2024
- [Updated] Eradicating Grayscale Issues with YouTube Video
- [New] A Fresh Take on Frigidity Crafting Inviting Backdrops
- Essential Skills for YouTube Success 8 Free Online Courses
- Elevate Sound with These ASMR Apps
- [Updated] 10 Best Free Movies on YouTube for Time Killing 2024
- 2024 Approved Essential Tips for Editing Your Videos in YouTube Studio
- A Dive Into the Premium List of Top 10 Budget-Friendly YouTube Designers
- Unlock YouTube Collaboration A Guide to Partnering and Producing Together
- Enhance Video Visibility with Effective Thumbnail Scaling
- Laughter Lab Top 7 Sketches & Vignettes for YouTubers
- Anime Gems on YouTube to Light Up Your Day [New List 2023]
- In 2024, Cutting-Edge Camera Technology For YouTube Stars
- Creating Simple Videos Top 10 YouTube Projects Anyone Can Do
- Most Influential Gamers on YouTube
- Quick Tunes Explore Video Music Characters
- [Updated] Crafting Content Gold YouTube Studio's Path to Perfection
- Elevate Your Youtube Presence Featuring Essential Channels Tutorial for 2024
- Startups' Guide to Earnings on YouTube Platform
- 2024 Approved Channel Naming Excellence Tips & Strategies
- 2024 Approved Efficiently Isolate Key Moments in YouTube Footage
- 2024 Approved 10 Strategies for Educators Starting Their Own YouTube Series
- Ultimate List Best iOS-Friendly, Free Video Editors
- [New] Comprehensive Insights Into iMovie Techniques for YouTube Creators
- [Updated] Elevate Your Video's Start with Top YouTube Intro Tips
- [Updated] Digital Experts' 5 Favorite Video Recorders for 2024
- [New] Foodie Frenzy TikTok's Most Shared Meals and Munchies
- 2024 Approved Cataloging FB Video Ratios
- Unlock Apple iPhone 7 Plus With Forgotten Passcode Different Methods You Can Try
- New In 2024, Top 10 Best Free Manga Sites to Read Online
- [Updated] Enjoy Classic Games Anywhere with the Top 5 PC-Based GB Emulators for 2024
- [New] Profile Pictorialism Designing Your Exaggerated Visage
- Updated Melodic Monarchs An Exclusive Array of Free Royalty-Free Piano Music for the Art of Filmmaking and Editing for 2024
- 2024 Approved The Ultimate AIFF Converter Selection Blueprint
- [Updated] 2024 Approved Expert Tips for Efficiently Logging GooGle Online Gatherings
- 2024 Approved Integrated IPTV Accessibility
- New The Experts Picks 8 Superior Rainfall Noise Resources Available for Downloading for 2024
- [New] 2024 Approved VideoPie Interpretation Platform
- [New] Leverage These 10 Devices for Crystal Clear Zooms for 2024
- Updated 2024 Approved Expert Recommendations Leveraging Voxels Voice Manipulation Feature to Boost Your Discord Experience
- [New] Ultimate ScreenRecorder Comprehensive, Step-by-Step Guide
- Title: Beginner's Guide to Choosing Lenses and Cameras for YouTube Vloggers
- Author: Steven
- Created at : 2024-05-25 18:48:54
- Updated at : 2024-05-26 18:48:54
- Link: https://youtube-clips.techidaily.com/beginners-guide-to-choosing-lenses-and-cameras-for-youtube-vloggers/
- License: This work is licensed under CC BY-NC-SA 4.0.
