
:max_bytes(150000):strip_icc()/ComputersLaptops_MoMoProductions_GettyImages-1305309014_CROPPED-73522b11cda24bcdb21a9dc3b34adc76.jpg)
"Becoming a Video Virtuoso Essential Tips for Upside-Down Youtube Livestreams for 2024"
Becoming a Video Virtuoso: Essential Tips for Upside-Down Youtube Livestreams
How to live streaming 360 video to youtube

Richard Bennett
Mar 27, 2024• Proven solutions
- Part1.Stream 360 to Youtube via Ricoh Theta S and OBS on PC
- Part2.Live Stream from Allie 360 Camera to YouTube on Mobile
1. Stream 360 to Youtube via Ricoh Theta S and OBS on PC
Step 1: First of all you need to get ready with your Ricoh Theta S 360 camera unit.
Step 2: Now visit the official website of Theta 360 in order to download your dedicated live streaming application.
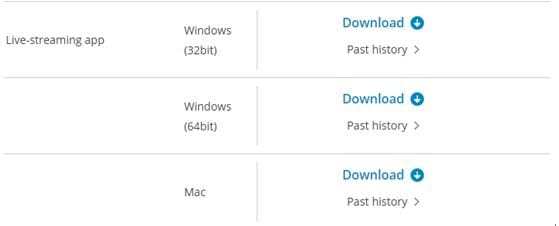
Step 3: Get your application and install it on your Mac or PC as per need.
Step 4: It is time to plug in to your Ricoh Theta S 360 camera using your PC.
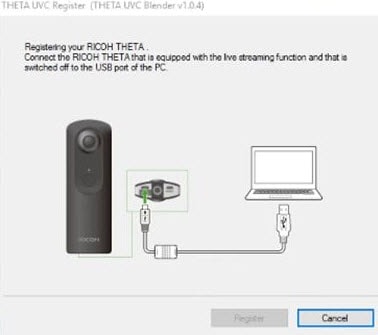
Step 5: Now select your device ‘Ricoh Theta S’ and then hit Okay.
Step 6: You will find option to register to application with your respective device. Select and hit register.
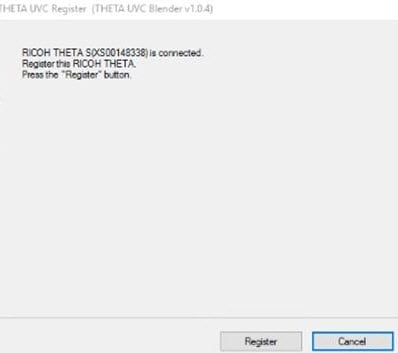
Step 7: As soon as your registration process is complete then un-plug your USB cable.
Step 8: It is time to turn the Ricoh Theta device to Live Mode; you simple need to press the top power and lower video button simultaneously to directly switch to the live mode.
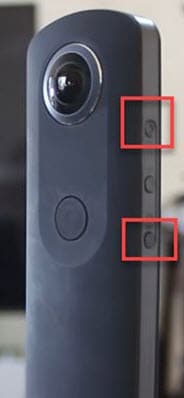
Step 9: Once your device enters into Live Stream mode then a Led will start blinking on your device that represents your device is live at this moment.
Step 10: Now you need to plug in the USB cable again with your computer.
Step 11: Visit the official site of OBS and download your software; install it on your system.
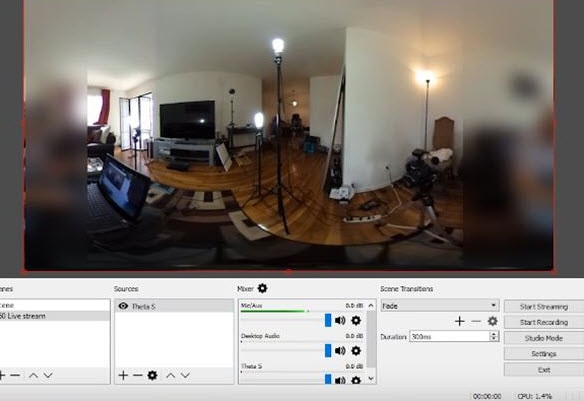
Step 12: Go to create scene option and then switch to create sources.
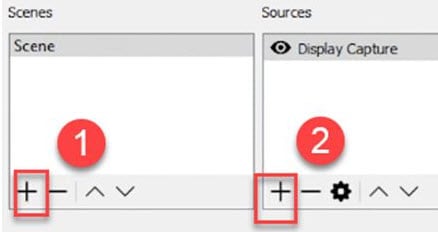
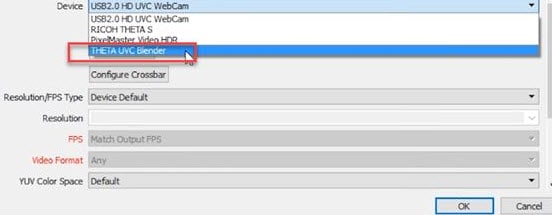
Step 13: Select video capture device as your source from drop down menu.
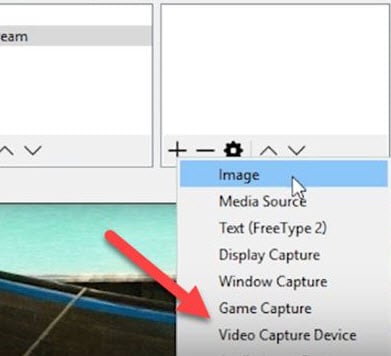
Step 14: Now from available list select Theta UVC as your active video capture source.
Step 15: You need to adjust screen as per your requirements.
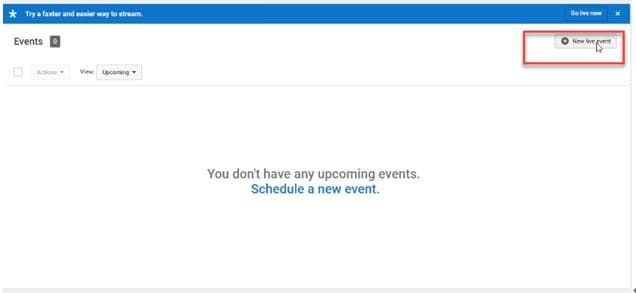
Step 16: Now move to YouTube and then hit New Live Events option.
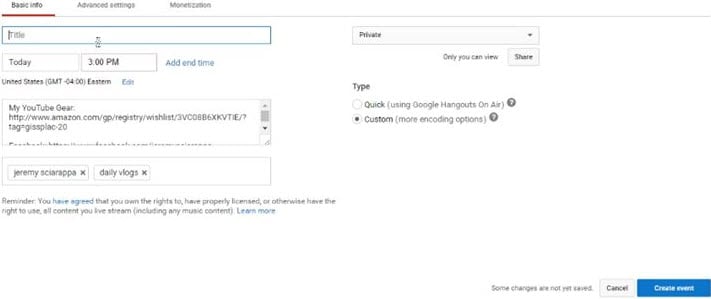
Step 17: Complete the basic information.
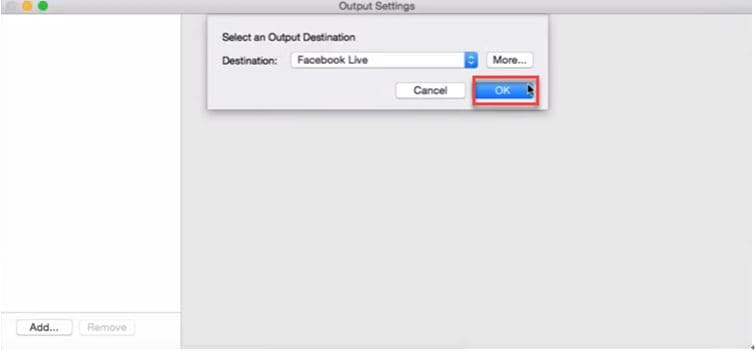
Step 18: You need to move to advanced settings now; select 360 live stream option and then create event.
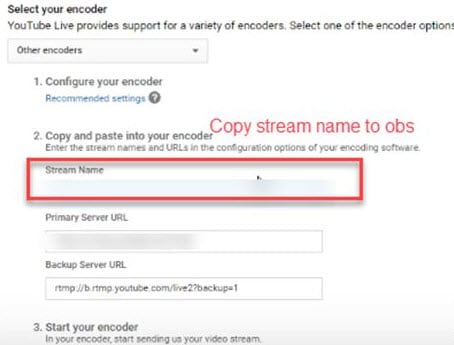
Step 19: Now complete the ingesting settings and finally select create new stream option.

Step 20: As soon as your event is created then you will be able to find your stream name on screen, copy it and simply paste it on OBS window.
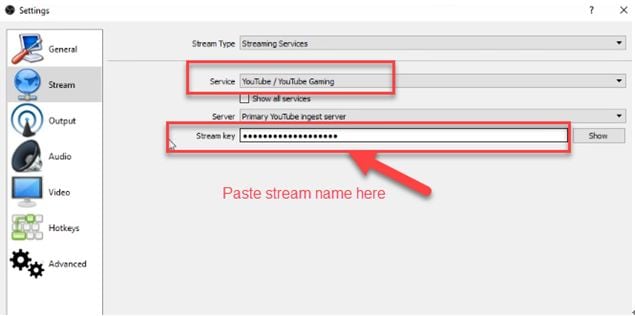
Step 21: It is time to return to OBS settings and then you need to paste that copied name on stream key option.
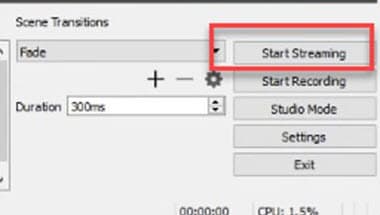
Step 22: Once all above settings are complete then click start stream option from your OBS window and you will soon be able to find your 360 live on YouTube.
2.Live Stream from Allie 360 Camera to YouTube on Mobile
Step 1: Get ready with your Allie 360 camera unit.
Step 2: Visit YouTube and then hit the option to create your live event.
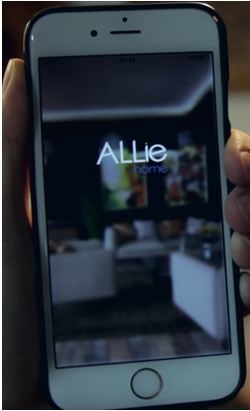
Step 3: It is time to download your Allie Application and then get it installed on your device.
- Prefer to use this link if you are working on iOS: https://itunes.apple.com/app/allie-home/id1063986074
- Android users need to visit: https://play.google.com/store/apps/details?id=com.icrealtime.allie
Step 4: As soon as you have downloaded your app then simply turn on the Bluetooth, Wi-Fi and air plane mode on your device.
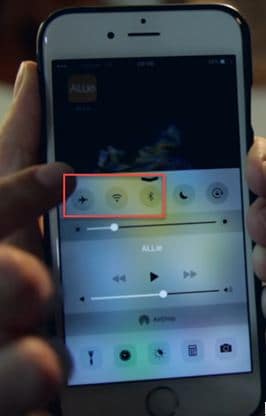
Step 5: Simply open your Allie application and then connect your camera.
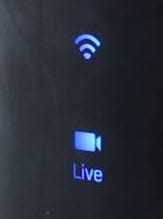
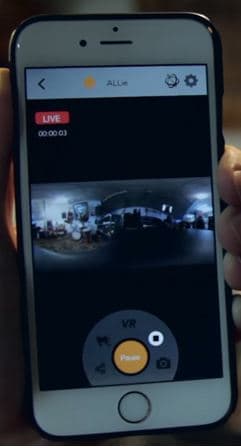
Step 6: Now users need to hit stream icon on screen.
![]()
Step 7: You will be asked to fill the necessary information about your video. It is also possible to make adjustments regarding video quality. Once you are done with all required settings then hit Submit option.

Step 8: Soon your video will become live; note that you can also share your live video via SNS platform with other viewers.
Richard Bennett
Richard Bennett is a writer and a lover of all things video.
Follow @Richard Bennett
Richard Bennett
Mar 27, 2024• Proven solutions
- Part1.Stream 360 to Youtube via Ricoh Theta S and OBS on PC
- Part2.Live Stream from Allie 360 Camera to YouTube on Mobile
1. Stream 360 to Youtube via Ricoh Theta S and OBS on PC
Step 1: First of all you need to get ready with your Ricoh Theta S 360 camera unit.
Step 2: Now visit the official website of Theta 360 in order to download your dedicated live streaming application.
Step 3: Get your application and install it on your Mac or PC as per need.
Step 4: It is time to plug in to your Ricoh Theta S 360 camera using your PC.
Step 5: Now select your device ‘Ricoh Theta S’ and then hit Okay.
Step 6: You will find option to register to application with your respective device. Select and hit register.
Step 7: As soon as your registration process is complete then un-plug your USB cable.
Step 8: It is time to turn the Ricoh Theta device to Live Mode; you simple need to press the top power and lower video button simultaneously to directly switch to the live mode.
Step 9: Once your device enters into Live Stream mode then a Led will start blinking on your device that represents your device is live at this moment.
Step 10: Now you need to plug in the USB cable again with your computer.
Step 11: Visit the official site of OBS and download your software; install it on your system.
Step 12: Go to create scene option and then switch to create sources.
Step 13: Select video capture device as your source from drop down menu.
Step 14: Now from available list select Theta UVC as your active video capture source.
Step 15: You need to adjust screen as per your requirements.
Step 16: Now move to YouTube and then hit New Live Events option.
Step 17: Complete the basic information.
Step 18: You need to move to advanced settings now; select 360 live stream option and then create event.
Step 19: Now complete the ingesting settings and finally select create new stream option.
Step 20: As soon as your event is created then you will be able to find your stream name on screen, copy it and simply paste it on OBS window.
Step 21: It is time to return to OBS settings and then you need to paste that copied name on stream key option.
Step 22: Once all above settings are complete then click start stream option from your OBS window and you will soon be able to find your 360 live on YouTube.
2.Live Stream from Allie 360 Camera to YouTube on Mobile
Step 1: Get ready with your Allie 360 camera unit.
Step 2: Visit YouTube and then hit the option to create your live event.
Step 3: It is time to download your Allie Application and then get it installed on your device.
- Prefer to use this link if you are working on iOS: https://itunes.apple.com/app/allie-home/id1063986074
- Android users need to visit: https://play.google.com/store/apps/details?id=com.icrealtime.allie
Step 4: As soon as you have downloaded your app then simply turn on the Bluetooth, Wi-Fi and air plane mode on your device.
Step 5: Simply open your Allie application and then connect your camera.
Step 6: Now users need to hit stream icon on screen.
![]()
Step 7: You will be asked to fill the necessary information about your video. It is also possible to make adjustments regarding video quality. Once you are done with all required settings then hit Submit option.
Step 8: Soon your video will become live; note that you can also share your live video via SNS platform with other viewers.
Richard Bennett
Richard Bennett is a writer and a lover of all things video.
Follow @Richard Bennett
Learn the Low-Cost Way of Designing Winning YouTube Ad Campaigns
How to Create Video Ads for Free in YouTube Video Builder
Richard Bennett
Mar 27, 2024• Proven solutions
Many people find it challenging to create compelling video advertisements for their brand promotions. While some of the creative tools might be expensive, the easy ones have a steep learning curve, and engaging a professional designer wouldn’t be something you might be ready for. YouTube Video Builder is a great solution for any such situation.
With that being said, the following sections talk about what YouTube Video Builder is, how is it useful, what advantages does it offer, and how can you create professional video adverts using the tool.
- Part 1: What Is YouTube Video Builder?
- Part 2: How Does YouTube Video Builder Work?
- Part 3: How to Get YouTube Video Builder?
- Part 4: How to Make Video Ads for Free with YouTube Video Builder?
- Part 5: Tips for Making Good Video Ads with YouTube Video Builder
Part 1: What Is YouTube Video Builder?
YouTube recently came up with an online tool, YouTube Video Builder, that, as the name suggests, enables you as an organization to prepare videos for free. These videos could be anywhere from 6 to 15 seconds long and are most appropriate for advertisements. Once created, the films can be used in the campaigns to promote your brand and/or products online.
However, you must keep the following few things handy before starting with YouTube Video Builder to prepare a video advertisement:
- Logo
You must have a good-quality photo of your brand logo that you want to add to the video as a watermark. This gives your organization online recognition.
- HD Images
At the time of this writing, YouTube Video Builder only allows you to add still images. The tool compiles these photos using a theme that you select, and enables you to add background music to make the advert more engaging. Therefore, it is imperative to have high-definition images of your product(s) that you want to create a promotional video for.
- Google Chrome Browser
You must have the latest version of the Google Chrome web browser installed on your computer.
- YouTube Channel
Because YouTube Video Builder will publish your video advertisements on YouTube itself, you must have your own YouTube Channel created , configured, and properly functioning so the posting process remains smooth and seamless.
- Availability of the Tool and Features
YouTube Video Builder is still in the Beta phase, and therefore you may not have access to all the features that the tool has to offer. However, this majorly depends on the region of your residence. As of now, the utility is not even available in some countries of the world.
Part 2: How Does YouTube Video Builder Work?
As explained earlier, YouTube Video Builder is an online tool that works on the latest version of the Google Chrome browser. The web interface of the utility has separate blocks (or placeholders if you want to call them) for different types of images. For instance, there is a placeholder for your logo, and a couple of other blank slots where you can import the photos from your computer.
There are some text input fields that you can populate with the relevant information such as the name of the video, the product’s name that you wish to promote, and many other things. There is a storyboard at the bottom of the interface that helps give your video a theme and the alignment of the ingredients that you have imported from your computer.
Finally, you can add background music to the video from the royalty-free tracks that can be accessed from the built-in library, and you are all set to go.
Part 3: How Can I Get YouTube Video Builder?
Because YouTube Video Builder is in its Beta phase, at the time of this writing you are required to send an access request to Google using your account that you want to use to create the videos from. You can send your requests to: https://services.google.com/fb/forms/videobuilderbeta/ .
Once your request is approved, you can then use the same Google account to sign in to the YouTube Video Builder portal, and start preparing your video advertisements. Here, it is important to understand that the Google account that you use to send an access request and prepare the videos must be the same ID that has your active and functional YouTube Channel.
Part 4: How to Make Video Ads for Free with YouTube Video Builder?
Once you have access to the Beta version of YouTube Video Builder, you can start creating the video ads for free. You can learn the process of how this can be done by following the simple instructions given below:
Step 1: Prepare a Console
After signing in to your YouTube Video Builder account, on the main interface, click Select Layout from the navigation bar at the right if not already selected, pick a layout that best suits your needs, and click Use Layout.

Next, from the Color & Logo section, choose the base (background) and text colors using their corresponding tools from under the Brand colors section.
![]()
After this, insert an image of your brand logo in the block under the Logos category.
![]()
Step 2: Add the Ingredients
When you are on the Images & Text section of the navigation bar, pick the high-definition photos from the Storyboard at the bottom, and add them to the Image 1, Image 2, and Image 3 boxes accordingly.

Now, scroll down to the Text section, and add the relevant content in the available text input fields. Make sure to add a compelling Call to action text to give the viewers a free passage to connect with you.

Step 3: Make Cosmetic Manipulations
From the Pick a Font section of the navigation bar, click the Google Fonts catalog link to search for a unique font, and once found, type its name in the available field to use that font.

Alternatively, you can leave the default one selected. When on the Select Music section, choose your preferred background music from the drop-down list that is present under the section.

Finally, click Create video, and wait while YouTube Video Builder takes you to the Preview, Save, Share section, and generates your video.

Step 4: Save the Video and Begin Promotion
After the video is generated, play to preview the film. If everything looks good, click Save video.

On the next page, click Copy to copy the video link, and share it with your friends, colleagues, and family members for their feedback.

Next, scroll down to get to the Create Campaign section of the navigation bar, and from the left screen, click Create campaign to begin a campaign to promote your brand and/or product(s).

Part 5: Tips for Making Good Video Ads with YouTube Video Builder
The whole point here is to prepare your video adverts with the least investment and almost no effort. The following few tips would help you achieve this with ease:
- Make sure to gather all the ingredients such as the photos of the products, brand logo, etc. before starting with the video creation process
- Set a layout, font, theme color, and background music that compliments the product(s) you wish to promote
- Remain consistent with the theme color, fonts, etc. throughout the video
- Make sure to include a catchy ‘Call for action’ text in your video ad
- Make as many modifications as you want before publishing the ad on your YouTube Channel. Avoid doing any amendments after the ad has been posted
- Share the link of your video with as many people as you possibly can to make your product(s) and brand visible and popular
- Make sure to use the ad in your campaigns to make people aware of your brand/product(s)
Conclusion
The bitter truth is, producing videos, especially for brand promotions requires expert creators, expensive tools, and a good amount of work experience. Although all these can be managed if you have some spare funds, YouTube Video Builder helps you create advertising videos of up to 15 seconds with ease and for free. All you need is access to YouTube Video Builder, your own YouTube Channel, your brand logo, and high-definition photos of your product(s).
Richard Bennett
Richard Bennett is a writer and a lover of all things video.
Follow @Richard Bennett
Richard Bennett
Mar 27, 2024• Proven solutions
Many people find it challenging to create compelling video advertisements for their brand promotions. While some of the creative tools might be expensive, the easy ones have a steep learning curve, and engaging a professional designer wouldn’t be something you might be ready for. YouTube Video Builder is a great solution for any such situation.
With that being said, the following sections talk about what YouTube Video Builder is, how is it useful, what advantages does it offer, and how can you create professional video adverts using the tool.
- Part 1: What Is YouTube Video Builder?
- Part 2: How Does YouTube Video Builder Work?
- Part 3: How to Get YouTube Video Builder?
- Part 4: How to Make Video Ads for Free with YouTube Video Builder?
- Part 5: Tips for Making Good Video Ads with YouTube Video Builder
Part 1: What Is YouTube Video Builder?
YouTube recently came up with an online tool, YouTube Video Builder, that, as the name suggests, enables you as an organization to prepare videos for free. These videos could be anywhere from 6 to 15 seconds long and are most appropriate for advertisements. Once created, the films can be used in the campaigns to promote your brand and/or products online.
However, you must keep the following few things handy before starting with YouTube Video Builder to prepare a video advertisement:
- Logo
You must have a good-quality photo of your brand logo that you want to add to the video as a watermark. This gives your organization online recognition.
- HD Images
At the time of this writing, YouTube Video Builder only allows you to add still images. The tool compiles these photos using a theme that you select, and enables you to add background music to make the advert more engaging. Therefore, it is imperative to have high-definition images of your product(s) that you want to create a promotional video for.
- Google Chrome Browser
You must have the latest version of the Google Chrome web browser installed on your computer.
- YouTube Channel
Because YouTube Video Builder will publish your video advertisements on YouTube itself, you must have your own YouTube Channel created , configured, and properly functioning so the posting process remains smooth and seamless.
- Availability of the Tool and Features
YouTube Video Builder is still in the Beta phase, and therefore you may not have access to all the features that the tool has to offer. However, this majorly depends on the region of your residence. As of now, the utility is not even available in some countries of the world.
Part 2: How Does YouTube Video Builder Work?
As explained earlier, YouTube Video Builder is an online tool that works on the latest version of the Google Chrome browser. The web interface of the utility has separate blocks (or placeholders if you want to call them) for different types of images. For instance, there is a placeholder for your logo, and a couple of other blank slots where you can import the photos from your computer.
There are some text input fields that you can populate with the relevant information such as the name of the video, the product’s name that you wish to promote, and many other things. There is a storyboard at the bottom of the interface that helps give your video a theme and the alignment of the ingredients that you have imported from your computer.
Finally, you can add background music to the video from the royalty-free tracks that can be accessed from the built-in library, and you are all set to go.
Part 3: How Can I Get YouTube Video Builder?
Because YouTube Video Builder is in its Beta phase, at the time of this writing you are required to send an access request to Google using your account that you want to use to create the videos from. You can send your requests to: https://services.google.com/fb/forms/videobuilderbeta/ .
Once your request is approved, you can then use the same Google account to sign in to the YouTube Video Builder portal, and start preparing your video advertisements. Here, it is important to understand that the Google account that you use to send an access request and prepare the videos must be the same ID that has your active and functional YouTube Channel.
Part 4: How to Make Video Ads for Free with YouTube Video Builder?
Once you have access to the Beta version of YouTube Video Builder, you can start creating the video ads for free. You can learn the process of how this can be done by following the simple instructions given below:
Step 1: Prepare a Console
After signing in to your YouTube Video Builder account, on the main interface, click Select Layout from the navigation bar at the right if not already selected, pick a layout that best suits your needs, and click Use Layout.
Next, from the Color & Logo section, choose the base (background) and text colors using their corresponding tools from under the Brand colors section.
![]()
After this, insert an image of your brand logo in the block under the Logos category.
![]()
Step 2: Add the Ingredients
When you are on the Images & Text section of the navigation bar, pick the high-definition photos from the Storyboard at the bottom, and add them to the Image 1, Image 2, and Image 3 boxes accordingly.
Now, scroll down to the Text section, and add the relevant content in the available text input fields. Make sure to add a compelling Call to action text to give the viewers a free passage to connect with you.
Step 3: Make Cosmetic Manipulations
From the Pick a Font section of the navigation bar, click the Google Fonts catalog link to search for a unique font, and once found, type its name in the available field to use that font.
Alternatively, you can leave the default one selected. When on the Select Music section, choose your preferred background music from the drop-down list that is present under the section.
Finally, click Create video, and wait while YouTube Video Builder takes you to the Preview, Save, Share section, and generates your video.
Step 4: Save the Video and Begin Promotion
After the video is generated, play to preview the film. If everything looks good, click Save video.
On the next page, click Copy to copy the video link, and share it with your friends, colleagues, and family members for their feedback.
Next, scroll down to get to the Create Campaign section of the navigation bar, and from the left screen, click Create campaign to begin a campaign to promote your brand and/or product(s).
Part 5: Tips for Making Good Video Ads with YouTube Video Builder
The whole point here is to prepare your video adverts with the least investment and almost no effort. The following few tips would help you achieve this with ease:
- Make sure to gather all the ingredients such as the photos of the products, brand logo, etc. before starting with the video creation process
- Set a layout, font, theme color, and background music that compliments the product(s) you wish to promote
- Remain consistent with the theme color, fonts, etc. throughout the video
- Make sure to include a catchy ‘Call for action’ text in your video ad
- Make as many modifications as you want before publishing the ad on your YouTube Channel. Avoid doing any amendments after the ad has been posted
- Share the link of your video with as many people as you possibly can to make your product(s) and brand visible and popular
- Make sure to use the ad in your campaigns to make people aware of your brand/product(s)
Conclusion
The bitter truth is, producing videos, especially for brand promotions requires expert creators, expensive tools, and a good amount of work experience. Although all these can be managed if you have some spare funds, YouTube Video Builder helps you create advertising videos of up to 15 seconds with ease and for free. All you need is access to YouTube Video Builder, your own YouTube Channel, your brand logo, and high-definition photos of your product(s).
Richard Bennett
Richard Bennett is a writer and a lover of all things video.
Follow @Richard Bennett
Also read:
- 2024 Approved Boost Your YouTube Output - Rapid Video Rendering and Transfer
- Step-by-Step Guide to Creating Popular YouTube Openings
- Is a Brief Subscribe Beneficial for Content Consumption?
- [New] Charting a Course for Cash Flows The 3-Step Methodology for Measuring YouTube Earnings
- Viral Video Evolution YouTube's Favorites
- [Updated] Best Channel Discoveries in ASMR
- 2024 Approved Designing an Editorial Epilogue
- [Updated] Channel Honor Roll - Play Button & Follower Awards
- [Updated] Enhancing Viewer Interest with Accurate Time Stamping
- Enigma of the Edgers Video Magic at Its Finest
- Tips for a Swift Checkup of Your YouTube Sign-In
- In 2024, Channel Upgrade How Reaching 500 Viewers Propelts Monetization
- Navigating Personal Brand Identity [High Engagement]
- Cinematic Delights for a Low Price - Top 10 Free Movies on YouTube for 2024
- 2024 Approved Dismantling YouTube Ranks Factors and Their Effects
- [New] Earnings in the Age of Streaming How YouTube Pays Creators
- Streamline Your YouTube Shorts Thumbnail Process
- [New] Assessing Your Video Streaming Needs To Subscribe or Not to Subscribe?
- 15 YouTube Starter Templates A Guide to Popularity
- [Updated] A Comparative Analysis of Youtube's Ownership Vs. CC Licenses
- 2024 Approved Drive More Traffic Effective Strategies for YouTube Outros
- [New] Crafting & Uploading Lengthy Video Masterpieces on YouTube
- 2024 Approved Boost Length on YouTube Entry Filming
- Constructing an Accessible Subscribe URL to YT Channels
- [Updated] Engage, Enchant Elevate Your Unboxing Content
- Harnessing the Benefits with Creative Commons Licenses
- [New] Essential Guidelines to Create Impactful YouTube Banners
- How to Make ASMR Videos All You Need to Know for 2024
- Fresh Talent 8 Rapidly Rising Online Stars
- What's the Take-Home From Each YouTube Sponsored Play?
- MCB Channel Theme Images and Templates
- Navigating the SEO Maze A Guide to YouTube Keywords
- [New] Decision-Making in the Workplace A Neurological Approach to Efficacy and Ethics
- 2024 Approved Best Free YouTube Intro Makers
- In 2024, A-List Makeup Tutorials Who to Watch ?
- The Ultimate Viewer Count Challenge Worldwide YouTuber Leaders
- [New] Dodging Doubts A Guide to Vlogging's Most Common Anxieties
- Unlocking the Full Potential Innovative Techniques for Youtube End Screen Designs
- Understanding User Psychology in YouTube Shorts Template Design
- 2024 Approved Digital Dynamo Dames The Next Generation of YouTube's Powerhouses
- [New] Building a Bridge Between Twitch and YouTube Audience Loyalty
- Access Tons of Free Vocal Textures
- Regulatory Guidelines YouTube Video Recording
- Prosperity Through Streaming A YouTube Money Blueprint
- How to Fix the YouTube Shorts Not Showing Up Issue?
- [New] Erase the Obvious Techniques for Masked YouTube Content
- Binge on Christmas Classics Enjoy 9 Whole-Film Flicks No Charge
- The Best of Home Workouts Top Yoga Channels Online
- In 2024, Enlarge Your Digital Footprint Proven Methods to Multi-Stream on Youtube & Twitch
- [New] In 2024, Upgrade Your TikTok Profile Essentials for Authenticity
- In 2024, 6 Ways To Transfer Contacts From Honor 90 Lite to iPhone | Dr.fone
- [Updated] Audience Captivation Through Crossfade Mastery in Audacity
- How to share/fake gps on Uber for Samsung Galaxy A24 | Dr.fone
- [New] The Ultimate Windows Capture Toolkit
- [Updated] 2024 Approved Fixing Audio Absence in Online Shared Videos
- [Updated] 2024 Approved Demystifying Discord's Premium Experience DiscoNitro Explored
- 2024 Approved Transformative Techniques Looping Videos That Engage Instagram Users
- [New] 2024 Approved Setting Up Virtual Gatherings WhatsApp Guide
- [New] 2024 Approved Elevate Your IG Videos Tips & Templates
- Updated Best Aspect Ratio Changer Tools for Videos and Images
- [Updated] 2024 Approved Revolutionize Your Workflow with Lenovo's Screen Capture Tools
- How To Change Itel S23 Lock Screen Clock in Seconds
- In 2024, Send Local Videos to Chromecast Easy Setup for Windows, Mac, Android, and iOS
- Updated In 2024, Streamlining Your Mixes Normalizing Audio in DaVinci Resolve
- [Updated] In 2024, Xbox Game Memories, Save Them with Screenshots
- Tutorial Transforming Photos Into Works of Art
- In 2024, Full Tutorial to Bypass Your Samsung Galaxy A15 5G Face Lock?
- Pokémon Go Cooldown Chart On Tecno Phantom V Fold | Dr.fone
- 4 Ways to Fix Android Blue Screen of Death On Honor X50i+ | Dr.fone
- Syncing Tunes with Video Posts on Facebook
- In 2024, How to Unlock Vivo X100 Pro Phone with Broken Screen
- [Updated] Top 5 Best Live Stream Video Conference Recorders
- 2024 Approved Accelerate Your Editing Process with These 5 Tips for OBS
- Bring Back the Light Solutions for Gaming Screens Turned Black with OBS
- [New] 2024 Approved Navigating FB Video Conversion to Professional-Quality MP3s
- Title: "Becoming a Video Virtuoso Essential Tips for Upside-Down Youtube Livestreams for 2024"
- Author: Steven
- Created at : 2024-05-25 18:48:47
- Updated at : 2024-05-26 18:48:47
- Link: https://youtube-clips.techidaily.com/becoming-a-video-virtuoso-essential-tips-for-upside-down-youtube-livestreams-for-2024/
- License: This work is licensed under CC BY-NC-SA 4.0.
