Become an Expert at YouTube Live Streams with Google Meet for 2024
Become an Expert at YouTube Live Streams with Google Meet
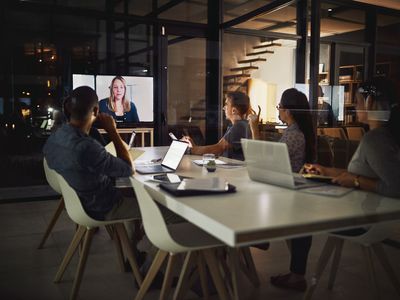
Google Meet helps people to connect virtually with each other in a well-protected environment. If you have physical restrictions, Google Meet can provide an enhanced ecosystem to collaborate with your team members. With high video and audio quality, it can prevent you from any sort of disturbance. If you want to connect with a larger audience during your Google Meet sessions, you can go for live streaming.
This article will address how to conduct Google Meet live stream through the platform of YouTube. To learn more, continue reading this guide.
- Available Google Workspace Edition
- Approval of YouTube Channel for Live
- Connect your YouTube Channel to Google Meet
- How to Live Stream from Google Meet to YouTube
- Bonus Tip: Easily Record your Google Meet Live Stream
Part 1: Three Things to Check Before Starting Your Live
Before increasing your audience from Google Meet live stream on YouTube, make sure to check the below prerequisites.
1. Available Google Workspace Edition
For Google Meet YouTube live, there are some requirements. The reason is that not every ordinary user of Google Meet can go for YouTube live streaming. To do so, you should buy any of the following pricing plans:
| Google Workspace Pricing Plan | Price |
|---|---|
| Enterprise Starter | Approx. $10/User/Month |
| Enterprise Standard | Approx. $20/User/Month |
| Enterprise Plus | Approx. $30/User/Month |
| Education Plus | Approx. $5/Student/Month |
| Teaching and Learning Upgrade | Approx. $4/License/Month |
| Workspace Individual Subscriber | Approx. $9.9/Month |
| Google One Subscribers with 2 TB or More Storage Space | Approx. $10/Month |
![]()
Note: To know the exact pricing plans of Google Workspace, you have to contact Google Support.
2. Approval of YouTube Channel for Live
To conduct live streaming, you must receive approval from the YouTube channel. For this, you must access your channel’s YouTube Studio to perform the account verification. Now to activate and enable live streaming on your YouTube account, check the following steps:
Step1 Open your YouTube account and click on the “Profile” icon given at the top-right corner. After opening the Profile menu, click on the “YouTube Studio” option.

Step2 A new window will be displayed on your screen. From the left panel, select “Content” among other options. Under the section called “Live,” locate the “Get Started” option. Afterward, tap on the “Request” option and perform the verification steps for enabling live streaming. After 24 hours, you would get approval for live streaming on YouTube. Hence, you would be able to live stream Google Meet meetings through your YouTube channel.

3. Connect your YouTube Channel to Google Meet
Once you get approval for live streaming, you can connect the YouTube channel to your Google Meet account. If the Host Management option is disabled, anyone within the Google Meet session can start live streaming. Conversely, only hosts or co-hosts can begin live streaming if this option is activated. Moreover, the individual who is starting the live stream from Google Meet will get connected to his YouTube channel.
Furthermore, you should use the same email address to enter the Google Meet that is connected to your YouTube account. By using the same email address, you can ensure smooth live streaming of Google Meet sessions to your YouTube channel. Also, you can only use laptops or desktops for initiating live streaming. The reason is that the Google Meet live stream on YouTube is not currently available on mobile devices.
Part 2: How to Live Stream from Google Meet to YouTube
Once you have fulfilled all the requirements, you can start a live stream from Google Meet to YouTube. Check the following steps to execute the process:
Step1 To allow Google Meet sessions to live stream on YouTube, the Google Workspace admin must adjust some settings. To begin, log in to the “Admin Console” on the Workspace administrator account. Now go to “Apps” and access the “Google Workspace” option.
Step2 Afterward, click “Google Meet” and tap on the “Stream” option. Once done, click on the “Pencil” icon to open the Settings menu. Now enable the options “Let People Steam Their Meetings” and “Let People Use YouTube to Stream Meetings.” Once done with the changes, click on the “Save” button.
Step3 Make sure that the Google account attached to your YouTube channel is capable of live streaming. Once done, go to your YouTube channel and tap on the “Create” button. Afterward, hit the “Live” button.
Step4 Now enter your Google Meet session and click on the “Activities” option. From the Activities menu, select “Live Streaming.” Now a small menu will open for live-streaming settings. You can create a new event and add an event title. Make sure to choose the privacy options and desired language. Afterward, click on the “Start Streaming” option.
Step5 A small pop-up will appear that will tell you to remind your participants about live streaming. After reminding, click on the “Start” button. You can see the red “Live” button that will indicate to you the ongoing live-streaming session. Once you have concluded the live streaming by clicking on the “Stop Streaming” button, you can check the video analytics by visiting your YouTube channel.
Bonus Tip: Easily Record your Google Meet Live Stream
Do you want to save your Google Meet live-stream session? The best tool through which you can save your essential live-streaming sessions is Wondershare Filmora Screen Recorder . By using this efficient screen recorder, you can access your saved live streaming session and revise the important points discussed in it.
The screen recorder of Filmora is capable of capturing webcam and screen recording simultaneously. You can select a customized recording area through this tool. For example, you can choose a full screen, a specific window, or a customized area. Furthermore, this screen recording tool can also capture your microphone and system’s sounds in high quality. At the same time, as a powerful video editor, you can edit your videos with various advanced features of Filmora to bring them to the next level. Click the video below to learn more about Filmora’s new features.
Steps to Record Live Streaming Using Filmora Screen Recorder
Are you ready to capture your live-streaming session on Google Meet? Here are the simple and accurate steps to begin the process:
Step1 Open the Screen Recorder
Download Wondershare Filmora and open its interface. Click the “Screen Recorder” option given on the main homepage. By doing so, a screen recorder window will open. Here, you can select screen recording modes such as full-screen, target window, or custom. Also, make sure to choose your system’s audio and microphone to proceed.

Step2 Adjust Settings and Start Recording
From Settings, you can also select the quality, frame rate, and color of mouse clicks. Once you have adjusted all the settings properly, hit the “REC” button.

Step3 End the Recording
After the countdown, the screen recording will begin. To stop the recording, you can press the F9 button from your keyboard. After the recording ends, the file will be dropped into the media library of Filmora.

Conclusion
Google Meet is a reliable environment to connect and collaborate with people. To increase your reach and target audience, you can conduct Google Meet live streaming on YouTube. This article has discussed a detailed way through which you can live stream your Google Meet session on your YouTube channel.
To save and access your live streaming sessions later, you can try the screen recorder of Wondershare Filmora . This screen recorder can capture screen and respective audio in high quality.
Free Download For Win 7 or later(64-bit)
Free Download For macOS 10.14 or later
Part 1: Three Things to Check Before Starting Your Live
Before increasing your audience from Google Meet live stream on YouTube, make sure to check the below prerequisites.
1. Available Google Workspace Edition
For Google Meet YouTube live, there are some requirements. The reason is that not every ordinary user of Google Meet can go for YouTube live streaming. To do so, you should buy any of the following pricing plans:
| Google Workspace Pricing Plan | Price |
|---|---|
| Enterprise Starter | Approx. $10/User/Month |
| Enterprise Standard | Approx. $20/User/Month |
| Enterprise Plus | Approx. $30/User/Month |
| Education Plus | Approx. $5/Student/Month |
| Teaching and Learning Upgrade | Approx. $4/License/Month |
| Workspace Individual Subscriber | Approx. $9.9/Month |
| Google One Subscribers with 2 TB or More Storage Space | Approx. $10/Month |
![]()
Note: To know the exact pricing plans of Google Workspace, you have to contact Google Support.
2. Approval of YouTube Channel for Live
To conduct live streaming, you must receive approval from the YouTube channel. For this, you must access your channel’s YouTube Studio to perform the account verification. Now to activate and enable live streaming on your YouTube account, check the following steps:
Step1 Open your YouTube account and click on the “Profile” icon given at the top-right corner. After opening the Profile menu, click on the “YouTube Studio” option.
Step2 A new window will be displayed on your screen. From the left panel, select “Content” among other options. Under the section called “Live,” locate the “Get Started” option. Afterward, tap on the “Request” option and perform the verification steps for enabling live streaming. After 24 hours, you would get approval for live streaming on YouTube. Hence, you would be able to live stream Google Meet meetings through your YouTube channel.
3. Connect your YouTube Channel to Google Meet
Once you get approval for live streaming, you can connect the YouTube channel to your Google Meet account. If the Host Management option is disabled, anyone within the Google Meet session can start live streaming. Conversely, only hosts or co-hosts can begin live streaming if this option is activated. Moreover, the individual who is starting the live stream from Google Meet will get connected to his YouTube channel.
Furthermore, you should use the same email address to enter the Google Meet that is connected to your YouTube account. By using the same email address, you can ensure smooth live streaming of Google Meet sessions to your YouTube channel. Also, you can only use laptops or desktops for initiating live streaming. The reason is that the Google Meet live stream on YouTube is not currently available on mobile devices.
Part 2: How to Live Stream from Google Meet to YouTube
Once you have fulfilled all the requirements, you can start a live stream from Google Meet to YouTube. Check the following steps to execute the process:
Step1 To allow Google Meet sessions to live stream on YouTube, the Google Workspace admin must adjust some settings. To begin, log in to the “Admin Console” on the Workspace administrator account. Now go to “Apps” and access the “Google Workspace” option.
Step2 Afterward, click “Google Meet” and tap on the “Stream” option. Once done, click on the “Pencil” icon to open the Settings menu. Now enable the options “Let People Steam Their Meetings” and “Let People Use YouTube to Stream Meetings.” Once done with the changes, click on the “Save” button.
Step3 Make sure that the Google account attached to your YouTube channel is capable of live streaming. Once done, go to your YouTube channel and tap on the “Create” button. Afterward, hit the “Live” button.
Step4 Now enter your Google Meet session and click on the “Activities” option. From the Activities menu, select “Live Streaming.” Now a small menu will open for live-streaming settings. You can create a new event and add an event title. Make sure to choose the privacy options and desired language. Afterward, click on the “Start Streaming” option.
Step5 A small pop-up will appear that will tell you to remind your participants about live streaming. After reminding, click on the “Start” button. You can see the red “Live” button that will indicate to you the ongoing live-streaming session. Once you have concluded the live streaming by clicking on the “Stop Streaming” button, you can check the video analytics by visiting your YouTube channel.
Bonus Tip: Easily Record your Google Meet Live Stream
Do you want to save your Google Meet live-stream session? The best tool through which you can save your essential live-streaming sessions is Wondershare Filmora Screen Recorder . By using this efficient screen recorder, you can access your saved live streaming session and revise the important points discussed in it.
The screen recorder of Filmora is capable of capturing webcam and screen recording simultaneously. You can select a customized recording area through this tool. For example, you can choose a full screen, a specific window, or a customized area. Furthermore, this screen recording tool can also capture your microphone and system’s sounds in high quality. At the same time, as a powerful video editor, you can edit your videos with various advanced features of Filmora to bring them to the next level. Click the video below to learn more about Filmora’s new features.
Steps to Record Live Streaming Using Filmora Screen Recorder
Are you ready to capture your live-streaming session on Google Meet? Here are the simple and accurate steps to begin the process:
Step1 Open the Screen Recorder
Download Wondershare Filmora and open its interface. Click the “Screen Recorder” option given on the main homepage. By doing so, a screen recorder window will open. Here, you can select screen recording modes such as full-screen, target window, or custom. Also, make sure to choose your system’s audio and microphone to proceed.
Step2 Adjust Settings and Start Recording
From Settings, you can also select the quality, frame rate, and color of mouse clicks. Once you have adjusted all the settings properly, hit the “REC” button.
Step3 End the Recording
After the countdown, the screen recording will begin. To stop the recording, you can press the F9 button from your keyboard. After the recording ends, the file will be dropped into the media library of Filmora.
Conclusion
Google Meet is a reliable environment to connect and collaborate with people. To increase your reach and target audience, you can conduct Google Meet live streaming on YouTube. This article has discussed a detailed way through which you can live stream your Google Meet session on your YouTube channel.
To save and access your live streaming sessions later, you can try the screen recorder of Wondershare Filmora . This screen recorder can capture screen and respective audio in high quality.
Free Download For Win 7 or later(64-bit)
Free Download For macOS 10.14 or later
Elevating YouTube Productions with Effective Video Lighting
How To Light Your YouTube Video

Richard Bennett
Oct 26, 2023• Proven solutions
When it comes to sensitivity to light, no consumer-level camera sensor comes close in performance to the human eye. Many newbies to videography, though, don’t think about this when they use their camera indoors and discover that their recorded footage appears too dark.
If you want to use your camera indoors as many YouTubers do, you’ll need to have extra light. But the solution is not as simple as surrounding yourself with lamps that are all randomly placed.
Below, I’ll go into detail on how you can set up your lighting equipment to make your YouTube videos look good.
| Table of Contents Using Light You Already Have Window LightingHome Lighting Home Studio Lighting Light Control3-Point Lighting4-Point Lighting |
|---|
Part 1: Using Light You Already Have
Most beginner YouTubers light their videos with what they already have. That’s what I did to start as well. In the past, my video recording space consisted of natural sunlight coming from my window and ceiling light for times when the sunlight wasn’t strong enough.
1. Window Lighting
The best thing about window lighting is that it’s free. The worst thing about it is that it’s uncontrollable. The amount of light you get in your video can vary with all the changes in the weather.
Window lighting for me was especially difficult to work with because I live in a very rainy and cloudy city, Vancouver, Canada, where we pretty much just get three months of good sun.

Above are two freeze frames from one of Daniel’s past window-lit vlogs. Although these two frames are both from the same vlog, you can see that the image on the right looks brighter due to clearer skies at that moment. These varying amounts of light is what you will have to deal with if you choose to light your YouTube video with window lighting.
2. Home Lighting
Home lighting is another source of light that many new YouTubers use. In the past, when my window light wasn’t strong enough to light my video recording space, I would turn on the ceiling light.

Notice how the color of Daniel’s skin looks much more orange here (above) than the color of the skin in the two side-by-side window lighting examples? The side of the face also appears to look bluer. This all happened because he mixed up different color temperatures shining out of the two lights (cooler window light and warmer ceiling light).
Most home lighting is warmer in its color temperature. If you want to use your home lights without everything being orange-tinted, you’ll need to switch out your light bulbs for daytime LED light bulbs.
Ceiling lights are also typically situated in the center of a room in order to light an entire room evenly. This is not likely to be the best location for your filming video. Since the ceiling light was directly above the face in the above example, you can see harder shadows beneath his cheeks.
Part 2: Home Studio Lighting
If you rather not deal with all the window and home lighting challenges, you can set up studio lighting in your home.
1. Light Control
The first thing you’ll want to do to set up studio lighting in your home is to pick a room to film in and eliminate as much external lighting as you can. Use blinds, curtains, towels, or any thick fabric to block sunlight from shining into your room.
2. 3-Point Lighting
The most common setup for studio lighting is 3-point lighting. For this kind of lighting you’ll need three lights: a key light, a fill light, and a back light (also called a hair light).

Out of the three lights, the key light should be the brightest. When it is positioned to the left of you (as shown in the diagram above) your right side will have shadows.
To minimize the shadows on your right side, use a weaker light as a fill light. You don’t want your fill light to completely eliminate all your shadows or else your shot will look flat.
Lastly, a backlight positioned behind you can give an appealing highlight to the ends of your head and even help to separate your hair from blending into your background if both happen to be dark.
3. 4-Point Lighting
As a YouTuber, you may not only want yourself to be seen optimally with proper lighting, but you may also want your background to be seen optimally, especially if you’ve taken the time to decorate it for your audience.
What you’ll need to ensure that your background is sufficiently lit is 4-point lighting setup. The 4-point lighting setup is the same as a 3-point lighting setup, but with an additional light shining at your background.
For more information on lighting equipment, check out my Top 17 Video Lighting Equipment For YouTubers .
Touch Up YouTube Videos with Filmora
Filmora is one of the best video editing software for YouTube beginners to start the YouTube channel. So, if you find the lighting isn’t perfect after recording, you can use the Auto Color Enhancement feature in Filmora to adjust the color with one-click. Or, you can change the white balance, Light, color, and HSL manually. Filmora also features some presets and LUTs templates , which allows you to apply pre-programmed effects to video for color correction faster.


Richard Bennett
Richard Bennett is a writer and a lover of all things video.
Follow @Richard Bennett
Richard Bennett
Oct 26, 2023• Proven solutions
When it comes to sensitivity to light, no consumer-level camera sensor comes close in performance to the human eye. Many newbies to videography, though, don’t think about this when they use their camera indoors and discover that their recorded footage appears too dark.
If you want to use your camera indoors as many YouTubers do, you’ll need to have extra light. But the solution is not as simple as surrounding yourself with lamps that are all randomly placed.
Below, I’ll go into detail on how you can set up your lighting equipment to make your YouTube videos look good.
| Table of Contents Using Light You Already Have Window LightingHome Lighting Home Studio Lighting Light Control3-Point Lighting4-Point Lighting |
|---|
Part 1: Using Light You Already Have
Most beginner YouTubers light their videos with what they already have. That’s what I did to start as well. In the past, my video recording space consisted of natural sunlight coming from my window and ceiling light for times when the sunlight wasn’t strong enough.
1. Window Lighting
The best thing about window lighting is that it’s free. The worst thing about it is that it’s uncontrollable. The amount of light you get in your video can vary with all the changes in the weather.
Window lighting for me was especially difficult to work with because I live in a very rainy and cloudy city, Vancouver, Canada, where we pretty much just get three months of good sun.
Above are two freeze frames from one of Daniel’s past window-lit vlogs. Although these two frames are both from the same vlog, you can see that the image on the right looks brighter due to clearer skies at that moment. These varying amounts of light is what you will have to deal with if you choose to light your YouTube video with window lighting.
2. Home Lighting
Home lighting is another source of light that many new YouTubers use. In the past, when my window light wasn’t strong enough to light my video recording space, I would turn on the ceiling light.
Notice how the color of Daniel’s skin looks much more orange here (above) than the color of the skin in the two side-by-side window lighting examples? The side of the face also appears to look bluer. This all happened because he mixed up different color temperatures shining out of the two lights (cooler window light and warmer ceiling light).
Most home lighting is warmer in its color temperature. If you want to use your home lights without everything being orange-tinted, you’ll need to switch out your light bulbs for daytime LED light bulbs.
Ceiling lights are also typically situated in the center of a room in order to light an entire room evenly. This is not likely to be the best location for your filming video. Since the ceiling light was directly above the face in the above example, you can see harder shadows beneath his cheeks.
Part 2: Home Studio Lighting
If you rather not deal with all the window and home lighting challenges, you can set up studio lighting in your home.
1. Light Control
The first thing you’ll want to do to set up studio lighting in your home is to pick a room to film in and eliminate as much external lighting as you can. Use blinds, curtains, towels, or any thick fabric to block sunlight from shining into your room.
2. 3-Point Lighting
The most common setup for studio lighting is 3-point lighting. For this kind of lighting you’ll need three lights: a key light, a fill light, and a back light (also called a hair light).
Out of the three lights, the key light should be the brightest. When it is positioned to the left of you (as shown in the diagram above) your right side will have shadows.
To minimize the shadows on your right side, use a weaker light as a fill light. You don’t want your fill light to completely eliminate all your shadows or else your shot will look flat.
Lastly, a backlight positioned behind you can give an appealing highlight to the ends of your head and even help to separate your hair from blending into your background if both happen to be dark.
3. 4-Point Lighting
As a YouTuber, you may not only want yourself to be seen optimally with proper lighting, but you may also want your background to be seen optimally, especially if you’ve taken the time to decorate it for your audience.
What you’ll need to ensure that your background is sufficiently lit is 4-point lighting setup. The 4-point lighting setup is the same as a 3-point lighting setup, but with an additional light shining at your background.
For more information on lighting equipment, check out my Top 17 Video Lighting Equipment For YouTubers .
Touch Up YouTube Videos with Filmora
Filmora is one of the best video editing software for YouTube beginners to start the YouTube channel. So, if you find the lighting isn’t perfect after recording, you can use the Auto Color Enhancement feature in Filmora to adjust the color with one-click. Or, you can change the white balance, Light, color, and HSL manually. Filmora also features some presets and LUTs templates , which allows you to apply pre-programmed effects to video for color correction faster.
Richard Bennett
Richard Bennett is a writer and a lover of all things video.
Follow @Richard Bennett
Also read:
- [New] Charting the Peak #1 Shorter Videos Downloader Hub
- [Updated] 2024 Approved YouTube Studio Editor Unveiled Ultimate Editing Companion
- [Updated] Bite-Sized Tips for Aspiring Video Editors
- [Updated] Designing Youtube Ads That Grab Attention A Compreeher Guide
- [Updated] DIY YouTube Trailer Production via Filmora Software
- 1. How to Fix: Auto-Deletion of Files by Windows Defender
- 2024 Approved Discover the Top 3 Alternative Video Portals
- Creating Unique YouTube Music Mixtapes
- In 2024, Navigating the Landscape of Digital Grading Tools
- New In 2024, Best Text-to-Audio Converters of All Times
- The Best Android SIM Unlock Code Generators Unlock Your Sony Xperia 10 V Phone Hassle-Free
- Webcam-Powered Recording Revolutionize Your PPTs for 2024
- Title: Become an Expert at YouTube Live Streams with Google Meet for 2024
- Author: Steven
- Created at : 2025-02-16 16:59:36
- Updated at : 2025-02-20 16:10:37
- Link: https://youtube-clips.techidaily.com/become-an-expert-at-youtube-live-streams-with-google-meet-for-2024/
- License: This work is licensed under CC BY-NC-SA 4.0.