
:max_bytes(150000):strip_icc()/183817512-56a1044a3df78cafdaa7de62.jpg)
"ASMR Gurus Recommend Best Microphones Reviewed"
ASMR Gurus Recommend: Best Microphones Reviewed
Best ASMR Microphones

Richard Bennett
Mar 27, 2024• Proven solutions
ASMR can be triggered by visual, audio, and tactile stimuli, which is the reason why most YouTubers who produce this type of content dedicate a lot of attention to the image and sound quality.
Furthermore, the vast majority of ASMR videos you can find on YouTube utilizes audio triggers to spark the autonomous sensory meridian response in one form or the other. Consequently, the quality of the audio recording determines whether or not your videos will be able to trigger ASMR. That’s why we selected some of the ASMR microphones novice and seasoned YouTubers can use to record the audio for their ASMR YouTube videos.
Part 1: Which Features Should an ASMR Microphone Have?
Thinking that you can use any microphone you can lay your hands on to record sound for you ASMR videos is a mistake, because the quality of the recording may not be at a satisfactory level if your microphone is producing a lot of self-noise or if it is not able to pick up soft noises.
Let’s take a closer look at the features and ASMR microphone should have.
1. The mic’s source of power
A microphone can draw power from two sources, as you can either connect it to a computer via a USB cable or you can use an XLR cable to connect the device to an external power source.
The so-called Phantom Power can be any type of adapter or audio recorder that supplies a microphone with power. All professional condenser microphones are connected to a power source through an XLR connection although some mics can have a built-in phantom power source that requires only an AA battery to function normally.
2. The microphone’s recording direction
Although there are a number of direction categories of microphones, ASMR content produces commonly use Omnidirectional and Binaural mics.
As its name suggests, an omnidirectional microphone can pick up sounds from all sides, which makes it a good option if you want to record ambient sounds like brushing or tapping. However, you should also keep in mind that this type of microphone can capture background noises which may impact the overall quality of the recording.
The binaural mics are composed of two microphones are used to record the left and right channel separately. You don’t necessarily have to get a binaural microphone in order to create a binaural audio recording since you can just use two different microphones to record the left and right channels individually.
3. The level of self-noise a microphone makes
Recording low sounds can be challenging if your microphone is creating humming or crackling noises automatically. The so-called self-noise level a microphone makes is quantified in A-weighted decibels, and ideally, you should get a mic that makes around 15dBA in order to keep sounds a microphone produces automatically at the very minimum.
Besides the self-noise, you should also look into S/N (Signal to Noise Ratio) that depicts the ratio of signal power to noise power. A mic that has approximately 80dBA or more should enable you to record low voices without having to worry about the unwanted noises.
Part 2: What Are The Best Budget ASMR Microphones for Beginners?
If you are thinking about starting an ASMR YouTube channel, you don’t have to get a professional microphone right away, because there lots of affordable mics that will enable you to create crystal-clear audio recordings.
We’ve shortlisted a few of the best budget ASMR microphones for beginners on the market with the aim to help you narrow down your choices. Here’s what they have to offer.
1. Tascam DR-05X Stereo Handheld Digital Recorder
Price: $89.99
This versatile digital recorder can be used for different purposes that range from capturing audio for podcasts to recording your personal notes. The Tascam DR-05X is equipped with a pair of dual condenser microphones that enable you to record low or high sounds with the same level of efficiency.
The device is powered by two AA batteries and it can record for almost 18 hours continually before you have to change the batteries. The Tascam DR-05X’s interface is intuitive which allows you to adjust audio levels, delete a take you didn’t like, or add markers to a recording effortlessly.
What’s more, this handheld digital recorder has a USB port which enables you to connect it to a computer and use it to record audio during live streams or while creating a new ASMR video for your YouTube channel. Nonetheless, this omnidirectional digital recorder doesn’t have an XLR jack and you can’t use it to capture sound from professional microphones.
2. Blue Yeti USB Microphone
Price: $129.99
Arguably the most popular microphone within YouTube’s ASMR community Blue Yeti USB microphone is a versatile mic you can use to record ambient sounds and vocals. The microphone has three condenser capsules which enables you to record audio with it in a broad range of different contexts.
In addition, you can switch between stereo, omnidirectional, cardioid, and bidirectional pattern modes and choose the direction from which the microphone is going to pick up sounds. Blue Yeti has the 20 Hz to 20 kHz frequency response and it features the mute and gain buttons so that you can quickly adjust this value even if you are still recording.
The mic’s signal to noise ratio is 100dBA which means that it produces a minimum amount of noises while you’re recording low sounds. You can use this mic on Windows XP and all other later versions of the OS as well as macOS X or higher.
3. Zoom H4N Pro
Price: $218.99
Yet another digital recorder that is frequently used to capture the audio for ASMR videos. Zoom H4N Pro is equipped with x/Y stereo microphones capable of recording audio at 140dBA SPA and it offers the possibility to record sound on four channels.
What’s more, this device enables you to create 24-bit audio files that can have up to 96kHz, while its output level is set to -10dBu. Zoom H4N Pro has two XLR/TRS jacks that are equipped with locking connectors as well as a 400 W monaural speaker.
Besides connecting XLR microphones to this digital recorder, you can also connect the device to your computer or a Smartphone through its USB port. The device supports SD cards that have up to 32GB of storage space, which means that you can record hours of audio without having to worry about the size of these files.
4. Blue Microphones Baby Bottle SL Large-Diaphragm Condenser Microphone
Price: $399.99
Music industry professionals have been using microphones manufactured by Blue Microphones for decades, which is why it is hardly surprising that their Baby Bottle mic is one of the best ASMR microphones on the market.
This is a cardioid microphone that utilizes the pressure gradient to pick up sounds from all directions. In addition, the device has a large-diaphragm capsule that enables it to produce sounds that are clear and rich in detail.
Moreover, this model has a high pass filter and -20dBA pad that ensures you can record high and soft sounds with the same level of quality. The noise level of this USB microphone is 87dbA which means that it doesn’t create humming sounds while it is recording low sounds. In addition, the microphone’s vintage design makes it a trendy option for all ASMR video content creators in search of a powerful and esthetically pleasing microphone.
Part 3: Which High-End ASMR Mics You Should Try?
As your ASMR YouTube channel grows, the quality of the audio recordings you create is becoming increasingly important, because it impacts the overall quality of the content you’re sharing with your followers.
In case you’re looking for a microphone that is going to improve the quality of your audio recordings you should check out the mics below.
1. Rode NT1-A Stereo Vocal Condenser Microphone
Price: $439.00
Rode is probably the most famous microphone manufacturer in the world, as the company produced some of the best mics ever created. Their NT1-A Stereo Vocal Condenser Microphone features a 1’’ capsule that contains a gold plated diaphragm. The mic has a cardioid polar pattern and its maximum SPL capability cannot exceed 137dBSPL.
Moreover, you can pair two of the NT1-A microphones if you want to create a stereo or binaural recordings. This Rode’s model has a noise level of just 5dB, which makes it one of the best studio microphones on the market.
This mic requires one A battery to function, and it only has an XRL jack, which means that you cannot connect it to a computer via a USB cable. Although its price may seem a bit steep, the audio quality this microphone can produce more than justifies the high cost.
2. 3Dio FS Pro II
Price: $2, 057.88
In case you want to record your ASMR videos with a microphone that meets the highest industry standards, then 3Dio FS Pro II is one of the best choices you have at your disposal. The microphone has the shape of human ears and like all omnidirectional microphones, it can pick up sounds from all directions.
This model has two XLR jacks and a 3.5mm stereo output jack so that you can connect it to a 16-channel mixer or different types of audio recording devices. 3Dio FS Pro II needs 48 V to run normally and it uses 1.9 V batteries that can provide you with up 300 hours of recording time.
The microphone is designed to imitate the way human beings hear by preserving the direction from which the sound came. This means that the listeners of your ASMR recordings are going to be able to detect the direction from which the sounds are coming from.
We’ve summarized the key features of the mics mentioned above for helping you making a quick decision.
| Product name | Polar Pattern | Self-noise / S/N ratio | Power Source type | Best for | Price |
|---|---|---|---|---|---|
| Tascam DR-05X | Stereo, omnidirectional | 92dB | USB | Whispers and low sounds | $89.99 |
| Blue Yeti | Bidirectional, omnidirectional, cardioid, stereo | 100dB | USB | Low and high sounds | $129.99 |
| Zoom H4N Pro | Stereo, omnidirectional | 140dB | USB | Whispers and ambient sounds | $218.99 |
| Blue Microphones Baby Bottle SL Large-Diaphragm Condenser Microphone | Cardioid | 87dB | Phantom power | Whispers and ambient sounds | $399.99 |
| Rode NT1-A Stereo | Cardioid or binaural | 5dB | Phantom power | Ambient sounds and voice recordings | $439.00 |
| 3Dio FS Pro II | Binaural, omnidirectional | 14dB | Phantom power | Ambient sounds and voice recordings | $2, 057.88 |
Part 4: Frequently Asked Questions About ASMR Microphones
1. Should I use a USB or XLR microphone for ASMR recordings?
Although both USB and XLR microphones are frequently used to capture ASMR recordings, and XLR microphone produces a much better sound quality. So, if you want to prioritize the audio quality you should record all your ASMR videos with an XLR microphone.
However, there are quite a few affordable USB mics on the market that will enable you to capture sound in decent quality at a relatively low price.
2. Which type of microphone should be used to record ASMR sounds?
Condenser microphones are a much better option than the dynamic mics because they pick up soft sounds easily. Also, getting an XLR mic is usually a better choice than opting for a USB mic.
3. Is an omnidirectional microphone better for ASMR than the binaural mic?
The answer to this question depends on the type of ASMR video you want to create. If it is important for you to capture tapping or scratching sounds from all sides then you should choose an omnidirectional microphone.
A binaural mic will enable you to create a more immersive audio recording, but they are also more expensive.
Conclusion
In the world of video production, the quality of your equipment often determines how good the final product is going to be. That’s why a good microphone is one of the essential items for an ASMR artist.
Finding a good microphone you can use to record ASMR sounds shouldn’t be too difficult, because you can get a high-quality option in different price tiers. If you are on a budget, then a microphone like Blue Yeti may be a great choice, because it lets you choose between different polar patterns and it produces a great quality of sound.
On the other hand, 3Dio FS Pro II or Rode NT1-A Stereo microphones are worth investing in because they will enable you to record sound at a professional level.
Richard Bennett
Richard Bennett is a writer and a lover of all things video.
Follow @Richard Bennett
Richard Bennett
Mar 27, 2024• Proven solutions
ASMR can be triggered by visual, audio, and tactile stimuli, which is the reason why most YouTubers who produce this type of content dedicate a lot of attention to the image and sound quality.
Furthermore, the vast majority of ASMR videos you can find on YouTube utilizes audio triggers to spark the autonomous sensory meridian response in one form or the other. Consequently, the quality of the audio recording determines whether or not your videos will be able to trigger ASMR. That’s why we selected some of the ASMR microphones novice and seasoned YouTubers can use to record the audio for their ASMR YouTube videos.
Part 1: Which Features Should an ASMR Microphone Have?
Thinking that you can use any microphone you can lay your hands on to record sound for you ASMR videos is a mistake, because the quality of the recording may not be at a satisfactory level if your microphone is producing a lot of self-noise or if it is not able to pick up soft noises.
Let’s take a closer look at the features and ASMR microphone should have.
1. The mic’s source of power
A microphone can draw power from two sources, as you can either connect it to a computer via a USB cable or you can use an XLR cable to connect the device to an external power source.
The so-called Phantom Power can be any type of adapter or audio recorder that supplies a microphone with power. All professional condenser microphones are connected to a power source through an XLR connection although some mics can have a built-in phantom power source that requires only an AA battery to function normally.
2. The microphone’s recording direction
Although there are a number of direction categories of microphones, ASMR content produces commonly use Omnidirectional and Binaural mics.
As its name suggests, an omnidirectional microphone can pick up sounds from all sides, which makes it a good option if you want to record ambient sounds like brushing or tapping. However, you should also keep in mind that this type of microphone can capture background noises which may impact the overall quality of the recording.
The binaural mics are composed of two microphones are used to record the left and right channel separately. You don’t necessarily have to get a binaural microphone in order to create a binaural audio recording since you can just use two different microphones to record the left and right channels individually.
3. The level of self-noise a microphone makes
Recording low sounds can be challenging if your microphone is creating humming or crackling noises automatically. The so-called self-noise level a microphone makes is quantified in A-weighted decibels, and ideally, you should get a mic that makes around 15dBA in order to keep sounds a microphone produces automatically at the very minimum.
Besides the self-noise, you should also look into S/N (Signal to Noise Ratio) that depicts the ratio of signal power to noise power. A mic that has approximately 80dBA or more should enable you to record low voices without having to worry about the unwanted noises.
Part 2: What Are The Best Budget ASMR Microphones for Beginners?
If you are thinking about starting an ASMR YouTube channel, you don’t have to get a professional microphone right away, because there lots of affordable mics that will enable you to create crystal-clear audio recordings.
We’ve shortlisted a few of the best budget ASMR microphones for beginners on the market with the aim to help you narrow down your choices. Here’s what they have to offer.
1. Tascam DR-05X Stereo Handheld Digital Recorder
Price: $89.99
This versatile digital recorder can be used for different purposes that range from capturing audio for podcasts to recording your personal notes. The Tascam DR-05X is equipped with a pair of dual condenser microphones that enable you to record low or high sounds with the same level of efficiency.
The device is powered by two AA batteries and it can record for almost 18 hours continually before you have to change the batteries. The Tascam DR-05X’s interface is intuitive which allows you to adjust audio levels, delete a take you didn’t like, or add markers to a recording effortlessly.
What’s more, this handheld digital recorder has a USB port which enables you to connect it to a computer and use it to record audio during live streams or while creating a new ASMR video for your YouTube channel. Nonetheless, this omnidirectional digital recorder doesn’t have an XLR jack and you can’t use it to capture sound from professional microphones.
2. Blue Yeti USB Microphone
Price: $129.99
Arguably the most popular microphone within YouTube’s ASMR community Blue Yeti USB microphone is a versatile mic you can use to record ambient sounds and vocals. The microphone has three condenser capsules which enables you to record audio with it in a broad range of different contexts.
In addition, you can switch between stereo, omnidirectional, cardioid, and bidirectional pattern modes and choose the direction from which the microphone is going to pick up sounds. Blue Yeti has the 20 Hz to 20 kHz frequency response and it features the mute and gain buttons so that you can quickly adjust this value even if you are still recording.
The mic’s signal to noise ratio is 100dBA which means that it produces a minimum amount of noises while you’re recording low sounds. You can use this mic on Windows XP and all other later versions of the OS as well as macOS X or higher.
3. Zoom H4N Pro
Price: $218.99
Yet another digital recorder that is frequently used to capture the audio for ASMR videos. Zoom H4N Pro is equipped with x/Y stereo microphones capable of recording audio at 140dBA SPA and it offers the possibility to record sound on four channels.
What’s more, this device enables you to create 24-bit audio files that can have up to 96kHz, while its output level is set to -10dBu. Zoom H4N Pro has two XLR/TRS jacks that are equipped with locking connectors as well as a 400 W monaural speaker.
Besides connecting XLR microphones to this digital recorder, you can also connect the device to your computer or a Smartphone through its USB port. The device supports SD cards that have up to 32GB of storage space, which means that you can record hours of audio without having to worry about the size of these files.
4. Blue Microphones Baby Bottle SL Large-Diaphragm Condenser Microphone
Price: $399.99
Music industry professionals have been using microphones manufactured by Blue Microphones for decades, which is why it is hardly surprising that their Baby Bottle mic is one of the best ASMR microphones on the market.
This is a cardioid microphone that utilizes the pressure gradient to pick up sounds from all directions. In addition, the device has a large-diaphragm capsule that enables it to produce sounds that are clear and rich in detail.
Moreover, this model has a high pass filter and -20dBA pad that ensures you can record high and soft sounds with the same level of quality. The noise level of this USB microphone is 87dbA which means that it doesn’t create humming sounds while it is recording low sounds. In addition, the microphone’s vintage design makes it a trendy option for all ASMR video content creators in search of a powerful and esthetically pleasing microphone.
Part 3: Which High-End ASMR Mics You Should Try?
As your ASMR YouTube channel grows, the quality of the audio recordings you create is becoming increasingly important, because it impacts the overall quality of the content you’re sharing with your followers.
In case you’re looking for a microphone that is going to improve the quality of your audio recordings you should check out the mics below.
1. Rode NT1-A Stereo Vocal Condenser Microphone
Price: $439.00
Rode is probably the most famous microphone manufacturer in the world, as the company produced some of the best mics ever created. Their NT1-A Stereo Vocal Condenser Microphone features a 1’’ capsule that contains a gold plated diaphragm. The mic has a cardioid polar pattern and its maximum SPL capability cannot exceed 137dBSPL.
Moreover, you can pair two of the NT1-A microphones if you want to create a stereo or binaural recordings. This Rode’s model has a noise level of just 5dB, which makes it one of the best studio microphones on the market.
This mic requires one A battery to function, and it only has an XRL jack, which means that you cannot connect it to a computer via a USB cable. Although its price may seem a bit steep, the audio quality this microphone can produce more than justifies the high cost.
2. 3Dio FS Pro II
Price: $2, 057.88
In case you want to record your ASMR videos with a microphone that meets the highest industry standards, then 3Dio FS Pro II is one of the best choices you have at your disposal. The microphone has the shape of human ears and like all omnidirectional microphones, it can pick up sounds from all directions.
This model has two XLR jacks and a 3.5mm stereo output jack so that you can connect it to a 16-channel mixer or different types of audio recording devices. 3Dio FS Pro II needs 48 V to run normally and it uses 1.9 V batteries that can provide you with up 300 hours of recording time.
The microphone is designed to imitate the way human beings hear by preserving the direction from which the sound came. This means that the listeners of your ASMR recordings are going to be able to detect the direction from which the sounds are coming from.
We’ve summarized the key features of the mics mentioned above for helping you making a quick decision.
| Product name | Polar Pattern | Self-noise / S/N ratio | Power Source type | Best for | Price |
|---|---|---|---|---|---|
| Tascam DR-05X | Stereo, omnidirectional | 92dB | USB | Whispers and low sounds | $89.99 |
| Blue Yeti | Bidirectional, omnidirectional, cardioid, stereo | 100dB | USB | Low and high sounds | $129.99 |
| Zoom H4N Pro | Stereo, omnidirectional | 140dB | USB | Whispers and ambient sounds | $218.99 |
| Blue Microphones Baby Bottle SL Large-Diaphragm Condenser Microphone | Cardioid | 87dB | Phantom power | Whispers and ambient sounds | $399.99 |
| Rode NT1-A Stereo | Cardioid or binaural | 5dB | Phantom power | Ambient sounds and voice recordings | $439.00 |
| 3Dio FS Pro II | Binaural, omnidirectional | 14dB | Phantom power | Ambient sounds and voice recordings | $2, 057.88 |
Part 4: Frequently Asked Questions About ASMR Microphones
1. Should I use a USB or XLR microphone for ASMR recordings?
Although both USB and XLR microphones are frequently used to capture ASMR recordings, and XLR microphone produces a much better sound quality. So, if you want to prioritize the audio quality you should record all your ASMR videos with an XLR microphone.
However, there are quite a few affordable USB mics on the market that will enable you to capture sound in decent quality at a relatively low price.
2. Which type of microphone should be used to record ASMR sounds?
Condenser microphones are a much better option than the dynamic mics because they pick up soft sounds easily. Also, getting an XLR mic is usually a better choice than opting for a USB mic.
3. Is an omnidirectional microphone better for ASMR than the binaural mic?
The answer to this question depends on the type of ASMR video you want to create. If it is important for you to capture tapping or scratching sounds from all sides then you should choose an omnidirectional microphone.
A binaural mic will enable you to create a more immersive audio recording, but they are also more expensive.
Conclusion
In the world of video production, the quality of your equipment often determines how good the final product is going to be. That’s why a good microphone is one of the essential items for an ASMR artist.
Finding a good microphone you can use to record ASMR sounds shouldn’t be too difficult, because you can get a high-quality option in different price tiers. If you are on a budget, then a microphone like Blue Yeti may be a great choice, because it lets you choose between different polar patterns and it produces a great quality of sound.
On the other hand, 3Dio FS Pro II or Rode NT1-A Stereo microphones are worth investing in because they will enable you to record sound at a professional level.
Richard Bennett
Richard Bennett is a writer and a lover of all things video.
Follow @Richard Bennett
Ultimate Screenshot Tools for YouTube Live Sharing
Best YouTube Livestreaming Screen Recorders
Richard Bennett
Oct 26, 2023• Proven solutions
The global pandemic has changed the way we live for the time being, and right now, we cannot attend events in the same way we did at the beginning of the year.
A growing number of cultural organizations, businesses, and influential YouTubers are turning towards YouTube’s Live feature because it provides a simple way of broadcasting different types of content in real-time. YouTube Live is by no means a new option, since the platform first introduced live streaming features in 2008, and some twelve years later, the feature has never been more popular.
However, the live streams you broadcast on YouTube are stored for just a brief period of time, which means you have to search for alternative methods of saving them. That’s why in this article we are going to take you through the best YouTube Live screen recorders you can use to capture the video content you are sharing with your followers.
Note: We resolutely oppose all forms of copyright-infringing downloads. This tutorial is only for downloading YouTube videos/audio materials from your own channel.
Top 10+ YouTube Live Screen Recorders
The maximum resolution in which you can record computer screen , audio recording options, or customization of the recording area are some of the most important features you need to consider while choosing a YouTube Live screen recorder.
We have selected some of the best YouTube Live screen recorders that enable you to do much more than just record live streams. So, let’s take a look at what they have to offer.
1. OBS Studio
Price: Free
Compatibility: Windows, Linux, macOS
The vast majority of live streams you can find on Twitch and YouTube are made with OBS Studio, but besides broadcasting videos, the software also gives you access to screencasting tools. This means that you can specify the area of the screen you want to record, choose the recording’s resolution and frame rate, or adjust the audio recording options.
OBS Studio is the best free, open-source screen recording program you can download. You shouldn’t use a software just because it’s free, but OBS Studio is also an extremely versatile tool. You can both record and stream in high definition and it comes with the ability to record either through your webcam or through your screen. It records directly through the graphics card , which means it can capture games even when in full-screen mode whereas a lot of other screen-recording software forces you to play games in windowed mode. The high quality can be seen easily in whatever you choose to broadcast.
OBS Studio allows you to record videos from a variety of sources, which makes it a perfect option for capturing the content you share through YouTube Live since you can select a browser window you want to capture in just a few clicks. What’s more, this open-source software is equipped with basic video editing tools, which enables you to preview the video you recorded before publishing it, apply transitions between cuts, or perform basic color correction.
Check the detailed guide to How to Record with OBS .
2. XSplit
Price: $24.95 for a three-month license
Compatibility: Windows
This is yet another broadcasting software that is equipped with powerful screen recording tools. Setting up a new screencasting session with XSplit is a simple and intuitive process that is not going to take much more than a few moments of your time.
All you need to do is define a workspace, then pick the preferred resolution and frame rate. The software allows you to capture screens in 4K resolution and at 60 fps, but it also offers a variety of resolution and frame rate options so that you can choose the one that best fits your needs. Furthermore, you can record the computer audio, which enables you to capture the live stream’s audio in excellent quality. Besides YouTube Live, XSplit can be used with Zoom , Skype, Google Hangouts, and numerous other live streaming and video calling apps.
3. Filmora
Price: Free, pricing plans start at $49.99/year
Compatibility: macOS, Windows


If you are looking for a screen recorder that is stacked with powerful video editing features, then Filmora is a great option for you. Customizing a YouTube Live or any other screencasting session with this video editing software is easy, and you can choose the resolution, frame rate, or even if you want to show mouse clicks in the recording.
Capturing the webcam feed and the computer’s screen simultaneously is also an option, while you can also decide whether or not you want to record audio from a microphone, computer audio, or both at the same time.
What’s more Filmora lets you set up the maximum duration of a screen recording and you start, pause, resume or stop a screen recording session by using hotkeys. Once you are done recording the live stream you shared on YouTube, you can edit the footage you created before uploading it to your YouTube channel.
4. Wondershare DemoCreator
Compatibility: Windows
Price: Start from $9.99
DemoCreator is a recorder that focuses its overall user experience. It is able to easily record high-quality videos at up to 120 FPS (60 FPS for Mac) and allows you to simultaneously record both your screen and webcam. This software is incredibly user friendly and makes for an easy experience for new streamers. The dual recording makes it great for gamers who are also looking to film their reactions.
5. CloudApp
Price: Free, $10 per month for an individual user
Compatibility: Windows, macOS, Linux, Chrome
Starting a new screen capturing session with the CloudApp requires you to just specify the portion of the screen you want to capture and hit the record button. Moreover, you can choose if you want to record with or without a webcam and you have the option to enable or disable the audio recording option.
However, you can only create 90-second screen recordings with the free version of the CloudApp and you cannot set resolution or frame rate of the recording. That’s why you need to upgrade to the Pro version if you want to use it to record live streams on YouTube. The Pro subscription model also grants you access to basic video editing tools and a variety of file sharing options. In addition, CloudApp lets you create and annotate still images and GIFs, which makes it a great option for digital marketers.
6. Techsmith Camtasia
Price: Free trial, $269.05 one-time fee
Compatibility: Windows, macOS
You don’t need years of video editing experience to start a new screen recording session in Camtasia. In fact, you just have to click on the Record button that is located in the software’s tool panel and then customize the settings.
Camtasia lets you choose if you want to record the full screen or just a selected portion of the screen or decide if you want to switch the webcam or the microphone off. You should make sure that the System Audio feature is enabled in order to record the sound of the live stream you’re sharing on YouTube. Pausing or stopping a screencasting session requires you to either click on the appropriate buttons or use the keyboard-based hotkeys. After you are done recording a live stream you can edit the footage using Camtasia’s video editing tools.
7. ScreenRec
Price: Free
Compatibility: Windows, macOS, Linux
Recording any live stream or TV show you play on your computer with ScreenRec is a straightforward process that can be completed in just a few clicks. Simply drag the mouse cursor over the area you want to record, then hit the Record button when you are ready and ScreenRec will start capturing the computer screen.
Once the screencasting session is completed you will get a sharable link that can be embedded to a website or used to save an MP4 file on your hard drive. Furthermore, ScreenRec is equipped with analytics tools that show you how many views your videos attracted or for how long each visitor watched them. All of these features make ScreenRec an excellent option for anyone who wants to record a live stream on YouTube or any other on-screen activity.
8. Flashback Express
Price: Free
Compatibility: Windows
Flashback Express is a simple screen recorder that lets you create high-res videos effortlessly. Setting up a new screencasting session requires you to just specify the area of the screen you want to record, choose whether or not you want to record the webcam feed and hit the Record button.
There are no restrictions in terms of the duration of screen recordings you can make with Flashback Express and the software doesn’t watermark the video you create.
However, you can only save the files in MP4, AVI, or WMW formats and you cannot adjust the video’s frame rate or resolution. What’s more, editing videos or applying effects with Flashback Express isn’t possible and you must upgrade to FlashBack Pro if you want to edit the live streams you broadcast on YouTube.
This piece of software is user friendly, but it doesn’t have as many features as other products on the market. Having said that, it is still an excellent tool that will help you live stream gameplay easily. Although it doesn’t come with built-in video editing software, it is possible to download another program to do this for you (i.e. Filmora). Flashback Express has the ability to record through your headset or microphone as well.
9. VLC
Price: Free
Compatibility: macOS, Linux, Windows
This is an iconic media player that became famous for its versatility and support for nearly all video file formats. Besides being one of the best media players ever created, VLC is also equipped with screen recording and video editing tools.
In order to start a new screencasting session, you will have to go to the Media menu and then select the Open Capture Device option. Once the new window pops up on the screen you should change the Capture Mode to Desktop and then adjust the frame rate in accordance with your needs.
Click on the Play button, and then hit the Record button after the screen recording window appears on the screen. You can only record the entire screen with VLC, since customizing the recording area isn’t an option, and all your files will be captured in the RAW format which means that you may have to resize them before you upload them to YouTube.
10. Screencast-o-matic
Price: Free, pricing options start at $1.65 per month
Compatibility: macOS, Windows
As its name suggests, this software product makes the screen recording process almost automatic. You can choose if you want to record an entire screen or just a window you selected. In addition, Screencast-o-matic lets you record the desktop and webcam footage at the same time, and you can even zoom in while the screencasting session is still in progress.
The free version of the software offers only a basic set of features that doesn’t include the option to record system audio. This means that you have to opt for one of the available subscription models if you want to record your live streams on YouTube with Screencast-o-matic. What’s more, you will be to create videos that are longer than 15 minutes, create recordings without watermarks or add music to your recordings if you opt for Deluxe or Premiere pricing options.
11. QuickTime Player
Price: Free
Compatibility: macOS, Windows
Mac users who want to record content that is broadcasted via YouTube Live can do so without having to install a third-party app. Apple ceased the support for the Windows-based version of QuickTime Player in 2016 and PC users can only capture their screens with this software if they have some of its earlier versions.
In order to start a new screen recording session in QuickTime Player, you just have to go to the File menu and select the New Screen Recording option. The Screen Recording window where you can choose if you want to record audio or show mouse click in the recording will pop up on the screen. QuickTime Player lets you choose if you want to capture the entire screen or just a portion of it, and you can click on the Record button to start a new screencasting session. In order to save a video file you created, you just have to go to the File menu and pick the Save option.
How to Record a YouTube Live Stream with Filmora
Recording a YouTube Live stream with Filmora is easy even if you never went through this process before. You can set up a new screencasting session in just a few easy steps that won’t take more than a few moments to complete. Here’s what you need to do:
Step 1: Launch Filmora and create a new project. Go to the Media tab once the video editor’s main window loads and click on the Record drop-down menu that is located next to the Import drop-down menu.
Choose the Record PC Screen option and then proceed to customize the settings for your screencasting session.

Step 2: Click on the Rectangular icon in the upper left corner of the Wondershare Filmora Scrn window and choose either Full Screen, Custom, or Target Window option, depending on how you want to record a YouTube Live stream to define the area of the screen that is going to be recorded.
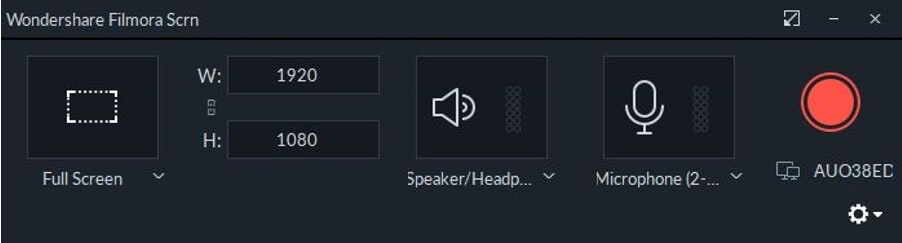
You can then proceed to insert the resolution your screen recording is going to have, and choose if you want to record system audio and sound from an external microphone.
Step 3: Click on the Gear icon below the Record button to gain access to additional settings, and then proceed to set the frame rate, adjust the video’s quality or activate the Show Mouse Clicks in Recording option.
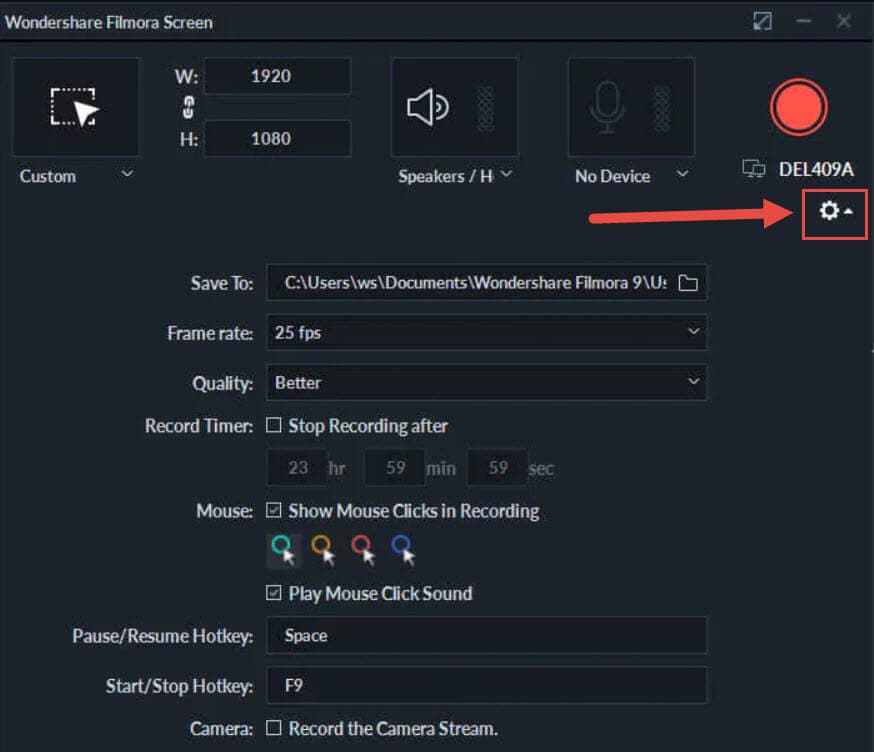
Make sure that the checkbox next to the Record the Camera Stream is marked if you want to record webcam feed and computer desktop at the same time.
Step 4: Press the red Record button in the upper right corner of the window and jump to the live stream. Once the broadcast is completed, you should click on the Stop button and use Filmora’s editing tools to remove all imperfections from the recording.
Filmora allows you to export all of your projects directly to your YouTube channel immediately after the rendering process is completed.
Frequently Asked Questions about YouTube Live Screen Recorders
1. Does YouTube Save Live Videos?
Stream Now, Mobile, Webcam, and Events streams can be stored automatically for 12 hours after they end. You can access all of your live streams by clicking on the Videos menu in the YouTube Studio and selecting the Live option and then change the Privacy setting in the Visibility menu.
2. How to use YouTube to Archive a Live Stream?
Once the live stream ends, you should go to the Dashboard and click on the Live feature, and then choose the Stream option. Check the Make Archive Unlisted When Complete checkbox and the live stream video will be saved accordingly.
Richard Bennett
Richard Bennett is a writer and a lover of all things video.
Follow @Richard Bennett
Richard Bennett
Oct 26, 2023• Proven solutions
The global pandemic has changed the way we live for the time being, and right now, we cannot attend events in the same way we did at the beginning of the year.
A growing number of cultural organizations, businesses, and influential YouTubers are turning towards YouTube’s Live feature because it provides a simple way of broadcasting different types of content in real-time. YouTube Live is by no means a new option, since the platform first introduced live streaming features in 2008, and some twelve years later, the feature has never been more popular.
However, the live streams you broadcast on YouTube are stored for just a brief period of time, which means you have to search for alternative methods of saving them. That’s why in this article we are going to take you through the best YouTube Live screen recorders you can use to capture the video content you are sharing with your followers.
Note: We resolutely oppose all forms of copyright-infringing downloads. This tutorial is only for downloading YouTube videos/audio materials from your own channel.
Top 10+ YouTube Live Screen Recorders
The maximum resolution in which you can record computer screen , audio recording options, or customization of the recording area are some of the most important features you need to consider while choosing a YouTube Live screen recorder.
We have selected some of the best YouTube Live screen recorders that enable you to do much more than just record live streams. So, let’s take a look at what they have to offer.
1. OBS Studio
Price: Free
Compatibility: Windows, Linux, macOS
The vast majority of live streams you can find on Twitch and YouTube are made with OBS Studio, but besides broadcasting videos, the software also gives you access to screencasting tools. This means that you can specify the area of the screen you want to record, choose the recording’s resolution and frame rate, or adjust the audio recording options.
OBS Studio is the best free, open-source screen recording program you can download. You shouldn’t use a software just because it’s free, but OBS Studio is also an extremely versatile tool. You can both record and stream in high definition and it comes with the ability to record either through your webcam or through your screen. It records directly through the graphics card , which means it can capture games even when in full-screen mode whereas a lot of other screen-recording software forces you to play games in windowed mode. The high quality can be seen easily in whatever you choose to broadcast.
OBS Studio allows you to record videos from a variety of sources, which makes it a perfect option for capturing the content you share through YouTube Live since you can select a browser window you want to capture in just a few clicks. What’s more, this open-source software is equipped with basic video editing tools, which enables you to preview the video you recorded before publishing it, apply transitions between cuts, or perform basic color correction.
Check the detailed guide to How to Record with OBS .
2. XSplit
Price: $24.95 for a three-month license
Compatibility: Windows
This is yet another broadcasting software that is equipped with powerful screen recording tools. Setting up a new screencasting session with XSplit is a simple and intuitive process that is not going to take much more than a few moments of your time.
All you need to do is define a workspace, then pick the preferred resolution and frame rate. The software allows you to capture screens in 4K resolution and at 60 fps, but it also offers a variety of resolution and frame rate options so that you can choose the one that best fits your needs. Furthermore, you can record the computer audio, which enables you to capture the live stream’s audio in excellent quality. Besides YouTube Live, XSplit can be used with Zoom , Skype, Google Hangouts, and numerous other live streaming and video calling apps.
3. Filmora
Price: Free, pricing plans start at $49.99/year
Compatibility: macOS, Windows
If you are looking for a screen recorder that is stacked with powerful video editing features, then Filmora is a great option for you. Customizing a YouTube Live or any other screencasting session with this video editing software is easy, and you can choose the resolution, frame rate, or even if you want to show mouse clicks in the recording.
Capturing the webcam feed and the computer’s screen simultaneously is also an option, while you can also decide whether or not you want to record audio from a microphone, computer audio, or both at the same time.
What’s more Filmora lets you set up the maximum duration of a screen recording and you start, pause, resume or stop a screen recording session by using hotkeys. Once you are done recording the live stream you shared on YouTube, you can edit the footage you created before uploading it to your YouTube channel.
4. Wondershare DemoCreator
Compatibility: Windows
Price: Start from $9.99
DemoCreator is a recorder that focuses its overall user experience. It is able to easily record high-quality videos at up to 120 FPS (60 FPS for Mac) and allows you to simultaneously record both your screen and webcam. This software is incredibly user friendly and makes for an easy experience for new streamers. The dual recording makes it great for gamers who are also looking to film their reactions.
5. CloudApp
Price: Free, $10 per month for an individual user
Compatibility: Windows, macOS, Linux, Chrome
Starting a new screen capturing session with the CloudApp requires you to just specify the portion of the screen you want to capture and hit the record button. Moreover, you can choose if you want to record with or without a webcam and you have the option to enable or disable the audio recording option.
However, you can only create 90-second screen recordings with the free version of the CloudApp and you cannot set resolution or frame rate of the recording. That’s why you need to upgrade to the Pro version if you want to use it to record live streams on YouTube. The Pro subscription model also grants you access to basic video editing tools and a variety of file sharing options. In addition, CloudApp lets you create and annotate still images and GIFs, which makes it a great option for digital marketers.
6. Techsmith Camtasia
Price: Free trial, $269.05 one-time fee
Compatibility: Windows, macOS
You don’t need years of video editing experience to start a new screen recording session in Camtasia. In fact, you just have to click on the Record button that is located in the software’s tool panel and then customize the settings.
Camtasia lets you choose if you want to record the full screen or just a selected portion of the screen or decide if you want to switch the webcam or the microphone off. You should make sure that the System Audio feature is enabled in order to record the sound of the live stream you’re sharing on YouTube. Pausing or stopping a screencasting session requires you to either click on the appropriate buttons or use the keyboard-based hotkeys. After you are done recording a live stream you can edit the footage using Camtasia’s video editing tools.
7. ScreenRec
Price: Free
Compatibility: Windows, macOS, Linux
Recording any live stream or TV show you play on your computer with ScreenRec is a straightforward process that can be completed in just a few clicks. Simply drag the mouse cursor over the area you want to record, then hit the Record button when you are ready and ScreenRec will start capturing the computer screen.
Once the screencasting session is completed you will get a sharable link that can be embedded to a website or used to save an MP4 file on your hard drive. Furthermore, ScreenRec is equipped with analytics tools that show you how many views your videos attracted or for how long each visitor watched them. All of these features make ScreenRec an excellent option for anyone who wants to record a live stream on YouTube or any other on-screen activity.
8. Flashback Express
Price: Free
Compatibility: Windows
Flashback Express is a simple screen recorder that lets you create high-res videos effortlessly. Setting up a new screencasting session requires you to just specify the area of the screen you want to record, choose whether or not you want to record the webcam feed and hit the Record button.
There are no restrictions in terms of the duration of screen recordings you can make with Flashback Express and the software doesn’t watermark the video you create.
However, you can only save the files in MP4, AVI, or WMW formats and you cannot adjust the video’s frame rate or resolution. What’s more, editing videos or applying effects with Flashback Express isn’t possible and you must upgrade to FlashBack Pro if you want to edit the live streams you broadcast on YouTube.
This piece of software is user friendly, but it doesn’t have as many features as other products on the market. Having said that, it is still an excellent tool that will help you live stream gameplay easily. Although it doesn’t come with built-in video editing software, it is possible to download another program to do this for you (i.e. Filmora). Flashback Express has the ability to record through your headset or microphone as well.
9. VLC
Price: Free
Compatibility: macOS, Linux, Windows
This is an iconic media player that became famous for its versatility and support for nearly all video file formats. Besides being one of the best media players ever created, VLC is also equipped with screen recording and video editing tools.
In order to start a new screencasting session, you will have to go to the Media menu and then select the Open Capture Device option. Once the new window pops up on the screen you should change the Capture Mode to Desktop and then adjust the frame rate in accordance with your needs.
Click on the Play button, and then hit the Record button after the screen recording window appears on the screen. You can only record the entire screen with VLC, since customizing the recording area isn’t an option, and all your files will be captured in the RAW format which means that you may have to resize them before you upload them to YouTube.
10. Screencast-o-matic
Price: Free, pricing options start at $1.65 per month
Compatibility: macOS, Windows
As its name suggests, this software product makes the screen recording process almost automatic. You can choose if you want to record an entire screen or just a window you selected. In addition, Screencast-o-matic lets you record the desktop and webcam footage at the same time, and you can even zoom in while the screencasting session is still in progress.
The free version of the software offers only a basic set of features that doesn’t include the option to record system audio. This means that you have to opt for one of the available subscription models if you want to record your live streams on YouTube with Screencast-o-matic. What’s more, you will be to create videos that are longer than 15 minutes, create recordings without watermarks or add music to your recordings if you opt for Deluxe or Premiere pricing options.
11. QuickTime Player
Price: Free
Compatibility: macOS, Windows
Mac users who want to record content that is broadcasted via YouTube Live can do so without having to install a third-party app. Apple ceased the support for the Windows-based version of QuickTime Player in 2016 and PC users can only capture their screens with this software if they have some of its earlier versions.
In order to start a new screen recording session in QuickTime Player, you just have to go to the File menu and select the New Screen Recording option. The Screen Recording window where you can choose if you want to record audio or show mouse click in the recording will pop up on the screen. QuickTime Player lets you choose if you want to capture the entire screen or just a portion of it, and you can click on the Record button to start a new screencasting session. In order to save a video file you created, you just have to go to the File menu and pick the Save option.
How to Record a YouTube Live Stream with Filmora
Recording a YouTube Live stream with Filmora is easy even if you never went through this process before. You can set up a new screencasting session in just a few easy steps that won’t take more than a few moments to complete. Here’s what you need to do:
Step 1: Launch Filmora and create a new project. Go to the Media tab once the video editor’s main window loads and click on the Record drop-down menu that is located next to the Import drop-down menu.
Choose the Record PC Screen option and then proceed to customize the settings for your screencasting session.
Step 2: Click on the Rectangular icon in the upper left corner of the Wondershare Filmora Scrn window and choose either Full Screen, Custom, or Target Window option, depending on how you want to record a YouTube Live stream to define the area of the screen that is going to be recorded.
You can then proceed to insert the resolution your screen recording is going to have, and choose if you want to record system audio and sound from an external microphone.
Step 3: Click on the Gear icon below the Record button to gain access to additional settings, and then proceed to set the frame rate, adjust the video’s quality or activate the Show Mouse Clicks in Recording option.
Make sure that the checkbox next to the Record the Camera Stream is marked if you want to record webcam feed and computer desktop at the same time.
Step 4: Press the red Record button in the upper right corner of the window and jump to the live stream. Once the broadcast is completed, you should click on the Stop button and use Filmora’s editing tools to remove all imperfections from the recording.
Filmora allows you to export all of your projects directly to your YouTube channel immediately after the rendering process is completed.
Frequently Asked Questions about YouTube Live Screen Recorders
1. Does YouTube Save Live Videos?
Stream Now, Mobile, Webcam, and Events streams can be stored automatically for 12 hours after they end. You can access all of your live streams by clicking on the Videos menu in the YouTube Studio and selecting the Live option and then change the Privacy setting in the Visibility menu.
2. How to use YouTube to Archive a Live Stream?
Once the live stream ends, you should go to the Dashboard and click on the Live feature, and then choose the Stream option. Check the Make Archive Unlisted When Complete checkbox and the live stream video will be saved accordingly.
Richard Bennett
Richard Bennett is a writer and a lover of all things video.
Follow @Richard Bennett
Also read:
- Demystifying Creator Studio A Practical Handbook
- In 2024, Creating Cost-Effective YouTube Closure Elements
- Streamline Your Online Listening Experience with Direct Capture
- [New] Elevate Engagement Crafting Anime Subscribe Bars for YouTube Content
- Slash Length, Amplify Impact YouTube Video Editing
- [Updated] Elevate Streams Using YouTube's AV1 Settings
- The Roadmap for YouTube Streaming Titans in Gaming
- In 2024, 10 Essential Vlog Editing Hacks for Novice Creators
- [Updated] Cyberspace Celebs Top YouTube Personalities by Views
- 2024 Approved Enhancing YouTube Videos with Professional Techniques Using WMM
- Paving the Way to YouTube Stardom Through Effective SEO Keywords
- 2024 Approved Build Your Wealth on YouTube A Guide to Creating Content Without Ads
- [New] A Guide to Profit Sharing for Creators of Video Clips
- In 2024, Downloading YouTube's Iconic Icons via Web, Windows/Mac Methods
- [Updated] Conquer the Viewer Void 10 Tactics for YouTube Video Growth
- [New] Best YouTube Video Reaction Ideas
- Perfecting the Art of Transferring Twitch Live to YouTube
- [New] Cut Costs and Boost Creativity 8 Online Spots Offering Free Eco-Backdrops
- Iconic Creativity Unleashed Exploring 6 Top-Tier Symbol Sources
- Essential Techniques for YouTube End Screen Designs
- Boosting Viewership with Animated Subscribe Buttons in Filmora (Easy Guide)
- Boost Visibility with a Bespoke YouTube Channel URL for 2024
- Leading Stock Tutorials Channel Roundup
- [New] Cementing Climactic Conclusions
- Ignite Your Brand's Potential Immerse in Our Exclusive Collection of over 50 Free YouTube Banners
- Optimize YouTube Visibility by Sustaining Creativity Commons License
- Average Income for YouTubers per Ad Displayed?
- In 2024, Channel Upgrade Smartphone Techniques for Professional Videos
- Digital Detox Ignoring Negativity on YouTube
- [Updated] Cut the Clutter Advanced Techniques with YouTube Studio Editor
- 2024 Approved Decipher YouTube's Mysteries with Advanced Insights From Social Blade
- Navigating Facebook Sharing of YouTube Videos
- [New] A Compre Written in Code Deciphering YouTube Backlink Building Techniques
- Streamlining Your Monetization Mastering YouTube AdSense
- Updated In-Depth Analysis of Sound Forges Audio Processing Features
- [New] Behind-the-Scenes Insight How Vimeo Record Works
- [New] 2024 Approved Converting Insta Videos to MP3 - A Comprehensive Overview
- [Updated] Innovative Shots with Purpose Top 20 Ideas for Inspiration for 2024
- [New] 2024 Approved Universal Approach How To Record Any YouTube Stream on Different Devices
- iPogo will be the new iSpoofer On Samsung Galaxy A05s? | Dr.fone
- Updated How to Make a Slideshow with Movavi Slideshow Maker
- In 2024, How To Use Allshare Cast To Turn On Screen Mirroring On Samsung Galaxy Z Flip 5 | Dr.fone
- Unlock Your Disabled Apple iPhone 8 Plus Without iTunes in 5 Ways | Dr.fone
- [Updated] 2024 Approved Distraction-Free Deliberations Perfecting Backdrop Blur on Mobile Devices
- [New] ClipComposer Critique – Full Report
- [New] A Comprehensive Review of Next-Gen Camera Systems for 2024
- [New] In 2024, Uncomplicated Guide to Mobile Device Live Captures
- [Updated] Maximize Your Screen Recording Experience with W8 Tools for 2024
- [New] Instagram Storytelling with Epic Videos for 2024
- [New] 2024 Approved The Ultimate Guide to Saving Instagram's Trending Videos
- In 2024, How to Change/Add Location Filters on Snapchat For your Poco M6 Pro 5G | Dr.fone
- [New] In 2024, Top 5 Alternatives to TikTok You Should Know [Updated ]
- How Long Does It Take To Edit Videos
- Pokemon Go No GPS Signal? Heres Every Possible Solution On Vivo Y27s | Dr.fone
- [Updated] Top 6 Sustainable MC Base Designs for 2024
- [New] Become a SnapBoom Expert in Minutes for 2024
- Updated Protect Your Edits A Beginners Guide to Saving in Final Cut Pro for 2024
- [New] Discover Effortless Pathways to Dynamic Snaps
- Windows 11 Stepping Out of the Clip as Photos
- Top Strategies for Optimizing Zoom Video Quality
- From Disarray to Artwork Your Collage Journey
- [Updated] In 2024, Cultivate Classics Essential Farming Game Lists
- Updated 2024 Approved Clearer Audio Aesthetics Removing Distractions with iMovie on macOS
- Two Ways to Track My Boyfriends Oppo Reno 9A without Him Knowing | Dr.fone
- 2024 Approved Essential Mac-Friendly Audio Mixers The Ultimate List of the Best 5
- How To Remove or Bypass Knox Enrollment Service On Samsung Galaxy M14 5G
- Updated In 2024, Easy Video Aspect Ratio Conversion No Expertise Needed
- Title: "ASMR Gurus Recommend Best Microphones Reviewed"
- Author: Steven
- Created at : 2024-05-25 18:46:55
- Updated at : 2024-05-26 18:46:55
- Link: https://youtube-clips.techidaily.com/asmr-gurus-recommend-best-microphones-reviewed/
- License: This work is licensed under CC BY-NC-SA 4.0.
