
"Amplify YouTube Performance - Rapid Video Rendering Guide"
Amplify YouTube Performance - Rapid Video Rendering Guide
How to Render and Upload YouTube Videos Faster?

Richard Bennett
Oct 26, 2023• Proven solutions
You’ve shot a video you’re proud of and you can’t wait to post it! But, slow down, you have to edit all your clips together first. And then you have to export your video from the editing program, which can take a while. Then you have to wait for it to upload to YouTube, and once it’s up you have to write your description, add cards, and do a handful of other things.
The period between finishing a video and actually posting it for your subscribers to see can be long and tiresome. A lot of videos have probably died in these stages because their creators ran out of energy and patience.
Don’t let this happen to your videos! Here are 4 ways you can save time and avoid headaches during post-production:
3. Use default descriptions and tags
4. TubeBuddy’s bulk features and tagging tools
1. Create mini-projects
When you have alarge editing project with lots of different titles, animations, clip sequences, and PIP tracks it can get hard to keep track of everything. That’s especially true if you need to go back and make changes. A change to one part of your video could affect other parts of it.
Also, the more complex your video is the longer it will take to render/export.
There is a way you can keep your project more organized, save time making minor adjustments, and speed up rendering: create sub-projects of different segments of your video and import them into your main project as their own clips.
This helps you in 3 ways:
1. If there are a lot of effects it’ll be faster to render a shorter video.
2. If you import your sequence as its own clip you won’t have to worry about adjusting little parts of it whenever you change earlier sections of your video.
3. If you do want to make adjustments to your sequence you can open up your mini-project and change it without affecting anything in your main project.
2. Optimize your upload speed
At home, your videos will upload fastest if all of your internet resources are devoted to the upload. That means you should not have any other windows open on your computer while you are uploading. You should also make sure there aren’t other devices competing for wifi like smart tvs, cell phones, or really fancy coffee makers.
If you have neighbors on the same wifi signal as you and they are online at the same time, this will slow you down too.
Because there is so much that can interfere with wifi, you might want to consider a wired Ethernet cable. Ethernet connections are faster in general, and you won’t have any problems with other devices competing for resources like you get with wifi.
If you’re doing everything you can to optimize your upload speed at home and still find that it takes an unreasonable amount of time to upload videos to YouTube, go somewhere with a better connection. Save your video to a USB drive and take it to a library or college to upload. Connections in these kinds of places tend to be very strong.
3. Use default descriptions and tags
In your Creator Studio, go to Channel > Upload defaults. Here you can write in titles, descriptions, and tags which will automatically be applied to every video you upload.

Note: in the latest YouTube Studio, the upload interface is changed but the main process is similar.

You probably have tags you use for almost every video you post. For example, if your channel is about vegan cooking then every one of your videos is probably tagged ‘vegan’, ‘food’, and ‘cooking’. If you type those tags in here then you don’t have to keep adding them to every new video, and you can still add or remove tags from individual uploads so you aren’t stuck using the exact same set of tags every time.
Similarly, you probably have some default text that goes in the description of every one of your videos (i.e. a link to your personal website or a brief introduction of yourself). If you type in a default description then that text will appear automatically in every new video description and you can just add to it when you need to for individual videos.
Using defaults might only save you a couple of minutes per video, but those minutes add up.
4. TubeBuddy’s bulk features and tagging tools
TubeBuddy is a channel management tool for YouTube. Most of its features are more geared towards very large channels or companies with a YouTube presence, but there are also features that can help small or mid-sized YouTubers save time and stay organized.
Some of these tools include templates for things like cards and end screens and bulk processing tools for when you want to change a lot of things at once. For example, if you wanted to update the links in every card in every one of your videos at once then TubeBuddy could help with that.
Some of TubeBuddy’s best features for growing channels are the tagging features. TubeBuddy will help you discover tags, suggest new tags, and even copy whole lists of tags from rival videos.
There are different levels of pricing for TubeBuddy (including a free version, although it’s very limited) and you get a discount on the Pro version if you have less than 50,000 lifetime views on your channel. It ends up being $4.50USD a month (or $3.60 USD a month if you pay for a year in advance). It’s a good investment for someone who’s starting to see some growth on YouTube, but probably not if you’re still trying to reach milestones like 500 subs or 10,000 views.
You have to work hard to get anywhere on YouTube, but that doesn’t mean you should be toiling away at tedious stuff like typing in the same tags over and over. If you have any time-saving tips then make sure to share them with everyone in the comments!
Remember that your time is valuable =)

If you are using Filmora to edit YouTube videos, you can upload the video to YouTube directly from Filmora without download it again first, which can save you time. Besides, if you don’t want the video to be public, you can change Privacy to unlisted or private in Filmora.


Richard Bennett
Richard Bennett is a writer and a lover of all things video.
Follow @Richard Bennett
Richard Bennett
Oct 26, 2023• Proven solutions
You’ve shot a video you’re proud of and you can’t wait to post it! But, slow down, you have to edit all your clips together first. And then you have to export your video from the editing program, which can take a while. Then you have to wait for it to upload to YouTube, and once it’s up you have to write your description, add cards, and do a handful of other things.
The period between finishing a video and actually posting it for your subscribers to see can be long and tiresome. A lot of videos have probably died in these stages because their creators ran out of energy and patience.
Don’t let this happen to your videos! Here are 4 ways you can save time and avoid headaches during post-production:
3. Use default descriptions and tags
4. TubeBuddy’s bulk features and tagging tools
1. Create mini-projects
When you have alarge editing project with lots of different titles, animations, clip sequences, and PIP tracks it can get hard to keep track of everything. That’s especially true if you need to go back and make changes. A change to one part of your video could affect other parts of it.
Also, the more complex your video is the longer it will take to render/export.
There is a way you can keep your project more organized, save time making minor adjustments, and speed up rendering: create sub-projects of different segments of your video and import them into your main project as their own clips.
This helps you in 3 ways:
1. If there are a lot of effects it’ll be faster to render a shorter video.
2. If you import your sequence as its own clip you won’t have to worry about adjusting little parts of it whenever you change earlier sections of your video.
3. If you do want to make adjustments to your sequence you can open up your mini-project and change it without affecting anything in your main project.
2. Optimize your upload speed
At home, your videos will upload fastest if all of your internet resources are devoted to the upload. That means you should not have any other windows open on your computer while you are uploading. You should also make sure there aren’t other devices competing for wifi like smart tvs, cell phones, or really fancy coffee makers.
If you have neighbors on the same wifi signal as you and they are online at the same time, this will slow you down too.
Because there is so much that can interfere with wifi, you might want to consider a wired Ethernet cable. Ethernet connections are faster in general, and you won’t have any problems with other devices competing for resources like you get with wifi.
If you’re doing everything you can to optimize your upload speed at home and still find that it takes an unreasonable amount of time to upload videos to YouTube, go somewhere with a better connection. Save your video to a USB drive and take it to a library or college to upload. Connections in these kinds of places tend to be very strong.
3. Use default descriptions and tags
In your Creator Studio, go to Channel > Upload defaults. Here you can write in titles, descriptions, and tags which will automatically be applied to every video you upload.
Note: in the latest YouTube Studio, the upload interface is changed but the main process is similar.
You probably have tags you use for almost every video you post. For example, if your channel is about vegan cooking then every one of your videos is probably tagged ‘vegan’, ‘food’, and ‘cooking’. If you type those tags in here then you don’t have to keep adding them to every new video, and you can still add or remove tags from individual uploads so you aren’t stuck using the exact same set of tags every time.
Similarly, you probably have some default text that goes in the description of every one of your videos (i.e. a link to your personal website or a brief introduction of yourself). If you type in a default description then that text will appear automatically in every new video description and you can just add to it when you need to for individual videos.
Using defaults might only save you a couple of minutes per video, but those minutes add up.
4. TubeBuddy’s bulk features and tagging tools
TubeBuddy is a channel management tool for YouTube. Most of its features are more geared towards very large channels or companies with a YouTube presence, but there are also features that can help small or mid-sized YouTubers save time and stay organized.
Some of these tools include templates for things like cards and end screens and bulk processing tools for when you want to change a lot of things at once. For example, if you wanted to update the links in every card in every one of your videos at once then TubeBuddy could help with that.
Some of TubeBuddy’s best features for growing channels are the tagging features. TubeBuddy will help you discover tags, suggest new tags, and even copy whole lists of tags from rival videos.
There are different levels of pricing for TubeBuddy (including a free version, although it’s very limited) and you get a discount on the Pro version if you have less than 50,000 lifetime views on your channel. It ends up being $4.50USD a month (or $3.60 USD a month if you pay for a year in advance). It’s a good investment for someone who’s starting to see some growth on YouTube, but probably not if you’re still trying to reach milestones like 500 subs or 10,000 views.
You have to work hard to get anywhere on YouTube, but that doesn’t mean you should be toiling away at tedious stuff like typing in the same tags over and over. If you have any time-saving tips then make sure to share them with everyone in the comments!
Remember that your time is valuable =)
If you are using Filmora to edit YouTube videos, you can upload the video to YouTube directly from Filmora without download it again first, which can save you time. Besides, if you don’t want the video to be public, you can change Privacy to unlisted or private in Filmora.
Richard Bennett
Richard Bennett is a writer and a lover of all things video.
Follow @Richard Bennett
Decoding YouTube Stats Efficiency with Social Blade’s Advanced Analysis
Use Social Blade for YouTube Analytics - Stats & How to Use Them
Richard Bennett
Oct 26, 2023• Proven solutions
Want to learn how to use Social Blade for YouTube? SocialBlade.com is a free-to-use website that displays your YouTube statistics – or the stats of any channel you are interested in – using an intuitive layout.
While many of the stats you can find on Social Blade are also available right on YouTube, some people find it easier to read on Social Blade. YouTube provides you with a lot of information, and a lot of it might not be useful to all creators.
Your YouTube Analytics
Social Blade is an excellent place to gauge the growth of your channel. It provides statistics on our subscribers, views, and estimated revenue.
To start using Social Blade, type your channel name into the search bar.
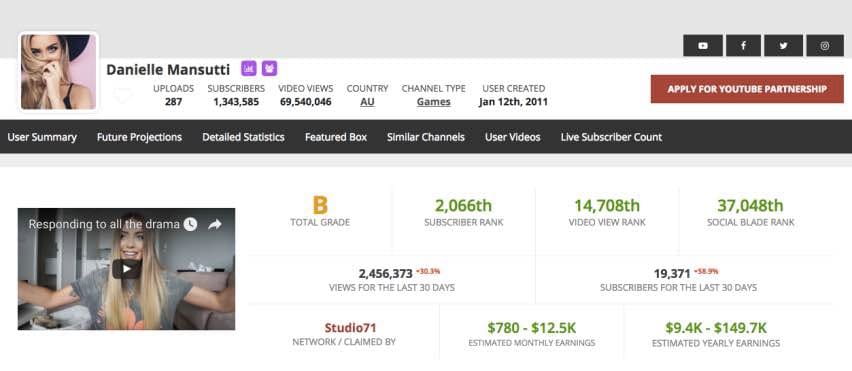
On the top section of the page, several stats will be clearly displayed.
First, you will see the letter grade assigned to your channel by Social Blade. If it is not a very good one, keep in mind that channels with over 10, 000 might still only receive Cs. Only YouTube megastars are getting As and Bs.
Next to your grade are your subscriber and video view ranks, as well as a rank assigned to you by Social Blade.
On the second line, you will see the views and subscribers you got in the last 30 days and the percentage by which you are up or down. Simply searching for yourself and glancing at this line is the easiest way to see whether your channel is growing, even easier than in your YouTube Creator Studio.
The final line of the first section will show you an estimate of your monthly revenue.
If you scroll down to the second section you will be able to see your views, subscribers, and estimated earnings per day rather than per month. Growth is in green and loss is in red.
By looking at this chart you can see which videos benefited your channel most after they were posted (your videos are not listed, but you can see based on the day you posted them). This will give you a good idea of what your audience wants to see.
Spying on Other Channels
When you check your stats, you type your channel name into the search bar. If you want to use Social Blade to monitor somebody else’s stats, type their channel name instead.
By looking up your direct competitors (channels about the same size as yours within your same genre) you will be able to see which of their videos are performing best for them when you combine the daily information Social Blade provides with your knowledge of what videos they posted when.
Knowing what is working for your rivals will help you design your content strategy .
You can also use Social Blade to look up huge YouTube stars who you admire, just to see how well they are doing. Take their estimated revenue with a grain of salt, though – it’s just an estimate.
That’s how you can use Social Blade for YouTube - have you ever used it?
Make Your Videos Stand Out with Powerful Video Editor
Richard Bennett
Richard Bennett is a writer and a lover of all things video.
Follow @Richard Bennett
Richard Bennett
Oct 26, 2023• Proven solutions
Want to learn how to use Social Blade for YouTube? SocialBlade.com is a free-to-use website that displays your YouTube statistics – or the stats of any channel you are interested in – using an intuitive layout.
While many of the stats you can find on Social Blade are also available right on YouTube, some people find it easier to read on Social Blade. YouTube provides you with a lot of information, and a lot of it might not be useful to all creators.
Your YouTube Analytics
Social Blade is an excellent place to gauge the growth of your channel. It provides statistics on our subscribers, views, and estimated revenue.
To start using Social Blade, type your channel name into the search bar.
On the top section of the page, several stats will be clearly displayed.
First, you will see the letter grade assigned to your channel by Social Blade. If it is not a very good one, keep in mind that channels with over 10, 000 might still only receive Cs. Only YouTube megastars are getting As and Bs.
Next to your grade are your subscriber and video view ranks, as well as a rank assigned to you by Social Blade.
On the second line, you will see the views and subscribers you got in the last 30 days and the percentage by which you are up or down. Simply searching for yourself and glancing at this line is the easiest way to see whether your channel is growing, even easier than in your YouTube Creator Studio.
The final line of the first section will show you an estimate of your monthly revenue.
If you scroll down to the second section you will be able to see your views, subscribers, and estimated earnings per day rather than per month. Growth is in green and loss is in red.
By looking at this chart you can see which videos benefited your channel most after they were posted (your videos are not listed, but you can see based on the day you posted them). This will give you a good idea of what your audience wants to see.
Spying on Other Channels
When you check your stats, you type your channel name into the search bar. If you want to use Social Blade to monitor somebody else’s stats, type their channel name instead.
By looking up your direct competitors (channels about the same size as yours within your same genre) you will be able to see which of their videos are performing best for them when you combine the daily information Social Blade provides with your knowledge of what videos they posted when.
Knowing what is working for your rivals will help you design your content strategy .
You can also use Social Blade to look up huge YouTube stars who you admire, just to see how well they are doing. Take their estimated revenue with a grain of salt, though – it’s just an estimate.
That’s how you can use Social Blade for YouTube - have you ever used it?
Make Your Videos Stand Out with Powerful Video Editor
Richard Bennett
Richard Bennett is a writer and a lover of all things video.
Follow @Richard Bennett
Also read:
- [New] Efface Thin Borders for a Seamless YouTube Experience
- [New] In 2024, Windows 10 Ultimate Screen Capture Tool
- [New] Transform Your IGTV Visuals with Updated Covers for 2024
- [Updated] 2024 Approved Gimbal Innovation Market's Elite Selections
- [Updated] In 2024, The Lowdown on Instagram's Video Time Frame
- 2024 Approved Elite Uploader MP4 Files Directly for FB
- Clear Cinematic Vision - Top Camera Stabilizers Reviewed
- In 2024, A Dive Into History The Definitive List of Student-Friendly Channels #1-10
- Quick Share Your YouTube Playlist Journey
- Title: Amplify YouTube Performance - Rapid Video Rendering Guide
- Author: Steven
- Created at : 2025-02-13 16:27:23
- Updated at : 2025-02-20 16:46:19
- Link: https://youtube-clips.techidaily.com/amplify-youtube-performance-rapid-video-rendering-guide/
- License: This work is licensed under CC BY-NC-SA 4.0.