
Amplify Your Youtubes' Interaction with Emojis for 2024
Amplify Your Youtubes’ Interaction with Emojis
How to Add Emojis on YouTube Comments

Richard Bennett
Mar 27, 2024• Proven solutions
Emojis are a great way to make your videos and comments stand out from the rest. You may also be able to catch the attention of millennials and improve your YouTube and Google ranking. Beginners can use emojis as a great strategy to improve YouTube SEO performance and get ahead of others. Experts suggest using emojis wisely; that is not to overload or spam whole titles or comments with smileys!
Here are some great ways to add YouTube comments emojis:
Part 1: How to Type Emojis in a YouTube Comment on Windows
Here are several ways to type emojis in YouTube comments. Follow the instructions below to write YouTube comments with emojis:
1. Adding Emojis to YouTube Videos on Windows with Keyboard
If you are using Windows 10, then you can use the keyboard shortcut to open the emoji icons. Press Windows + ; (semi-colon) or Windows + . (period) to open the emoji keyboard. And you will see the emojis.
Currently, there are 6 types of emojis you can add on Windows, including smiley faces and animals, people, celebrities and objects, foods and plants, transportation and places, and symbols.
You can then click the emoji that you’d like to add to the YouTube video directly.
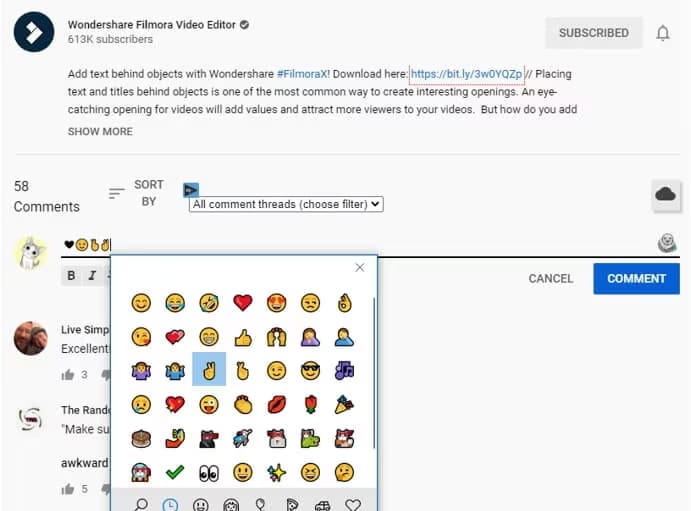
2. Copy and Paste Emojis from Websites
One of the easiest ways to add emojis to YouTube comments is to copy-paste them from an emoji database. You can right-click on the emoji and then select “copy.”
Now, go to your YouTube comment and right-click again. Scroll down and click on “paste” to use the emoji.
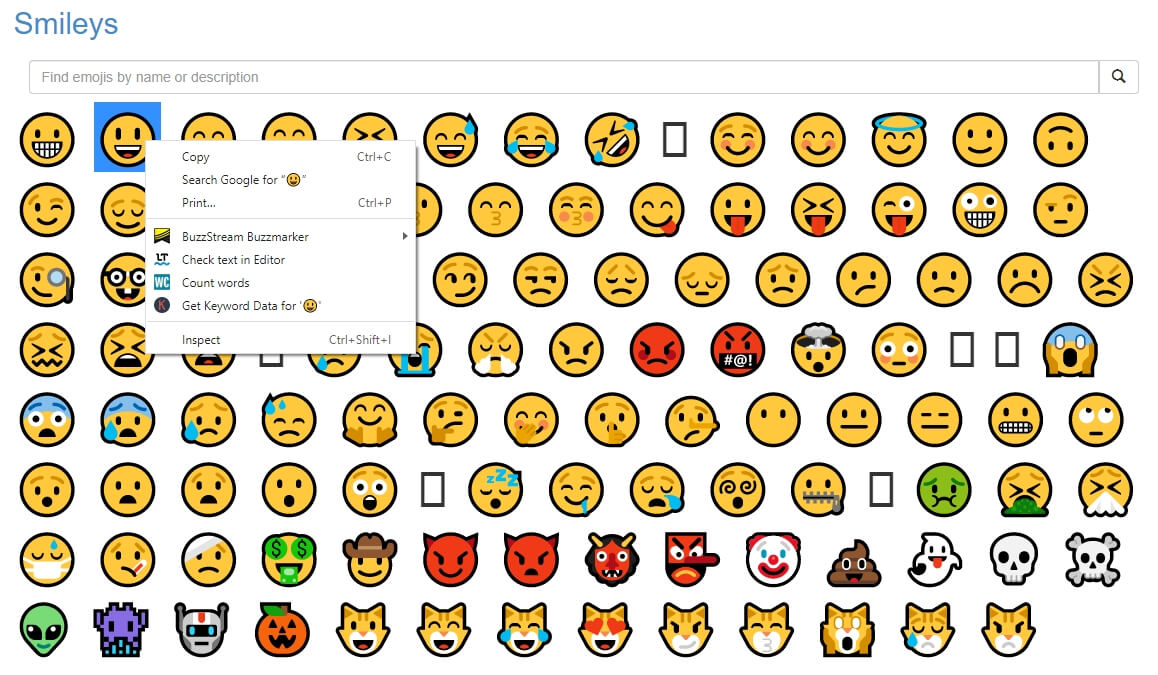
Here are some of the best websites to download emojis that you may need. In these websites, you can get a range of smileys and icons to use for your YouTube comments. You can start with smiley faces that help you express many emotions. Then you can get emojis of objects like cars, mountains, drinks, fruits, bells, guitars, and more.
The list is just endless, and you will never face any shortage of emojis.
Part 2: How to Add Emojis to YouTube Comments on Mac?
Mac users enjoy a wide selection of emojis without any hassles and can easily add emojis to comments they type on YouTube. Just follow the steps below to add emoji to YouTube comments.
You can select any emoji from the emoji resources website and ctrl-click your mouse to copy it. Now, navigate to your YouTube comment and ctrl-click your mouse. Click on “paste” to add the smiley to your comments.
If you want to use your keyboard, select the emoji and press “Command” and “C.” Now, press “Command” and “V” to paste the emoji in your YouTube comment.
Your emoji is now added to your YouTube comments.
You can also use your Mac’s inbuilt emojis in your YouTube comments. Start typing your YouTube comment and then use your keyboard shortcut Command + Control + Space to access the emoji list.
You can now double-click on any emoji to include it in your comment. The free emoji lists are full of smileys, animal faces, everyday objects and things, sports emojis, vehicles, and more. and more. You will find an emoji to suit every comment you type on YouTube.
If your Mac has a Touch Bar, then you can tap the smile face and then tap an emoji to add to YouTube video comments.
YouTuber Javier Mercedes has made a quick tutorial and introduced many more ways to typing emojis on Mac. Check it below and find the best way based on your preferences.
Part 3: How to Add Emoji to YouTube Comments with TubeBuddy?
TubeBuddy is a suite of tools for YouTubers to grow their success. You can access a range of tools, including YouTube comments emojis to improve your visual appeal. It is a free browser extension that you can add to Chrome, Opera, Firefox, and more.
TubeBuddy provides a large collection of emojis and smileys for you to use in your YouTube comments. Additionally, you don’t need to copy-paste anything. The plugin lets you insert emojis from a list with a click. Here are the steps to add emojis to YouTube comments using TubeBuddy:
Step 1: Install TubeBuddy
Visit the TubeBuddy website and install the plugin for your browser. TubeBuddy is available on both Chrome, FireFox, Opera, and Edge, as well as iOS and Android devices.
Step 2: Sign in to YouTube
Sign in to your YouTube account to allow TubeBuddy access to your comments. You will find the TubeBuddy icon beside the YouTube search bar on your browser.
Step 3: Add Emojis at Commenting
A window with a list of emojis will appear on YouTube as you type your comments. You can select any emoji and add it to your comments.
Types of Emojis in TubeBuddy
TubeBuddy is home to a large collection of emojis. You won’t find many emojis anywhere else on the internet. All emojis are grouped under categories like smileys, places, food and drinks, buildings, and more.
You can quickly select a category and then add emoji to YouTube comments. The tool also adds new emojis daily.
Bonus: How to Add Emojis to YouTube Video Title and Description?
You can add cool emojis to your video titles and descriptions for more innovation. People will also be more likely to choose your video as they pop-out on the search results or playlists.
Here is how you can add emojis to YouTube video titles and descriptions:
You can access any list of YouTube comments emojis and select the one you like. Then use your mouse to copy the emoji and paste it into your YouTube titles and description. Or press “Ctrl” + “C” for Windows and “Command” + “C” for Mac to copy your emoji.
Now go to your title or description and press “Ctrl” + “V” for Windows and “Command” + “V” for Mac to paste the emoji.
FAQs about YouTube Video Comments
- Are Emojis Harmful to Use for YouTube?
We all have heard rumors of using emojis in YouTube video titles or comments may damage views or reputation. However, it’s not true, and emojis have no negative consequences on YouTube.
Rather, you can attract more viewers and even improve YouTube SEO by using emojis. Google also allows emojis in search results, and data shows they rank better. You can use emojis for YouTube with complete peace of mind.
In my opinion, there will be no harmful effects on your views, subscribers, or credibility. Instead, you may be able to appeal to a younger crowd and get more clicks.
- Will adding Emojis Impact YouTube SEO?
Many people don’t use emojis in their YouTube videos, fearing a negative impact. But all the rumors out there are just rumors without any truth. YouTube doesn’t penalize you in any way if you use emojis in comments, titles, or descriptions. You will not experience any penal actions by including emojis on YouTube.
Google is also friendly with emojis, and many websites use them to stand apart from the crowd. Using emojis on YouTube can be an excellent way to improve your SEO performance. Your videos will also have a chance to show up on Google results and YouTube. Emojis also help your videos look innovative to draw in more views.
Final Thoughts
Using emojis in YouTube comments is a great way to boost the popularity of your videos. You can also use emojis in your video titles and descriptions to appear more innovative. Additionally, emojis can improve your YouTube SEO performance and even help you rank on Google search results.
Copy-pasting emojis is a simple way to use them, but you can also go for other methods. TubeBuddy is a great choice if you want to eliminate the whole copy-paste scenario and include more types of emojis in your comments directly.
Richard Bennett
Richard Bennett is a writer and a lover of all things video.
Follow @Richard Bennett
Richard Bennett
Mar 27, 2024• Proven solutions
Emojis are a great way to make your videos and comments stand out from the rest. You may also be able to catch the attention of millennials and improve your YouTube and Google ranking. Beginners can use emojis as a great strategy to improve YouTube SEO performance and get ahead of others. Experts suggest using emojis wisely; that is not to overload or spam whole titles or comments with smileys!
Here are some great ways to add YouTube comments emojis:
Part 1: How to Type Emojis in a YouTube Comment on Windows
Here are several ways to type emojis in YouTube comments. Follow the instructions below to write YouTube comments with emojis:
1. Adding Emojis to YouTube Videos on Windows with Keyboard
If you are using Windows 10, then you can use the keyboard shortcut to open the emoji icons. Press Windows + ; (semi-colon) or Windows + . (period) to open the emoji keyboard. And you will see the emojis.
Currently, there are 6 types of emojis you can add on Windows, including smiley faces and animals, people, celebrities and objects, foods and plants, transportation and places, and symbols.
You can then click the emoji that you’d like to add to the YouTube video directly.
2. Copy and Paste Emojis from Websites
One of the easiest ways to add emojis to YouTube comments is to copy-paste them from an emoji database. You can right-click on the emoji and then select “copy.”
Now, go to your YouTube comment and right-click again. Scroll down and click on “paste” to use the emoji.
Here are some of the best websites to download emojis that you may need. In these websites, you can get a range of smileys and icons to use for your YouTube comments. You can start with smiley faces that help you express many emotions. Then you can get emojis of objects like cars, mountains, drinks, fruits, bells, guitars, and more.
The list is just endless, and you will never face any shortage of emojis.
Part 2: How to Add Emojis to YouTube Comments on Mac?
Mac users enjoy a wide selection of emojis without any hassles and can easily add emojis to comments they type on YouTube. Just follow the steps below to add emoji to YouTube comments.
You can select any emoji from the emoji resources website and ctrl-click your mouse to copy it. Now, navigate to your YouTube comment and ctrl-click your mouse. Click on “paste” to add the smiley to your comments.
If you want to use your keyboard, select the emoji and press “Command” and “C.” Now, press “Command” and “V” to paste the emoji in your YouTube comment.
Your emoji is now added to your YouTube comments.
You can also use your Mac’s inbuilt emojis in your YouTube comments. Start typing your YouTube comment and then use your keyboard shortcut Command + Control + Space to access the emoji list.
You can now double-click on any emoji to include it in your comment. The free emoji lists are full of smileys, animal faces, everyday objects and things, sports emojis, vehicles, and more. and more. You will find an emoji to suit every comment you type on YouTube.
If your Mac has a Touch Bar, then you can tap the smile face and then tap an emoji to add to YouTube video comments.
YouTuber Javier Mercedes has made a quick tutorial and introduced many more ways to typing emojis on Mac. Check it below and find the best way based on your preferences.
Part 3: How to Add Emoji to YouTube Comments with TubeBuddy?
TubeBuddy is a suite of tools for YouTubers to grow their success. You can access a range of tools, including YouTube comments emojis to improve your visual appeal. It is a free browser extension that you can add to Chrome, Opera, Firefox, and more.
TubeBuddy provides a large collection of emojis and smileys for you to use in your YouTube comments. Additionally, you don’t need to copy-paste anything. The plugin lets you insert emojis from a list with a click. Here are the steps to add emojis to YouTube comments using TubeBuddy:
Step 1: Install TubeBuddy
Visit the TubeBuddy website and install the plugin for your browser. TubeBuddy is available on both Chrome, FireFox, Opera, and Edge, as well as iOS and Android devices.
Step 2: Sign in to YouTube
Sign in to your YouTube account to allow TubeBuddy access to your comments. You will find the TubeBuddy icon beside the YouTube search bar on your browser.
Step 3: Add Emojis at Commenting
A window with a list of emojis will appear on YouTube as you type your comments. You can select any emoji and add it to your comments.
Types of Emojis in TubeBuddy
TubeBuddy is home to a large collection of emojis. You won’t find many emojis anywhere else on the internet. All emojis are grouped under categories like smileys, places, food and drinks, buildings, and more.
You can quickly select a category and then add emoji to YouTube comments. The tool also adds new emojis daily.
Bonus: How to Add Emojis to YouTube Video Title and Description?
You can add cool emojis to your video titles and descriptions for more innovation. People will also be more likely to choose your video as they pop-out on the search results or playlists.
Here is how you can add emojis to YouTube video titles and descriptions:
You can access any list of YouTube comments emojis and select the one you like. Then use your mouse to copy the emoji and paste it into your YouTube titles and description. Or press “Ctrl” + “C” for Windows and “Command” + “C” for Mac to copy your emoji.
Now go to your title or description and press “Ctrl” + “V” for Windows and “Command” + “V” for Mac to paste the emoji.
FAQs about YouTube Video Comments
- Are Emojis Harmful to Use for YouTube?
We all have heard rumors of using emojis in YouTube video titles or comments may damage views or reputation. However, it’s not true, and emojis have no negative consequences on YouTube.
Rather, you can attract more viewers and even improve YouTube SEO by using emojis. Google also allows emojis in search results, and data shows they rank better. You can use emojis for YouTube with complete peace of mind.
In my opinion, there will be no harmful effects on your views, subscribers, or credibility. Instead, you may be able to appeal to a younger crowd and get more clicks.
- Will adding Emojis Impact YouTube SEO?
Many people don’t use emojis in their YouTube videos, fearing a negative impact. But all the rumors out there are just rumors without any truth. YouTube doesn’t penalize you in any way if you use emojis in comments, titles, or descriptions. You will not experience any penal actions by including emojis on YouTube.
Google is also friendly with emojis, and many websites use them to stand apart from the crowd. Using emojis on YouTube can be an excellent way to improve your SEO performance. Your videos will also have a chance to show up on Google results and YouTube. Emojis also help your videos look innovative to draw in more views.
Final Thoughts
Using emojis in YouTube comments is a great way to boost the popularity of your videos. You can also use emojis in your video titles and descriptions to appear more innovative. Additionally, emojis can improve your YouTube SEO performance and even help you rank on Google search results.
Copy-pasting emojis is a simple way to use them, but you can also go for other methods. TubeBuddy is a great choice if you want to eliminate the whole copy-paste scenario and include more types of emojis in your comments directly.
Richard Bennett
Richard Bennett is a writer and a lover of all things video.
Follow @Richard Bennett
Unlock Creative Storytelling: The Art of Jump Cutting
How To Use Jump Cuts in Your Vlog
Richard Bennett
Mar 27, 2024• Proven solutions
A common problem for new YouTubers and Vlogers is that they cannot get through a recording without feeling like they have messed up and need to restart. It can be extremely discouraging at first. More experienced vloggers know that mistakes happen and they are no reason to stop recording. Instead of trying to record a perfect clip it is common for vloggers to remove errors from their videos in editing using jump cuts.
How To Use Jump Cuts in Your Vlog
1. What is a Jump Cut?
A jump cut is when you jump from one part of your clip to a later part of that same clip, cutting out the section in-between.
In movies or tv shows jump cuts can be distracting. In vlogs it is the exact opposite; jump cuts are used to remove distractions. It is not strange for a YouTube video to contain a lot of jump cuts. If you go and re-watch a video by your favorite vlogger you will probably notice that every once in a while the vlogger is suddenly sitting differently or that something else has suddenly changed. That is a jump cut, and chances are you did not even think twice about it when you first watched the video.
2. When to use Jump Cuts in your Youtube Video
There are a lot of things you might want to take out of your clips using jump cuts. Here are some examples:
Repetition: You may have had to repeat yourself because you misspoke. Or, you might watch your clip back and realize that two sections you intended – perhaps even scripted – are very similar and you only need one.
Off-Topic Tangents: Once you get comfortable talking to the camera it is easy to find yourself getting off-topic while recording. These tangents might be funny or feel important, but you should still cut them out of your final video. Rather than scrapping them completely, though, consider giving your tangent its very own video. Successful vloggers post new videos frequently, after all.
Silence: Use jump cuts to take out any pauses in your video. Every period of silence is an opportunity for viewers to get distracted and decide to click on something else. Adding music to the background of your video can help with shorter pauses, but cutting out any silence is still a good way to go.
In the video tutorial below, we will share with you some practical and creative jump cuts tips that you can try in video editing. And most of the jump cuts are done with the cutting features in Filmora . You can download the free trial version below by clicking the Free Download button based on your system.
 Download Mac Version ](https://tools.techidaily.com/wondershare/filmora/download/ )
3. How to Make Jump Cuts in Vlog & YouTube Videos
You can make jump cuts in almost every editing program, from free software like Windows Movie Maker to professional programs like Adobe Premiere. Remember no matter which video editing software you are using to edit your videos with jump cut, you need to ensure that the software can scroll through your video clips and audio files frame-by-frame. And some video editors may only allow you to scroll video footage frame by frame. This tutorial is for Filmora Video Editor (Now upgraded to Filmora), but many of the same steps will apply to other software.
Download Mac Version ](https://tools.techidaily.com/wondershare/filmora/download/ )
You may also like: How to trim and cut videos in Windows Movie Maker for Free
Open up Filmora Video Editor and add a clip into the timeline. Watch it through, and then revisit sections where you think you might want to make cuts.
Find a place in your clip that has silence and use the scissors icon to cut your clip into two. Then start playing your clip and pause as soon as you hear sound.
Make sure your clip is selected, and then go back frame by frame until you hear nothing.
Use the scissors icon to make another cut. You will now have three clips; one before the silence, the silent pause, and the section where sound starts again. Delete the quiet middle clip.
4. Keep video shorter for more views
The videos that get the most views on YouTube are an average of three minutes long. People will use the length of a video as a reason not to click on it. Viewers are also more likely to get distracted and stop watching longer videos before they are over. That does not mean you should not take as long as you need to properly explain your ideas, just that you should be careful your video is not longer than it needs to be. It is common for youtubers to use only about a third of the clip they record. The rest is removed using jump cuts.
Filmora video editor will help you to be more creative in video editing and saving your time at the same time. Download and leave a comment below about how do you like it.

Richard Bennett
Richard Bennett is a writer and a lover of all things video.
Follow @Richard Bennett
Richard Bennett
Mar 27, 2024• Proven solutions
A common problem for new YouTubers and Vlogers is that they cannot get through a recording without feeling like they have messed up and need to restart. It can be extremely discouraging at first. More experienced vloggers know that mistakes happen and they are no reason to stop recording. Instead of trying to record a perfect clip it is common for vloggers to remove errors from their videos in editing using jump cuts.
How To Use Jump Cuts in Your Vlog
1. What is a Jump Cut?
A jump cut is when you jump from one part of your clip to a later part of that same clip, cutting out the section in-between.
In movies or tv shows jump cuts can be distracting. In vlogs it is the exact opposite; jump cuts are used to remove distractions. It is not strange for a YouTube video to contain a lot of jump cuts. If you go and re-watch a video by your favorite vlogger you will probably notice that every once in a while the vlogger is suddenly sitting differently or that something else has suddenly changed. That is a jump cut, and chances are you did not even think twice about it when you first watched the video.
2. When to use Jump Cuts in your Youtube Video
There are a lot of things you might want to take out of your clips using jump cuts. Here are some examples:
Repetition: You may have had to repeat yourself because you misspoke. Or, you might watch your clip back and realize that two sections you intended – perhaps even scripted – are very similar and you only need one.
Off-Topic Tangents: Once you get comfortable talking to the camera it is easy to find yourself getting off-topic while recording. These tangents might be funny or feel important, but you should still cut them out of your final video. Rather than scrapping them completely, though, consider giving your tangent its very own video. Successful vloggers post new videos frequently, after all.
Silence: Use jump cuts to take out any pauses in your video. Every period of silence is an opportunity for viewers to get distracted and decide to click on something else. Adding music to the background of your video can help with shorter pauses, but cutting out any silence is still a good way to go.
In the video tutorial below, we will share with you some practical and creative jump cuts tips that you can try in video editing. And most of the jump cuts are done with the cutting features in Filmora . You can download the free trial version below by clicking the Free Download button based on your system.
Download Mac Version ](https://tools.techidaily.com/wondershare/filmora/download/ )
3. How to Make Jump Cuts in Vlog & YouTube Videos
You can make jump cuts in almost every editing program, from free software like Windows Movie Maker to professional programs like Adobe Premiere. Remember no matter which video editing software you are using to edit your videos with jump cut, you need to ensure that the software can scroll through your video clips and audio files frame-by-frame. And some video editors may only allow you to scroll video footage frame by frame. This tutorial is for Filmora Video Editor (Now upgraded to Filmora), but many of the same steps will apply to other software.
Download Mac Version ](https://tools.techidaily.com/wondershare/filmora/download/ )
You may also like: How to trim and cut videos in Windows Movie Maker for Free
Open up Filmora Video Editor and add a clip into the timeline. Watch it through, and then revisit sections where you think you might want to make cuts.
Find a place in your clip that has silence and use the scissors icon to cut your clip into two. Then start playing your clip and pause as soon as you hear sound.
Make sure your clip is selected, and then go back frame by frame until you hear nothing.
Use the scissors icon to make another cut. You will now have three clips; one before the silence, the silent pause, and the section where sound starts again. Delete the quiet middle clip.
4. Keep video shorter for more views
The videos that get the most views on YouTube are an average of three minutes long. People will use the length of a video as a reason not to click on it. Viewers are also more likely to get distracted and stop watching longer videos before they are over. That does not mean you should not take as long as you need to properly explain your ideas, just that you should be careful your video is not longer than it needs to be. It is common for youtubers to use only about a third of the clip they record. The rest is removed using jump cuts.
Filmora video editor will help you to be more creative in video editing and saving your time at the same time. Download and leave a comment below about how do you like it.
Richard Bennett
Richard Bennett is a writer and a lover of all things video.
Follow @Richard Bennett
Also read:
- [New] 2024 Approved Popcorn Projections Thorough Review of Film Snack Recorder
- [New] Dive Into Digital Green Magic Top 4 YouTube Sources for No-Cost Background Workshops
- [New] Mastering Social Media Connections Instagram & TikTok for 2024
- [New] The Top 25 Mobile Editors for DJi Filmmaking
- [Updated] Achieve Video Perfection YouTube Studio Edition Tips & Tricks
- [Updated] Explore the Power of VCE 2.2 for Impeccable Video Clarity for 2024
- Debugging Techniques Identifying and Resolving Common JavaScript Errors for 2024
- Elevate Your Youtube Profitability Anywhere, Anytime for 2024
- Exploring Genres A Collection of 15 Innovative Musician-Focused Videos
- Failure to Adhere to Recommended Calibration Frequencies Can Result in Product Quality Issues and Non-Compliance with Industry Standards.
- How to Download YouTube Tunes Without Risk for Free
- In 2024, Du Recorder Features and Review
- In 2024, Top Apps and Online Tools To Track Samsung Galaxy F04 Phone With/Without IMEI Number
- In 2024, Your Ultimate Manual for Opting Into YouTube Premium
- Increase Watch Time, Win Viewers on YouTube
- The Science of Display Understanding Srgb vs Rgb Colors for 2024
- The Ultimate Hash Tag Guide for Gamers' YouTube Channels
- Title: Amplify Your Youtubes' Interaction with Emojis for 2024
- Author: Steven
- Created at : 2025-02-13 16:22:56
- Updated at : 2025-02-20 17:15:33
- Link: https://youtube-clips.techidaily.com/amplify-your-youtubes-interaction-with-emojis-for-2024/
- License: This work is licensed under CC BY-NC-SA 4.0.