
:max_bytes(150000):strip_icc()/GettyImages-640608114-590235945f9b5810dcabd4b5.jpg)
"Advanced Presentation Techniques YouTube in Slides for 2024"
Advanced Presentation Techniques: YouTube in Slides
Create High-Quality Video - Wondershare Filmora
An easy and powerful YouTube video editor
Numerous video and audio effects to choose from
Detailed tutorials provided by the official channel
Google Slide presentation is a powerful tool for creators to keep their audience engaged. This online platform lets you create and demonstrate your ideas. It will capture your viewers’ attention from the very beginning. It also doesn’t matter whatever learning style you engage. Adding YouTube videos to Google Slide will appeal to all levels of individuals.
More so, it is the best way to provide a break for both the audience and the creator. You can break Google Slide presentations with videos to offer some break. Viewers and the presenter get a breather in the process. The presenter can take a short break from speaking while the video plays. Let’s now dive into how to embed a YouTube video in Google Slides.

In this article
01 Why should we add a video to Google Slides?
02 How to add a YouTube video to Google Slide
03 How to choose the right video for your Slides?
Why should we add a video to Google Slides?
There is a great impact of adding video to Google Slides.
For attention
Videos will automatically awaken you, especially if your thoughts have started to sway during a presentation. A video has a direct way of showing creativity. The audience automatically connects the dots between the video and the presentation lines alike.
To stimulate discussion
A picture is worth a thousand words. There is a way that an added video will help the audience connect to the day’s topic. It will bring up several ideas and stir up discussion with the presenter.
Easy following
With videos embedded in Google Slide, viewers will find it easy to understand and digest. Videos automatically eliminate boredom and make any topic interesting.
How to add a YouTube video to Google Slide
Use these two methods to add a YouTube video to Google Slides. Via the Search and Direct link.
Method 1. Embed YouTube video to Google Slide by search and selection
Google has owned YouTube since the year 2006. You can, therefore, integrate Google’s products with YouTube easily.
Step 1. First, go to the slide where you want to embed your video.
Step 2. Then choose the “Insert” option from the menu bar and hit the “Video” option.

Step 3. It would be best if you now viewed the “YouTube” search bar to type in the video you want to embed. You can use keywords to search for the video in question and view instant search results.
Step 4. Then select the video you want to embed, and you’ll see it appear on the “Slide.”

Step 5. Format your video. Remember that the entire video will be embedded. You don’t necessarily need the whole video. It is time to select just a brief but relevant clip from the video to use. Then position your video to the right point using the axes from the exact starting point to the finished part you want the video to appear in.
Method 2. Embed YouTube video to Google Slide by direct link
You can engage this method if you want to include the entire video.
Step 1. Get the URL of the specific YouTube video that you want to use.

Step 2. Then go to your browser’s “Address bar” to copy the YouTube link.
Step 3. Next, open the “Presentation” slide to put your video to.
Step 4. Choose the “Insert” tab from the menu bar.
Step 5. Then hit on the “Video” option from the drop-down menu that appears.
Step 6. A new window will open automatically. Choose the “By URL” tab.
Step 7. Then paste the YouTube video URL in the “Paste YouTube URL Here” bar section.

Step 8. Wait for the video file to load and press the “Select” option. The video will immediately appear in the presentation slide. Just drag and drop the video in your preferred position.
Note: You can do a few edits inside the application. Set the timer when your video should start and when to stop. You can also adjust the video player size.
How to choose the right video for your Slides?
Not all videos will make an impact on your Google Slide. You need to use the best shot that adds value to your presentation. These guidelines will help you to settle on the best video.
Be Professional – choose the best video for your presentation. Remember that the video is part of the presentation and carries more weight. Settling for quality video will bring out the professionalism in you.
Relevant – how do you know that what you are showing your audience corresponds to the presentation piece? Ensure that the video you add has something to do with the Google Slide presentation topic. The two should naturally flow to make it easy to understand the whole concept.
Precise – your presentation is not about the video. The ideal length should not exceed 60 seconds. The longer the video, the greater the chance for your audience to lose track along the way.
Know every footage you are working with – this will help you pick the best shots for your presentation. So, learn every aspect of the video before settling down to use it.
Add new content – even though one content may suit several presentations, don’t rely on the same piece each time. Your audience will want to feel something fresh each time you are presenting. So, compose different videos for different scenarios to make that big impact.
Create an eye-catching video for your Slides with Filmora
The video quality matters when it comes to creating your Slides. The best video creator – Filmora – works in simple steps to give you an eye-catching video. It will create videos for all scenarios like marketing, tutorial, gaming, etc.
Key features of Filmora
- It offers you advanced video effects like filters, motion elements, etc
- You can multiply your fun with multiple screens with the Split Screen feature
- Easily change backgrounds using the Green Screen feature
- The speed control lets you fast forward or slow down a special moment
- Import your video clips to social media platforms
- You can also adjust the audio of your tracks using the Audio Mixer feature
Follow this guide to create a video for your slide with Filmora
Step 1. Launch Filmora
First, begin by downloading and installing Filmora on your computer device. Once installed, launch it and allow it to run. You can either create a new project or open an existing project to work on.
Step 2. Create a new project
Here, click on the “New Project” tab on the app’s welcome screen. The editor should load immediately. Then proceed to register the product. Just hit on the “Register” tab.
Step 3. Import video
Check the upper left corner of your screen to see the “Import” tab. Click on it and choose the “Import Media Files” option. Next, navigate to the location of your computer’s local list to select the clip or video you want to edit. Then, hit the “Import” button to add the video to the timeline for editing.
Step 4. Edit video
Drag and drop the raw footage to Filmora’s timeline to begin editing. Here, you can trim, add other video clips, merge, and add effects as you wish. Likewise, you can add opening titles, subtitles, and end credits to your video. More so, this tool offers different templates to use. Just drag and drop the templates you wish to use to a specific location on the timeline.
Step 5. Preview your file
Last but not least, you can preview your files. Click on the “Play” tab to start previewing your video clips. The main essence of this part is to allow you to make the necessary changes to your clips if there is a need.
Step 6. Export and Share
With Filmora, you can export your file to various social media platforms. But first, go to the “Output window” and select the video file format to use. This software supports several output formats to apply to any platform and device. Just click on the “Format” tab and choose the file format to use. Then also change the resolution and other parameters like frame rate and channel of your video in the “Settings” section. Finally, share your video to your YouTube channel and get ready to add the video to the Google Slide presentation.
For Win 7 or later (64-bit)
For macOS 10.12 or later
Conclusion
● You now know how to put a YouTube video in Google Slides the simple way. You can search for your YouTube videos or directly use the URL link. Whatever the case, remember that it’s the quality of your video that carries more weight. Thanks to the availability of third-party apps that you can use to create and improve the quality of your videos.
● Filmora is at your service to create high-resolution videos that you can export in any format to your YouTube channel. The tool is intuitive, and it won’t matter whether you haven’t tried it before. It is a perfect choice for both professionals and first-time users.
Google Slide presentation is a powerful tool for creators to keep their audience engaged. This online platform lets you create and demonstrate your ideas. It will capture your viewers’ attention from the very beginning. It also doesn’t matter whatever learning style you engage. Adding YouTube videos to Google Slide will appeal to all levels of individuals.
More so, it is the best way to provide a break for both the audience and the creator. You can break Google Slide presentations with videos to offer some break. Viewers and the presenter get a breather in the process. The presenter can take a short break from speaking while the video plays. Let’s now dive into how to embed a YouTube video in Google Slides.
In this article
01 Why should we add a video to Google Slides?
02 How to add a YouTube video to Google Slide
03 How to choose the right video for your Slides?
Why should we add a video to Google Slides?
There is a great impact of adding video to Google Slides.
For attention
Videos will automatically awaken you, especially if your thoughts have started to sway during a presentation. A video has a direct way of showing creativity. The audience automatically connects the dots between the video and the presentation lines alike.
To stimulate discussion
A picture is worth a thousand words. There is a way that an added video will help the audience connect to the day’s topic. It will bring up several ideas and stir up discussion with the presenter.
Easy following
With videos embedded in Google Slide, viewers will find it easy to understand and digest. Videos automatically eliminate boredom and make any topic interesting.
How to add a YouTube video to Google Slide
Use these two methods to add a YouTube video to Google Slides. Via the Search and Direct link.
Method 1. Embed YouTube video to Google Slide by search and selection
Google has owned YouTube since the year 2006. You can, therefore, integrate Google’s products with YouTube easily.
Step 1. First, go to the slide where you want to embed your video.
Step 2. Then choose the “Insert” option from the menu bar and hit the “Video” option.
Step 3. It would be best if you now viewed the “YouTube” search bar to type in the video you want to embed. You can use keywords to search for the video in question and view instant search results.
Step 4. Then select the video you want to embed, and you’ll see it appear on the “Slide.”
Step 5. Format your video. Remember that the entire video will be embedded. You don’t necessarily need the whole video. It is time to select just a brief but relevant clip from the video to use. Then position your video to the right point using the axes from the exact starting point to the finished part you want the video to appear in.
Method 2. Embed YouTube video to Google Slide by direct link
You can engage this method if you want to include the entire video.
Step 1. Get the URL of the specific YouTube video that you want to use.
Step 2. Then go to your browser’s “Address bar” to copy the YouTube link.
Step 3. Next, open the “Presentation” slide to put your video to.
Step 4. Choose the “Insert” tab from the menu bar.
Step 5. Then hit on the “Video” option from the drop-down menu that appears.
Step 6. A new window will open automatically. Choose the “By URL” tab.
Step 7. Then paste the YouTube video URL in the “Paste YouTube URL Here” bar section.
Step 8. Wait for the video file to load and press the “Select” option. The video will immediately appear in the presentation slide. Just drag and drop the video in your preferred position.
Note: You can do a few edits inside the application. Set the timer when your video should start and when to stop. You can also adjust the video player size.
How to choose the right video for your Slides?
Not all videos will make an impact on your Google Slide. You need to use the best shot that adds value to your presentation. These guidelines will help you to settle on the best video.
Be Professional – choose the best video for your presentation. Remember that the video is part of the presentation and carries more weight. Settling for quality video will bring out the professionalism in you.
Relevant – how do you know that what you are showing your audience corresponds to the presentation piece? Ensure that the video you add has something to do with the Google Slide presentation topic. The two should naturally flow to make it easy to understand the whole concept.
Precise – your presentation is not about the video. The ideal length should not exceed 60 seconds. The longer the video, the greater the chance for your audience to lose track along the way.
Know every footage you are working with – this will help you pick the best shots for your presentation. So, learn every aspect of the video before settling down to use it.
Add new content – even though one content may suit several presentations, don’t rely on the same piece each time. Your audience will want to feel something fresh each time you are presenting. So, compose different videos for different scenarios to make that big impact.
Create an eye-catching video for your Slides with Filmora
The video quality matters when it comes to creating your Slides. The best video creator – Filmora – works in simple steps to give you an eye-catching video. It will create videos for all scenarios like marketing, tutorial, gaming, etc.
Key features of Filmora
- It offers you advanced video effects like filters, motion elements, etc
- You can multiply your fun with multiple screens with the Split Screen feature
- Easily change backgrounds using the Green Screen feature
- The speed control lets you fast forward or slow down a special moment
- Import your video clips to social media platforms
- You can also adjust the audio of your tracks using the Audio Mixer feature
Follow this guide to create a video for your slide with Filmora
Step 1. Launch Filmora
First, begin by downloading and installing Filmora on your computer device. Once installed, launch it and allow it to run. You can either create a new project or open an existing project to work on.
Step 2. Create a new project
Here, click on the “New Project” tab on the app’s welcome screen. The editor should load immediately. Then proceed to register the product. Just hit on the “Register” tab.
Step 3. Import video
Check the upper left corner of your screen to see the “Import” tab. Click on it and choose the “Import Media Files” option. Next, navigate to the location of your computer’s local list to select the clip or video you want to edit. Then, hit the “Import” button to add the video to the timeline for editing.
Step 4. Edit video
Drag and drop the raw footage to Filmora’s timeline to begin editing. Here, you can trim, add other video clips, merge, and add effects as you wish. Likewise, you can add opening titles, subtitles, and end credits to your video. More so, this tool offers different templates to use. Just drag and drop the templates you wish to use to a specific location on the timeline.
Step 5. Preview your file
Last but not least, you can preview your files. Click on the “Play” tab to start previewing your video clips. The main essence of this part is to allow you to make the necessary changes to your clips if there is a need.
Step 6. Export and Share
With Filmora, you can export your file to various social media platforms. But first, go to the “Output window” and select the video file format to use. This software supports several output formats to apply to any platform and device. Just click on the “Format” tab and choose the file format to use. Then also change the resolution and other parameters like frame rate and channel of your video in the “Settings” section. Finally, share your video to your YouTube channel and get ready to add the video to the Google Slide presentation.
For Win 7 or later (64-bit)
For macOS 10.12 or later
Conclusion
● You now know how to put a YouTube video in Google Slides the simple way. You can search for your YouTube videos or directly use the URL link. Whatever the case, remember that it’s the quality of your video that carries more weight. Thanks to the availability of third-party apps that you can use to create and improve the quality of your videos.
● Filmora is at your service to create high-resolution videos that you can export in any format to your YouTube channel. The tool is intuitive, and it won’t matter whether you haven’t tried it before. It is a perfect choice for both professionals and first-time users.
Mirrorless vs DSLR: Video Mastery in Focus
Mirrorless vs. DSLR Cameras: Which is Better for Videos?

Richard Bennett
Oct 26, 2023• Proven solutions
If you’re looking to shoot your videos with interchangeable lenses, your camera set up will either have to have a mirrorless camera body or a DSLR camera body. In this post, I’ll be comparing the two camera body types for recording video.
- Part 1: What is a DSLR Camera?
- Part 2: What is a Mirrorless Camera?
- Part 3: Mirrorless vs. DSLR - a Complete Comparison
- Part 4: Mirrorless vs. DSLR - Which One is Better for Video?
What is a DSLR Camera?
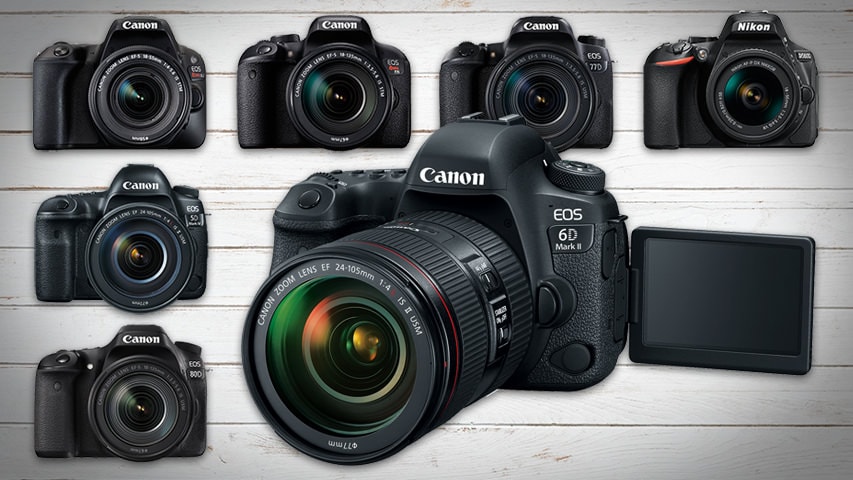
DSLR cameras are digital single-lens reflex cameras. Like 35mm film cameras of the past, DSLR cameras are built with an angled mirror inside its camera body. This mirror allows you to look into your camera’s optical viewfinder and see exactly what your camera sees.
The mirror inside a DSLR camera flips up out of the way when you open the shutter to allow light to reach the camera’s image sensor.
Check out our list of the 7 Best DSLR Cameras For Vlogging .
What is a Mirrorless Camera?
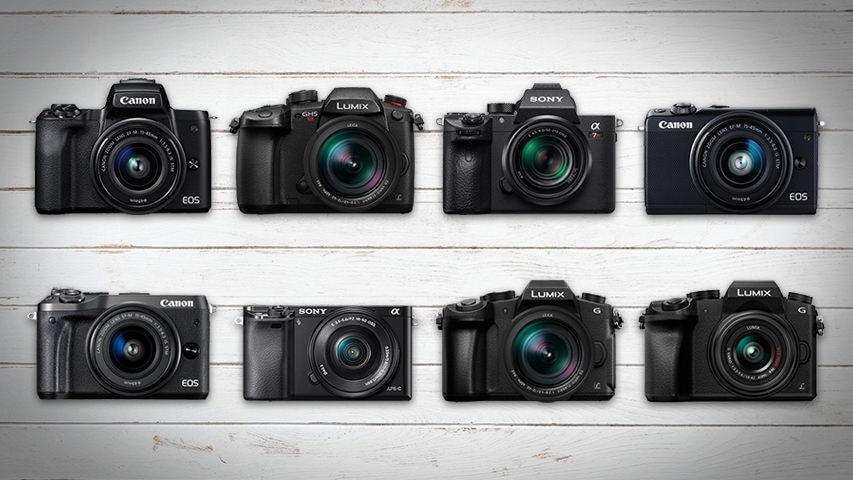
Mirrorless cameras are interchangeable lens cameras without a mirror inside the camera body. With nothing to reflect your image, you won’t find any optical viewfinder to look through to see exactly what your camera sees.
Light passes through the lens of a mirrorless camera and lands directly onto the camera’s sensor.
Check out our list of the 8 Best Mirrorless Cameras For Vlogging .
Mirrorless vs. DSLR - a Complete Comparison
Size and Weight
DSLR cameras are larger and heavier than mirrorless cameras because there are more parts that go into their camera bodies. DSLR cameras require enough space inside for an angled mirror to flip up out of the way.
If your video shooting style is more on-the-go, like that of a daily vlogger or travel vlogger, the smaller size and lighter weight of a mirrorless camera may be more suitable for you.
Previewing Images
When you’re using a DSLR camera, your optical viewfinder will show you exactly what your camera sees as opposed to a digital preview of what your image sensor picks up. No matter how bright or dark your scene actually is, through the optical viewfinder, you’ll be able to clearly see what your camera sees with the power of your eye.
Mirrorless cameras, on the other hand, display on your camera’s screen or electronic viewfinder a digital preview of what your camera is looking at. You will notice a lag, especially in low light, between actions that are taking place in front of the camera and the same actions being displayed in your live preview.
Lenses and Accessories
Having been around much longer, there are plenty more options for lenses and accessories when it comes to shooting with DSLR cameras. You can choose from all kinds of different quality levels and price ranges.
Video Resolution
4K video recording is more readily available in mirrorless cameras than DSLR cameras. At a much more affordable budget, you can get your hands on a 4K mirrorless camera. If you want to shoot 4K video on a DSLR camera, though, you will have to pay for some of the most expensive DSLR cameras on the market.
Image Stabilization
Up until quite recently, you needed to get the right lens with built-in optical image stabilization if you wanted to shoot stabilized photos and videos with an interchangeable lens camera. Image stabilization had not been readily available in the bodies of these cameras.
In recent years, however, mirrorless cameras have been much more active in their development of camera bodies equipped with shifting image sensors. Your shots can be even more stabilized when the optical image stabilization of your lens is combined with your camera’s in-body sensor-shift image stabilization.
Battery Life
When it comes to shooting video, DSLR cameras and mirrorless cameras consume about the same amount of power. It’s still safe to say, though, that DSLR cameras, for the most part, have better battery life than mirrorless cameras because their bigger batteries are packed with more power.
Mirrorless vs. DSLR - Which One is Better for Video?
In my opinion, when it comes to filming a video, mirrorless cameras are the way to go. In such a short time, mirrorless cameras have made huge leaps in their capabilities. It won’t be long before the ultimate vlogging camera comes out on the mirrorless market.
In the end, if you need to edit videos futhermore, try Filmora video editor . It’s a video editor which has significantly improved overall performance, making the product faster, and more powerful, and taking the user editing experience to a new level.
It is perfect for helping beginners, and intermediate users create stylish videos by providing an intuitive user interface and built-in effects.
![]()
Richard Bennett
Richard Bennett is a writer and a lover of all things video.
Follow @Richard Bennett
Richard Bennett
Oct 26, 2023• Proven solutions
If you’re looking to shoot your videos with interchangeable lenses, your camera set up will either have to have a mirrorless camera body or a DSLR camera body. In this post, I’ll be comparing the two camera body types for recording video.
- Part 1: What is a DSLR Camera?
- Part 2: What is a Mirrorless Camera?
- Part 3: Mirrorless vs. DSLR - a Complete Comparison
- Part 4: Mirrorless vs. DSLR - Which One is Better for Video?
What is a DSLR Camera?
DSLR cameras are digital single-lens reflex cameras. Like 35mm film cameras of the past, DSLR cameras are built with an angled mirror inside its camera body. This mirror allows you to look into your camera’s optical viewfinder and see exactly what your camera sees.
The mirror inside a DSLR camera flips up out of the way when you open the shutter to allow light to reach the camera’s image sensor.
Check out our list of the 7 Best DSLR Cameras For Vlogging .
What is a Mirrorless Camera?
Mirrorless cameras are interchangeable lens cameras without a mirror inside the camera body. With nothing to reflect your image, you won’t find any optical viewfinder to look through to see exactly what your camera sees.
Light passes through the lens of a mirrorless camera and lands directly onto the camera’s sensor.
Check out our list of the 8 Best Mirrorless Cameras For Vlogging .
Mirrorless vs. DSLR - a Complete Comparison
Size and Weight
DSLR cameras are larger and heavier than mirrorless cameras because there are more parts that go into their camera bodies. DSLR cameras require enough space inside for an angled mirror to flip up out of the way.
If your video shooting style is more on-the-go, like that of a daily vlogger or travel vlogger, the smaller size and lighter weight of a mirrorless camera may be more suitable for you.
Previewing Images
When you’re using a DSLR camera, your optical viewfinder will show you exactly what your camera sees as opposed to a digital preview of what your image sensor picks up. No matter how bright or dark your scene actually is, through the optical viewfinder, you’ll be able to clearly see what your camera sees with the power of your eye.
Mirrorless cameras, on the other hand, display on your camera’s screen or electronic viewfinder a digital preview of what your camera is looking at. You will notice a lag, especially in low light, between actions that are taking place in front of the camera and the same actions being displayed in your live preview.
Lenses and Accessories
Having been around much longer, there are plenty more options for lenses and accessories when it comes to shooting with DSLR cameras. You can choose from all kinds of different quality levels and price ranges.
Video Resolution
4K video recording is more readily available in mirrorless cameras than DSLR cameras. At a much more affordable budget, you can get your hands on a 4K mirrorless camera. If you want to shoot 4K video on a DSLR camera, though, you will have to pay for some of the most expensive DSLR cameras on the market.
Image Stabilization
Up until quite recently, you needed to get the right lens with built-in optical image stabilization if you wanted to shoot stabilized photos and videos with an interchangeable lens camera. Image stabilization had not been readily available in the bodies of these cameras.
In recent years, however, mirrorless cameras have been much more active in their development of camera bodies equipped with shifting image sensors. Your shots can be even more stabilized when the optical image stabilization of your lens is combined with your camera’s in-body sensor-shift image stabilization.
Battery Life
When it comes to shooting video, DSLR cameras and mirrorless cameras consume about the same amount of power. It’s still safe to say, though, that DSLR cameras, for the most part, have better battery life than mirrorless cameras because their bigger batteries are packed with more power.
Mirrorless vs. DSLR - Which One is Better for Video?
In my opinion, when it comes to filming a video, mirrorless cameras are the way to go. In such a short time, mirrorless cameras have made huge leaps in their capabilities. It won’t be long before the ultimate vlogging camera comes out on the mirrorless market.
In the end, if you need to edit videos futhermore, try Filmora video editor . It’s a video editor which has significantly improved overall performance, making the product faster, and more powerful, and taking the user editing experience to a new level.
It is perfect for helping beginners, and intermediate users create stylish videos by providing an intuitive user interface and built-in effects.
![]()
Richard Bennett
Richard Bennett is a writer and a lover of all things video.
Follow @Richard Bennett
Also read:
- 2024 Approved Digital Dynamos 8 YouTube Channels Surging Forward
- 2024 Approved Dominate YouTube Traffic with Proficient Use of Creator Studio
- Captivate Audiences with Effective and Appealing Video Previews for 2024
- Turn Your Tactical Talks Into a Thriving YouTube Trade
- Unlimited Christmas Classics 9 Films Available for No Charge!
- Tag Tactics Amplifying Your Gaming Content Online
- Your Visual Impact Journey Begins with Our 50 FREE Banners!
- [Updated] Epic Editing Illusions YouTube Edition
- 10 Essential Tips for Achieving Wealth Through YouTube Video Views
- Enhance Engagement Top Tools and Tips for Properly Tagged Videos
- In 2024, Audience Wow Factor The Best Camera Lenses for YouTube Stars
- [New] Best Free YouTube to MP3 Converters You Should Know [Online/Win/Mac]
- Worldwide Rankings Top 10 YouTube Influencers by Subscription Counts
- Best Buy List Selecting the Premier Video Cards for YouTube for 2024
- In 2024, A Convenient Compilation Finding Your YT Comments
- The Non-Indexable World of YouTube A Compreayer Guide to ‘Unlisted’ Videos
- 2024 Approved Collaborative Video Creation & Growth Tips
- [New] Cut Beyond Youtube Unveiling the Top 5 Video Editor Options
- IOS+Android Guide to Invisible YouTube Viewing
- 2024 Approved Disabling YouTube Ads Across Chrome, Firefox, Android & iOS Browsers
- No Cost Cinema – Your Guide to the Top 10 Free Film Shows Online
- A Complete Guide to Crafting Best-in-Class YT Thumbnails for 2024
- Become a Trending Sensation with These Effective YouTube SEO Strategies for 2024
- In 2024, Echoes of Excellence 10 Strategies for Superior Sound Quality
- Accelerate YT Growth Strategies for 1K+ Subscribers
- [Updated] Contrasting Copyright Clauses in Youtube & the Freedom of CC
- How to Create a Killer Unboxing Video A Complete Guide
- 3-Step Financial Forecasting Assessing Revenue From Google's Platform, YouTube for 2024
- Educators' Guide to Thriving YouTube Channels – 10 Must-Know Secrets for 2024
- Procure No-Cost Media Content From Prime 4 YouTube Vids
- [Updated] Cinematography Secrets Unveiled by YouTube Pros
- 2024 Approved Discovering 2023'S Cinematic Hidden Gems
- In 2024, Breakdown Fundamental Aspects of ASMR Videos
- [New] Best Free YouTube Intro Makers to Create Awesome Intros
- 2024 Approved Elevating Your YouTube Comments with Emoji Skills
- Streamline Your Online Listening Experience with Direct Capture
- Decoding YouTube's Economics How to Quantify Watches and Earnings for 2024
- The First-Timer's Blueprint for YouTube Income
- Emulating Old Hollywood Style in Modern Videos for 2024
- Top 15 Augmented Reality Games Like Pokémon GO To Play On Honor 90 Pro | Dr.fone
- Record PS4 with OBS Full Guide
- [New] Expert Strategies for Perfectly Shared Screens on Mobile/Desktop
- [New] 2024 Approved The Definitive Guide for PC, Mac, and Smartphone Movie Logging
- Digital Precision The Art of Perfect Online Image Trimming
- New 2024 Approved The Ultimate Guide to 4K Proxy Video Editing Top Apps
- Can’t view MKV movies content on Huawei
- 2024 Approved Ultimate Guide for Du Recorder Features and Review
- How to unlock Nokia 130 Music
- How to restore wiped messages on Infinix Note 30i
- Full Solutions to Fix Error Code 920 In Google Play on Nokia C22 | Dr.fone
- How to Transfer Data from Realme V30T to Other Android Devices? | Dr.fone
- [Updated] Essential Free Cam Tech Guide Quality and Selection for 2024
- Here, the Main Discussion Is Regarding the Split of the Audio From the Video in the Sony Vegas Pro. There Are Also some Details About the Substitute, Which Is Wondershare Filmora for 2024
- In 2024, 5 Easy Ways to Copy Contacts from Oppo Reno 11 5G to iPhone 14 and 15 | Dr.fone
- Small Business's Safest Video Conferencing Top Picks
- New 2024 Approved Final Cut Pro X Essentials Adding and Customizing Titles
- How To Revive Your Bricked Motorola Moto G84 5G in Minutes | Dr.fone
- Quick-Win Strategies for Replying on Discord Platforms
- In 2024, A Comprehensive Approach to Mastering the Art of Instagram Reels
- In 2024, How to Transfer Data from Xiaomi Civi 3 to Other Android Devices? | Dr.fone
- Mastery in One Bite IO Screen Capture Guidebook for 2024
- Title: "Advanced Presentation Techniques YouTube in Slides for 2024"
- Author: Steven
- Created at : 2024-05-25 18:45:17
- Updated at : 2024-05-26 18:45:17
- Link: https://youtube-clips.techidaily.com/advanced-presentation-techniques-youtube-in-slides-for-2024/
- License: This work is licensed under CC BY-NC-SA 4.0.
