"A Tale of Two Approaches Polite vs Aggressive Asking for 2024"
A Tale of Two Approaches: Polite vs Aggressive Asking
How to Get People to Subscribe to Your YouTube Channel


Richard Bennett
Oct 26, 2023• Proven solutions
The following is a step-by-step tutorial on how to get more subscribers by asking the right way. People are more likely to do something if you give them a bit of a nudge, and that includes subscribing to your YouTube channel.
There are people who think that if people like their videos they’ll subscribe, so they shouldn’t bother people by asking. This is, simply put, wrong. When people are browsing YouTube their minds are on what video they want to watch next, not whether or not they want to subscribe – unless you remind them.
What is a ‘Call To Action’?
It has become the norm for YouTubers to ask viewers to subscribe in their sign-offs. A typical CTA (‘call to action’) goes something like this:
“Thanks for watching. If you liked this video, make sure to subscribe for more!”
That’s great. At the end of a video is a good place to ask people to subscribe, but is it the best and only place you should be reminding them? If you take a peek at your analytics and you might find that most of your viewers aren’t watching to the ends of your videos (people have short attention spans).
A More Effective Way of Asking For Subscribers
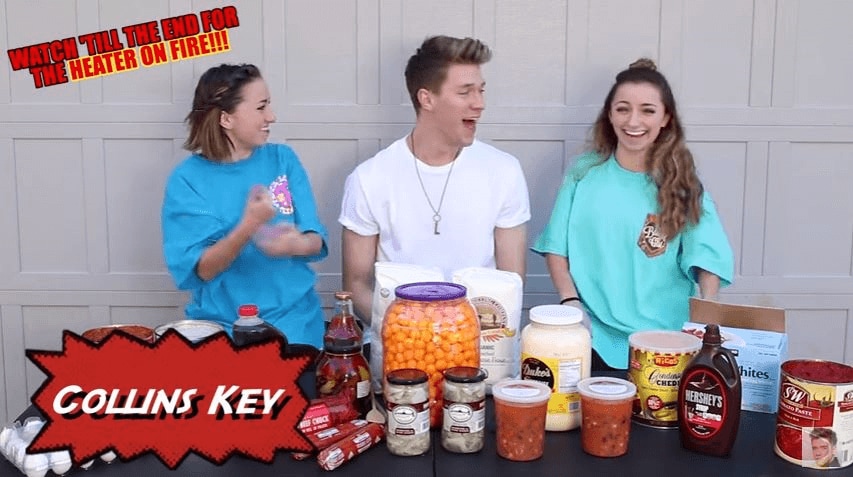
Collins Key is one YouTuber who has mastered asking for subscribers early on, and given that he has over 7 million subscribers himself I’d say it’s working out. Check out the technique in this video collab with Brooklyn and Bailey:
Step 1: How to Hook The Viewer
As you can see, the video starts with a ‘flash forward’ to one of the twins saying the heater is on fire and then a reminder of what’s going to happen later – the heater catching fire – is written in the top left of the screen so it stays on the viewers’ mind. This is one way in which the viewer is immediately hooked.
 Project Manager - Asset Browser for 3Ds Max
Step 2: Get to The Point Quickly
Shortly after, while still in the first 30 seconds of the video, Collins gets right to the point and introduces the Twin Telepathy Challenge promised in the title of the video. The hook with the heater catching fire is effective, but it’s not essential. It happens to suit Collins’ style, and it happens to have happened. Getting to the main point of the video quickly – usually in the first 15 seconds, not the first 30 (it’s in the first 15 seconds that most viewers click away) – is vital. People click on videos for a reason, and if they don’t see a sign of that payoff quickly they’ll leave.
Step 3: Create A Moment - Make Subscribing Part of the Experience
It’s only after hooking the viewer in and reiterating the promise of the title that Collins asks viewers to subscribe. The really clever thing about how he asks is that he carves out time in the video for the viewer to comply with his request. He gives 5 seconds and does a countdown.
 NeoDownloader - Fast and fully automatic image/video/music downloader.
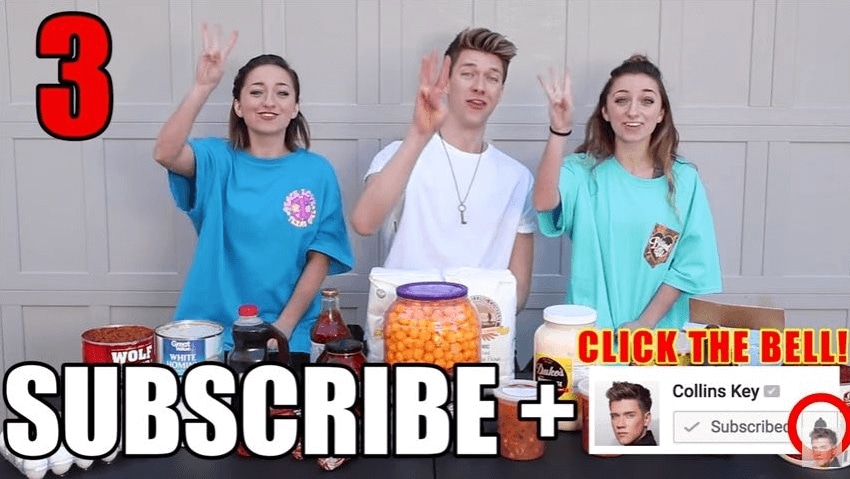
Collins Key has been one of the fastest-growing channels on YouTube. He does not implement this strategy in every video, but it’s not a stretch to think it’s had something to do with his success. Instead of simply asking you to subscribe at the end of the video, he creates a part of the video early on – before people who don’t watch until the end will have clicked away – where you feel as if you’re ‘supposed to’ subscribe.
Polish Your YouTube Videos with Filmora
Even with the above tricks, you may not get the subscribers as you wish unless you can make sure your videos and contents are of high quality. As YouTube is getting more and more popular and more YouTubers are competing for subscribers, you will need to polish your YouTube videos.
As one of the most widely used video editing software in YouTube video editing, Filmora video editor provides lots of templates and effects with an intuitive interface, which saves much time. Its features like motion tracking, audio ducking, keyframing, color matching and effects will help make your video impressive enough to get pepople to subscribe to your channel.
Here is a tutorial video about how to use Filmora to edit your YouTube video. Check it out and try Filmora if you are interested.


That’s how you can get more YouTube subscribers by asking the right way. You may follow the instructions and try it yourself. Do not forget to track your YouTube subscribers in real time to make necessary adjustments.
Richard Bennett
Richard Bennett is a writer and a lover of all things video.
Follow @Richard Bennett
Richard Bennett
Oct 26, 2023• Proven solutions
The following is a step-by-step tutorial on how to get more subscribers by asking the right way. People are more likely to do something if you give them a bit of a nudge, and that includes subscribing to your YouTube channel.
There are people who think that if people like their videos they’ll subscribe, so they shouldn’t bother people by asking. This is, simply put, wrong. When people are browsing YouTube their minds are on what video they want to watch next, not whether or not they want to subscribe – unless you remind them.
 TubeDigger - online video downloader from mostly any site
What is a ‘Call To Action’?
It has become the norm for YouTubers to ask viewers to subscribe in their sign-offs. A typical CTA (‘call to action’) goes something like this:
“Thanks for watching. If you liked this video, make sure to subscribe for more!”
That’s great. At the end of a video is a good place to ask people to subscribe, but is it the best and only place you should be reminding them? If you take a peek at your analytics and you might find that most of your viewers aren’t watching to the ends of your videos (people have short attention spans).
A More Effective Way of Asking For Subscribers
Collins Key is one YouTuber who has mastered asking for subscribers early on, and given that he has over 7 million subscribers himself I’d say it’s working out. Check out the technique in this video collab with Brooklyn and Bailey:
Step 1: How to Hook The Viewer
As you can see, the video starts with a ‘flash forward’ to one of the twins saying the heater is on fire and then a reminder of what’s going to happen later – the heater catching fire – is written in the top left of the screen so it stays on the viewers’ mind. This is one way in which the viewer is immediately hooked.
Step 2: Get to The Point Quickly
Shortly after, while still in the first 30 seconds of the video, Collins gets right to the point and introduces the Twin Telepathy Challenge promised in the title of the video. The hook with the heater catching fire is effective, but it’s not essential. It happens to suit Collins’ style, and it happens to have happened. Getting to the main point of the video quickly – usually in the first 15 seconds, not the first 30 (it’s in the first 15 seconds that most viewers click away) – is vital. People click on videos for a reason, and if they don’t see a sign of that payoff quickly they’ll leave.
Step 3: Create A Moment - Make Subscribing Part of the Experience
It’s only after hooking the viewer in and reiterating the promise of the title that Collins asks viewers to subscribe. The really clever thing about how he asks is that he carves out time in the video for the viewer to comply with his request. He gives 5 seconds and does a countdown.
Collins Key has been one of the fastest-growing channels on YouTube. He does not implement this strategy in every video, but it’s not a stretch to think it’s had something to do with his success. Instead of simply asking you to subscribe at the end of the video, he creates a part of the video early on – before people who don’t watch until the end will have clicked away – where you feel as if you’re ‘supposed to’ subscribe.
Polish Your YouTube Videos with Filmora
Even with the above tricks, you may not get the subscribers as you wish unless you can make sure your videos and contents are of high quality. As YouTube is getting more and more popular and more YouTubers are competing for subscribers, you will need to polish your YouTube videos.
As one of the most widely used video editing software in YouTube video editing, Filmora video editor provides lots of templates and effects with an intuitive interface, which saves much time. Its features like motion tracking, audio ducking, keyframing, color matching and effects will help make your video impressive enough to get pepople to subscribe to your channel.
Here is a tutorial video about how to use Filmora to edit your YouTube video. Check it out and try Filmora if you are interested.
That’s how you can get more YouTube subscribers by asking the right way. You may follow the instructions and try it yourself. Do not forget to track your YouTube subscribers in real time to make necessary adjustments.
Richard Bennett
Richard Bennett is a writer and a lover of all things video.
Follow @Richard Bennett
Richard Bennett
Oct 26, 2023• Proven solutions
The following is a step-by-step tutorial on how to get more subscribers by asking the right way. People are more likely to do something if you give them a bit of a nudge, and that includes subscribing to your YouTube channel.
There are people who think that if people like their videos they’ll subscribe, so they shouldn’t bother people by asking. This is, simply put, wrong. When people are browsing YouTube their minds are on what video they want to watch next, not whether or not they want to subscribe – unless you remind them.
What is a ‘Call To Action’?
It has become the norm for YouTubers to ask viewers to subscribe in their sign-offs. A typical CTA (‘call to action’) goes something like this:
“Thanks for watching. If you liked this video, make sure to subscribe for more!”
That’s great. At the end of a video is a good place to ask people to subscribe, but is it the best and only place you should be reminding them? If you take a peek at your analytics and you might find that most of your viewers aren’t watching to the ends of your videos (people have short attention spans).
A More Effective Way of Asking For Subscribers
Collins Key is one YouTuber who has mastered asking for subscribers early on, and given that he has over 7 million subscribers himself I’d say it’s working out. Check out the technique in this video collab with Brooklyn and Bailey:
Step 1: How to Hook The Viewer
As you can see, the video starts with a ‘flash forward’ to one of the twins saying the heater is on fire and then a reminder of what’s going to happen later – the heater catching fire – is written in the top left of the screen so it stays on the viewers’ mind. This is one way in which the viewer is immediately hooked.

Step 2: Get to The Point Quickly
Shortly after, while still in the first 30 seconds of the video, Collins gets right to the point and introduces the Twin Telepathy Challenge promised in the title of the video. The hook with the heater catching fire is effective, but it’s not essential. It happens to suit Collins’ style, and it happens to have happened. Getting to the main point of the video quickly – usually in the first 15 seconds, not the first 30 (it’s in the first 15 seconds that most viewers click away) – is vital. People click on videos for a reason, and if they don’t see a sign of that payoff quickly they’ll leave.
Step 3: Create A Moment - Make Subscribing Part of the Experience
It’s only after hooking the viewer in and reiterating the promise of the title that Collins asks viewers to subscribe. The really clever thing about how he asks is that he carves out time in the video for the viewer to comply with his request. He gives 5 seconds and does a countdown.
 Greeting Card Builder
Collins Key has been one of the fastest-growing channels on YouTube. He does not implement this strategy in every video, but it’s not a stretch to think it’s had something to do with his success. Instead of simply asking you to subscribe at the end of the video, he creates a part of the video early on – before people who don’t watch until the end will have clicked away – where you feel as if you’re ‘supposed to’ subscribe.
Polish Your YouTube Videos with Filmora
Even with the above tricks, you may not get the subscribers as you wish unless you can make sure your videos and contents are of high quality. As YouTube is getting more and more popular and more YouTubers are competing for subscribers, you will need to polish your YouTube videos.
As one of the most widely used video editing software in YouTube video editing, Filmora video editor provides lots of templates and effects with an intuitive interface, which saves much time. Its features like motion tracking, audio ducking, keyframing, color matching and effects will help make your video impressive enough to get pepople to subscribe to your channel.
Here is a tutorial video about how to use Filmora to edit your YouTube video. Check it out and try Filmora if you are interested.
That’s how you can get more YouTube subscribers by asking the right way. You may follow the instructions and try it yourself. Do not forget to track your YouTube subscribers in real time to make necessary adjustments.
 vMix 4K - Software based live production. vMix 4K includes everything in vMix HD plus 4K support, PTZ control, External/Fullscreen output, 4 Virtual Outputs, 1 Replay, 4 vMix Call, and 2 Recorders.
Richard Bennett
Richard Bennett is a writer and a lover of all things video.
Follow @Richard Bennett
Richard Bennett
Oct 26, 2023• Proven solutions
The following is a step-by-step tutorial on how to get more subscribers by asking the right way. People are more likely to do something if you give them a bit of a nudge, and that includes subscribing to your YouTube channel.
There are people who think that if people like their videos they’ll subscribe, so they shouldn’t bother people by asking. This is, simply put, wrong. When people are browsing YouTube their minds are on what video they want to watch next, not whether or not they want to subscribe – unless you remind them.
What is a ‘Call To Action’?
It has become the norm for YouTubers to ask viewers to subscribe in their sign-offs. A typical CTA (‘call to action’) goes something like this:
“Thanks for watching. If you liked this video, make sure to subscribe for more!”
That’s great. At the end of a video is a good place to ask people to subscribe, but is it the best and only place you should be reminding them? If you take a peek at your analytics and you might find that most of your viewers aren’t watching to the ends of your videos (people have short attention spans).
A More Effective Way of Asking For Subscribers
Collins Key is one YouTuber who has mastered asking for subscribers early on, and given that he has over 7 million subscribers himself I’d say it’s working out. Check out the technique in this video collab with Brooklyn and Bailey:
Step 1: How to Hook The Viewer
As you can see, the video starts with a ‘flash forward’ to one of the twins saying the heater is on fire and then a reminder of what’s going to happen later – the heater catching fire – is written in the top left of the screen so it stays on the viewers’ mind. This is one way in which the viewer is immediately hooked.
Step 2: Get to The Point Quickly
Shortly after, while still in the first 30 seconds of the video, Collins gets right to the point and introduces the Twin Telepathy Challenge promised in the title of the video. The hook with the heater catching fire is effective, but it’s not essential. It happens to suit Collins’ style, and it happens to have happened. Getting to the main point of the video quickly – usually in the first 15 seconds, not the first 30 (it’s in the first 15 seconds that most viewers click away) – is vital. People click on videos for a reason, and if they don’t see a sign of that payoff quickly they’ll leave.
Step 3: Create A Moment - Make Subscribing Part of the Experience
It’s only after hooking the viewer in and reiterating the promise of the title that Collins asks viewers to subscribe. The really clever thing about how he asks is that he carves out time in the video for the viewer to comply with his request. He gives 5 seconds and does a countdown.
Collins Key has been one of the fastest-growing channels on YouTube. He does not implement this strategy in every video, but it’s not a stretch to think it’s had something to do with his success. Instead of simply asking you to subscribe at the end of the video, he creates a part of the video early on – before people who don’t watch until the end will have clicked away – where you feel as if you’re ‘supposed to’ subscribe.
 HD Video Converter Factory Pro
Polish Your YouTube Videos with Filmora
Even with the above tricks, you may not get the subscribers as you wish unless you can make sure your videos and contents are of high quality. As YouTube is getting more and more popular and more YouTubers are competing for subscribers, you will need to polish your YouTube videos.
As one of the most widely used video editing software in YouTube video editing, Filmora video editor provides lots of templates and effects with an intuitive interface, which saves much time. Its features like motion tracking, audio ducking, keyframing, color matching and effects will help make your video impressive enough to get pepople to subscribe to your channel.
Here is a tutorial video about how to use Filmora to edit your YouTube video. Check it out and try Filmora if you are interested.
 vMix Basic HD - Software based live production. vMix Basic HD includes 4 inputs, 3 cameras, streaming, recording, playlist.
That’s how you can get more YouTube subscribers by asking the right way. You may follow the instructions and try it yourself. Do not forget to track your YouTube subscribers in real time to make necessary adjustments.
![]() FX PRO (Gold Robot + Silver Robot(Basic Package))
FX PRO (Gold Robot + Silver Robot(Basic Package))
Richard Bennett
Richard Bennett is a writer and a lover of all things video.
Follow @Richard Bennett
Mastering YT: Techniques for Fading Out Unwanted Backgrounds
How to Blur Background of Your YouTube Video
Richard Bennett
Mar 27, 2024• Proven solutions
A lot of YouTubers like to vlog in front of blurred backgrounds. Blurring the background of your YouTube video is a fast way to make it look more professional – you stand out when you are entirely in focus, and everything behind you is blurry. Plus, it is an easy way to disguise the room you are vlogging from.

Even if your set is clean, there could be things like books behind you, which will distract viewers; they will be trying to read the spines. Blurring out the background of your shot makes your video look polished and keeps people’s focus entirely on you.
- Part 1: Blur YouTube Video Background in Shooting Videos
- Part 2: Add Tilt-Shift Effects to Video in Editing
Part 1: How to Blur Background of Your YouTube Video in Shooting Videos
Blurring your background is also how you create a beautiful bokeh lighting effect. Bokeh is when you blur lights in the background of your shot, creating halo-like circles of light. By attaching a filter with a shape cut out to the camera lens, you can even generate bokeh lights in other shapes, like hearts or stars.
Aperture refers to the hole in your lens which allows light into your camera. A narrow aperture lets in less light, and a wide aperture lets in more. The wider your aperture is, the shallower your depth of field will be. Widening your aperture also helps your camera perform better in low-light situations. Widening your aperture too much under the wrong circumstances can let in too much light and result in your footage being overexposed.
Depth of Field is the area of your image that is in focus. If you have a large depth of field, then objects close to and far away from your camera will all be in focus. Only a select area will be focused and the rest will be blurred if you have a shallow depth of field.
F-Stops are the measurement of an aperture’s width. The higher your f-stop, the narrower your aperture will be. To create a blurred background or a bokeh effect, you need a wide aperture, and thus a small f-stop. F-stops are written like ‘f/1.4’. You need an f-stop of less than f/4 to blur your background, and less than f/2.8 for bokeh.
1. Blurring and Bokeh
Blurred backgrounds and bokeh are very closely related. A bokeh effect is essentially a blurred background that includes lights.
To achieve a blurred background or a bokeh effect, you need to have a shallow depth of field. That means a wide aperture and a low f-stop.
2. How to Blur your Background
Place your subject – in the case of a vlog, your subject is probably yourself – in a shallow depth of field, and they will remain sharply in focus while everything behind them is blurred.
If the subject is yourself, you might need a helper to either operate your camera or stand in for you while you set up your camera. You will need to be able to check that the place you plan to stand or sit is in focus.
To get a shallow depth of field, make sure your aperture is wide. Do this by setting a low f-stop. Ideally, your f-stop will be 2.8 or lower, but if your camera cannot go that low, then f/3 or f/4 can also work.
Creating a bokeh effect is mostly the same, except that it works best when your subject/depth of field is very close to the camera, and you have a light source off in the background. Zoom Lenses do not usually have wide enough apertures to create bokeh backgrounds.
Blur Video Background in Post-Production with Wondershare Filmora Video Editor
If you need to blur the video background after shooting, you can use some video editing software to add the bokeh effect or the tilt-off effect in post-production. Here, I will show you how to do that in Filmora.
Filmora is one of the most widely used video editing software among YouTubers. Its user-friendly interface and tutorial guide enables green-hands to start video editing quickly. Besides, you can find many free filters, effects, and elements pre-programmed, so you can use them directly without looking for presets and templates somewhere else.
 Software Update Pro - Check and update software installed on your computer.
1. Add Bokeh Filter to Video in Filmora
There are about 20 bokeh effects available in filters and overlays. You can find them easily by typing bokeh in the search bar in Effects.
Note: you should select Included to see all bokeh effects pre-programmed in Filmora. If you need more visual effects, just go to the Filmstock effects store.

Double click the bokeh effect to preview the result, and if you find the bokeh effect fits the video, just drop it to the track above the video. And the bokeh filter or overlay will be applied to the video automatically.
2. Use Tilt-Shift Circle/Linear Effect to Blur Video Background
Filmora features two tilt effects, tilt-shift circle and tilt-shift linear, which allows you to highlight people in the video, blur, and conceal the video background.
Go to the Effects tab and then switch to the Utility menu under Included category.

Here, I will select the Tilt-Shift Circle effect and drop it to the track above the video. Now, you can adjust the size, position, and intensity of the tilt-shift circle effect

You see, the video background is blurred, and the people are highlighted. Now it’s your turn to download the Filmora video editor and try it yourself.

Richard Bennett
Richard Bennett is a writer and a lover of all things video.
Follow @Richard Bennett
Richard Bennett
Mar 27, 2024• Proven solutions
A lot of YouTubers like to vlog in front of blurred backgrounds. Blurring the background of your YouTube video is a fast way to make it look more professional – you stand out when you are entirely in focus, and everything behind you is blurry. Plus, it is an easy way to disguise the room you are vlogging from.
Even if your set is clean, there could be things like books behind you, which will distract viewers; they will be trying to read the spines. Blurring out the background of your shot makes your video look polished and keeps people’s focus entirely on you.
- Part 1: Blur YouTube Video Background in Shooting Videos
- Part 2: Add Tilt-Shift Effects to Video in Editing

Part 1: How to Blur Background of Your YouTube Video in Shooting Videos
Blurring your background is also how you create a beautiful bokeh lighting effect. Bokeh is when you blur lights in the background of your shot, creating halo-like circles of light. By attaching a filter with a shape cut out to the camera lens, you can even generate bokeh lights in other shapes, like hearts or stars.
Aperture refers to the hole in your lens which allows light into your camera. A narrow aperture lets in less light, and a wide aperture lets in more. The wider your aperture is, the shallower your depth of field will be. Widening your aperture also helps your camera perform better in low-light situations. Widening your aperture too much under the wrong circumstances can let in too much light and result in your footage being overexposed.
Depth of Field is the area of your image that is in focus. If you have a large depth of field, then objects close to and far away from your camera will all be in focus. Only a select area will be focused and the rest will be blurred if you have a shallow depth of field.
F-Stops are the measurement of an aperture’s width. The higher your f-stop, the narrower your aperture will be. To create a blurred background or a bokeh effect, you need a wide aperture, and thus a small f-stop. F-stops are written like ‘f/1.4’. You need an f-stop of less than f/4 to blur your background, and less than f/2.8 for bokeh.
1. Blurring and Bokeh
Blurred backgrounds and bokeh are very closely related. A bokeh effect is essentially a blurred background that includes lights.
To achieve a blurred background or a bokeh effect, you need to have a shallow depth of field. That means a wide aperture and a low f-stop.
2. How to Blur your Background
Place your subject – in the case of a vlog, your subject is probably yourself – in a shallow depth of field, and they will remain sharply in focus while everything behind them is blurred.
If the subject is yourself, you might need a helper to either operate your camera or stand in for you while you set up your camera. You will need to be able to check that the place you plan to stand or sit is in focus.
To get a shallow depth of field, make sure your aperture is wide. Do this by setting a low f-stop. Ideally, your f-stop will be 2.8 or lower, but if your camera cannot go that low, then f/3 or f/4 can also work.
Creating a bokeh effect is mostly the same, except that it works best when your subject/depth of field is very close to the camera, and you have a light source off in the background. Zoom Lenses do not usually have wide enough apertures to create bokeh backgrounds.
Blur Video Background in Post-Production with Wondershare Filmora Video Editor
If you need to blur the video background after shooting, you can use some video editing software to add the bokeh effect or the tilt-off effect in post-production. Here, I will show you how to do that in Filmora.
Filmora is one of the most widely used video editing software among YouTubers. Its user-friendly interface and tutorial guide enables green-hands to start video editing quickly. Besides, you can find many free filters, effects, and elements pre-programmed, so you can use them directly without looking for presets and templates somewhere else.
1. Add Bokeh Filter to Video in Filmora
There are about 20 bokeh effects available in filters and overlays. You can find them easily by typing bokeh in the search bar in Effects.
Note: you should select Included to see all bokeh effects pre-programmed in Filmora. If you need more visual effects, just go to the Filmstock effects store.
.png) Kanto Player Professional
Kanto Player Professional
Double click the bokeh effect to preview the result, and if you find the bokeh effect fits the video, just drop it to the track above the video. And the bokeh filter or overlay will be applied to the video automatically.
2. Use Tilt-Shift Circle/Linear Effect to Blur Video Background
Filmora features two tilt effects, tilt-shift circle and tilt-shift linear, which allows you to highlight people in the video, blur, and conceal the video background.
Go to the Effects tab and then switch to the Utility menu under Included category.
Here, I will select the Tilt-Shift Circle effect and drop it to the track above the video. Now, you can adjust the size, position, and intensity of the tilt-shift circle effect
You see, the video background is blurred, and the people are highlighted. Now it’s your turn to download the Filmora video editor and try it yourself.
Richard Bennett
Richard Bennett is a writer and a lover of all things video.
Follow @Richard Bennett
Richard Bennett
Mar 27, 2024• Proven solutions
A lot of YouTubers like to vlog in front of blurred backgrounds. Blurring the background of your YouTube video is a fast way to make it look more professional – you stand out when you are entirely in focus, and everything behind you is blurry. Plus, it is an easy way to disguise the room you are vlogging from.
Even if your set is clean, there could be things like books behind you, which will distract viewers; they will be trying to read the spines. Blurring out the background of your shot makes your video look polished and keeps people’s focus entirely on you.
- Part 1: Blur YouTube Video Background in Shooting Videos
- Part 2: Add Tilt-Shift Effects to Video in Editing
Part 1: How to Blur Background of Your YouTube Video in Shooting Videos
Blurring your background is also how you create a beautiful bokeh lighting effect. Bokeh is when you blur lights in the background of your shot, creating halo-like circles of light. By attaching a filter with a shape cut out to the camera lens, you can even generate bokeh lights in other shapes, like hearts or stars.
Aperture refers to the hole in your lens which allows light into your camera. A narrow aperture lets in less light, and a wide aperture lets in more. The wider your aperture is, the shallower your depth of field will be. Widening your aperture also helps your camera perform better in low-light situations. Widening your aperture too much under the wrong circumstances can let in too much light and result in your footage being overexposed.
Depth of Field is the area of your image that is in focus. If you have a large depth of field, then objects close to and far away from your camera will all be in focus. Only a select area will be focused and the rest will be blurred if you have a shallow depth of field.
F-Stops are the measurement of an aperture’s width. The higher your f-stop, the narrower your aperture will be. To create a blurred background or a bokeh effect, you need a wide aperture, and thus a small f-stop. F-stops are written like ‘f/1.4’. You need an f-stop of less than f/4 to blur your background, and less than f/2.8 for bokeh.
1. Blurring and Bokeh
Blurred backgrounds and bokeh are very closely related. A bokeh effect is essentially a blurred background that includes lights.
To achieve a blurred background or a bokeh effect, you need to have a shallow depth of field. That means a wide aperture and a low f-stop.
2. How to Blur your Background
Place your subject – in the case of a vlog, your subject is probably yourself – in a shallow depth of field, and they will remain sharply in focus while everything behind them is blurred.
If the subject is yourself, you might need a helper to either operate your camera or stand in for you while you set up your camera. You will need to be able to check that the place you plan to stand or sit is in focus.
To get a shallow depth of field, make sure your aperture is wide. Do this by setting a low f-stop. Ideally, your f-stop will be 2.8 or lower, but if your camera cannot go that low, then f/3 or f/4 can also work.
Creating a bokeh effect is mostly the same, except that it works best when your subject/depth of field is very close to the camera, and you have a light source off in the background. Zoom Lenses do not usually have wide enough apertures to create bokeh backgrounds.
Blur Video Background in Post-Production with Wondershare Filmora Video Editor
If you need to blur the video background after shooting, you can use some video editing software to add the bokeh effect or the tilt-off effect in post-production. Here, I will show you how to do that in Filmora.
Filmora is one of the most widely used video editing software among YouTubers. Its user-friendly interface and tutorial guide enables green-hands to start video editing quickly. Besides, you can find many free filters, effects, and elements pre-programmed, so you can use them directly without looking for presets and templates somewhere else.
1. Add Bokeh Filter to Video in Filmora
There are about 20 bokeh effects available in filters and overlays. You can find them easily by typing bokeh in the search bar in Effects.
Note: you should select Included to see all bokeh effects pre-programmed in Filmora. If you need more visual effects, just go to the Filmstock effects store.
Double click the bokeh effect to preview the result, and if you find the bokeh effect fits the video, just drop it to the track above the video. And the bokeh filter or overlay will be applied to the video automatically.
2. Use Tilt-Shift Circle/Linear Effect to Blur Video Background
Filmora features two tilt effects, tilt-shift circle and tilt-shift linear, which allows you to highlight people in the video, blur, and conceal the video background.
Go to the Effects tab and then switch to the Utility menu under Included category.

Here, I will select the Tilt-Shift Circle effect and drop it to the track above the video. Now, you can adjust the size, position, and intensity of the tilt-shift circle effect
 Nero Burning ROM:
The ultimate burning program for all your needs!
You see, the video background is blurred, and the people are highlighted. Now it’s your turn to download the Filmora video editor and try it yourself.
Richard Bennett
Richard Bennett is a writer and a lover of all things video.
Follow @Richard Bennett
Richard Bennett
Mar 27, 2024• Proven solutions
A lot of YouTubers like to vlog in front of blurred backgrounds. Blurring the background of your YouTube video is a fast way to make it look more professional – you stand out when you are entirely in focus, and everything behind you is blurry. Plus, it is an easy way to disguise the room you are vlogging from.
Even if your set is clean, there could be things like books behind you, which will distract viewers; they will be trying to read the spines. Blurring out the background of your shot makes your video look polished and keeps people’s focus entirely on you.
- Part 1: Blur YouTube Video Background in Shooting Videos
- Part 2: Add Tilt-Shift Effects to Video in Editing
 Allavsoft Batch Download Online Videos, Music Offline to MP4, MP3, MOV, etc format
Part 1: How to Blur Background of Your YouTube Video in Shooting Videos
Blurring your background is also how you create a beautiful bokeh lighting effect. Bokeh is when you blur lights in the background of your shot, creating halo-like circles of light. By attaching a filter with a shape cut out to the camera lens, you can even generate bokeh lights in other shapes, like hearts or stars.
Aperture refers to the hole in your lens which allows light into your camera. A narrow aperture lets in less light, and a wide aperture lets in more. The wider your aperture is, the shallower your depth of field will be. Widening your aperture also helps your camera perform better in low-light situations. Widening your aperture too much under the wrong circumstances can let in too much light and result in your footage being overexposed.
Depth of Field is the area of your image that is in focus. If you have a large depth of field, then objects close to and far away from your camera will all be in focus. Only a select area will be focused and the rest will be blurred if you have a shallow depth of field.
F-Stops are the measurement of an aperture’s width. The higher your f-stop, the narrower your aperture will be. To create a blurred background or a bokeh effect, you need a wide aperture, and thus a small f-stop. F-stops are written like ‘f/1.4’. You need an f-stop of less than f/4 to blur your background, and less than f/2.8 for bokeh.
1. Blurring and Bokeh
Blurred backgrounds and bokeh are very closely related. A bokeh effect is essentially a blurred background that includes lights.
To achieve a blurred background or a bokeh effect, you need to have a shallow depth of field. That means a wide aperture and a low f-stop.
2. How to Blur your Background
Place your subject – in the case of a vlog, your subject is probably yourself – in a shallow depth of field, and they will remain sharply in focus while everything behind them is blurred.
If the subject is yourself, you might need a helper to either operate your camera or stand in for you while you set up your camera. You will need to be able to check that the place you plan to stand or sit is in focus.
To get a shallow depth of field, make sure your aperture is wide. Do this by setting a low f-stop. Ideally, your f-stop will be 2.8 or lower, but if your camera cannot go that low, then f/3 or f/4 can also work.
Creating a bokeh effect is mostly the same, except that it works best when your subject/depth of field is very close to the camera, and you have a light source off in the background. Zoom Lenses do not usually have wide enough apertures to create bokeh backgrounds.
Blur Video Background in Post-Production with Wondershare Filmora Video Editor
If you need to blur the video background after shooting, you can use some video editing software to add the bokeh effect or the tilt-off effect in post-production. Here, I will show you how to do that in Filmora.
Filmora is one of the most widely used video editing software among YouTubers. Its user-friendly interface and tutorial guide enables green-hands to start video editing quickly. Besides, you can find many free filters, effects, and elements pre-programmed, so you can use them directly without looking for presets and templates somewhere else.
 Glary Utilities PRO - Premium all-in-one utility to clean, speed up, maintain and protect your PC
1. Add Bokeh Filter to Video in Filmora
There are about 20 bokeh effects available in filters and overlays. You can find them easily by typing bokeh in the search bar in Effects.
Note: you should select Included to see all bokeh effects pre-programmed in Filmora. If you need more visual effects, just go to the Filmstock effects store.
Double click the bokeh effect to preview the result, and if you find the bokeh effect fits the video, just drop it to the track above the video. And the bokeh filter or overlay will be applied to the video automatically.
### 2\. Use Tilt-Shift Circle/Linear Effect to Blur Video BackgroundFilmora features two tilt effects, tilt-shift circle and tilt-shift linear, which allows you to highlight people in the video, blur, and conceal the video background.
Go to the Effects tab and then switch to the Utility menu under Included category.
Here, I will select the Tilt-Shift Circle effect and drop it to the track above the video. Now, you can adjust the size, position, and intensity of the tilt-shift circle effect
You see, the video background is blurred, and the people are highlighted. Now it’s your turn to download the Filmora video editor and try it yourself.
Richard Bennett
Richard Bennett is a writer and a lover of all things video.
Follow @Richard Bennett
- Title: A Tale of Two Approaches Polite vs Aggressive Asking for 2024
- Author: Steven
- Created at : 2024-07-22 20:30:26
- Updated at : 2024-07-23 20:30:26
- Link: https://youtube-clips.techidaily.com/a-tale-of-two-approaches-polite-vs-aggressive-asking-for-2024/
- License: This work is licensed under CC BY-NC-SA 4.0.