
:max_bytes(150000):strip_icc()/screenburnin01-5bdc37e9c9e77c00269c4545.jpg)
"A Step-by-Step Guide to Elevate Your Stream on YouTube"
A Step-by-Step Guide to Elevate Your Stream on YouTube
Create High-Quality Video - Wondershare Filmora
An easy and powerful YouTube video editor
Numerous video and audio effects to choose from
Detailed tutorials provided by the official channel
Amidst many online applications is Twitch. This live streaming platform takes your experience to another level. You can use it to make crafts, play games, attract broadcasters, and many more. Twitch was launched in 2011, and since then, it has attracted millions of users, managing a database of about 4 million broadcasters by early 2020. With it, users can stream their activities as others watch in real-time. Just browse a category to find a stream.
You can also follow streamers that you like on the platform and get updates and notifications immediately after they are posted. But how do you start a career on a platform like Twitch? You need to broadcast and gather a large following. You can use built-in audiences from other platforms like Facebook. Let’s dive into the core of the matter and look at how to upload Twitch streams to YouTube and build your platform.

In this article
02 What is the benefit of uploading your Twitch Streams to YouTube
03 How to upload your Twitch Streams to YouTube
What is Twitch VOD?
Twitch Video on Demand (VOD) is a recording of previously streamed content. It provides briefings if you missed catching the Twitch live stream. Just watch the VOD from your favorite streamer and be engaged the best way possible. However, VODs don’t last forever. They are removed after two weeks of broadcast. But streamers with Partner Status can have their VODs last up to 60 days.
- How to enable Twitch VOD?
VODs are the best form to archive streams that your fans missed. Even though they are not enabled by default, you can manually enable them and not let your fans miss any important event from your channel. They’ll find it under the “Videos” tab on any Twitch channel. Follow these steps to enable VOD on your channel.
Step 1. Go to your profile icon in the top right corner of Twitch
Check in the “Channel & Video” section and locate the “Stream Key & Preferences” menu.

Step 2. Click on “Creator Dashboard”
Remember, you can enable VODs from your creator dashboard. Just go under the “Settings” tab and click on the “Stream section” of the creator dashboard. Check under the subtitle “VOD Settings” and get the option to store past broadcasts. You can also toggle the slider to store your past broadcasts.

Step 3 Click on the “Settings” tab on the left-hand side and go to Stream
You’ll get various drop-down menu options. Click on the “Settings” tab and choose the “Stream” option. The system will navigate to a new page, thus setting your preferences for VODs and clips.
Step 4. Go to “VOD Settings” and toggle on the “Store Past Broadcast.”
Ensure you have the toggle option turned ON under the “VOD Settings.” If it’s “ON,” you’ll realize the toggle will be purple, with a checkmark in it. Twitch will be confirmed to be enabled if it’s purple.

- Frequently Asked Question about Twitch VOD
These are some questions frequently asked by Twitch users.
1. How long will Twitch store my VOD
Your Twitch can either be stored for 14 or 60 days, depending on your level. For Twitch Prime, Twitch Partner or a Twitch Turbo user has their past broadcasts automatically saved for 60 days before deletion. But if you are not connected to these three options, your past broadcasts will be saved for only 14 days before deletion.
Since your past broadcasts cannot be live for more than 60 days, you have the option to download the video to your computer before the validity days expire and Twitch deletes it. You can use an External Hard drive to save the past broadcast content. Likewise, it is possible to turn your past broadcast content into Highlight and, in turn, permanently store them on Twitch.
2. What is the difference between Twitch VOD, Highlights, and Clips
Twitch VOD is a previously saved video of your live stream content. You choose to save either part or the entire content of your previously streamed content. More so, you don’t need any additional requirements to use VOD.
Highlights are short videos that have been edited from your past broadcast content. You can save them on Twitch permanently. Streamers majorly use highlights to save video game achievements. Unlike VOD Twitch that can be saved up to 60 days, Highlights usually lasts no more than 3 minutes.
- To make Highlights on Twitch, first, navigate to your Dashboard.
- Then scroll down and click on “Content” > “Video Producer.
- Next, press on “All Videos” to change them to “Past Broadcasts.”
- Now press the “Highlight” button, and Twitch will immediately open a new tab for “Twitch Highlighter Tool.”
- Then select the video part to include as “Highlight” and press the “Create Highlights” button.
- Wait a while for the process to be completed, and Voila! You have your Highlights created.
When it comes to Twitch Clip, you can capture special moments in a stream you are currently watching. On the same note, you can share clips with friends and other users on social media platforms. Such shared clips contain a link where others view the source or video from.
The clips you create will automatically be saved on the streamer’s channel on the “Clips” page, where other viewers can see them too. Nonetheless, you can download “clips” to your computer and, in turn, upload them whenever you want to. And note that you can help your stream grow via “Clips” by letting your viewers clip and share your stream moments.
- To create “Clips” on Twitch, identify which Streamers channel you wish to create a clip from.
- Then click on the “Clapper board” icon. Next, edit your clip between 5 and 60 seconds long.
- Finally, create a title and publish your Clip. You’ll also enjoy the privilege to share your clip’s link to other social media networks.
What is the benefit of uploading your Twitch Streams to YouTube
You stand to gain a lot when you upload your Twitch Streams to YouTube.
1) To enlighten your followers
Your followers will see your streams and make the best decisions. Viewers can check out your recordings and other highlights from past streams. It will help them decide whether they like what they see and probably join your live streams.
2) Twitch provides content for you to share and monetize on YouTube
Since Twitch streaming is more popular nowadays, many people throng it for content. It is not wise to rely entirely on Twitch to discover as a Twitch Streamer. Posting to YouTube will make it known within a short time. You would have announced your streams most nobly and kept your followers up to date, attracting new ones as well.
3) To keep your followers engaged even when you are offline
Even though live streaming is important, some viewers may not attend the live sessions due to different time zones or other commitments. In this regard, when uploaded to YouTube, Twitch will give them a chance to watch your content just whenever they log in. They, therefore, have the option to watch a Twitch VOD of the live stream they missed.
How to upload your Twitch Streams to YouTube
Check how to upload Twitch streams to YouTube from the Twitch website.
Step 1. Identify the little arrow next to your name on the Twitch website and click on it. Then click on the “Video Producer” to take you to a list of your Twitch videos.

Step 2. Check out and click on the “three-dots” on the video you wish to upload to YouTube. Click on the “Export” tab.
Step 3. A menu will then pop up. Here, you can fill in the description, title, and tags that you would like to appear on the YouTube video. There is an option for Twitch to split your video automatically. If you wish so, then tick the “Checkbox” to enable it. Then click on the “Start Export” option to export your Twitch streams to YouTube.

Bouns! Edit Your Twitch Video with Filmora
The quality of your video matters when it comes to uploading Twitch Streams to YouTube. Using a third-party tool to edit your video is the first step in ensuring your videos communicate meaningful content. Filmora comes in handy to bring your imaginations to life. Use it for simple creation without limits, even for beginners.
- Use it to track moving objects in video clips
- Easily match any image of the selected clip
- Its powerful tools let you edit your video by cropping, splitting, adjusting speed, etc
- The video keyframe easily indicates the beginning and end of the parameters
For Win 7 or later (64-bit)
For macOS 10.12 or later
Conclusion
● Don’t just focus on how to upload Twitch streams to YouTube but also consider the quality of video you are posting to YouTube. Remember, your video quality will speak much more of you than any other description. So, strive to produce quality videos using the best tool, Filmora. The app is easy to use and will elevate your views and imaginations through your video in the most impactful way.
Amidst many online applications is Twitch. This live streaming platform takes your experience to another level. You can use it to make crafts, play games, attract broadcasters, and many more. Twitch was launched in 2011, and since then, it has attracted millions of users, managing a database of about 4 million broadcasters by early 2020. With it, users can stream their activities as others watch in real-time. Just browse a category to find a stream.
You can also follow streamers that you like on the platform and get updates and notifications immediately after they are posted. But how do you start a career on a platform like Twitch? You need to broadcast and gather a large following. You can use built-in audiences from other platforms like Facebook. Let’s dive into the core of the matter and look at how to upload Twitch streams to YouTube and build your platform.
In this article
02 What is the benefit of uploading your Twitch Streams to YouTube
03 How to upload your Twitch Streams to YouTube
What is Twitch VOD?
Twitch Video on Demand (VOD) is a recording of previously streamed content. It provides briefings if you missed catching the Twitch live stream. Just watch the VOD from your favorite streamer and be engaged the best way possible. However, VODs don’t last forever. They are removed after two weeks of broadcast. But streamers with Partner Status can have their VODs last up to 60 days.
- How to enable Twitch VOD?
VODs are the best form to archive streams that your fans missed. Even though they are not enabled by default, you can manually enable them and not let your fans miss any important event from your channel. They’ll find it under the “Videos” tab on any Twitch channel. Follow these steps to enable VOD on your channel.
Step 1. Go to your profile icon in the top right corner of Twitch
Check in the “Channel & Video” section and locate the “Stream Key & Preferences” menu.
Step 2. Click on “Creator Dashboard”
Remember, you can enable VODs from your creator dashboard. Just go under the “Settings” tab and click on the “Stream section” of the creator dashboard. Check under the subtitle “VOD Settings” and get the option to store past broadcasts. You can also toggle the slider to store your past broadcasts.
Step 3 Click on the “Settings” tab on the left-hand side and go to Stream
You’ll get various drop-down menu options. Click on the “Settings” tab and choose the “Stream” option. The system will navigate to a new page, thus setting your preferences for VODs and clips.
Step 4. Go to “VOD Settings” and toggle on the “Store Past Broadcast.”
Ensure you have the toggle option turned ON under the “VOD Settings.” If it’s “ON,” you’ll realize the toggle will be purple, with a checkmark in it. Twitch will be confirmed to be enabled if it’s purple.
- Frequently Asked Question about Twitch VOD
These are some questions frequently asked by Twitch users.
1. How long will Twitch store my VOD
Your Twitch can either be stored for 14 or 60 days, depending on your level. For Twitch Prime, Twitch Partner or a Twitch Turbo user has their past broadcasts automatically saved for 60 days before deletion. But if you are not connected to these three options, your past broadcasts will be saved for only 14 days before deletion.
Since your past broadcasts cannot be live for more than 60 days, you have the option to download the video to your computer before the validity days expire and Twitch deletes it. You can use an External Hard drive to save the past broadcast content. Likewise, it is possible to turn your past broadcast content into Highlight and, in turn, permanently store them on Twitch.
2. What is the difference between Twitch VOD, Highlights, and Clips
Twitch VOD is a previously saved video of your live stream content. You choose to save either part or the entire content of your previously streamed content. More so, you don’t need any additional requirements to use VOD.
Highlights are short videos that have been edited from your past broadcast content. You can save them on Twitch permanently. Streamers majorly use highlights to save video game achievements. Unlike VOD Twitch that can be saved up to 60 days, Highlights usually lasts no more than 3 minutes.
- To make Highlights on Twitch, first, navigate to your Dashboard.
- Then scroll down and click on “Content” > “Video Producer.
- Next, press on “All Videos” to change them to “Past Broadcasts.”
- Now press the “Highlight” button, and Twitch will immediately open a new tab for “Twitch Highlighter Tool.”
- Then select the video part to include as “Highlight” and press the “Create Highlights” button.
- Wait a while for the process to be completed, and Voila! You have your Highlights created.
When it comes to Twitch Clip, you can capture special moments in a stream you are currently watching. On the same note, you can share clips with friends and other users on social media platforms. Such shared clips contain a link where others view the source or video from.
The clips you create will automatically be saved on the streamer’s channel on the “Clips” page, where other viewers can see them too. Nonetheless, you can download “clips” to your computer and, in turn, upload them whenever you want to. And note that you can help your stream grow via “Clips” by letting your viewers clip and share your stream moments.
- To create “Clips” on Twitch, identify which Streamers channel you wish to create a clip from.
- Then click on the “Clapper board” icon. Next, edit your clip between 5 and 60 seconds long.
- Finally, create a title and publish your Clip. You’ll also enjoy the privilege to share your clip’s link to other social media networks.
What is the benefit of uploading your Twitch Streams to YouTube
You stand to gain a lot when you upload your Twitch Streams to YouTube.
1) To enlighten your followers
Your followers will see your streams and make the best decisions. Viewers can check out your recordings and other highlights from past streams. It will help them decide whether they like what they see and probably join your live streams.
2) Twitch provides content for you to share and monetize on YouTube
Since Twitch streaming is more popular nowadays, many people throng it for content. It is not wise to rely entirely on Twitch to discover as a Twitch Streamer. Posting to YouTube will make it known within a short time. You would have announced your streams most nobly and kept your followers up to date, attracting new ones as well.
3) To keep your followers engaged even when you are offline
Even though live streaming is important, some viewers may not attend the live sessions due to different time zones or other commitments. In this regard, when uploaded to YouTube, Twitch will give them a chance to watch your content just whenever they log in. They, therefore, have the option to watch a Twitch VOD of the live stream they missed.
How to upload your Twitch Streams to YouTube
Check how to upload Twitch streams to YouTube from the Twitch website.
Step 1. Identify the little arrow next to your name on the Twitch website and click on it. Then click on the “Video Producer” to take you to a list of your Twitch videos.
Step 2. Check out and click on the “three-dots” on the video you wish to upload to YouTube. Click on the “Export” tab.
Step 3. A menu will then pop up. Here, you can fill in the description, title, and tags that you would like to appear on the YouTube video. There is an option for Twitch to split your video automatically. If you wish so, then tick the “Checkbox” to enable it. Then click on the “Start Export” option to export your Twitch streams to YouTube.
Bouns! Edit Your Twitch Video with Filmora
The quality of your video matters when it comes to uploading Twitch Streams to YouTube. Using a third-party tool to edit your video is the first step in ensuring your videos communicate meaningful content. Filmora comes in handy to bring your imaginations to life. Use it for simple creation without limits, even for beginners.
- Use it to track moving objects in video clips
- Easily match any image of the selected clip
- Its powerful tools let you edit your video by cropping, splitting, adjusting speed, etc
- The video keyframe easily indicates the beginning and end of the parameters
For Win 7 or later (64-bit)
For macOS 10.12 or later
Conclusion
● Don’t just focus on how to upload Twitch streams to YouTube but also consider the quality of video you are posting to YouTube. Remember, your video quality will speak much more of you than any other description. So, strive to produce quality videos using the best tool, Filmora. The app is easy to use and will elevate your views and imaginations through your video in the most impactful way.
Elevating Video Popularity on YouTube
How To Get More Video Views on YouTube

Richard Bennett
Mar 27, 2024• Proven solutions
Whether you are new to YouTube or have been vlogging for a while you probably want more views. Having entertaining and/or informative content is the most important thing, but making great videos can only get you so far if people never get a chance to watch them. There are strategies you can use to make sure people get a chance to watch your videos in the first place.
In this article, we will let you know how to get more views on YouTube .
10 Tips for Getting More Views on YouTube
1. Be Searchable
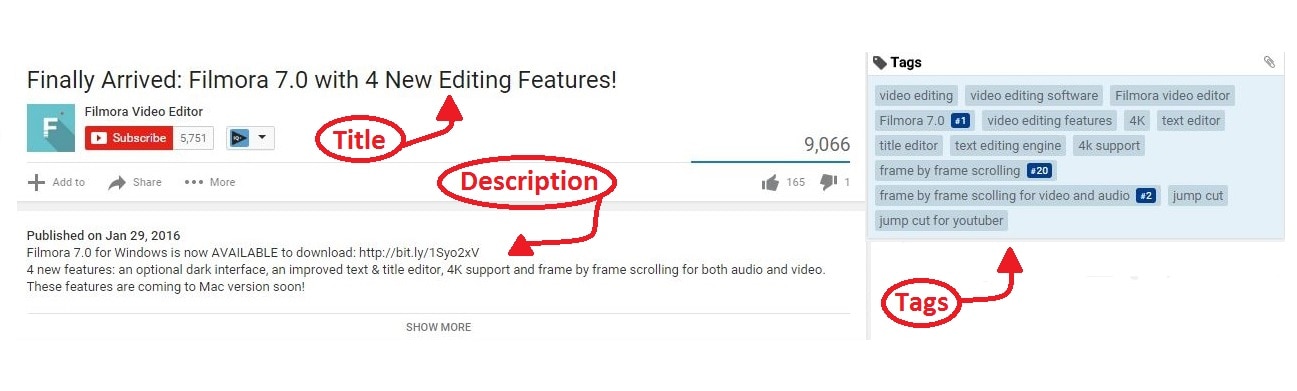
A big part of how to get views on YouTube is making sure people get a chance to watch your videos. People cannot click on something that does not come up in their search results. If you want people to get the chance to see your vlog you need to tailor the titles, descriptions, and tags of your videos so that they come up in searches.
A good way to start is to do a search for your topic and check out how videos that come up first are tagged. This will give you a sense for what keywords you should try to incorporate. For a more in-depth explanation of how you can use your titles, descriptions, and tags to get more views read ‘How To Upload Videos to YouTube’ and watch Tasha’s video.
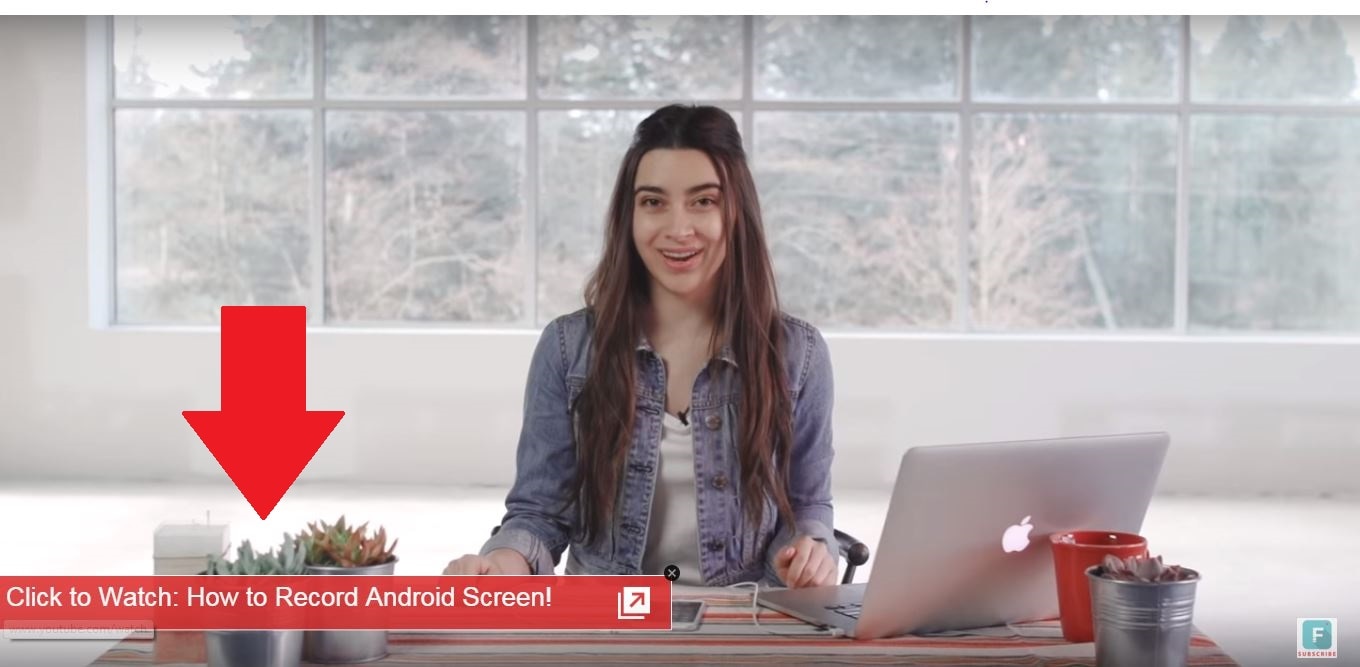
2. Link Yourself
If somebody is watching your video and enjoying it then they will probably welcome the chance to check out similar content. At the end of your videos always include a link to one of your previous videos. If somebody has watched your video all the way through then they must have liked it, and there is a good chance they will click your link. You can use either YouTube Cards or annotations to redirect viewers to your other videos.
You do not have to limit yourself to providing links only at the ends of your videos, but you should never include more than three total links in one video. If there are too many then people will start ignoring them.
3. Make Playlists
Playlists work for the same reason that linking to your other videos does. If somebody likes what they are watching they will probably like watching something similar. The great thing about playlists is that the viewer does not have to take action and click on another of your videos – one just automatically plays when their current video ends. People watching a video on a playlist are more likely to watch multiple videos from that playlist.
If one of your videos is ranked high on a YouTube search, and that video is also on a playlist, then your playlist will also come up in that same search. This will put your other videos in the path of potential viewers.

4. Ask and You Shall Receive
If you can get more people to subscribe to your videos then you will see your view counts start to snowball. How do you get people to subscribe and share your videos? Ask them to.
People are more likely to subscribe or share if they are prompted to, so make sure to remind viewers to subscribe and share in every video. Consider putting a ‘subscribe’ button at the end of every video.
5. Use YouTube Cards
The overlays that show up in the videos are the YouTube cards. In the overlays, you may add any link, call-to-action-button, image or a title that can explain the content of your video or help in sales.
For instance, when you create a video series, YouTube card helps your viewers to get to the webpage directly when you mention the link on the card or find and watch the following video in the sequence easily.

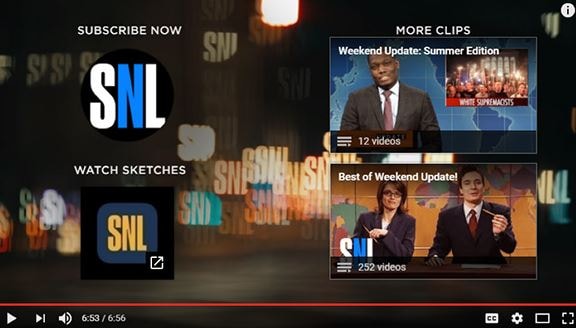
6. End Screens Is Useful
The YouTube end screens are one of the best ways to get YouTube views. It offers several options to your viewers through the Call-to-Action button when you create your brand. You may consider inviting your audiences to subscribe and suggest a few videos that they may like from your channel.
The end screens appear at the last 20 seconds of your video and up to 4 elements can be added to each of it. You may also add your landing page’s link in the ens screen.
7. Optimize Thumbnail
In order to get more views on YouTube, the thumbnail image optimization can play a big role.
For instance, a celebrity or superhero image can prove to be beneficial when displayed in the suggested videos section, organic search results page or while you share on the social media.
It is highly recommended that only high-quality images must be used. The image must feature clear, comprehensible, and attractive fonts with facial-closeups.
But, you may use it only if they’re included in your video. The image thumbnail must relate to the description and title you used for the video to boost its value.

8. Provide Value
To get more views on YouTube, the content you offer must be valuable. It must either help people to learn something like how-to videos or keep people entertained and engaged. When you offer valuable content, people get back to you for more and also help in increasing views in your future videos.
9. Interact With Your Viewers
Without the viewers, it is not possible to get YouTube views so keeping your viewers in the loop is an ideal way to get more views on YouTube.
For instance, when a viewer leaves a comment on your video, it may be a positive or a negative one, try to respond in a much detailed manner without ignoring the comment. When you be a part of your viewer’s community and engage in their discussion, it shows you care for them and think about their success.
You may try to know if your content is helping them out and in return, they might remember your generosity and view more of your content in future. Do not be too pushy, just share your views or products and content.
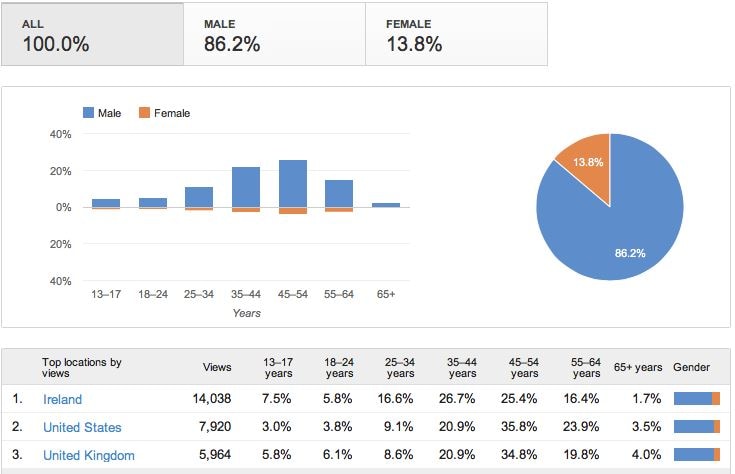
10. Use Youtube Analytics Properly
To achieve success, it is essential to experiment, track the results, and make necessary changes as per requirement.
The YouTube Analytics helps to check the videos that performed best, the engagement of the viewers, and your audience’s demographics as well. With a detailed report, you can make necessary changes to your strategy that can help you to get more views on youtube.
Read More to Get :
5 Tips To Get More Views With YouTube Video Optimization [Free Checklist] >>
How to Loop a YouTube Video >>
Conclusion
Using the strategies explained above you do not need to leave the success of your videos up to chance. It is often completely random which YouTube videos go viral, but you can have a lot of influence over how many views you get. Support your own content through links, playlists, and in video promotion. Also, make sure your titles, descriptions, and tags are optimized for YouTube searches. These are great methods for getting more views on YouTube.
Richard Bennett
Richard Bennett is a writer and a lover of all things video.
Follow @Richard Bennett
Richard Bennett
Mar 27, 2024• Proven solutions
Whether you are new to YouTube or have been vlogging for a while you probably want more views. Having entertaining and/or informative content is the most important thing, but making great videos can only get you so far if people never get a chance to watch them. There are strategies you can use to make sure people get a chance to watch your videos in the first place.
In this article, we will let you know how to get more views on YouTube .
10 Tips for Getting More Views on YouTube
1. Be Searchable
A big part of how to get views on YouTube is making sure people get a chance to watch your videos. People cannot click on something that does not come up in their search results. If you want people to get the chance to see your vlog you need to tailor the titles, descriptions, and tags of your videos so that they come up in searches.
A good way to start is to do a search for your topic and check out how videos that come up first are tagged. This will give you a sense for what keywords you should try to incorporate. For a more in-depth explanation of how you can use your titles, descriptions, and tags to get more views read ‘How To Upload Videos to YouTube’ and watch Tasha’s video.
2. Link Yourself
If somebody is watching your video and enjoying it then they will probably welcome the chance to check out similar content. At the end of your videos always include a link to one of your previous videos. If somebody has watched your video all the way through then they must have liked it, and there is a good chance they will click your link. You can use either YouTube Cards or annotations to redirect viewers to your other videos.
You do not have to limit yourself to providing links only at the ends of your videos, but you should never include more than three total links in one video. If there are too many then people will start ignoring them.
3. Make Playlists
Playlists work for the same reason that linking to your other videos does. If somebody likes what they are watching they will probably like watching something similar. The great thing about playlists is that the viewer does not have to take action and click on another of your videos – one just automatically plays when their current video ends. People watching a video on a playlist are more likely to watch multiple videos from that playlist.
If one of your videos is ranked high on a YouTube search, and that video is also on a playlist, then your playlist will also come up in that same search. This will put your other videos in the path of potential viewers.
4. Ask and You Shall Receive
If you can get more people to subscribe to your videos then you will see your view counts start to snowball. How do you get people to subscribe and share your videos? Ask them to.
People are more likely to subscribe or share if they are prompted to, so make sure to remind viewers to subscribe and share in every video. Consider putting a ‘subscribe’ button at the end of every video.
5. Use YouTube Cards
The overlays that show up in the videos are the YouTube cards. In the overlays, you may add any link, call-to-action-button, image or a title that can explain the content of your video or help in sales.
For instance, when you create a video series, YouTube card helps your viewers to get to the webpage directly when you mention the link on the card or find and watch the following video in the sequence easily.
6. End Screens Is Useful
The YouTube end screens are one of the best ways to get YouTube views. It offers several options to your viewers through the Call-to-Action button when you create your brand. You may consider inviting your audiences to subscribe and suggest a few videos that they may like from your channel.
The end screens appear at the last 20 seconds of your video and up to 4 elements can be added to each of it. You may also add your landing page’s link in the ens screen.
7. Optimize Thumbnail
In order to get more views on YouTube, the thumbnail image optimization can play a big role.
For instance, a celebrity or superhero image can prove to be beneficial when displayed in the suggested videos section, organic search results page or while you share on the social media.
It is highly recommended that only high-quality images must be used. The image must feature clear, comprehensible, and attractive fonts with facial-closeups.
But, you may use it only if they’re included in your video. The image thumbnail must relate to the description and title you used for the video to boost its value.
8. Provide Value
To get more views on YouTube, the content you offer must be valuable. It must either help people to learn something like how-to videos or keep people entertained and engaged. When you offer valuable content, people get back to you for more and also help in increasing views in your future videos.
9. Interact With Your Viewers
Without the viewers, it is not possible to get YouTube views so keeping your viewers in the loop is an ideal way to get more views on YouTube.
For instance, when a viewer leaves a comment on your video, it may be a positive or a negative one, try to respond in a much detailed manner without ignoring the comment. When you be a part of your viewer’s community and engage in their discussion, it shows you care for them and think about their success.
You may try to know if your content is helping them out and in return, they might remember your generosity and view more of your content in future. Do not be too pushy, just share your views or products and content.
10. Use Youtube Analytics Properly
To achieve success, it is essential to experiment, track the results, and make necessary changes as per requirement.
The YouTube Analytics helps to check the videos that performed best, the engagement of the viewers, and your audience’s demographics as well. With a detailed report, you can make necessary changes to your strategy that can help you to get more views on youtube.
Read More to Get :
5 Tips To Get More Views With YouTube Video Optimization [Free Checklist] >>
How to Loop a YouTube Video >>
Conclusion
Using the strategies explained above you do not need to leave the success of your videos up to chance. It is often completely random which YouTube videos go viral, but you can have a lot of influence over how many views you get. Support your own content through links, playlists, and in video promotion. Also, make sure your titles, descriptions, and tags are optimized for YouTube searches. These are great methods for getting more views on YouTube.
Richard Bennett
Richard Bennett is a writer and a lover of all things video.
Follow @Richard Bennett
Also read:
- [New] Achieve Perfect Views with Aspect Ratio Knowledge on YOUTUBE
- Charting a Successful Course in YouTube Keywords for 2024
- [New] Cutting-Edge Video Ad Creation Leaders Amongst Many
- Streamlining Video Features YouTube Annotations Guide
- [Updated] Designing Effective Video Previews for Channels
- 2024 Approved Enhance Videos Seamlessly Using YouTube Studio Editor
- [Updated] Boost Your Content Reach The Expert Guide to Youtube's Featured Channels
- Earnings Expertise in Streams A Comparative Study for 2024
- In 2024, Download Free MCB Logo Templates
- [New] Comparing Profits From High-Ranking YouTube Videos
- Flash-Share Sharing Playlists in a Snap
- Acoustic Mastery Secrets for Exceptional Audio Capture for 2024
- The Essential Guide to YouTube Edits with Premiere Pro
- Selecting Prime Apps for iPhone/Android Intro Videos
- From Zeroes to Heroes Amplifying Your Youtube Following
- Channel Branding Made Simple & Free
- Tailor-Made Viewing Pace on YouTube at Your Fingertips
- Smooth Cinematography Best Stabilizers Listed
- Streamlining Your Method for Erasing YouTube Post-Comments
- Breakdown of Profit From a Million Youtube Watches for 2024
- 2024 Approved Elevate Viewership 3 Key Storytelling Approaches
- [New] Discover the Ideal Release Windows on YouTube
- [New] Diversify Your Watchlist - The Top 27 Non-YouTube Video Hubs
- Gourmet Guide Culinary Video Production
- Fixes | What If YouTube Zoom to Fill Not Working for 2024
- [New] 2024 Approved Unlocking the Mystery of 'PFP' A TikTok Perspective
- A Complete Guide of Top 7 Video Language Translators for 2024
- New The Best of the Best Top Reaction Video Editing Apps
- In 2024, A Closer Look at Instagram Stories Beyond the Screen
- The Ultimate HDTV Showdown Selecting the Best 8K Models
- In 2024, Mac Green Screen Software Finding the Perfect Fit for You
- [New] 2024 Approved The Ultimate Selection Top 10 Zero-Dollar Video Calls
- How to Change/Add Location Filters on Snapchat For your Xiaomi Redmi 12 5G | Dr.fone
- Recover Apple iPhone XR Data From iOS iCloud | Dr.fone
- [Updated] In 2024, Examining VLC for Screen Capture
- In 2024, Best Ways on How to Unlock/Bypass/Swipe/Remove Infinix Hot 40 Fingerprint Lock
- Want to Uninstall Google Play Service from Oppo Reno 8T? Here is How | Dr.fone
- Remove FRP Lock on Spark Go (2023)
- Leveraging iMovie Content on the Vimeo Network
- [Updated] 2024 Approved Optimize Your Virtual Space with Zoom Setup
- [Updated] 2024 Approved Serendipity in a Snapshot Top 10 Chill Playtime
- Title: "A Step-by-Step Guide to Elevate Your Stream on YouTube"
- Author: Steven
- Created at : 2024-05-25 18:43:42
- Updated at : 2024-05-26 18:43:42
- Link: https://youtube-clips.techidaily.com/a-step-by-step-guide-to-elevate-your-stream-on-youtube/
- License: This work is licensed under CC BY-NC-SA 4.0.
