
:max_bytes(150000):strip_icc()/Apple-iPhone-15-Pro-lineup-design-230912_big.jpg.large_2x-d4c86ba576534524b322e14268aa9fbe.jpg)
"A Simple Path to Enhanced YouTube Sign-Ups - Create Animated Subscription Bar Using Filmora"
A Simple Path to Enhanced YouTube Sign-Ups - Create Animated Subscription Bar Using Filmora
How to Make Your YouTube Animated Subscribe Button Easily With Filmora

Richard Bennett
Mar 27, 2024• Proven solutions
The main goal of every content creator is to increase its audience to expand its reach and views. To do so, it’s essential to provide something unique and different to the viewer. Without providing them the content they are looking for, it is impossible to grow your channel and reach. Once your content is ready and you are getting many views, it is essential to make these potential viewers your permanent viewers. The animated subscribe button will help you achieve this goal. While your viewers are watching your videos, you must remind them about subscribing to your channel for receiving such incredible content in the future. Subscribe animation plays a vital role in converting your viewers into subscribers.
There are so many platforms on the internet from where you can get Youtube subscribe button animation free, and you can also purchase these subscribe png gifs. But creating your own animated subscribe button can make you stand out from the crowd and make your videos unique and exclusive. Because it enables you to design it the way you want according to your brand, so, let’s create your own subscribe animation using Wondershare Filmora .
Step-By-Step guide
Step 1: To get started,open Filmora X. On your upper left corner, click on the “Sample Colors,” select the Green color and drag it to Video Track into the timeline. We are using a Green background to easily remove it using the green screen feature in Filmora to use it in our future projects after exporting it, without creating it again. Adjust the duration of this track according to your requirement. In my case, I am trying to make an animated subscribe button of 5 seconds.
Step 2: Lock this track by clicking on the lock icon to work on subscribe animation without disturbing the background easily.
Step 3: Now it’s time to design the subscribe png gif. Go to the Sample colors again and drag the red color into the time above the green background.
Step 4: Double click on the red color in the timeline and adjust its size. Make it look like a subscribe button that is a rectangle and place it at the bottom center of the background. You can put it anywhere you want it to appear in your future videos.
Step 5: Now, let’s add Subscribe text into the button. Go to the Title and select any style that you like. “Basic 6” will work perfectly fine for this purpose. Drag and drop it into the timeline above all tracks.
Step 6: Double click on the Title on the timeline and edit it with “Subscribe” and place it under the red rectangle and click OK.
Step 7: We have put a cursor that can click on the animated subscribe button. You can use Google Search to find a transparent cursor. Make sure to save it in png format. Download it and import it into Filmora.
Step 8: Drag and drop the cursor into the timeline and place it above all the other three tracks to make it prominent. Adjust the size of the cursor place it on the Subscribe button where you want it to appear.
Step 9: Now, it’s time to animate the design using keyframes. First of all, let’s animate the red rectangle. Double click on the red color on the timeline. Go to the ‘Animation’ tab and then click ‘Customize.’ Move to the 1 second in the timeline and click ‘Add.’
Step 10: Now go back to the beginning in the timeline and adjust the scale to 0%. It will make the rectangle pop up when you play the clip.
Step 11: Text needs to be animated as well to match it with the rectangle. Double click on the text in the timeline and click ‘ADVANCED.’
Step 12: In this Advance text editor, go to the ‘Animation’ tab and select any animation that you like. On the timeline under the preview screen, adjusts the dark areas according to the time you set on the rectangle, which was 1 second. We want the text to appear on the screen in 1 second, like the rectangle. Also, adjust the ending time when you want the text to disappear again. We have set it on 4 seconds. Which means it will start to fade after 4 seconds.
Step 13: Now, to animate the mouse cursor, we will use the same process we used for a rectangle that is key framing. Double click on the cursor track on the timeline and move the time on your timeline to a point when you want the cursor to appear. Now add a key frame by clicking ‘Add’.
Step 14: Now jump back to a point in your timeline, when the cursor will start appearing from outside the screen. Move the cursor outside the screen from where you want it to start moving toward the subscribe animation.
Step 15: To animate the click of the cursor, move ahead a little bit into your timeline and scale down the cursor to around 70%. Move it a little further and scale it up to 100%.
Step 16: You can add the sound of mouse click to make it more realistic. You can find this sound anywhere on the internet. Download it and import it into Filmora. Now place it into the timeline where it can match the movement of the cursor.
Step 17: Now it’s time to make this subscribe animation button disappear. Move forward into the time to the end, at around 4 seconds. Double click on the red button in the timeline and add a key frame at its actual scale.
Step 18: After that, move further in the timeline to the end and make its scale 0. It will make it disappear.
Step 19: Do the same with the cursor. Double click on the cursor in the time and add a key frame at its actual position.
Step 20: Move ahead when you want it to disappear. Move the cursor out of the screen and click ‘OK’.
Step 21: Your Subscribe png gif is ready to be exported and used in your videos. Click on export and choose from various formats and options to choose from while exporting it.
You may also like: How to Get People to Subscribe Channel
Conclusion:Your own Animated Subscribe Button is ready to be used in your future videos and projects. This is a ready-to-use subscribe button that can be easily used using the green screen effect in Filmora. Just import the clip, remove the green screen, and you are good to go. You can also customize this Subscribe Animation using your channel and more. Keep experimenting with new things using Filmora.


Richard Bennett
Richard Bennett is a writer and a lover of all things video.
Follow @Richard Bennett
Richard Bennett
Mar 27, 2024• Proven solutions
The main goal of every content creator is to increase its audience to expand its reach and views. To do so, it’s essential to provide something unique and different to the viewer. Without providing them the content they are looking for, it is impossible to grow your channel and reach. Once your content is ready and you are getting many views, it is essential to make these potential viewers your permanent viewers. The animated subscribe button will help you achieve this goal. While your viewers are watching your videos, you must remind them about subscribing to your channel for receiving such incredible content in the future. Subscribe animation plays a vital role in converting your viewers into subscribers.
There are so many platforms on the internet from where you can get Youtube subscribe button animation free, and you can also purchase these subscribe png gifs. But creating your own animated subscribe button can make you stand out from the crowd and make your videos unique and exclusive. Because it enables you to design it the way you want according to your brand, so, let’s create your own subscribe animation using Wondershare Filmora .
Step-By-Step guide
Step 1: To get started,open Filmora X. On your upper left corner, click on the “Sample Colors,” select the Green color and drag it to Video Track into the timeline. We are using a Green background to easily remove it using the green screen feature in Filmora to use it in our future projects after exporting it, without creating it again. Adjust the duration of this track according to your requirement. In my case, I am trying to make an animated subscribe button of 5 seconds.
Step 2: Lock this track by clicking on the lock icon to work on subscribe animation without disturbing the background easily.
Step 3: Now it’s time to design the subscribe png gif. Go to the Sample colors again and drag the red color into the time above the green background.
Step 4: Double click on the red color in the timeline and adjust its size. Make it look like a subscribe button that is a rectangle and place it at the bottom center of the background. You can put it anywhere you want it to appear in your future videos.
Step 5: Now, let’s add Subscribe text into the button. Go to the Title and select any style that you like. “Basic 6” will work perfectly fine for this purpose. Drag and drop it into the timeline above all tracks.
Step 6: Double click on the Title on the timeline and edit it with “Subscribe” and place it under the red rectangle and click OK.
Step 7: We have put a cursor that can click on the animated subscribe button. You can use Google Search to find a transparent cursor. Make sure to save it in png format. Download it and import it into Filmora.
Step 8: Drag and drop the cursor into the timeline and place it above all the other three tracks to make it prominent. Adjust the size of the cursor place it on the Subscribe button where you want it to appear.
Step 9: Now, it’s time to animate the design using keyframes. First of all, let’s animate the red rectangle. Double click on the red color on the timeline. Go to the ‘Animation’ tab and then click ‘Customize.’ Move to the 1 second in the timeline and click ‘Add.’
Step 10: Now go back to the beginning in the timeline and adjust the scale to 0%. It will make the rectangle pop up when you play the clip.
Step 11: Text needs to be animated as well to match it with the rectangle. Double click on the text in the timeline and click ‘ADVANCED.’
Step 12: In this Advance text editor, go to the ‘Animation’ tab and select any animation that you like. On the timeline under the preview screen, adjusts the dark areas according to the time you set on the rectangle, which was 1 second. We want the text to appear on the screen in 1 second, like the rectangle. Also, adjust the ending time when you want the text to disappear again. We have set it on 4 seconds. Which means it will start to fade after 4 seconds.
Step 13: Now, to animate the mouse cursor, we will use the same process we used for a rectangle that is key framing. Double click on the cursor track on the timeline and move the time on your timeline to a point when you want the cursor to appear. Now add a key frame by clicking ‘Add’.
Step 14: Now jump back to a point in your timeline, when the cursor will start appearing from outside the screen. Move the cursor outside the screen from where you want it to start moving toward the subscribe animation.
Step 15: To animate the click of the cursor, move ahead a little bit into your timeline and scale down the cursor to around 70%. Move it a little further and scale it up to 100%.
Step 16: You can add the sound of mouse click to make it more realistic. You can find this sound anywhere on the internet. Download it and import it into Filmora. Now place it into the timeline where it can match the movement of the cursor.
Step 17: Now it’s time to make this subscribe animation button disappear. Move forward into the time to the end, at around 4 seconds. Double click on the red button in the timeline and add a key frame at its actual scale.
Step 18: After that, move further in the timeline to the end and make its scale 0. It will make it disappear.
Step 19: Do the same with the cursor. Double click on the cursor in the time and add a key frame at its actual position.
Step 20: Move ahead when you want it to disappear. Move the cursor out of the screen and click ‘OK’.
Step 21: Your Subscribe png gif is ready to be exported and used in your videos. Click on export and choose from various formats and options to choose from while exporting it.
You may also like: How to Get People to Subscribe Channel
Conclusion:Your own Animated Subscribe Button is ready to be used in your future videos and projects. This is a ready-to-use subscribe button that can be easily used using the green screen effect in Filmora. Just import the clip, remove the green screen, and you are good to go. You can also customize this Subscribe Animation using your channel and more. Keep experimenting with new things using Filmora.
Richard Bennett
Richard Bennett is a writer and a lover of all things video.
Follow @Richard Bennett
Boosting Your Channels’ Viewer Loyalty: Essential Tactics Unveiled
6 Ways To Increase Audience Retention on YouTube
Richard Bennett
Mar 27, 2024• Proven solutions
Audience retention is one of your most important stats on YouTube. It is even more important than your view count. Your view count really only tells you how many people are finding and clicking on your videos, not whether they are actually watching them. Audience retention refers to how much of a video a viewer watches before clicking away, which is very useful information to have. If you know when people are leaving your videos then you know what you need to work on.
You May Also Like: How to analyse your and your competitors’ YouTube Channel >>
How to structure a YouTube video >>
- Part 1: What is Audience Retention?
- Part 2: How to See Your Audience Retention Report in YouTube?
- Part 3: What is a Good Audience Retention Rate on YouTube?
- Part 4: 6 Ways to Increase YouTube Audience Retention
Part 1: What is Audience Retention?
To put it in simple terms, YouTube audience retention is about how much of each video your viewers watch. It’s usually expressed as a percentage, so if your viewer gets half way through, they will have a retention of 50 per cent.
For YouTube analytics, audience retention is taken as a mean of the retention figures for each of your viewers. For example, if you post a ten-minute video and half your viewers get to the five-minute mark, that’s a retention of 50 per cent. If the other half watch it right to the end, that’s a retention of 100 per cent. The mean of these two figures is 75 per cent, and that’s what YouTube will use as your audience retention figure.
This retention rate affects how highly your video is ranked on YouTube, with videos boasting higher audience retention rates appearing higher in the search results than those which do not. This is because both YouTube and Google are highly focussed on customer satisfaction, and a long watch time means a very happy customer was watching that video. For this reason, it’s well worth considering how to increase YouTube audience retention as it demonstrates that you’re making great content as well as helping you get more viewers.
Part 2: How to See Your Audience Retention Report in YouTube?
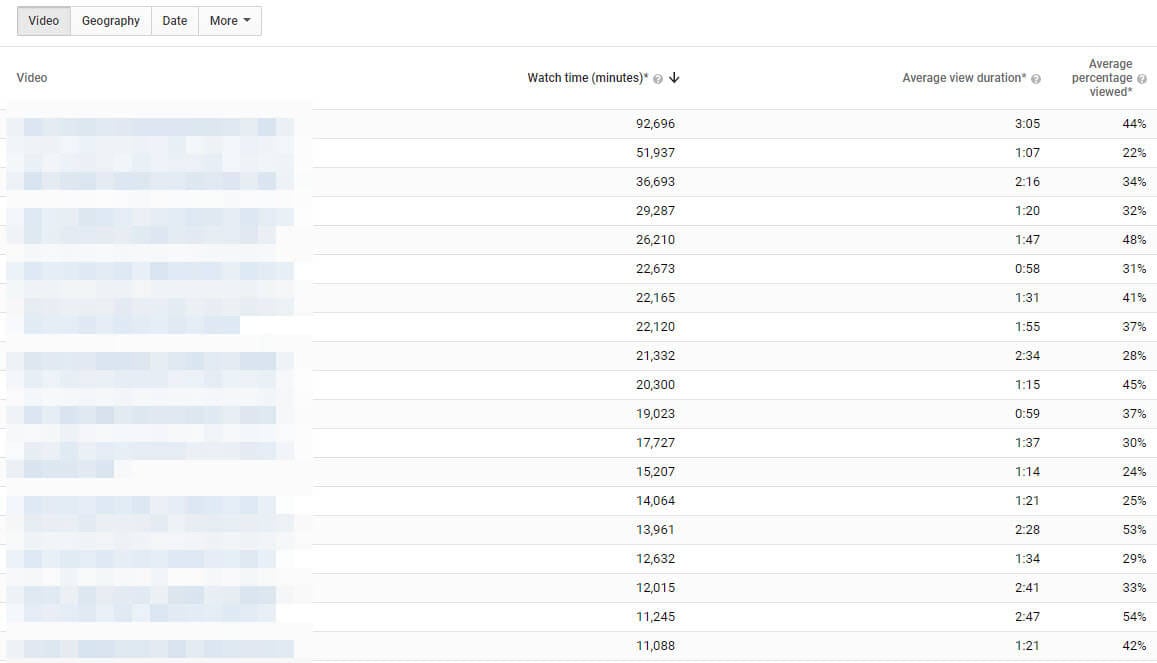
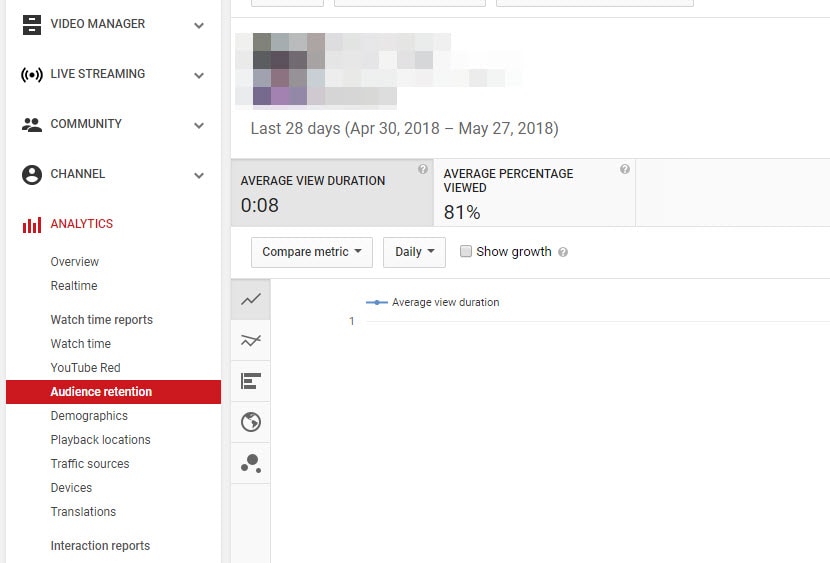
YouTube will produce reports to help you keep track of your audience retention. There are two types of audience retention reports; absolute and relative. Absolute allows you to view a graph of your video’s retention and see when people might be clicking away, or if they are skipping to later parts of your video. If you lose a lot of viewers in the first 15 seconds of your videos then that is a clear indication that your content is not what the viewers who find your videos really want. The relative report is where your video is compared to the average retention of similar videos.
Note that by ‘similar videos’, YouTube means videos of a similar length. There is no way to compare your videos only to other videos in your genre. The relative report will always be somewhat skewed because your videos will be measured against very different content.
To see an audience retention report log into your YouTube account and go to yourCreator Studio. There, selectAudience RetentionunderAnalytics.
Part 3: What is a Good Audience Retention Rate on YouTube?
When you’re considering how to increase YouTube audience retention, it can be good to have a goal in mind. Obviously 100 per cent is going to be the Holy Grail of retention rates, but how many videos are actually going to achieve that? It only takes for one person to ‘accidentally’ click on your video and rapidly click away, or for someone to have to stop for outside reasons, to drag your average down.
According to the YouTube community, a good goal to aim for is around 50 per cent, but as there is a lot which can affect your retention rate, that number may be different for you. Low view numbers sometimes get higher retention rates because it’s mainly subscribers watching, whereas channels with millions of views may suffer due to more people abandoning. Rather than setting yourself a golden number, focus instead on increasing your retention rate from wherever it is now, and celebrate your own success instead of measuring yourself against others.
Part 4: 6 Ways to Increase YouTube Audience Retention
If you’re serious about learning how to increase YouTube audience retention, here are five of the best ideas for you:
1. Compare your videos
Investigating your audience retention report will highlight the videos where you achieved maximum success. Think about what you did here, and work to replicate that technique. Perhaps you were talking about a product, or maybe your structured your video slightly differently. It’s up to you to dissect your video and find out what it was that kept people watching for longer, so that you can repeat this success in the future. You can also use some influencer marketing platform such as InflueNex to take a look at the videos in your similar channels, and learn the popular videos on their channels.
2. Get on with it
Research shows that YouTube viewers have an incredibly short attention span. Depending on who you believe, you could have as much as six seconds or as little as just three to grab their attention and compel them to carry on watching. If you want to improve your audience retention, coming in with an engaging, attention grabbing statement right at the start is crucial to your success. Nobody wants to waste their time watching someone waffle on for ages about their granny or their favorite hobbies, so get right down to it straight away, by telling them what’s in store.
3. Make it visually engaging
Perhaps all you’ve got is a presentation to make. You’re not a gamer, you’re not showing clips of your cat and you’re not doing a makeup tutorial, so surely all you need is a camera, good lighting and your face, right? Wrong. Viewers like to see the visual content changing, and videos which have a range of scenes are usually far more successful than those where it’s just a person talking to camera. Think about how you can insert cutaways, pop up text, different footage and other graphics to keep it interesting for your viewers.
4. Make it shorter
This one is a no brainer really. If you make a one-minute video, how hard is it going to be to keep viewers watching to the end compared to a 20-minute marathon. However, going too short can be negative too, unless you really do have something very quick and simple to showcase. Long videos work well for YouTubers in the gaming niche, in particular, because viewers want to know the end result, but for most of us, these sorts of viewing statistics are hard to reach.
If you consider a viewer who watches three minutes of your content, would you rather they watched three minutes of a ten-minute video and then clicked away bored, or would you rather they finished an entire video that was only three minutes long? Both in terms of audience retention and of your own reputation, having a viewer finish a short video is much more valuable to you than losing someone half way through a long one. That person probably enjoyed your content to the end and will more than likely watch another one of your videos. Conversely, the one you lost half way through was bored enough to stop watching and will probably not bother viewing any other videos of yours in future.
5. Keep them hooked
Think carefully about your YouTube video structure. Ideally, you will tell them at the very start that you’ve got something amazing to share with them later on. This could be a tip, a tutorial, a new product reveal or even something funny. Whatever it is, tell them they’re going to love it from the start, and keep reminding them to watch from the end to get this gift. That doesn’t mean you shouldn’t give them great content all the way through, just that you should save a carrot for the end of the ride to reward those loyal viewers.
So, now you know how to increase YouTube audience retention, what are you going to do about it? Have a go at modifying your videos to boost the numbers who will watch to the end and let us know how you got on.
6. Use an Excellent Video Editor
Content is the king. It is necessary to use a powerful video editor to help you edit videos. With an excellent video editor like Filmora, you can custom stunning videos effortlessly.
Richard Bennett
Richard Bennett is a writer and a lover of all things video.
Follow @Richard Bennett
Richard Bennett
Mar 27, 2024• Proven solutions
Audience retention is one of your most important stats on YouTube. It is even more important than your view count. Your view count really only tells you how many people are finding and clicking on your videos, not whether they are actually watching them. Audience retention refers to how much of a video a viewer watches before clicking away, which is very useful information to have. If you know when people are leaving your videos then you know what you need to work on.
You May Also Like: How to analyse your and your competitors’ YouTube Channel >>
How to structure a YouTube video >>
- Part 1: What is Audience Retention?
- Part 2: How to See Your Audience Retention Report in YouTube?
- Part 3: What is a Good Audience Retention Rate on YouTube?
- Part 4: 6 Ways to Increase YouTube Audience Retention
Part 1: What is Audience Retention?
To put it in simple terms, YouTube audience retention is about how much of each video your viewers watch. It’s usually expressed as a percentage, so if your viewer gets half way through, they will have a retention of 50 per cent.
For YouTube analytics, audience retention is taken as a mean of the retention figures for each of your viewers. For example, if you post a ten-minute video and half your viewers get to the five-minute mark, that’s a retention of 50 per cent. If the other half watch it right to the end, that’s a retention of 100 per cent. The mean of these two figures is 75 per cent, and that’s what YouTube will use as your audience retention figure.
This retention rate affects how highly your video is ranked on YouTube, with videos boasting higher audience retention rates appearing higher in the search results than those which do not. This is because both YouTube and Google are highly focussed on customer satisfaction, and a long watch time means a very happy customer was watching that video. For this reason, it’s well worth considering how to increase YouTube audience retention as it demonstrates that you’re making great content as well as helping you get more viewers.
Part 2: How to See Your Audience Retention Report in YouTube?
YouTube will produce reports to help you keep track of your audience retention. There are two types of audience retention reports; absolute and relative. Absolute allows you to view a graph of your video’s retention and see when people might be clicking away, or if they are skipping to later parts of your video. If you lose a lot of viewers in the first 15 seconds of your videos then that is a clear indication that your content is not what the viewers who find your videos really want. The relative report is where your video is compared to the average retention of similar videos.
Note that by ‘similar videos’, YouTube means videos of a similar length. There is no way to compare your videos only to other videos in your genre. The relative report will always be somewhat skewed because your videos will be measured against very different content.
To see an audience retention report log into your YouTube account and go to yourCreator Studio. There, selectAudience RetentionunderAnalytics.
Part 3: What is a Good Audience Retention Rate on YouTube?
When you’re considering how to increase YouTube audience retention, it can be good to have a goal in mind. Obviously 100 per cent is going to be the Holy Grail of retention rates, but how many videos are actually going to achieve that? It only takes for one person to ‘accidentally’ click on your video and rapidly click away, or for someone to have to stop for outside reasons, to drag your average down.
According to the YouTube community, a good goal to aim for is around 50 per cent, but as there is a lot which can affect your retention rate, that number may be different for you. Low view numbers sometimes get higher retention rates because it’s mainly subscribers watching, whereas channels with millions of views may suffer due to more people abandoning. Rather than setting yourself a golden number, focus instead on increasing your retention rate from wherever it is now, and celebrate your own success instead of measuring yourself against others.
Part 4: 6 Ways to Increase YouTube Audience Retention
If you’re serious about learning how to increase YouTube audience retention, here are five of the best ideas for you:
1. Compare your videos
Investigating your audience retention report will highlight the videos where you achieved maximum success. Think about what you did here, and work to replicate that technique. Perhaps you were talking about a product, or maybe your structured your video slightly differently. It’s up to you to dissect your video and find out what it was that kept people watching for longer, so that you can repeat this success in the future. You can also use some influencer marketing platform such as InflueNex to take a look at the videos in your similar channels, and learn the popular videos on their channels.
2. Get on with it
Research shows that YouTube viewers have an incredibly short attention span. Depending on who you believe, you could have as much as six seconds or as little as just three to grab their attention and compel them to carry on watching. If you want to improve your audience retention, coming in with an engaging, attention grabbing statement right at the start is crucial to your success. Nobody wants to waste their time watching someone waffle on for ages about their granny or their favorite hobbies, so get right down to it straight away, by telling them what’s in store.
3. Make it visually engaging
Perhaps all you’ve got is a presentation to make. You’re not a gamer, you’re not showing clips of your cat and you’re not doing a makeup tutorial, so surely all you need is a camera, good lighting and your face, right? Wrong. Viewers like to see the visual content changing, and videos which have a range of scenes are usually far more successful than those where it’s just a person talking to camera. Think about how you can insert cutaways, pop up text, different footage and other graphics to keep it interesting for your viewers.
4. Make it shorter
This one is a no brainer really. If you make a one-minute video, how hard is it going to be to keep viewers watching to the end compared to a 20-minute marathon. However, going too short can be negative too, unless you really do have something very quick and simple to showcase. Long videos work well for YouTubers in the gaming niche, in particular, because viewers want to know the end result, but for most of us, these sorts of viewing statistics are hard to reach.
If you consider a viewer who watches three minutes of your content, would you rather they watched three minutes of a ten-minute video and then clicked away bored, or would you rather they finished an entire video that was only three minutes long? Both in terms of audience retention and of your own reputation, having a viewer finish a short video is much more valuable to you than losing someone half way through a long one. That person probably enjoyed your content to the end and will more than likely watch another one of your videos. Conversely, the one you lost half way through was bored enough to stop watching and will probably not bother viewing any other videos of yours in future.
5. Keep them hooked
Think carefully about your YouTube video structure. Ideally, you will tell them at the very start that you’ve got something amazing to share with them later on. This could be a tip, a tutorial, a new product reveal or even something funny. Whatever it is, tell them they’re going to love it from the start, and keep reminding them to watch from the end to get this gift. That doesn’t mean you shouldn’t give them great content all the way through, just that you should save a carrot for the end of the ride to reward those loyal viewers.
So, now you know how to increase YouTube audience retention, what are you going to do about it? Have a go at modifying your videos to boost the numbers who will watch to the end and let us know how you got on.
6. Use an Excellent Video Editor
Content is the king. It is necessary to use a powerful video editor to help you edit videos. With an excellent video editor like Filmora, you can custom stunning videos effortlessly.
Richard Bennett
Richard Bennett is a writer and a lover of all things video.
Follow @Richard Bennett
Also read:
- Reimagine Realities Unlocking the Potential of YouTube's Greenscreens
- In 2024, Audiovisual Rhythm Optimal DJ Content for Gatherings
- In 2024, Boosting Earnings in the Quick Flicks of YouTube Shorts
- Comprehensive Guide to YouTube's Subscription Advantages for 2024
- Unlocking Creative Potential in Lyric Videos with Lyric Video Maker
- Unlock Brand Potential - Access 50 Banners at No Cost
- 2024 Approved Counteracting Bot Influence for Higher Traffic
- 2024 Approved Engage Audiences Best Hashtags for Going Viral on YT
- Essential Tips for Producing Engaging Educational Content for YouTube
- Earth's Highest-Paid Online Video Personality for 2024
- In 2024, 80+ Creative Cooking Channel Names to Attract More Audience
- Explosive Videos Hitting 100M Views on YouTube (2024 Rankings)
- Watch This! Top Music Reaction Videos of 2023
- In 2024, 6 Ways To Increase Audience Retention on YouTube
- Reach Everyone by Pairing YouTube & Twitch Streams
- In 2024, Cutting-Edge Techniques for Resolving YouTube Short Issues
- The Mobile Marketer's Blueprint Simple Pathway to YouTube Success
- [New] In 2024, Sharpened Focus on Squares Creating Striking iMovie Content for Instagram
- New Whats the Difference Between Adobe Premiere and After Effects for 2024
- [Updated] Permanent Banishment From the TikTok Community, Done Right
- Updated From Forward to Reverse The Ultimate TikTok Video Editing Guide 2023 Update for 2024
- Xiaomi Redmi Note 12 Pro 4G can’t play AVCHD .mts video
- New In 2024, Echoes of Tomorrow 7 Pioneering Sound Alterations Redefining Music Production
- New KineMaster on Mac Download, Install, and Start Editing for 2024
- In 2024, Planning to Use a Pokemon Go Joystick on Oppo A38? | Dr.fone
- Relapse Prevention
- iSpoofer is not working On Tecno Phantom V Flip? Fixed | Dr.fone
- In 2024, 5 Ways to Transfer Music from OnePlus 11 5G to Other Android Devices Easily | Dr.fone
- [New] Capturing TikTok Videos Saving on Modern Smartphones
- Precision and Power A Filmmaker's Guide to Professional Voice-Over Techniques for 2024
- [New] Breaking Barriers in Advertising Animating for Maximum ROI on FB for 2024
- Title: "A Simple Path to Enhanced YouTube Sign-Ups - Create Animated Subscription Bar Using Filmora"
- Author: Steven
- Created at : 2024-05-25 18:43:31
- Updated at : 2024-05-26 18:43:31
- Link: https://youtube-clips.techidaily.com/a-simple-path-to-enhanced-youtube-sign-ups-create-animated-subscription-bar-using-filmora/
- License: This work is licensed under CC BY-NC-SA 4.0.
