A Practical Approach to Incorporate YouTube Playlists Online for 2024
A Practical Approach to Incorporate YouTube Playlists Online
YouTube is an excellent resource for entertainment, education, and general information, but did you know you can also display a YouTube playlist on your website?
Embedding a YouTube playlist will allow you to showcase a collection of videos on a topic or theme on your website. It’s also a great way to keep your visitors engaged on your site for more extended periods.
To help you with the process, we’ll explore different step-by-step methods to embed a YouTube playlist on a website to add interactivity to your site.
So, if you’re ready to get started, read on!
How To Embed a YouTube Playlist on a Website
If you want to embed and display a YouTube playlist on your website, we’ll give you a complete rundown of the three methods you can try to get this done. But, of course, each method has its pros and cons, so you’ll need to decide which is right for you.
Here’s how to embed a YouTube playlist on a Website:
Embedding a YouTube Playlist on Website Using WordPress Plugin
The plugin is the simplest way to add a YouTube Playlist to your WordPress website. This will help you get this done in no time without having to write any code for the process.
With plugins like YouTube Feed Pro by Smash Balloon , you can extend your website’s functionality and create, customize, or embed a YouTube playlist with just a few clicks of a mouse.
To embed and add a YouTube playlist on your website page/post, do the following steps in sequence:
Step1 Launch a browser on your PC and head to your WordPress website’s login page. Sign in to your dashboard using your username and password.
Step2 Click the “Plugins” option from the left-hand side menu on the WordPress dashboard. Now, click “Add New” and use the search option to find and install the YouTube Feed Pro plugin. Afterward, click the “Activate” option to enable the plugin.
Step3 Click the “YouTube Feed” option from the left menu and open “All Feeds.” On the next page, click “Add New” at the top left of the screen.
You will now be asked what type of feed you want to create. Select “Playlist” and click “Next.”
Step4 You need to create your YouTube API Key , copy it, and paste it into the pop-up. Click “Add” to connect your YouTube account to the plugin.
Step5 Select the Playlist you want to display on your WordPress website and take its ID. Paste that in the next pop-up window and click “Next” to continue the process.
Your YouTube playlist will be connected to your WordPress website. To further customize it, select the template you want and click “Next.” You can also configure the Feed Layout and Color Scheme.
Step6 Once you are done with customization, click the “Embed” option on the top-right side of the screen, and a pop-up window will appear. Next, click “Add to a Page,” and a list of pages on your website will be displayed.
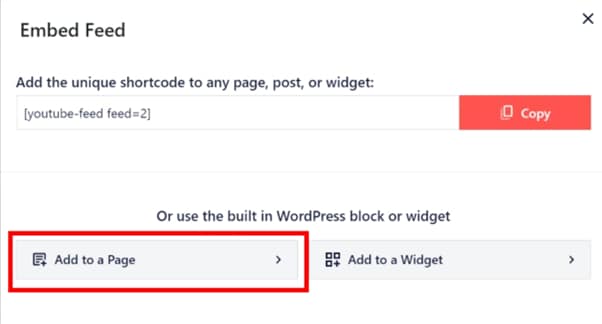
Choose your page and click “Add” at the bottom of the pop-up window. You’ll be directed to a new page where you can embed the feed. Click the “Plus” icon at the top-left of the screen, search for YouTube Feed and choose the Feeds for YouTube block to embed and add your playlist.
That’s about it! You’ve successfully embedded a YouTube playlist on your WordPress website.
Embedding a YouTube Playlist on a Website Using oEmbed Code
Another method to embed a YouTube playlist on your WordPress website is to use oEmbed Code. This method requires basic CSS, HTML, or Java knowledge; otherwise, you won’t be able to customize your playlist.
Moreover, this method is too complicated for beginners, and you will miss the customer support provided by WordPress plugin developers in case of any mishaps.
To use the oEmbed Code method, do the following steps:
Step1 In the first step, head to your YouTube account and access the Playlist you want to embed. Next, click the three dots below it and copy its URL.
Step2 Now, login to your WordPress dashboard and open the post or page editor where you want to add the playlist.
Step3 Paste the URL directly in the editor and click “Update” to save the changes.
WordPress will grab your playlist from YouTube and automatically show it in your post using oEmbed. The outcome is a single video with a menu that your viewers can click to see other videos in the playlist.
Embedding a YouTube Playlist on WebsiteUsing
Another way to embed a playlist of your YouTube channel on your WordPress site is by using the iFrame code with the following step-by-step instructions:
Step1 In the first step, launch a browser on your desktop or laptop and go to your YouTube channel.
Step2 Now, head to the YouTube playlist you want to embed, click the “Share” icon, and a pop-up window will appear.
Step3 Choose the “Embed” option, and a new lightbox pop-up will appear, having your playlist’s embed code. Click “Copy” to save the code on your clipboard.
Step4 Log in to your WordPress dashboard and open the page/post editor where you want to embed the playlist. Click the “Plus” icon, search for “custom HTML,” and select “Custom HTML block” to add to the page/post.
Now, paste the iFrame embed code you’ve copied from YouTube and click “Update” at the top-right of the screen to save the changes and embed your playlist.
This method will also display one video with a menu from where you and your website viewers can access the playlist. Moreover, there are few customization options to change the appearance.
A Bonus Tip: YouTube Video Maker - Filmora
If you find your YouTube videos as boring and not engaging as other content on your website, we recommend using Wondershare Filmora for your next project.
Free Download For Win 7 or later(64-bit)
Free Download For macOS 10.14 or later
With this software, you can quickly make eye-captivating YouTube videos by recording from a screen or webcam and can edit them using advanced editing features. Filmora also allows you to instantly export your content to YouTube with just a few clicks, which you can later embed into your website.
Some key features of Wondershare Filmora are as follows:
- Advanced video editing features include keyframing, speed ramping, Boris FX, Motion Tracking, Titles, and more.
- Massive library of preset templates, effects, transitions, animations, and royalty-free music.
- Instant Export to YouTube channel.
- Record from webcam, screen, and voiceover.
- Simple drag-and-drop interface.
Conclusion
This article discusses step-by-step methods to embed a YouTube playlist on a website using the WordPress plugin, oEmbed code, and iFrame embed code.
Additionally, we’ve recommended Wondershare Filmora for making engaging and captivating YouTube videos that you can export directly to your channel from the software.
We hope you’ve found this article informative and can now display your YouTube playlist on your site without hassle.
Catch a Wider Net via Concurrent Streams to Youtube + Twitch
Youtube Video Maker - Wondershare Filmora
Provide abundant video effects - A creative video editor
Powerful color correction and grading
Detailed tutorials provided by the official channel
As the world has progressed, a great deal has changed, and it has transformed into a digital hub. People have started to use different platforms to entertain themselves, watch their favorite content online, gaming, music, sports, or any other form of entertainment.
Cross-platform streaming is a concept people have started to follow especially when it comes to gaming. The audience has a wide variety of choices when it comes to viewing live content online.
YouTube and Twitch are two major platforms streamers use to publish their content online for their targeted audience. They need to stream their content on YouTube and Twitch simultaneously as it engages a wider range of audiences worldwide, and newer streamers can benefit from it.
In this article
Part 1: How Can You Stream on Twitch and YouTube at the Same Time?
Part 2: How to Multi-stream using Streamlabs Prime
Part 3: Bonus Tips | Enlarge your Live Stream Performance!
Part 1: How Can You Stream on Twitch and YouTube at the Same Time?
To stream simultaneously on multiple platforms, a certain program or application is required to provide you with the required tools to enable you to broadcast your content. Several programs provide the option to stream to multiple websites at the same time e.g., Restream, Streamlabs Prime, and MelonApp.
Restream
Restream.io is a service that provides you with the option to broadcast your content to more than 30 different platforms including Twitch and YouTube. When you log in, you can choose the channels you wish to broadcast on and restream will issue a unique key for you.
After you have selected your desired selection, go to your broadcasting software, and choose Restream.io as your preferred service and insert your unique key provided by Restream.
Restream will let you use their services for free provided you use it with their watermark. It is recommended for newer users but if you wish to remove the watermark and go ad-free you will have to upgrade your plan.
Below is a step-by-step guide to help you stream using Restream.io
Step 1: Sign up or log in
The first step is to sign up on Restream. It will require you to choose a unique username, password and enter a valid email address.
Step 2: Choose your desired Platforms
From the list of different platforms, choose the ones you wish to stream to and add your channels by authorizing with the required credentials. Restream has an option of more than 30 platforms including YouTube, Twitch, Facebook, Twitter, and LinkedIn.
Step 3: Choose your subscription plan
Choose your desired plan that caters to your needs. Keep in mind that Restream is 100% free but free accounts do not come with recording or storage and will show a Restream watermark.
You can remove this watermark by upgrading your subscription plan to a Professional one from the dashboard.
Step 4: Choose the final streaming platforms
Connect all your channels so you can stream from a single platform. Click the platform icon and connect your preferred accounts with Restream.
Step 5: Tweak the settings according to your preference
Set up for streaming preferences and settings along with your streaming software. You can broadcast directly from your browser, multiple members from different locations, from your mobile phone, or even your GoPro. More available streaming features can be found on the Restream Help Center.
Restream also offers a wide range of services including the option to stream pre-recorded videos on Twitch at a preselected time and date. However, there is a caveat that you will not be able to multi-stream after you get an affiliate status on your Twitch channel.
Part 2: How to Multi-stream using Streamlabs Prime
Streamlabs Prime is the premium version of Streamlabs. It provides you with a range of 40+ apps that can also improve the quality of your streams and allow you to multi-stream. It is one of the best streaming software in the game currently.
Many content creators use Streamlabs to simultaneously run their streams on YouTube along with Twitch to grasp a wider range of audiences and get more views. One of the best things about Streamlabs is that you can connect to the broadcast services directly from the program without entering any stream key.
Streamlabs has included the option to Multi Stream on different platforms within its OBS client. Below are the steps required to set you up for streaming on YouTube and Twitch at the same time.
Step 1: Open the settings of your desired client
Click on the gear icon to open the settings on the bottom left of the client, click on the Stream tab where you will see the three main platforms for streaming.
Step 2: Add your preferred platforms
Add YouTube and Twitch by pressing the connect button; you can also add other services as well with the Add Destination feature.
Your stream will automatically be broadcast to all selected platforms when you go live. Although, you will be required to use the premium service of Streamlabs to ensure you can Multistream to different platforms at the same time.
Melon is a web-based service that lets you live-stream onto different platforms at the same time such as YouTube, Twitch, Facebook, and LinkedIn in just a matter of a few clicks. No downloads are required and there are umpteen options of customizations to personalize your feed according to your preference.
You can earn through donations from your live stream and are provided with the best customer support 24/7. Everything is hosted on a cloud-based setup and you can stream and record in 1080p.
Below are the steps to guide you on how to stream using the MelonApp.
Step 1: Login or Sign up
Login or Signup with your credentials into Melon and allow the required permissions i.e., microphone and camera.
Step 2: Choose your subscription plan
Choose your premium plan to avail of multi-streaming along with high-quality broadcasting, unlimited streaming, and tons of customization.
Step 3: Choose your desired platforms
Choose and connect the platforms you want to stream to from the Settings in the top right corner. If you have to reselect, simply click x, and reconnect to a different service.
Step 4: Finalize your preferences
Click on ‘Go Live’ and select the platforms for the current stream you wish to broadcast. Selected platforms will be highlighted.
Step 5: Go live
In the end, click next, put in the title of your stream and its description and you are all set to broadcast your content.
Part 3: Bonus Tips | Enlarge your Live Stream Performance
Now that you know how to stream on Twitch and YouTube, here are some tips to improve your live streams!
Tip # 1: Enhance Your Content
You can enhance your content in multiple ways to grasp a wider audience and get your message all around the globe.
Tip # 2: Introduce Graphics and Transitions
You can use interesting gifs, screens, intros, and outros for your streams. Announcing your streams beforehand can also help build up hype and make people anticipate your feed.
Tip # 3: Work More on Post Production
People stream different content on these streaming platforms including gaming, podcasts, educational and entertainment videos. Editing your content to near perfection is one of the most major aspects of a successful broadcast.
Tip # 4: Use Editing Tools to Make Your Videos Interesting
You can use different editing tools such as Wondershare Filmora which is a great video editing software that allows you to edit, trim, cut, add sounds and apply tons of effects to your content no matter what type or genre it is.
Tip # 5: Add Certain Effects to Appear Professional
You can also introduce motion tracking, keyframing, and use other powerful features, and that too for free using Wondershare Filmora. However, if you wish to go a step further you can always opt for their premium version and transcend into a world of endless options and opportunities to edit and enhance your content.
Tip # 6: Promote Your Content Using Social Media
Multi-streaming helps build up a wider community of fans as it is targeting different sets of people and you can also earn from your streams using advertisements and introducing click-on banners for brand endorsements.
Some platforms also let you promote and manage your merchandise, so it is always a good opportunity for these streaming clients and platforms.
Conclusion
Now you can also monetize your streams and broadcast on different platforms such as YouTube and Twitch at the same time. This will boost your reach and views in a very positive way. You can also tweak your content by editing it and inserting sound effects, gifs, and much more to make it more interesting and catchier.
And by multi-streaming on YouTube and Twitch, you will have a greater chance of being found by gaming sponsors and your growth will not be tied just to a single platform. You can also promote your streams on other social media platforms and your handles as well.
Pre-recorded videos are also a great way to present your content with perfection without any chances of being prone to any potential online mishaps.
Also read:
- Ace Your Earnings Game in YouTube Shorts
- [Updated] Collaborative Video Creation & Growth Tips
- [Updated] Discovering the Hidden Truth Behind YouTube's Viewer Numbers
- [New] 2023'S Standout YouTube Music Playback Gems
- Turning Hair Videos Into Income Streams
- Skyrocket Subscribers and Engagement - Top 12 Video Promotion Tactics
- Techniques for Broadcasting Purpose-Driven Lifestyle Plays
- In 2024, Beyond VidCon Top 50 YouTube Celebrations
- In 2024, 10 Best Online Video Cutters on YouTube
- 2024 Approved Discover the Top 30 FreeFire Hashtags for Amplifying Video Growth
- Key Audio Changer Software for Content Creators
- [Updated] Channel Transformation Through Strategic Use of YouTube Outros
- Crafting Charts with a Click YouTube Short Tunes Made Easy
- [Updated] Efficient Fortnite Imagery Design Quickly
- Elevate Your Videography with Top SEO Gadgets
- [Updated] Essential Illumination Strategies for Filming
- [Updated] Elevate Your Viewing Experience with These Top 27 Alternatives
- Subscriber Supreme Ranked Global YouTube Personalities by Numbers
- In 2024, Discover the Top 10 Fitness Channels for Yogis
- Exclusive List of Premium Video Downloader Apps
- Calculating Earnings The Essence of YouTube Short Revenue Split for 2024
- [Updated] Aesthetic Alignment for Online Glamour Content
- In 2024, Decoding the Economic Riches of Mr. Beast
- 2024 Approved Effortless Guide to Share Your Videos as Shorts on Computers & Phones
- [Updated] Affordable Advertising Streamlining Channel-Sponsorship Partnerships
- Unveil Top 8 Websites with FREE Green Screen Video Treasures
- The Best of Home Workouts Top Yoga Channels Online
- Visualize Success - Discover the Top 10 Online Tools for Channel Branding
- Video Editors Unite Adobe and YouTube Integration Tips
- In 2024, A Comprehensive Tutorial for Transforming Vids Into Dollars
- In 2024, Best iPhone & Android Photo & Video Capture Applications Reviewed
- Avoid Every Interruption The Ultimate Guide to 7 AdBlocking Tools for 2024
- Inside Their Secrets Top 10 YouTube Beauty Gurus You Need to See
- [Updated] Capture the Action Crafting Best-in-Class Sports Films
- [New] Essential Tips Creating Striking YouTube Video Previews
- Secrets to Profit From Youtube Shorts Fundamentals and Earning Prospects
- In 2024, Branding with Visuals Inserting Watermarks Into YouTube Vids
- Bypass Latency with AV1 in YouTube Settings
- The Ultimate Guide to Samsung Galaxy M54 5G Pattern Lock Screen Everything You Need to Know
- Twitter's Peak Moments Top Viewers' Stories for 2024
- In 2024, How to Reset Gmail Password on Realme Note 50 Devices
- In 2024, The Top 5 Android Apps That Use Fingerprint Sensor to Lock Your Apps On Realme C55
- Updated The Investment in Sound Quality Ranked List of Excellent, No-Cost and Full-Priced Podcast Editors
- New In 2024, Apple Video Editing Mastery Essential Software You Need
- [Updated] In 2024, Design Marvels Japanese Homescape in MC Landscape
- [New] In 2024, Ultimate Guide to Best Video Chatting Solutions (PC/Phone)
- [New] The Ultimate Facebook Playbook for Business Growth (30 Key Points) for 2024
- Unlocking Made Easy The Best 10 Apps for Unlocking Your Xiaomi Device
- Optimal Listeners for University Talks for 2024
- [Updated] Television Innovation Integrating FB Live Experiences
- How to Unlock SIM Card on Vivo V30 Lite 5G online without jailbreak
- How To Install the Latest iOS Beta Version on iPhone XS Max? | Dr.fone
- [Updated] Innovations in Video Sharing Top 5 Beyond TikTok Platforms for 2024
- Cloud Consortium Choices Best Spaces Revealed
- How to use iSpoofer on Xiaomi Redmi A2+? | Dr.fone
- [Updated] Crossing the Line-Free Verifying Video Rights on TikTok
- Title: A Practical Approach to Incorporate YouTube Playlists Online for 2024
- Author: Steven
- Created at : 2024-05-25 18:43:24
- Updated at : 2024-05-26 18:43:24
- Link: https://youtube-clips.techidaily.com/a-practical-approach-to-incorporate-youtube-playlists-online-for-2024/
- License: This work is licensed under CC BY-NC-SA 4.0.