:max_bytes(150000):strip_icc()/markus-winkler-3Rn2EjoAC1g-unsplash-e091e94ce3814db994047f2ca43e0a90.jpg)
A Guide to Crafting Engaging Videos in Adobe Premiere for 2024
A Guide to Crafting Engaging Videos in Adobe Premiere
How to Edit YouTube Videos in Adobe Premiere

Richard Bennett
Mar 27, 2024• Proven solutions
You just made a few videos, and you want to edit them first before uploading to YouTube. The truth is that you may find the editing part a bit more challenging compared to uploading. However, there are now tools like Adobe Premiere that can help make the editing process easier. Read on and learn how to edit YouTube videos with Adobe Premier so that you can create amazing videos.
Related article:Adobe Premiere User Guide
Adobe Premiere is largely targeted towards professional users, and the best alternative you can use today, whether you are a professional user or just a casual YouTube user, is Wondershare Filmora . This is not only a highly effective video editing program, but it is also user-friendly and very easy to use.
 Download Mac Version ](https://tools.techidaily.com/wondershare/filmora/download/ )
Adobe is well known for having some of the leading video production tools in the industry. In fact, most of their tools ranging from the Premier Pro and Photoshop to Audition and many others have been used in many video and movie productions, including some of the popular theatrical releases of our times. Their latest professional video editor, Adobe Premier can be summarized as one of the best editors with versatility, depth, and power for high-quality video editing.
How to edit YouTube Videos with Adobe Premier
Step 1: Import the Video Clips
The first step in how to edit YouTube videos with Adobe Premier is to basically import the video clips you want to edit. This is achieved using a simple process of clicking “import” from the “file” drop-down menu. Once you have finished importing your photos or video files, you can then drag them from the sidebar and into the editing area.

Note
- If the videos you want to import are already published online, you can start the process by first downloading them directly from YouTube first, making sure to save them as MP4 files.
- The best way of importing videos from YouTube is by using an innovative video converter like Wondershare Video Converter Ultimate. This program will help in downloading and converting files to a format that is supported by Adobe Premier.
Step 2: Editing
The next step in how edit YouTube videos with Adobe Premiere is to start modifying the video files or photos the way you want. To achieve this, click on “Effects Control” and apply the desired effects. If you want to insert some text or words into your video, select “title” and then click “new title.” Now choose how you would like the words to behave, for instance, “Default Roll” makes the text roll upwards in the page.
Now drag the text that you have created into the editor area. If you want to edit the text, simply double-click to select it, and it will bring up a separate page where you can make further edits. You can then modify the text, font, and the positioning as well. This page also allows you to set whether the text will crawl or roll.

The final part of the process is to import your chosen audio file. This could be the chosen soundtrack for your presentation. Simply drag the audio file onto your editor. You can then modify how the length of your videos or photos by selecting and dragging the specific photo or video. Finally, press enter and your video will start rendering.
Step 3: Save the Edited File and Upload to YouTube
It is important to note that even as you edit YouTube videos with Adobe Premier, the software does not allow direct uploads to YouTube. This means you will need to save the edited file first on your computer and ensure you use a YouTube supported format. The most effective option is to use the codec, which will then save your file in the MPEG-4 format. This is the preferred format for YouTube and Video uploads.
Richard Bennett
Richard Bennett is a writer and a lover of all things video.
Follow @Richard Bennett
Richard Bennett
Mar 27, 2024• Proven solutions
You just made a few videos, and you want to edit them first before uploading to YouTube. The truth is that you may find the editing part a bit more challenging compared to uploading. However, there are now tools like Adobe Premiere that can help make the editing process easier. Read on and learn how to edit YouTube videos with Adobe Premier so that you can create amazing videos.
Related article:Adobe Premiere User Guide
Adobe Premiere is largely targeted towards professional users, and the best alternative you can use today, whether you are a professional user or just a casual YouTube user, is Wondershare Filmora . This is not only a highly effective video editing program, but it is also user-friendly and very easy to use.
Download Mac Version ](https://tools.techidaily.com/wondershare/filmora/download/ )
Adobe is well known for having some of the leading video production tools in the industry. In fact, most of their tools ranging from the Premier Pro and Photoshop to Audition and many others have been used in many video and movie productions, including some of the popular theatrical releases of our times. Their latest professional video editor, Adobe Premier can be summarized as one of the best editors with versatility, depth, and power for high-quality video editing.
How to edit YouTube Videos with Adobe Premier
Step 1: Import the Video Clips
The first step in how to edit YouTube videos with Adobe Premier is to basically import the video clips you want to edit. This is achieved using a simple process of clicking “import” from the “file” drop-down menu. Once you have finished importing your photos or video files, you can then drag them from the sidebar and into the editing area.

Note
- If the videos you want to import are already published online, you can start the process by first downloading them directly from YouTube first, making sure to save them as MP4 files.
- The best way of importing videos from YouTube is by using an innovative video converter like Wondershare Video Converter Ultimate. This program will help in downloading and converting files to a format that is supported by Adobe Premier.
Step 2: Editing
The next step in how edit YouTube videos with Adobe Premiere is to start modifying the video files or photos the way you want. To achieve this, click on “Effects Control” and apply the desired effects. If you want to insert some text or words into your video, select “title” and then click “new title.” Now choose how you would like the words to behave, for instance, “Default Roll” makes the text roll upwards in the page.
Now drag the text that you have created into the editor area. If you want to edit the text, simply double-click to select it, and it will bring up a separate page where you can make further edits. You can then modify the text, font, and the positioning as well. This page also allows you to set whether the text will crawl or roll.
The final part of the process is to import your chosen audio file. This could be the chosen soundtrack for your presentation. Simply drag the audio file onto your editor. You can then modify how the length of your videos or photos by selecting and dragging the specific photo or video. Finally, press enter and your video will start rendering.
Step 3: Save the Edited File and Upload to YouTube
It is important to note that even as you edit YouTube videos with Adobe Premier, the software does not allow direct uploads to YouTube. This means you will need to save the edited file first on your computer and ensure you use a YouTube supported format. The most effective option is to use the codec, which will then save your file in the MPEG-4 format. This is the preferred format for YouTube and Video uploads.
Richard Bennett
Richard Bennett is a writer and a lover of all things video.
Follow @Richard Bennett
Richard Bennett
Mar 27, 2024• Proven solutions
You just made a few videos, and you want to edit them first before uploading to YouTube. The truth is that you may find the editing part a bit more challenging compared to uploading. However, there are now tools like Adobe Premiere that can help make the editing process easier. Read on and learn how to edit YouTube videos with Adobe Premier so that you can create amazing videos.
Related article:Adobe Premiere User Guide
Adobe Premiere is largely targeted towards professional users, and the best alternative you can use today, whether you are a professional user or just a casual YouTube user, is Wondershare Filmora . This is not only a highly effective video editing program, but it is also user-friendly and very easy to use.
Download Mac Version ](https://tools.techidaily.com/wondershare/filmora/download/ )
Adobe is well known for having some of the leading video production tools in the industry. In fact, most of their tools ranging from the Premier Pro and Photoshop to Audition and many others have been used in many video and movie productions, including some of the popular theatrical releases of our times. Their latest professional video editor, Adobe Premier can be summarized as one of the best editors with versatility, depth, and power for high-quality video editing.
How to edit YouTube Videos with Adobe Premier
Step 1: Import the Video Clips
The first step in how to edit YouTube videos with Adobe Premier is to basically import the video clips you want to edit. This is achieved using a simple process of clicking “import” from the “file” drop-down menu. Once you have finished importing your photos or video files, you can then drag them from the sidebar and into the editing area.
Note
- If the videos you want to import are already published online, you can start the process by first downloading them directly from YouTube first, making sure to save them as MP4 files.
- The best way of importing videos from YouTube is by using an innovative video converter like Wondershare Video Converter Ultimate. This program will help in downloading and converting files to a format that is supported by Adobe Premier.
Step 2: Editing
The next step in how edit YouTube videos with Adobe Premiere is to start modifying the video files or photos the way you want. To achieve this, click on “Effects Control” and apply the desired effects. If you want to insert some text or words into your video, select “title” and then click “new title.” Now choose how you would like the words to behave, for instance, “Default Roll” makes the text roll upwards in the page.
Now drag the text that you have created into the editor area. If you want to edit the text, simply double-click to select it, and it will bring up a separate page where you can make further edits. You can then modify the text, font, and the positioning as well. This page also allows you to set whether the text will crawl or roll.
 /a>
/a>
The final part of the process is to import your chosen audio file. This could be the chosen soundtrack for your presentation. Simply drag the audio file onto your editor. You can then modify how the length of your videos or photos by selecting and dragging the specific photo or video. Finally, press enter and your video will start rendering.
Step 3: Save the Edited File and Upload to YouTube
It is important to note that even as you edit YouTube videos with Adobe Premier, the software does not allow direct uploads to YouTube. This means you will need to save the edited file first on your computer and ensure you use a YouTube supported format. The most effective option is to use the codec, which will then save your file in the MPEG-4 format. This is the preferred format for YouTube and Video uploads.

Richard Bennett
Richard Bennett is a writer and a lover of all things video.
Follow @Richard Bennett
Richard Bennett
Mar 27, 2024• Proven solutions
You just made a few videos, and you want to edit them first before uploading to YouTube. The truth is that you may find the editing part a bit more challenging compared to uploading. However, there are now tools like Adobe Premiere that can help make the editing process easier. Read on and learn how to edit YouTube videos with Adobe Premier so that you can create amazing videos.
Related article:Adobe Premiere User Guide
Adobe Premiere is largely targeted towards professional users, and the best alternative you can use today, whether you are a professional user or just a casual YouTube user, is Wondershare Filmora . This is not only a highly effective video editing program, but it is also user-friendly and very easy to use.
Download Mac Version ](https://tools.techidaily.com/wondershare/filmora/download/ )
Adobe is well known for having some of the leading video production tools in the industry. In fact, most of their tools ranging from the Premier Pro and Photoshop to Audition and many others have been used in many video and movie productions, including some of the popular theatrical releases of our times. Their latest professional video editor, Adobe Premier can be summarized as one of the best editors with versatility, depth, and power for high-quality video editing.
## How to edit YouTube Videos with Adobe PremierStep 1: Import the Video Clips
The first step in how to edit YouTube videos with Adobe Premier is to basically import the video clips you want to edit. This is achieved using a simple process of clicking “import” from the “file” drop-down menu. Once you have finished importing your photos or video files, you can then drag them from the sidebar and into the editing area.
Note
- If the videos you want to import are already published online, you can start the process by first downloading them directly from YouTube first, making sure to save them as MP4 files.
- The best way of importing videos from YouTube is by using an innovative video converter like Wondershare Video Converter Ultimate. This program will help in downloading and converting files to a format that is supported by Adobe Premier.
Step 2: Editing
The next step in how edit YouTube videos with Adobe Premiere is to start modifying the video files or photos the way you want. To achieve this, click on “Effects Control” and apply the desired effects. If you want to insert some text or words into your video, select “title” and then click “new title.” Now choose how you would like the words to behave, for instance, “Default Roll” makes the text roll upwards in the page.
Now drag the text that you have created into the editor area. If you want to edit the text, simply double-click to select it, and it will bring up a separate page where you can make further edits. You can then modify the text, font, and the positioning as well. This page also allows you to set whether the text will crawl or roll.
The final part of the process is to import your chosen audio file. This could be the chosen soundtrack for your presentation. Simply drag the audio file onto your editor. You can then modify how the length of your videos or photos by selecting and dragging the specific photo or video. Finally, press enter and your video will start rendering.
Step 3: Save the Edited File and Upload to YouTube
It is important to note that even as you edit YouTube videos with Adobe Premier, the software does not allow direct uploads to YouTube. This means you will need to save the edited file first on your computer and ensure you use a YouTube supported format. The most effective option is to use the codec, which will then save your file in the MPEG-4 format. This is the preferred format for YouTube and Video uploads.
.png) Kanto Player Professional
Kanto Player Professional
Richard Bennett
Richard Bennett is a writer and a lover of all things video.
Follow @Richard Bennett
 WinUtilities Pro
Audiophiles Recommend: Top 5 Headset Choices
Top 5 Gaming Headsets for YouTube in 2024
Richard Bennett
Feb 20, 2024• Proven solutions
Need a gaming headset? The number of gamers is growing every day, and that means more and more people are looking for content from experienced gamers on YouTube and Twitch. To produce great YouTube gaming videos, you’ll need a lot of gaming knowledge and a few pieces of high-quality equipment, including a good headset. Without a headset, it might be hard to keep track of in-game audio cues while entertaining your audience.
Most hardware manufacturers are actively targeting the gaming market, releasing specialized headset models for 2024. Here is a quick overview of the five best candidates for the title of the best gaming headset for 2024:
2. Audio Technica ATH-ADG1 Open Air High Fidelity Headset
3. Logitec Surround Sound Gaming Headset G430
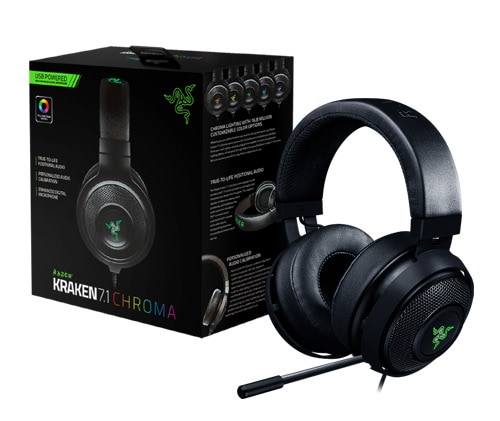
4. Razer Kraken 7.1 Chroma Gaming Headset
5. HyperX Cloud II Gaming Headset
1. Razer Man O’ War 7.1
 Screensaver Factory, Create stunning professional screensavers within minutes. Create screensavers for yourself, for marketing or unlimited royalty-free commercial distribution. Make screensavers from images, video and swf flash, add background music and smooth sprite and transition effects. Screensaver Factory is very easy to use, and it enables you to make self-installing screensaver files and CDs for easy setup and distribution. Screensaver Factory is the most advanced software of its kind.
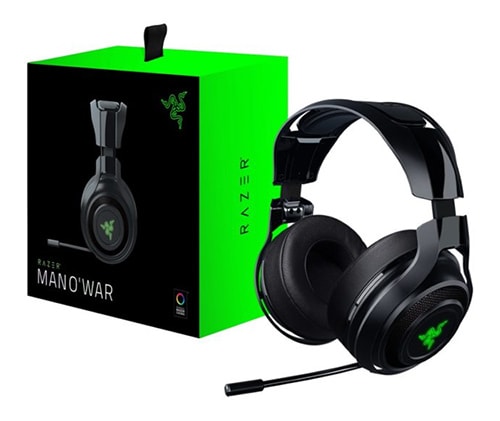
Price: $222.48
Compatible with: PC, Mac (with USB), PlayStation, Xbox
This wireless headset has an impressive surround sound engine that allows for an immersive gaming experience and convincing positional audio. The headset features a modern ergonomic design with earcups that fit very tightly and completely seal off the outside world. Razer Man O’War looks bulky, but it weighs just over 330 grams and uses an analog 3.5 mm connector.
The microphone boom extends from the left ear cup and can be easily adjusted or retracted. Most importantly, microphone controls are very sophisticated allowing for in-game switching between channels without disruption. When used for talking, the microphone will ensure absolute clarity, which comes handy for those who broadcast their games on YouTube.
Pros:
- Wireless setup for maximum freedom
- Minimizes ambient noise with cushion-like ear cups
- Lightweight and comfortable to wear
- Fully retractable, high-quality MEMS microphone
- Long-lasting batteries – up to 14 hours
Cons:
- Occasional loss of connectivity
- Slightly expensive for a plastic build
2. Audio Technica ATH-ADG1 Open Air High Fidelity Headset
 Forex Robotron Basic Package
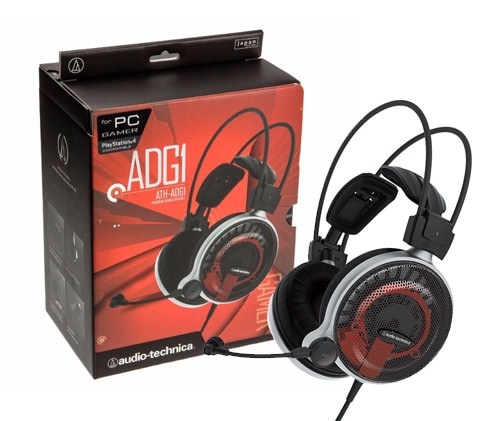
Price: $299
Compatible with: PC, PS4, iPad, iPhone, Xbox (with adapter)
For a gaming headset, this model boasts a really impressive audio quality. This characteristic is a huge strength, especially when coupled with its broad compatibility and innovative design. The structure of this headset is unique, with an open-air setup that allows for the circulation of air under the set, which is useful during long gaming sessions. This comes at a price since the isolation against ambient noise is less than perfect and the feeling might be a bit awkward until you get used to it.
As for the microphone, it is permanently attached to the left side of the headset with a flexible stem, so it can be easily adjusted to the desired position. This implies that ATH-ADG1 was made specifically for those who need to communicate while receiving the high-quality audio feed, such as gaming streamers.
Pros:
- Extremely light and uniquely built for comfort
- Top-notch audio quality above its class
- Innovative, self-adjusting frame
- Comfortable ear cups
Cons:
- Analog headset, so the quality depends on the connected device
- Specialized product with a narrow range of applications
- Fragile build that can easily be damaged
- Very expensive
3. Logitec Surround Sound Gaming Headset G430
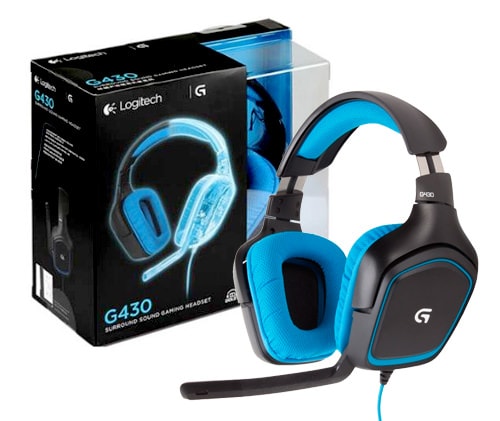
Price: $79.99
Compatible with: PC, PS4
Logitec is well known for producing high-quality peripherals, and this model lives up to that standard despite its affordable price. Its most touted feature is the surround sound system, which is not common in this price range. This allows for very realistic in-game audio, particularly because the headset has an excellent bass channel. In addition to solid audio performance, the Logitec gaming headset is characterized by low weight rotating ear cups with a protective cloth and vibrant coloring.
A standard 3.5 mm connector is used for the microphone, which is conveniently positioned and capable of clearly capturing speech while blocking out other sounds. Unfortunately, the microphone can’t be easily manipulated and doesn’t offer the option to be muted automatically, although a manual switch is available to turn it off. For a budget gaming headset, that’s a fair compromise.
Pros:
- Realistic, immersive sound
- Smart design optimized to decrease weight
- The Durable cloth covering the ear cups
- Surround effect on a cheap gaming headset
- Excellent price-to-quality ratio
Cons:
- Lack of programmable commands
- Poor protection against ambient noise
- Less than impressive visually
 PaperScan Professional: PaperScan Scanner Software is a powerful TWAIN & WIA scanning application centered on one idea: making document acquisition an unparalleled easy task for anyone.
4. Razer Kraken 7.1 Chroma Gaming Headset
Price: $96.77
Compatible with : PC, PS4
If you are looking for the best gaming headset with a microphone, this is a very b candidate. It is pretty affordable compared to the other Razer headset on this list (the Man O’ War), but it is equally robust when it comes to performance, including high-quality surround audio. This is a rather large headset with thick ear cups decorated with a glowing logo of the brand, but its size is not a problem since Kraken is very comfortable even when worn continually for hours.
Kraken’s fully retractable and flexible microphone can be hidden under the left cup when not in use, giving this model a bit of versatility. It picks up your voice even when it’s bent sideways, so YouTube professionals won’t have to worry about the exact positioning while engaged in a fierce battle. It’s also possible to use a toggle switch to mute the microphone quickly.
Pros:
- Excellent audio for its price range
- Surround audio contributes to the more complete gaming experience
- Completely isolates any ambient sounds
- Flexible mic that can be moved out of the way
- Access to Synapse 2.0 software
Cons:
- USB only, no 3.5 mm jacks
- Lack of preset settings for gaming
- A sensitive microphone that sometimes picks up unwanted sounds
5. HyperX Cloud II Gaming Headset
 vMix 4K - Software based live production. vMix 4K includes everything in vMix HD plus 4K support, PTZ control, External/Fullscreen output, 4 Virtual Outputs, 1 Replay, 4 vMix Call, and 2 Recorders.
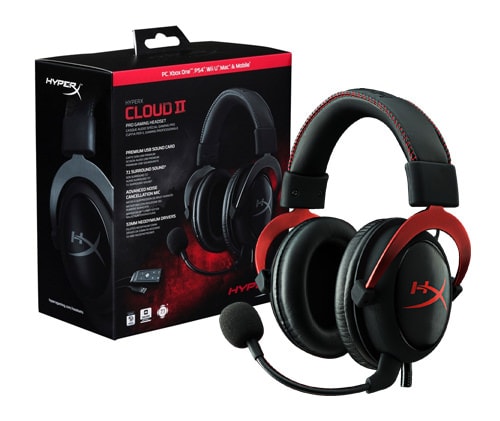
Price: $99.88
Compatible with: PC, Mac, Xbox, PS4, Mobile
Well designed, packed with advanced features and moderately priced, this gaming headset offers a lot of value to the YouTube crowd. It comes with optional surround audio that can be plugged in via sound card, or disconnected when this effect is not needed. The headset was originally designed to work perfectly on the Xbox, but it retains compatibility with most desktops, laptops, and consoles.
The detachable microphone is very solid and particularly effective in filtering noise and eliminating echo. It can be easily moved into any position or removed altogether when the headset is used for any purpose other than game streaming.
Pros:
- b and elegant aluminum frame
- Advanced audio control box
- Virtual 7.1 surround audio
- Interchangeable ear pads
- Premium look and feel at an affordable price
Cons:
- Inconveniently positioned mute switch
- Relatively short cord limiting movement
Best Video Editing Software for Gamers- Wondershare Filmora9
No doubt gamers would need a lot of effects and overlays to edit a live stream video to show the best effects on the game screen. High bass music syncing with the scene is very important for a game video. The sky is the limit to add effects and background to the game videos with Wondershare Filmora9 as it’s the best video editor for professionals and newcomers who are interested in gaming and pursuing a YouTube channel. Filmora9 provides you with a green screen, PIP, scene detection, play video in reverse, add voice over, royalty-free music, overlays, and transitions that you can use to make a gaming video like a pro.


Richard Bennett
Richard Bennett is a writer and a lover of all things video.
Follow @Richard Bennett
Richard Bennett
Feb 20, 2024• Proven solutions
Need a gaming headset? The number of gamers is growing every day, and that means more and more people are looking for content from experienced gamers on YouTube and Twitch. To produce great YouTube gaming videos, you’ll need a lot of gaming knowledge and a few pieces of high-quality equipment, including a good headset. Without a headset, it might be hard to keep track of in-game audio cues while entertaining your audience.
Most hardware manufacturers are actively targeting the gaming market, releasing specialized headset models for 2024. Here is a quick overview of the five best candidates for the title of the best gaming headset for 2024:
2. Audio Technica ATH-ADG1 Open Air High Fidelity Headset
3. Logitec Surround Sound Gaming Headset G430
4. Razer Kraken 7.1 Chroma Gaming Headset
5. HyperX Cloud II Gaming Headset
1. Razer Man O’ War 7.1
 SwifDoo PDF Perpetual (2-PC) Free upgrade. No monthly fees ever.
Price: $222.48
Compatible with: PC, Mac (with USB), PlayStation, Xbox
This wireless headset has an impressive surround sound engine that allows for an immersive gaming experience and convincing positional audio. The headset features a modern ergonomic design with earcups that fit very tightly and completely seal off the outside world. Razer Man O’War looks bulky, but it weighs just over 330 grams and uses an analog 3.5 mm connector.
The microphone boom extends from the left ear cup and can be easily adjusted or retracted. Most importantly, microphone controls are very sophisticated allowing for in-game switching between channels without disruption. When used for talking, the microphone will ensure absolute clarity, which comes handy for those who broadcast their games on YouTube.
Pros:
- Wireless setup for maximum freedom
- Minimizes ambient noise with cushion-like ear cups
- Lightweight and comfortable to wear
- Fully retractable, high-quality MEMS microphone
- Long-lasting batteries – up to 14 hours
Cons:
- Occasional loss of connectivity
- Slightly expensive for a plastic build
2. Audio Technica ATH-ADG1 Open Air High Fidelity Headset
 Forex Robotron Gold Package
Price: $299
Compatible with: PC, PS4, iPad, iPhone, Xbox (with adapter)
For a gaming headset, this model boasts a really impressive audio quality. This characteristic is a huge strength, especially when coupled with its broad compatibility and innovative design. The structure of this headset is unique, with an open-air setup that allows for the circulation of air under the set, which is useful during long gaming sessions. This comes at a price since the isolation against ambient noise is less than perfect and the feeling might be a bit awkward until you get used to it.
As for the microphone, it is permanently attached to the left side of the headset with a flexible stem, so it can be easily adjusted to the desired position. This implies that ATH-ADG1 was made specifically for those who need to communicate while receiving the high-quality audio feed, such as gaming streamers.
Pros:
- Extremely light and uniquely built for comfort
- Top-notch audio quality above its class
- Innovative, self-adjusting frame
- Comfortable ear cups
Cons:
- Analog headset, so the quality depends on the connected device
- Specialized product with a narrow range of applications
- Fragile build that can easily be damaged
- Very expensive
3. Logitec Surround Sound Gaming Headset G430
Price: $79.99
Compatible with: PC, PS4
Logitec is well known for producing high-quality peripherals, and this model lives up to that standard despite its affordable price. Its most touted feature is the surround sound system, which is not common in this price range. This allows for very realistic in-game audio, particularly because the headset has an excellent bass channel. In addition to solid audio performance, the Logitec gaming headset is characterized by low weight rotating ear cups with a protective cloth and vibrant coloring.
A standard 3.5 mm connector is used for the microphone, which is conveniently positioned and capable of clearly capturing speech while blocking out other sounds. Unfortunately, the microphone can’t be easily manipulated and doesn’t offer the option to be muted automatically, although a manual switch is available to turn it off. For a budget gaming headset, that’s a fair compromise.
Pros:
- Realistic, immersive sound
- Smart design optimized to decrease weight
- The Durable cloth covering the ear cups
- Surround effect on a cheap gaming headset
- Excellent price-to-quality ratio
Cons:
- Lack of programmable commands
- Poor protection against ambient noise
- Less than impressive visually
4. Razer Kraken 7.1 Chroma Gaming Headset
 Greeting Card Builder
Price: $96.77
Compatible with : PC, PS4
If you are looking for the best gaming headset with a microphone, this is a very b candidate. It is pretty affordable compared to the other Razer headset on this list (the Man O’ War), but it is equally robust when it comes to performance, including high-quality surround audio. This is a rather large headset with thick ear cups decorated with a glowing logo of the brand, but its size is not a problem since Kraken is very comfortable even when worn continually for hours.
Kraken’s fully retractable and flexible microphone can be hidden under the left cup when not in use, giving this model a bit of versatility. It picks up your voice even when it’s bent sideways, so YouTube professionals won’t have to worry about the exact positioning while engaged in a fierce battle. It’s also possible to use a toggle switch to mute the microphone quickly.
Pros:
- Excellent audio for its price range
- Surround audio contributes to the more complete gaming experience
- Completely isolates any ambient sounds
- Flexible mic that can be moved out of the way
- Access to Synapse 2.0 software
Cons:
- USB only, no 3.5 mm jacks
- Lack of preset settings for gaming
- A sensitive microphone that sometimes picks up unwanted sounds
 Simple and intuitive video editing
5. HyperX Cloud II Gaming Headset

Price: $99.88
Compatible with: PC, Mac, Xbox, PS4, Mobile
Well designed, packed with advanced features and moderately priced, this gaming headset offers a lot of value to the YouTube crowd. It comes with optional surround audio that can be plugged in via sound card, or disconnected when this effect is not needed. The headset was originally designed to work perfectly on the Xbox, but it retains compatibility with most desktops, laptops, and consoles.
The detachable microphone is very solid and particularly effective in filtering noise and eliminating echo. It can be easily moved into any position or removed altogether when the headset is used for any purpose other than game streaming.
Pros:
- b and elegant aluminum frame
- Advanced audio control box
- Virtual 7.1 surround audio
- Interchangeable ear pads
- Premium look and feel at an affordable price
Cons:
- Inconveniently positioned mute switch
- Relatively short cord limiting movement
Best Video Editing Software for Gamers- Wondershare Filmora9
No doubt gamers would need a lot of effects and overlays to edit a live stream video to show the best effects on the game screen. High bass music syncing with the scene is very important for a game video. The sky is the limit to add effects and background to the game videos with Wondershare Filmora9 as it’s the best video editor for professionals and newcomers who are interested in gaming and pursuing a YouTube channel. Filmora9 provides you with a green screen, PIP, scene detection, play video in reverse, add voice over, royalty-free music, overlays, and transitions that you can use to make a gaming video like a pro.

WPS Office Premium ( File Recovery, Photo Scanning, Convert PDF)–Yearly
Richard Bennett
Richard Bennett is a writer and a lover of all things video.
Follow @Richard Bennett
Richard Bennett
Feb 20, 2024• Proven solutions
Need a gaming headset? The number of gamers is growing every day, and that means more and more people are looking for content from experienced gamers on YouTube and Twitch. To produce great YouTube gaming videos, you’ll need a lot of gaming knowledge and a few pieces of high-quality equipment, including a good headset. Without a headset, it might be hard to keep track of in-game audio cues while entertaining your audience.
Most hardware manufacturers are actively targeting the gaming market, releasing specialized headset models for 2024. Here is a quick overview of the five best candidates for the title of the best gaming headset for 2024:
2. Audio Technica ATH-ADG1 Open Air High Fidelity Headset
3. Logitec Surround Sound Gaming Headset G430
4. Razer Kraken 7.1 Chroma Gaming Headset
5. HyperX Cloud II Gaming Headset
1. Razer Man O’ War 7.1
 ZoneAlarm Extreme Security NextGen
Price: $222.48
Compatible with: PC, Mac (with USB), PlayStation, Xbox
This wireless headset has an impressive surround sound engine that allows for an immersive gaming experience and convincing positional audio. The headset features a modern ergonomic design with earcups that fit very tightly and completely seal off the outside world. Razer Man O’War looks bulky, but it weighs just over 330 grams and uses an analog 3.5 mm connector.
The microphone boom extends from the left ear cup and can be easily adjusted or retracted. Most importantly, microphone controls are very sophisticated allowing for in-game switching between channels without disruption. When used for talking, the microphone will ensure absolute clarity, which comes handy for those who broadcast their games on YouTube.
Pros:
- Wireless setup for maximum freedom
- Minimizes ambient noise with cushion-like ear cups
- Lightweight and comfortable to wear
- Fully retractable, high-quality MEMS microphone
- Long-lasting batteries – up to 14 hours
Cons:
- Occasional loss of connectivity
- Slightly expensive for a plastic build
2. Audio Technica ATH-ADG1 Open Air High Fidelity Headset
Price: $299
Compatible with: PC, PS4, iPad, iPhone, Xbox (with adapter)
For a gaming headset, this model boasts a really impressive audio quality. This characteristic is a huge strength, especially when coupled with its broad compatibility and innovative design. The structure of this headset is unique, with an open-air setup that allows for the circulation of air under the set, which is useful during long gaming sessions. This comes at a price since the isolation against ambient noise is less than perfect and the feeling might be a bit awkward until you get used to it.
As for the microphone, it is permanently attached to the left side of the headset with a flexible stem, so it can be easily adjusted to the desired position. This implies that ATH-ADG1 was made specifically for those who need to communicate while receiving the high-quality audio feed, such as gaming streamers.
Pros:
- Extremely light and uniquely built for comfort
- Top-notch audio quality above its class
- Innovative, self-adjusting frame
- Comfortable ear cups
Cons:
- Analog headset, so the quality depends on the connected device
- Specialized product with a narrow range of applications
- Fragile build that can easily be damaged
- Very expensive
3. Logitec Surround Sound Gaming Headset G430
Price: $79.99
Compatible with: PC, PS4
Logitec is well known for producing high-quality peripherals, and this model lives up to that standard despite its affordable price. Its most touted feature is the surround sound system, which is not common in this price range. This allows for very realistic in-game audio, particularly because the headset has an excellent bass channel. In addition to solid audio performance, the Logitec gaming headset is characterized by low weight rotating ear cups with a protective cloth and vibrant coloring.
A standard 3.5 mm connector is used for the microphone, which is conveniently positioned and capable of clearly capturing speech while blocking out other sounds. Unfortunately, the microphone can’t be easily manipulated and doesn’t offer the option to be muted automatically, although a manual switch is available to turn it off. For a budget gaming headset, that’s a fair compromise.
Pros:
- Realistic, immersive sound
- Smart design optimized to decrease weight
- The Durable cloth covering the ear cups
- Surround effect on a cheap gaming headset
- Excellent price-to-quality ratio
Cons:
- Lack of programmable commands
- Poor protection against ambient noise
- Less than impressive visually
## **4\. [Razer Kraken 7.1 Chroma Gaming Headset](https://www.razerzone.com/gaming-audio/razer-kraken-71-v2)**
Price: $96.77
Compatible with : PC, PS4
If you are looking for the best gaming headset with a microphone, this is a very b candidate. It is pretty affordable compared to the other Razer headset on this list (the Man O’ War), but it is equally robust when it comes to performance, including high-quality surround audio. This is a rather large headset with thick ear cups decorated with a glowing logo of the brand, but its size is not a problem since Kraken is very comfortable even when worn continually for hours.
Kraken’s fully retractable and flexible microphone can be hidden under the left cup when not in use, giving this model a bit of versatility. It picks up your voice even when it’s bent sideways, so YouTube professionals won’t have to worry about the exact positioning while engaged in a fierce battle. It’s also possible to use a toggle switch to mute the microphone quickly.
Pros:
- Excellent audio for its price range
- Surround audio contributes to the more complete gaming experience
- Completely isolates any ambient sounds
- Flexible mic that can be moved out of the way
- Access to Synapse 2.0 software
Cons:
- USB only, no 3.5 mm jacks
- Lack of preset settings for gaming
- A sensitive microphone that sometimes picks up unwanted sounds
5. HyperX Cloud II Gaming Headset
Price: $99.88
Compatible with: PC, Mac, Xbox, PS4, Mobile
Well designed, packed with advanced features and moderately priced, this gaming headset offers a lot of value to the YouTube crowd. It comes with optional surround audio that can be plugged in via sound card, or disconnected when this effect is not needed. The headset was originally designed to work perfectly on the Xbox, but it retains compatibility with most desktops, laptops, and consoles.
The detachable microphone is very solid and particularly effective in filtering noise and eliminating echo. It can be easily moved into any position or removed altogether when the headset is used for any purpose other than game streaming.
Pros:
- b and elegant aluminum frame
- Advanced audio control box
- Virtual 7.1 surround audio
- Interchangeable ear pads
- Premium look and feel at an affordable price
Cons:
- Inconveniently positioned mute switch
- Relatively short cord limiting movement
Best Video Editing Software for Gamers- Wondershare Filmora9
No doubt gamers would need a lot of effects and overlays to edit a live stream video to show the best effects on the game screen. High bass music syncing with the scene is very important for a game video. The sky is the limit to add effects and background to the game videos with Wondershare Filmora9 as it’s the best video editor for professionals and newcomers who are interested in gaming and pursuing a YouTube channel. Filmora9 provides you with a green screen, PIP, scene detection, play video in reverse, add voice over, royalty-free music, overlays, and transitions that you can use to make a gaming video like a pro.
Richard Bennett
Richard Bennett is a writer and a lover of all things video.
Follow @Richard Bennett
Richard Bennett
Feb 20, 2024• Proven solutions
Need a gaming headset? The number of gamers is growing every day, and that means more and more people are looking for content from experienced gamers on YouTube and Twitch. To produce great YouTube gaming videos, you’ll need a lot of gaming knowledge and a few pieces of high-quality equipment, including a good headset. Without a headset, it might be hard to keep track of in-game audio cues while entertaining your audience.
Most hardware manufacturers are actively targeting the gaming market, releasing specialized headset models for 2024. Here is a quick overview of the five best candidates for the title of the best gaming headset for 2024:
2. Audio Technica ATH-ADG1 Open Air High Fidelity Headset
3. Logitec Surround Sound Gaming Headset G430
4. Razer Kraken 7.1 Chroma Gaming Headset
5. HyperX Cloud II Gaming Headset
1. Razer Man O’ War 7.1
Price: $222.48
Compatible with: PC, Mac (with USB), PlayStation, Xbox
This wireless headset has an impressive surround sound engine that allows for an immersive gaming experience and convincing positional audio. The headset features a modern ergonomic design with earcups that fit very tightly and completely seal off the outside world. Razer Man O’War looks bulky, but it weighs just over 330 grams and uses an analog 3.5 mm connector.
The microphone boom extends from the left ear cup and can be easily adjusted or retracted. Most importantly, microphone controls are very sophisticated allowing for in-game switching between channels without disruption. When used for talking, the microphone will ensure absolute clarity, which comes handy for those who broadcast their games on YouTube.
Pros:
- Wireless setup for maximum freedom
- Minimizes ambient noise with cushion-like ear cups
- Lightweight and comfortable to wear
- Fully retractable, high-quality MEMS microphone
- Long-lasting batteries – up to 14 hours
Cons:
- Occasional loss of connectivity
- Slightly expensive for a plastic build
2. Audio Technica ATH-ADG1 Open Air High Fidelity Headset
Price: $299
Compatible with: PC, PS4, iPad, iPhone, Xbox (with adapter)
For a gaming headset, this model boasts a really impressive audio quality. This characteristic is a huge strength, especially when coupled with its broad compatibility and innovative design. The structure of this headset is unique, with an open-air setup that allows for the circulation of air under the set, which is useful during long gaming sessions. This comes at a price since the isolation against ambient noise is less than perfect and the feeling might be a bit awkward until you get used to it.
As for the microphone, it is permanently attached to the left side of the headset with a flexible stem, so it can be easily adjusted to the desired position. This implies that ATH-ADG1 was made specifically for those who need to communicate while receiving the high-quality audio feed, such as gaming streamers.
Pros:
- Extremely light and uniquely built for comfort
- Top-notch audio quality above its class
- Innovative, self-adjusting frame
- Comfortable ear cups
Cons:
- Analog headset, so the quality depends on the connected device
- Specialized product with a narrow range of applications
- Fragile build that can easily be damaged
- Very expensive
3. Logitec Surround Sound Gaming Headset G430
 The Tube Sites Submitter is a fast and efficient tool for anyone who needs to upload videos quickly, easily and automatically to hundreds of tube sites in mere minutes .
Price: $79.99
Compatible with: PC, PS4
Logitec is well known for producing high-quality peripherals, and this model lives up to that standard despite its affordable price. Its most touted feature is the surround sound system, which is not common in this price range. This allows for very realistic in-game audio, particularly because the headset has an excellent bass channel. In addition to solid audio performance, the Logitec gaming headset is characterized by low weight rotating ear cups with a protective cloth and vibrant coloring.
A standard 3.5 mm connector is used for the microphone, which is conveniently positioned and capable of clearly capturing speech while blocking out other sounds. Unfortunately, the microphone can’t be easily manipulated and doesn’t offer the option to be muted automatically, although a manual switch is available to turn it off. For a budget gaming headset, that’s a fair compromise.
Pros:
- Realistic, immersive sound
- Smart design optimized to decrease weight
- The Durable cloth covering the ear cups
- Surround effect on a cheap gaming headset
- Excellent price-to-quality ratio
Cons:
- Lack of programmable commands
- Poor protection against ambient noise
- Less than impressive visually
4. Razer Kraken 7.1 Chroma Gaming Headset
 KoolReport Pro is an advanced solution for creating data reports and dashboards in PHP. Equipped with all extended packages , KoolReport Pro is able to connect to various datasources, perform advanced data analysis, construct stunning charts and graphs and export your beautiful work to PDF, Excel, JPG or other formats. Plus, it includes powerful built-in reports such as pivot report and drill-down report which will save your time in building ones.
 It will help you to write dynamic data reports easily, to construct intuitive dashboards or to build a whole business intelligence cockpit.
KoolReport Pro package goes with Full Source Code, Royal Free, ONE (1) Year Priority Support, ONE (1) Year Free Upgrade and 30-Days Money Back Guarantee.
Developer License allows Single Developer to create Unlimited Reports, deploy on Unlimited Servers and able deliver the work to Unlimited Clients.
Price: $96.77
Compatible with : PC, PS4
If you are looking for the best gaming headset with a microphone, this is a very b candidate. It is pretty affordable compared to the other Razer headset on this list (the Man O’ War), but it is equally robust when it comes to performance, including high-quality surround audio. This is a rather large headset with thick ear cups decorated with a glowing logo of the brand, but its size is not a problem since Kraken is very comfortable even when worn continually for hours.
Kraken’s fully retractable and flexible microphone can be hidden under the left cup when not in use, giving this model a bit of versatility. It picks up your voice even when it’s bent sideways, so YouTube professionals won’t have to worry about the exact positioning while engaged in a fierce battle. It’s also possible to use a toggle switch to mute the microphone quickly.
Pros:
- Excellent audio for its price range
- Surround audio contributes to the more complete gaming experience
- Completely isolates any ambient sounds
- Flexible mic that can be moved out of the way
- Access to Synapse 2.0 software
Cons:
- USB only, no 3.5 mm jacks
- Lack of preset settings for gaming
- A sensitive microphone that sometimes picks up unwanted sounds
5. HyperX Cloud II Gaming Headset
Price: $99.88
Compatible with: PC, Mac, Xbox, PS4, Mobile
Well designed, packed with advanced features and moderately priced, this gaming headset offers a lot of value to the YouTube crowd. It comes with optional surround audio that can be plugged in via sound card, or disconnected when this effect is not needed. The headset was originally designed to work perfectly on the Xbox, but it retains compatibility with most desktops, laptops, and consoles.
The detachable microphone is very solid and particularly effective in filtering noise and eliminating echo. It can be easily moved into any position or removed altogether when the headset is used for any purpose other than game streaming.
Pros:
- b and elegant aluminum frame
- Advanced audio control box
- Virtual 7.1 surround audio
- Interchangeable ear pads
- Premium look and feel at an affordable price
Cons:
- Inconveniently positioned mute switch
- Relatively short cord limiting movement
Best Video Editing Software for Gamers- Wondershare Filmora9
No doubt gamers would need a lot of effects and overlays to edit a live stream video to show the best effects on the game screen. High bass music syncing with the scene is very important for a game video. The sky is the limit to add effects and background to the game videos with Wondershare Filmora9 as it’s the best video editor for professionals and newcomers who are interested in gaming and pursuing a YouTube channel. Filmora9 provides you with a green screen, PIP, scene detection, play video in reverse, add voice over, royalty-free music, overlays, and transitions that you can use to make a gaming video like a pro.
Richard Bennett
Richard Bennett is a writer and a lover of all things video.
Follow @Richard Bennett
- Title: A Guide to Crafting Engaging Videos in Adobe Premiere for 2024
- Author: Steven
- Created at : 2024-07-22 20:29:52
- Updated at : 2024-07-23 20:29:52
- Link: https://youtube-clips.techidaily.com/a-guide-to-crafting-engaging-videos-in-adobe-premiere-for-2024/
- License: This work is licensed under CC BY-NC-SA 4.0.