
:max_bytes(150000):strip_icc()/alanturing-5b85aa874cedfd0025bf4240.png)
"A Beginner's Blueprint Setting Up on YouTube"
A Beginner’s Blueprint: Setting Up on YouTube
How to Create a YouTube Account

Richard Bennett
Mar 27, 2024• Proven solutions
People create YouTube accounts for a lot of different reasons. Some YouTubers just love making videos and created their channels so they would have somewhere to post their work. Others have strong opinions they need a platform to share. There are a lot of people on YouTube whose main interest is in a separate website or other social media page, but they use their YouTube channels to help generate traffic. If you are considering starting your own YouTube channel then you should take a second to consider why you want to, since this will have an impact on what kind of videos you make. Your reasons for wanting to make a YouTube account do not have to be very elaborate. Maybe you just think it will be fun. Good news; it will be!
Once you know for sure that you want to create a YouTube account, and also know why you want to do it, you have already started building your channel. There are still a few important things to consider, though. This article will walk you through signing up for a YouTube account, and give you some tips about starting your channel.
Creating Your YouTube Account in 6 Steps
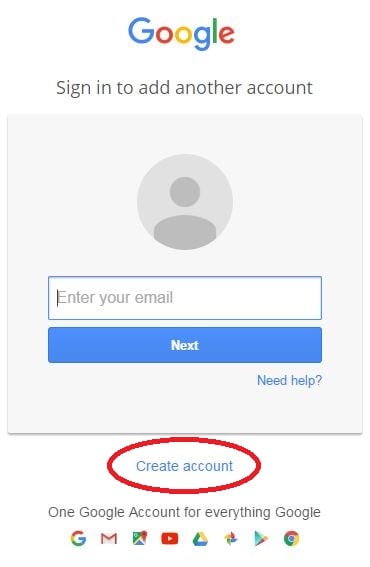
1. Go to YouTube.com and look at the top right corner of your screen. There will either be a blue Sign In button, or an icon representing you. YouTube accounts and Google accounts are the same, so if you are signed into your Gmail account you are already signed into YouTube as well.
2. If you see a Sign In button, click it. If you see your icon click on that, and in the window that pops up select Add Account. Either way, you will be taken into a sign in screen. Under where it asks for your email address it will say Create Account. Click on Create Account.
3. In the sign up page you will need to put in your name, email address, and mobile phone number as well as some other personal information. Do not enter your current Gmail address. Enter an alternate email you have created for your vlog, or click on I would like a new Gmail address. This will change your page slightly so that the email field becomes Choose a Username.


You will probably need to try a few different usernames before you find one that is not taken.
4. You will have to put in both a first and last name when you create your account, but you can change it to one name later.
5. Your password will need to be at least 8 characters long. Try to use a combination of letters or numbers, and make sure it is not something easily guessable (i.e spouses name).
6. After you finish the form click Next Step and, in the next screen, Continue to YouTube.
Tips on Starting a YouTube Channel
1. Choose a Topic you Love
When choosing a topic for your YouTube channel make sure you pick something you are passionate about. If you already have an interest or hobby which you are always researching and are extremely up-to-date on then that should probably be the theme of your vlog. If you plan to have a channel where people go to learn anything then you will need to be an authority on that topic. Whatever you make videos about it will need to be something you can realistically see yourself putting a lot of time into. If you cannot think of more than a couple ideas for videos on your topic then that is a sign that you need to choose something else to focus on.
You should check to see how much demand there is for videos on your topic. This can be done by googling your topic to see what else is out there. If not many people have addressed your topic yet it probably means that it is not something a lot of people want to know about. However, it could also mean that the people who do want to watch videos like yours have been starved for content. Your channel will flop if you do not love what you are making videos about, so do not choose something just because you think it will be popular. Follow your passion.
2. Check out the Competition
You should look for other vlogs with similar topics to yours not only to gauge how much demand there is for your videos, but to check out the competition. If there are a lot of YouTube channels dedicated to the same topic you want to vlog about then this should not discourage you from going after the same viewers. People who are excited about a topic frequently watch more than one vlog about it. It might not even be correct to think of other vloggers within your genre as ‘the competition’ since you are ultimately part of the same community. You will need to watch these people’s videos as part of keeping yourself informed and will likely become a fan – maybe even a collaborator some day – of theirs.
The main reason you want to look into YouTube channels like yours is because you do not want to be creating content that is overdone and boring. You are tackling the same topic as other people, and may even make some videos on the exact same subjects as others already have. There needs to be something unique about your videos that makes them stand out from what already exists. By looking at what other people are already doing you will be able to come up with ideas for what you can do differently.
3. Choose a Great Name
Picking a great name for your YouTube account can take a lot of effort. Chances are you will not want to use your own name, at least not in full. Although your real name can work for if you are a lifestyle vlogger in most cases you will have a more specific topic that will need to be addressed in your channel’s name. Try out your name or a nickname for yourself in combination with different words associated with the topic of your vlog. Aim to create a name that is catchy and easy to remember.
Chances are a few of your first couple picks will be unavailable. YouTube is a popular site and a lot of the best names are taken. The last thing you should ever do while naming your YouTube channel is add numbers or letters to the end of a name you like because it is taken. Names with numbers at the end are hard for viewers to remember and find again. Choosing a weak name with a trail of numbers or letters after it will make it very hard for your channel to grow. Brainstorm a long list of potential names that are actually good and keep on trying them out until you find one that’s available.
For more information on naming your YouTube channel read our post ‘How To Pick a Name for Your YouTube Channel’.
4. Make a Schedule
Maintaining a YouTube channel is a big time commitment. You need to post videos regularly or people will forget about you, and videos can take a long time to make. When you are first starting your vlog you should make yourself a schedule for when you want to upload videos. Having a schedule will help you budget your time and ensure that your vlog never gets in the way of the rest of your life.
Having a posting schedule will also help you grow your channel. Viewers like it when they know when to expect new content from vloggers they like. They are more likely to subscribe and tune in for every post if they are given a chance to anticipate when your new entry is coming.
5. Take Inventory
Think about what equipment you have that you can use for your YouTube channel. The only thing you absolutely cannot get by without is a decent camera, but there are other types of equipment that it is a good idea to have too. Lights, a tripod, an external microphone – these are all things that a lot of YouTubers find they need in order to produce great videos. If you do not have these things, or money you are prepared to invest in them, then you will need to find ways around them until your situation changes. For more information check out our post ‘The Best YouTube Equipment: What You Need to Start Your Channel’.
Read More to Get : Best Video Websites Like YouTube >>
Richard Bennett
Richard Bennett is a writer and a lover of all things video.
Follow @Richard Bennett
Richard Bennett
Mar 27, 2024• Proven solutions
People create YouTube accounts for a lot of different reasons. Some YouTubers just love making videos and created their channels so they would have somewhere to post their work. Others have strong opinions they need a platform to share. There are a lot of people on YouTube whose main interest is in a separate website or other social media page, but they use their YouTube channels to help generate traffic. If you are considering starting your own YouTube channel then you should take a second to consider why you want to, since this will have an impact on what kind of videos you make. Your reasons for wanting to make a YouTube account do not have to be very elaborate. Maybe you just think it will be fun. Good news; it will be!
Once you know for sure that you want to create a YouTube account, and also know why you want to do it, you have already started building your channel. There are still a few important things to consider, though. This article will walk you through signing up for a YouTube account, and give you some tips about starting your channel.
Creating Your YouTube Account in 6 Steps
1. Go to YouTube.com and look at the top right corner of your screen. There will either be a blue Sign In button, or an icon representing you. YouTube accounts and Google accounts are the same, so if you are signed into your Gmail account you are already signed into YouTube as well.
2. If you see a Sign In button, click it. If you see your icon click on that, and in the window that pops up select Add Account. Either way, you will be taken into a sign in screen. Under where it asks for your email address it will say Create Account. Click on Create Account.
3. In the sign up page you will need to put in your name, email address, and mobile phone number as well as some other personal information. Do not enter your current Gmail address. Enter an alternate email you have created for your vlog, or click on I would like a new Gmail address. This will change your page slightly so that the email field becomes Choose a Username.
You will probably need to try a few different usernames before you find one that is not taken.
4. You will have to put in both a first and last name when you create your account, but you can change it to one name later.
5. Your password will need to be at least 8 characters long. Try to use a combination of letters or numbers, and make sure it is not something easily guessable (i.e spouses name).
6. After you finish the form click Next Step and, in the next screen, Continue to YouTube.
Tips on Starting a YouTube Channel
1. Choose a Topic you Love
When choosing a topic for your YouTube channel make sure you pick something you are passionate about. If you already have an interest or hobby which you are always researching and are extremely up-to-date on then that should probably be the theme of your vlog. If you plan to have a channel where people go to learn anything then you will need to be an authority on that topic. Whatever you make videos about it will need to be something you can realistically see yourself putting a lot of time into. If you cannot think of more than a couple ideas for videos on your topic then that is a sign that you need to choose something else to focus on.
You should check to see how much demand there is for videos on your topic. This can be done by googling your topic to see what else is out there. If not many people have addressed your topic yet it probably means that it is not something a lot of people want to know about. However, it could also mean that the people who do want to watch videos like yours have been starved for content. Your channel will flop if you do not love what you are making videos about, so do not choose something just because you think it will be popular. Follow your passion.
2. Check out the Competition
You should look for other vlogs with similar topics to yours not only to gauge how much demand there is for your videos, but to check out the competition. If there are a lot of YouTube channels dedicated to the same topic you want to vlog about then this should not discourage you from going after the same viewers. People who are excited about a topic frequently watch more than one vlog about it. It might not even be correct to think of other vloggers within your genre as ‘the competition’ since you are ultimately part of the same community. You will need to watch these people’s videos as part of keeping yourself informed and will likely become a fan – maybe even a collaborator some day – of theirs.
The main reason you want to look into YouTube channels like yours is because you do not want to be creating content that is overdone and boring. You are tackling the same topic as other people, and may even make some videos on the exact same subjects as others already have. There needs to be something unique about your videos that makes them stand out from what already exists. By looking at what other people are already doing you will be able to come up with ideas for what you can do differently.
3. Choose a Great Name
Picking a great name for your YouTube account can take a lot of effort. Chances are you will not want to use your own name, at least not in full. Although your real name can work for if you are a lifestyle vlogger in most cases you will have a more specific topic that will need to be addressed in your channel’s name. Try out your name or a nickname for yourself in combination with different words associated with the topic of your vlog. Aim to create a name that is catchy and easy to remember.
Chances are a few of your first couple picks will be unavailable. YouTube is a popular site and a lot of the best names are taken. The last thing you should ever do while naming your YouTube channel is add numbers or letters to the end of a name you like because it is taken. Names with numbers at the end are hard for viewers to remember and find again. Choosing a weak name with a trail of numbers or letters after it will make it very hard for your channel to grow. Brainstorm a long list of potential names that are actually good and keep on trying them out until you find one that’s available.
For more information on naming your YouTube channel read our post ‘How To Pick a Name for Your YouTube Channel’.
4. Make a Schedule
Maintaining a YouTube channel is a big time commitment. You need to post videos regularly or people will forget about you, and videos can take a long time to make. When you are first starting your vlog you should make yourself a schedule for when you want to upload videos. Having a schedule will help you budget your time and ensure that your vlog never gets in the way of the rest of your life.
Having a posting schedule will also help you grow your channel. Viewers like it when they know when to expect new content from vloggers they like. They are more likely to subscribe and tune in for every post if they are given a chance to anticipate when your new entry is coming.
5. Take Inventory
Think about what equipment you have that you can use for your YouTube channel. The only thing you absolutely cannot get by without is a decent camera, but there are other types of equipment that it is a good idea to have too. Lights, a tripod, an external microphone – these are all things that a lot of YouTubers find they need in order to produce great videos. If you do not have these things, or money you are prepared to invest in them, then you will need to find ways around them until your situation changes. For more information check out our post ‘The Best YouTube Equipment: What You Need to Start Your Channel’.
Read More to Get : Best Video Websites Like YouTube >>
Richard Bennett
Richard Bennett is a writer and a lover of all things video.
Follow @Richard Bennett
Unlocking the Power of Revenue Streams: YouTubers’ AdSense Manual
How to Use AdSense for YouTube
Richard Bennett
Mar 27, 2024• Proven solutions
Now, since your YouTube channel has a large of subscribers and views, you start thinking to make money by using YouTube AdSense. However, do you really know YouTube AdSense very well? Or even, do you even know what it is exactly. In order to let you better understand it and make money, we have rounded up all information here to explain the basic knowledge of AdSense to you. Keeping reading to learn more!
- Part1: What is Adsense
- Part2: How to Link YouTube Account to Adsense
- Part3: How to Use AdSense for YouTube
Part 1: What is Adsense?
You might have noticed several ads displayed on the videos on various social platforms. AdSense is a part of Google that is responsible for placing such ads in the videos. You can sign in from YouTube account directly.
When you wish to place an ad, you may publish it on various media through Adsense. As an advertiser, you may publish anything in videos, images or texts on the websites and pay per impression or per click or per conversion.
Having a YouTube Adsense account or your website connected to Adsense account can help you earn money when Google places ads to your channel.
Do not worry, creating a Google Adsense account is free and when you create one, your YouTube channel or your website gets free eligibility for Google Ads. You just need to copy a code and paste it to start. The AdSense returns calculation is on pay per click or on a per-impression basis. However, if you want to receive the payment, you need to set up AdSense account first.
Part 2: How to Link YouTube Account to Adsense
Step 1: Link YouTube Account To Adsense
- Click on Setup YouTube AdSense or from monetization option, click on Setup Adsense option for your channel. Press Next. You are directed to Adsense sign up page.
- Select your email account, you wish to sign up with. You may also sign up with existing id or create a new one

- In case, you are using your existing email, sign in to YouTube Adsense with the same id. Once signed up, fill personal details form with information like address, name, etc.
- While filling your payee name be very careful and fill exactly as in your bank account name.

- Submit the form. Your application goes under review and might be under process for 2-3 hours to a few days depending on your Google Adsense and channel quality.
Step 2: Enable Monetization
- Click on My Channel from the menu option. Next, click on monetization to monetize your videos
- From monetization, click on monetize videos option for selecting the type of ads to monetize the video content or your channel.

- You may also monetize videos individually selecting the one you like from Video Manager segment if you do not wish to monetize all videos at once.
- Click monetize from the Action drop-down menu. Select ad type as per your wish. Press the monetize button.

- If you need to change monetization setting for a specific video, edit from the video manager or click on the dollar icon.
- To edit, click monetization option and select monetize with ads. Select the format of ads to monetize the particular video. Save the changes made.
Part 3: How to Use AdSense for YouTube
1. Finding Your Money in AdSense
Intuitively, many YouTube creators think that the first thing they see when they open up AdSense should be their daily earnings. This is not the case. Besides how much money you have made, AdSense keeps track of a lot of things the average YouTuber will not find useful. Getting to a report on your daily earnings actually takes a bit of navigation.
First, click on Performance Report near the top of your screen in AdSense. In the next page there will be a dropdown menu that says Days. Click on that menu and change it to Products.
In Products, scroll down until you get to a chart where there are two options: Hosted AdSense for Content and AdSense for Content. AdSense for Content relates to a personal website. For information about your YouTube channel click on Hosted AdSense for Content.

The next page is a report of how much money you have made from monetizing your YouTube channel. Your earnings will be organized by date. The money you see in this report has already had YouTube’s 45% commission deducted.
2. How are my earnings determined?
How much money you make through AdSense depends on your CPMs and EPMs. CPM is an acronym for “cost per mille” and indicates how much money and advertiser is paying for 1000 impressions of an ad. RPM is your revenue per 1000 impressions.
A lot of YouTubers new to AdSense assume that “per thousand impressions” means “per thousand views”, and that is incorrect. Besides the fact that not all views are monetized, impressions are not views. They are ad clicks. For long, skippable, video ads an “impression” is when a viewer watches the ad to the end instead of skipping it.
CPMs vary depending on the type of ad, where it is being run, and current advertising trends. Advertisers pay more for certain kinds of ads or for ad space in more popular videos. Beware of MCN scams claiming they can guarantee you a certain CPM; they cannot. Which ads are displayed in your videos is determined automatically by YouTube’s system and depends on factors like how you categorized your videos and how many views they have.
3. How do I get paid?
There are five different ways to get paid through AdSense: Check, Western Union Quick Cash, Wire Transfer, Rapida, or an Electronic Funds Transfer (EFT). Generally, AdSense will begin the process of paying you your monthly earnings on the 21st of the following month. How long it takes to get your money after that depends on your payment method.
Using Western Union Quick Cash you can pick your cash up at your Western Union branch the same day.
EFTs get your money to you within seven business days after the 21st.
Checks can take two to four weeks to arrive in the mail.
Wire Transfers and Rapida can each take up to 15 days.

In order to be paid you will have to earn enough to reach the payment threshold, which is $100. So, if you only earn $5 in a month, you should not expect to receive a payment for that month. You will receive your first payment after you earn $100.
Conclusion
Making money with YouTube Adsense is one of the best media that is reliable, easy to use, and better than any other ways of creating money. With Adsense, you can create various size and kinds of ad units to add it to your website. Those ad spaces are filled by Google with the content and traffic relevant to your site. There are also some YouTuber influencer marketing platforms such as InflueNex , which enables YouTubers to learn about their own channels, their competitors’ channels, and join the platform for establishing replationship with the brands.
Richard Bennett
Richard Bennett is a writer and a lover of all things video.
Follow @Richard Bennett
Richard Bennett
Mar 27, 2024• Proven solutions
Now, since your YouTube channel has a large of subscribers and views, you start thinking to make money by using YouTube AdSense. However, do you really know YouTube AdSense very well? Or even, do you even know what it is exactly. In order to let you better understand it and make money, we have rounded up all information here to explain the basic knowledge of AdSense to you. Keeping reading to learn more!
- Part1: What is Adsense
- Part2: How to Link YouTube Account to Adsense
- Part3: How to Use AdSense for YouTube
Part 1: What is Adsense?
You might have noticed several ads displayed on the videos on various social platforms. AdSense is a part of Google that is responsible for placing such ads in the videos. You can sign in from YouTube account directly.
When you wish to place an ad, you may publish it on various media through Adsense. As an advertiser, you may publish anything in videos, images or texts on the websites and pay per impression or per click or per conversion.
Having a YouTube Adsense account or your website connected to Adsense account can help you earn money when Google places ads to your channel.
Do not worry, creating a Google Adsense account is free and when you create one, your YouTube channel or your website gets free eligibility for Google Ads. You just need to copy a code and paste it to start. The AdSense returns calculation is on pay per click or on a per-impression basis. However, if you want to receive the payment, you need to set up AdSense account first.
Part 2: How to Link YouTube Account to Adsense
Step 1: Link YouTube Account To Adsense
- Click on Setup YouTube AdSense or from monetization option, click on Setup Adsense option for your channel. Press Next. You are directed to Adsense sign up page.
- Select your email account, you wish to sign up with. You may also sign up with existing id or create a new one
- In case, you are using your existing email, sign in to YouTube Adsense with the same id. Once signed up, fill personal details form with information like address, name, etc.
- While filling your payee name be very careful and fill exactly as in your bank account name.
- Submit the form. Your application goes under review and might be under process for 2-3 hours to a few days depending on your Google Adsense and channel quality.
Step 2: Enable Monetization
- Click on My Channel from the menu option. Next, click on monetization to monetize your videos
- From monetization, click on monetize videos option for selecting the type of ads to monetize the video content or your channel.
- You may also monetize videos individually selecting the one you like from Video Manager segment if you do not wish to monetize all videos at once.
- Click monetize from the Action drop-down menu. Select ad type as per your wish. Press the monetize button.
- If you need to change monetization setting for a specific video, edit from the video manager or click on the dollar icon.
- To edit, click monetization option and select monetize with ads. Select the format of ads to monetize the particular video. Save the changes made.
Part 3: How to Use AdSense for YouTube
1. Finding Your Money in AdSense
Intuitively, many YouTube creators think that the first thing they see when they open up AdSense should be their daily earnings. This is not the case. Besides how much money you have made, AdSense keeps track of a lot of things the average YouTuber will not find useful. Getting to a report on your daily earnings actually takes a bit of navigation.
First, click on Performance Report near the top of your screen in AdSense. In the next page there will be a dropdown menu that says Days. Click on that menu and change it to Products.
In Products, scroll down until you get to a chart where there are two options: Hosted AdSense for Content and AdSense for Content. AdSense for Content relates to a personal website. For information about your YouTube channel click on Hosted AdSense for Content.
The next page is a report of how much money you have made from monetizing your YouTube channel. Your earnings will be organized by date. The money you see in this report has already had YouTube’s 45% commission deducted.
2. How are my earnings determined?
How much money you make through AdSense depends on your CPMs and EPMs. CPM is an acronym for “cost per mille” and indicates how much money and advertiser is paying for 1000 impressions of an ad. RPM is your revenue per 1000 impressions.
A lot of YouTubers new to AdSense assume that “per thousand impressions” means “per thousand views”, and that is incorrect. Besides the fact that not all views are monetized, impressions are not views. They are ad clicks. For long, skippable, video ads an “impression” is when a viewer watches the ad to the end instead of skipping it.
CPMs vary depending on the type of ad, where it is being run, and current advertising trends. Advertisers pay more for certain kinds of ads or for ad space in more popular videos. Beware of MCN scams claiming they can guarantee you a certain CPM; they cannot. Which ads are displayed in your videos is determined automatically by YouTube’s system and depends on factors like how you categorized your videos and how many views they have.
3. How do I get paid?
There are five different ways to get paid through AdSense: Check, Western Union Quick Cash, Wire Transfer, Rapida, or an Electronic Funds Transfer (EFT). Generally, AdSense will begin the process of paying you your monthly earnings on the 21st of the following month. How long it takes to get your money after that depends on your payment method.
Using Western Union Quick Cash you can pick your cash up at your Western Union branch the same day.
EFTs get your money to you within seven business days after the 21st.
Checks can take two to four weeks to arrive in the mail.
Wire Transfers and Rapida can each take up to 15 days.
In order to be paid you will have to earn enough to reach the payment threshold, which is $100. So, if you only earn $5 in a month, you should not expect to receive a payment for that month. You will receive your first payment after you earn $100.
Conclusion
Making money with YouTube Adsense is one of the best media that is reliable, easy to use, and better than any other ways of creating money. With Adsense, you can create various size and kinds of ad units to add it to your website. Those ad spaces are filled by Google with the content and traffic relevant to your site. There are also some YouTuber influencer marketing platforms such as InflueNex , which enables YouTubers to learn about their own channels, their competitors’ channels, and join the platform for establishing replationship with the brands.
Richard Bennett
Richard Bennett is a writer and a lover of all things video.
Follow @Richard Bennett
Also read:
- In 2024, Essential Guidelines to Create Impactful YouTube Banners
- In 2024, Channel Upgrade Made Simple - Embrace TubeBuddy Techniques
- Proven Pathways to Dominate the Unboxing Sphere
- In 2024, Consistent Title Creation Framework for Tech Sectors
- 10 Best Fitness Channels for Yogis for 2024
- How to Create GIFs From YouTube Videos on Desktop and Mobile Devices for 2024
- Streamline Your Browsing with These 7 Android-Centric AdBlockers
- In 2024, Channeling Creativity Get Green Screen Tips From YouTube
- The Leading Yoga-Focused Fitness YouTube Channels
- [New] Elevating Your Listening Palette with YouTube Music
- 2024 Approved Distinguishing Between YouTube Policies and CC Clauses
- Prime 10 Channel List Best History YT Groups
- Gamer-Tested Streaming Software Picks
- [Updated] Edit with Ease The Top 10 YouTube Video Trimmers Guide
- In 2024, Become a YouTube Live Expert Strategies and Insights
- 2024 Approved Economical Audio Devices for Vloggers on a Budget
- [New] Creating a Viral Traction with 6 Strategic Steps in YouTube Marketing
- Channel Identity Visualization The Ultimate Toolkit of 10
- DJ Delight Choosing Ultimate Event Videos
- In 2024, Essential Listings for Easy Access to YouTube Intro Files
- Epicurean Education Recipe Film-Making for 2024
- Decoding the Mystery of Where Are My YouTube Comments?
- 2024 Approved Checking Credentials on YouTube
- 2024 Approved Audio Clarity 10 Pro Tips for High-Quality Recordings
- ApexCutter Suite Sophisticated PC Editing with Music for 2024
- 2024 Approved Channel Building Blueprint Reaching 1K Subs Rapidly
- [New] Elevate Your Vlogs Optimizing Title, Description & Tags
- The Artisan's Approach to Crafting Channel Identities
- [New] Decoding YouTube's Mystery A Sequential Exploration Guide
- [Updated] Elevate Your Channel Ranking with These 11 SEO Secrets
- Stumble upon Substantial Comment Sections
- 2024 Approved Enhance Viewing Experience Best YouTube Converters to AVI
- 2024 Approved Best Tales for YouTube Triumph Top 3 Strategies
- Innovating Sustainable Communities Within the Concrete Jungle
- Advanced Presentation Techniques YouTube in Slides for 2024
- 2024 Approved Crafting Prime Valorant Video Thumbnails on YouTube
- In 2024, Digital Destinations Where to Direct Your Videos
- 2024 Approved Cutting-Edge Tools to Snatch and Save Videos Flawlessly
- Top 9 Premium Wedding Films Online Youtube & Vimeo
- 2024 Approved Discover 20 Must-Subscribe Music Channels on YouTube
- 2024 Approved Crafting Charm in the Click A Thumbnail Hack for YouTube Shorts
- The Pathway to Streaming Google Meet on YouTube Procedures
- In 2024, Elite Screening Pacts How to Choose a CMS
- [New] Record Your Webcam with VLC
- [Updated] Enhanced Tech Efficiency with No-Cost Capture Software
- Additional Tips About Sinnoh Stone For Infinix Note 30 5G | Dr.fone
- In 2024, How to Unlock Vivo V27 PIN Code/Pattern Lock/Password
- In 2024, Effortless Ways to Transfer Data from Your Apple iPhone 11 Pro to iPhone 15 | Dr.fone
- [Updated] In 2024, Earnings Expertise for YouTube Creators FB Insights and Tactics
- [Updated] Sync Fix Twitter Vids and Chrome
- Bypassing Google Account With vnROM Bypass For Honor X50
- 2024 Approved Merge PPT Deck with Cinematic Capabilities
- [New] Videocapture with VLC Appraisal
- Maximize Film Potential with These 20+ Recording Tricks
- In 2024, Two Ways to Track My Boyfriends Xiaomi Redmi Note 12 Pro 5G without Him Knowing | Dr.fone
- Updated 2024 Approved The Guide to Learning All the Details About Voice Cloning
- [New] Hassle-Free Techniques Record Your Dell Screen Easily for 2024
- Updated Screen Size, Screen Sense How Aspect Ratio Impacts YouTube Video Engagement for 2024
- [Updated] 2024 Approved Ditching Vimeo The Ultimate List of Excellent Alternatives
- VoiceLinkPro Sync Your Soundscapes with Ease in the Latest of Premiere Pro 2023 Iteration
- In-Depth Guide to Mastering Your Discord Broadcasts
- Updated Flawless Skin in FCPX A Beginners Guide to Plugin-Free Retouching
- How to Cast OnePlus Nord CE 3 Lite 5G Screen to PC Using WiFi | Dr.fone
- Laugh, Cry or Shout Out on These Top 10 Instagram Memes Hubs
- [Updated] 2024 Approved From Forgotten to Found A Guide to Using TikTok Hashtags Right
- Life360 Learn How Everything Works On Apple iPhone 15 Pro | Dr.fone
- How to Transfer from Apple iPhone XS to iPhone 8/X/11 | Dr.fone
- [Updated] 2024 Approved Techniques for Fast Vimeo Videos
- New Unlock Pro-Level Text Animation on Your Phone with These Apps
- 2024 Approved Maximizing Instagram Video Lengths A Step-by-Step Guide
- [New] Exploring Essential Screen Recording Software for Educators for 2024
- Updated In 2024, Decoding MP4 Melodies A Compendium of Easy Audio Extraction Strategies
- Ways to stop parent tracking your Vivo Y17s | Dr.fone
- In 2024, Easy Tutorial for Activating iCloud from iPhone 7 Plus Safe and Legal
- New In 2024, Pro Tips for Creating Stunning Picture-in-Picture Effects in Final Cut Pro
- Updated 2024 Approved Top 10 Video Trimmer for PC
- [Updated] 30 Best-Kept Secrets to Livestream Conferences at No Charge
- [Updated] Discover These 6 Must-Have Instagram Reel Tools for 2024
- [Updated] In 2024, Beginner's Handbook for PC Users - Initiating a TikTok Broadcast
- The Essential Guide to Trimming Videos in Your Windows Device
- Title: "A Beginner's Blueprint Setting Up on YouTube"
- Author: Steven
- Created at : 2024-05-25 18:42:34
- Updated at : 2024-05-26 18:42:34
- Link: https://youtube-clips.techidaily.com/a-beginners-blueprint-setting-up-on-youtube/
- License: This work is licensed under CC BY-NC-SA 4.0.
