
:max_bytes(150000):strip_icc()/gettyimages-612441534-2000-915697f3325a4f2f9c1f2822c925a493.jpg)
"6+ Software Choices Download YouTube Music as MP3 for iPhone Users for 2024"
6+ Software Choices: Download YouTube Music as MP3 for iPhone Users
6 Free Software to Convert YouTube to MP3 for iPhone

Ollie Mattison
Mar 27, 2024• Proven solutions
Loved a video on YouTube, but was unable to find the MP3 version? Worry not! Now, with a YouTube music converter, you can easily convert YouTube videos into MP3 files for your iPhone and enjoy them to your heart’s content. A trusted brand can offer you the best MP3 audio files out of your favorite YouTube videos within no time. Here we bring free apps to convert music for your iPhone.
- Part 1: YouTube to MP3 Converter on iPhone
- Part 2: YouTube to MP3 Converter for iPhone (on Desktop)
- Part 3: FAQs About YouTube to MP3 Converter
You may also like:
How to convert Youtube to mp3 [three ways] >>
How to video chat call on Snapchat with 3 steps >>
Best 10 Flvto Alternatives to Convert YouTube Videos >>
Best Video Resolution Converter >>
Part 1: YouTube to MP3 Converter on iPhone
1. Video to MP3 Converter
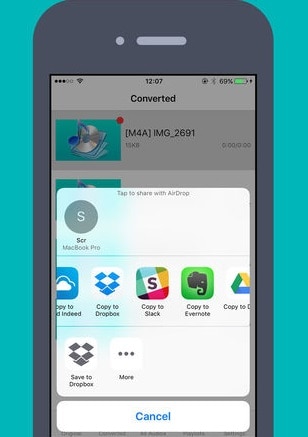
Video to MP3 Converter is an App that allows you to convert videos into different formats of audio such as MP3, M4A, OPUS, WAV, and a lot more, and save it on your iPhone.
The features of this App are –
- You can select audio tracks and customize sample rate, volume, and bitrate.
- You can decide the starting and ending point of the audio to be converted.
- You can import audio or video from Album, camera roll, One Drive, Google Drive, Dropbox, or iCloud.
- You can open audio files with this App and share them with other Apps as well.
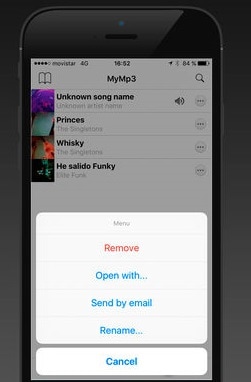
2. MyMP3
MyMP3 can convert videos available on your device into MP3 quickly. You can save recorded audio into MP3 and WAV format.
The main features of MyMP3 are –
- You can convert local videos into MP3 and share them on any social media, email, or instant messaging App.
- It allows you to edit the metadata.
- You can record from a microphone, CD, turntable, audio streamed from the internet, Skype call or phone calls, and the likes.
- It allows ripping CDs, renaming batch files, scheduling recordings, silence detection, and playlist management while recording vinyl albums.
Part 2: YouTube to MP3 converter for iPhone (on Desktop)
1. Filmora Editor
You can use Filmora as a YouTube music converter which will help in converting without much effort. Filmora is basically a video editing software that can help you edit videos in various ways. You can edit any of your video projects with ease when using Filmora. In order to convert Youtube to MP3 in iPhone, you can choose iPhone as the target device while exporting. Let’s check out some amazing features of this software. Or you can learn more from Wondershare Video Community .
Key Features:
- Anyone can easily use it for its extremely easy interface and design.
- People can have the delight in various graphical features with this tool such as filters and overlays.
- With this software, one can seamlessly merge multiple videos without compromising quality.
- There are lots of advanced tools associated with Filmora including background blur option, audio mixer, screen splitting, text editing, green screen, speed ramping, and more.
- If you are looking for stunning effects, Filmstocks, NewBlue FX and BorisFX can definitely meet any of your needs.
- 4k videos are also supported via Filmora easily.


2. Freemake Video Downloader
Freemake Video Downloader is a YouTube music converter that allows you to save YouTube videos and MP3s on your iPhone. While converting the videos into MP3s you need to specify the destination device (Export to iPod/iPhone), so that the right format can be set for the same.
Features of this application are –
- You can have the audios exported to iTunes automatically.
- Simple 3 step process to download and save YouTube videos into your iPhone.

3. Any Audio Converter
Any Audio Converter is an online converter and downloader that allows you to convert YouTube videos to MP3 for iPhone to your desired quality, and size of audio files. This YouTube music converter can convert downloaded videos and music to MP3, WAV, and WMA faster with better quality.
Major features of this audio converter are –
- You can download online videos and music from more than 100 sites.
- It helps you to rip and extract audio from CDs and videos.
- It supports audio conversion in multiple formats without compromising the quality.
- You can burn videos to AVCHD DVD or DVD.
- You can edit videos with special effects, clips, or crop effects.

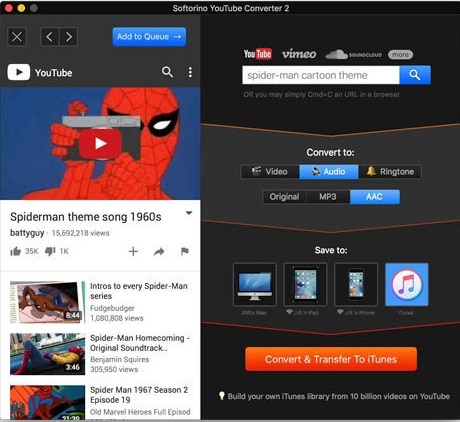
4. Softorino YouTube Converter 2
Softorino YouTube Converter 2 can not only convert YouTube to MP3 for iPhone, but also to MP4 for all iOS devices as well. It is compatible with over 60 top sources.
- With this App, you can access videos, music, and ringtones as well.
- It supports all iOS devices and delivers 4K ultra HD, with subtitles.
- Automatically connects your device to Wi-Fi, and recognizes content automatically for the album
Part 3: FAQs About YouTube to MP3 Converter
1. Can You Convert YouTube Videos to mp3 on iPhone?
Yes, you can. There are numerous YouTube to mp3 convert websites and YouTube audio downloader apps that let you convert YouTube videos to mp3 on your iPhone.
But there are legal issues you need to consider before joining the conversion trend. Technically, it is not illegal to convert a YouTube video to MP3 - but it is illegal to download a copyrighted music video. Moreover, YouTube has stated that stream-ripping violates their Terms of Service, and both YouTube & Google have tried to shut down numerous websites that provide video conversion services.
2. How Can I Save a Song From YouTube to My iPhone?
There are several ways to do that. The legal and recommended method is to get a YouTube Music Premium subscription. This will enable you to download songs from YouTube and save them on your iPhone for offline consumption. The alternative way involves numerous websites and apps that enable you to convert YouTube videos to mp3 and download them on your iPhone. This approach, however, is illegal and should be avoided.
Final Verdict
After going through the list of YouTube music converters in this article, we have found that Filmora is the ultimate solution for all your video download and audio conversion needs. With its matchless features, this App makes your life simple and melodious. However, it is our suggestion, the final call will be yours. We would like to know which was your choice and how was the experience using it. Thanks, readers for having a glance at this post. We hope you are delighted after reading it and finding what you needed.
Ollie Mattison
Ollie Mattison is a writer and a lover of all things video.
Follow @Ollie Mattison
Ollie Mattison
Mar 27, 2024• Proven solutions
Loved a video on YouTube, but was unable to find the MP3 version? Worry not! Now, with a YouTube music converter, you can easily convert YouTube videos into MP3 files for your iPhone and enjoy them to your heart’s content. A trusted brand can offer you the best MP3 audio files out of your favorite YouTube videos within no time. Here we bring free apps to convert music for your iPhone.
- Part 1: YouTube to MP3 Converter on iPhone
- Part 2: YouTube to MP3 Converter for iPhone (on Desktop)
- Part 3: FAQs About YouTube to MP3 Converter
You may also like:
How to convert Youtube to mp3 [three ways] >>
How to video chat call on Snapchat with 3 steps >>
Best 10 Flvto Alternatives to Convert YouTube Videos >>
Best Video Resolution Converter >>
Part 1: YouTube to MP3 Converter on iPhone
1. Video to MP3 Converter
Video to MP3 Converter is an App that allows you to convert videos into different formats of audio such as MP3, M4A, OPUS, WAV, and a lot more, and save it on your iPhone.
The features of this App are –
- You can select audio tracks and customize sample rate, volume, and bitrate.
- You can decide the starting and ending point of the audio to be converted.
- You can import audio or video from Album, camera roll, One Drive, Google Drive, Dropbox, or iCloud.
- You can open audio files with this App and share them with other Apps as well.
2. MyMP3
MyMP3 can convert videos available on your device into MP3 quickly. You can save recorded audio into MP3 and WAV format.
The main features of MyMP3 are –
- You can convert local videos into MP3 and share them on any social media, email, or instant messaging App.
- It allows you to edit the metadata.
- You can record from a microphone, CD, turntable, audio streamed from the internet, Skype call or phone calls, and the likes.
- It allows ripping CDs, renaming batch files, scheduling recordings, silence detection, and playlist management while recording vinyl albums.
Part 2: YouTube to MP3 converter for iPhone (on Desktop)
1. Filmora Editor
You can use Filmora as a YouTube music converter which will help in converting without much effort. Filmora is basically a video editing software that can help you edit videos in various ways. You can edit any of your video projects with ease when using Filmora. In order to convert Youtube to MP3 in iPhone, you can choose iPhone as the target device while exporting. Let’s check out some amazing features of this software. Or you can learn more from Wondershare Video Community .
Key Features:
- Anyone can easily use it for its extremely easy interface and design.
- People can have the delight in various graphical features with this tool such as filters and overlays.
- With this software, one can seamlessly merge multiple videos without compromising quality.
- There are lots of advanced tools associated with Filmora including background blur option, audio mixer, screen splitting, text editing, green screen, speed ramping, and more.
- If you are looking for stunning effects, Filmstocks, NewBlue FX and BorisFX can definitely meet any of your needs.
- 4k videos are also supported via Filmora easily.
2. Freemake Video Downloader
Freemake Video Downloader is a YouTube music converter that allows you to save YouTube videos and MP3s on your iPhone. While converting the videos into MP3s you need to specify the destination device (Export to iPod/iPhone), so that the right format can be set for the same.
Features of this application are –
- You can have the audios exported to iTunes automatically.
- Simple 3 step process to download and save YouTube videos into your iPhone.
3. Any Audio Converter
Any Audio Converter is an online converter and downloader that allows you to convert YouTube videos to MP3 for iPhone to your desired quality, and size of audio files. This YouTube music converter can convert downloaded videos and music to MP3, WAV, and WMA faster with better quality.
Major features of this audio converter are –
- You can download online videos and music from more than 100 sites.
- It helps you to rip and extract audio from CDs and videos.
- It supports audio conversion in multiple formats without compromising the quality.
- You can burn videos to AVCHD DVD or DVD.
- You can edit videos with special effects, clips, or crop effects.
4. Softorino YouTube Converter 2
Softorino YouTube Converter 2 can not only convert YouTube to MP3 for iPhone, but also to MP4 for all iOS devices as well. It is compatible with over 60 top sources.
- With this App, you can access videos, music, and ringtones as well.
- It supports all iOS devices and delivers 4K ultra HD, with subtitles.
- Automatically connects your device to Wi-Fi, and recognizes content automatically for the album
Part 3: FAQs About YouTube to MP3 Converter
1. Can You Convert YouTube Videos to mp3 on iPhone?
Yes, you can. There are numerous YouTube to mp3 convert websites and YouTube audio downloader apps that let you convert YouTube videos to mp3 on your iPhone.
But there are legal issues you need to consider before joining the conversion trend. Technically, it is not illegal to convert a YouTube video to MP3 - but it is illegal to download a copyrighted music video. Moreover, YouTube has stated that stream-ripping violates their Terms of Service, and both YouTube & Google have tried to shut down numerous websites that provide video conversion services.
2. How Can I Save a Song From YouTube to My iPhone?
There are several ways to do that. The legal and recommended method is to get a YouTube Music Premium subscription. This will enable you to download songs from YouTube and save them on your iPhone for offline consumption. The alternative way involves numerous websites and apps that enable you to convert YouTube videos to mp3 and download them on your iPhone. This approach, however, is illegal and should be avoided.
Final Verdict
After going through the list of YouTube music converters in this article, we have found that Filmora is the ultimate solution for all your video download and audio conversion needs. With its matchless features, this App makes your life simple and melodious. However, it is our suggestion, the final call will be yours. We would like to know which was your choice and how was the experience using it. Thanks, readers for having a glance at this post. We hope you are delighted after reading it and finding what you needed.
Ollie Mattison
Ollie Mattison is a writer and a lover of all things video.
Follow @Ollie Mattison
Directing Twitch Viewers Seamlessly to YouTube Channel
Create High-Quality Video - Wondershare Filmora
An easy and powerful YouTube video editor
Numerous video and audio effects to choose from
Detailed tutorials provided by the official channel
Amidst many online applications is Twitch. This live streaming platform takes your experience to another level. You can use it to make crafts, play games, attract broadcasters, and many more. Twitch was launched in 2011, and since then, it has attracted millions of users, managing a database of about 4 million broadcasters by early 2020. With it, users can stream their activities as others watch in real-time. Just browse a category to find a stream.
You can also follow streamers that you like on the platform and get updates and notifications immediately after they are posted. But how do you start a career on a platform like Twitch? You need to broadcast and gather a large following. You can use built-in audiences from other platforms like Facebook. Let’s dive into the core of the matter and look at how to upload Twitch streams to YouTube and build your platform.

In this article
02 What is the benefit of uploading your Twitch Streams to YouTube
03 How to upload your Twitch Streams to YouTube
What is Twitch VOD?
Twitch Video on Demand (VOD) is a recording of previously streamed content. It provides briefings if you missed catching the Twitch live stream. Just watch the VOD from your favorite streamer and be engaged the best way possible. However, VODs don’t last forever. They are removed after two weeks of broadcast. But streamers with Partner Status can have their VODs last up to 60 days.
- How to enable Twitch VOD?
VODs are the best form to archive streams that your fans missed. Even though they are not enabled by default, you can manually enable them and not let your fans miss any important event from your channel. They’ll find it under the “Videos” tab on any Twitch channel. Follow these steps to enable VOD on your channel.
Step 1. Go to your profile icon in the top right corner of Twitch
Check in the “Channel & Video” section and locate the “Stream Key & Preferences” menu.

Step 2. Click on “Creator Dashboard”
Remember, you can enable VODs from your creator dashboard. Just go under the “Settings” tab and click on the “Stream section” of the creator dashboard. Check under the subtitle “VOD Settings” and get the option to store past broadcasts. You can also toggle the slider to store your past broadcasts.

Step 3 Click on the “Settings” tab on the left-hand side and go to Stream
You’ll get various drop-down menu options. Click on the “Settings” tab and choose the “Stream” option. The system will navigate to a new page, thus setting your preferences for VODs and clips.
Step 4. Go to “VOD Settings” and toggle on the “Store Past Broadcast.”
Ensure you have the toggle option turned ON under the “VOD Settings.” If it’s “ON,” you’ll realize the toggle will be purple, with a checkmark in it. Twitch will be confirmed to be enabled if it’s purple.

- Frequently Asked Question about Twitch VOD
These are some questions frequently asked by Twitch users.
1. How long will Twitch store my VOD
Your Twitch can either be stored for 14 or 60 days, depending on your level. For Twitch Prime, Twitch Partner or a Twitch Turbo user has their past broadcasts automatically saved for 60 days before deletion. But if you are not connected to these three options, your past broadcasts will be saved for only 14 days before deletion.
Since your past broadcasts cannot be live for more than 60 days, you have the option to download the video to your computer before the validity days expire and Twitch deletes it. You can use an External Hard drive to save the past broadcast content. Likewise, it is possible to turn your past broadcast content into Highlight and, in turn, permanently store them on Twitch.
2. What is the difference between Twitch VOD, Highlights, and Clips
Twitch VOD is a previously saved video of your live stream content. You choose to save either part or the entire content of your previously streamed content. More so, you don’t need any additional requirements to use VOD.
Highlights are short videos that have been edited from your past broadcast content. You can save them on Twitch permanently. Streamers majorly use highlights to save video game achievements. Unlike VOD Twitch that can be saved up to 60 days, Highlights usually lasts no more than 3 minutes.
- To make Highlights on Twitch, first, navigate to your Dashboard.
- Then scroll down and click on “Content” > “Video Producer.
- Next, press on “All Videos” to change them to “Past Broadcasts.”
- Now press the “Highlight” button, and Twitch will immediately open a new tab for “Twitch Highlighter Tool.”
- Then select the video part to include as “Highlight” and press the “Create Highlights” button.
- Wait a while for the process to be completed, and Voila! You have your Highlights created.
When it comes to Twitch Clip, you can capture special moments in a stream you are currently watching. On the same note, you can share clips with friends and other users on social media platforms. Such shared clips contain a link where others view the source or video from.
The clips you create will automatically be saved on the streamer’s channel on the “Clips” page, where other viewers can see them too. Nonetheless, you can download “clips” to your computer and, in turn, upload them whenever you want to. And note that you can help your stream grow via “Clips” by letting your viewers clip and share your stream moments.
- To create “Clips” on Twitch, identify which Streamers channel you wish to create a clip from.
- Then click on the “Clapper board” icon. Next, edit your clip between 5 and 60 seconds long.
- Finally, create a title and publish your Clip. You’ll also enjoy the privilege to share your clip’s link to other social media networks.
What is the benefit of uploading your Twitch Streams to YouTube
You stand to gain a lot when you upload your Twitch Streams to YouTube.
1) To enlighten your followers
Your followers will see your streams and make the best decisions. Viewers can check out your recordings and other highlights from past streams. It will help them decide whether they like what they see and probably join your live streams.
2) Twitch provides content for you to share and monetize on YouTube
Since Twitch streaming is more popular nowadays, many people throng it for content. It is not wise to rely entirely on Twitch to discover as a Twitch Streamer. Posting to YouTube will make it known within a short time. You would have announced your streams most nobly and kept your followers up to date, attracting new ones as well.
3) To keep your followers engaged even when you are offline
Even though live streaming is important, some viewers may not attend the live sessions due to different time zones or other commitments. In this regard, when uploaded to YouTube, Twitch will give them a chance to watch your content just whenever they log in. They, therefore, have the option to watch a Twitch VOD of the live stream they missed.
How to upload your Twitch Streams to YouTube
Check how to upload Twitch streams to YouTube from the Twitch website.
Step 1. Identify the little arrow next to your name on the Twitch website and click on it. Then click on the “Video Producer” to take you to a list of your Twitch videos.

Step 2. Check out and click on the “three-dots” on the video you wish to upload to YouTube. Click on the “Export” tab.
Step 3. A menu will then pop up. Here, you can fill in the description, title, and tags that you would like to appear on the YouTube video. There is an option for Twitch to split your video automatically. If you wish so, then tick the “Checkbox” to enable it. Then click on the “Start Export” option to export your Twitch streams to YouTube.

Bouns! Edit Your Twitch Video with Filmora
The quality of your video matters when it comes to uploading Twitch Streams to YouTube. Using a third-party tool to edit your video is the first step in ensuring your videos communicate meaningful content. Filmora comes in handy to bring your imaginations to life. Use it for simple creation without limits, even for beginners.
- Use it to track moving objects in video clips
- Easily match any image of the selected clip
- Its powerful tools let you edit your video by cropping, splitting, adjusting speed, etc
- The video keyframe easily indicates the beginning and end of the parameters
For Win 7 or later (64-bit)
For macOS 10.12 or later
Conclusion
● Don’t just focus on how to upload Twitch streams to YouTube but also consider the quality of video you are posting to YouTube. Remember, your video quality will speak much more of you than any other description. So, strive to produce quality videos using the best tool, Filmora. The app is easy to use and will elevate your views and imaginations through your video in the most impactful way.
Amidst many online applications is Twitch. This live streaming platform takes your experience to another level. You can use it to make crafts, play games, attract broadcasters, and many more. Twitch was launched in 2011, and since then, it has attracted millions of users, managing a database of about 4 million broadcasters by early 2020. With it, users can stream their activities as others watch in real-time. Just browse a category to find a stream.
You can also follow streamers that you like on the platform and get updates and notifications immediately after they are posted. But how do you start a career on a platform like Twitch? You need to broadcast and gather a large following. You can use built-in audiences from other platforms like Facebook. Let’s dive into the core of the matter and look at how to upload Twitch streams to YouTube and build your platform.
In this article
02 What is the benefit of uploading your Twitch Streams to YouTube
03 How to upload your Twitch Streams to YouTube
What is Twitch VOD?
Twitch Video on Demand (VOD) is a recording of previously streamed content. It provides briefings if you missed catching the Twitch live stream. Just watch the VOD from your favorite streamer and be engaged the best way possible. However, VODs don’t last forever. They are removed after two weeks of broadcast. But streamers with Partner Status can have their VODs last up to 60 days.
- How to enable Twitch VOD?
VODs are the best form to archive streams that your fans missed. Even though they are not enabled by default, you can manually enable them and not let your fans miss any important event from your channel. They’ll find it under the “Videos” tab on any Twitch channel. Follow these steps to enable VOD on your channel.
Step 1. Go to your profile icon in the top right corner of Twitch
Check in the “Channel & Video” section and locate the “Stream Key & Preferences” menu.
Step 2. Click on “Creator Dashboard”
Remember, you can enable VODs from your creator dashboard. Just go under the “Settings” tab and click on the “Stream section” of the creator dashboard. Check under the subtitle “VOD Settings” and get the option to store past broadcasts. You can also toggle the slider to store your past broadcasts.
Step 3 Click on the “Settings” tab on the left-hand side and go to Stream
You’ll get various drop-down menu options. Click on the “Settings” tab and choose the “Stream” option. The system will navigate to a new page, thus setting your preferences for VODs and clips.
Step 4. Go to “VOD Settings” and toggle on the “Store Past Broadcast.”
Ensure you have the toggle option turned ON under the “VOD Settings.” If it’s “ON,” you’ll realize the toggle will be purple, with a checkmark in it. Twitch will be confirmed to be enabled if it’s purple.
- Frequently Asked Question about Twitch VOD
These are some questions frequently asked by Twitch users.
1. How long will Twitch store my VOD
Your Twitch can either be stored for 14 or 60 days, depending on your level. For Twitch Prime, Twitch Partner or a Twitch Turbo user has their past broadcasts automatically saved for 60 days before deletion. But if you are not connected to these three options, your past broadcasts will be saved for only 14 days before deletion.
Since your past broadcasts cannot be live for more than 60 days, you have the option to download the video to your computer before the validity days expire and Twitch deletes it. You can use an External Hard drive to save the past broadcast content. Likewise, it is possible to turn your past broadcast content into Highlight and, in turn, permanently store them on Twitch.
2. What is the difference between Twitch VOD, Highlights, and Clips
Twitch VOD is a previously saved video of your live stream content. You choose to save either part or the entire content of your previously streamed content. More so, you don’t need any additional requirements to use VOD.
Highlights are short videos that have been edited from your past broadcast content. You can save them on Twitch permanently. Streamers majorly use highlights to save video game achievements. Unlike VOD Twitch that can be saved up to 60 days, Highlights usually lasts no more than 3 minutes.
- To make Highlights on Twitch, first, navigate to your Dashboard.
- Then scroll down and click on “Content” > “Video Producer.
- Next, press on “All Videos” to change them to “Past Broadcasts.”
- Now press the “Highlight” button, and Twitch will immediately open a new tab for “Twitch Highlighter Tool.”
- Then select the video part to include as “Highlight” and press the “Create Highlights” button.
- Wait a while for the process to be completed, and Voila! You have your Highlights created.
When it comes to Twitch Clip, you can capture special moments in a stream you are currently watching. On the same note, you can share clips with friends and other users on social media platforms. Such shared clips contain a link where others view the source or video from.
The clips you create will automatically be saved on the streamer’s channel on the “Clips” page, where other viewers can see them too. Nonetheless, you can download “clips” to your computer and, in turn, upload them whenever you want to. And note that you can help your stream grow via “Clips” by letting your viewers clip and share your stream moments.
- To create “Clips” on Twitch, identify which Streamers channel you wish to create a clip from.
- Then click on the “Clapper board” icon. Next, edit your clip between 5 and 60 seconds long.
- Finally, create a title and publish your Clip. You’ll also enjoy the privilege to share your clip’s link to other social media networks.
What is the benefit of uploading your Twitch Streams to YouTube
You stand to gain a lot when you upload your Twitch Streams to YouTube.
1) To enlighten your followers
Your followers will see your streams and make the best decisions. Viewers can check out your recordings and other highlights from past streams. It will help them decide whether they like what they see and probably join your live streams.
2) Twitch provides content for you to share and monetize on YouTube
Since Twitch streaming is more popular nowadays, many people throng it for content. It is not wise to rely entirely on Twitch to discover as a Twitch Streamer. Posting to YouTube will make it known within a short time. You would have announced your streams most nobly and kept your followers up to date, attracting new ones as well.
3) To keep your followers engaged even when you are offline
Even though live streaming is important, some viewers may not attend the live sessions due to different time zones or other commitments. In this regard, when uploaded to YouTube, Twitch will give them a chance to watch your content just whenever they log in. They, therefore, have the option to watch a Twitch VOD of the live stream they missed.
How to upload your Twitch Streams to YouTube
Check how to upload Twitch streams to YouTube from the Twitch website.
Step 1. Identify the little arrow next to your name on the Twitch website and click on it. Then click on the “Video Producer” to take you to a list of your Twitch videos.
Step 2. Check out and click on the “three-dots” on the video you wish to upload to YouTube. Click on the “Export” tab.
Step 3. A menu will then pop up. Here, you can fill in the description, title, and tags that you would like to appear on the YouTube video. There is an option for Twitch to split your video automatically. If you wish so, then tick the “Checkbox” to enable it. Then click on the “Start Export” option to export your Twitch streams to YouTube.
Bouns! Edit Your Twitch Video with Filmora
The quality of your video matters when it comes to uploading Twitch Streams to YouTube. Using a third-party tool to edit your video is the first step in ensuring your videos communicate meaningful content. Filmora comes in handy to bring your imaginations to life. Use it for simple creation without limits, even for beginners.
- Use it to track moving objects in video clips
- Easily match any image of the selected clip
- Its powerful tools let you edit your video by cropping, splitting, adjusting speed, etc
- The video keyframe easily indicates the beginning and end of the parameters
For Win 7 or later (64-bit)
For macOS 10.12 or later
Conclusion
● Don’t just focus on how to upload Twitch streams to YouTube but also consider the quality of video you are posting to YouTube. Remember, your video quality will speak much more of you than any other description. So, strive to produce quality videos using the best tool, Filmora. The app is easy to use and will elevate your views and imaginations through your video in the most impactful way.
Also read:
- In 2024, Discover Ultimate ASMR Microphones for Clear Sounds
- In 2024, Elevate Your Watchlist Experience with YouTube's AV1 Settings
- [New] Direct to Mp3 Ease Select 10 Video-to-Audio Devices
- Uncover the Top 7 Android Alternatives for Ad-Free Browsing
- [Updated] Access Top Shorter Video Downloads for FREE Online
- In 2024, Comprehensive Guide to YouTube Video Captioning
- Code Commanders Elite Females on YT
- Effortless Guide to Share Your Videos as Shorts on Computers & Phones
- [New] Convert & Share Simplified MP3 to YouTube Process [3 Phases]
- Permanently Quit YouTube Shorts Now!
- [New] 10 Visionary Beauty Experts Leading Online Trends
- [New] DSLR or Mirrorless for High-Quality Video Recording?
- Effective Team Videos Boosting Channelnode Growth Rate for 2024
- [Updated] Breaking Even on YouTube Key View Figures Explored
- 2024 Approved Dancefloor Dynamics Top-Rated DJ Video Selections
- Maximize Your YouTube Channel's Financial Potential
- [Updated] Crafting Curls and Contours Creating a Personalized Beauty Channel
- Easy Ways To Get Free Views on YouTube! Alternative Methods
- Enthralling Enchantment YouTube Edition of Best Magic
- 10 Best History YouTube Channels for Students & History Lovers for 2024
- [New] Decoding the Undisclosed World of YouTube Videos
- [New] Elite Streaming Sensations World's Most Popular Video Content Makers
- Conquer the Viewer Void 10 Tactics for YouTube Video Growth for 2024
- Leading Lights YouTube's Biggest Brands
- Cutting-Edge 8 Content Creators Skyrocketing Growth for 2024
- 2024 Approved Create Captivating Sports Videography
- Choosing YouTube Downloader Apps on Your Android Device for 2024
- YouTube Journey Starter Pack 8 Essential Online Courses
- From Bite-Sized to Detailed Converting Shorts to Editable MP4
- The Comparative Guide to Content Mastery on YouTube
- Audio Outliers Best Sound Distortion Apps for Your Device for 2024
- Add Fantastic Backgrounds for YouTube Thumbnails [Methods & Resources]
- In 2024, Can I use iTools gpx file to catch the rare Pokemon On Lava Storm 5G | Dr.fone
- Troubleshooting Error Connecting to the Apple ID Server From iPhone 15 Pro Max
- In 2024, Unlocking iPhone 13 Pro Passcode without a Computer
- [Updated] Advanced Inshot Transition Methods Explained
- Which is the Best Fake GPS Joystick App On Xiaomi Redmi Note 12 Pro 5G? | Dr.fone
- Here are Some Pro Tips for Pokemon Go PvP Battles On Realme 11 Pro+ | Dr.fone
- How To Remove or Bypass Knox Enrollment Service On Tecno
- In 2024, How to Transfer Data from Motorola Edge 40 Pro to Samsung Phone | Dr.fone
- [Updated] Unforgettable Journeys Our Favorites in Adventure Gameplay for 2024
- [New] In 2024, How to Archive & Backup Your Chats on Messenger Securely
- How To Upgrade or Downgrade Apple iPhone XS Max Without Losing Data? | Dr.fone
- Title: "6+ Software Choices Download YouTube Music as MP3 for iPhone Users for 2024"
- Author: Steven
- Created at : 2024-05-25 18:42:10
- Updated at : 2024-05-26 18:42:10
- Link: https://youtube-clips.techidaily.com/6plus-software-choices-download-youtube-music-as-mp3-for-iphone-users-for-2024/
- License: This work is licensed under CC BY-NC-SA 4.0.
