
:max_bytes(150000):strip_icc()/Apple-Watch-Ultra-2-23e8ec3e4ee04c6e98c9d654a35f59ec.jpg)
"30 Must-Have YouTube Intros Tools for Beginners, All Free for 2024"
30 Must-Have YouTube Intros Tools for Beginners, All Free
Best Free YouTube Intro Makers

Richard Bennett
Nov 01, 2022• Proven solutions
An intro video goes a long way towards building your brand and showing viewers that you’re serious about YouTube. Here’s where you can make or download intros, plus some tips on making intros that support the growth of your channel.
Free Intro Makers
Here’s a list of 4 places you can create or download FREE YouTube intros with no watermark.
Blender
Blender is a free, open-source, ‘3D creation suite’. It’s great for modeling and animation, and you can even use it to make your YouTube intros.
This is an extremely powerful program. You can create cartoons and video game prototypes in Blender. This does mean that it’s probably not realistic for someone with no experience in animation to jump in and make a quick intro for their YouTube channel. However, if you want to learn Blender, all of the information you need is easily accessible through the tutorials on their site.
What’s a bit more realistic than learning an entire animation suite to make an intro is to download a premade template and just customize it in Blender. You can find YouTube intro templates that are editable in Blender on YouTube and Velosofy.
Movietools
This is a great site where you can download all kinds of free resources including video loops and animated backgrounds you can use to build YouTube intros.
You cannot download a complete Intro with your own text and/or logo from Movietools the way you can with Panzoid, but they can provide most of the resources you would need to build a sequence in Filmora or another editor.
Downloads from Movietools come as WMV (Windows Media) or MP4 files.
Panzoid
For a lot of creators, Panzoid is the default site they go to for YouTube intros, and that’s with good reason. Panzoid has an endless supply of intro templates (new ones are created weekly by members of their community) which you can edit right on the site.
A lot of the intro templates on Panzoid include music, and almost all of them include 3D text.
Click on a template you like and then click ‘open in clipmaker’.
In the clipmaker, you’ll be able to edit the template however you like. The main change you’ll want to make will probably be to the text – you’ll want it to say your channel name. In the menu on the left side of the screen, you’ll see an icon that looks like a cube. Click on it to bring up a list of the objects in the sequence.
The text will probably be under a heading such as ‘Group: All’, although there may be some variation on this depending on who built the template. Look for something that says ‘Group: Text’ in one of the dropdown menus and then look at where it says ‘Text: (the text from the template)’. There will probably be at least two fields like this for one word/line (they’re layers of the same thing). Make sure to edit them all to say the same thing or your intro will look odd.
Click the icon that looks like an arrow pointing down to choose your quality (next to mode) and format before you export. The highest quality will make your clip slow to download, but that could be worth it since you’ll probably get a lot of use out of this clip and you only need to download it once.
Velosofy
Velosofy has a ton of great intro templates you can download for free. The only complication is that the downloads are project files for programs like Sony Vegas or After Effects, making it difficult to use them unless you have those programs.
Luckily, one of the programs Velosofy has intro downloads for is Blender, the free animation software discussed above. You can download YouTube intro templates from Velosofy to edit in Blender and end up with a great custom intro for free.
5 Tips for Making a Great Intro
Here are some tips for making an intro that supports the growth of your YouTube channel.
1. Keep it Under 10 Seconds
Someone who doesn’t know you, who is shopping around for the best video to watch on a particular topic, will not have the patience to sit through a long intro. In order to stop them from clicking away, you’ll need to keep your intro short. Ten seconds is the longest you can get away with, and that’s only if your intro is exciting and includes a lot of movement and music.
Five seconds will be better than 10 seconds in most cases.
2. Match Your Channel’s Branding
Your intro should help to strengthen your personal brand by using the same kinds of colors and fonts found in your channel art and thumbnails.
Beyond matching your visuals, your intro should support the general tone of your channel. If you tend to be upbeat in your videos, upbeat music and brighter colors are probably best. If you’re a tech channel, something sleek with a black background could be better.
3. Use Music
Viewers are likely to get distracted and click away during silent pauses. In order to keep their attention through your intro, you’ll need to include music, and maybe even a sound effect.
4. Include Your Channel Name
This might seem basic, but there are intros out there where the creator has overlooked this. One of the main purposes of your intro is to brand your video, so there’s nothing more important than including your channel name.
5. Introduce Your Topic Before Your Intro
Instead of putting your intro at the very beginning of your video, put a short clip ahead of it where you explain your topic. A viewer that is looking for you to get to the point quickly might click away if the first thing they see is the intro instead of information relevant to their search.
What’s your YouTube intro like? Can you think of a way you’d like to change or improve it?
Richard Bennett
Richard Bennett is a writer and a lover of all things video.
Follow @Richard Bennett
Richard Bennett
Nov 01, 2022• Proven solutions
An intro video goes a long way towards building your brand and showing viewers that you’re serious about YouTube. Here’s where you can make or download intros, plus some tips on making intros that support the growth of your channel.
Free Intro Makers
Here’s a list of 4 places you can create or download FREE YouTube intros with no watermark.
Blender
Blender is a free, open-source, ‘3D creation suite’. It’s great for modeling and animation, and you can even use it to make your YouTube intros.
This is an extremely powerful program. You can create cartoons and video game prototypes in Blender. This does mean that it’s probably not realistic for someone with no experience in animation to jump in and make a quick intro for their YouTube channel. However, if you want to learn Blender, all of the information you need is easily accessible through the tutorials on their site.
What’s a bit more realistic than learning an entire animation suite to make an intro is to download a premade template and just customize it in Blender. You can find YouTube intro templates that are editable in Blender on YouTube and Velosofy.
Movietools
This is a great site where you can download all kinds of free resources including video loops and animated backgrounds you can use to build YouTube intros.
You cannot download a complete Intro with your own text and/or logo from Movietools the way you can with Panzoid, but they can provide most of the resources you would need to build a sequence in Filmora or another editor.
Downloads from Movietools come as WMV (Windows Media) or MP4 files.
Panzoid
For a lot of creators, Panzoid is the default site they go to for YouTube intros, and that’s with good reason. Panzoid has an endless supply of intro templates (new ones are created weekly by members of their community) which you can edit right on the site.
A lot of the intro templates on Panzoid include music, and almost all of them include 3D text.
Click on a template you like and then click ‘open in clipmaker’.
In the clipmaker, you’ll be able to edit the template however you like. The main change you’ll want to make will probably be to the text – you’ll want it to say your channel name. In the menu on the left side of the screen, you’ll see an icon that looks like a cube. Click on it to bring up a list of the objects in the sequence.
The text will probably be under a heading such as ‘Group: All’, although there may be some variation on this depending on who built the template. Look for something that says ‘Group: Text’ in one of the dropdown menus and then look at where it says ‘Text: (the text from the template)’. There will probably be at least two fields like this for one word/line (they’re layers of the same thing). Make sure to edit them all to say the same thing or your intro will look odd.
Click the icon that looks like an arrow pointing down to choose your quality (next to mode) and format before you export. The highest quality will make your clip slow to download, but that could be worth it since you’ll probably get a lot of use out of this clip and you only need to download it once.
Velosofy
Velosofy has a ton of great intro templates you can download for free. The only complication is that the downloads are project files for programs like Sony Vegas or After Effects, making it difficult to use them unless you have those programs.
Luckily, one of the programs Velosofy has intro downloads for is Blender, the free animation software discussed above. You can download YouTube intro templates from Velosofy to edit in Blender and end up with a great custom intro for free.
5 Tips for Making a Great Intro
Here are some tips for making an intro that supports the growth of your YouTube channel.
1. Keep it Under 10 Seconds
Someone who doesn’t know you, who is shopping around for the best video to watch on a particular topic, will not have the patience to sit through a long intro. In order to stop them from clicking away, you’ll need to keep your intro short. Ten seconds is the longest you can get away with, and that’s only if your intro is exciting and includes a lot of movement and music.
Five seconds will be better than 10 seconds in most cases.
2. Match Your Channel’s Branding
Your intro should help to strengthen your personal brand by using the same kinds of colors and fonts found in your channel art and thumbnails.
Beyond matching your visuals, your intro should support the general tone of your channel. If you tend to be upbeat in your videos, upbeat music and brighter colors are probably best. If you’re a tech channel, something sleek with a black background could be better.
3. Use Music
Viewers are likely to get distracted and click away during silent pauses. In order to keep their attention through your intro, you’ll need to include music, and maybe even a sound effect.
4. Include Your Channel Name
This might seem basic, but there are intros out there where the creator has overlooked this. One of the main purposes of your intro is to brand your video, so there’s nothing more important than including your channel name.
5. Introduce Your Topic Before Your Intro
Instead of putting your intro at the very beginning of your video, put a short clip ahead of it where you explain your topic. A viewer that is looking for you to get to the point quickly might click away if the first thing they see is the intro instead of information relevant to their search.
What’s your YouTube intro like? Can you think of a way you’d like to change or improve it?
Richard Bennett
Richard Bennett is a writer and a lover of all things video.
Follow @Richard Bennett
The Essential Guide to Tracking Down Your YouTube Voice
How to Find Your Comments on YouTube?
Richard Bennett
Mar 27, 2024• Proven solutions
Have you ever felt worried about any YouTube comment that you published long ago, and later you realized that it was a mistake? Or, do you want to know what comments did you post and when? If so, YouTube offers a simple way of finding your past remarks, and making any changes to them if need be.
That said, the following sections teach you how to find your YouTube comments on a desktop or laptop computer, and also on a mobile device if you are a gadget freak.
- Part 1: How to Find Comments You’ve Posted on YouTube?
- Part 2: How to Find All YouTube Comments Your Channel Has Received?
- Part 3: How to Find Someone’s YouTube Comments by User Name?
- Part 4: How to Edit and Reply to YouTube Comments?
- Part 5: How to Moderate YouTube Comments?
- Part 6: Tips for Writing Good YouTube Comments
Part 1: How to Find All the Comments You’ve Posted on YouTube?
YouTube allows you to post comments on any video only if you are signed in to your Google account while browsing the streaming platform. Because of this, the portal is able to keep a record of your activities, thus enabling you to track all your comments, and take necessary action such as deleting or modifying them as required.
You can learn how to find all the comments you have posted on YouTube while using your preferred device by following the instructions given below:
1. Find Your YouTube Comments on a Desktop or Laptop Computer
Step 1: Sign In to Your YouTube Account
Launch your favorite web browser, go to the YouTube page, click SIGN IN from the top-right corner, and follow the on-screen instructions to enter your credentials and sign in to your Google/YouTube account.
Step 2: Get to the History Page
Click the Menu button from the top-left corner of the page, and then click History from the categories available in the navigation bar in the left.

Step 3: Access/View Your Past Comments
Click Comments from the right of the History page to view all the comments that you have posted earlier.

2. Find Your YouTube Comments on an iPhone
Unfortunately, at the time of this writing, the YouTube app for iOS doesn’t have the feature to view your comments history. However, there is a workaround where you can use a web browser on your smartphone to get this done. The process that is given below explains how to view your past YouTube comments on an iPhone:
Step 1: Sign In to Your YouTube Account on an Internet Browser
Launch your favorite web browser on your iPhone (Safari, the default one, is used here for illustration), go to https://m.youtube.com , tap the profile icon from the top-right corner, tap Sign in from the menu that appears, and follow the on-screen instructions to use your Google account credentials to sign in to YouTube.
Step 2: Access the Desktop Version of YouTube
Tap the More Options icon from the top-left corner of the browser, and then tap Request Desktop Website from the menu that appears to access the desktop version of YouTube on your iPhone.

Step 3: View Your Past YouTube Comments
Tap the Menu icon from the top-left corner of the YouTube page, and tap History from the menu that appears. On the History page, tap Comments from the right pane to view/access your YouTube comments that you posted in the past.

3. Find Your YouTube Comments on an Android Smartphone
As it is with iOS, the YouTube app for Android doesn’t allow you to view your comments history either. However, the workaround of using a web browser works pretty well on Android smartphones too, but with a few tweaks. The process of doing so is given below:
Step 1: Use a Web Browser to Sign In to Your YouTube Account
Launch Google Chrome on your Android smartphone (you can use any other web browser of your choice), and go to https://m.youtube.com . Notice how the interface automatically changes to the desktop version. Note: If the desktop version of the website isn’t visible, you can tap the More button (with three vertical dots) from the top-right corner of the browser, and check the Desktop site box.
Next, tap SIGN IN from the top-right corner of the YouTube page, enter your Google account credentials in the box available on the Sign in screen, enter your password when prompted, and sign in to your YouTube account.
Step 2: Choose a Web Browser (for Confirmation)
When the confirmation box pops up at the bottom, choose your preferred web browser, and tap the frequency of its usage for accessing YouTube. For instance, choose Chrome and Just once to use Google Chrome to access YouTube only for this session.
Step 3: View/Access Your Past YouTube Comments
Once you are signed in to your account, tap the Menu icon from the top-left corner of the YouTube page, and tap History from the menu that appears. When the History page opens up, tap Comments from the right pane to view and/or access your past YouTube comments.
Part 2: How to Find All YouTube Comments Your Channel Has Received?
If you own a YouTube channel and have posted several videos there, it is likely that you also have received a decent number of comments. Usually, these remarks are pretty helpful as they tell you how to improve your production quality, and what your audience prefers to watch in the future. Therefore, it is imperative to learn how to find all the comments that your YouTube channel has received, and the process given below explains exactly that:
1. Find Your Channel’s YouTube Comments on a Desktop or Laptop Computer
You can use your favorite web browser on a PC to easily find all the comments that the videos on your YouTube channel have received as long as you are signed in to your Google account. The step-by-step instructions on how this can be done are given below:
Step 1: Go to the Your videos Page
Open your favorite Internet browser, go to https://www.youtube.com , and sign in to your YouTube account as explained in the previous sections. Next, click the Menu icon from the top-left corner of the YouTube homepage, and click Your videos from the menu that appears.

Step 2: View the Comments
Make sure that the Uploads tab is selected on the Channel content window, and check the number under the Comments column of each video to see how many comments that particular film has received. You can click the number for any video to view its comments.

Step 3: Hide or Hold a Comment for Approval
Click the More icon from the right of the comment you want to moderate, and click Hide user from channel or Always approve comments from this user to hide the comments from the selected user or keep their comments on hold until you review and approve them respectively.

Note: To view all comments received on your YouTube channel, go to the Comments tab under YouTube Studio, and you will find all Channel comments & mentions.
2. Find Your Channel’s YouTube Comments on a Mobile App
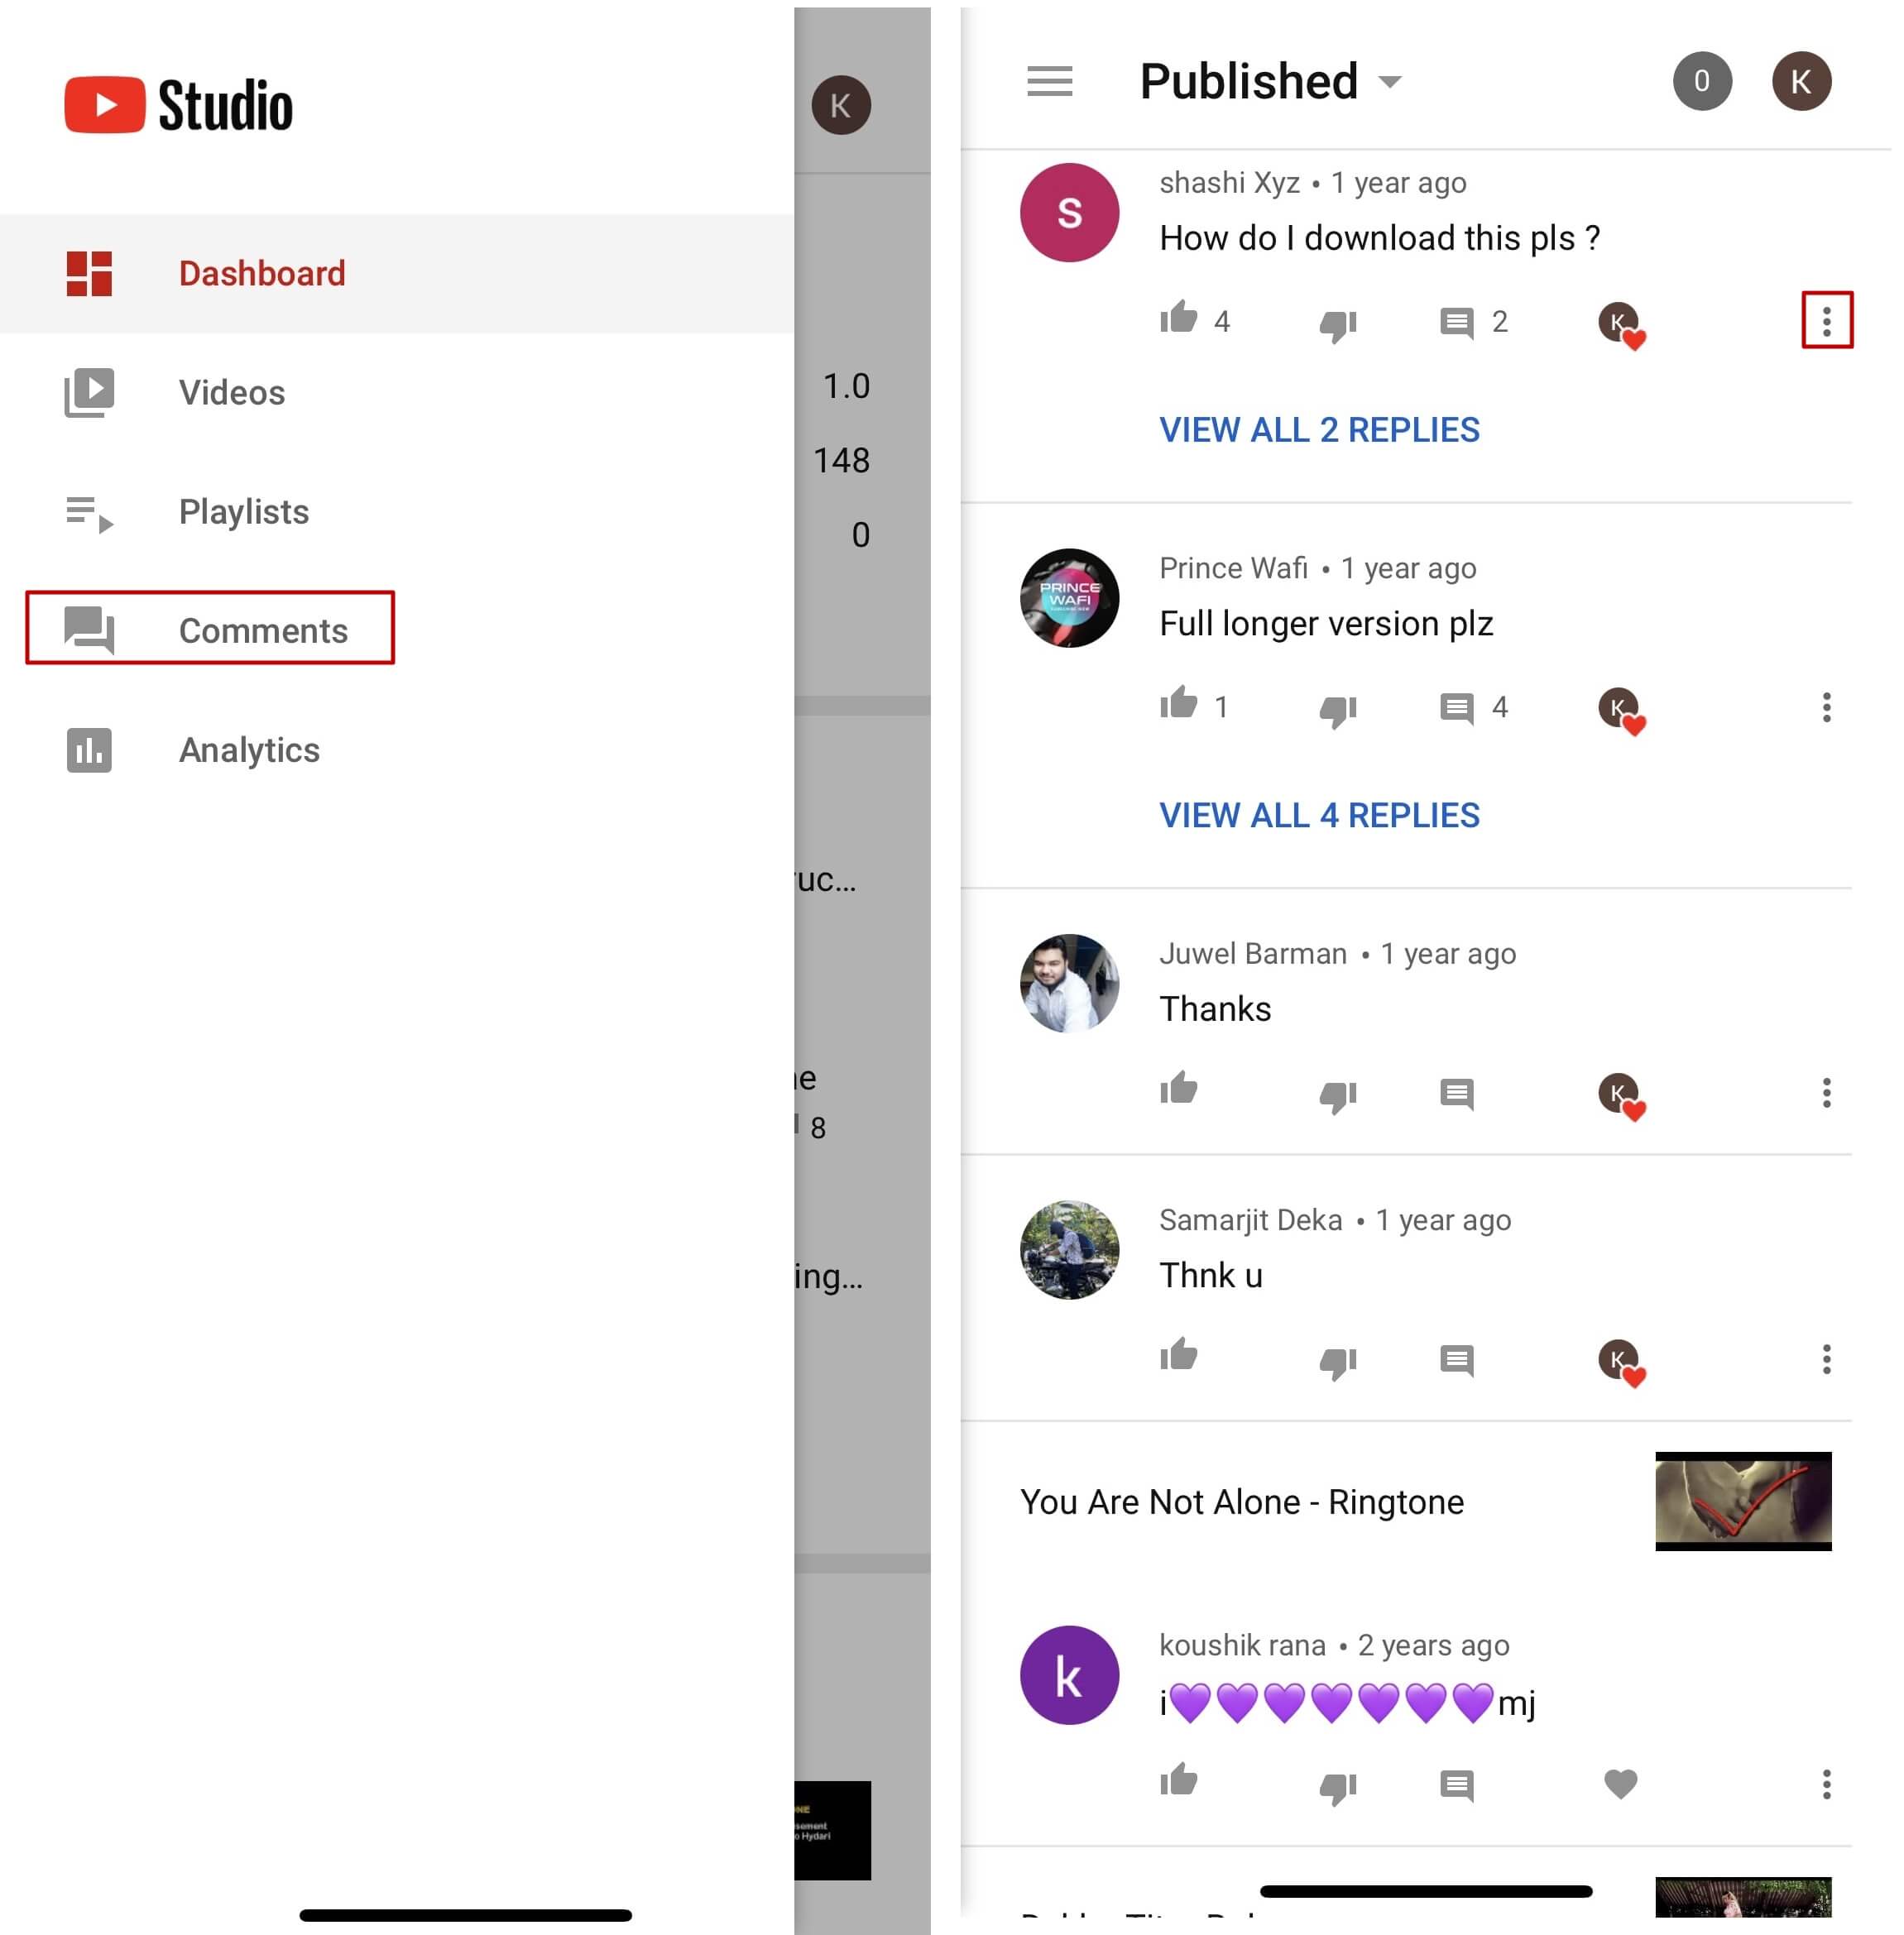
This process is comparatively simpler than the previous one as all that you need to do is download the YT Studio app, and access a central location where all the comments for all the videos can be viewed. The process is given below:
Step 1: Obtain a Mobile App
Go to App Store or Google Play Store, and search and download the YT Studio app on your iPhone or Android smartphone (iPhone X is used here for illustration).
Step 2: View/Access All the Comments
Launch the YT Studio app, and sign in to your YouTube account. Tap the Menu icon from the top-left corner of the interface, and tap Comments from the menu to view all the published comments for all the videos that you have received on your YouTube channel.
Step 3: Hide Users and View Held Comments
Tap the More button from the right of an inappropriate comment, and tap Hide user from channel from the menu that comes up. In addition, you can tap the More button next to Published from the top, and tap Held for review from the box that pops up to view the comments that are waiting for your approval.
Note: Unfortunately, you cannot hold the comments for approval using the YT Studio app. As a workaround, you can follow the procedure given earlier to access the desktop version of YouTube on your smartphone, and then use the method explained in the previous section to get this done. However, it is recommended that you do all such sensitive tasks on a laptop or desktop computer to avoid any errors.
Part 3: Find Someone’s YouTube Comments by User Name
If any of your YouTube videos has thousands of comments and you need to find a particular one from a specific user, checking each remark manually would be an extremely time-consuming and tedious task. Therefore, it is a good idea to let an efficient application do the job for you.
One program, a Google Chrome extension called YCS – YouTube Comment Search to be precise, can help you with this. All you are required to do is, install the extension, go to the video, and search the comment by the name of the user. The step-by-step instructions on how this can be done are given below:
Step 1: Install YCS – YouTube Comment Search
Launch Google Chrome on your desktop or laptop computer, search for YCS – YouTube Comment Search, click Add to Chrome, and click Add extension on the notification box that pops up to install the YCS – YouTube Comment Search extension on your instance of Google Chrome.
Step 2: Load All Comments
Go to your or any other’s YouTube video, and click Load All from the top-right corner of the YouTube Comment Search panel that is present under the description box to allow YCS to scan all the comments the video has received.

Step 3: Search Comments from a Particular User
Choose Comments from the search type drop-down list, enter the name of the user in question in the Search box, and click Search to fetch all their comments on the video.

Part 4: How to Edit and Reply to YouTube Comments?
Editing an existing YouTube comment that you have posted earlier, or replying to the one published by someone else is simple. The process is given below:
Step 1: Edit an Existing Comment
Use any of the methods explained above to locate your YouTube comment that you want to edit. Next, click the More icon from the right of the comment, click Edit from the menu, make the required changes to the text, and click SAVE.
Step 2: Reply to a Comment
Locate the comment that you want to reply to, click REPLY from under the comment, type your text in the available field, and click REPLY.

Part 5: How to Moderate YouTube Comments?
If you publish videos on YouTube that may put some impact on people’s lifestyle, you are likely to face criticism quite often. Therefore, you might want to moderate all your comments before they become visible to the audience so as not to spread negativity among the mass. Fortunately, YouTube helps you get this done easily, and the instructions that teach you the process are given below:
Step 1: Get to Your Channel’s Settings Box
Sign in to your YouTube account, click the Menu icon from the top-left corner of the homepage, and click Your videos from the menu that appears.
From the bottom of the navigation bar on the left of the YouTube Studio page, click Settings to open the channel’s Settings box.
Step 2: Moderate YouTube Comments
Go to the Community category from the left pane, and go to the Defaults tab from the right. Next, choose Hide all comments for review from the Comments on your new videos drop-down list, and click SAVE from the bottom-right corner of the box to moderate all YouTube comments that your new videos receive from this point onward.

Part 6: Tips for Writing Good YouTube Comments
While posting a comment on a YouTube video, it is imperative to keep a few things in mind. Some important tips that might come in handy in this regard are suggested below:
- Make your comment as relevant to the video as you possibly can
- Avoid using harsh language or slangs to maintain decency
- Be genuine while leaving feedback. However, make sure to choose polite words while typing a comment
- In case you want to add some suggestions, make sure to be humble
- Ignore the replies with inappropriate content
FAQs About YouTube Comments
Q1) Why can’t I see the comments I posted?
A: If you cannot see your comments, this could be because the owner or moderator has configured the channel or the video to hold all the comments for review before they are visible on YouTube.
In such a case, you are advised to wait for the authorized person to approve your remark before it is published. Another possibility is that the moderator/owner has added you to the ‘hidden users’ list due to some reason. Even in this case, your comment won’t be visible until you are removed from that list.
Q2) I have enabled ‘Notify me’ about comments and other activity on my channel or videos, but can’t see the comments on my video. Why?
A: You won’t be able to view the unpublished comments or those from the users you have added to the ‘hidden’ list. To fix this problem, you may want to disable moderation from your channel or the videos, and also unhide the users. The processes of both these configurations are explained in detail in the above sections.
Richard Bennett
Richard Bennett is a writer and a lover of all things video.
Follow @Richard Bennett
Richard Bennett
Mar 27, 2024• Proven solutions
Have you ever felt worried about any YouTube comment that you published long ago, and later you realized that it was a mistake? Or, do you want to know what comments did you post and when? If so, YouTube offers a simple way of finding your past remarks, and making any changes to them if need be.
That said, the following sections teach you how to find your YouTube comments on a desktop or laptop computer, and also on a mobile device if you are a gadget freak.
- Part 1: How to Find Comments You’ve Posted on YouTube?
- Part 2: How to Find All YouTube Comments Your Channel Has Received?
- Part 3: How to Find Someone’s YouTube Comments by User Name?
- Part 4: How to Edit and Reply to YouTube Comments?
- Part 5: How to Moderate YouTube Comments?
- Part 6: Tips for Writing Good YouTube Comments
Part 1: How to Find All the Comments You’ve Posted on YouTube?
YouTube allows you to post comments on any video only if you are signed in to your Google account while browsing the streaming platform. Because of this, the portal is able to keep a record of your activities, thus enabling you to track all your comments, and take necessary action such as deleting or modifying them as required.
You can learn how to find all the comments you have posted on YouTube while using your preferred device by following the instructions given below:
1. Find Your YouTube Comments on a Desktop or Laptop Computer
Step 1: Sign In to Your YouTube Account
Launch your favorite web browser, go to the YouTube page, click SIGN IN from the top-right corner, and follow the on-screen instructions to enter your credentials and sign in to your Google/YouTube account.
Step 2: Get to the History Page
Click the Menu button from the top-left corner of the page, and then click History from the categories available in the navigation bar in the left.
Step 3: Access/View Your Past Comments
Click Comments from the right of the History page to view all the comments that you have posted earlier.
2. Find Your YouTube Comments on an iPhone
Unfortunately, at the time of this writing, the YouTube app for iOS doesn’t have the feature to view your comments history. However, there is a workaround where you can use a web browser on your smartphone to get this done. The process that is given below explains how to view your past YouTube comments on an iPhone:
Step 1: Sign In to Your YouTube Account on an Internet Browser
Launch your favorite web browser on your iPhone (Safari, the default one, is used here for illustration), go to https://m.youtube.com , tap the profile icon from the top-right corner, tap Sign in from the menu that appears, and follow the on-screen instructions to use your Google account credentials to sign in to YouTube.
Step 2: Access the Desktop Version of YouTube
Tap the More Options icon from the top-left corner of the browser, and then tap Request Desktop Website from the menu that appears to access the desktop version of YouTube on your iPhone.
Step 3: View Your Past YouTube Comments
Tap the Menu icon from the top-left corner of the YouTube page, and tap History from the menu that appears. On the History page, tap Comments from the right pane to view/access your YouTube comments that you posted in the past.
3. Find Your YouTube Comments on an Android Smartphone
As it is with iOS, the YouTube app for Android doesn’t allow you to view your comments history either. However, the workaround of using a web browser works pretty well on Android smartphones too, but with a few tweaks. The process of doing so is given below:
Step 1: Use a Web Browser to Sign In to Your YouTube Account
Launch Google Chrome on your Android smartphone (you can use any other web browser of your choice), and go to https://m.youtube.com . Notice how the interface automatically changes to the desktop version. Note: If the desktop version of the website isn’t visible, you can tap the More button (with three vertical dots) from the top-right corner of the browser, and check the Desktop site box.
Next, tap SIGN IN from the top-right corner of the YouTube page, enter your Google account credentials in the box available on the Sign in screen, enter your password when prompted, and sign in to your YouTube account.
Step 2: Choose a Web Browser (for Confirmation)
When the confirmation box pops up at the bottom, choose your preferred web browser, and tap the frequency of its usage for accessing YouTube. For instance, choose Chrome and Just once to use Google Chrome to access YouTube only for this session.
Step 3: View/Access Your Past YouTube Comments
Once you are signed in to your account, tap the Menu icon from the top-left corner of the YouTube page, and tap History from the menu that appears. When the History page opens up, tap Comments from the right pane to view and/or access your past YouTube comments.
Part 2: How to Find All YouTube Comments Your Channel Has Received?
If you own a YouTube channel and have posted several videos there, it is likely that you also have received a decent number of comments. Usually, these remarks are pretty helpful as they tell you how to improve your production quality, and what your audience prefers to watch in the future. Therefore, it is imperative to learn how to find all the comments that your YouTube channel has received, and the process given below explains exactly that:
1. Find Your Channel’s YouTube Comments on a Desktop or Laptop Computer
You can use your favorite web browser on a PC to easily find all the comments that the videos on your YouTube channel have received as long as you are signed in to your Google account. The step-by-step instructions on how this can be done are given below:
Step 1: Go to the Your videos Page
Open your favorite Internet browser, go to https://www.youtube.com , and sign in to your YouTube account as explained in the previous sections. Next, click the Menu icon from the top-left corner of the YouTube homepage, and click Your videos from the menu that appears.
Step 2: View the Comments
Make sure that the Uploads tab is selected on the Channel content window, and check the number under the Comments column of each video to see how many comments that particular film has received. You can click the number for any video to view its comments.
Step 3: Hide or Hold a Comment for Approval
Click the More icon from the right of the comment you want to moderate, and click Hide user from channel or Always approve comments from this user to hide the comments from the selected user or keep their comments on hold until you review and approve them respectively.
Note: To view all comments received on your YouTube channel, go to the Comments tab under YouTube Studio, and you will find all Channel comments & mentions.
2. Find Your Channel’s YouTube Comments on a Mobile App
This process is comparatively simpler than the previous one as all that you need to do is download the YT Studio app, and access a central location where all the comments for all the videos can be viewed. The process is given below:
Step 1: Obtain a Mobile App
Go to App Store or Google Play Store, and search and download the YT Studio app on your iPhone or Android smartphone (iPhone X is used here for illustration).
Step 2: View/Access All the Comments
Launch the YT Studio app, and sign in to your YouTube account. Tap the Menu icon from the top-left corner of the interface, and tap Comments from the menu to view all the published comments for all the videos that you have received on your YouTube channel.
Step 3: Hide Users and View Held Comments
Tap the More button from the right of an inappropriate comment, and tap Hide user from channel from the menu that comes up. In addition, you can tap the More button next to Published from the top, and tap Held for review from the box that pops up to view the comments that are waiting for your approval.
Note: Unfortunately, you cannot hold the comments for approval using the YT Studio app. As a workaround, you can follow the procedure given earlier to access the desktop version of YouTube on your smartphone, and then use the method explained in the previous section to get this done. However, it is recommended that you do all such sensitive tasks on a laptop or desktop computer to avoid any errors.
Part 3: Find Someone’s YouTube Comments by User Name
If any of your YouTube videos has thousands of comments and you need to find a particular one from a specific user, checking each remark manually would be an extremely time-consuming and tedious task. Therefore, it is a good idea to let an efficient application do the job for you.
One program, a Google Chrome extension called YCS – YouTube Comment Search to be precise, can help you with this. All you are required to do is, install the extension, go to the video, and search the comment by the name of the user. The step-by-step instructions on how this can be done are given below:
Step 1: Install YCS – YouTube Comment Search
Launch Google Chrome on your desktop or laptop computer, search for YCS – YouTube Comment Search, click Add to Chrome, and click Add extension on the notification box that pops up to install the YCS – YouTube Comment Search extension on your instance of Google Chrome.
Step 2: Load All Comments
Go to your or any other’s YouTube video, and click Load All from the top-right corner of the YouTube Comment Search panel that is present under the description box to allow YCS to scan all the comments the video has received.
Step 3: Search Comments from a Particular User
Choose Comments from the search type drop-down list, enter the name of the user in question in the Search box, and click Search to fetch all their comments on the video.
Part 4: How to Edit and Reply to YouTube Comments?
Editing an existing YouTube comment that you have posted earlier, or replying to the one published by someone else is simple. The process is given below:
Step 1: Edit an Existing Comment
Use any of the methods explained above to locate your YouTube comment that you want to edit. Next, click the More icon from the right of the comment, click Edit from the menu, make the required changes to the text, and click SAVE.
Step 2: Reply to a Comment
Locate the comment that you want to reply to, click REPLY from under the comment, type your text in the available field, and click REPLY.
Part 5: How to Moderate YouTube Comments?
If you publish videos on YouTube that may put some impact on people’s lifestyle, you are likely to face criticism quite often. Therefore, you might want to moderate all your comments before they become visible to the audience so as not to spread negativity among the mass. Fortunately, YouTube helps you get this done easily, and the instructions that teach you the process are given below:
Step 1: Get to Your Channel’s Settings Box
Sign in to your YouTube account, click the Menu icon from the top-left corner of the homepage, and click Your videos from the menu that appears.
From the bottom of the navigation bar on the left of the YouTube Studio page, click Settings to open the channel’s Settings box.
Step 2: Moderate YouTube Comments
Go to the Community category from the left pane, and go to the Defaults tab from the right. Next, choose Hide all comments for review from the Comments on your new videos drop-down list, and click SAVE from the bottom-right corner of the box to moderate all YouTube comments that your new videos receive from this point onward.
Part 6: Tips for Writing Good YouTube Comments
While posting a comment on a YouTube video, it is imperative to keep a few things in mind. Some important tips that might come in handy in this regard are suggested below:
- Make your comment as relevant to the video as you possibly can
- Avoid using harsh language or slangs to maintain decency
- Be genuine while leaving feedback. However, make sure to choose polite words while typing a comment
- In case you want to add some suggestions, make sure to be humble
- Ignore the replies with inappropriate content
FAQs About YouTube Comments
Q1) Why can’t I see the comments I posted?
A: If you cannot see your comments, this could be because the owner or moderator has configured the channel or the video to hold all the comments for review before they are visible on YouTube.
In such a case, you are advised to wait for the authorized person to approve your remark before it is published. Another possibility is that the moderator/owner has added you to the ‘hidden users’ list due to some reason. Even in this case, your comment won’t be visible until you are removed from that list.
Q2) I have enabled ‘Notify me’ about comments and other activity on my channel or videos, but can’t see the comments on my video. Why?
A: You won’t be able to view the unpublished comments or those from the users you have added to the ‘hidden’ list. To fix this problem, you may want to disable moderation from your channel or the videos, and also unhide the users. The processes of both these configurations are explained in detail in the above sections.
Richard Bennett
Richard Bennett is a writer and a lover of all things video.
Follow @Richard Bennett
Also read:
- [New] Enhance Your Channel's Voice Dive Into the World of Banner Makers (Apps)
- [Updated] Borrow Without Cost Images From Leading YouTubers' Archives
- 2024 Approved Audiovisual Standards for Success on YouTube – Top Format Choices
- [Updated] Broadcast Your Music MP3 Conversion and Upload on YouTube
- Calm Cursor 3 Pathways to Mellow Watching Videos on YouTube (57 Chars)
- Decoding Chroma Techniques From Raw Footage to Final Cut for 2024
- Thrifty Tips for Hosting Webinars on YouTube
- In 2024, Crafting Chic Looks The Ultimate Cosmetic Compendium
- [Updated] Amplify YouTube Visibility Crafting Effective Descriptions & Tags
- [Updated] Beginner's Bane The Top 8 Youtube Errors You Shouldn't Commit
- Crack the Code Unearthing Hidden Gems in YouTube's Archive
- 2024 Approved Elite' Writes on 10 Free Video Transcript Extractors
- Navigating Through Youtube’s AdSense Revenue Understanding Payments per Thousand Views
- Unboxing YouTube Shorts Music Hacks for Viral Scenes
- Hits at Hyperspeed The Fast Track to 100 Million Views on YouTube in '24
- Digital Dominion #1 to #10 Most Watched YouTube Videos in a Day for 2024
- Quick-Fix Valorant Thumbnails Professionally Done Now!
- Football Game Analysis Premier Insights in Graphs
- Crafting a Profitable Channel in Your First Youtube Steps for 2024
- Unique Channels Generating Top-Notch Video Naming
- 10 Recording Tips to Record Audio in High Quality
- Laws Governing Recording YouTube Live Streams
- Taming the Black Screen Demon of YouTube
- In 2024, Behind the Scenes What Does an 'Unlisted' Video Mean?
- Mastering Zero-Cost YouTube Intros Essential Tips & Templates
- [New] Cinema Comes at a Cost-Free Price Your Ultimate YouTube Movie List
- How To Make a YouTube Trailer
- Unlocking Audience Connection Top Video Formats for YouTube Success
- 10 Best YouTube Conversion Tools for WebM Format
- Leveraging Two Platforms Optimize Your Twitch and YouTube Presence
- Audience-Centric Video Structure Chapter Addition for Maximum Viewership on YouTube for 2024
- Buy YouTube Likes? Does It Really Help Boost Your Channel?
- Coordinated Titling Scheme Across Diverse Digital Platforms for 2024
- [Updated] Android & iOS Prime ASMR Software Options
- In 2024, Crafting Captivating Intros on Mobile Platforms
- [New] Creative Music Videos A List of 15 YouTube Projects
- Avoiding the Blank Thumbnail Scenario in Shorts for 2024
- Elite Visionaries Video Realm
- Top Anime Youtube Picks for Everyday Enthusiasms
- Creating Classical Cinematography A Modern Tutorial
- [Updated] Deciphering the Must-Haves for an Enhanced YouTube Experience
- In 2024, Compelling MacOS Sierra Coders for Vids
- [New] 2024 Approved Capturing Your Screenplay Free Software Insights
- [New] Building a Strong Introduction Examples & Methods
- [New] Brand Awareness Through Opening
- [Updated] 2024 Approved Capture the Perfect Pace A Beginner's Approach to Slow Mo Videos on TikTok
- [New] 2024 Approved Revolutionizing Marketing with Interactive TikTok Content
- How To Bypass Google FRP on Oppo A2
- [Updated] In 2024, Leading Popular Instagram After Effects Designs
- Become a TikTok Filming Pro A Step-by-Step Approach
- In 2024, The Ultimate List of Effective Snapchat Techniques
- In 2024, How to Transfer Contacts from Infinix Smart 8 Pro to iPhone XS/11 | Dr.fone
- [New] Mastering the Art of Deleting Discord Servers for 2024
- Cutting Edge Techniques for Captivating Discord Streams for 2024
- Updated The Step-by-Step Guide to Personalizing Mobile Notifications
- Updated Unbiased Review of Videopad Video Editor Features, Performance, and Value
- [Updated] In 2024, Affordable OBS Adjustments and Tweaks
- [New] The Untold Journey of an Instagram Story Enthusiast
- [Updated] Changing Your Windows 11 Backdrop with Precision
- Perfecting Auditory Aesthetics in Video Production
- [Updated] 2024 Approved Brief Stardom Flash Review
- A Complete Guide To OEM Unlocking on Vivo Y100A
- In 2024, Community-Shared Music Collections (Copyright-Free)
- [New] In 2024, Slowing Down Action IPhone Filmmaking Tricks
- What Is an AI Avatar for 2024
- In 2024, Best Pokemons for PVP Matches in Pokemon Go For Honor 90 | Dr.fone
- [New] Master Recording Techniques for Your Logitech Webcam Installation
- [New] Transform Your Content with These OBS Video Tricks
- [New] Social Simulacrum Sketches Designing Distorted Digital Selves for 2024
- Title: "30 Must-Have YouTube Intros Tools for Beginners, All Free for 2024"
- Author: Steven
- Created at : 2024-05-25 18:41:51
- Updated at : 2024-05-26 18:41:51
- Link: https://youtube-clips.techidaily.com/30-must-have-youtube-intros-tools-for-beginners-all-free-for-2024/
- License: This work is licensed under CC BY-NC-SA 4.0.
