
"2024 Approved Essential Steps to Implement Video Card Anchors on YouTube"
Essential Steps to Implement Video Card Anchors on YouTube
How to Add YouTube Annotations and Cards?

Richard Bennett
Mar 27, 2024• Proven solutions
Update: YouTube has replaced annotation with end screen. You can find the latest informaiton about YouTube screen and YouTube cards here.
YouTube Cards and Annotations are very useful if you want to encourage your viewrs to take an action, like Subscribe, go to another video or associated website, etc. Today, we’re going to show you the differences between cards and annotations, and how to add them in YouTube videos.
Do you want to make your YouTube video more attractive? Wondershare Filmora is a such video editing software designed for YouTube creator. It not only allows you cut, trim, crop, zoom, reverse, rotate the video clips, but also makes the advanced features like green screen, PIP, tilt-shift and mosaic easy like a piece of cake. With Wondershare Filmora, you can ignite your YouTube videos with over 300 effects like Fashion, Beauty, Block Buster, Travel, etc.
 Download Mac Version ](https://tools.techidaily.com/wondershare/filmora/download/ )
The main difference between annotation and cards is their outlook. Cards are more graphical whereas annotations are text based. The cards slide in once you click the small “i” button on the video where as the annotation is there based on the timings set by the user. Moreover the main differences between the two are:
1. YouTube Cards are small and unobtrusive, unless a viewer chooses to click on them, which is why they are the better option when you are trying to get views on other videos. Irritating a few people with a big annotation might be worth it if you also draw other people’s attention to your cause or website, but it is not a good way to endear yourself to people you are trying to get views and subscriptions from. When a card is clicked a thumbnail will appear with a link to your additional content. YouTube Cards are often better than annotations for adding links to your videos because they look much tidier. Also, unlike annotations, cards will be visible to people watching your videos on their mobile devices.
2. You cannot use Cards just to insert notes into your videos, though, and you cannot adjust their size like you can with annotations. So, if you do need a link to be large and extremely noticeable, annotations might still be your best option. Cards and annotations can even be used in combination sometimes.
How to add YouTube Cards
YouTube Cards are similar to annotations but more interactive. They allow the owner of the video to add images and other links. A small box appears, clicking on which will activate the cards.
- Click on the “Video Manager” tab

- Click “Edit” tab under the video screen shot you want to add the card on
- Click on the “Cards” tab

- On the right panel click on “Add Card” drop down menu and select the type of card you want to add
- Click on the create button which will open the corresponding video
- Once you finish the subsequent information required click create card
- Select the timeline for the playhead to appear which leads to the card slide

- Apply changes and exit
How to add YouTube annotations
YouTube Annotation is addition of a text layer, link or hotspots over your video. They add interactive boxes which link to other websites or videos (any link you want).
- Click on the video manager tab
- Click edit tab under the video screen shot you want to add the annotation on
- Click on the “End screen & Annotation” tab

- On the right panel click on “+ Add Element” and select the kind of annotation you want to add
- Adjust the position of Annotation, you can drag the rectangle to locate it at any position of the video, move the slide to set the start and end time of the annotation

- Apply changes
The types of YouTube annotations:
1. Speech Bubbles
Speech Bubbles: look like the dialogue box in a comic strip. There is a tail which you can adjust so it looks like one of the people in your video is saying what is written in the annotation. Speech bubbles are great for adding in funny comments.
2. Notes
Notes: come in a limited selection of colors and can be adjusted to take up a maximum of 30% of your player screen. Sometimes you need a huge annotation to get an important point across, but using huge note annotations too often – especially near the beginnings of your videos – will annoy viewers. If you need a large note annotation make sure to place it later in your video, when a viewer will already be invested in what they are watching and less likely to click away.
3. Titles
Titles: are large pieces of text that go either at the beginning of your video or in-between different topics within your video. YouTube’s titles are not very nice to look at, but they are a decent option if you do not have access to video editing software.
4. Spotlights
Spotlights: have a subtle border and are completely clear inside. Your text only appears when a user hovers over the spotlight. Spotlights are great for turning elements within your video into links.
5. Labels
Labels: are completely transparent, like spotlights, but the user does not have to hover over them for your text to be visible.
6. Pauses
Pauses: are no longer available to add to your videos, although Pause Annotations added before they were removed still work. Pause Annotations used to stop your video for a set period of time when your annotation appeared.
If somebody watches your video and gets to the end then that means they enjoyed it and will probably be open to checking out more of your content. Rather than hoping that your other videos show up in the ‘Suggested Videos’ YouTube will show after yours has finished playing you should always include an outro, or ending card, after your video to recommend your own work. Annotations are used in a lot of successful YouTuber’s ending cards.
One form this takes is small Note annotations in the bottom corners of the screen, one linking to your previous video and one to the next. Sometimes your viewers might not necessarily get the most enjoyment out of your videos by watching them in order, though. Sometimes you want to link viewers to the videos that are most related to the one they just watched.
The best outros also include a subscribe button, which can be created using annotations. These annotations work best when combined with a verbal call to action. Make sure your outro lasts long enough for people to make the decision to subscribe or click another video.
No matter what kind of annotations you are using, you should never use more than two of them at a time anywhere except for your outro. You should also never place annotations at the very top of your screen, or in the middle at the bottom. If your video is embedding on a separate website then the player will cover annotations at the top of the screen, and ads might cover annotations placed in the bottom-middle of the screen. Keep in mind when using annotations that they will not be visible to users watching your videos on mobile devices. If mobile traffic is very important to you then consider using YouTube Cards.
Richard Bennett
Richard Bennett is a writer and a lover of all things video.
Follow @Richard Bennett
Richard Bennett
Mar 27, 2024• Proven solutions
Update: YouTube has replaced annotation with end screen. You can find the latest informaiton about YouTube screen and YouTube cards here.
YouTube Cards and Annotations are very useful if you want to encourage your viewrs to take an action, like Subscribe, go to another video or associated website, etc. Today, we’re going to show you the differences between cards and annotations, and how to add them in YouTube videos.
Do you want to make your YouTube video more attractive? Wondershare Filmora is a such video editing software designed for YouTube creator. It not only allows you cut, trim, crop, zoom, reverse, rotate the video clips, but also makes the advanced features like green screen, PIP, tilt-shift and mosaic easy like a piece of cake. With Wondershare Filmora, you can ignite your YouTube videos with over 300 effects like Fashion, Beauty, Block Buster, Travel, etc.
Download Mac Version ](https://tools.techidaily.com/wondershare/filmora/download/ )
The main difference between annotation and cards is their outlook. Cards are more graphical whereas annotations are text based. The cards slide in once you click the small “i” button on the video where as the annotation is there based on the timings set by the user. Moreover the main differences between the two are:
1. YouTube Cards are small and unobtrusive, unless a viewer chooses to click on them, which is why they are the better option when you are trying to get views on other videos. Irritating a few people with a big annotation might be worth it if you also draw other people’s attention to your cause or website, but it is not a good way to endear yourself to people you are trying to get views and subscriptions from. When a card is clicked a thumbnail will appear with a link to your additional content. YouTube Cards are often better than annotations for adding links to your videos because they look much tidier. Also, unlike annotations, cards will be visible to people watching your videos on their mobile devices.
2. You cannot use Cards just to insert notes into your videos, though, and you cannot adjust their size like you can with annotations. So, if you do need a link to be large and extremely noticeable, annotations might still be your best option. Cards and annotations can even be used in combination sometimes.
How to add YouTube Cards
YouTube Cards are similar to annotations but more interactive. They allow the owner of the video to add images and other links. A small box appears, clicking on which will activate the cards.
- Click on the “Video Manager” tab
- Click “Edit” tab under the video screen shot you want to add the card on
- Click on the “Cards” tab
- On the right panel click on “Add Card” drop down menu and select the type of card you want to add
- Click on the create button which will open the corresponding video
- Once you finish the subsequent information required click create card
- Select the timeline for the playhead to appear which leads to the card slide
- Apply changes and exit
How to add YouTube annotations
YouTube Annotation is addition of a text layer, link or hotspots over your video. They add interactive boxes which link to other websites or videos (any link you want).
- Click on the video manager tab
- Click edit tab under the video screen shot you want to add the annotation on
- Click on the “End screen & Annotation” tab
- On the right panel click on “+ Add Element” and select the kind of annotation you want to add
- Adjust the position of Annotation, you can drag the rectangle to locate it at any position of the video, move the slide to set the start and end time of the annotation
- Apply changes
The types of YouTube annotations:
1. Speech Bubbles
Speech Bubbles: look like the dialogue box in a comic strip. There is a tail which you can adjust so it looks like one of the people in your video is saying what is written in the annotation. Speech bubbles are great for adding in funny comments.
2. Notes
Notes: come in a limited selection of colors and can be adjusted to take up a maximum of 30% of your player screen. Sometimes you need a huge annotation to get an important point across, but using huge note annotations too often – especially near the beginnings of your videos – will annoy viewers. If you need a large note annotation make sure to place it later in your video, when a viewer will already be invested in what they are watching and less likely to click away.
3. Titles
Titles: are large pieces of text that go either at the beginning of your video or in-between different topics within your video. YouTube’s titles are not very nice to look at, but they are a decent option if you do not have access to video editing software.
4. Spotlights
Spotlights: have a subtle border and are completely clear inside. Your text only appears when a user hovers over the spotlight. Spotlights are great for turning elements within your video into links.
5. Labels
Labels: are completely transparent, like spotlights, but the user does not have to hover over them for your text to be visible.
6. Pauses
Pauses: are no longer available to add to your videos, although Pause Annotations added before they were removed still work. Pause Annotations used to stop your video for a set period of time when your annotation appeared.
If somebody watches your video and gets to the end then that means they enjoyed it and will probably be open to checking out more of your content. Rather than hoping that your other videos show up in the ‘Suggested Videos’ YouTube will show after yours has finished playing you should always include an outro, or ending card, after your video to recommend your own work. Annotations are used in a lot of successful YouTuber’s ending cards.
One form this takes is small Note annotations in the bottom corners of the screen, one linking to your previous video and one to the next. Sometimes your viewers might not necessarily get the most enjoyment out of your videos by watching them in order, though. Sometimes you want to link viewers to the videos that are most related to the one they just watched.
The best outros also include a subscribe button, which can be created using annotations. These annotations work best when combined with a verbal call to action. Make sure your outro lasts long enough for people to make the decision to subscribe or click another video.
No matter what kind of annotations you are using, you should never use more than two of them at a time anywhere except for your outro. You should also never place annotations at the very top of your screen, or in the middle at the bottom. If your video is embedding on a separate website then the player will cover annotations at the top of the screen, and ads might cover annotations placed in the bottom-middle of the screen. Keep in mind when using annotations that they will not be visible to users watching your videos on mobile devices. If mobile traffic is very important to you then consider using YouTube Cards.
Richard Bennett
Richard Bennett is a writer and a lover of all things video.
Follow @Richard Bennett
Premium Screener Tech: Perfect for YouTube Videos
Best Screen Recorder for YouTube
Richard Bennett
Mar 27, 2024• Proven solutions
Taking viewers ‘in app’ is an effective way to show them how you work or play. A screen recording is a footage recorded not from your camera, but directly from the interface of your computer or mobile device. A screen recording might be footage from a game, a software tutorial, or a demonstration of your creative process in a program.
We have picked up the best 10 paid screen recorders for YouTube on Windows and Mac, but if you are looking for a complete solution to record videos on Windows, Mac, Android or iOS phone to make tutorial videos, how-to videos, or demonstration videos, or products/software review videos, or gameplay videos on YouTube, here is the all the information you need. This article will introduce you to the best screen recorders on computers, Android devices, and iPhones for YouTube.
- Part 1: Best Screen Recording Software for Recording Windows/Mac Screen for YouTube
- Part 2: Best Screen Capturing Apps for Recording Your Android Screen (No Root)
- Part 3: Best Screen Recording Apps for Recording on iOS Devices for YouTube Videos
Part 1: Best Software for Recording Your Computer Screen for YouTube Videos
1. Filmora Video Editor

In addition to being a powerful editing tool, Filmora can also be used to record your computer screen. In Filmora, just select Media and then Record. In the Record menu, click Record PC Screen. The recording window will pop up and you will be able to decide whether you want to record your full screen, a customized selection of it, or a specific target window. After you have finished recording your clip will automatically appear in the Media menu in your Filmora project so you can edit it right away. You can download Filmora from Filmora.wondershare.com if you do not have it yet.
If you just want to make a how-to video with some captured screens, Filmora will be a good choice. Check the video below about how to record Screen with Filmora.
2. Wondershare DemoCreator
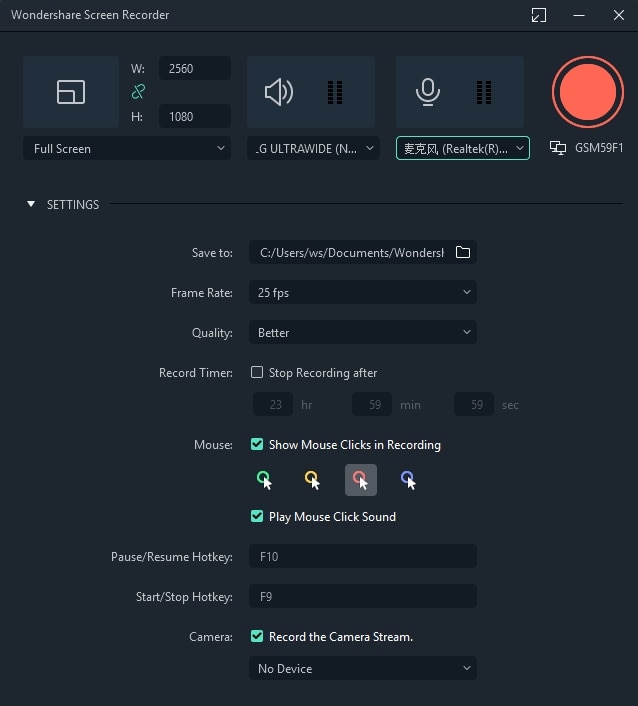
DemoCreator is a specially designed screen recording software from Wondershare for both gameplay recording, tutorial making, screen capturing, and webcam recording as well. You can use it to record the full screen of your Windows or Mac computer or a particular part on the screen. The best part is that you can both record and edit the video in DemoCreator and upload it to YouTube directly. This screen recorder for YouTube is a perfect solution for those who want to capture 120 frames per second and 4K videos.
3.VLC Media Player [Windows & Mac & Linux, Free]
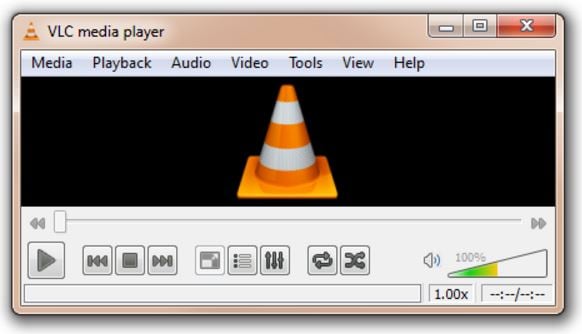
VLC Media Player is a free media player that has a great screen recording feature. You can download it from Video LAN.org. In order to take a screen recording using VLC you first need to click on View and Advanced Controls. A lot of the more advanced features, like screen recording, are initially hidden so as not to confuse users, but selecting Advanced Controls will make them visible. Then you can go to Media and Open Capture Device. In the window that opens choose Desktop next to Capture Mode and click Play. VLC will start displaying your desktop in the player window. Now you just have to click Record.
Learn more details about how to record YouTube videos with VLC
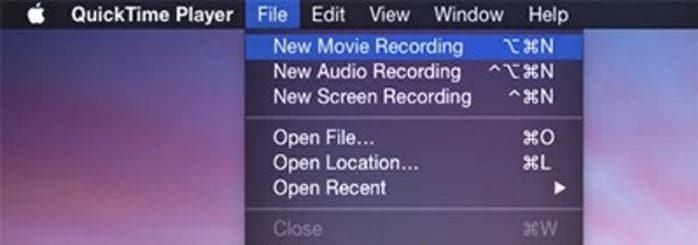
4.QuickTime [Mac, Free]

QuickTime is the default media player for Mac users. To access QuickTime’s screen recording feature select File and New Screen Recording. In the window that pops up click on the arrow next to the Record button and choose a microphone. Then you can press Record. Your recording will not start right away. First, a window will pop up explaining that you can stop your recording by pressing ‘command-control-escape’. Although QuickTime is available for PCs the PC version does not have a screen recording feature.
Learn more details about how to record YouTube video and audio with QuickTime Player on Mac
Part 2: Recording Your Android Screen for YouTube Videos (No Root)
We have already described 4 ways of recording screen videos on Android , while in this part, we will introduce some useful screen recording apps for recording YouTube videos on Android phones.
1. AZ Screen Recorder
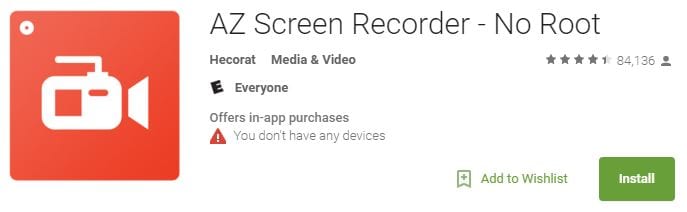
AZ Screen Recorder is free screen recording app for Android 5.0 Lollipop. Using AZ Screen Recorder you can simultaneously record from your phone’s camera and screen. This is useful if you want to shoot a video of yourself explaining an app to add into your final video. Although the basic version of AZ Screen Recorder is free there are in-app purchases.
2.Unlimited Screen Recorder
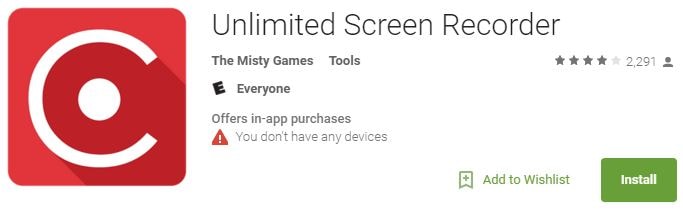
Unlimited Screen Recorder is also for 5.0 Lollipop and is free with in-app purchases. Like the name ‘Unlimited’ suggests you can use this app to record for as long as you want. There is no time limit. You can also record audio through Unlimited Screen Recorder so it is convenient to make a voiceover for your video.
There are very few options available for recording Android devices older than Lollipop without rooting your device.
Click here to check more screen recording apps to capture videos on Android
Part 3: Recording Your iOS Device Screen for YouTube Videos
With the release of iOS 11, recording on iPhone and iPad is much easier with the built-in screen recording tool . If your iOS is above 11 (including 11) version, you can record the screen with its in-app application, check this video to know the details:
Apart from recording with the built-in recording tool, you can also use some best iOS screen recording apps to record YouTube videos, or use some mirror software to record iPhone/iPad on Windows and Mac and create a YouTube video.
1.QuickTime
QuickTime can be used to record the screen of your iPhone or iPad in addition to the screen of your Mac. First you need to connect your device to your computer with a USB port. Instead of selecting ‘New Screen Recording’ in QuickTime, the way you would when recording your computer screen, select ‘New Movie Recording’. In the recording window click on the arrow next to the ‘Record’ button and choose your iOS device where it asks you to choose a camera. This method only works with the Mac version of QuickTime.
2.Reflector
Reflector is mirroring software available for Mac or PC. Mirroring software creates a clone of your device’s interface on your computer screen. Once your device is being displayed on the screen of your computer you can capture it by recording your computer screen. You can download Reflector from Airsquirrels.com.
In order to use Reflector to mirror your device, you will also need to use AirPlay on your iPhone or iPad, and your device and your computer will need to be connected to the same wifi network. In AirPlay, make sure mirroring is on and select your computer as a receiver. Your computer will not show up as an option if you do not have Reflector running.
Conclusion
Above are the screen and video recording software programs that we picked up for you to make a YouTube tutorial, how-to or software review video on most popular platforms including Windows and Mac computer and Android and iOS smartphones. Besides recording, you may also need thebest video editing software for editing YouTube videos . Watch the video tutorial to check how to edit your YouTube videos and get to know some terms in video editing. Remember to download Filmora and have a try today.
Richard Bennett
Richard Bennett is a writer and a lover of all things video.
Follow @Richard Bennett
Richard Bennett
Mar 27, 2024• Proven solutions
Taking viewers ‘in app’ is an effective way to show them how you work or play. A screen recording is a footage recorded not from your camera, but directly from the interface of your computer or mobile device. A screen recording might be footage from a game, a software tutorial, or a demonstration of your creative process in a program.
We have picked up the best 10 paid screen recorders for YouTube on Windows and Mac, but if you are looking for a complete solution to record videos on Windows, Mac, Android or iOS phone to make tutorial videos, how-to videos, or demonstration videos, or products/software review videos, or gameplay videos on YouTube, here is the all the information you need. This article will introduce you to the best screen recorders on computers, Android devices, and iPhones for YouTube.
- Part 1: Best Screen Recording Software for Recording Windows/Mac Screen for YouTube
- Part 2: Best Screen Capturing Apps for Recording Your Android Screen (No Root)
- Part 3: Best Screen Recording Apps for Recording on iOS Devices for YouTube Videos
Part 1: Best Software for Recording Your Computer Screen for YouTube Videos
1. Filmora Video Editor
In addition to being a powerful editing tool, Filmora can also be used to record your computer screen. In Filmora, just select Media and then Record. In the Record menu, click Record PC Screen. The recording window will pop up and you will be able to decide whether you want to record your full screen, a customized selection of it, or a specific target window. After you have finished recording your clip will automatically appear in the Media menu in your Filmora project so you can edit it right away. You can download Filmora from Filmora.wondershare.com if you do not have it yet.
If you just want to make a how-to video with some captured screens, Filmora will be a good choice. Check the video below about how to record Screen with Filmora.
2. Wondershare DemoCreator
DemoCreator is a specially designed screen recording software from Wondershare for both gameplay recording, tutorial making, screen capturing, and webcam recording as well. You can use it to record the full screen of your Windows or Mac computer or a particular part on the screen. The best part is that you can both record and edit the video in DemoCreator and upload it to YouTube directly. This screen recorder for YouTube is a perfect solution for those who want to capture 120 frames per second and 4K videos.
3.VLC Media Player [Windows & Mac & Linux, Free]
VLC Media Player is a free media player that has a great screen recording feature. You can download it from Video LAN.org. In order to take a screen recording using VLC you first need to click on View and Advanced Controls. A lot of the more advanced features, like screen recording, are initially hidden so as not to confuse users, but selecting Advanced Controls will make them visible. Then you can go to Media and Open Capture Device. In the window that opens choose Desktop next to Capture Mode and click Play. VLC will start displaying your desktop in the player window. Now you just have to click Record.
Learn more details about how to record YouTube videos with VLC
4.QuickTime [Mac, Free]
QuickTime is the default media player for Mac users. To access QuickTime’s screen recording feature select File and New Screen Recording. In the window that pops up click on the arrow next to the Record button and choose a microphone. Then you can press Record. Your recording will not start right away. First, a window will pop up explaining that you can stop your recording by pressing ‘command-control-escape’. Although QuickTime is available for PCs the PC version does not have a screen recording feature.
Learn more details about how to record YouTube video and audio with QuickTime Player on Mac
Part 2: Recording Your Android Screen for YouTube Videos (No Root)
We have already described 4 ways of recording screen videos on Android , while in this part, we will introduce some useful screen recording apps for recording YouTube videos on Android phones.
1. AZ Screen Recorder
AZ Screen Recorder is free screen recording app for Android 5.0 Lollipop. Using AZ Screen Recorder you can simultaneously record from your phone’s camera and screen. This is useful if you want to shoot a video of yourself explaining an app to add into your final video. Although the basic version of AZ Screen Recorder is free there are in-app purchases.
2.Unlimited Screen Recorder
Unlimited Screen Recorder is also for 5.0 Lollipop and is free with in-app purchases. Like the name ‘Unlimited’ suggests you can use this app to record for as long as you want. There is no time limit. You can also record audio through Unlimited Screen Recorder so it is convenient to make a voiceover for your video.
There are very few options available for recording Android devices older than Lollipop without rooting your device.
Click here to check more screen recording apps to capture videos on Android
Part 3: Recording Your iOS Device Screen for YouTube Videos
With the release of iOS 11, recording on iPhone and iPad is much easier with the built-in screen recording tool . If your iOS is above 11 (including 11) version, you can record the screen with its in-app application, check this video to know the details:
Apart from recording with the built-in recording tool, you can also use some best iOS screen recording apps to record YouTube videos, or use some mirror software to record iPhone/iPad on Windows and Mac and create a YouTube video.
1.QuickTime
QuickTime can be used to record the screen of your iPhone or iPad in addition to the screen of your Mac. First you need to connect your device to your computer with a USB port. Instead of selecting ‘New Screen Recording’ in QuickTime, the way you would when recording your computer screen, select ‘New Movie Recording’. In the recording window click on the arrow next to the ‘Record’ button and choose your iOS device where it asks you to choose a camera. This method only works with the Mac version of QuickTime.
2.Reflector
Reflector is mirroring software available for Mac or PC. Mirroring software creates a clone of your device’s interface on your computer screen. Once your device is being displayed on the screen of your computer you can capture it by recording your computer screen. You can download Reflector from Airsquirrels.com.
In order to use Reflector to mirror your device, you will also need to use AirPlay on your iPhone or iPad, and your device and your computer will need to be connected to the same wifi network. In AirPlay, make sure mirroring is on and select your computer as a receiver. Your computer will not show up as an option if you do not have Reflector running.
Conclusion
Above are the screen and video recording software programs that we picked up for you to make a YouTube tutorial, how-to or software review video on most popular platforms including Windows and Mac computer and Android and iOS smartphones. Besides recording, you may also need thebest video editing software for editing YouTube videos . Watch the video tutorial to check how to edit your YouTube videos and get to know some terms in video editing. Remember to download Filmora and have a try today.
Richard Bennett
Richard Bennett is a writer and a lover of all things video.
Follow @Richard Bennett
Also read:
- YouTube Editing Essentials A Comprehensive Guide to Song Inserts
- In 2024, Digital Domination Rise From Thousands to a Million on YouTube
- In 2024, Crafting the Next Big Thing Your Guide to YouTube's Best Video Types
- [New] Design Guide YouTube Banners & Thumbnail Creation
- [New] Crafting a Striking Online Presence with Perfect YT Dimensions
- Elite Tech for Saving Your On-Camera Video Memories for 2024
- The Compact Guide to Creating Viral Music on YouTube
- Exploring Successful Strategies to Elevate Audience Numbers on YouTube Shorts
- [Updated] AutoPlay YouTube on Mobile, No Distractions
- The Ultimate Framework for Captivating Streams on YouTube
- In 2024, Diversify Your Watchlist - The Top 27 Non-YouTube Video Hubs
- Strategic Steps for Professional-Level YouTube Promos
- Skyrocketing Views Simple Strategies Without Cost
- Top 15 Web Destinations for Your Daily Dose of Anime
- Financial Fortitude for YouTubers Beyond Basic Earnings
- CarryMinati Unmasked The Monetary Milestones
- Leveraging Two Platforms Optimize Your Twitch and YouTube Presence
- Boosting Profitability in the World of Youtube Shorts
- A Filmmaker's Guide to Mastering Green Screen Technology
- [Updated] Beauty Brilliance Masterclasses and Product Explorations
- 2024 Approved Breakdown of Profit Earning Potential From Each YouTube Sponsored Post?
- Ace the Game Crafting a Pro Gaming Channels Success Story for 2024
- Navigating to Your YouTube Comments Easily
- Manipulate Sound Rate in YouTube Playback
- In 2024, Analyzing Why YouTube Features Specific Comments
- Ecological Architecture Merging Nature and City Planning for 2024
- Quick & Detailed Guide to iPhone/iPad for YouTube Video Uploading
- Essential Tactics for YouTube Success in 25 Ways for 2024
- [Updated] A Fresh Take on Frigidity Crafting Inviting Backdrops
- Captivating Audiences with Unique Haul Content Ideas
- Expert Tips for Harnessing the Power of Top 9 Free YouTube Makers
- [Updated] A Compreayer's Guide to Polishing YouTube Content via iMovie Editing Techniques
- [New] Comprehensive Review of iOS Free Video Editing Apps
- 5 Best Route Generator Apps You Should Try On Tecno Spark 20C | Dr.fone
- In 2024, Repeat, Replay, Loop The Best Free Video Software
- Godslayer Chronicles Ragnarok Dawn for 2024
- [New] 2024 Approved Leading Edge Selecting 9 Superior Online Microphone Recorders
- In 2024, 12 Innovative Screen Shots Ideas for Better Videos
- How to Unlock iPhone 14 Pro Max Without Passcode? | Dr.fone
- How To Unlock SIM Cards Of Motorola Moto G84 5G Without PUK Codes
- In 2024, How Can Infinix Smart 7 HDMirror Share to PC? | Dr.fone
- Updated 10 Must-Use MP4 to GIF Converters to Get Perfect-Made GIF for 2024
- Updated 2024 Approved FCPX Audio Editing Essentials Learn L-Cuts and J-Cuts
- The Updated Method to Bypass Xiaomi Mix Fold 3 FRP
- The way to get back lost music from Meizu 21
- The Best Android Unlock Software For Huawei P60 Device Top 5 Picks to Remove Android Locks
- Title: "2024 Approved Essential Steps to Implement Video Card Anchors on YouTube"
- Author: Steven
- Created at : 2024-06-19 02:39:13
- Updated at : 2024-06-20 02:39:13
- Link: https://youtube-clips.techidaily.com/2024-approved-essential-steps-to-implement-video-card-anchors-on-youtube/
- License: This work is licensed under CC BY-NC-SA 4.0.
