
"2024 Approved Enhancing YouTube Music Soundscape"
Enhancing YouTube Music Soundscape
YouTube Music has become a popular go-to platform for music lovers to find new songs and artists to enjoy. The content is uploaded regularly, so there’s always something new to discover.
But with so much music content on YouTube Music, finding the right mix for you can take time and effort. That’s why we’ve put together this guide on how to find my playlists on YouTube.
We’ll also answer some frequently asked questions to help you find solutions regarding the YouTube Mix queries. So, without wasting time, let’s get on with the guide!

Basic Information of YouTube Mix
Before starting, let’s learn some basic information about the YouTube Music Mix playlists:
 Project Manager - Asset Browser for 3Ds Max
Three Ways Of YouTube Music Mix
YouTube has popularized three personalized mixes to keep you up-to-date on newly released music and introduce more artists to you:
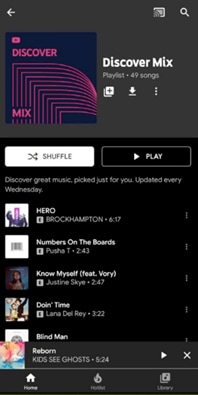
Discover Mix: Discover Mix introduces you to 50 new tracks every week, expanding your musical horizons and introducing you to contemporary artists. This playlist mix provides new updates every Wednesday, making it a go-to playlist for discovering new music to your taste.
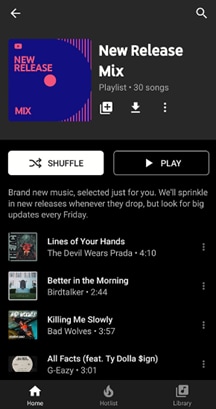
New Release Mix: In the New Release Mix playlist, you can find all the newest tracks from your favorite artists, and some music is recommended. New updates are provided every Friday (when most new releases come out), and mid-week releases the entire week to ensure you’re always up-to-date on the latest music.
Your Mix: Your Mix is a playlist full of songs by popular and well-known artists, as well as some new tunes and performers you’ve never discovered before, which are recommended based on your preferences, making it ideal for unwinding and listening to something you’re guaranteed to love. The playlist is updated regularly, so the music never gets dull, and there’s always something new to listen to.
 Software Update Pro - Check and update software installed on your computer.
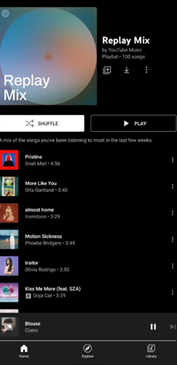
What Is YouTube Music Replay Mix?
YouTube Music Replay Mix is a feature of YouTube Music that is automatically generated via the YouTube algorithm and contains a personalized mix of tracks based on your listening history. The mix is updated daily and includes up to 100 songs.
You can access it by tapping the “Replay Mix” option on the YouTube app’s main screen or the YouTube Music website. This feature is perfect for those who want a continuously updated mix of their favorite songs.
So, if you’re always on the go and need more time to create your playlist, YouTube Music Replay Mix is a great option. Since it’s based on your listening history, you can be sure that you’ll always hear songs that you love.

The Things You Want To Know About YouTube Mix
Now that you’ve what YouTube Mix is, you might have some queries in mind. To help you resolve them, we’ve provided solutions to the most frequently asked questions:

1. How Do I Save My Mix Playlist On YouTube?
To save My Mix playlist on YouTube, launch the YouTube app, tap “More” on the app’s main interface, and tap “Add to Library.” You can also save the playlist by going to the Mix page and tapping “Save” below the description.
2. How Do I Find My Playlist On YouTube?
The YouTube Music Replay Mix playlist is located on the home screen of the YouTube Music app and website under the “Mixed for you” header. Here you can also find other playlists, including “Your likes,” “New Release Mix,” “My Supermix,” and “Discover Mix.”
3. How Do I Add Songs To The Replay Mix Playlist?
You can’t manually add songs to the Replay Mix because YouTube Music automatically adds tracks that you listen to more than once.
The more often you hear a soundtrack, the higher it will appear on the YouTube list. Conversely, songs you’ve only played once or twice will appear lower on the list.

4. How Do I Delete A Mix Playlist On YouTube?
To delete a saved YouTube playlist from the Music library:
- Launch YouTube Music app on your mobile device or head to its website on your computer.
- Tap “Library” on the home screen or homepage and tap the “Mix” you want to delete.
- Tap the**”More”** option on the playlist panel and tap “Remove Playlist From Library.”
5. How Do I Turn Off YouTube Mixes?
To turn off YouTube Mixes, you can use Google extensions or create one yourself if you are an expert in coding.
6. Are YouTube Mixes Endless?
YouTube Music offers an endless personalized music playlist called “My Mixes.” Every time you click or tap the playlist, a new queue of your most listened or favorite tracks is generated for you.
The playlist contains about 100 songs with an endless auto-play feature once you reach the end of the list.

A Bonus Tip: How To Make a Music Video?
Hopefully, you have got the information you need about YouTube Mixes. Supposing you are YouTube music lover, we wonder, do you want to create YouTube videos for your channel or add music to your clips? In that case, we prepared a video tutorial for you - How To Make a Music Video. If you have any interests, you can watch it and learn about how to use the user-friendly video editor to make it:
Here’s why Wondershare Filmora is an excellent option for making YouTube videos or adding music to them:
- Huge royalty-free music library
- Easy to use, even for novice users
- Record videos from your webcam and screen simultaneously
- Multiple advanced video editing features, such as green screen, background blur, keyframe, split screen, motion tracking, and preset templates
- Adds effects, filters, transitions, and animations to your video footage to make it more eye-catching
- Quick “export to YouTube” feature to help you instantly share your final project on your channel
Free Download For Win 7 or later(64-bit)
Free Download For macOS 10.14 or later
If you want additional guidance on adding YouTube Music to your videos using Filmora,click here to learn everything you need to know!
Conclusion
This comprehensive guide explored some basic information about YouTube Music Mix and discussed how to find My Playlist on YouTube Music quickly. We’ve also provided solutions to help you save, find, delete, or turn off YouTube Mix playlists.
In addition, we’ve provided a bonus tip to use Filmora to add music to your YouTube videos and discussed its key features.
Hopefully, you’ve found this article helpful and can now locate your YouTube Music Mix playlist without issues.
Stream to Success: OBS Youtube Broadcast Basics
Live stream to youtube with OBS step by step guide for beginners

Richard Bennett
Mar 27, 2024• Proven solutions
- Part1. Stream Now set up
- Part2. Set up Your Live Streaming Encoder
- Part3. Youtube Events set up
- Part4. Video tutorial
1. Stream Now set up
Follow these steps to live stream your impressive videos to YouTube using Stream Now tool:
Step 1: First of all you need to login with your account and then move to Creator Studio option directly.


Step 2: Choose the Video Manager option from top most toolbar.

Step 3: From the drop down menu, simply select Live Streaming option to begin with.

Step 4: Now hot the steam now option on your screen.

Step 5: Change or Upload your thumbnail as per need.

Step 6: It is time to provide an eye catching title to your video, add description and finally choose category from the drop down menu.

Step 7: While using stream option, never forget to click on ‘make archive unlisted when complete’ option so that you can save as well as watch your content on YouTube at later stage.

Step 8: You can monetize your ads as per need.

Step 9: It also provides options to add cards.

Step 10: Now move to encoder setup and then simply copy and paste these details to your streaming software.

Step 11: Now you can set your live chat option as per your requirement.

Step 12: The analysis window will help you to know about how many viewers are connected to your video as well as the message updates will be reflected.

Step 13: Stream health can be monitored directly.

Step 14: One can also use the social media button for live shares.
 PCDJ Karaoki is the complete professional karaoke software designed for KJs and karaoke venues. Karaoki includes an advanced automatic singer rotation list with singer history, key control, news ticker, next singers screen, a song book exporter and printer, a jukebox background music player and many other features designed so you can host karaoke shows faster and easier!
2.Set up Your Live Streaming Encoder
As soon as you have completed the above set up then next task is to adjust settings of your streaming encoder. It is possible to make easy selection out of wide range of live streaming encoders. The details below are provided with reference to OBS too that is open source type free to access software.
Step 1: First of all you need to visit official website of OBS and get your software tool installed on your system.
Step 2: Now launch OBS on your device and directly go to settings option.

Step 3: It is time to copy the stream key from YouTube and then paste it directly in the specified field of OBS.
 ZoneAlarm Extreme Security NextGen

Step 4: Users can now add their sources and scenes.

Step 5: Once all these settings are done then you can simply hit the option for start streaming and it will bring your content to YouTube directly.

3. Youtube Events set up
Live stream is little different from Stream Now platform as it allows users to schedule the streams as well as a connectivity to Google Hangouts is provided. These easy to follow steps will assist you to handle all settings for your events using Live Stream tool:
Step 1: Simply click on the schedule event option on screen.

Step 2: It is much easier to make settings for basic information as well as audience type. Make some desired changes to SNS platform. If you select the Quick type then it will directly select your webcam and you need not to make additional complicated settings whereas the custom type option provides easy set up options with OBS.

Step 3: The advance settings option works same as that of stream now features and users can adjust most of these settings as per their streaming needs.

Step 4: Users can turn monetization On or Off as per their preferences.

Step 5: As soon as you finish all above settings then simply click on the create event option.

Step 6: One more window will appear on your screen and here you can make adjustment for preferred bit rate. Also put your dedicated stream key with encoder.
 Project Manager - Asset Browser for 3Ds Max

Step 7: When all above steps are completed then you need to hit the option for save changes so that your tool can act accordingly.

Step 8: Now click on events and here you will be able to find your event. Move to live control room if you want to access complete details about this event and you can easily delete it.

Step 9: Users can set privacy terms or simple delete the event that is currently in action.
 Glarysoft File Recovery Pro Annually - Helps to recover your lost file/data, even permanently deleted data.
Video tutorial

Richard Bennett
Richard Bennett is a writer and a lover of all things video.
Follow @Richard Bennett
Richard Bennett
Mar 27, 2024• Proven solutions
- Part1. Stream Now set up
- Part2. Set up Your Live Streaming Encoder
- Part3. Youtube Events set up
- Part4. Video tutorial

1. Stream Now set up
Follow these steps to live stream your impressive videos to YouTube using Stream Now tool:
Step 1: First of all you need to login with your account and then move to Creator Studio option directly.
Step 2: Choose the Video Manager option from top most toolbar.
Step 3: From the drop down menu, simply select Live Streaming option to begin with.
Step 4: Now hot the steam now option on your screen.
Step 5: Change or Upload your thumbnail as per need.
Step 6: It is time to provide an eye catching title to your video, add description and finally choose category from the drop down menu.
 vMix Basic HD - Software based live production. vMix Basic HD includes 4 inputs, 3 cameras, streaming, recording, playlist.
Step 7: While using stream option, never forget to click on ‘make archive unlisted when complete’ option so that you can save as well as watch your content on YouTube at later stage.
Step 8: You can monetize your ads as per need.
 Screensaver Factory, Create stunning professional screensavers within minutes. Create screensavers for yourself, for marketing or unlimited royalty-free commercial distribution. Make screensavers from images, video and swf flash, add background music and smooth sprite and transition effects. Screensaver Factory is very easy to use, and it enables you to make self-installing screensaver files and CDs for easy setup and distribution. Screensaver Factory is the most advanced software of its kind.
Step 9: It also provides options to add cards.

Step 10: Now move to encoder setup and then simply copy and paste these details to your streaming software.

Step 11: Now you can set your live chat option as per your requirement.
Step 12: The analysis window will help you to know about how many viewers are connected to your video as well as the message updates will be reflected.
Step 13: Stream health can be monitored directly.
Step 14: One can also use the social media button for live shares.
2.Set up Your Live Streaming Encoder
As soon as you have completed the above set up then next task is to adjust settings of your streaming encoder. It is possible to make easy selection out of wide range of live streaming encoders. The details below are provided with reference to OBS too that is open source type free to access software.
Step 1: First of all you need to visit official website of OBS and get your software tool installed on your system.
Step 2: Now launch OBS on your device and directly go to settings option.
 CalendarBudget - Monthly subscription membership to CalendarBudget via web browser or mobile app. Support included.
Step 3: It is time to copy the stream key from YouTube and then paste it directly in the specified field of OBS.
Step 4: Users can now add their sources and scenes.
Step 5: Once all these settings are done then you can simply hit the option for start streaming and it will bring your content to YouTube directly.
3. Youtube Events set up
Live stream is little different from Stream Now platform as it allows users to schedule the streams as well as a connectivity to Google Hangouts is provided. These easy to follow steps will assist you to handle all settings for your events using Live Stream tool:
Step 1: Simply click on the schedule event option on screen.
Step 2: It is much easier to make settings for basic information as well as audience type. Make some desired changes to SNS platform. If you select the Quick type then it will directly select your webcam and you need not to make additional complicated settings whereas the custom type option provides easy set up options with OBS.
Step 3: The advance settings option works same as that of stream now features and users can adjust most of these settings as per their streaming needs.
Step 4: Users can turn monetization On or Off as per their preferences.
Step 5: As soon as you finish all above settings then simply click on the create event option.
 Forex Robotron Gold Package
Step 6: One more window will appear on your screen and here you can make adjustment for preferred bit rate. Also put your dedicated stream key with encoder.
Step 7: When all above steps are completed then you need to hit the option for save changes so that your tool can act accordingly.
Step 8: Now click on events and here you will be able to find your event. Move to live control room if you want to access complete details about this event and you can easily delete it.
Step 9: Users can set privacy terms or simple delete the event that is currently in action.
Video tutorial
Richard Bennett
Richard Bennett is a writer and a lover of all things video.
Follow @Richard Bennett
Richard Bennett
Mar 27, 2024• Proven solutions
- Part1. Stream Now set up
- Part2. Set up Your Live Streaming Encoder
- Part3. Youtube Events set up
- Part4. Video tutorial
1. Stream Now set up
Follow these steps to live stream your impressive videos to YouTube using Stream Now tool:
Step 1: First of all you need to login with your account and then move to Creator Studio option directly.
Step 2: Choose the Video Manager option from top most toolbar.
Step 3: From the drop down menu, simply select Live Streaming option to begin with.
Step 4: Now hot the steam now option on your screen.
Step 5: Change or Upload your thumbnail as per need.
Step 6: It is time to provide an eye catching title to your video, add description and finally choose category from the drop down menu.
Step 7: While using stream option, never forget to click on ‘make archive unlisted when complete’ option so that you can save as well as watch your content on YouTube at later stage.
 EmEditor Professional (Lifetime License, non-store app)
Step 8: You can monetize your ads as per need.
Step 9: It also provides options to add cards.
 Power Tools add-on for Google Sheets, Lifetime subscription
Step 10: Now move to encoder setup and then simply copy and paste these details to your streaming software.
Step 11: Now you can set your live chat option as per your requirement.

Step 12: The analysis window will help you to know about how many viewers are connected to your video as well as the message updates will be reflected.
Step 13: Stream health can be monitored directly.
Step 14: One can also use the social media button for live shares.
Parental Control Software
## 2.Set up Your Live Streaming EncoderAs soon as you have completed the above set up then next task is to adjust settings of your streaming encoder. It is possible to make easy selection out of wide range of live streaming encoders. The details below are provided with reference to OBS too that is open source type free to access software.
Step 1: First of all you need to visit official website of OBS and get your software tool installed on your system.
Step 2: Now launch OBS on your device and directly go to settings option.
 ZoneAlarm Pro Antivirus + Firewall NextGen
Step 3: It is time to copy the stream key from YouTube and then paste it directly in the specified field of OBS.
Step 4: Users can now add their sources and scenes.
Step 5: Once all these settings are done then you can simply hit the option for start streaming and it will bring your content to YouTube directly.
3. Youtube Events set up
Live stream is little different from Stream Now platform as it allows users to schedule the streams as well as a connectivity to Google Hangouts is provided. These easy to follow steps will assist you to handle all settings for your events using Live Stream tool:
Step 1: Simply click on the schedule event option on screen.
Step 2: It is much easier to make settings for basic information as well as audience type. Make some desired changes to SNS platform. If you select the Quick type then it will directly select your webcam and you need not to make additional complicated settings whereas the custom type option provides easy set up options with OBS.
Step 3: The advance settings option works same as that of stream now features and users can adjust most of these settings as per their streaming needs.

Step 4: Users can turn monetization On or Off as per their preferences.
Step 5: As soon as you finish all above settings then simply click on the create event option.

Step 6: One more window will appear on your screen and here you can make adjustment for preferred bit rate. Also put your dedicated stream key with encoder.
Step 7: When all above steps are completed then you need to hit the option for save changes so that your tool can act accordingly.
Step 8: Now click on events and here you will be able to find your event. Move to live control room if you want to access complete details about this event and you can easily delete it.
Step 9: Users can set privacy terms or simple delete the event that is currently in action.
Video tutorial
Richard Bennett
Richard Bennett is a writer and a lover of all things video.
Follow @Richard Bennett
Richard Bennett
Mar 27, 2024• Proven solutions
- Part1. Stream Now set up
- Part2. Set up Your Live Streaming Encoder
- Part3. Youtube Events set up
- Part4. Video tutorial
 The Tube Sites Submitter is a fast and efficient tool for anyone who needs to upload videos quickly, easily and automatically to hundreds of tube sites in mere minutes .
 1. Stream Now set up
Follow these steps to live stream your impressive videos to YouTube using Stream Now tool:
Step 1: First of all you need to login with your account and then move to Creator Studio option directly.
Step 2: Choose the Video Manager option from top most toolbar.
Step 3: From the drop down menu, simply select Live Streaming option to begin with.
Step 4: Now hot the steam now option on your screen.
Step 5: Change or Upload your thumbnail as per need.
Step 6: It is time to provide an eye catching title to your video, add description and finally choose category from the drop down menu.
Step 7: While using stream option, never forget to click on ‘make archive unlisted when complete’ option so that you can save as well as watch your content on YouTube at later stage.

Key features:
• Import from any devices and cams, including GoPro and drones. All formats supported. Сurrently the only free video editor that allows users to export in a new H265/HEVC codec, something essential for those working with 4K and HD.
• Everything for hassle-free basic editing: cut, crop and merge files, add titles and favorite music
• Visual effects, advanced color correction and trendy Instagram-like filters
• All multimedia processing done from one app: video editing capabilities reinforced by a video converter, a screen capture, a video capture, a disc burner and a YouTube uploader
• Non-linear editing: edit several files with simultaneously
• Easy export to social networks: special profiles for YouTube, Facebook, Vimeo, Twitter and Instagram
• High quality export – no conversion quality loss, double export speed even of HD files due to hardware acceleration
• Stabilization tool will turn shaky or jittery footage into a more stable video automatically.
• Essential toolset for professional video editing: blending modes, Mask tool, advanced multiple-color Chroma Key
Step 8: You can monetize your ads as per need.
Step 9: It also provides options to add cards.
Step 10: Now move to encoder setup and then simply copy and paste these details to your streaming software.
Step 11: Now you can set your live chat option as per your requirement.

Step 12: The analysis window will help you to know about how many viewers are connected to your video as well as the message updates will be reflected.
Step 13: Stream health can be monitored directly.
Step 14: One can also use the social media button for live shares.
2.Set up Your Live Streaming Encoder
As soon as you have completed the above set up then next task is to adjust settings of your streaming encoder. It is possible to make easy selection out of wide range of live streaming encoders. The details below are provided with reference to OBS too that is open source type free to access software.
Step 1: First of all you need to visit official website of OBS and get your software tool installed on your system.
Step 2: Now launch OBS on your device and directly go to settings option.
Step 3: It is time to copy the stream key from YouTube and then paste it directly in the specified field of OBS.

WPS Office Premium ( File Recovery, Photo Scanning, Convert PDF)–Yearly
Step 4: Users can now add their sources and scenes.
Step 5: Once all these settings are done then you can simply hit the option for start streaming and it will bring your content to YouTube directly.
3. Youtube Events set up
Live stream is little different from Stream Now platform as it allows users to schedule the streams as well as a connectivity to Google Hangouts is provided. These easy to follow steps will assist you to handle all settings for your events using Live Stream tool:
Step 1: Simply click on the schedule event option on screen.

WPS Office Premium ( File Recovery, Photo Scanning, Convert PDF)–Yearly
Step 2: It is much easier to make settings for basic information as well as audience type. Make some desired changes to SNS platform. If you select the Quick type then it will directly select your webcam and you need not to make additional complicated settings whereas the custom type option provides easy set up options with OBS.
Step 3: The advance settings option works same as that of stream now features and users can adjust most of these settings as per their streaming needs.
Step 4: Users can turn monetization On or Off as per their preferences.
Step 5: As soon as you finish all above settings then simply click on the create event option.

Step 6: One more window will appear on your screen and here you can make adjustment for preferred bit rate. Also put your dedicated stream key with encoder.

Step 7: When all above steps are completed then you need to hit the option for save changes so that your tool can act accordingly.
Step 8: Now click on events and here you will be able to find your event. Move to live control room if you want to access complete details about this event and you can easily delete it.
Step 9: Users can set privacy terms or simple delete the event that is currently in action.
Video tutorial
Richard Bennett
Richard Bennett is a writer and a lover of all things video.
Follow @Richard Bennett
- Title: 2024 Approved Enhancing YouTube Music Soundscape
- Author: Steven
- Created at : 2024-07-22 20:27:46
- Updated at : 2024-07-23 20:27:46
- Link: https://youtube-clips.techidaily.com/2024-approved-enhancing-youtube-music-soundscape/
- License: This work is licensed under CC BY-NC-SA 4.0.