
"2024 Approved Elevate Your Recordings Doing Without a Microphone"
Elevate Your Recordings: Doing Without a Microphone
How to Record Good Audio Without a Microphone?

Richard Bennett
Oct 26, 2023• Proven solutions
Audio quality is more important than video quality on YouTube. You’ve probably heard that before – viewers might forgive sub-par video quality if they’re interested in what you’re saying, but if it’s hard to understand what you’re saying they’ll click away.
Getting an external mic (even a $10 one-off Amazon ) is one of the best ways to improve your videos. That said, maybe your budget is $0. Or, maybe you just don’t happen to have a mic now and don’t want to wait to make videos. It could even be that you just don’t want to bother with an external mic.
Luckily, there are a lot of easy, free, things you can do to protect the quality of your audio recording even if you’re not using an external mic. Here are a few tips:
- 1. Keep Your Camera Close
- 2. Shoot Somewhere Quiet
- 3. Pick a Good Room
- 4. Protect your Built-In Mic from Wind
- 5. Use a Free Audio App
- 6. Do a Sound Check
 KoolReport Pro is an advanced solution for creating data reports and dashboards in PHP. Equipped with all extended packages , KoolReport Pro is able to connect to various datasources, perform advanced data analysis, construct stunning charts and graphs and export your beautiful work to PDF, Excel, JPG or other formats. Plus, it includes powerful built-in reports such as pivot report and drill-down report which will save your time in building ones.
 It will help you to write dynamic data reports easily, to construct intuitive dashboards or to build a whole business intelligence cockpit.
KoolReport Pro package goes with Full Source Code, Royal Free, ONE (1) Year Priority Support, ONE (1) Year Free Upgrade and 30-Days Money Back Guarantee.
Developer License allows Single Developer to create Unlimited Reports, deploy on Unlimited Servers and able deliver the work to Unlimited Clients.
1. Keep Your Camera Close (like, really close)
The biggest problem with the mic built into any camera or phone is just that, since it’s with the camera, it’s usually too far away from you. Built-in mics can record decent audio up close, but usually, your camera will be set up farther away from you than an external mic would be.
For example, your camera’s mic might be just as good as a clip-on LAV, but that LAV is right by your mouth and the camera is a couple of big steps away.
Moving your camera/smartphone physically closer to you will make it hard to include anything besides your head and shoulders in your shot, but it will get you significantly better audio.
2.Shoot Somewhere Quiet
The best way to limit the amount of background noise you pick up in your sound recording is to shoot somewhere where there’s no background noise. That probably seems really basic, but it’s something a lot of people just don’t do. It’s easy to default to recording in your home office, even though it’s right next to the kitchen where your family is bustling around, or in your bedroom even though there’s a busy street right outside your window.
Sometimes the best thing you can do for your audio is simply to scout out a quiet room in your house where the sound recording conditions are better. Speaking of recording conditions…
3. Pick a Good Room
There’s more that goes into picking a good room than how quiet it is. If you try to record in a room that’s too big your voice might sound to distant, and if you try to record in a room that’s too small your audio will be too echo-y. You need a room that’s just right.
You should also pay attention to what’s in the room you’re recording in. Avoid hard, reflective, surfaces like appliances and mirrors which your voice will bounce off of. The same conditions that make you sound great when you sing in the shower will – like recording in a small space -make your voiceover unpleasantly echo-y.
Look for a room that has a lot of soft things in it, like beds and sofas.
4. Protect your Built-In Mic from Wind
If you shoot outside, then the wind passing over your built-in mic will do terrible things to your audio. You can do a lot to counter-act this problem by physically blocking the wind.
There are a few ways to do this. If you’re doing hand-held shots you can partially cover your camera or phone’s mic with your finger. You don’t want to completely cover it/press down or your audio will be muffled. What you’re trying to do is create a barrier blocking out the wind.
On movie sets, they block out wind by covering the microphones with big fuzzy things called ‘dead cats’. You can also block out wind noise by attaching something fuzzy to your microphone. If your camera’s built-in mic is on front of it then you just need something big and fluffy you can loop around the lens. You can use a piece of a boa, a fuzzy novelty scrunchie – you can even murder a fuzzy stuffed animal! Do you have an old coat with a fuzz around the hood? That fuzz would do nicely.
The pompom used in this video cost $2, but you might already have something that would work!
If your built-in mic is on top of your camera you can get something called a ‘micromuff’. A micromuff is essentially a circular or rectangular piece of velcro with long strands of fluff on top. It’s open in the middle so it doesn’t actually cover your mic, but the surrounding fuzz blocks out the wind.

You use the adhesive backing to attach the base velcro to your camera. The other side of the velcro has your fluff attached to the back.
The only thing about a micromuff is that it costs about $30, and if you’re going to spend $30 on audio equipment then you could just buy yourself an inexpensive LAV mic. I only bring up the micromuff because it’s a very simple design you can probably DIY – you just need velcro with adhesive backing and any of the fluff-sources we just discussed.
5. Use a Free Audio App
If you’re recording on a smartphone, you can download a free app that will let you make adjustments to your audio as you record it. With the right app, you can adjust your gain (volume is how you control ‘output’ audio, and gain is for ‘input’ audio. By turning up your gain, you can make your mic more sensitive), tempo, and more. A lot of the time, your audio recording app will also let you edit your audio afterward.
Even if you’re not recording video from your smartphone, it might be a good idea to use your phone as your mic and record a separate audio file. You’ll be able to use an app to fine-tune your recording, and you can set your phone up closer to you the way you would an external mic while keeping your camera back a bit farther.
Free audio apps: Hi-Q MP3 Voice Recorder (Android), RecForge II (Android), Smart Voice Recorder (Android), Audio Memos (iOS), and Recorder Plus (iOS).
6. Do a Sound Check
Once you think you’ve got good audio set up – test it! You don’t want to do a whole video and find out when you play it back that your audio doesn’t sound good.
Do you have any of your own audio tips to pass on? Leave them in the comments!
This topic was suggested by RS Beauty over in the forums. Thanks for the idea!

Polish Your YouTube Videos with Filmora
As one of the most widely used video editing software in YouTube video editing, Filmora allows you to record voiceover and edit the recorded audio with mixer, equalizer and provides lots of templates and effects with an intuitive interface, which saves much time. Download the free trial version and get started now.


Richard Bennett
Richard Bennett is a writer and a lover of all things video.
Follow @Richard Bennett
Richard Bennett
Oct 26, 2023• Proven solutions
Audio quality is more important than video quality on YouTube. You’ve probably heard that before – viewers might forgive sub-par video quality if they’re interested in what you’re saying, but if it’s hard to understand what you’re saying they’ll click away.
Getting an external mic (even a $10 one-off Amazon ) is one of the best ways to improve your videos. That said, maybe your budget is $0. Or, maybe you just don’t happen to have a mic now and don’t want to wait to make videos. It could even be that you just don’t want to bother with an external mic.
Luckily, there are a lot of easy, free, things you can do to protect the quality of your audio recording even if you’re not using an external mic. Here are a few tips:
- 1. Keep Your Camera Close
- 2. Shoot Somewhere Quiet
- 3. Pick a Good Room
- 4. Protect your Built-In Mic from Wind
- 5. Use a Free Audio App
- 6. Do a Sound Check

1. Keep Your Camera Close (like, really close)
The biggest problem with the mic built into any camera or phone is just that, since it’s with the camera, it’s usually too far away from you. Built-in mics can record decent audio up close, but usually, your camera will be set up farther away from you than an external mic would be.
For example, your camera’s mic might be just as good as a clip-on LAV, but that LAV is right by your mouth and the camera is a couple of big steps away.
Moving your camera/smartphone physically closer to you will make it hard to include anything besides your head and shoulders in your shot, but it will get you significantly better audio.
2.Shoot Somewhere Quiet
The best way to limit the amount of background noise you pick up in your sound recording is to shoot somewhere where there’s no background noise. That probably seems really basic, but it’s something a lot of people just don’t do. It’s easy to default to recording in your home office, even though it’s right next to the kitchen where your family is bustling around, or in your bedroom even though there’s a busy street right outside your window.
Sometimes the best thing you can do for your audio is simply to scout out a quiet room in your house where the sound recording conditions are better. Speaking of recording conditions…
 Simple and intuitive video editing
3. Pick a Good Room
There’s more that goes into picking a good room than how quiet it is. If you try to record in a room that’s too big your voice might sound to distant, and if you try to record in a room that’s too small your audio will be too echo-y. You need a room that’s just right.
You should also pay attention to what’s in the room you’re recording in. Avoid hard, reflective, surfaces like appliances and mirrors which your voice will bounce off of. The same conditions that make you sound great when you sing in the shower will – like recording in a small space -make your voiceover unpleasantly echo-y.
Look for a room that has a lot of soft things in it, like beds and sofas.
4. Protect your Built-In Mic from Wind
If you shoot outside, then the wind passing over your built-in mic will do terrible things to your audio. You can do a lot to counter-act this problem by physically blocking the wind.
There are a few ways to do this. If you’re doing hand-held shots you can partially cover your camera or phone’s mic with your finger. You don’t want to completely cover it/press down or your audio will be muffled. What you’re trying to do is create a barrier blocking out the wind.
On movie sets, they block out wind by covering the microphones with big fuzzy things called ‘dead cats’. You can also block out wind noise by attaching something fuzzy to your microphone. If your camera’s built-in mic is on front of it then you just need something big and fluffy you can loop around the lens. You can use a piece of a boa, a fuzzy novelty scrunchie – you can even murder a fuzzy stuffed animal! Do you have an old coat with a fuzz around the hood? That fuzz would do nicely.
The pompom used in this video cost $2, but you might already have something that would work!
If your built-in mic is on top of your camera you can get something called a ‘micromuff’. A micromuff is essentially a circular or rectangular piece of velcro with long strands of fluff on top. It’s open in the middle so it doesn’t actually cover your mic, but the surrounding fuzz blocks out the wind.
You use the adhesive backing to attach the base velcro to your camera. The other side of the velcro has your fluff attached to the back.
The only thing about a micromuff is that it costs about $30, and if you’re going to spend $30 on audio equipment then you could just buy yourself an inexpensive LAV mic. I only bring up the micromuff because it’s a very simple design you can probably DIY – you just need velcro with adhesive backing and any of the fluff-sources we just discussed.
5. Use a Free Audio App
If you’re recording on a smartphone, you can download a free app that will let you make adjustments to your audio as you record it. With the right app, you can adjust your gain (volume is how you control ‘output’ audio, and gain is for ‘input’ audio. By turning up your gain, you can make your mic more sensitive), tempo, and more. A lot of the time, your audio recording app will also let you edit your audio afterward.
Even if you’re not recording video from your smartphone, it might be a good idea to use your phone as your mic and record a separate audio file. You’ll be able to use an app to fine-tune your recording, and you can set your phone up closer to you the way you would an external mic while keeping your camera back a bit farther.
Free audio apps: Hi-Q MP3 Voice Recorder (Android), RecForge II (Android), Smart Voice Recorder (Android), Audio Memos (iOS), and Recorder Plus (iOS).
 Glary Utilities PRO - Premium all-in-one utility to clean, speed up, maintain and protect your PC
6. Do a Sound Check
Once you think you’ve got good audio set up – test it! You don’t want to do a whole video and find out when you play it back that your audio doesn’t sound good.
Do you have any of your own audio tips to pass on? Leave them in the comments!
This topic was suggested by RS Beauty over in the forums. Thanks for the idea!

Polish Your YouTube Videos with Filmora
As one of the most widely used video editing software in YouTube video editing, Filmora allows you to record voiceover and edit the recorded audio with mixer, equalizer and provides lots of templates and effects with an intuitive interface, which saves much time. Download the free trial version and get started now.

Richard Bennett
Richard Bennett is a writer and a lover of all things video.
Follow @Richard Bennett
Richard Bennett
Oct 26, 2023• Proven solutions
Audio quality is more important than video quality on YouTube. You’ve probably heard that before – viewers might forgive sub-par video quality if they’re interested in what you’re saying, but if it’s hard to understand what you’re saying they’ll click away.
Getting an external mic (even a $10 one-off Amazon ) is one of the best ways to improve your videos. That said, maybe your budget is $0. Or, maybe you just don’t happen to have a mic now and don’t want to wait to make videos. It could even be that you just don’t want to bother with an external mic.
Luckily, there are a lot of easy, free, things you can do to protect the quality of your audio recording even if you’re not using an external mic. Here are a few tips:
- 1. Keep Your Camera Close
- 2. Shoot Somewhere Quiet
- 3. Pick a Good Room
- 4. Protect your Built-In Mic from Wind
- 5. Use a Free Audio App
- 6. Do a Sound Check

1. Keep Your Camera Close (like, really close)
The biggest problem with the mic built into any camera or phone is just that, since it’s with the camera, it’s usually too far away from you. Built-in mics can record decent audio up close, but usually, your camera will be set up farther away from you than an external mic would be.
For example, your camera’s mic might be just as good as a clip-on LAV, but that LAV is right by your mouth and the camera is a couple of big steps away.
Moving your camera/smartphone physically closer to you will make it hard to include anything besides your head and shoulders in your shot, but it will get you significantly better audio.
## 2.Shoot Somewhere QuietThe best way to limit the amount of background noise you pick up in your sound recording is to shoot somewhere where there’s no background noise. That probably seems really basic, but it’s something a lot of people just don’t do. It’s easy to default to recording in your home office, even though it’s right next to the kitchen where your family is bustling around, or in your bedroom even though there’s a busy street right outside your window.
Sometimes the best thing you can do for your audio is simply to scout out a quiet room in your house where the sound recording conditions are better. Speaking of recording conditions…
3. Pick a Good Room
There’s more that goes into picking a good room than how quiet it is. If you try to record in a room that’s too big your voice might sound to distant, and if you try to record in a room that’s too small your audio will be too echo-y. You need a room that’s just right.
You should also pay attention to what’s in the room you’re recording in. Avoid hard, reflective, surfaces like appliances and mirrors which your voice will bounce off of. The same conditions that make you sound great when you sing in the shower will – like recording in a small space -make your voiceover unpleasantly echo-y.
Look for a room that has a lot of soft things in it, like beds and sofas.
4. Protect your Built-In Mic from Wind
If you shoot outside, then the wind passing over your built-in mic will do terrible things to your audio. You can do a lot to counter-act this problem by physically blocking the wind.
There are a few ways to do this. If you’re doing hand-held shots you can partially cover your camera or phone’s mic with your finger. You don’t want to completely cover it/press down or your audio will be muffled. What you’re trying to do is create a barrier blocking out the wind.
On movie sets, they block out wind by covering the microphones with big fuzzy things called ‘dead cats’. You can also block out wind noise by attaching something fuzzy to your microphone. If your camera’s built-in mic is on front of it then you just need something big and fluffy you can loop around the lens. You can use a piece of a boa, a fuzzy novelty scrunchie – you can even murder a fuzzy stuffed animal! Do you have an old coat with a fuzz around the hood? That fuzz would do nicely.
The pompom used in this video cost $2, but you might already have something that would work!
If your built-in mic is on top of your camera you can get something called a ‘micromuff’. A micromuff is essentially a circular or rectangular piece of velcro with long strands of fluff on top. It’s open in the middle so it doesn’t actually cover your mic, but the surrounding fuzz blocks out the wind.

You use the adhesive backing to attach the base velcro to your camera. The other side of the velcro has your fluff attached to the back.
The only thing about a micromuff is that it costs about $30, and if you’re going to spend $30 on audio equipment then you could just buy yourself an inexpensive LAV mic. I only bring up the micromuff because it’s a very simple design you can probably DIY – you just need velcro with adhesive backing and any of the fluff-sources we just discussed.
5. Use a Free Audio App
If you’re recording on a smartphone, you can download a free app that will let you make adjustments to your audio as you record it. With the right app, you can adjust your gain (volume is how you control ‘output’ audio, and gain is for ‘input’ audio. By turning up your gain, you can make your mic more sensitive), tempo, and more. A lot of the time, your audio recording app will also let you edit your audio afterward.
Even if you’re not recording video from your smartphone, it might be a good idea to use your phone as your mic and record a separate audio file. You’ll be able to use an app to fine-tune your recording, and you can set your phone up closer to you the way you would an external mic while keeping your camera back a bit farther.
Free audio apps: Hi-Q MP3 Voice Recorder (Android), RecForge II (Android), Smart Voice Recorder (Android), Audio Memos (iOS), and Recorder Plus (iOS).
6. Do a Sound Check
Once you think you’ve got good audio set up – test it! You don’t want to do a whole video and find out when you play it back that your audio doesn’t sound good.
Do you have any of your own audio tips to pass on? Leave them in the comments!
This topic was suggested by RS Beauty over in the forums. Thanks for the idea!
Polish Your YouTube Videos with Filmora
As one of the most widely used video editing software in YouTube video editing, Filmora allows you to record voiceover and edit the recorded audio with mixer, equalizer and provides lots of templates and effects with an intuitive interface, which saves much time. Download the free trial version and get started now.
Richard Bennett
Richard Bennett is a writer and a lover of all things video.
Follow @Richard Bennett
Richard Bennett
Oct 26, 2023• Proven solutions
Audio quality is more important than video quality on YouTube. You’ve probably heard that before – viewers might forgive sub-par video quality if they’re interested in what you’re saying, but if it’s hard to understand what you’re saying they’ll click away.
Getting an external mic (even a $10 one-off Amazon ) is one of the best ways to improve your videos. That said, maybe your budget is $0. Or, maybe you just don’t happen to have a mic now and don’t want to wait to make videos. It could even be that you just don’t want to bother with an external mic.
Luckily, there are a lot of easy, free, things you can do to protect the quality of your audio recording even if you’re not using an external mic. Here are a few tips:
- 1. Keep Your Camera Close
- 2. Shoot Somewhere Quiet
- 3. Pick a Good Room
- 4. Protect your Built-In Mic from Wind
- 5. Use a Free Audio App
- 6. Do a Sound Check
1. Keep Your Camera Close (like, really close)
The biggest problem with the mic built into any camera or phone is just that, since it’s with the camera, it’s usually too far away from you. Built-in mics can record decent audio up close, but usually, your camera will be set up farther away from you than an external mic would be.
For example, your camera’s mic might be just as good as a clip-on LAV, but that LAV is right by your mouth and the camera is a couple of big steps away.
Moving your camera/smartphone physically closer to you will make it hard to include anything besides your head and shoulders in your shot, but it will get you significantly better audio.
2.Shoot Somewhere Quiet
The best way to limit the amount of background noise you pick up in your sound recording is to shoot somewhere where there’s no background noise. That probably seems really basic, but it’s something a lot of people just don’t do. It’s easy to default to recording in your home office, even though it’s right next to the kitchen where your family is bustling around, or in your bedroom even though there’s a busy street right outside your window.
Sometimes the best thing you can do for your audio is simply to scout out a quiet room in your house where the sound recording conditions are better. Speaking of recording conditions…
3. Pick a Good Room
There’s more that goes into picking a good room than how quiet it is. If you try to record in a room that’s too big your voice might sound to distant, and if you try to record in a room that’s too small your audio will be too echo-y. You need a room that’s just right.
You should also pay attention to what’s in the room you’re recording in. Avoid hard, reflective, surfaces like appliances and mirrors which your voice will bounce off of. The same conditions that make you sound great when you sing in the shower will – like recording in a small space -make your voiceover unpleasantly echo-y.
Look for a room that has a lot of soft things in it, like beds and sofas.
4. Protect your Built-In Mic from Wind
If you shoot outside, then the wind passing over your built-in mic will do terrible things to your audio. You can do a lot to counter-act this problem by physically blocking the wind.
There are a few ways to do this. If you’re doing hand-held shots you can partially cover your camera or phone’s mic with your finger. You don’t want to completely cover it/press down or your audio will be muffled. What you’re trying to do is create a barrier blocking out the wind.
On movie sets, they block out wind by covering the microphones with big fuzzy things called ‘dead cats’. You can also block out wind noise by attaching something fuzzy to your microphone. If your camera’s built-in mic is on front of it then you just need something big and fluffy you can loop around the lens. You can use a piece of a boa, a fuzzy novelty scrunchie – you can even murder a fuzzy stuffed animal! Do you have an old coat with a fuzz around the hood? That fuzz would do nicely.
The pompom used in this video cost $2, but you might already have something that would work!
If your built-in mic is on top of your camera you can get something called a ‘micromuff’. A micromuff is essentially a circular or rectangular piece of velcro with long strands of fluff on top. It’s open in the middle so it doesn’t actually cover your mic, but the surrounding fuzz blocks out the wind.

You use the adhesive backing to attach the base velcro to your camera. The other side of the velcro has your fluff attached to the back.
The only thing about a micromuff is that it costs about $30, and if you’re going to spend $30 on audio equipment then you could just buy yourself an inexpensive LAV mic. I only bring up the micromuff because it’s a very simple design you can probably DIY – you just need velcro with adhesive backing and any of the fluff-sources we just discussed.
5. Use a Free Audio App
If you’re recording on a smartphone, you can download a free app that will let you make adjustments to your audio as you record it. With the right app, you can adjust your gain (volume is how you control ‘output’ audio, and gain is for ‘input’ audio. By turning up your gain, you can make your mic more sensitive), tempo, and more. A lot of the time, your audio recording app will also let you edit your audio afterward.
Even if you’re not recording video from your smartphone, it might be a good idea to use your phone as your mic and record a separate audio file. You’ll be able to use an app to fine-tune your recording, and you can set your phone up closer to you the way you would an external mic while keeping your camera back a bit farther.
Free audio apps: Hi-Q MP3 Voice Recorder (Android), RecForge II (Android), Smart Voice Recorder (Android), Audio Memos (iOS), and Recorder Plus (iOS).
6. Do a Sound Check
Once you think you’ve got good audio set up – test it! You don’t want to do a whole video and find out when you play it back that your audio doesn’t sound good.
Do you have any of your own audio tips to pass on? Leave them in the comments!
This topic was suggested by RS Beauty over in the forums. Thanks for the idea!
Polish Your YouTube Videos with Filmora
As one of the most widely used video editing software in YouTube video editing, Filmora allows you to record voiceover and edit the recorded audio with mixer, equalizer and provides lots of templates and effects with an intuitive interface, which saves much time. Download the free trial version and get started now.
Richard Bennett
Richard Bennett is a writer and a lover of all things video.
Follow @Richard Bennett
 vMix Basic HD - Software based live production. vMix Basic HD includes 4 inputs, 3 cameras, streaming, recording, playlist.
Crafting the Ideal YouTube Playlist: An Easy, Step-by-Step Method
The YouTube Watch Later playlist is a great way to save videos and view them later. But if you don’t keep on top of it, your Watch Later list can quickly become unmanageable and cluttered with content that you no longer want to watch afterward.
If you are wondering how, you can declutter the playlist, we’ve got you covered. To help you with the task, we’ve compiled a comprehensive step-by-step guide. In this article, we will show you how to clear Watch Later on YouTube with just a few clicks.
So, without beating around the bush, let’s get started with our tutorial!
How To Delete YouTube Watch Later Playlist
If your YouTube Watch Later playlist is filled with videos you’ll never watch again, or you are not interested in that specific content type, you can quickly delete these videos at any time.
Here’s the step-by-step process on how to clear Watch Later on YouTube Web and App:
How To Delete YouTube Watch Later Playlist On Web?
You can delete the YouTube Watch Later Playlist on your desktop in the following ways:
From YouTube Homepage
To clear the YouTube Watch Later Playlist from the YouTube Homepage, do the following steps:
Step1 First, open a browser on your PC and visit the YouTube homepage. Sign into your account if needed and click the “Library” option located at the left-hand side menu panel.

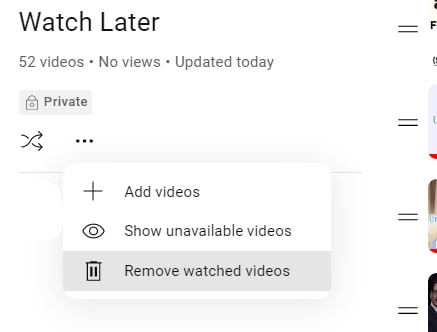
Step2 Croll down and click the “See All” option under the Watch Later header. Click the Three Dots below the Watch Later playlist details on the next page.
Step3 From the drop-down menu, click “Remove Watch Videos.” This will instantly remove all the videos you’ve watched but are still in the playlist.
Step4 Finally, to remove the unwatched videos, hover over a video and click the Three Dots. Select the “Remove from Watch Later” option to delete the video. You can repeat this process to remove all the content from the playlist until it is decluttered at the point of your satisfaction.

Using A Script
Since the above process can be tiring, you can use a script to remove all the videos at once from the Watch Later playlist in the following way:
Step1 In the first step, launch the Google Chrome browser on your system and head to the YouTube website**.** Next, select the “Library” option in the left pane and click “Watch Later” from the menu.
Step2 Now, hit the “Ctrl + Shift + J” keys on Windows or the “Command + Option+ J” buttons on Mac to launch the developer mode and open the console window.

Step3 Copy and paste the following lines of the script at the end of the line under the Console tab where the cursor is blinking.
setInterval(function () { document.querySelector(‘#primary button[aria-label=”Action menu”]‘).click(); var things = document.evaluate( ‘//span[contains(text(),”Remove from”)]‘, document, null, XPathResult.ORDERED_NODE_SNAPSHOT_TYPE, null ); for (var i = 0; i < things.snapshotLength; i++) { things.snapshotItem(i).click(); } }, 1000);
Step4 In the last step, hit the “Enter” key to clear the Watch Later Playlist on YouTube. However, the process may take some time, depending on the number of videos in your playlist.
Although a bit tech-savvy, the script execution method is the most effective way to delete all Watch Later videos at once.
You can also replace the number at the end of the script with a lower entry to delete videos according to your preference. Also, choosing a lesser number can speed up the video deletion process from YouTube Watch Later list by a great deal.
![]()
Note: It is important to note that experimenting with scripts is only for some. The script above has been confirmed to work, but others still need to be thoroughly checked and could potentially damage your computer. To prevent this from happening, only look for scripts from reliable sources instead of those posted by random people in various forums.
How To Delete YouTube Watch Later Playlist On YouTube App?
If you are using YouTube on an Android or iOS device, it is possible to clear the Watch Later Playlist by doing the steps below:
Step1 In the first step, swipe up on the Homescreen of your Android device or swipe right on your iOS device to launch App Drawer, and tap “YouTube” to launch the app.
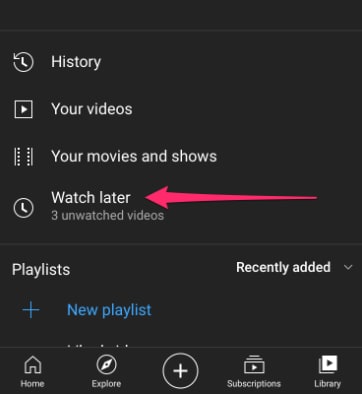
Step2 Now, tap the “Library” option in the bottom-right corner of the screen and tap “Watch Later.”

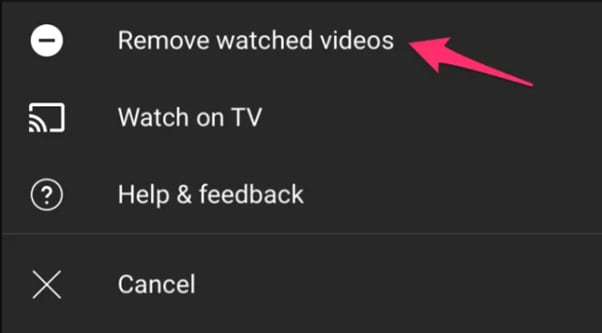
Step3 Next, tap the three dots (vertical ellipses) icon on the top-right side of the screen and choose the “Remove Watched Videos” option to delete them from the playlist.
Step4 If there are still unwatched videos in the playlist, select a video and tap the three dots next to it. Now, tap the “Remove from Watch Later” option. Repeat the process to remove all the unwatched videos to clear the playlist.
Is there an Alternative Way to Download YouTube Videos without Using Software?
Now that you’ve learned how you can clear the Watch Later playlist on YouTube, you might be looking for a way to download your favorite videos on your PC for later watch without using any software. If so,click here to find out 13 proven ways to get this done.
Free Download For Win 7 or later(64-bit)
Free Download For macOS 10.14 or later

Bonus Video Tutorial: From a User to a Creator, How To Edit YouTube Videos Like a Pro
Hopefully, you have found the most appropriate solution to clear your YouTube Watcher Later playlist. However, while you are a YouTube user, how can you transfer your character from a user to a creator? In this video era, why not participate in the creation party and be one of them?
If you have any interests, you can watch the video we specially prepared for you. This video will show you how to use a user-friendly video editor, Filmora , to create your own YouTube videos!
Conclusion
In this article, we’ve discussed how to clear your YouTube watch later playlist from both the YouTube web from the homepage and using the script in the browser’s developer mode. We’ve also provided a step-by-step process for deleting the Watch Later playlist on the YouTube mobile app.
This guide was informative enough to answer most of your queries, and after reading it, you can now unclutter your YouTube Watch Later without any issues.
How To Delete YouTube Watch Later Playlist On YouTube App?
If you are using YouTube on an Android or iOS device, it is possible to clear the Watch Later Playlist by doing the steps below:
Step1 In the first step, swipe up on the Homescreen of your Android device or swipe right on your iOS device to launch App Drawer, and tap “YouTube” to launch the app.
Step2 Now, tap the “Library” option in the bottom-right corner of the screen and tap “Watch Later.”
Step3 Next, tap the three dots (vertical ellipses) icon on the top-right side of the screen and choose the “Remove Watched Videos” option to delete them from the playlist.
Step4 If there are still unwatched videos in the playlist, select a video and tap the three dots next to it. Now, tap the “Remove from Watch Later” option. Repeat the process to remove all the unwatched videos to clear the playlist.
Is there an Alternative Way to Download YouTube Videos without Using Software?
Now that you’ve learned how you can clear the Watch Later playlist on YouTube, you might be looking for a way to download your favorite videos on your PC for later watch without using any software. If so,click here to find out 13 proven ways to get this done.
Free Download For Win 7 or later(64-bit)
Free Download For macOS 10.14 or later
Bonus Video Tutorial: From a User to a Creator, How To Edit YouTube Videos Like a Pro
Hopefully, you have found the most appropriate solution to clear your YouTube Watcher Later playlist. However, while you are a YouTube user, how can you transfer your character from a user to a creator? In this video era, why not participate in the creation party and be one of them?
If you have any interests, you can watch the video we specially prepared for you. This video will show you how to use a user-friendly video editor, Filmora , to create your own YouTube videos!

Conclusion
In this article, we’ve discussed how to clear your YouTube watch later playlist from both the YouTube web from the homepage and using the script in the browser’s developer mode. We’ve also provided a step-by-step process for deleting the Watch Later playlist on the YouTube mobile app.
This guide was informative enough to answer most of your queries, and after reading it, you can now unclutter your YouTube Watch Later without any issues.
- Title: 2024 Approved Elevate Your Recordings Doing Without a Microphone
- Author: Steven
- Created at : 2024-07-22 20:26:37
- Updated at : 2024-07-23 20:26:37
- Link: https://youtube-clips.techidaily.com/2024-approved-elevate-your-recordings-doing-without-a-microphone/
- License: This work is licensed under CC BY-NC-SA 4.0.