
:max_bytes(150000):strip_icc()/GettyImages-1394308880-ee06bc57b691475da90278d04794bfa0.jpg)
"2024 Approved Eco-Effective Marketing Green Screens & CTA Boosting"
Eco-Effective Marketing: Green Screens & CTA Boosting
Create High-Quality Video - Wondershare Filmora
An easy and powerful YouTube video editor
Numerous video and audio effects to choose from
Detailed tutorials provided by the official channel
Advances in filmmaking have brought many concepts into reality. And the green screen is one common practice. Green screen technology is a technique where you use two images or video streams to composite them together. You can use any background images, either foreground or behind the actors. For YouTube, you can use green screen subscribe to facilitate video Call To Action. A green screen easily produces impossible scenes and expands filming ideas. Everything done at the Studio is also the best way to protect actors from hazardous environments.
More so, the best trick is to allow actors to appear together on the screen even when the scenes were captured separately. And did you know that subscribe green screen makes it easy to add YouTube Call To Action and direct viewers on what to do?

Methods to add a subscribe button to your video
Viewers are not likely to subscribe to any channel if they are not guided. One best method is to engage a subscribe button to your video and draw the attention of as many as possible.
1 Use Subscribe Green Screen
Put your green screen to work by subscribing to it. Follow these steps to produce eye-catching videos, with a call to action closing point.
Step 1. Set screen
You need to create a background at the Studio – and that’s the green screen. Keenly hand it on a frame before you start filming. Also, note that no wrinkles or fold-ups are visible.

Step 2. Adjust lighting
Lighting is important to facilitate high-resolution video output quality. Put appropriate lighting settings to avoid directional shadows and get the best results.
Step 3. Set up the subject
Give ample space between the subject and the green screen for an effective outcome. If they are too close, there will be a reflection of the green screen on the subject. It isn’t professional as it will be hard when it comes to matching to a different background.

Step 4. Start filming
Begin to film your video and ensure you take various shots for comparison. It is good to film at different angles to see what works best.
Step 5. Polish the rough cut
Tune all the footage to perfect video clips. It will save your efforts when keying out green screen footage. Remove the unwanted parts by trimming. You can also do other edits like merge and split where necessary.
Step 6. Key out the footage and edit the green screen
Your footage is now ready, and you are now free to edit the green screen. It is better to engage reliable editing software to remove the green traces in the shot.
Step 7. Paste the new background
Any background concept can now fit in. Add your desired background video or image in a new layer below the subject. You can continue to make other necessary adjustments like sharpness and hue for reality.
Step 8. Add Call To Action
Finally, tell your viewers to subscribe to your YouTube channel while watching the video. You can also introduce your other channels that aren’t yet known or those that have not reached 1,000 subscribers.
2 Using YouTube Studio
You can also enable the green screen to subscribe via the YouTube Studio. It is a YouTube application that provides you with the tools you need to create a successful YouTube channel. You can manage your videos, respond to comments and even add adverts to your content for pay. Here are the steps to add subscribe button.
Step 1. First, go directly to “studio.youtube.com” or click on your profile picture on the YouTube page to launch YT Studio.

Step 2. Click on the “Menu” option and choose the “Settings”> “Channel” option.

Step 3. Then select the “Choose” image and select which subscribe button image you wish to use as your branding watermark. You can easily get one on the Google images section.
Step 4. Next, choose the display time for the branding watermark. It could be a custom start time if you want the branding watermark to start showing at a specific time. You can also choose “End or video” for it to appear at the last 10 to 15 seconds of your video. Likewise, the branding watermark can show throughout the video if you choose the “Entire video” option.
Step 5. Finally, save the changes. Voila! Viewers can subscribe to your channel easily, with a single click of a button.
3 Using Subscribe Effects
You can also use the subscribers’ effects to add a Call To Action. Remember, your main aim is to increase the audience to your channel. And in most cases, viewers forget to subscribe even though they love your video. Perhaps they don’t understand the importance it holds to your channel. You can do this using a reliable video editor software – Filmora.
Filmora is a sophisticated tool that is easy to use and export your videos to your computer and upload them to YouTube. It has over 300 effects for YouTubers and comprises exclusive overlays for any scene. Follow these steps to add the subscribe button with subscribe effects.
Key Features of Filmora
- Edit and export your videos at up to 4K resolution
- Supports GIF animation, which you can use for CTA
- It has an advanced text editor
- Easily remove background noise for a polished video sound
- It has an audio equalizer functionality for audio uniformity
- It has the video stabilization functionality
For Win 7 or later (64-bit)
For macOS 10.12 or later
Step 1. Launch Filmora
Open Filmora on your computer, then navigate to the upper left corner of the screen. Click on the “Sample Colors” and select the “Green color.” Next, drag it to video track into the timeline. Then adjust the duration of your video track to your preference.

Step 2. Design the subscribe GIF animation
Use a different color shade to design the subscribe GIF animation. Take “Red” in this case as it smartly blends with the green color that we choose earlier. Drag the red color above the green background.

Step 3. Adjust the red box
Make the added color red button look like a subscribe button. Then place it at any point you want it to appear in front of the background.
Step 4. Add the subscribe text
Write a text into the button. Filmora offers you various styles of text to choose from. You can select the text style you want to use, then drag and drop it into the timeline.

Step 5. Edit title with “Subscribe”
Edit your text with the word “Subscribe,” then place it under the red rectangle and hit the “OK” button.
Step 6. Animate the “Subscribe” button
Double click on the “Red” button. Just go to the “Animate” tab and click on the “Customize” option. Next, click on the “Add” button.

Step 7. Animate text as well
Go to the “Text” option in the timeline and click on “Advanced” text editor. Then go to the “Animation” tab and select the animation you wish to use. Here, you can adjust your text’s start and ending time when you want it to start fading.
Step 8. Export GIF
Your Subscribe GIF is now ready to be exported to your video. Hit the “Export” button and select which format to export it in.

Extra Tip: Ways to Include Calls to Action on videos
Know how to include CTA in your video marketing strategy to boost your subscribers.
- Include Annotations
Annotations are eye-catching and a quick reminder for viewers. You have a variety to choose from, like bubbles, shoutouts, etc. They are used to remind you to subscribe to the channel, view another video, or comment after watching it. - Edit CTAs in your video
It lets the viewer know what to do next before the video ends. The likely reminder is to subscribe to the channel. They could also be reminded to watch the next video or leave a comment. - YouTube Ad Overlays also work
However, ad overlay is for content creators with Google AdWords enabled on their YT channel. Adding an Ad Overlay will link you to any part of the web. Do you want to know the best part? No cost at all! You only need to pay for the views you buy during your video promotion.
Conclusion
● The best strategy to get viewers to subscribe to your YouTube channel is to engage a Call To Action. A bigger number of subscribers guarantees more watch time and the possible growth of your channel. Subscribe green screen even makes it perfect as far as video creation is concerned. You can get different video background ideas and make every scene look authentic. You can engage a third-party tool like Filmora. It will effortlessly add a green screen subscribe in a few steps. Likewise, you can add annotations and other text styles to enhance your look.
Advances in filmmaking have brought many concepts into reality. And the green screen is one common practice. Green screen technology is a technique where you use two images or video streams to composite them together. You can use any background images, either foreground or behind the actors. For YouTube, you can use green screen subscribe to facilitate video Call To Action. A green screen easily produces impossible scenes and expands filming ideas. Everything done at the Studio is also the best way to protect actors from hazardous environments.
More so, the best trick is to allow actors to appear together on the screen even when the scenes were captured separately. And did you know that subscribe green screen makes it easy to add YouTube Call To Action and direct viewers on what to do?
Methods to add a subscribe button to your video
Viewers are not likely to subscribe to any channel if they are not guided. One best method is to engage a subscribe button to your video and draw the attention of as many as possible.
1 Use Subscribe Green Screen
Put your green screen to work by subscribing to it. Follow these steps to produce eye-catching videos, with a call to action closing point.
Step 1. Set screen
You need to create a background at the Studio – and that’s the green screen. Keenly hand it on a frame before you start filming. Also, note that no wrinkles or fold-ups are visible.
Step 2. Adjust lighting
Lighting is important to facilitate high-resolution video output quality. Put appropriate lighting settings to avoid directional shadows and get the best results.
Step 3. Set up the subject
Give ample space between the subject and the green screen for an effective outcome. If they are too close, there will be a reflection of the green screen on the subject. It isn’t professional as it will be hard when it comes to matching to a different background.
Step 4. Start filming
Begin to film your video and ensure you take various shots for comparison. It is good to film at different angles to see what works best.
Step 5. Polish the rough cut
Tune all the footage to perfect video clips. It will save your efforts when keying out green screen footage. Remove the unwanted parts by trimming. You can also do other edits like merge and split where necessary.
Step 6. Key out the footage and edit the green screen
Your footage is now ready, and you are now free to edit the green screen. It is better to engage reliable editing software to remove the green traces in the shot.
Step 7. Paste the new background
Any background concept can now fit in. Add your desired background video or image in a new layer below the subject. You can continue to make other necessary adjustments like sharpness and hue for reality.
Step 8. Add Call To Action
Finally, tell your viewers to subscribe to your YouTube channel while watching the video. You can also introduce your other channels that aren’t yet known or those that have not reached 1,000 subscribers.
2 Using YouTube Studio
You can also enable the green screen to subscribe via the YouTube Studio. It is a YouTube application that provides you with the tools you need to create a successful YouTube channel. You can manage your videos, respond to comments and even add adverts to your content for pay. Here are the steps to add subscribe button.
Step 1. First, go directly to “studio.youtube.com” or click on your profile picture on the YouTube page to launch YT Studio.
Step 2. Click on the “Menu” option and choose the “Settings”> “Channel” option.
Step 3. Then select the “Choose” image and select which subscribe button image you wish to use as your branding watermark. You can easily get one on the Google images section.
Step 4. Next, choose the display time for the branding watermark. It could be a custom start time if you want the branding watermark to start showing at a specific time. You can also choose “End or video” for it to appear at the last 10 to 15 seconds of your video. Likewise, the branding watermark can show throughout the video if you choose the “Entire video” option.
Step 5. Finally, save the changes. Voila! Viewers can subscribe to your channel easily, with a single click of a button.
3 Using Subscribe Effects
You can also use the subscribers’ effects to add a Call To Action. Remember, your main aim is to increase the audience to your channel. And in most cases, viewers forget to subscribe even though they love your video. Perhaps they don’t understand the importance it holds to your channel. You can do this using a reliable video editor software – Filmora.
Filmora is a sophisticated tool that is easy to use and export your videos to your computer and upload them to YouTube. It has over 300 effects for YouTubers and comprises exclusive overlays for any scene. Follow these steps to add the subscribe button with subscribe effects.
Key Features of Filmora
- Edit and export your videos at up to 4K resolution
- Supports GIF animation, which you can use for CTA
- It has an advanced text editor
- Easily remove background noise for a polished video sound
- It has an audio equalizer functionality for audio uniformity
- It has the video stabilization functionality
For Win 7 or later (64-bit)
For macOS 10.12 or later
Step 1. Launch Filmora
Open Filmora on your computer, then navigate to the upper left corner of the screen. Click on the “Sample Colors” and select the “Green color.” Next, drag it to video track into the timeline. Then adjust the duration of your video track to your preference.
Step 2. Design the subscribe GIF animation
Use a different color shade to design the subscribe GIF animation. Take “Red” in this case as it smartly blends with the green color that we choose earlier. Drag the red color above the green background.
Step 3. Adjust the red box
Make the added color red button look like a subscribe button. Then place it at any point you want it to appear in front of the background.
Step 4. Add the subscribe text
Write a text into the button. Filmora offers you various styles of text to choose from. You can select the text style you want to use, then drag and drop it into the timeline.
Step 5. Edit title with “Subscribe”
Edit your text with the word “Subscribe,” then place it under the red rectangle and hit the “OK” button.
Step 6. Animate the “Subscribe” button
Double click on the “Red” button. Just go to the “Animate” tab and click on the “Customize” option. Next, click on the “Add” button.
Step 7. Animate text as well
Go to the “Text” option in the timeline and click on “Advanced” text editor. Then go to the “Animation” tab and select the animation you wish to use. Here, you can adjust your text’s start and ending time when you want it to start fading.
Step 8. Export GIF
Your Subscribe GIF is now ready to be exported to your video. Hit the “Export” button and select which format to export it in.
Extra Tip: Ways to Include Calls to Action on videos
Know how to include CTA in your video marketing strategy to boost your subscribers.
- Include Annotations
Annotations are eye-catching and a quick reminder for viewers. You have a variety to choose from, like bubbles, shoutouts, etc. They are used to remind you to subscribe to the channel, view another video, or comment after watching it. - Edit CTAs in your video
It lets the viewer know what to do next before the video ends. The likely reminder is to subscribe to the channel. They could also be reminded to watch the next video or leave a comment. - YouTube Ad Overlays also work
However, ad overlay is for content creators with Google AdWords enabled on their YT channel. Adding an Ad Overlay will link you to any part of the web. Do you want to know the best part? No cost at all! You only need to pay for the views you buy during your video promotion.
Conclusion
● The best strategy to get viewers to subscribe to your YouTube channel is to engage a Call To Action. A bigger number of subscribers guarantees more watch time and the possible growth of your channel. Subscribe green screen even makes it perfect as far as video creation is concerned. You can get different video background ideas and make every scene look authentic. You can engage a third-party tool like Filmora. It will effortlessly add a green screen subscribe in a few steps. Likewise, you can add annotations and other text styles to enhance your look.
YouTube’s Elite Annual Showcases (Post-VidCon)
Beyond VidCon - A Guide to the Most Important YouTube Events

Richard Bennett
Dec 30, 2022• Proven solutions
Want to meet your favorite creators? Or, do you want to become a better creator yourself? There are huge conventions you can go to where you can both indulge in fandom and work on your skills. Here are the 7 largest and most well-known:
- VidCon (US/Europe/Australia)
- PlayList Live (US)
- Beautycon (US/UK)
- YouTube Fanfest (Various international locations)
- RTX (US/UK/Australia)
- Amplify Live (Australia)
- Summer in the City (UK)
The Most Important YouTube Events
Want to be a youtube creator too? Go and get Wondershare Filmora, the video editing software for all creators.


1. VidCon
VidCon US: June (Anaheim, California)
VidCon Europe (Amsterdam): March/April
VidCon Australia: August/September
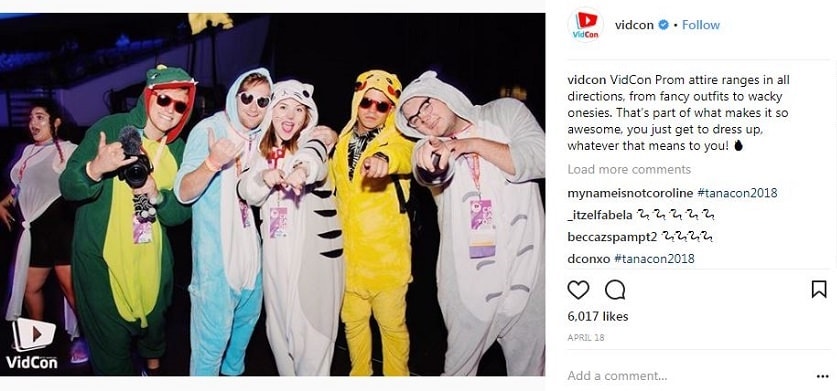
In 2017 over 30,000 YouTube enthusiasts – from fans to A-list creators – attended VidCon US, and that was thousands of more people than attended in 2016. It’s hard to imagine that this event – the biggest convention for YouTube and online video – will do anything but grow over the next few years.
VidCon was founded by the Vlogbrothers in 2010 as a place for internet friends to meet in real life.
Passes:
There are three different types of passes for VidCon – the Community Track, the Creator Track, and the Industry Track.
The Community Track is for anyone who loves YouTube and wants a chance to see their favorite creators and meet other fans. Pricing ranges from $100 to $180, depending on how early you buy your ticket.
The Creator Track gets you to access to all the same events as the Community badges (except for the Meet & Greet Lottery*), plus even more panels and workshops that will help you become a better creator. Pricing ranges from $150 to $250 depending on how early you buy your ticket.
The Industry Track is for anyone working in online video or video-adjacent industries, like advertising, branding, or talent management. There are panels on online marketing and working with influencers. Pricing ranges from $550 to $850, depending on when you buy your ticket.
*The Meet and Greet Lottery is a chance for anyone attending with a Community or Industry pass to meet their favorite creator. You rank the 15 creators you’d most like to meet according to how much you want to meet them. A computerized system will determine who gets into which Meet & Greet.
You have a two-week window (usually the first half of May) to submit your choices.
2. PlayList Live
Orlando, Florida: April/May
Tri-State (Secaucus, New Jersey): September
Washington DC: September
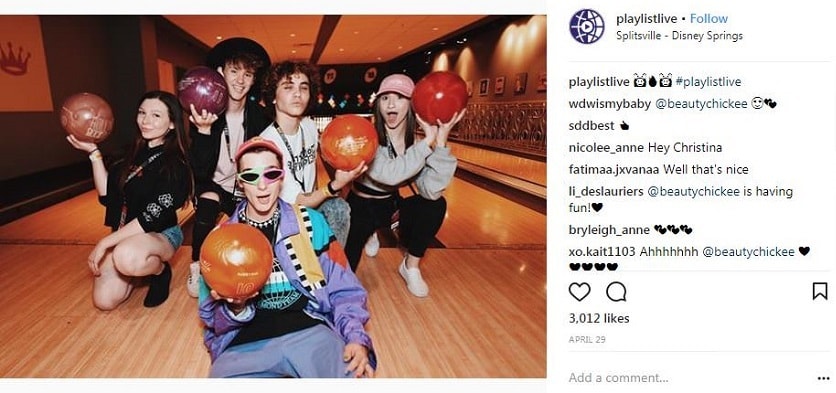
Playlist Live is a YouTube event for creators and their supporters that has a particular focus on music. Where VidCon is advertised using images of sunshine, crowded convention halls, and speakers, Playlist Live is advertised with images of city skylines, concerts, and fireworks.
Playlist Live prides itself on having ‘non-stop interactive activities.’ These include chances to meet your favorite creators on the Saturday and Sunday of the event. Which meetups you get to attend are determined by first-come-first-serve online signup.
Passes:
Pricing may vary depending on which event you are attending and how early you purchase your ticket. The following ranges are an estimate. Not all pass types are available for all events.
The Standard Pass ($75 - $130) is the basic pass for fans of the online video who want to meet their favorite creators, play games, and have a great time.
The Standard Pass + Merch ($100-$155) gets you into the same events as the standard pass plus a t-shirt and a wristband.
The Standard Deluxe ($120 - $205) comes with a hoodie, sunglasses, and a commemorative ticket.
The Parent Pass/Parent + Merch/Parent Deluxe ($75-$200) is for parents who want to chaperone their kids around Playlist Live and includes access to everything the Standard Pass can access.
The Insight Pass ($150-$205) is for anyone who wants to learn more about being a digital creator. You get Standard access as well as workshops and panels for successful creators and industry professionals designed to help you on your path.
The Insight + Merch/Insight Deluxe Passes ($175-$280) you get the same access as an Insight Pass plus goodies like shirts, wristbands, commemorative tickets, and sunglasses.
The Premium Pass ($250-$404) grants you standard access plus early access for meetup registration and a special VIP meetup.
There is also business Passes with Merch and Deluxe (Business Deluxe can cost up to $330) options for people working in marketing, publicity, production, etc. These passes include access to an extra day of business and industry-specific programming.
3. Beautycon Festivals
Los Angeles: July
New York: April
London, UK: November
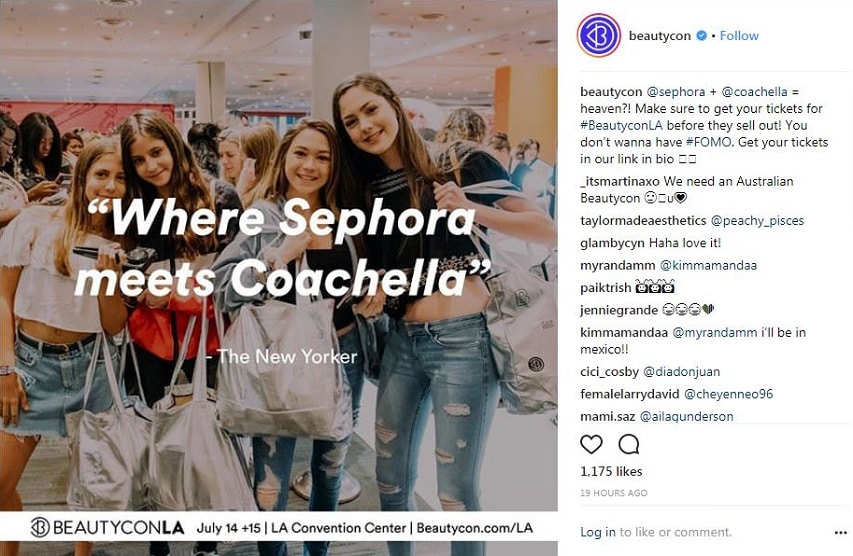
Beautycon is an event meant to highlight innovators in the fields of Beauty, Makeup, and Lifestyle. They bring together online creators, fans, celebrities, and brands for two-day festivals full of fun, panel discussions, shopping, and free samples.
In 2017, 30,000 people attended Beautycon festivals internationally.
Passes:
Two-Day General Admission ($69) gets you in for the whole weekend, and you’ll also get a fabric wristband and other goodies.
You can also get a One-Day General Admission to pass for $49.
The Two-Day Hauler pass ($199) gets you in the doors 2 hours before the General Admission passes, plus a VIP swag bag.
General Admission and Hauler passes do not include access to programmed meetups.
Two-Day All Access passes ($999) include early entry as well as reserved seating in the front row at the Min Stage, photo opportunities in the Halo Room, a tour of the Creator Gifting Suite, custom merch, credit at the Beautycon Shop online, plus everything from the General and Hauler packs.
The final type of pass, the Two-Day Beauty Insider ($1999) pass, has everything the All-Access pass has plus a 2-night stay at a hotel downtown (for the LA festival).
4. YouTube FanFest
These events are customized to the wherever festival is visiting, so you’re always sure to see the big and rising YouTube stars from your region. Generally, these events include performances and activities as well as a Meet & Greet.
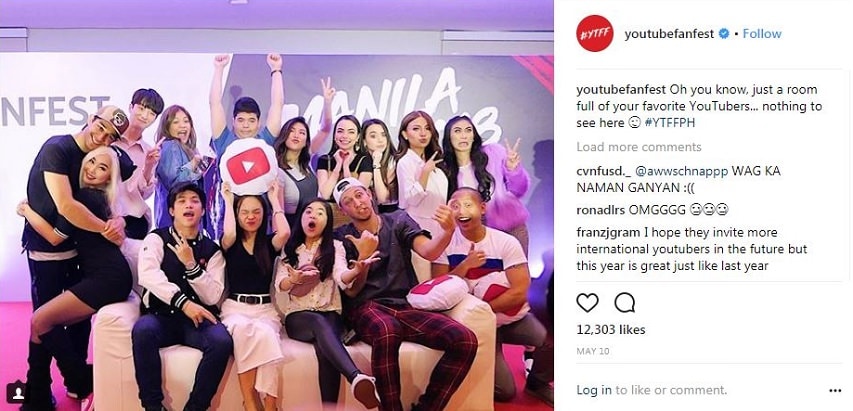
There is not a steady annual schedule for FanFests, but it has visited these cities in the past: Manila, Mumbai, Seoul, Toronto, Sao Paulo, Jakarta, Tokyo, Jeddah, Bangkok, Ho Chi Minh City, Hong Kong, and Washington, DC.
5. RTX
Austin, Texas: August
London: September
Sydney, Australia: February
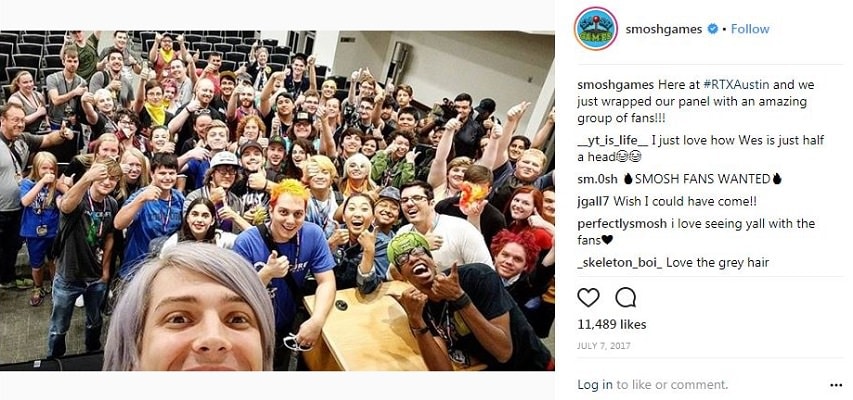
Brought to you by the creators behind Rooster Teeth, RTX is a celebration of internet culture and gaming. It includes exhibitors, live events, panels, and activities targeting gamers. Partners include Twitch and multiple gaming companies.
Passes:
It costs $50 for a Friday or Sunday pass, and $55 for just Saturday. You’ll get an attendee bag and lanyard with your pass.
The Weekend pass costs $110, and you get access to all 3 days plus the bag/lanyard and 1 autograph code.
A Weekend Plus ($335) pass gets you everything the Weekend pass gets you plus 2 autograph codes, early access to the Expo hall on Friday, lounge access, and reserved seating at the stage.
The Platinum pass is the most expensive at $729, and it includes everything the Weekend Plus pass does plus a priority line for panels, priority seating, and an exclusive party.
6. Amplify Live
Sydney, Australia: April
Melbourne, Australia: April
These events showcase the biggest social medial talent and musical acts in Australia and New Zealand. In 2017 the headliners of the Cool for Summer tour were Lindsey Stirling, Dan & Phil, and Nash Grier.
Tickets for the Cool for Summer tour cost $65 or $75 AUD depending on how early you buy them.
For VIP access, you can buy a Deluxe pass for $125-$150 AUD.
Meet and Greet tickets must be purchased separately from your event ticket.
Silver Meet and Greet, $80 AUD: access to the ‘Cool for Summer Celebrity Zone’ featuring non-headliner talent.
Gold Meet and Greet, $189 AUD: access to the ‘Cool for Summer Celebrity Zone’ plus a guaranteed meeting with one of the headliners (you choose which when you purchase).
Platinum Meet & Greet, $450 AUD: meet all the headliners and get access to an exclusive VIP area, merch pack, and special entry.
7. Summer in the City
London, UK: August
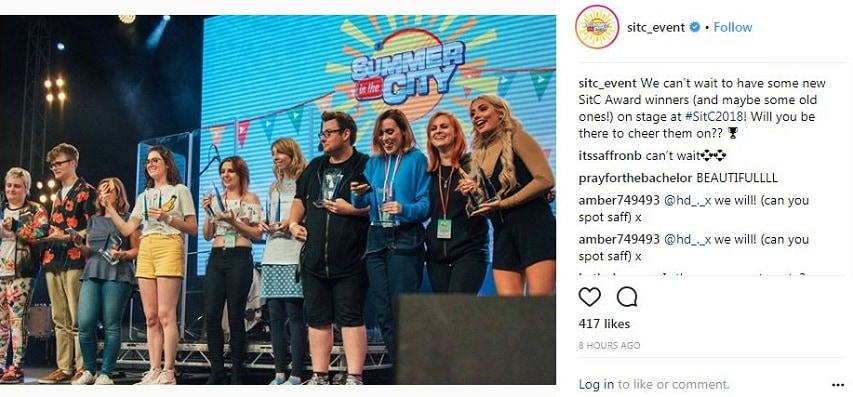
This is the largest online video festival in the UK. It features discussion panels, workshops, and live performances targeted at creators, fans of online video, and industry professionals. YouTubers might hang out on the show floor meeting fans, and there are also Meet and Greet sessions for top creators. All ticket holders can submit online ballots for a chance at Meet and Greet access.
Summer in the City even has its own awards show, SitC, to honor the best in online content. Previous winners include Dodie, Tomska, Jack & Dean, and Nathan Zed.
There is one day of Summer in the City called ‘Creator Day’ (generally on Friday), which features educational workshops for creators and industry professionals.
Passes:
If you buy your tickets during early bird pricing, the prices will look like this:
Saturday OR Sunday: £30.00
Saturday AND Sunday: £45.00
Creator Day: £30.00
Creator Day + Weekend: £60.00
Industry Ticket: £100.00
Have you ever attended an offline YouTube event? Which one, and how did you like it?
Richard Bennett
Richard Bennett is a writer and a lover of all things video.
Follow @Richard Bennett
Richard Bennett
Dec 30, 2022• Proven solutions
Want to meet your favorite creators? Or, do you want to become a better creator yourself? There are huge conventions you can go to where you can both indulge in fandom and work on your skills. Here are the 7 largest and most well-known:
- VidCon (US/Europe/Australia)
- PlayList Live (US)
- Beautycon (US/UK)
- YouTube Fanfest (Various international locations)
- RTX (US/UK/Australia)
- Amplify Live (Australia)
- Summer in the City (UK)
The Most Important YouTube Events
Want to be a youtube creator too? Go and get Wondershare Filmora, the video editing software for all creators.
1. VidCon
VidCon US: June (Anaheim, California)
VidCon Europe (Amsterdam): March/April
VidCon Australia: August/September
In 2017 over 30,000 YouTube enthusiasts – from fans to A-list creators – attended VidCon US, and that was thousands of more people than attended in 2016. It’s hard to imagine that this event – the biggest convention for YouTube and online video – will do anything but grow over the next few years.
VidCon was founded by the Vlogbrothers in 2010 as a place for internet friends to meet in real life.
Passes:
There are three different types of passes for VidCon – the Community Track, the Creator Track, and the Industry Track.
The Community Track is for anyone who loves YouTube and wants a chance to see their favorite creators and meet other fans. Pricing ranges from $100 to $180, depending on how early you buy your ticket.
The Creator Track gets you to access to all the same events as the Community badges (except for the Meet & Greet Lottery*), plus even more panels and workshops that will help you become a better creator. Pricing ranges from $150 to $250 depending on how early you buy your ticket.
The Industry Track is for anyone working in online video or video-adjacent industries, like advertising, branding, or talent management. There are panels on online marketing and working with influencers. Pricing ranges from $550 to $850, depending on when you buy your ticket.
*The Meet and Greet Lottery is a chance for anyone attending with a Community or Industry pass to meet their favorite creator. You rank the 15 creators you’d most like to meet according to how much you want to meet them. A computerized system will determine who gets into which Meet & Greet.
You have a two-week window (usually the first half of May) to submit your choices.
2. PlayList Live
Orlando, Florida: April/May
Tri-State (Secaucus, New Jersey): September
Washington DC: September
Playlist Live is a YouTube event for creators and their supporters that has a particular focus on music. Where VidCon is advertised using images of sunshine, crowded convention halls, and speakers, Playlist Live is advertised with images of city skylines, concerts, and fireworks.
Playlist Live prides itself on having ‘non-stop interactive activities.’ These include chances to meet your favorite creators on the Saturday and Sunday of the event. Which meetups you get to attend are determined by first-come-first-serve online signup.
Passes:
Pricing may vary depending on which event you are attending and how early you purchase your ticket. The following ranges are an estimate. Not all pass types are available for all events.
The Standard Pass ($75 - $130) is the basic pass for fans of the online video who want to meet their favorite creators, play games, and have a great time.
The Standard Pass + Merch ($100-$155) gets you into the same events as the standard pass plus a t-shirt and a wristband.
The Standard Deluxe ($120 - $205) comes with a hoodie, sunglasses, and a commemorative ticket.
The Parent Pass/Parent + Merch/Parent Deluxe ($75-$200) is for parents who want to chaperone their kids around Playlist Live and includes access to everything the Standard Pass can access.
The Insight Pass ($150-$205) is for anyone who wants to learn more about being a digital creator. You get Standard access as well as workshops and panels for successful creators and industry professionals designed to help you on your path.
The Insight + Merch/Insight Deluxe Passes ($175-$280) you get the same access as an Insight Pass plus goodies like shirts, wristbands, commemorative tickets, and sunglasses.
The Premium Pass ($250-$404) grants you standard access plus early access for meetup registration and a special VIP meetup.
There is also business Passes with Merch and Deluxe (Business Deluxe can cost up to $330) options for people working in marketing, publicity, production, etc. These passes include access to an extra day of business and industry-specific programming.
3. Beautycon Festivals
Los Angeles: July
New York: April
London, UK: November
Beautycon is an event meant to highlight innovators in the fields of Beauty, Makeup, and Lifestyle. They bring together online creators, fans, celebrities, and brands for two-day festivals full of fun, panel discussions, shopping, and free samples.
In 2017, 30,000 people attended Beautycon festivals internationally.
Passes:
Two-Day General Admission ($69) gets you in for the whole weekend, and you’ll also get a fabric wristband and other goodies.
You can also get a One-Day General Admission to pass for $49.
The Two-Day Hauler pass ($199) gets you in the doors 2 hours before the General Admission passes, plus a VIP swag bag.
General Admission and Hauler passes do not include access to programmed meetups.
Two-Day All Access passes ($999) include early entry as well as reserved seating in the front row at the Min Stage, photo opportunities in the Halo Room, a tour of the Creator Gifting Suite, custom merch, credit at the Beautycon Shop online, plus everything from the General and Hauler packs.
The final type of pass, the Two-Day Beauty Insider ($1999) pass, has everything the All-Access pass has plus a 2-night stay at a hotel downtown (for the LA festival).
4. YouTube FanFest
These events are customized to the wherever festival is visiting, so you’re always sure to see the big and rising YouTube stars from your region. Generally, these events include performances and activities as well as a Meet & Greet.
There is not a steady annual schedule for FanFests, but it has visited these cities in the past: Manila, Mumbai, Seoul, Toronto, Sao Paulo, Jakarta, Tokyo, Jeddah, Bangkok, Ho Chi Minh City, Hong Kong, and Washington, DC.
5. RTX
Austin, Texas: August
London: September
Sydney, Australia: February
Brought to you by the creators behind Rooster Teeth, RTX is a celebration of internet culture and gaming. It includes exhibitors, live events, panels, and activities targeting gamers. Partners include Twitch and multiple gaming companies.
Passes:
It costs $50 for a Friday or Sunday pass, and $55 for just Saturday. You’ll get an attendee bag and lanyard with your pass.
The Weekend pass costs $110, and you get access to all 3 days plus the bag/lanyard and 1 autograph code.
A Weekend Plus ($335) pass gets you everything the Weekend pass gets you plus 2 autograph codes, early access to the Expo hall on Friday, lounge access, and reserved seating at the stage.
The Platinum pass is the most expensive at $729, and it includes everything the Weekend Plus pass does plus a priority line for panels, priority seating, and an exclusive party.
6. Amplify Live
Sydney, Australia: April
Melbourne, Australia: April
These events showcase the biggest social medial talent and musical acts in Australia and New Zealand. In 2017 the headliners of the Cool for Summer tour were Lindsey Stirling, Dan & Phil, and Nash Grier.
Tickets for the Cool for Summer tour cost $65 or $75 AUD depending on how early you buy them.
For VIP access, you can buy a Deluxe pass for $125-$150 AUD.
Meet and Greet tickets must be purchased separately from your event ticket.
Silver Meet and Greet, $80 AUD: access to the ‘Cool for Summer Celebrity Zone’ featuring non-headliner talent.
Gold Meet and Greet, $189 AUD: access to the ‘Cool for Summer Celebrity Zone’ plus a guaranteed meeting with one of the headliners (you choose which when you purchase).
Platinum Meet & Greet, $450 AUD: meet all the headliners and get access to an exclusive VIP area, merch pack, and special entry.
7. Summer in the City
London, UK: August
This is the largest online video festival in the UK. It features discussion panels, workshops, and live performances targeted at creators, fans of online video, and industry professionals. YouTubers might hang out on the show floor meeting fans, and there are also Meet and Greet sessions for top creators. All ticket holders can submit online ballots for a chance at Meet and Greet access.
Summer in the City even has its own awards show, SitC, to honor the best in online content. Previous winners include Dodie, Tomska, Jack & Dean, and Nathan Zed.
There is one day of Summer in the City called ‘Creator Day’ (generally on Friday), which features educational workshops for creators and industry professionals.
Passes:
If you buy your tickets during early bird pricing, the prices will look like this:
Saturday OR Sunday: £30.00
Saturday AND Sunday: £45.00
Creator Day: £30.00
Creator Day + Weekend: £60.00
Industry Ticket: £100.00
Have you ever attended an offline YouTube event? Which one, and how did you like it?
Richard Bennett
Richard Bennett is a writer and a lover of all things video.
Follow @Richard Bennett
Also read:
- Perfecting Video Segmentation for Enhanced Viewing Experience on YouTube
- Redefining Your Viewing Experience YouTube Playlist Shuffle
- Free Video Embedding for Dynamic Online Articles
- [New] ASMR App Selection Guide for Phones
- Boost Visibility with Customized Channel Names!
- Top 5 Snug Scenarios for Your Snowy Youtube Sessions
- In 2024, Cultivating the Culture of Creativity Within YouTube Shorts
- [Updated] Comprehensible Guide to High-Quality Audios on YouTube
- Free YouTube Outro Kings 6 TOP Suggestions
- In 2024, Digital Dialogue Mastery Connecting with Viewers Flawlessly
- [Updated] Discover Websites Your Gateway to YouTube Branded Content
- Enhance Your Videography YouTube Studio Edition Techniques
- Crafting Collabs that Attract and Retain Viewers for 2024
- YouTube Playlist Building Step-by-Step Expertise
- 30 Powerful FreeGame Hashtags for Dominating YouTube for 2024
- 2024 Approved Cutting-Edge Templates Unlocking Your Video's Potential
- [Updated] Enhancing Your Video's Final Impression
- In 2024, Constructing a Custom YouTube Subscription URL
- 2024 Approved Elevate Views A Guide to Best YouTube Hash Tags
- Essential Vids Summary Uncovered for 2024
- 2024 Approved Chart-Toppers Top 10 YouTube Personalities in Views
- In 2024, Decoding Vtubers The Path From Concept to Career?
- The Creator's Guide to Mastering YOUTUBE Aspect Ratios
- [New] DIY Tripods| How to Stabilize Your Camera without Buying a Tripod
- [Updated] Essential Errors to Dodge Beginner YouTuber's Guide
- [Updated] 10 Best Yoga YouTube Channels to Follow - Keep Fit
- [Updated] Editorial Spellbinding Secrets Revealed
- Ultimate Mic for Digital Content Makers
- Increase Video Traffic Key YouTube SEO Strategies
- Audience Wave Top Hash Tags to Swell Youtube Views for 2024
- How To Fake GPS On Samsung Galaxy F04 For Mobile Legends? | Dr.fone
- [New] Inexpensive PCs Revealed by Best OBS Setup
- [New] Crafting Memorable Pfps in Discord with Ease and Style
- [New] How to Make Reels on Facebook?
- [Updated] In 2024, Innovative Recording Screen & Camera with Vimeo Record
- Effortless Capture of Virtual Meeting Footage on PCs
- How to Use Pokémon Emerald Master Ball Cheat On Motorola Edge 40 Neo | Dr.fone
- 3 Ways to Track Xiaomi Redmi Note 13 Pro 5G without Them Knowing | Dr.fone
- New 2024 Approved Best Free Video Hosting Solutions for Individuals and Businesses
- 2024 Approved Step-by-Step Installation of Professional VRecorder
- From Song to Script Simple Strategies for Transcribing MP3 Audio Files Online
- New Christmas Is Coming! How to Find & Make Animated Christmas GIFs for 2024
- [Updated] Unveiling Top 7 TikTok Devices for Peak Performance for 2024
- New 2024 Approved The Ultimate Guide to Converting MP4 to MP3 Best Converters
- What To Do if Your Xiaomi Redmi Note 12 Pro+ 5G Auto Does Not Work | Dr.fone
- 2024 Approved Unparalleled Strategies for Virtual Session Recording
- [Updated] 2024 Approved Amazon Original Elite Social Favorites and Watch Count Hits
- [Updated] In 2024, Top 30 Trending TikTok Deals for Amazon
- [Updated] 2024 Approved Streamlining FB Message Transcription with Expert Tips
- Title: "2024 Approved Eco-Effective Marketing Green Screens & CTA Boosting"
- Author: Steven
- Created at : 2024-05-25 18:37:16
- Updated at : 2024-05-26 18:37:16
- Link: https://youtube-clips.techidaily.com/2024-approved-eco-effective-marketing-green-screens-and-cta-boosting/
- License: This work is licensed under CC BY-NC-SA 4.0.
