
"2024 Approved Easy YouTube Introduction Design Tips and Tricks"
Easy YouTube Introduction Design: Tips and Tricks
How to Create YouTube Intros & End Cards - Free and Easy

Shanoon Cox
Oct 26, 2023• Proven solutions
Part1: Intros
Elements of an Intro
Intros should only last about five seconds, and that can be cut down to two or three if you have a larger following.
When your intro video is longer than five seconds viewers are more likely to click away. The first 15 seconds of a video is when viewers are most likely to decide to click on one of the recommended videos, or go back to their search results and choose something else. The odds of them leaving within these first 15 seconds are greater if you do not get right to the main point of your video. That is why long intro sequences are bad for your watch time.
Whether it is better to put your intro at the very beginning of your video, or after you introduce your topic, will depend on your viewers. You may want to try it both ways and then look at your retention report (found in your YouTube Creator Studio under Analytics) to see which works best for you.
Top Intro Sites
There are a few different sites where you can download animated intros, customized to include your username or logo. Here are two of the best:
FlixPress.com
This is probably the most popular intro site. There are a lot of great animated intros available for under $5, or even for free.
IntroMaker.net
This is another site with really professional looking intros for $5. They only have two free options, though.
Creating an Intro in Filmora
You can create a simple intro card in Filmora.


- Choose your background. You may want to use a short clip as your intro, or you may just want a colored background.
- Drag your clip or background into the video track of your timeline and trim it down to five seconds.
- If you have a logo, import it into Filmora and drag it into your picture-in-picture track.
- With your logo selected, click on the Green Screen icon. In the pop-up, select the background of your logo to make it transparent. For this to work your logo cannot be the same color as its background.
- Click on the editing icon with your logo selected and choose an animation.
- Go to the Text/Titles menu and choose an animated title that suits your channel. Drag it into your text track and edit it to include your name.
- The last piece of your intro is sound. You can choose a song from Filmora’s library and cut it down to five seconds, or import your sound effect.
- Export your video and save it for use in all of your other videos.
Part 2: End Cards
When your video ends, YouTube will recommend a selection of videos users may want to watch next. Often, these recommendations will not include more of your videos.
To keep viewers on your channel, you can create your End Card which recommends other content you have created.
Elements of an End Card
An end card includes clips from two or three of your videos, muted, and shrunk down to thumbnail-size. Using spotlight annotations you can make these thumbnails click-able.
It is also important that your end card includes multiple calls to action. A call to action is meant to spur a viewer to some kind of action. Writing ‘Check out this video’ above one of your thumbnails is a call to action.
You should also have a subscribe link somewhere in your end card, ideally a very noticeable button with a proven call to action like ‘Subscribe Now!’.
Some creators will leave their end cards at that and play music overtop, but it can be even more effective to include a voiceover where you ask viewers to subscribe and watch your other videos.
How To Make an End Card
- Choose a static background. You may want to download an end card template or create one in a drawing program. If you do, make sure to include calls to action like ‘Watch more!’ and ‘Subscribe’.
- Drag your background into your timeline at the end of your video.
- Import two or three of your previous videos and drag them into your picture in picture tracks. Each clip should be on its track.
- Trim the clips in your picture in picture track down to the same length as your end card.
- Shrink your clips down to thumbnail-size by dragging their corners in the preview window.
- Position your clips so they are spaced evenly by dragging them in the preview screen.
- Mute your clips.
- If your background does not include any calls to action, choose a title from the Text/Titles menu in Filmora and create at least two – one asking viewers to subscribe, and one asking them to watch your suggested videos.
- Export your video from Filmora and upload it to YouTube.
- Go to your Video Manager and select Annotations in the drop-down menu next to your video.
- Go to your end card in the previewer, as that is where you want to add your annotations.
- Click Add Annotation and add a spotlight annotation to your video. Stretch it over one of your thumbnails and then check the Link box under your Annotation’s timing. Insert a link to the video you are previewing.
- Repeat for any other thumbnails. For your subscribe button, change where it said ‘Video’ to ‘Subscribe’ and enter your channel URL.
- Click Apply Changes.
Shanoon Cox
Shanoon Cox is a writer and a lover of all things video.
Follow @Shanoon Cox
Shanoon Cox
Oct 26, 2023• Proven solutions
Part1: Intros
Elements of an Intro
Intros should only last about five seconds, and that can be cut down to two or three if you have a larger following.
When your intro video is longer than five seconds viewers are more likely to click away. The first 15 seconds of a video is when viewers are most likely to decide to click on one of the recommended videos, or go back to their search results and choose something else. The odds of them leaving within these first 15 seconds are greater if you do not get right to the main point of your video. That is why long intro sequences are bad for your watch time.
Whether it is better to put your intro at the very beginning of your video, or after you introduce your topic, will depend on your viewers. You may want to try it both ways and then look at your retention report (found in your YouTube Creator Studio under Analytics) to see which works best for you.
Top Intro Sites
There are a few different sites where you can download animated intros, customized to include your username or logo. Here are two of the best:
FlixPress.com
This is probably the most popular intro site. There are a lot of great animated intros available for under $5, or even for free.
IntroMaker.net
This is another site with really professional looking intros for $5. They only have two free options, though.
Creating an Intro in Filmora
You can create a simple intro card in Filmora.
- Choose your background. You may want to use a short clip as your intro, or you may just want a colored background.
- Drag your clip or background into the video track of your timeline and trim it down to five seconds.
- If you have a logo, import it into Filmora and drag it into your picture-in-picture track.
- With your logo selected, click on the Green Screen icon. In the pop-up, select the background of your logo to make it transparent. For this to work your logo cannot be the same color as its background.
- Click on the editing icon with your logo selected and choose an animation.
- Go to the Text/Titles menu and choose an animated title that suits your channel. Drag it into your text track and edit it to include your name.
- The last piece of your intro is sound. You can choose a song from Filmora’s library and cut it down to five seconds, or import your sound effect.
- Export your video and save it for use in all of your other videos.
Part 2: End Cards
When your video ends, YouTube will recommend a selection of videos users may want to watch next. Often, these recommendations will not include more of your videos.
To keep viewers on your channel, you can create your End Card which recommends other content you have created.
Elements of an End Card
An end card includes clips from two or three of your videos, muted, and shrunk down to thumbnail-size. Using spotlight annotations you can make these thumbnails click-able.
It is also important that your end card includes multiple calls to action. A call to action is meant to spur a viewer to some kind of action. Writing ‘Check out this video’ above one of your thumbnails is a call to action.
You should also have a subscribe link somewhere in your end card, ideally a very noticeable button with a proven call to action like ‘Subscribe Now!’.
Some creators will leave their end cards at that and play music overtop, but it can be even more effective to include a voiceover where you ask viewers to subscribe and watch your other videos.
How To Make an End Card
- Choose a static background. You may want to download an end card template or create one in a drawing program. If you do, make sure to include calls to action like ‘Watch more!’ and ‘Subscribe’.
- Drag your background into your timeline at the end of your video.
- Import two or three of your previous videos and drag them into your picture in picture tracks. Each clip should be on its track.
- Trim the clips in your picture in picture track down to the same length as your end card.
- Shrink your clips down to thumbnail-size by dragging their corners in the preview window.
- Position your clips so they are spaced evenly by dragging them in the preview screen.
- Mute your clips.
- If your background does not include any calls to action, choose a title from the Text/Titles menu in Filmora and create at least two – one asking viewers to subscribe, and one asking them to watch your suggested videos.
- Export your video from Filmora and upload it to YouTube.
- Go to your Video Manager and select Annotations in the drop-down menu next to your video.
- Go to your end card in the previewer, as that is where you want to add your annotations.
- Click Add Annotation and add a spotlight annotation to your video. Stretch it over one of your thumbnails and then check the Link box under your Annotation’s timing. Insert a link to the video you are previewing.
- Repeat for any other thumbnails. For your subscribe button, change where it said ‘Video’ to ‘Subscribe’ and enter your channel URL.
- Click Apply Changes.
 Power Tools add-on for Google Sheets, 12-month subscription
Shanoon Cox
Shanoon Cox is a writer and a lover of all things video.
Follow @Shanoon Cox
Shanoon Cox
Oct 26, 2023• Proven solutions
Part1: Intros
Elements of an Intro
Intros should only last about five seconds, and that can be cut down to two or three if you have a larger following.
When your intro video is longer than five seconds viewers are more likely to click away. The first 15 seconds of a video is when viewers are most likely to decide to click on one of the recommended videos, or go back to their search results and choose something else. The odds of them leaving within these first 15 seconds are greater if you do not get right to the main point of your video. That is why long intro sequences are bad for your watch time.
Whether it is better to put your intro at the very beginning of your video, or after you introduce your topic, will depend on your viewers. You may want to try it both ways and then look at your retention report (found in your YouTube Creator Studio under Analytics) to see which works best for you.
Top Intro Sites
There are a few different sites where you can download animated intros, customized to include your username or logo. Here are two of the best:
FlixPress.com
This is probably the most popular intro site. There are a lot of great animated intros available for under $5, or even for free.
IntroMaker.net
This is another site with really professional looking intros for $5. They only have two free options, though.
Creating an Intro in Filmora
You can create a simple intro card in Filmora.
- Choose your background. You may want to use a short clip as your intro, or you may just want a colored background.
- Drag your clip or background into the video track of your timeline and trim it down to five seconds.
- If you have a logo, import it into Filmora and drag it into your picture-in-picture track.
- With your logo selected, click on the Green Screen icon. In the pop-up, select the background of your logo to make it transparent. For this to work your logo cannot be the same color as its background.
- Click on the editing icon with your logo selected and choose an animation.
- Go to the Text/Titles menu and choose an animated title that suits your channel. Drag it into your text track and edit it to include your name.
- The last piece of your intro is sound. You can choose a song from Filmora’s library and cut it down to five seconds, or import your sound effect.
- Export your video and save it for use in all of your other videos.

Part 2: End Cards
When your video ends, YouTube will recommend a selection of videos users may want to watch next. Often, these recommendations will not include more of your videos.
To keep viewers on your channel, you can create your End Card which recommends other content you have created.
Elements of an End Card
An end card includes clips from two or three of your videos, muted, and shrunk down to thumbnail-size. Using spotlight annotations you can make these thumbnails click-able.
It is also important that your end card includes multiple calls to action. A call to action is meant to spur a viewer to some kind of action. Writing ‘Check out this video’ above one of your thumbnails is a call to action.
You should also have a subscribe link somewhere in your end card, ideally a very noticeable button with a proven call to action like ‘Subscribe Now!’.
Some creators will leave their end cards at that and play music overtop, but it can be even more effective to include a voiceover where you ask viewers to subscribe and watch your other videos.
How To Make an End Card
- Choose a static background. You may want to download an end card template or create one in a drawing program. If you do, make sure to include calls to action like ‘Watch more!’ and ‘Subscribe’.
- Drag your background into your timeline at the end of your video.
- Import two or three of your previous videos and drag them into your picture in picture tracks. Each clip should be on its track.
- Trim the clips in your picture in picture track down to the same length as your end card.
- Shrink your clips down to thumbnail-size by dragging their corners in the preview window.
- Position your clips so they are spaced evenly by dragging them in the preview screen.
- Mute your clips.
- If your background does not include any calls to action, choose a title from the Text/Titles menu in Filmora and create at least two – one asking viewers to subscribe, and one asking them to watch your suggested videos.
- Export your video from Filmora and upload it to YouTube.
- Go to your Video Manager and select Annotations in the drop-down menu next to your video.
- Go to your end card in the previewer, as that is where you want to add your annotations.
- Click Add Annotation and add a spotlight annotation to your video. Stretch it over one of your thumbnails and then check the Link box under your Annotation’s timing. Insert a link to the video you are previewing.
- Repeat for any other thumbnails. For your subscribe button, change where it said ‘Video’ to ‘Subscribe’ and enter your channel URL.
- Click Apply Changes.

Shanoon Cox
Shanoon Cox is a writer and a lover of all things video.
Follow @Shanoon Cox
Shanoon Cox
Oct 26, 2023• Proven solutions

Part1: Intros
Elements of an Intro
Intros should only last about five seconds, and that can be cut down to two or three if you have a larger following.
When your intro video is longer than five seconds viewers are more likely to click away. The first 15 seconds of a video is when viewers are most likely to decide to click on one of the recommended videos, or go back to their search results and choose something else. The odds of them leaving within these first 15 seconds are greater if you do not get right to the main point of your video. That is why long intro sequences are bad for your watch time.
Whether it is better to put your intro at the very beginning of your video, or after you introduce your topic, will depend on your viewers. You may want to try it both ways and then look at your retention report (found in your YouTube Creator Studio under Analytics) to see which works best for you.
Top Intro Sites
There are a few different sites where you can download animated intros, customized to include your username or logo. Here are two of the best:
FlixPress.com
This is probably the most popular intro site. There are a lot of great animated intros available for under $5, or even for free.
IntroMaker.net
This is another site with really professional looking intros for $5. They only have two free options, though.
Creating an Intro in Filmora
You can create a simple intro card in Filmora.
- Choose your background. You may want to use a short clip as your intro, or you may just want a colored background.
- Drag your clip or background into the video track of your timeline and trim it down to five seconds.
- If you have a logo, import it into Filmora and drag it into your picture-in-picture track.
- With your logo selected, click on the Green Screen icon. In the pop-up, select the background of your logo to make it transparent. For this to work your logo cannot be the same color as its background.
- Click on the editing icon with your logo selected and choose an animation.
- Go to the Text/Titles menu and choose an animated title that suits your channel. Drag it into your text track and edit it to include your name.
- The last piece of your intro is sound. You can choose a song from Filmora’s library and cut it down to five seconds, or import your sound effect.
- Export your video and save it for use in all of your other videos.
Part 2: End Cards
When your video ends, YouTube will recommend a selection of videos users may want to watch next. Often, these recommendations will not include more of your videos.
To keep viewers on your channel, you can create your End Card which recommends other content you have created.
Elements of an End Card
An end card includes clips from two or three of your videos, muted, and shrunk down to thumbnail-size. Using spotlight annotations you can make these thumbnails click-able.
It is also important that your end card includes multiple calls to action. A call to action is meant to spur a viewer to some kind of action. Writing ‘Check out this video’ above one of your thumbnails is a call to action.
You should also have a subscribe link somewhere in your end card, ideally a very noticeable button with a proven call to action like ‘Subscribe Now!’.
Some creators will leave their end cards at that and play music overtop, but it can be even more effective to include a voiceover where you ask viewers to subscribe and watch your other videos.
How To Make an End Card
- Choose a static background. You may want to download an end card template or create one in a drawing program. If you do, make sure to include calls to action like ‘Watch more!’ and ‘Subscribe’.
- Drag your background into your timeline at the end of your video.
- Import two or three of your previous videos and drag them into your picture in picture tracks. Each clip should be on its track.
- Trim the clips in your picture in picture track down to the same length as your end card.
- Shrink your clips down to thumbnail-size by dragging their corners in the preview window.
- Position your clips so they are spaced evenly by dragging them in the preview screen.
- Mute your clips.
- If your background does not include any calls to action, choose a title from the Text/Titles menu in Filmora and create at least two – one asking viewers to subscribe, and one asking them to watch your suggested videos.
- Export your video from Filmora and upload it to YouTube.
- Go to your Video Manager and select Annotations in the drop-down menu next to your video.
- Go to your end card in the previewer, as that is where you want to add your annotations.
- Click Add Annotation and add a spotlight annotation to your video. Stretch it over one of your thumbnails and then check the Link box under your Annotation’s timing. Insert a link to the video you are previewing.
- Repeat for any other thumbnails. For your subscribe button, change where it said ‘Video’ to ‘Subscribe’ and enter your channel URL.
- Click Apply Changes.

Shanoon Cox
Shanoon Cox is a writer and a lover of all things video.
Follow @Shanoon Cox

Charting Success with YouTube Income Streams
YouTube Affiliate Marketing: How to Make Money with It

Richard Bennett
Mar 27, 2024• Proven solutions
Many people are finding it harder to make money online today. However, there are always avenues to explore that can help you increase your revenue. If you’ve never considered YouTube affiliate marketing before, or you are considering to step into it, now could be the perfect time to find out more about this valuable opportunity.
In this article, we will explain how you can make money via YouTube affiliate marketing, so read on to find out more.
- Part1: What is YouTube affiliate marketing
- Part2: Steps to start your YouTube affiliate marketing project
- Part2: 3 Tips before you begin
Want to join the Filmora affiliate program but don’t have the media kit? Visit the Filmora Marketing Kit to download banners, logos and demo videos from Filmora.
Part 1: What is YouTube affiliate marketing?
In YouTube affiliate marketing, videos are made to encourage customers to purchase products from third-party sites including Amazon.
When users buy products via your links, you can receive commission, which can be up to 10% depending on the category of the product and how much you are selling.
Examples of YouTube affiliate marketing videos include reviews, how-to guides, un-boxing videos and more. Videos are designed to show off what products can do and explain why customers should go on to make a purchase.
When you have completed your video, you can register for an affiliate marketing program and then add links to your video. The links can be placed either in the video description or as annotations in the clip itself.
Amazon affiliate marketers don’t always just produce videos – they can also promote products via articles, written reviews and more. To make your marketing program successful, you must ensure people know about your video and encourage them to click on the links and buy the products.
Though this can seem daunting at first, the more experience you gain, the more revenue you can generate.
Part 2: Steps to start your YouTube affiliate marketing project
Step 1: build affiliate relationship
One of the first steps you should take when getting your project off the ground is to establish relationships with brands that you love. If you do have a genuine love for the product, this should be reflected in the content and encourage others to make purchases.
Viewers can often tell when your enthusiasm is not genuine, which is why it’s so important to identify products that really do appeal to you. Make a list of the products or programs you use in your daily life and search online to see if there is an affiliate program for it.
If this is the case, you simply need to apply to join it. You may find that the product, program or service that you love does not have a program. Should this be the situation, contact partners to tell them about your love for the product or service and see if they can set something up. Chances are they will be more than happy to do so, as it could be very beneficial for them.

 CalendarBudget - Monthly subscription membership to CalendarBudget via web browser or mobile app. Support included.
 Step 2: Create your product video
The next step is to actually produce your video. Viewers love honesty, so don’t be afraid to say so if there is a way you feel the product or service could be improved.
Remember to include calls to action. Un-boxing videos are very popular and show viewers everything inside a package, whilst review videos can also provide valuable insights.
Top 10 lists also generate high views. You must also remember to include a disclosure that informs viewers that you are being paid via an affiliate marketing scheme. This is a legal obligation.
 Screensaver Factory, Create stunning professional screensavers within minutes. Create screensavers for yourself, for marketing or unlimited royalty-free commercial distribution. Make screensavers from images, video and swf flash, add background music and smooth sprite and transition effects. Screensaver Factory is very easy to use, and it enables you to make self-installing screensaver files and CDs for easy setup and distribution. Screensaver Factory is the most advanced software of its kind.
Step 3: Promote your content
There are many things you can do to ensure your product is seen. Share your video on all your social media channels, respond to as many questions from viewers as possible and add links to online environments where the product is already being discussed.
Set up a channel that can be found when relevant search terms are used and make sure your titles are optimized for search too.

Part 3: 3 Tips before you begin

1. Commission Rate
All brands have different commission rates, with some offering up to 50% and others providing around 5%. Make sure you know what the rates are before you proceed and read the terms and conditions carefully. You may well wish to create a dedicated channel or channels to bring everything together. If you’re passionate about other people’s products, it makes perfect sense to get paid to talk about them.

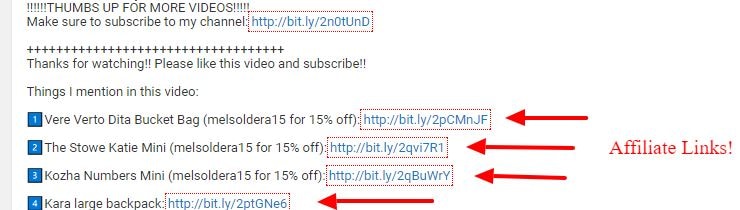
2. Where affiliate links appear
Affiliate links are placed below the YouTube video in the description. One issue for YouTube affiliate marketers is that buyers tend to exit YouTube once they have clicked on your link, whether they go on to buy the product or not.
It is important to try and get as many views as possible to boost exposure for your video, whilst achieving as many sales as you can. Try to strike the ideal balance between encouraging viewers to make a purchase and to watch as much of your content as possible. The more views you receive, the more favorably your content will be treated by YouTube.
3. Know your product well
It is really essential to know your product inside out when you are marketing it to viewers. YouTube viewers expect you to be an expert when it comes to the products you are showcasing, so take as much time as you need to gain an in-depth understanding of how it works and what its features are.
You must also be able to explain why it makes so much sense to choose the specific product or service over its competitors. Try not to be repetitive, use HD footage and a quality mic, avoid link spamming, choose the best kind of video for the product and plan out the video before you start creating it. Again, engage with your audience as much as you can.
Conclusion
There are various great reasons for getting involved in YouTube affiliate marketing. You may be amazed to see just how much cash you can generate when you follow the above steps and create inspiring videos that showcase products in the best possible light. Just remember to be honest and talk about the cons as well as the pros if they are any. Doing this will help you become a trusted, authentic YouTube affiliate marketer. Why wait any longer to get started?
Richard Bennett
Richard Bennett is a writer and a lover of all things video.
Follow @Richard Bennett
Richard Bennett
Mar 27, 2024• Proven solutions
Many people are finding it harder to make money online today. However, there are always avenues to explore that can help you increase your revenue. If you’ve never considered YouTube affiliate marketing before, or you are considering to step into it, now could be the perfect time to find out more about this valuable opportunity.
In this article, we will explain how you can make money via YouTube affiliate marketing, so read on to find out more.
- Part1: What is YouTube affiliate marketing
- Part2: Steps to start your YouTube affiliate marketing project
- Part2: 3 Tips before you begin
Want to join the Filmora affiliate program but don’t have the media kit? Visit the Filmora Marketing Kit to download banners, logos and demo videos from Filmora.
 Glarysoft File Recovery Pro - Helps to recover your lost file/data, even permanently deleted data.
Part 1: What is YouTube affiliate marketing?
In YouTube affiliate marketing, videos are made to encourage customers to purchase products from third-party sites including Amazon.
When users buy products via your links, you can receive commission, which can be up to 10% depending on the category of the product and how much you are selling.
Examples of YouTube affiliate marketing videos include reviews, how-to guides, un-boxing videos and more. Videos are designed to show off what products can do and explain why customers should go on to make a purchase.
When you have completed your video, you can register for an affiliate marketing program and then add links to your video. The links can be placed either in the video description or as annotations in the clip itself.
Amazon affiliate marketers don’t always just produce videos – they can also promote products via articles, written reviews and more. To make your marketing program successful, you must ensure people know about your video and encourage them to click on the links and buy the products.
Though this can seem daunting at first, the more experience you gain, the more revenue you can generate.
![]() FX PRO (Gold Robot + Silver Robot(Basic Package))
FX PRO (Gold Robot + Silver Robot(Basic Package))
Part 2: Steps to start your YouTube affiliate marketing project
Step 1: build affiliate relationship
One of the first steps you should take when getting your project off the ground is to establish relationships with brands that you love. If you do have a genuine love for the product, this should be reflected in the content and encourage others to make purchases.
Viewers can often tell when your enthusiasm is not genuine, which is why it’s so important to identify products that really do appeal to you. Make a list of the products or programs you use in your daily life and search online to see if there is an affiliate program for it.
If this is the case, you simply need to apply to join it. You may find that the product, program or service that you love does not have a program. Should this be the situation, contact partners to tell them about your love for the product or service and see if they can set something up. Chances are they will be more than happy to do so, as it could be very beneficial for them.
Step 2: Create your product video
The next step is to actually produce your video. Viewers love honesty, so don’t be afraid to say so if there is a way you feel the product or service could be improved.
Remember to include calls to action. Un-boxing videos are very popular and show viewers everything inside a package, whilst review videos can also provide valuable insights.
Top 10 lists also generate high views. You must also remember to include a disclosure that informs viewers that you are being paid via an affiliate marketing scheme. This is a legal obligation.
Step 3: Promote your content
There are many things you can do to ensure your product is seen. Share your video on all your social media channels, respond to as many questions from viewers as possible and add links to online environments where the product is already being discussed.
Set up a channel that can be found when relevant search terms are used and make sure your titles are optimized for search too.
 vMix 4K - Software based live production. vMix 4K includes everything in vMix HD plus 4K support, PTZ control, External/Fullscreen output, 4 Virtual Outputs, 1 Replay, 4 vMix Call, and 2 Recorders.

Part 3: 3 Tips before you begin
1. Commission Rate
All brands have different commission rates, with some offering up to 50% and others providing around 5%. Make sure you know what the rates are before you proceed and read the terms and conditions carefully. You may well wish to create a dedicated channel or channels to bring everything together. If you’re passionate about other people’s products, it makes perfect sense to get paid to talk about them.

2. Where affiliate links appear
Affiliate links are placed below the YouTube video in the description. One issue for YouTube affiliate marketers is that buyers tend to exit YouTube once they have clicked on your link, whether they go on to buy the product or not.
It is important to try and get as many views as possible to boost exposure for your video, whilst achieving as many sales as you can. Try to strike the ideal balance between encouraging viewers to make a purchase and to watch as much of your content as possible. The more views you receive, the more favorably your content will be treated by YouTube.
3. Know your product well
It is really essential to know your product inside out when you are marketing it to viewers. YouTube viewers expect you to be an expert when it comes to the products you are showcasing, so take as much time as you need to gain an in-depth understanding of how it works and what its features are.
You must also be able to explain why it makes so much sense to choose the specific product or service over its competitors. Try not to be repetitive, use HD footage and a quality mic, avoid link spamming, choose the best kind of video for the product and plan out the video before you start creating it. Again, engage with your audience as much as you can.
Conclusion
There are various great reasons for getting involved in YouTube affiliate marketing. You may be amazed to see just how much cash you can generate when you follow the above steps and create inspiring videos that showcase products in the best possible light. Just remember to be honest and talk about the cons as well as the pros if they are any. Doing this will help you become a trusted, authentic YouTube affiliate marketer. Why wait any longer to get started?
 PaperScan Professional: PaperScan Scanner Software is a powerful TWAIN & WIA scanning application centered on one idea: making document acquisition an unparalleled easy task for anyone.
Richard Bennett
Richard Bennett is a writer and a lover of all things video.
Follow @Richard Bennett
Richard Bennett
Mar 27, 2024• Proven solutions
Many people are finding it harder to make money online today. However, there are always avenues to explore that can help you increase your revenue. If you’ve never considered YouTube affiliate marketing before, or you are considering to step into it, now could be the perfect time to find out more about this valuable opportunity.
In this article, we will explain how you can make money via YouTube affiliate marketing, so read on to find out more.
- Part1: What is YouTube affiliate marketing
- Part2: Steps to start your YouTube affiliate marketing project
- Part2: 3 Tips before you begin
Want to join the Filmora affiliate program but don’t have the media kit? Visit the Filmora Marketing Kit to download banners, logos and demo videos from Filmora.
Part 1: What is YouTube affiliate marketing?
In YouTube affiliate marketing, videos are made to encourage customers to purchase products from third-party sites including Amazon.
When users buy products via your links, you can receive commission, which can be up to 10% depending on the category of the product and how much you are selling.
Examples of YouTube affiliate marketing videos include reviews, how-to guides, un-boxing videos and more. Videos are designed to show off what products can do and explain why customers should go on to make a purchase.
When you have completed your video, you can register for an affiliate marketing program and then add links to your video. The links can be placed either in the video description or as annotations in the clip itself.
Amazon affiliate marketers don’t always just produce videos – they can also promote products via articles, written reviews and more. To make your marketing program successful, you must ensure people know about your video and encourage them to click on the links and buy the products.
Though this can seem daunting at first, the more experience you gain, the more revenue you can generate.
Part 2: Steps to start your YouTube affiliate marketing project
Step 1: build affiliate relationship
One of the first steps you should take when getting your project off the ground is to establish relationships with brands that you love. If you do have a genuine love for the product, this should be reflected in the content and encourage others to make purchases.
Viewers can often tell when your enthusiasm is not genuine, which is why it’s so important to identify products that really do appeal to you. Make a list of the products or programs you use in your daily life and search online to see if there is an affiliate program for it.
If this is the case, you simply need to apply to join it. You may find that the product, program or service that you love does not have a program. Should this be the situation, contact partners to tell them about your love for the product or service and see if they can set something up. Chances are they will be more than happy to do so, as it could be very beneficial for them.
Step 2: Create your product video
The next step is to actually produce your video. Viewers love honesty, so don’t be afraid to say so if there is a way you feel the product or service could be improved.
Remember to include calls to action. Un-boxing videos are very popular and show viewers everything inside a package, whilst review videos can also provide valuable insights.
Top 10 lists also generate high views. You must also remember to include a disclosure that informs viewers that you are being paid via an affiliate marketing scheme. This is a legal obligation.
Step 3: Promote your content
There are many things you can do to ensure your product is seen. Share your video on all your social media channels, respond to as many questions from viewers as possible and add links to online environments where the product is already being discussed.
Set up a channel that can be found when relevant search terms are used and make sure your titles are optimized for search too.

Part 3: 3 Tips before you begin
1. Commission Rate
All brands have different commission rates, with some offering up to 50% and others providing around 5%. Make sure you know what the rates are before you proceed and read the terms and conditions carefully. You may well wish to create a dedicated channel or channels to bring everything together. If you’re passionate about other people’s products, it makes perfect sense to get paid to talk about them.
2. Where affiliate links appear
Affiliate links are placed below the YouTube video in the description. One issue for YouTube affiliate marketers is that buyers tend to exit YouTube once they have clicked on your link, whether they go on to buy the product or not.
It is important to try and get as many views as possible to boost exposure for your video, whilst achieving as many sales as you can. Try to strike the ideal balance between encouraging viewers to make a purchase and to watch as much of your content as possible. The more views you receive, the more favorably your content will be treated by YouTube.
3. Know your product well
It is really essential to know your product inside out when you are marketing it to viewers. YouTube viewers expect you to be an expert when it comes to the products you are showcasing, so take as much time as you need to gain an in-depth understanding of how it works and what its features are.
You must also be able to explain why it makes so much sense to choose the specific product or service over its competitors. Try not to be repetitive, use HD footage and a quality mic, avoid link spamming, choose the best kind of video for the product and plan out the video before you start creating it. Again, engage with your audience as much as you can.

Conclusion
There are various great reasons for getting involved in YouTube affiliate marketing. You may be amazed to see just how much cash you can generate when you follow the above steps and create inspiring videos that showcase products in the best possible light. Just remember to be honest and talk about the cons as well as the pros if they are any. Doing this will help you become a trusted, authentic YouTube affiliate marketer. Why wait any longer to get started?

Richard Bennett
Richard Bennett is a writer and a lover of all things video.
Follow @Richard Bennett
Richard Bennett
Mar 27, 2024• Proven solutions
Many people are finding it harder to make money online today. However, there are always avenues to explore that can help you increase your revenue. If you’ve never considered YouTube affiliate marketing before, or you are considering to step into it, now could be the perfect time to find out more about this valuable opportunity.
In this article, we will explain how you can make money via YouTube affiliate marketing, so read on to find out more.
- Part1: What is YouTube affiliate marketing
- Part2: Steps to start your YouTube affiliate marketing project
- Part2: 3 Tips before you begin
Want to join the Filmora affiliate program but don’t have the media kit? Visit the Filmora Marketing Kit to download banners, logos and demo videos from Filmora.
Part 1: What is YouTube affiliate marketing?
In YouTube affiliate marketing, videos are made to encourage customers to purchase products from third-party sites including Amazon.
When users buy products via your links, you can receive commission, which can be up to 10% depending on the category of the product and how much you are selling.
Examples of YouTube affiliate marketing videos include reviews, how-to guides, un-boxing videos and more. Videos are designed to show off what products can do and explain why customers should go on to make a purchase.
When you have completed your video, you can register for an affiliate marketing program and then add links to your video. The links can be placed either in the video description or as annotations in the clip itself.
Amazon affiliate marketers don’t always just produce videos – they can also promote products via articles, written reviews and more. To make your marketing program successful, you must ensure people know about your video and encourage them to click on the links and buy the products.
Though this can seem daunting at first, the more experience you gain, the more revenue you can generate.
Part 2: Steps to start your YouTube affiliate marketing project
Step 1: build affiliate relationship
One of the first steps you should take when getting your project off the ground is to establish relationships with brands that you love. If you do have a genuine love for the product, this should be reflected in the content and encourage others to make purchases.
Viewers can often tell when your enthusiasm is not genuine, which is why it’s so important to identify products that really do appeal to you. Make a list of the products or programs you use in your daily life and search online to see if there is an affiliate program for it.
If this is the case, you simply need to apply to join it. You may find that the product, program or service that you love does not have a program. Should this be the situation, contact partners to tell them about your love for the product or service and see if they can set something up. Chances are they will be more than happy to do so, as it could be very beneficial for them.

Step 2: Create your product video
The next step is to actually produce your video. Viewers love honesty, so don’t be afraid to say so if there is a way you feel the product or service could be improved.
Remember to include calls to action. Un-boxing videos are very popular and show viewers everything inside a package, whilst review videos can also provide valuable insights.
Top 10 lists also generate high views. You must also remember to include a disclosure that informs viewers that you are being paid via an affiliate marketing scheme. This is a legal obligation.

WPS Office Premium ( File Recovery, Photo Scanning, Convert PDF)–Yearly
Step 3: Promote your content
There are many things you can do to ensure your product is seen. Share your video on all your social media channels, respond to as many questions from viewers as possible and add links to online environments where the product is already being discussed.
Set up a channel that can be found when relevant search terms are used and make sure your titles are optimized for search too.
Part 3: 3 Tips before you begin
 Lyric Video Creator Professional Version
1. Commission Rate
All brands have different commission rates, with some offering up to 50% and others providing around 5%. Make sure you know what the rates are before you proceed and read the terms and conditions carefully. You may well wish to create a dedicated channel or channels to bring everything together. If you’re passionate about other people’s products, it makes perfect sense to get paid to talk about them.

Key features:
• Import from any devices and cams, including GoPro and drones. All formats supported. Сurrently the only free video editor that allows users to export in a new H265/HEVC codec, something essential for those working with 4K and HD.
• Everything for hassle-free basic editing: cut, crop and merge files, add titles and favorite music
• Visual effects, advanced color correction and trendy Instagram-like filters
• All multimedia processing done from one app: video editing capabilities reinforced by a video converter, a screen capture, a video capture, a disc burner and a YouTube uploader
• Non-linear editing: edit several files with simultaneously
• Easy export to social networks: special profiles for YouTube, Facebook, Vimeo, Twitter and Instagram
• High quality export – no conversion quality loss, double export speed even of HD files due to hardware acceleration
• Stabilization tool will turn shaky or jittery footage into a more stable video automatically.
• Essential toolset for professional video editing: blending modes, Mask tool, advanced multiple-color Chroma Key
 With Screensaver Wonder you can easily make a screensaver from your own pictures and video files. Create screensavers for your own computer or create standalone, self-installing screensavers for easy sharing with your friends. Together with its sister product Screensaver Factory, Screensaver Wonder is one of the most popular screensaver software products in the world, helping thousands of users decorate their computer screens quickly and easily.
2. Where affiliate links appear
Affiliate links are placed below the YouTube video in the description. One issue for YouTube affiliate marketers is that buyers tend to exit YouTube once they have clicked on your link, whether they go on to buy the product or not.
It is important to try and get as many views as possible to boost exposure for your video, whilst achieving as many sales as you can. Try to strike the ideal balance between encouraging viewers to make a purchase and to watch as much of your content as possible. The more views you receive, the more favorably your content will be treated by YouTube.
 HD Video Converter Factory Pro
3. Know your product well
It is really essential to know your product inside out when you are marketing it to viewers. YouTube viewers expect you to be an expert when it comes to the products you are showcasing, so take as much time as you need to gain an in-depth understanding of how it works and what its features are.
You must also be able to explain why it makes so much sense to choose the specific product or service over its competitors. Try not to be repetitive, use HD footage and a quality mic, avoid link spamming, choose the best kind of video for the product and plan out the video before you start creating it. Again, engage with your audience as much as you can.
Conclusion
There are various great reasons for getting involved in YouTube affiliate marketing. You may be amazed to see just how much cash you can generate when you follow the above steps and create inspiring videos that showcase products in the best possible light. Just remember to be honest and talk about the cons as well as the pros if they are any. Doing this will help you become a trusted, authentic YouTube affiliate marketer. Why wait any longer to get started?
Richard Bennett
Richard Bennett is a writer and a lover of all things video.
Follow @Richard Bennett
- Title: 2024 Approved Easy YouTube Introduction Design Tips and Tricks
- Author: Steven
- Created at : 2024-07-22 20:25:39
- Updated at : 2024-07-23 20:25:39
- Link: https://youtube-clips.techidaily.com/2024-approved-easy-youtube-introduction-design-tips-and-tricks/
- License: This work is licensed under CC BY-NC-SA 4.0.