
:max_bytes(150000):strip_icc()/subwaysurfers-11a4d59f94d64363ad6a19cd07dfe109.jpeg)
"2024 Approved DIY YouTube Openers Technique One & Technique Two"
DIY YouTube Openers: Technique One & Technique Two
2024 | How to Make a YouTube Intro Video?

Richard Bennett
Mar 27, 2024• Proven solutions
Be it YouTube or any other streaming channel, or even for selling your videos on any e-commerce website, intros play a vital role in your brand promotion, and creating them is not as complicated as it sounds either.
The following sections describe in detail how to make a YouTube intro with Wondershare Filmora video editor, and keep it safe so it can be re-used easily in all your creations to maintain consistency and to give your brand a unique identity.
Part 1: How to Make a YouTube Intro Video with Filmora
With Wondershare Filmora, you can create your custom intros from scratch, i.e., even if you don’t have an existing image or footage to start with. You can follow the method given below to learn how to make YouTube intro with Filmora:
Step 1: Add Intro Background to Filmora
Launch Wondershare Filmora, go to Media tab at the top, select the Sample Colors category from the left pane.
Notice all the existing solid and gradient colors in the Media library in the right, hover the mouse over the tile of the color you want to use as a background, and click the + icon that appears in the center to add it to the timeline.

Note: The default duration of such solids is 5 seconds. You can increase or decrease this time by dragging the right handle of track in the timeline.
Alternatively, you can also use your own background image or video clip by selecting the Project Media category from the left pane, clicking anywhere inside the Media window, and then importing your favorite media file to Filmora. After importing, you can follow the procedure given above to add it to the timeline.
Step 2: Select and Add Audio/Sound Effect to YouTube Intro
With audio in the YouTube intro, your video will be more recognizable. If you have watched PewDiePie ‘s video, you’ll find that even though he changed the images on the intro often, he keeps the music and sound the same in the intro.

In Filmora, you can use the music and sound effect in the inbuilt audio library, double click the audio thumbnail from the library to listen to the soundtrack.
Repeat the process until you find the background music or sound effect that you can use in the intro. Once found, drag and drop it to the audio track below the video.

Note: You should keep the background and the audio at the same duration. For more details about audio editing in Filmora, please check this guide about how to edit audio .
Step 3: Add Text/Logo to Intro Video
In the intro video, you can add your channel name, company name, or other branding elements for brand awareness consideration.
Click Titles tab, hover the mouse over the tile with the text you want to use, and then drag and drop it to the track above the video.


To customize, double-click the title track in the timeline, use the new window that appears in the upper-left area of the interface to change, format, and animate the text as needed, and click OK from the bottom-right corner of the library.
Also, you need to adjust the position and duration of the title to get a better view.
In the intro video, it is recommended to add your logo or slogan as well. To add your logo, drag and drop it to the track above the video, and adjust its position and size. For more details, you can check the guide about How to Add Photo or Video to Watermark .
Step 4: Add Effects to YouTube Intro
Go to Effects tab, choose a category from the top-left pane, and click and drag your preferred effect from the Effects library to the timeline.
Adjust the playback duration by dragging the right handle of the track in the timeline as explained above. Optionally, double-click the Effects track to customize the appearance as needed.
Step 5: Export the Intro and Add to Shared Media
Once you are done creating your YouTube intro with all the required ingredients, click EXPORT from the top-center area of the interface, go to the Local tab on the Export box, choose your preferred output format from the left pane (the most common and widely used is MP4), adjust other preferences like destination location, resolution, framerate, etc. from the right pane of the box, and click EXPORT to export the YouTube intro.
Once exported, back on the main interface, select Media again from the standard toolbar, select the Shared Media container from the left pane, click anywhere inside the Media library, and import the YouTube intro video you just created to Shared Media so it can be reused every time you create a new video for the series.

Also, you can save the project, and then revise the element, effects or text to make a YouTube intro vibration.
You can find there are many video tutorials about how to use Filmora to make a YouTube intro, and below is one for you to have a quick glance.
Part 2: How to Make YouTube Intros with Templates
If the turnaround time of your project is about to end, and you need to hustle up, you can always use pre-built templates that not only expedite your creation process, they also look more professional because they are designed by the experts who already have decades of experience in the industry.
Besides the pre-programmed templates and effects in Filmora, you can find more visual effect packs in the effect store Filmstock .
You can learn how to make YouTube intro video in Filmora with a template downloaded from Filmstock.
Step 1: Visit Filmora Effects Page on Filmstock
Visit https://filmstock.wondershare.com/ and log in with the same WSID that you used on Filmora, and then click EFFECTS from the top of the webpage. Since Filmstock also provides templates for After Effects, you should select Filmora Effects to access the entire Filmora Effects library.

You can search the effects that you want in the Search bar, here, since I’m looking for effects for YouTube intro, I just enter “intro”. The effects related to intro will be displayed like below.
Step 2: Download Video Effect Packs for Filmora
Click your preferred intro effect template, click Download Now and follow the on-screen instructions to obtain and download the template.
After downloading, you will see these them in red circles under titles, transitions, or filters, based on the elements included in this effect pack. You can then add this downloaded titles or transitions to the intro video.

Looking for an online solution? Check the list of Top 10 Free Online YouTube Intro Makers .
Part 3: Creative Intro Makers Made with Filmora (Video Tutorial Included)
Both the above processes on how to make YouTube intro video are helpful as long as you use effective titles, decent effects, and extremely appealing color combinations. While the first method gives you full control over the creation as you can use all your imaginations to prepare one, the second method saves your time and yet lets you come up with a professionally-looking intro clip.
Below is a video tutorial from YouTuber Nash. He demonstrated how to create a YouTube Intro with the Sample Colors, Titles, filters and sound effects.
FAQs About YouTube Intro Video Making
- 1. What is a YouTube Intro Video?
A YouTube intro video is 5 seconds to 7 seconds short motion clip that comprises your company name and logo. Such intros help in your brand promotion and give any film or episode that follows them a unique identity. This allows audiences to recognize your organization, and with regular appearances, you can establish strong goodwill among your customers.
- 2. What Should I Put in a YouTube Intro Video?
A YouTube intro video should have your YouTube channel name, an effective and well-formatted text, brand logo, background music, effects, and a slight and simple animation.
Conclusion
To learn how to make a YouTube intro is easy, and things can get even simpler if you are using an efficient and robust post-production software like Wondershare Filmora, which not only allows you to create such clips from the scratch, it also enables you to access Filmstock’ online library to download more fantastic templates in order to expedite your workflow.
Richard Bennett
Richard Bennett is a writer and a lover of all things video.
Follow @Richard Bennett
Richard Bennett
Mar 27, 2024• Proven solutions
Be it YouTube or any other streaming channel, or even for selling your videos on any e-commerce website, intros play a vital role in your brand promotion, and creating them is not as complicated as it sounds either.
The following sections describe in detail how to make a YouTube intro with Wondershare Filmora video editor, and keep it safe so it can be re-used easily in all your creations to maintain consistency and to give your brand a unique identity.
Part 1: How to Make a YouTube Intro Video with Filmora
With Wondershare Filmora, you can create your custom intros from scratch, i.e., even if you don’t have an existing image or footage to start with. You can follow the method given below to learn how to make YouTube intro with Filmora:
Step 1: Add Intro Background to Filmora
Launch Wondershare Filmora, go to Media tab at the top, select the Sample Colors category from the left pane.
Notice all the existing solid and gradient colors in the Media library in the right, hover the mouse over the tile of the color you want to use as a background, and click the + icon that appears in the center to add it to the timeline.
Note: The default duration of such solids is 5 seconds. You can increase or decrease this time by dragging the right handle of track in the timeline.
Alternatively, you can also use your own background image or video clip by selecting the Project Media category from the left pane, clicking anywhere inside the Media window, and then importing your favorite media file to Filmora. After importing, you can follow the procedure given above to add it to the timeline.
Step 2: Select and Add Audio/Sound Effect to YouTube Intro
With audio in the YouTube intro, your video will be more recognizable. If you have watched PewDiePie ‘s video, you’ll find that even though he changed the images on the intro often, he keeps the music and sound the same in the intro.
In Filmora, you can use the music and sound effect in the inbuilt audio library, double click the audio thumbnail from the library to listen to the soundtrack.
Repeat the process until you find the background music or sound effect that you can use in the intro. Once found, drag and drop it to the audio track below the video.
Note: You should keep the background and the audio at the same duration. For more details about audio editing in Filmora, please check this guide about how to edit audio .
Step 3: Add Text/Logo to Intro Video
In the intro video, you can add your channel name, company name, or other branding elements for brand awareness consideration.
Click Titles tab, hover the mouse over the tile with the text you want to use, and then drag and drop it to the track above the video.
To customize, double-click the title track in the timeline, use the new window that appears in the upper-left area of the interface to change, format, and animate the text as needed, and click OK from the bottom-right corner of the library.
Also, you need to adjust the position and duration of the title to get a better view.
In the intro video, it is recommended to add your logo or slogan as well. To add your logo, drag and drop it to the track above the video, and adjust its position and size. For more details, you can check the guide about How to Add Photo or Video to Watermark .
Step 4: Add Effects to YouTube Intro
Go to Effects tab, choose a category from the top-left pane, and click and drag your preferred effect from the Effects library to the timeline.
Adjust the playback duration by dragging the right handle of the track in the timeline as explained above. Optionally, double-click the Effects track to customize the appearance as needed.
Step 5: Export the Intro and Add to Shared Media
Once you are done creating your YouTube intro with all the required ingredients, click EXPORT from the top-center area of the interface, go to the Local tab on the Export box, choose your preferred output format from the left pane (the most common and widely used is MP4), adjust other preferences like destination location, resolution, framerate, etc. from the right pane of the box, and click EXPORT to export the YouTube intro.
Once exported, back on the main interface, select Media again from the standard toolbar, select the Shared Media container from the left pane, click anywhere inside the Media library, and import the YouTube intro video you just created to Shared Media so it can be reused every time you create a new video for the series.
Also, you can save the project, and then revise the element, effects or text to make a YouTube intro vibration.
You can find there are many video tutorials about how to use Filmora to make a YouTube intro, and below is one for you to have a quick glance.
Part 2: How to Make YouTube Intros with Templates
If the turnaround time of your project is about to end, and you need to hustle up, you can always use pre-built templates that not only expedite your creation process, they also look more professional because they are designed by the experts who already have decades of experience in the industry.
Besides the pre-programmed templates and effects in Filmora, you can find more visual effect packs in the effect store Filmstock .
You can learn how to make YouTube intro video in Filmora with a template downloaded from Filmstock.
Step 1: Visit Filmora Effects Page on Filmstock
Visit https://filmstock.wondershare.com/ and log in with the same WSID that you used on Filmora, and then click EFFECTS from the top of the webpage. Since Filmstock also provides templates for After Effects, you should select Filmora Effects to access the entire Filmora Effects library.
You can search the effects that you want in the Search bar, here, since I’m looking for effects for YouTube intro, I just enter “intro”. The effects related to intro will be displayed like below.
Step 2: Download Video Effect Packs for Filmora
Click your preferred intro effect template, click Download Now and follow the on-screen instructions to obtain and download the template.
After downloading, you will see these them in red circles under titles, transitions, or filters, based on the elements included in this effect pack. You can then add this downloaded titles or transitions to the intro video.
Looking for an online solution? Check the list of Top 10 Free Online YouTube Intro Makers .
Part 3: Creative Intro Makers Made with Filmora (Video Tutorial Included)
Both the above processes on how to make YouTube intro video are helpful as long as you use effective titles, decent effects, and extremely appealing color combinations. While the first method gives you full control over the creation as you can use all your imaginations to prepare one, the second method saves your time and yet lets you come up with a professionally-looking intro clip.
Below is a video tutorial from YouTuber Nash. He demonstrated how to create a YouTube Intro with the Sample Colors, Titles, filters and sound effects.
FAQs About YouTube Intro Video Making
- 1. What is a YouTube Intro Video?
A YouTube intro video is 5 seconds to 7 seconds short motion clip that comprises your company name and logo. Such intros help in your brand promotion and give any film or episode that follows them a unique identity. This allows audiences to recognize your organization, and with regular appearances, you can establish strong goodwill among your customers.
- 2. What Should I Put in a YouTube Intro Video?
A YouTube intro video should have your YouTube channel name, an effective and well-formatted text, brand logo, background music, effects, and a slight and simple animation.
Conclusion
To learn how to make a YouTube intro is easy, and things can get even simpler if you are using an efficient and robust post-production software like Wondershare Filmora, which not only allows you to create such clips from the scratch, it also enables you to access Filmstock’ online library to download more fantastic templates in order to expedite your workflow.
Richard Bennett
Richard Bennett is a writer and a lover of all things video.
Follow @Richard Bennett
Precise Posting Schedules: A Guide to YouTube Excellence
Create High-Quality Video - Wondershare Filmora
An easy and powerful YouTube video editor
Numerous video and audio effects to choose from
Detailed tutorials provided by the official channel
Creators have one thing in mind when posting their content online. To be viewed by numerous followers and potential subscribers. For this, you need to run your channels tactfully. There are days when people throng the social media to watch upcoming content and videos. Perhaps you can make your best bets on such days. And is there any best day to post YouTube video?
Probably yes! People will settle on social media sites when they are more relaxed and off heavy duties on the weekdays. Let’s now dive into posting your videos and attaining some good leads.

In this article
01 Why is it important to post your YouTube video on the best days?
02 Best Days to Post on YouTube - General Practices
03 Best Days to Post on YouTube - Individual channel
Why is it important to post your YouTube video on the best days?
You are better off with best days to post on YouTube to increase the chances of getting more views. You want to make the biggest catch, and putting in a little effort will help you yield good results.
1) Your content never dies
The major advantage of posting on best days is that they hit the wall right from the onset of posting. You won’t need a lot of time to invest in expensive equipment. Remember, when viewers see your content immediately, they are posted, there are high chances of them sharing along with friends.
2) You’ll grow your audience worldwide
Growing a worldwide audience is every content creator’s dream. Posting your videos on the best days will open doors to new visitors who perhaps haven’t heard about you. It is even better to include captions so that people of all walks get your message deeply.
3) You’ll appear more on Google searches
Posting at the right time will help Google identify your content and make it appear on Google searches. Google uses an algorithm to check on many concepts of video posting. It means that posting your videos to YouTube on the best days will spike the graph and automatically get noticed by Google.
4) Your audience will promote you
Remember, when viewers go on searches, they look for something important to them. So, coming across your content at the right time will make an instant catch. They only want to fulfill their needs at that specific time. Hence will buy or promote you as long as what you sell is what they are looking for.
5) Increased subscribers
People want to associate themselves with new content. Anyone would be thrilled to hit the button on content that just popped up when they are online at their relaxed moments. You never know; you may just hit that 1,000 subscribers list by posting your videos on the best days.
Best Days to Post on YouTube - General Practices
How then do you know the best day to upload on YouTube? You can use general practices to pinpoint when your viewers are online or when your channel is at its peak.
- Weekday evenings
Weekdays are very busy days for everyone. People feel relaxed and ready to catch up on social media’s trending in the evening. So, posting in the evenings on weekdays may instantly help you get some increased views.
- Target Thursdays and Fridays
Depending on your YouTube content, you can target school-age children these days. If your content is about kid’s stuff and other online learning skills, then pushing it just before the weekend could give you some good visits. Kids tend to have various activities over the weekend and so, the best time for them to embark on online learning is just before the weekend kicks off.
- Weekends
Weekends will suit content that needs to sell products to the middle-class. Since they are busy the whole week with other duties, they probably find time over the weekend to chill and check out what’s happening around them and the world at large.
- End year
When it comes to the best months to post on YouTube, the end-year period tends to be the best. Usually, this is when companies and individuals are winding up on their busy schedules of the year. They want to get improvements and tips to start the next year. It is wise to spend more time online, giving the necessary tips and probably hooking up some potential customers.
Best Days to Post on YouTube - Individual channel
Stop guessing and find the facts right. Hitting on the road at the right time can get you as many viewers as possible. YouTube makes getting the facts right quite easy. Just use YouTube studio to know when your viewers are online.
First, go to YouTube Studio
Check in the “YouTube Studio” > “Analytics” > “Audience” option. Remember that your channel should have enough views for this option to give you relevant data.
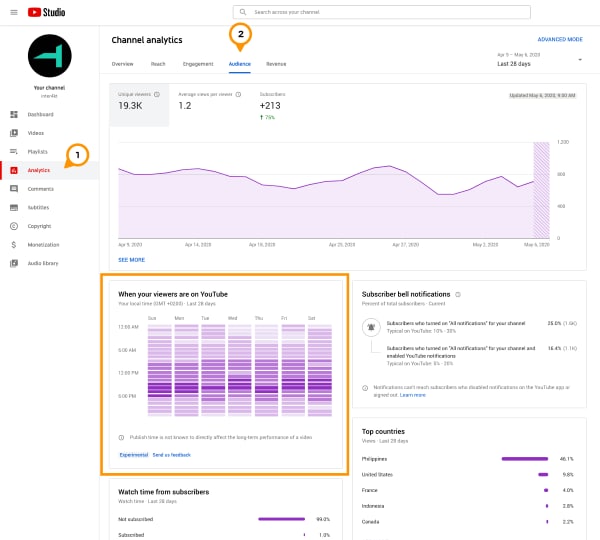
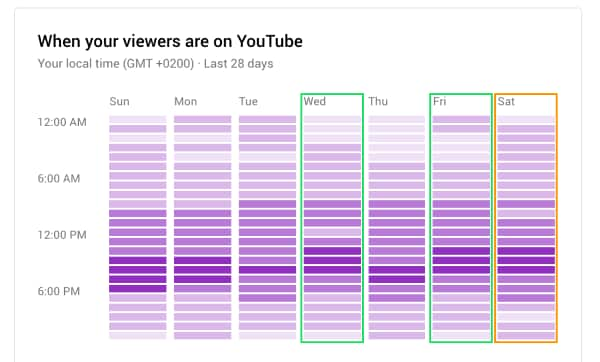
Find the hours with the darkest purple bars
You’ll realize that there are dark bars and light ones. The latter represent when few viewers are on your channel. Avoid posting during such times and focus when you have many viewers on site. Also, try to post a few hours before the peak time.

Focus on the days with the darkest bars
Apart from specific times of the day, you can focus on days of the week when your viewers are on your channel. You will mostly realize that the best days of the week to post to your channel are on weekends. It is quite typical as it’s the days when viewers are more relaxed and can find new things online. However, you can monitor your statistics and learn the number of days per week you need to emphasize more on posting your videos.
Post videos a day before the peak day
You can also dwell on the narrative; the early bird catches the worm. You can make an early catch since you know the day when your viewers will throng’ your channel, but you don’t know the time. Post videos a day before your channel goes busy. By this, you won’t leave any viewers outside your new postings.
A few hours before prime time
Another trick is to get your videos posted in good time. Once you have known the best hour of the day when viewers are likely to be active, make your video available a few hours before then. They’ll then get it rolling once they land into the channel for the newest updates. If not, you may miss out on views you would have gotten by making your video go public earlier.
Upload your videos in private a few hours before publishing
Yes, mistakes do happen, and you don’t want to be caught up in the mix of errors. You can increase perfection by uploading your videos for some hours before publishing them. It will give you a good time to check it out privately and iron out any concerns. You don’t want your video going viral with tons of mishaps.
Create High-Quality Video with Filmora to Ensure Video Engagement
Besides knowing the best days to post on YouTube, you have to give your audience quality for their time. Composing the best video is the killer for this course. Learn how to get high-quality videos with Filmora. It is a widely used video editing tool that comes in hand with lots of templates and effects. These features enable you to compose high-end videos in 4K and HD resolution. The effect of quality videos is that they’ll help you get many views because users will understand your video first. Filmora has an intuitive interface that will give you an easy time.
- Edit your videos with minimal effect. You can easily merge, crop, tilt, and perform more with Filmora.
- Easily do motion tracking from the main interface.
- It supports 4K and HD editing ability./li>
- Use the speed control feature to make your clips up to ten times faster or slower.
- Make magical moves with the Reverse feature. You can flip your videos and play them backward.
- Create stunning video colors in your video using the color tuning feature. You can adjust the white balance and the dynamic range of colors.
- Get quality sound with the noise removal feature.
For Win 7 or later (64-bit)
For macOS 10.12 or later
Conclusion
● You don’t have to guess the best days to upload to YouTube anymore. You can use YouTube algorithm Studio to calculate and give you the exact hours and days when your viewers are at bay. But again, this will only be effective if you have already gathered a substantial number of viewers. It will, therefore, not work for you if you are starting on YouTube. Usually, there isn’t enough data yet for the system to know the best time to publish, and neither know how your content performs in general.
● But all in all, you can use general practices to know when to post your content. Most likely, combine your efforts and don’t dwell on specific hours or days. Use both combined to reach as many audiences as possible.
Creators have one thing in mind when posting their content online. To be viewed by numerous followers and potential subscribers. For this, you need to run your channels tactfully. There are days when people throng the social media to watch upcoming content and videos. Perhaps you can make your best bets on such days. And is there any best day to post YouTube video?
Probably yes! People will settle on social media sites when they are more relaxed and off heavy duties on the weekdays. Let’s now dive into posting your videos and attaining some good leads.
In this article
01 Why is it important to post your YouTube video on the best days?
02 Best Days to Post on YouTube - General Practices
03 Best Days to Post on YouTube - Individual channel
Why is it important to post your YouTube video on the best days?
You are better off with best days to post on YouTube to increase the chances of getting more views. You want to make the biggest catch, and putting in a little effort will help you yield good results.
1) Your content never dies
The major advantage of posting on best days is that they hit the wall right from the onset of posting. You won’t need a lot of time to invest in expensive equipment. Remember, when viewers see your content immediately, they are posted, there are high chances of them sharing along with friends.
2) You’ll grow your audience worldwide
Growing a worldwide audience is every content creator’s dream. Posting your videos on the best days will open doors to new visitors who perhaps haven’t heard about you. It is even better to include captions so that people of all walks get your message deeply.
3) You’ll appear more on Google searches
Posting at the right time will help Google identify your content and make it appear on Google searches. Google uses an algorithm to check on many concepts of video posting. It means that posting your videos to YouTube on the best days will spike the graph and automatically get noticed by Google.
4) Your audience will promote you
Remember, when viewers go on searches, they look for something important to them. So, coming across your content at the right time will make an instant catch. They only want to fulfill their needs at that specific time. Hence will buy or promote you as long as what you sell is what they are looking for.
5) Increased subscribers
People want to associate themselves with new content. Anyone would be thrilled to hit the button on content that just popped up when they are online at their relaxed moments. You never know; you may just hit that 1,000 subscribers list by posting your videos on the best days.
Best Days to Post on YouTube - General Practices
How then do you know the best day to upload on YouTube? You can use general practices to pinpoint when your viewers are online or when your channel is at its peak.
- Weekday evenings
Weekdays are very busy days for everyone. People feel relaxed and ready to catch up on social media’s trending in the evening. So, posting in the evenings on weekdays may instantly help you get some increased views.
- Target Thursdays and Fridays
Depending on your YouTube content, you can target school-age children these days. If your content is about kid’s stuff and other online learning skills, then pushing it just before the weekend could give you some good visits. Kids tend to have various activities over the weekend and so, the best time for them to embark on online learning is just before the weekend kicks off.
- Weekends
Weekends will suit content that needs to sell products to the middle-class. Since they are busy the whole week with other duties, they probably find time over the weekend to chill and check out what’s happening around them and the world at large.
- End year
When it comes to the best months to post on YouTube, the end-year period tends to be the best. Usually, this is when companies and individuals are winding up on their busy schedules of the year. They want to get improvements and tips to start the next year. It is wise to spend more time online, giving the necessary tips and probably hooking up some potential customers.
Best Days to Post on YouTube - Individual channel
Stop guessing and find the facts right. Hitting on the road at the right time can get you as many viewers as possible. YouTube makes getting the facts right quite easy. Just use YouTube studio to know when your viewers are online.
First, go to YouTube Studio
Check in the “YouTube Studio” > “Analytics” > “Audience” option. Remember that your channel should have enough views for this option to give you relevant data.
Find the hours with the darkest purple bars
You’ll realize that there are dark bars and light ones. The latter represent when few viewers are on your channel. Avoid posting during such times and focus when you have many viewers on site. Also, try to post a few hours before the peak time.
Focus on the days with the darkest bars
Apart from specific times of the day, you can focus on days of the week when your viewers are on your channel. You will mostly realize that the best days of the week to post to your channel are on weekends. It is quite typical as it’s the days when viewers are more relaxed and can find new things online. However, you can monitor your statistics and learn the number of days per week you need to emphasize more on posting your videos.
Post videos a day before the peak day
You can also dwell on the narrative; the early bird catches the worm. You can make an early catch since you know the day when your viewers will throng’ your channel, but you don’t know the time. Post videos a day before your channel goes busy. By this, you won’t leave any viewers outside your new postings.
A few hours before prime time
Another trick is to get your videos posted in good time. Once you have known the best hour of the day when viewers are likely to be active, make your video available a few hours before then. They’ll then get it rolling once they land into the channel for the newest updates. If not, you may miss out on views you would have gotten by making your video go public earlier.
Upload your videos in private a few hours before publishing
Yes, mistakes do happen, and you don’t want to be caught up in the mix of errors. You can increase perfection by uploading your videos for some hours before publishing them. It will give you a good time to check it out privately and iron out any concerns. You don’t want your video going viral with tons of mishaps.
Create High-Quality Video with Filmora to Ensure Video Engagement
Besides knowing the best days to post on YouTube, you have to give your audience quality for their time. Composing the best video is the killer for this course. Learn how to get high-quality videos with Filmora. It is a widely used video editing tool that comes in hand with lots of templates and effects. These features enable you to compose high-end videos in 4K and HD resolution. The effect of quality videos is that they’ll help you get many views because users will understand your video first. Filmora has an intuitive interface that will give you an easy time.
- Edit your videos with minimal effect. You can easily merge, crop, tilt, and perform more with Filmora.
- Easily do motion tracking from the main interface.
- It supports 4K and HD editing ability./li>
- Use the speed control feature to make your clips up to ten times faster or slower.
- Make magical moves with the Reverse feature. You can flip your videos and play them backward.
- Create stunning video colors in your video using the color tuning feature. You can adjust the white balance and the dynamic range of colors.
- Get quality sound with the noise removal feature.
For Win 7 or later (64-bit)
For macOS 10.12 or later
Conclusion
● You don’t have to guess the best days to upload to YouTube anymore. You can use YouTube algorithm Studio to calculate and give you the exact hours and days when your viewers are at bay. But again, this will only be effective if you have already gathered a substantial number of viewers. It will, therefore, not work for you if you are starting on YouTube. Usually, there isn’t enough data yet for the system to know the best time to publish, and neither know how your content performs in general.
● But all in all, you can use general practices to know when to post your content. Most likely, combine your efforts and don’t dwell on specific hours or days. Use both combined to reach as many audiences as possible.
Also read:
- In 2024, Discover the Top 10 Fitness Channels for Yogis
- Mastering Metadata Title and Description for YouTube Traction
- [Updated] Elevate Video Decks Smart Description Templates
- [New] Elevate Video Reach Optimize Tags for $6,00Es+ Growth
- [New] Enhance Your Music Library Top 6 Free iOS Apps for Audio Conversion
- 2024 Approved Earning Streaming Strategies - 8 Beginners' Tips
- Million Visioners Dissecting the Money Behind the Numbers
- 2024 Approved Compreeve YouTube Extraction 11 Tools Reviewed
- [Updated] 15 Premier Sci-Tech Vloggers for Enlightened Learning
- Essential Guide to Writing Click-Worthy Youtube Titles for 2024
- 2024 Approved Deciphering the Complexity of Online Content Monetization
- Mapping Media Memorable Ends
- Dissecting YouTube Revenue How Much Do You Earning From AdSense per KV, In 2024
- Embarking on an Avatar's Adventure to Internet Fame
- In 2024, Amplify Viewership with These Top 10 YouTube Reaction Strategies
- [Updated] Enhance Video Visibility with Effective Thumbnail Scaling
- In 2024, A Comprehensive Rundown Longer Videos on YouTube
- [New] Converting Your Twitch Showcase Into a YouTube Hit
- Showcasing the Best at Innovative YouTube Ad Making
- 2024 Approved Catapult Over a Thousand YouTube Audience Members
- Earnings From a Million YouTube Globals for 2024
- [New] Best FreeFire YouTube Hashtags and Tips For YouTube Gaming Videos
- Mastering YouTube Pace Control Top Tips for Slower Views (48 Chars)
- Pictorial Narration Framework
- Reduce, Share and Enjoy Top 5 Shortened URLs for YouTube
- Best Video Makers with Music and Photos
- [Updated] Capturing Moments with the Best 5 Photo & Video Apps for iPhones/Android
- Best YouTube Music Gurus to Follow
- Budget-Friendly Methods for YouTube Card Creation
- Best Budget Edits 8 No-Charge Video Editing Software
- Amplifying Your Content Free Techniques to Boost YouTube Views
- [Updated] Drafting Dynamic Denouements
- [New] Boost Your Video's Impact with GS and YT Conversion
- Demystifying YouTube's SEO A Keyword Research Guide for 2024
- [Updated] Elevate Your Content YouTube's Keyword Strategies Exposed
- Crafting a Cash Cascade on YouTube Strategies Beyond the Ad Model
- Snapchat to Subscribers How Jake Crafted YouTube Magic
- [New] Compreran Exploration of Giroptic's Panorama
- Easy Methods How To Transfer Pictures From Apple iPhone XS to PC | Dr.fone
- Updated 2024 Approved Locate Vocal Noise Sample
- Nostalgic Film Techniques for Contemporary Projects Using VHS
- [New] 2024 Approved Groundbreaking Tools to Create Instagram Grids That Wow
- Possible solutions to restore deleted videos from Honor Magic 6 Lite
- How To Transfer WhatsApp From iPhone 6s Plus to other iPhone 15 Pro devices? | Dr.fone
- 2024 Approved Swift Clearing of TikTok Imprints on Mobile Devices
- Updated In 2024, | Live Stream on YouTube Using Zoom
- How to Change Location on TikTok to See More Content On your Nubia Z50S Pro | Dr.fone
- [Updated] 2024 Approved Elevate Your Social Media Game Post TikToks on Twitter
- The Updated Method to Bypass Motorola G54 5G FRP
- Top 10 AirPlay Apps in Realme 12+ 5G for Streaming | Dr.fone
- Title: "2024 Approved DIY YouTube Openers Technique One & Technique Two"
- Author: Steven
- Created at : 2024-05-25 18:36:10
- Updated at : 2024-05-26 18:36:10
- Link: https://youtube-clips.techidaily.com/2024-approved-diy-youtube-openers-technique-one-and-technique-two/
- License: This work is licensed under CC BY-NC-SA 4.0.
