"2024 Approved Decoding YouTube Community Terms and Policies"
Decoding YouTube Community Terms and Policies
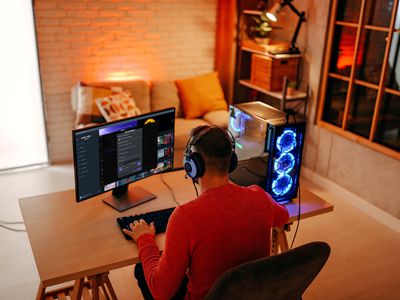
YouTube has become more than an entertainment now. Most content creators are using the platform to earn and bring their skills to some use. Good knowledge of YouTube Community Guidelines would work in the long run.
The article introduces the YouTube Community and covers how to make community posts on YouTube. Additionally, stay tuned to find out how to get the community tab on YouTube. So let us begin!
In this article
02 How to Make A Community Post on YouTube?
03 How to Get Community Tab on YouTube?
04 How to Make Good Use of Community Tab on YouTube?

Part 1: What is YouTube Community?
Before getting into YouTube community posts, it is crucial to understand what YouTube Community is and how it affects the content creators. The YouTube community is an extensive range of viewers or followers that one needs to grow their channel. Creating a connection with the viewers helps because you have loyal followers; you have got it all.

Key features:
• Import from any devices and cams, including GoPro and drones. All formats supported. Сurrently the only free video editor that allows users to export in a new H265/HEVC codec, something essential for those working with 4K and HD.
• Everything for hassle-free basic editing: cut, crop and merge files, add titles and favorite music
• Visual effects, advanced color correction and trendy Instagram-like filters
• All multimedia processing done from one app: video editing capabilities reinforced by a video converter, a screen capture, a video capture, a disc burner and a YouTube uploader
• Non-linear editing: edit several files with simultaneously
• Easy export to social networks: special profiles for YouTube, Facebook, Vimeo, Twitter and Instagram
• High quality export – no conversion quality loss, double export speed even of HD files due to hardware acceleration
• Stabilization tool will turn shaky or jittery footage into a more stable video automatically.
• Essential toolset for professional video editing: blending modes, Mask tool, advanced multiple-color Chroma Key
It is because the trusted followers would go above and beyond to share your content to their social media accounts and give you instant feedback. YouTube community tab works like a charm for creators to engage with the audience. They can use YouTube community posts such as polls, ask questions, use GIFs, and interact with the community.
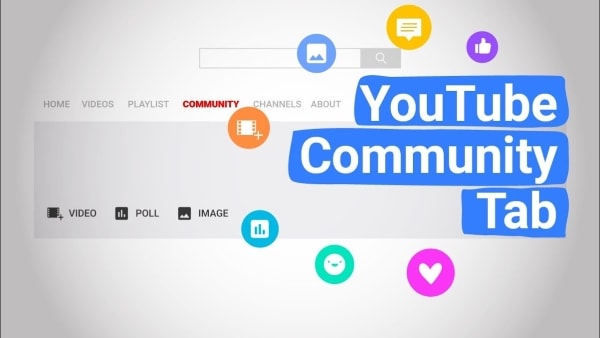
Part 2: How to Make A Community Post on YouTube?
The first question to arise in one’s mind revolves around how to make a community post on YouTube. The community post YouTube helps in interaction with the general public and community. To make community posts YouTube via computer and mobile device, follow the guidelines below in detail.

Community Post YouTube Via Computer
The steps below shall help the reader to make a YouTube community post through the system.
Step 1: Launch YouTube from your browser and log in to your account. Now, click on the “Upload” button located at the top right corner of the screen.

Step 2: Tap on “Create Post” and type the message in the textbox. You can insert an image, GIF, or video as required. Now, pick the type of post.
Step 3: Hit “Post” afterward. The “Community” posts can be accessed from the “Community” tab in your account channel.

Community Post YouTube Via Mobile Phone
To know How to make community posts on YouTube mobile, follow the guidelines below:
Step 1: Launch the YouTube application from your iPhone or Android. Hit the “Create” icon that looks like a video camera located in the top right corner.

Step 2: Click on “Create Post,” add the post to the textbox and upload any required media. Choose the type of post and tap “Post.”
## Part 3: How to Get Community Tab on YouTube?The vital concern to be addressed in this section spins around how to enable a community tab on YouTube. On October 12, 2021, YouTube updated the policy that stated that a channel must have a minimal 500+ subscribers to get community tab YouTube.


Before October, the threshold for subscribers used to be 1000+. Now it has been reduced so that most channels can communicate and engage with the audience. The content creators can access the community tab on YouTube faster by following some pointers and tips.
For once, they can interact with the audience more and find ways to keep them in a loop. It creates a strong community of followers and subscribers. To do so, the account owners can reply to every comment, ask different questions, and pin the best comments. Additionally, you can ask for feedback and opinions in the comment tab to enable the community tab on YouTube.
Ask people their take on a certain stereotype, have a tip from viewers that can be shared with the community, and how they want to see the future. It also makes the community ponder upon the cruel realities of the world and express themselves out loud. You can also make more quality content videos to be a part of the community for good.

Part 4: How to Make Good Use of Community Tab on YouTube?
The users know how to get the community tab on your YouTube channel and how to post community posts on YouTube. It is time to know how to make good use of the community tab on YouTube. Having this knowledge shall help the new and old content creators to use their skills and bring good to the world.
So, without wasting any time, let us begin the process.
 Allavsoft Batch Download Online Videos, Music Offline to MP4, MP3, MOV, etc format
Showcase Behind the Scenes and Bloopers
Most viewers crave authenticity more than ever. The regular videos and updates on a channel and scripted and well-crafted, so there is no window for error. However, upload your life updates and BTS scenes from video production to engage the audience and use the community tab to its full potential.

Cross Channel Promotion Process
The community tab helps promote your various vlog or podcasts. It means that you can support new creators in the market and establish a cross-channel promotion network. Engaging with other creators helps the audience know about your community tab YouTube.
Use Teasers and Promos
Using different teasers and promos plays a significant role in developing the well-deserved hype for the show or video. It compels the audience to stay tuned to whatever the channel is bringing to the table. Moreover, the time between working on the video and uploading it can be filled by teasers that promote the upcoming project big time.
.png) Kanto Player Professional
Kanto Player ProfessionalExceptional and Planned Giveaways
Giveaways appear to be a devious plan to lure in the audience. However, if your content is worthy enough to stick around, you don’t need to worry much. Therefore, plan a giveaway and set some rules for it. The circle of interest is widely enhanced using this tactic from the platform of community tab on YouTube.

Hosting Q/A Sessions
Another effective way to use the YouTube community tab to its full potential revolves around hosting a Questions and Answer Session. The general public likes to relate to the bloggers and influencers and know about them. A Q/A session sparks the connection between the two where the viewers ask different personal and professional questions.
It is a huge possibility that you gain new followers, and they stick to the way you communicate and give importance to your subscribers.
Ask for Inspiration and Video
The most common practice of renowned content creators is to engage the audience and ask them for inspiration in the following video. You can ask your subscribers what they want to see you act on and what topic should be covered. Do not hesitate to use polls and gauge interest in general and stereotypical subjects.
Conclusion
YouTube has become a one-stop shop for watching impeccable content and earning through the creation of media. It is vital to know YouTube community guidelines to work better and efficiently.
To create good intros and outros for your YouTube channels, incorporate the usage of Wondershare Filmora . It offers some moving effects and transitions to create a spell-bound impact on the viewers.
Versatile Video Editor - Wondershare Filmora
An easy yet powerful editor
Numerous effects to choose from
Detailed tutorials provided by the official channel
02 How to Make A Community Post on YouTube?
03 How to Get Community Tab on YouTube?
04 How to Make Good Use of Community Tab on YouTube?
Part 1: What is YouTube Community?
Before getting into YouTube community posts, it is crucial to understand what YouTube Community is and how it affects the content creators. The YouTube community is an extensive range of viewers or followers that one needs to grow their channel. Creating a connection with the viewers helps because you have loyal followers; you have got it all.
It is because the trusted followers would go above and beyond to share your content to their social media accounts and give you instant feedback. YouTube community tab works like a charm for creators to engage with the audience. They can use YouTube community posts such as polls, ask questions, use GIFs, and interact with the community.
Part 2: How to Make A Community Post on YouTube?
The first question to arise in one’s mind revolves around how to make a community post on YouTube. The community post YouTube helps in interaction with the general public and community. To make community posts YouTube via computer and mobile device, follow the guidelines below in detail.
Community Post YouTube Via Computer
The steps below shall help the reader to make a YouTube community post through the system.
Step 1: Launch YouTube from your browser and log in to your account. Now, click on the “Upload” button located at the top right corner of the screen.
Step 2: Tap on “Create Post” and type the message in the textbox. You can insert an image, GIF, or video as required. Now, pick the type of post.
Step 3: Hit “Post” afterward. The “Community” posts can be accessed from the “Community” tab in your account channel.
Community Post YouTube Via Mobile Phone
To know How to make community posts on YouTube mobile, follow the guidelines below:
Step 1: Launch the YouTube application from your iPhone or Android. Hit the “Create” icon that looks like a video camera located in the top right corner.
Step 2: Click on “Create Post,” add the post to the textbox and upload any required media. Choose the type of post and tap “Post.”
Part 3: How to Get Community Tab on YouTube?
The vital concern to be addressed in this section spins around how to enable a community tab on YouTube. On October 12, 2021, YouTube updated the policy that stated that a channel must have a minimal 500+ subscribers to get community tab YouTube.
Before October, the threshold for subscribers used to be 1000+. Now it has been reduced so that most channels can communicate and engage with the audience. The content creators can access the community tab on YouTube faster by following some pointers and tips.
For once, they can interact with the audience more and find ways to keep them in a loop. It creates a strong community of followers and subscribers. To do so, the account owners can reply to every comment, ask different questions, and pin the best comments. Additionally, you can ask for feedback and opinions in the comment tab to enable the community tab on YouTube.
Ask people their take on a certain stereotype, have a tip from viewers that can be shared with the community, and how they want to see the future. It also makes the community ponder upon the cruel realities of the world and express themselves out loud. You can also make more quality content videos to be a part of the community for good.
Part 4: How to Make Good Use of Community Tab on YouTube?
The users know how to get the community tab on your YouTube channel and how to post community posts on YouTube. It is time to know how to make good use of the community tab on YouTube. Having this knowledge shall help the new and old content creators to use their skills and bring good to the world.
So, without wasting any time, let us begin the process.
Showcase Behind the Scenes and Bloopers
Most viewers crave authenticity more than ever. The regular videos and updates on a channel and scripted and well-crafted, so there is no window for error. However, upload your life updates and BTS scenes from video production to engage the audience and use the community tab to its full potential.

Cross Channel Promotion Process
The community tab helps promote your various vlog or podcasts. It means that you can support new creators in the market and establish a cross-channel promotion network. Engaging with other creators helps the audience know about your community tab YouTube.
Use Teasers and Promos
Using different teasers and promos plays a significant role in developing the well-deserved hype for the show or video. It compels the audience to stay tuned to whatever the channel is bringing to the table. Moreover, the time between working on the video and uploading it can be filled by teasers that promote the upcoming project big time.

Exceptional and Planned Giveaways
Giveaways appear to be a devious plan to lure in the audience. However, if your content is worthy enough to stick around, you don’t need to worry much. Therefore, plan a giveaway and set some rules for it. The circle of interest is widely enhanced using this tactic from the platform of community tab on YouTube.
Hosting Q/A Sessions
Another effective way to use the YouTube community tab to its full potential revolves around hosting a Questions and Answer Session. The general public likes to relate to the bloggers and influencers and know about them. A Q/A session sparks the connection between the two where the viewers ask different personal and professional questions.
It is a huge possibility that you gain new followers, and they stick to the way you communicate and give importance to your subscribers.

Ask for Inspiration and Video
The most common practice of renowned content creators is to engage the audience and ask them for inspiration in the following video. You can ask your subscribers what they want to see you act on and what topic should be covered. Do not hesitate to use polls and gauge interest in general and stereotypical subjects.
Conclusion
YouTube has become a one-stop shop for watching impeccable content and earning through the creation of media. It is vital to know YouTube community guidelines to work better and efficiently.
To create good intros and outros for your YouTube channels, incorporate the usage of Wondershare Filmora . It offers some moving effects and transitions to create a spell-bound impact on the viewers.
Versatile Video Editor - Wondershare Filmora
An easy yet powerful editor
Numerous effects to choose from
Detailed tutorials provided by the official channel
02 How to Make A Community Post on YouTube?
03 How to Get Community Tab on YouTube?
04 How to Make Good Use of Community Tab on YouTube?
Part 1: What is YouTube Community?
Before getting into YouTube community posts, it is crucial to understand what YouTube Community is and how it affects the content creators. The YouTube community is an extensive range of viewers or followers that one needs to grow their channel. Creating a connection with the viewers helps because you have loyal followers; you have got it all.
It is because the trusted followers would go above and beyond to share your content to their social media accounts and give you instant feedback. YouTube community tab works like a charm for creators to engage with the audience. They can use YouTube community posts such as polls, ask questions, use GIFs, and interact with the community.
Part 2: How to Make A Community Post on YouTube?
The first question to arise in one’s mind revolves around how to make a community post on YouTube. The community post YouTube helps in interaction with the general public and community. To make community posts YouTube via computer and mobile device, follow the guidelines below in detail.
Community Post YouTube Via Computer
The steps below shall help the reader to make a YouTube community post through the system.
Step 1: Launch YouTube from your browser and log in to your account. Now, click on the “Upload” button located at the top right corner of the screen.
Step 2: Tap on “Create Post” and type the message in the textbox. You can insert an image, GIF, or video as required. Now, pick the type of post.
Step 3: Hit “Post” afterward. The “Community” posts can be accessed from the “Community” tab in your account channel.
Community Post YouTube Via Mobile Phone
To know How to make community posts on YouTube mobile, follow the guidelines below:
Step 1: Launch the YouTube application from your iPhone or Android. Hit the “Create” icon that looks like a video camera located in the top right corner.
Step 2: Click on “Create Post,” add the post to the textbox and upload any required media. Choose the type of post and tap “Post.”
Part 3: How to Get Community Tab on YouTube?
The vital concern to be addressed in this section spins around how to enable a community tab on YouTube. On October 12, 2021, YouTube updated the policy that stated that a channel must have a minimal 500+ subscribers to get community tab YouTube.
Before October, the threshold for subscribers used to be 1000+. Now it has been reduced so that most channels can communicate and engage with the audience. The content creators can access the community tab on YouTube faster by following some pointers and tips.
For once, they can interact with the audience more and find ways to keep them in a loop. It creates a strong community of followers and subscribers. To do so, the account owners can reply to every comment, ask different questions, and pin the best comments. Additionally, you can ask for feedback and opinions in the comment tab to enable the community tab on YouTube.
Ask people their take on a certain stereotype, have a tip from viewers that can be shared with the community, and how they want to see the future. It also makes the community ponder upon the cruel realities of the world and express themselves out loud. You can also make more quality content videos to be a part of the community for good.
 DLNow Video Downloader
Part 4: How to Make Good Use of Community Tab on YouTube?
The users know how to get the community tab on your YouTube channel and how to post community posts on YouTube. It is time to know how to make good use of the community tab on YouTube. Having this knowledge shall help the new and old content creators to use their skills and bring good to the world.
So, without wasting any time, let us begin the process.

Showcase Behind the Scenes and Bloopers
Most viewers crave authenticity more than ever. The regular videos and updates on a channel and scripted and well-crafted, so there is no window for error. However, upload your life updates and BTS scenes from video production to engage the audience and use the community tab to its full potential.
Cross Channel Promotion Process
The community tab helps promote your various vlog or podcasts. It means that you can support new creators in the market and establish a cross-channel promotion network. Engaging with other creators helps the audience know about your community tab YouTube.
Use Teasers and Promos
Using different teasers and promos plays a significant role in developing the well-deserved hype for the show or video. It compels the audience to stay tuned to whatever the channel is bringing to the table. Moreover, the time between working on the video and uploading it can be filled by teasers that promote the upcoming project big time.
Exceptional and Planned Giveaways
Giveaways appear to be a devious plan to lure in the audience. However, if your content is worthy enough to stick around, you don’t need to worry much. Therefore, plan a giveaway and set some rules for it. The circle of interest is widely enhanced using this tactic from the platform of community tab on YouTube.
Hosting Q/A Sessions
Another effective way to use the YouTube community tab to its full potential revolves around hosting a Questions and Answer Session. The general public likes to relate to the bloggers and influencers and know about them. A Q/A session sparks the connection between the two where the viewers ask different personal and professional questions.
It is a huge possibility that you gain new followers, and they stick to the way you communicate and give importance to your subscribers.
Ask for Inspiration and Video
The most common practice of renowned content creators is to engage the audience and ask them for inspiration in the following video. You can ask your subscribers what they want to see you act on and what topic should be covered. Do not hesitate to use polls and gauge interest in general and stereotypical subjects.
Conclusion
YouTube has become a one-stop shop for watching impeccable content and earning through the creation of media. It is vital to know YouTube community guidelines to work better and efficiently.
To create good intros and outros for your YouTube channels, incorporate the usage of Wondershare Filmora . It offers some moving effects and transitions to create a spell-bound impact on the viewers.
Versatile Video Editor - Wondershare Filmora
An easy yet powerful editor
Numerous effects to choose from
Detailed tutorials provided by the official channel
02 How to Make A Community Post on YouTube?
03 How to Get Community Tab on YouTube?
04 How to Make Good Use of Community Tab on YouTube?
Part 1: What is YouTube Community?
Before getting into YouTube community posts, it is crucial to understand what YouTube Community is and how it affects the content creators. The YouTube community is an extensive range of viewers or followers that one needs to grow their channel. Creating a connection with the viewers helps because you have loyal followers; you have got it all.
It is because the trusted followers would go above and beyond to share your content to their social media accounts and give you instant feedback. YouTube community tab works like a charm for creators to engage with the audience. They can use YouTube community posts such as polls, ask questions, use GIFs, and interact with the community.
Part 2: How to Make A Community Post on YouTube?
The first question to arise in one’s mind revolves around how to make a community post on YouTube. The community post YouTube helps in interaction with the general public and community. To make community posts YouTube via computer and mobile device, follow the guidelines below in detail.
Community Post YouTube Via Computer
The steps below shall help the reader to make a YouTube community post through the system.
Step 1: Launch YouTube from your browser and log in to your account. Now, click on the “Upload” button located at the top right corner of the screen.
Step 2: Tap on “Create Post” and type the message in the textbox. You can insert an image, GIF, or video as required. Now, pick the type of post.
Step 3: Hit “Post” afterward. The “Community” posts can be accessed from the “Community” tab in your account channel.
Community Post YouTube Via Mobile Phone
To know How to make community posts on YouTube mobile, follow the guidelines below:
Step 1: Launch the YouTube application from your iPhone or Android. Hit the “Create” icon that looks like a video camera located in the top right corner.
Step 2: Click on “Create Post,” add the post to the textbox and upload any required media. Choose the type of post and tap “Post.”
 /a>
/a>Part 3: How to Get Community Tab on YouTube?
The vital concern to be addressed in this section spins around how to enable a community tab on YouTube. On October 12, 2021, YouTube updated the policy that stated that a channel must have a minimal 500+ subscribers to get community tab YouTube.
 Screensaver Factory, Create stunning professional screensavers within minutes. Create screensavers for yourself, for marketing or unlimited royalty-free commercial distribution. Make screensavers from images, video and swf flash, add background music and smooth sprite and transition effects. Screensaver Factory is very easy to use, and it enables you to make self-installing screensaver files and CDs for easy setup and distribution. Screensaver Factory is the most advanced software of its kind.
Before October, the threshold for subscribers used to be 1000+. Now it has been reduced so that most channels can communicate and engage with the audience. The content creators can access the community tab on YouTube faster by following some pointers and tips.
For once, they can interact with the audience more and find ways to keep them in a loop. It creates a strong community of followers and subscribers. To do so, the account owners can reply to every comment, ask different questions, and pin the best comments. Additionally, you can ask for feedback and opinions in the comment tab to enable the community tab on YouTube.
Ask people their take on a certain stereotype, have a tip from viewers that can be shared with the community, and how they want to see the future. It also makes the community ponder upon the cruel realities of the world and express themselves out loud. You can also make more quality content videos to be a part of the community for good.
 Glary Utilities PRO - Premium all-in-one utility to clean, speed up, maintain and protect your PC
Part 4: How to Make Good Use of Community Tab on YouTube?
The users know how to get the community tab on your YouTube channel and how to post community posts on YouTube. It is time to know how to make good use of the community tab on YouTube. Having this knowledge shall help the new and old content creators to use their skills and bring good to the world.
So, without wasting any time, let us begin the process.
Showcase Behind the Scenes and Bloopers
Most viewers crave authenticity more than ever. The regular videos and updates on a channel and scripted and well-crafted, so there is no window for error. However, upload your life updates and BTS scenes from video production to engage the audience and use the community tab to its full potential.
Cross Channel Promotion Process
The community tab helps promote your various vlog or podcasts. It means that you can support new creators in the market and establish a cross-channel promotion network. Engaging with other creators helps the audience know about your community tab YouTube.
Use Teasers and Promos
Using different teasers and promos plays a significant role in developing the well-deserved hype for the show or video. It compels the audience to stay tuned to whatever the channel is bringing to the table. Moreover, the time between working on the video and uploading it can be filled by teasers that promote the upcoming project big time.
Exceptional and Planned Giveaways
Giveaways appear to be a devious plan to lure in the audience. However, if your content is worthy enough to stick around, you don’t need to worry much. Therefore, plan a giveaway and set some rules for it. The circle of interest is widely enhanced using this tactic from the platform of community tab on YouTube.
Hosting Q/A Sessions
Another effective way to use the YouTube community tab to its full potential revolves around hosting a Questions and Answer Session. The general public likes to relate to the bloggers and influencers and know about them. A Q/A session sparks the connection between the two where the viewers ask different personal and professional questions.
It is a huge possibility that you gain new followers, and they stick to the way you communicate and give importance to your subscribers.
Ask for Inspiration and Video
The most common practice of renowned content creators is to engage the audience and ask them for inspiration in the following video. You can ask your subscribers what they want to see you act on and what topic should be covered. Do not hesitate to use polls and gauge interest in general and stereotypical subjects.
Conclusion
YouTube has become a one-stop shop for watching impeccable content and earning through the creation of media. It is vital to know YouTube community guidelines to work better and efficiently.
To create good intros and outros for your YouTube channels, incorporate the usage of Wondershare Filmora . It offers some moving effects and transitions to create a spell-bound impact on the viewers.
Versatile Video Editor - Wondershare Filmora
An easy yet powerful editor
Numerous effects to choose from
Detailed tutorials provided by the official channel
 PDF application, powered by AI-based OCR, for unified workflows with both digital and scanned documents.
 Grasp the Art of Steadiness in Photography
DIY Tripods| How to Stabilize Your Camera without Buying a Tripod

Richard Bennett
Oct 26, 2023• Proven solutions
When you’re trying to grow a channel on YouTube it can feel like equipment is a barrier, but it shouldn’t be. If you can’t afford a high-end tripod, for example, there are loads of ways to get by without one.
DIY Your Video with Wondershare Filmora
Wondershare Filmora has the best video stabilization tool is your videos have a bad frame or were recorded in dim lights. If a video is shot in bad weather or unfriendly situation where you don’t have all the equipment required for a quality recording, Wondershare Filmora can help you in the background to edit your videos like a pro. And it has all the relevant tools like effects, transitions, background removal, overlays, and background music that could turn your normal video to a professional one.


Here are 3 of our favorite DIY tripods.
DIY smartphone tripod using binder clips or hair clips
You’re a solo operation and your best camera is on your phone. That’s pretty common.
If you have a DSLR then you can set it down on any stable surface while filming yourself, but your phone can’t stand up by itself. It needs something or someone to hold it. Do you just accept that and shoot everything as a selfie?
No. No, you don’t, because there are common household items that can help you out of this problem. For this DIY tripod, you need either 2 binder clips or 2 ‘claw clips’ (also called ‘hair jaws’).
Hold your phone in landscape mode (horizontally, so it’s long rather than tall) and attach clips to the bottom corners. If you are worried about scratching your screen, fold up some paper to place between your clip and your phone.
Here it is with binder clips:


And here it is with hair clips:

Now you can set your smartphone upon any stable surface, like a table or a stack of books.
Here are some more cool ideas!
DIY adjustable tripod using books and a towel
You’ve probably heard a million times that you can stabilize your camera by sitting it down on any stable surface – on your desk, on a stack of books, up in a tree, etc. This is very true!
But if you can use any stable surface, why do people buy tripods?
Because it isn’t convenient to rearrange your furniture whenever you want to make a video, and also because tripods are adjustable. You can change their height, you can use them to pan or tilt, and it’s pretty easy to move them a bit forwards or backward while you’re setting up your shot.
To get similar functions from the ‘any stable surface’ solution you can use a table, a stack of books, and a towel.
- Set up the area where you’re going to sit while you’re filming on one end of the table.
- Put the towel down over the approximate spot you want your camera to be.
- Stack your books on top of the towel.
- Put your camera on top of the books.
Now if your camera isn’t up high enough, or is too high, you can adjust it just by adding or taking away books. If you want to move it closer or farther away from you, just pull the towel forwards or backward.
DIY gripping ‘Gorillapod’ using wire and tape
Gorillapod’s are cool because you can use them like normal tripods, carry them around like selfie sticks, or attach them to things like fences and posts. Here’s how you can make something similar using wire, electrical tape or duct tape, and a 1/4 bolt.
Your wire should be fairly stiff and you’ll need three pieces the same length, which should be at least 10 inches. Old clothes hangers work well. This needs to be something strong enough to support the weight of your camera, but soft enough that it’s not impossible for you to bend.

All of your supplies plus the finished product.
Readying your legs
Step 1: Bend 2 inches at one end of each wire into a ‘U’ shape. You will probably need pliers for this.
Step 2: Pick up one of your pieces of wire and wrap one end with electrical tape. Go around 5-10 times (to prevent it from coming undone at the end) and then, without cutting your tape, start moving up and wrapping the rest of your wire. Stop before your ‘U’ section.
Repeat this with the other two wires.
Attaching your legs
Step 1: Place the ‘U’ section of a leg against your bolt. The bolt’s threading should be pointing away from the leg. Now, use your tape to attach them. Wind it around 2 or 3 times, then repeat the process with both of the other legs individually.
Step 2: After all the legs are attached, wrap some more tape around all 3 as tightly as you can.
Your camera will mount onto the bolt! You’ll be able to use this as a normal table-top tripod or use the flexible legs to grab onto different things like a Gorillapod. Read more at Instructables.
Note: make sure the bolt is a fit for your camera before you get too far into this process.
Richard Bennett
Richard Bennett is a writer and a lover of all things video.
Follow @Richard Bennett
Richard Bennett
Oct 26, 2023• Proven solutions
When you’re trying to grow a channel on YouTube it can feel like equipment is a barrier, but it shouldn’t be. If you can’t afford a high-end tripod, for example, there are loads of ways to get by without one.
 ZoneAlarm Extreme Security NextGen
DIY Your Video with Wondershare Filmora
Wondershare Filmora has the best video stabilization tool is your videos have a bad frame or were recorded in dim lights. If a video is shot in bad weather or unfriendly situation where you don’t have all the equipment required for a quality recording, Wondershare Filmora can help you in the background to edit your videos like a pro. And it has all the relevant tools like effects, transitions, background removal, overlays, and background music that could turn your normal video to a professional one.
Here are 3 of our favorite DIY tripods.
DIY smartphone tripod using binder clips or hair clips
You’re a solo operation and your best camera is on your phone. That’s pretty common.
If you have a DSLR then you can set it down on any stable surface while filming yourself, but your phone can’t stand up by itself. It needs something or someone to hold it. Do you just accept that and shoot everything as a selfie?
No. No, you don’t, because there are common household items that can help you out of this problem. For this DIY tripod, you need either 2 binder clips or 2 ‘claw clips’ (also called ‘hair jaws’).
Hold your phone in landscape mode (horizontally, so it’s long rather than tall) and attach clips to the bottom corners. If you are worried about scratching your screen, fold up some paper to place between your clip and your phone.
Here it is with binder clips:
And here it is with hair clips:
Now you can set your smartphone upon any stable surface, like a table or a stack of books.
Here are some more cool ideas!

DIY adjustable tripod using books and a towel
You’ve probably heard a million times that you can stabilize your camera by sitting it down on any stable surface – on your desk, on a stack of books, up in a tree, etc. This is very true!
But if you can use any stable surface, why do people buy tripods?
Because it isn’t convenient to rearrange your furniture whenever you want to make a video, and also because tripods are adjustable. You can change their height, you can use them to pan or tilt, and it’s pretty easy to move them a bit forwards or backward while you’re setting up your shot.
To get similar functions from the ‘any stable surface’ solution you can use a table, a stack of books, and a towel.
- Set up the area where you’re going to sit while you’re filming on one end of the table.
- Put the towel down over the approximate spot you want your camera to be.
- Stack your books on top of the towel.
- Put your camera on top of the books.
Now if your camera isn’t up high enough, or is too high, you can adjust it just by adding or taking away books. If you want to move it closer or farther away from you, just pull the towel forwards or backward.
DIY gripping ‘Gorillapod’ using wire and tape
Gorillapod’s are cool because you can use them like normal tripods, carry them around like selfie sticks, or attach them to things like fences and posts. Here’s how you can make something similar using wire, electrical tape or duct tape, and a 1/4 bolt.
Your wire should be fairly stiff and you’ll need three pieces the same length, which should be at least 10 inches. Old clothes hangers work well. This needs to be something strong enough to support the weight of your camera, but soft enough that it’s not impossible for you to bend.
All of your supplies plus the finished product.
Readying your legs
Step 1: Bend 2 inches at one end of each wire into a ‘U’ shape. You will probably need pliers for this.
Step 2: Pick up one of your pieces of wire and wrap one end with electrical tape. Go around 5-10 times (to prevent it from coming undone at the end) and then, without cutting your tape, start moving up and wrapping the rest of your wire. Stop before your ‘U’ section.
Repeat this with the other two wires.
Attaching your legs
Step 1: Place the ‘U’ section of a leg against your bolt. The bolt’s threading should be pointing away from the leg. Now, use your tape to attach them. Wind it around 2 or 3 times, then repeat the process with both of the other legs individually.
Step 2: After all the legs are attached, wrap some more tape around all 3 as tightly as you can.
Your camera will mount onto the bolt! You’ll be able to use this as a normal table-top tripod or use the flexible legs to grab onto different things like a Gorillapod. Read more at Instructables.
Note: make sure the bolt is a fit for your camera before you get too far into this process.
Richard Bennett
Richard Bennett is a writer and a lover of all things video.
Follow @Richard Bennett
Richard Bennett
Oct 26, 2023• Proven solutions
When you’re trying to grow a channel on YouTube it can feel like equipment is a barrier, but it shouldn’t be. If you can’t afford a high-end tripod, for example, there are loads of ways to get by without one.
DIY Your Video with Wondershare Filmora
Wondershare Filmora has the best video stabilization tool is your videos have a bad frame or were recorded in dim lights. If a video is shot in bad weather or unfriendly situation where you don’t have all the equipment required for a quality recording, Wondershare Filmora can help you in the background to edit your videos like a pro. And it has all the relevant tools like effects, transitions, background removal, overlays, and background music that could turn your normal video to a professional one.

Here are 3 of our favorite DIY tripods.
DIY smartphone tripod using binder clips or hair clips
You’re a solo operation and your best camera is on your phone. That’s pretty common.
If you have a DSLR then you can set it down on any stable surface while filming yourself, but your phone can’t stand up by itself. It needs something or someone to hold it. Do you just accept that and shoot everything as a selfie?
No. No, you don’t, because there are common household items that can help you out of this problem. For this DIY tripod, you need either 2 binder clips or 2 ‘claw clips’ (also called ‘hair jaws’).
Hold your phone in landscape mode (horizontally, so it’s long rather than tall) and attach clips to the bottom corners. If you are worried about scratching your screen, fold up some paper to place between your clip and your phone.
Here it is with binder clips:
And here it is with hair clips:
Now you can set your smartphone upon any stable surface, like a table or a stack of books.
Here are some more cool ideas!
DIY adjustable tripod using books and a towel
You’ve probably heard a million times that you can stabilize your camera by sitting it down on any stable surface – on your desk, on a stack of books, up in a tree, etc. This is very true!
But if you can use any stable surface, why do people buy tripods?
Because it isn’t convenient to rearrange your furniture whenever you want to make a video, and also because tripods are adjustable. You can change their height, you can use them to pan or tilt, and it’s pretty easy to move them a bit forwards or backward while you’re setting up your shot.
To get similar functions from the ‘any stable surface’ solution you can use a table, a stack of books, and a towel.
- Set up the area where you’re going to sit while you’re filming on one end of the table.
- Put the towel down over the approximate spot you want your camera to be.
- Stack your books on top of the towel.
- Put your camera on top of the books.
Now if your camera isn’t up high enough, or is too high, you can adjust it just by adding or taking away books. If you want to move it closer or farther away from you, just pull the towel forwards or backward.
DIY gripping ‘Gorillapod’ using wire and tape
Gorillapod’s are cool because you can use them like normal tripods, carry them around like selfie sticks, or attach them to things like fences and posts. Here’s how you can make something similar using wire, electrical tape or duct tape, and a 1/4 bolt.
Your wire should be fairly stiff and you’ll need three pieces the same length, which should be at least 10 inches. Old clothes hangers work well. This needs to be something strong enough to support the weight of your camera, but soft enough that it’s not impossible for you to bend.
All of your supplies plus the finished product.
Readying your legs
Step 1: Bend 2 inches at one end of each wire into a ‘U’ shape. You will probably need pliers for this.
Step 2: Pick up one of your pieces of wire and wrap one end with electrical tape. Go around 5-10 times (to prevent it from coming undone at the end) and then, without cutting your tape, start moving up and wrapping the rest of your wire. Stop before your ‘U’ section.
Repeat this with the other two wires.
Attaching your legs
Step 1: Place the ‘U’ section of a leg against your bolt. The bolt’s threading should be pointing away from the leg. Now, use your tape to attach them. Wind it around 2 or 3 times, then repeat the process with both of the other legs individually.
Step 2: After all the legs are attached, wrap some more tape around all 3 as tightly as you can.
Your camera will mount onto the bolt! You’ll be able to use this as a normal table-top tripod or use the flexible legs to grab onto different things like a Gorillapod. Read more at Instructables.
Note: make sure the bolt is a fit for your camera before you get too far into this process.
Richard Bennett
Richard Bennett is a writer and a lover of all things video.
Follow @Richard Bennett
Richard Bennett
Oct 26, 2023• Proven solutions
When you’re trying to grow a channel on YouTube it can feel like equipment is a barrier, but it shouldn’t be. If you can’t afford a high-end tripod, for example, there are loads of ways to get by without one.
### DIY Your Video with Wondershare FilmoraWondershare Filmora has the best video stabilization tool is your videos have a bad frame or were recorded in dim lights. If a video is shot in bad weather or unfriendly situation where you don’t have all the equipment required for a quality recording, Wondershare Filmora can help you in the background to edit your videos like a pro. And it has all the relevant tools like effects, transitions, background removal, overlays, and background music that could turn your normal video to a professional one.
Here are 3 of our favorite DIY tripods.
DIY smartphone tripod using binder clips or hair clips
You’re a solo operation and your best camera is on your phone. That’s pretty common.
If you have a DSLR then you can set it down on any stable surface while filming yourself, but your phone can’t stand up by itself. It needs something or someone to hold it. Do you just accept that and shoot everything as a selfie?
No. No, you don’t, because there are common household items that can help you out of this problem. For this DIY tripod, you need either 2 binder clips or 2 ‘claw clips’ (also called ‘hair jaws’).
Hold your phone in landscape mode (horizontally, so it’s long rather than tall) and attach clips to the bottom corners. If you are worried about scratching your screen, fold up some paper to place between your clip and your phone.
Here it is with binder clips:
And here it is with hair clips:
Now you can set your smartphone upon any stable surface, like a table or a stack of books.
Here are some more cool ideas!
DIY adjustable tripod using books and a towel
You’ve probably heard a million times that you can stabilize your camera by sitting it down on any stable surface – on your desk, on a stack of books, up in a tree, etc. This is very true!
But if you can use any stable surface, why do people buy tripods?
Because it isn’t convenient to rearrange your furniture whenever you want to make a video, and also because tripods are adjustable. You can change their height, you can use them to pan or tilt, and it’s pretty easy to move them a bit forwards or backward while you’re setting up your shot.
To get similar functions from the ‘any stable surface’ solution you can use a table, a stack of books, and a towel.
- Set up the area where you’re going to sit while you’re filming on one end of the table.
- Put the towel down over the approximate spot you want your camera to be.
- Stack your books on top of the towel.
- Put your camera on top of the books.
Now if your camera isn’t up high enough, or is too high, you can adjust it just by adding or taking away books. If you want to move it closer or farther away from you, just pull the towel forwards or backward.
 vMix 4K - Software based live production. vMix 4K includes everything in vMix HD plus 4K support, PTZ control, External/Fullscreen output, 4 Virtual Outputs, 1 Replay, 4 vMix Call, and 2 Recorders.
DIY gripping ‘Gorillapod’ using wire and tape
Gorillapod’s are cool because you can use them like normal tripods, carry them around like selfie sticks, or attach them to things like fences and posts. Here’s how you can make something similar using wire, electrical tape or duct tape, and a 1/4 bolt.
Your wire should be fairly stiff and you’ll need three pieces the same length, which should be at least 10 inches. Old clothes hangers work well. This needs to be something strong enough to support the weight of your camera, but soft enough that it’s not impossible for you to bend.
All of your supplies plus the finished product.
Readying your legs
Step 1: Bend 2 inches at one end of each wire into a ‘U’ shape. You will probably need pliers for this.
Step 2: Pick up one of your pieces of wire and wrap one end with electrical tape. Go around 5-10 times (to prevent it from coming undone at the end) and then, without cutting your tape, start moving up and wrapping the rest of your wire. Stop before your ‘U’ section.
Repeat this with the other two wires.
Attaching your legs
Step 1: Place the ‘U’ section of a leg against your bolt. The bolt’s threading should be pointing away from the leg. Now, use your tape to attach them. Wind it around 2 or 3 times, then repeat the process with both of the other legs individually.
Step 2: After all the legs are attached, wrap some more tape around all 3 as tightly as you can.
Your camera will mount onto the bolt! You’ll be able to use this as a normal table-top tripod or use the flexible legs to grab onto different things like a Gorillapod. Read more at Instructables.
Note: make sure the bolt is a fit for your camera before you get too far into this process.
Richard Bennett
Richard Bennett is a writer and a lover of all things video.
Follow @Richard Bennett
- Title: 2024 Approved Decoding YouTube Community Terms and Policies
- Author: Steven
- Created at : 2024-07-22 20:23:15
- Updated at : 2024-07-23 20:23:15
- Link: https://youtube-clips.techidaily.com/2024-approved-decoding-youtube-community-terms-and-policies/
- License: This work is licensed under CC BY-NC-SA 4.0.