
:max_bytes(150000):strip_icc()/Gaming_GettyImages-951533434_ORIG-HERO_Westend61_CROPPED_Sharpened-7deada36d17e4feab8029945aabcb2b5.jpg)
"2024 Approved Decision-Making in the Workplace A Neurological Approach to Efficacy and Ethics"
Decision-Making in the Workplace: A Neurological Approach to Efficacy and Ethics
How to Make Killer YouTube Channel Art

Richard Bennett
Mar 27, 2024• Proven solutions
Call it channel art, call it a cover, banner or whatever you like, the fact remains that YouTube channel art is one of the key elements of any successful YouTube channel. Your viewers arrive at your channel to see your videos, but it is the channel art that can market your brand and products to them.
As much as creating great videos with personality can sell your YouTube channel, the way your channel looks and feels is equally important. Take a brief look around any popular YouTuber’s channel and you’ll see that they’ve invested time and thought into creating beautiful, eye-catching channel art for it.
If you’re still in the dark about how to create YouTube channel art; we’re here to help. Here’s what you need to know.
Quick Jump Menu
- What is YouTube channel art [5 Elements Should Be Included]
- YouTube Channel Art Dimensions & Size [Mobile/Tablet/Desktop/TV]
- Why should you care about channel art
- Tips for making channel art
- Tools you need to create killer YouTube channel art
- Download YouTube Channel Art Templates for Free
- YouTube Channel Art Dimensions Cheatsheet [Infographic]
The Filmora team has made a video tutorial about how to master YouTube Channel Art, watch it before digging in. Remember to download the free Filmora Trial version to have a try.
 Download Mac Version ](https://tools.techidaily.com/wondershare/filmora/download/ )
Part 1: What is YouTube channel art?
YouTube channel art includes thumbnails, banners, watermarks, and icons. Thumbnails will help viewers decide to watch your videos, and a personalized banner will tell people who you are and what your vlog is about. Watermarks both label your work as yours and protect it from theft. Your icon is the avatar you will use to communicate with your subscribers. You can totally change the look and feel of the page and the changes will carry forwards for the page display on all platforms. However, the elements might look slightly different on desktops, mobile devices, and TV screens.
1. Banner
A banner sits at the top of your channel, welcoming viewers to your videos and promoting your brand. Having your brand front and center here is a great plan, as it gives people confidence in who they are watching, as well as raising your brand profile on the platform.

Size: 2560x1440px recommended. Cannot be smaller than 2048x1152px.
Safe Area for All Devices: 1546x423px
File Size: 6MB or smaller
Do:
- Make sure all your text is in the safe area
- Include channel information like what kinds of videos you make and your upload days
- Add social media links
Don’t:
- Use a font or font color that’s hard to read at a glance
- Put a busy background or photo directly behind your text (put a solid background in-between)
How to Upload a YouTube Banner / Channel Art
Go to My Channel and select Add channel art near the top of the screen (if this is the first time), or hover over your existing channel art to make the edit icon show up.
2. Watermark
Watermarking your videos, banner and other content you produce can help protect your hard work. Sharing should be encouraged on YouTube, but you should absolutely get the credit for your content. A watermark ensures your brand is being acknowledged whenever someone hits the share button.
3. Thumbnail
Developing unique thumbnails can really encourage more video views. Rather than just using a still from your actual video, you can create unique art to accompany each upload, describing what’s within the video and motivating people to watch.
Size: 1289x720px recommended. Width cannot be less than 640px.
File Size: 2MB or smaller
Format: .JPG, .GIF (no moving GIFS), .BMP, .PNG
Do:
- Use colors that stand out
- Have a consistent format (all your thumbnails should have the same basic layout)
- Include your face (or a character’s face, if you’re a gamer)
- Show viewers what your video is about
Don’t:
- Include anything sexually suggestive or violent.
- Write more than 3 words or use a small font
How to Upload a YouTube Thumbnail
In the screen right after you’ve uploaded a video (in your Creator Studio), select Custom thumbnail under Video thumbnails after you upload a video.
OR
Select Edit next to your video in the Video Manager/Creator Studio. In the preview screen, click Custom thumbnail.
4. Icon or logo
If you’re building a brand on YouTube, you should absolutely have a recognizable logo or, at least, an icon that is unique to you. This way you’ll start to be recognized whenever people stumble across your footage, even if it’s on another platform such as Facebook.
Size: 800x800px recommended. Can be square or round, but must render to 98x98px.
Format: JPG, GIF (no animated GIFs), BMP, PNG
Do:
- Use a close up of your face (if you want a custom URL: only channels that use photos as icons qualify)
- Use a simple logo (if that’s more on-brand for you)
Don’t:
- Use a full-body picture (it won’t look good shrunk down)
- Use a picture of a celebrity or an image that falls under someone else’s copyright
How to Upload a YouTube Profile Picture / Icon
Go to My Channel, hover over your existing channel icon, and click the edit icon (looks like a pencil). Then, click Edit.
5. Channel art links
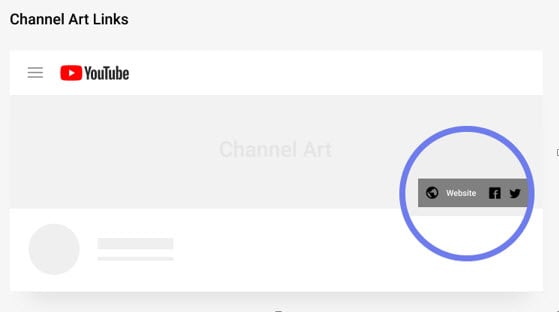
Adding links to your YouTube channel is a no-brainer. After all, if people love your channel, why not get them engaged on your social networks and website too? Adding links is easy in the Creator Studio, and you can choose to have links overlaid on your channel art too.
6. YouTube Intros
Ideal Length: under 10 seconds is alright. Under 5 seconds is better.
Placement: within the first 30 seconds of your video.
Do:
- Use music
- Include colors and images that match your personal brand
- Include the name of your channel
Don’t:
- Make it longer than 10 seconds
How to Add a YouTube Intro
Add your intro before you upload using your video editing software. It’s best to create it in a separate project and export it as a clip you can re-use in all your videos. Click here to download some free intros
7. YouTube End Screens / Outros
Length: 5-20 seconds
Placement: the last 5-20 seconds of your video
Your video must be at least 25 seconds in order to add an end screen.
Do:
- Link to at least 1 video or playlist
- Prompt viewers to subscribe
- Include social icons and handles so people can find you
Don’t:
- Overcrowd the screen with options (it makes people less likely to click anything)
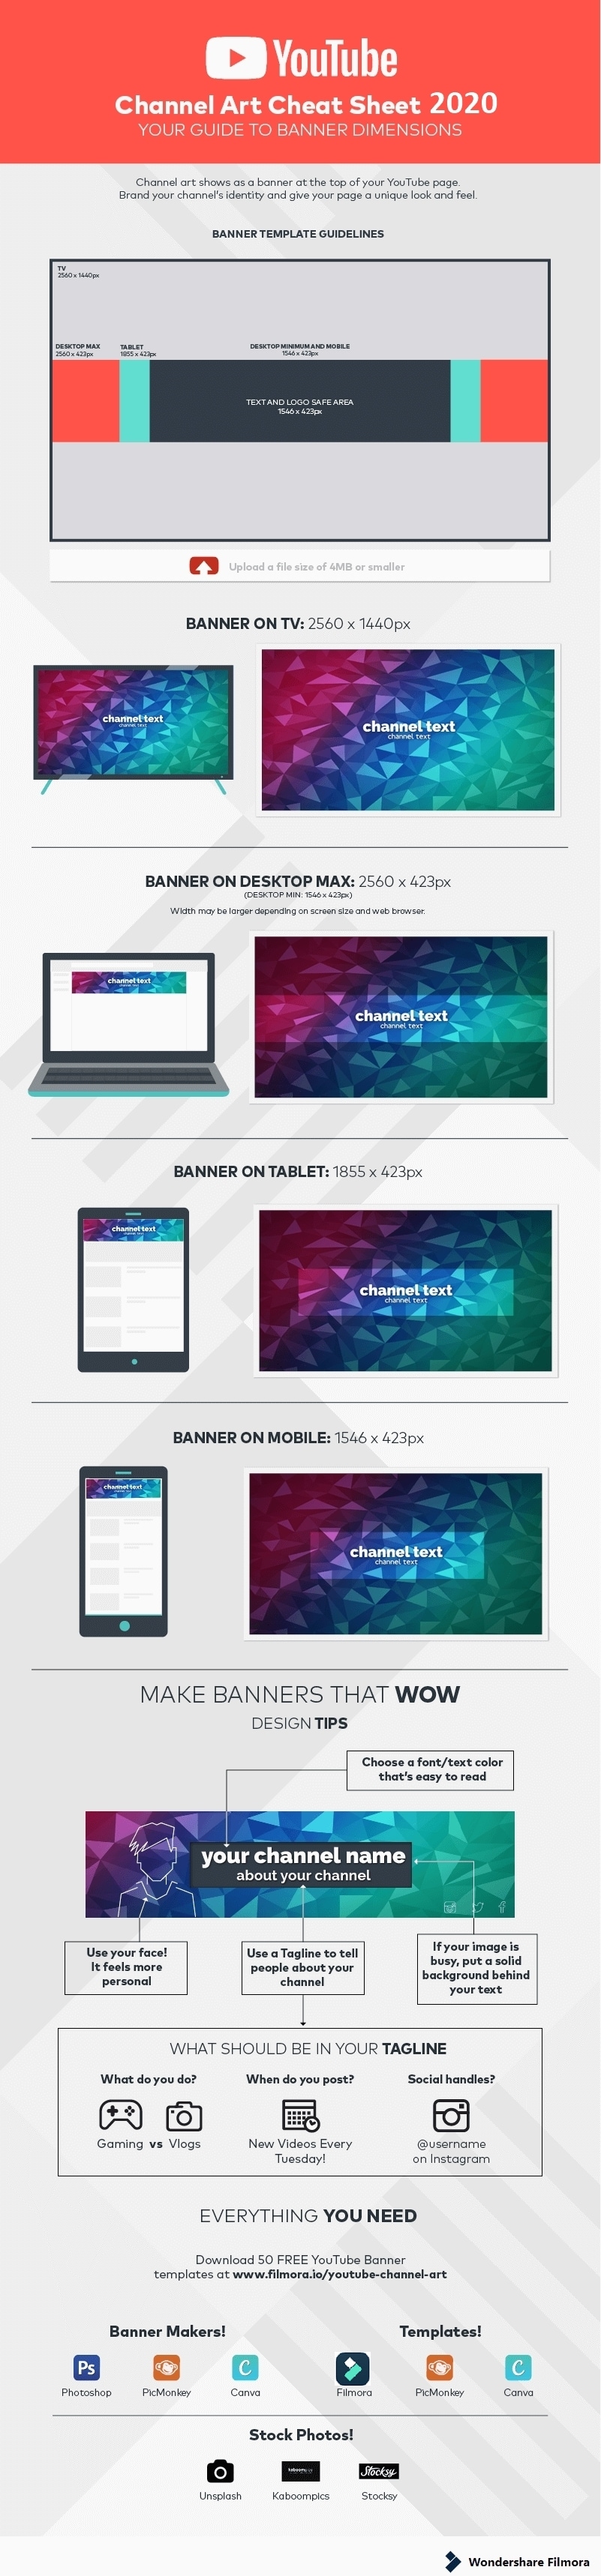
Part 2: YouTube Channel Art Dimensions & Image Size Checklist
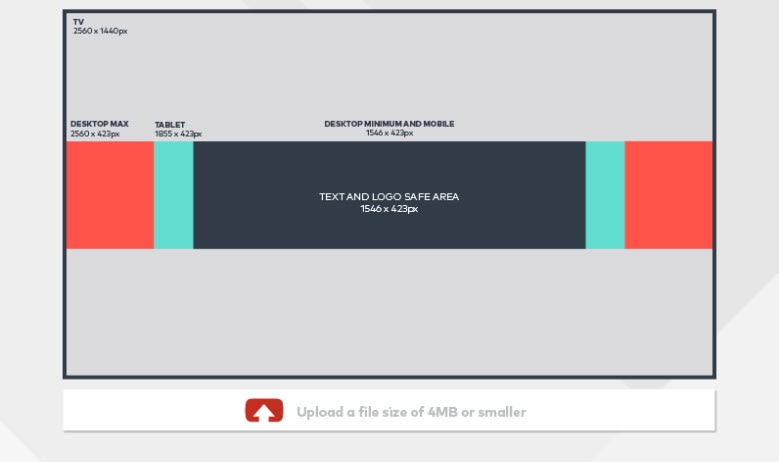
Getting the sizing of your channel art right is crucial. If you don’t plan this from the start, then all the effort you put into designing your channel art will be wasted, as it will either not display properly or will just look terrible. YouTube has provided these guidelines for channel art designs:
- The file size must not exceed 6MB
- The image should ideally be 2560 x 1440 pixels
- The minimum image size is 2048 x 1152 pixels
- The maximum width is 2560 x 423 pixels
The ideal dimensions for different devices are listed below:
- Mobile:1546px * 423px
- Tablet :1855px * 423px
- Desktop:2560px * 423px
- TV:2560px * 1440px
You see, YouTube channel art 2560*1440 px is ideal for TV devices. If you’re not sure about the width and height of the channel art image, you can download the Channel Art Templates from YouTube Official Site to check.
Keeping in mind people will access your channel on a variety of screen sizes, you’re going to need to design channel art that fits within these proportions and displays correctly no matter how it’s viewed. Use the ‘safe area’ displayed on YouTube to ensure your logo and branding is correct on every screen size.
Part 3: Why should you care about channel art?
If you’re wondering if you should really be bothered about channel art, the answer is you absolutely should. Channel art is all about branding, and in today’s cluttered web world, having a strong, recognizable brand is crucial. Rather than simply having a place to upload some videos, your YouTube channel can become a powerful marketing tool for promoting your brand and values.
According to research, we are a highly visual species. 65 percent of people learn better visually, and when you’re thinking about retaining information, 90 percent of what we store in our brains is visual information. By presenting your viewers with visual content, you’re helping them take it in, retain it better and remember you for the future.
Part 4: Tips for Making Channel Art
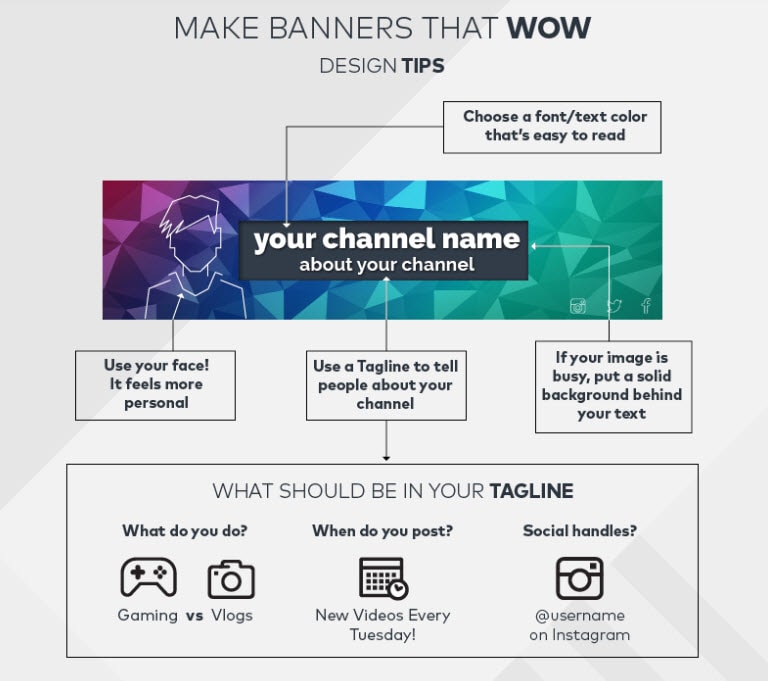
1. Tips for Making Thumbnails
A thumbnail is an image that represents your video in YouTube’s search results. There are things you can do with your thumbnail that will make it more likely to get clicked on. Always upload your own thumbnail rather than relying on the one YouTube automatically chooses, and make sure the thumbnail you use is related to the content of your video.
One of the most important things to remember is that thumbnails are small. It is better if there is not a lot going on in them because details will be hard to see. If there is any text in your thumbnail make sure it is huge so that people can still read it once it has been shrunken down.
If you are making a thumbnail for a vlog entry then choose a shot that has you in it, particularly one where you are not too far away from the camera. It is also a good idea if the thumbnails for your vlog entries all look similar so it is easy for people browsing to recognize which videos are yours.
2. Tips for Making Watermarks
Watermarks work best when they are small and transparent so they do not distract viewers from your videos. If your watermark is colored, there should not be more than one or two colors. Unlike the full version of your logo, you do not want your watermark to be overly eye-catching.
3. Tips for Making Icons
Watermarks work best when they are small and transparent so they do not distract viewers from your videos. If your watermark is colored, there should not be more than one or two colors. Unlike the full version of your logo, you do not want your watermark to be overly eye-catching.
Part 5: Best Free & Paid YouTube Channel Art Maker [2021 List]
Fortunately, you don’t need to be a renowned artist or graphic designer to get some swish YouTube art ready for your channel. With some of the easy-to-use, powerful tools that are available out there, you can make some beautiful, professional-looking channel art in no time at all. Here are six of our favorite tools for creating amazing youtube channel art:
1. Photoshop
Produced by Adobe, Photoshop has been leading the way in professional design software for many years. When it comes to creating logos, banners, editing photos and more, nothing really comes close to the power of this software. While the professional version of Photoshop can set you back several hundreds of dollars, Photoshop Elements is much more affordable at around the $100 mark, and has enough functionality to do most things you’d need for your channel art.
New from Adobe is Adobe Spark Post, a free-to-use web and iOS app which has been specifically designed to help you create beautiful channel art. Although it can only provide basic channel art without much in the way of editing tools, if you’re new to graphic design and want a free, user-friendly way to create your art, this could be worth considering.
2. Wondershare PixStudio

Wondershare PixStudio is an all-in-one and powerful online graphic design maker for everyone. This online platform provides a wonderful creative design solution for you. Just through drag and drop templates, and then use photos/text/elements to design. After the simple and fast design, One-Click to download your creations, and share to your Facebook, Instagram Story, and YouTube Thumbnails, etc. immediately.
This online platform empowers anyone to create a beautiful design within a few steps. No professional skills required! By simply dragging and dropping the creative elements and templates, you are capable to release your imagination and convert it to stunning artwork.
3. Fotor
For a good, user-friendly way to create professional-looking YouTube channel art, Fotor is a pretty solid choice. Using a simple drag and drop interface, users can create a unique channel banner using preset designs or even uploading their own artwork.
The developers of Fotor have built in a bespoke banner maker, preset to the exact size required for YouTube channel art. This makes it easier than ever to ensure you develop excellent channel art which will display correctly on any device. Editing is limited, so advanced designers will probably find it all a bit too simplistic, but for the man on the street, this is a perfect choice.
4. Canva
Canva really stands out from the competition for the number of customizable design elements present on the website. From shapes to backgrounds, images to text, there are thousands of awesome, professional-looking elements to choose from to create your unique channel art.
Similar to Fotor, those who know what they’re doing in the design field will find it lacking in functionality, and there’s an irritating glitch where you can’t stretch more than one image to the ends of the canvas. Watch out for premium design elements too, as lots require payment, although usually not more than a dollar or two.
5. PicMonkey
For a good middle ground between expensive but powerful Photoshop and free but limited options like Canva and Fotor, PicMonkey is a great solution. It has plenty of design functionality, from working with layers to performing tasks like blending, and you can free draw and erase parts of your image too.
We found PicMonkey capable of pretty much everything you’d need to create a professional YouTube banner, and it’s a fair bit more user friendly than Photoshop too. It’s not free, but at a cost of $7.99 per month, it’s pretty affordable for what you get.
6. Snappa
Another web-based freemium service, Snappa has the added advantage of coming pre-loaded with all the dimensions of popular social channel’s banners, profile images and more, including YouTube. That means you can work on your channel art directly, seeing clearly which parts will be displayed on what devices.
The drawback to this particular platform is the sheer volume of stock images already on the site. There are some nice ones, but due to the lack of organization you need to scroll through quite a few mediocre options to find them. There’s also a fairly ungenerous limit on how many items you can create and save without upgrading, but the pro version is fairly affordable at just $10 a month.
There are many other services out there to help you create your YouTube channel art and what’s best for you will depend on the type of channel art you’re looking to create, as well as your own abilities with graphic design. Try some of the free versions before you jump in and pay for things, as some are actually really rather good.
Part 6: YouTube Channel Art Templates Free Download
If you don’t know how to make youtube channel art, don’t be worry, because in the following part, I’ll share with you some free youtube channel art templates. The Filmora team has a community and forum for YouTube creators and it has designed some stunning YouTube Channel Art templates for different genres channels such as gaming, beauty, travel, comedy and education. Click here to download 50 free YouTube Banners, JPG & PhotoShop files. Examples:


Part 7: YouTube Channel Art Dimensions Cheatsheet [Infographic]
Usually, a viewer won’t visit your channel page and see your channel art until after they’ve watched one of your videos. The reason they’ve clicked to see your channel is that they want to learn more about you – do you have more videos like the one they just watched? Do you post a lot? Are you worth subscribing to?
If a viewer who is on the fence about subscribing to you arrives on your channel page and sees that you haven’t bothered uploading channel art, or that you’re using something that looks sloppy, odds are they won’t subscribe. This ‘Channel Art Cheat Sheet’ will help ensure you aren’t losing potential subscribers.
Recommended Video Editing Software for YouTube
The best video editor for YouTubers - Wondershare Filmora , not only allows you to cut, crop, rotate, reverse videos, but also offers your advanced features like PIP, Green Screen, or audio mixing. What’s more, you can find lots of effects on Fashion, gaming, education, tutorial, sports, etc. Check this article to know more.
Download Mac Version ](https://tools.techidaily.com/wondershare/filmora/download/ )
Richard Bennett
Richard Bennett is a writer and a lover of all things video.
Follow @Richard Bennett
Richard Bennett
Mar 27, 2024• Proven solutions
Call it channel art, call it a cover, banner or whatever you like, the fact remains that YouTube channel art is one of the key elements of any successful YouTube channel. Your viewers arrive at your channel to see your videos, but it is the channel art that can market your brand and products to them.
As much as creating great videos with personality can sell your YouTube channel, the way your channel looks and feels is equally important. Take a brief look around any popular YouTuber’s channel and you’ll see that they’ve invested time and thought into creating beautiful, eye-catching channel art for it.
If you’re still in the dark about how to create YouTube channel art; we’re here to help. Here’s what you need to know.
Quick Jump Menu
- What is YouTube channel art [5 Elements Should Be Included]
- YouTube Channel Art Dimensions & Size [Mobile/Tablet/Desktop/TV]
- Why should you care about channel art
- Tips for making channel art
- Tools you need to create killer YouTube channel art
- Download YouTube Channel Art Templates for Free
- YouTube Channel Art Dimensions Cheatsheet [Infographic]
The Filmora team has made a video tutorial about how to master YouTube Channel Art, watch it before digging in. Remember to download the free Filmora Trial version to have a try.
Download Mac Version ](https://tools.techidaily.com/wondershare/filmora/download/ )
Part 1: What is YouTube channel art?
YouTube channel art includes thumbnails, banners, watermarks, and icons. Thumbnails will help viewers decide to watch your videos, and a personalized banner will tell people who you are and what your vlog is about. Watermarks both label your work as yours and protect it from theft. Your icon is the avatar you will use to communicate with your subscribers. You can totally change the look and feel of the page and the changes will carry forwards for the page display on all platforms. However, the elements might look slightly different on desktops, mobile devices, and TV screens.
1. Banner
A banner sits at the top of your channel, welcoming viewers to your videos and promoting your brand. Having your brand front and center here is a great plan, as it gives people confidence in who they are watching, as well as raising your brand profile on the platform.
Size: 2560x1440px recommended. Cannot be smaller than 2048x1152px.
Safe Area for All Devices: 1546x423px
File Size: 6MB or smaller
Do:
- Make sure all your text is in the safe area
- Include channel information like what kinds of videos you make and your upload days
- Add social media links
Don’t:
- Use a font or font color that’s hard to read at a glance
- Put a busy background or photo directly behind your text (put a solid background in-between)
How to Upload a YouTube Banner / Channel Art
Go to My Channel and select Add channel art near the top of the screen (if this is the first time), or hover over your existing channel art to make the edit icon show up.
2. Watermark
Watermarking your videos, banner and other content you produce can help protect your hard work. Sharing should be encouraged on YouTube, but you should absolutely get the credit for your content. A watermark ensures your brand is being acknowledged whenever someone hits the share button.
3. Thumbnail
Developing unique thumbnails can really encourage more video views. Rather than just using a still from your actual video, you can create unique art to accompany each upload, describing what’s within the video and motivating people to watch.
Size: 1289x720px recommended. Width cannot be less than 640px.
File Size: 2MB or smaller
Format: .JPG, .GIF (no moving GIFS), .BMP, .PNG
Do:
- Use colors that stand out
- Have a consistent format (all your thumbnails should have the same basic layout)
- Include your face (or a character’s face, if you’re a gamer)
- Show viewers what your video is about
Don’t:
- Include anything sexually suggestive or violent.
- Write more than 3 words or use a small font
How to Upload a YouTube Thumbnail
In the screen right after you’ve uploaded a video (in your Creator Studio), select Custom thumbnail under Video thumbnails after you upload a video.
OR
Select Edit next to your video in the Video Manager/Creator Studio. In the preview screen, click Custom thumbnail.
4. Icon or logo
If you’re building a brand on YouTube, you should absolutely have a recognizable logo or, at least, an icon that is unique to you. This way you’ll start to be recognized whenever people stumble across your footage, even if it’s on another platform such as Facebook.
Size: 800x800px recommended. Can be square or round, but must render to 98x98px.
Format: JPG, GIF (no animated GIFs), BMP, PNG
Do:
- Use a close up of your face (if you want a custom URL: only channels that use photos as icons qualify)
- Use a simple logo (if that’s more on-brand for you)
Don’t:
- Use a full-body picture (it won’t look good shrunk down)
- Use a picture of a celebrity or an image that falls under someone else’s copyright
How to Upload a YouTube Profile Picture / Icon
Go to My Channel, hover over your existing channel icon, and click the edit icon (looks like a pencil). Then, click Edit.
5. Channel art links
Adding links to your YouTube channel is a no-brainer. After all, if people love your channel, why not get them engaged on your social networks and website too? Adding links is easy in the Creator Studio, and you can choose to have links overlaid on your channel art too.
6. YouTube Intros
Ideal Length: under 10 seconds is alright. Under 5 seconds is better.
Placement: within the first 30 seconds of your video.
Do:
- Use music
- Include colors and images that match your personal brand
- Include the name of your channel
Don’t:
- Make it longer than 10 seconds
How to Add a YouTube Intro
Add your intro before you upload using your video editing software. It’s best to create it in a separate project and export it as a clip you can re-use in all your videos. Click here to download some free intros
7. YouTube End Screens / Outros
Length: 5-20 seconds
Placement: the last 5-20 seconds of your video
Your video must be at least 25 seconds in order to add an end screen.
Do:
- Link to at least 1 video or playlist
- Prompt viewers to subscribe
- Include social icons and handles so people can find you
Don’t:
- Overcrowd the screen with options (it makes people less likely to click anything)
Part 2: YouTube Channel Art Dimensions & Image Size Checklist
Getting the sizing of your channel art right is crucial. If you don’t plan this from the start, then all the effort you put into designing your channel art will be wasted, as it will either not display properly or will just look terrible. YouTube has provided these guidelines for channel art designs:
- The file size must not exceed 6MB
- The image should ideally be 2560 x 1440 pixels
- The minimum image size is 2048 x 1152 pixels
- The maximum width is 2560 x 423 pixels
The ideal dimensions for different devices are listed below:
- Mobile:1546px * 423px
- Tablet :1855px * 423px
- Desktop:2560px * 423px
- TV:2560px * 1440px
You see, YouTube channel art 2560*1440 px is ideal for TV devices. If you’re not sure about the width and height of the channel art image, you can download the Channel Art Templates from YouTube Official Site to check.
Keeping in mind people will access your channel on a variety of screen sizes, you’re going to need to design channel art that fits within these proportions and displays correctly no matter how it’s viewed. Use the ‘safe area’ displayed on YouTube to ensure your logo and branding is correct on every screen size.
Part 3: Why should you care about channel art?
If you’re wondering if you should really be bothered about channel art, the answer is you absolutely should. Channel art is all about branding, and in today’s cluttered web world, having a strong, recognizable brand is crucial. Rather than simply having a place to upload some videos, your YouTube channel can become a powerful marketing tool for promoting your brand and values.
According to research, we are a highly visual species. 65 percent of people learn better visually, and when you’re thinking about retaining information, 90 percent of what we store in our brains is visual information. By presenting your viewers with visual content, you’re helping them take it in, retain it better and remember you for the future.
Part 4: Tips for Making Channel Art
1. Tips for Making Thumbnails
A thumbnail is an image that represents your video in YouTube’s search results. There are things you can do with your thumbnail that will make it more likely to get clicked on. Always upload your own thumbnail rather than relying on the one YouTube automatically chooses, and make sure the thumbnail you use is related to the content of your video.
One of the most important things to remember is that thumbnails are small. It is better if there is not a lot going on in them because details will be hard to see. If there is any text in your thumbnail make sure it is huge so that people can still read it once it has been shrunken down.
If you are making a thumbnail for a vlog entry then choose a shot that has you in it, particularly one where you are not too far away from the camera. It is also a good idea if the thumbnails for your vlog entries all look similar so it is easy for people browsing to recognize which videos are yours.
2. Tips for Making Watermarks
Watermarks work best when they are small and transparent so they do not distract viewers from your videos. If your watermark is colored, there should not be more than one or two colors. Unlike the full version of your logo, you do not want your watermark to be overly eye-catching.
3. Tips for Making Icons
Watermarks work best when they are small and transparent so they do not distract viewers from your videos. If your watermark is colored, there should not be more than one or two colors. Unlike the full version of your logo, you do not want your watermark to be overly eye-catching.
Part 5: Best Free & Paid YouTube Channel Art Maker [2021 List]
Fortunately, you don’t need to be a renowned artist or graphic designer to get some swish YouTube art ready for your channel. With some of the easy-to-use, powerful tools that are available out there, you can make some beautiful, professional-looking channel art in no time at all. Here are six of our favorite tools for creating amazing youtube channel art:
1. Photoshop
Produced by Adobe, Photoshop has been leading the way in professional design software for many years. When it comes to creating logos, banners, editing photos and more, nothing really comes close to the power of this software. While the professional version of Photoshop can set you back several hundreds of dollars, Photoshop Elements is much more affordable at around the $100 mark, and has enough functionality to do most things you’d need for your channel art.
New from Adobe is Adobe Spark Post, a free-to-use web and iOS app which has been specifically designed to help you create beautiful channel art. Although it can only provide basic channel art without much in the way of editing tools, if you’re new to graphic design and want a free, user-friendly way to create your art, this could be worth considering.
2. Wondershare PixStudio
Wondershare PixStudio is an all-in-one and powerful online graphic design maker for everyone. This online platform provides a wonderful creative design solution for you. Just through drag and drop templates, and then use photos/text/elements to design. After the simple and fast design, One-Click to download your creations, and share to your Facebook, Instagram Story, and YouTube Thumbnails, etc. immediately.
This online platform empowers anyone to create a beautiful design within a few steps. No professional skills required! By simply dragging and dropping the creative elements and templates, you are capable to release your imagination and convert it to stunning artwork.
3. Fotor
For a good, user-friendly way to create professional-looking YouTube channel art, Fotor is a pretty solid choice. Using a simple drag and drop interface, users can create a unique channel banner using preset designs or even uploading their own artwork.
The developers of Fotor have built in a bespoke banner maker, preset to the exact size required for YouTube channel art. This makes it easier than ever to ensure you develop excellent channel art which will display correctly on any device. Editing is limited, so advanced designers will probably find it all a bit too simplistic, but for the man on the street, this is a perfect choice.
4. Canva
Canva really stands out from the competition for the number of customizable design elements present on the website. From shapes to backgrounds, images to text, there are thousands of awesome, professional-looking elements to choose from to create your unique channel art.
Similar to Fotor, those who know what they’re doing in the design field will find it lacking in functionality, and there’s an irritating glitch where you can’t stretch more than one image to the ends of the canvas. Watch out for premium design elements too, as lots require payment, although usually not more than a dollar or two.
5. PicMonkey
For a good middle ground between expensive but powerful Photoshop and free but limited options like Canva and Fotor, PicMonkey is a great solution. It has plenty of design functionality, from working with layers to performing tasks like blending, and you can free draw and erase parts of your image too.
We found PicMonkey capable of pretty much everything you’d need to create a professional YouTube banner, and it’s a fair bit more user friendly than Photoshop too. It’s not free, but at a cost of $7.99 per month, it’s pretty affordable for what you get.
6. Snappa
Another web-based freemium service, Snappa has the added advantage of coming pre-loaded with all the dimensions of popular social channel’s banners, profile images and more, including YouTube. That means you can work on your channel art directly, seeing clearly which parts will be displayed on what devices.
The drawback to this particular platform is the sheer volume of stock images already on the site. There are some nice ones, but due to the lack of organization you need to scroll through quite a few mediocre options to find them. There’s also a fairly ungenerous limit on how many items you can create and save without upgrading, but the pro version is fairly affordable at just $10 a month.
There are many other services out there to help you create your YouTube channel art and what’s best for you will depend on the type of channel art you’re looking to create, as well as your own abilities with graphic design. Try some of the free versions before you jump in and pay for things, as some are actually really rather good.
Part 6: YouTube Channel Art Templates Free Download
If you don’t know how to make youtube channel art, don’t be worry, because in the following part, I’ll share with you some free youtube channel art templates. The Filmora team has a community and forum for YouTube creators and it has designed some stunning YouTube Channel Art templates for different genres channels such as gaming, beauty, travel, comedy and education. Click here to download 50 free YouTube Banners, JPG & PhotoShop files. Examples:
Part 7: YouTube Channel Art Dimensions Cheatsheet [Infographic]
Usually, a viewer won’t visit your channel page and see your channel art until after they’ve watched one of your videos. The reason they’ve clicked to see your channel is that they want to learn more about you – do you have more videos like the one they just watched? Do you post a lot? Are you worth subscribing to?
If a viewer who is on the fence about subscribing to you arrives on your channel page and sees that you haven’t bothered uploading channel art, or that you’re using something that looks sloppy, odds are they won’t subscribe. This ‘Channel Art Cheat Sheet’ will help ensure you aren’t losing potential subscribers.
Recommended Video Editing Software for YouTube
The best video editor for YouTubers - Wondershare Filmora , not only allows you to cut, crop, rotate, reverse videos, but also offers your advanced features like PIP, Green Screen, or audio mixing. What’s more, you can find lots of effects on Fashion, gaming, education, tutorial, sports, etc. Check this article to know more.
Download Mac Version ](https://tools.techidaily.com/wondershare/filmora/download/ )
Richard Bennett
Richard Bennett is a writer and a lover of all things video.
Follow @Richard Bennett
Amp Up Your Audio Game with Top 4 Budget Convert Apps
YouTube to WAV File: 4 Best Free Convert Solutions
Richard Bennett
Mar 27, 2024• Proven solutions
YouTube to WAV converter is a very common phenomenon. This is done by the users as they want to play the video on selected devices.
In this article, we will help you manage to convert YouTube to WAV file with ease.
You will Learn :
- What is WAV?
- How to Convert YouTube to WAV Format? (4 Options)
- Tips to Convert YouTube to WAV
- Beside WAV Other Popular Formats for YouTube Videos
What is WAV?
WAV, known as Wave Form Audio File Format and is fully supported by Windows, is a common format that was launched back in 1991, which supports most of the older devices as well.
For the users that want uncompressed and lossless quality prefer to use WAV format. It is extended from the RIFF format to the RF64 format.
How to Convert YouTube to WAV Format?
Some many ways and programs can be used as YouTube to WAV converter. All these programs are easy to use and definitive guides are also available online. Some of the best ways are mentioned below.
Option 1: Convert YouTube to WAV by Wondershare Filmora
Filmora is by far the best program that can be used to convert YouTube to WAV format. YouTube to WAV file conversion has never been as easy as it is with this program. The program is easy to use and allows the users to overcome the issues which other programs present.
Features of the Program
- It is one of the very few programs that come with split-screen functionality. It means that the video and audio can be played simultaneously on a single interface.
- The audio equalizer ensures that the tuning is done as per the requirements.
- There is an advanced functionality of text editing which allows the users to mention the text onto the converted video as well.
- The UI of the program is graphical and hence it is easy to use. The independent reviews have granted a score of 9.5 based on this functionality of the program.
- The part selection is available in the program. It means that multiple conversions can be done at the same time without losing quality.
How to Convert YouTube to WAV Using Filmora?
This YouTube WAV converter is easy to use. The best part is that it is compatible with major platforms i.e. Windows and Mac. The processes for both will be explained in detail so that you can understand the program better.
The Process to Convert YouTube to WAV:
Step 1: Download Filmora for Windows or Mac (depends on your operating system).
If you want to download the program for Windows then click below download icon:
For Mac version download click below icon:
Step 2: There are three ways to import media into the program.
Methond 1: Click File > Import Media. Choose the YouTube file that you want to convert to WAV format. If the file is on another device then you can get it from there as well.

Method 2: Click Import Media on the main interface and select the file from the window that pops up.
Method 3: You can also drag and drop the files onto the interface to make sure that they are imported.
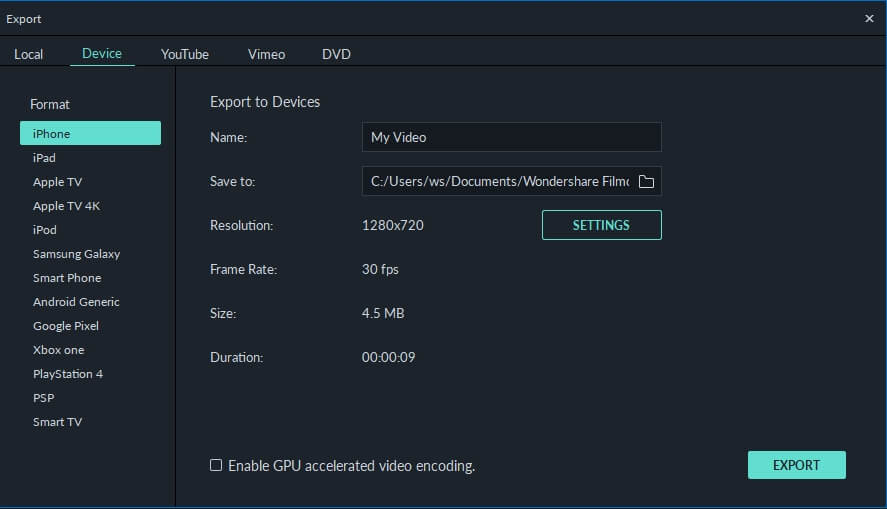
Step 3: You now just need to export the video in the WAV format. Click the Export button and then go for the Local tab. The export formats that are currently supported by the program are WMV, MP4, AVI, MOV, F4V, MKV, TS, 3GP, MPEG-2, WEBM, GIF and MP3.

Step 4: You can then alter the settings within the settings tab. The bit rate is the main thing that defines the quality of the video. Once the settings are done press OK
Step 5: You can also export the video as per the device that you want to play it on.
Step 6: You can also upload the video to social media platforms such as YouTube and Vimeo.
Step 7: You can also burn the converted format onto a DVD. Select the appropriate settings and press Export.
The process is explained as under. For video guides please visit Filmora 101 as it will get you the complete knowledge thoroughly.
You may also like: How to Convert YouTube to MP4 Safely? [Step by Step Guide] >>
Option 2: Other Way to Convert YouTube to WAV on Windows
5K Player is one of the best and the most used players that also work as YouTube to WAV conversion platform as well. The process is very easy to follow and is mentioned as under.
Step 1: Copy and paste the URL of the video on the desired location within the player. Click download and the process starts.

Step 2: Click “To Music” and select the WAV format from the drop-down that appears. You can also choose the bit rate, frame rate, and resolution. Once the conversion is completed you can save the file and the process ends here.
You may also like: >> How to to Convert WMV to MP4 Easily?
Option 3: Other Way to Convert YouTube to WAV on Mac
The Allavsoft is one of the best converters that can be used to convert YouTube to WAV on Mac. The process is simple and has been explained as under.
Step 1: Paste the URL of the YouTube video that you want to convert. You can also select the download quality and can access the file once the download has been completed.

Step 2: You can then select the format and once the conversion has been completed click the download button. The same has been depicted by numbers 2 and 3 in the picture below. WAV lossless quality should be selected from the dropdown to make sure that the work is done without any issue and problem.
Right format selection is important as the conversion is done instantly.
Option 4: YouTube to WAV Conversion Online
The process that you need to follow is explained as under.
Step 1: Visit https.//www.savethevideo.com/convert to access the converter.
Step 2: Paste the URL of the YouTube video that you want to convert and click the “Convert” button:

Step 3: Wait till the converter fetches the information.
Step 4: From the drop-down make sure that you select the WAV format.
Step 5: Click “Convert” once again and the process of conversion starts.
Step 6: The video then starts to download in the desired format.
Step 7: Click “Download” and save the file to the desired location. This concludes the process in full.
Tips to Convert YouTube to WAV
Below are some tips that would be useful for the users that want to convert YouTube to WAV format.
1. Always use the multipurpose software. It will allow you to download and convert the video at the same time-saving time.
2. Lossless quality is always to be selected while you are converting the format. It will make sure that the video is never compressed at all.
3. One of the best ways to convert the video is to disable the background noise. This will lead to awesome results.
4. Converting from YouTube to WAV also requires you to choose the software that is fast and reliable or else you will get the outcome which is not as per your requirements.
5. Free software programs can also get the malware to your system and therefore these are not recommended at all.
6. WAV is a format that is of high quality as the converters have loads of options so it is advised to use these carefully.
7. Make sure that the converters that are used are the ones that are highly rated and have a graphical user interface.
8. The YouTube to WAV downloader should be there on with the converter as it will make the process easy and you don’t need tons of software programs for a single purpose.
9. Always go for the program that supports the containers instead of just the format. If a program supports the containers then it is easy to convert a number of formats.
10. The conversion should be done with converters that do not cause any type of loss to enhance the quality as well.
Beside WAV Other Popular Formats for YouTube Videos
Many other video formats should be used to make sure that the best and the most advanced outcome is generated. Some of the most popular formats are as under.
- Audio Video Interleave Format, AVI
It is one of the oldest formats that are on the market. It was developed by Microsoft as a part of their video processing format for Windows. It was made publically available in 1992.
This one of the oldest formats is used universally. Many people consider it the standard to save videos. The AVI files are simple to use and are supported by almost every video player currently on the market.
It is easy to store as it takes less space than many other formats that are on the market. It will also let you transfer the files relatively faster due to the small size.
- Flash Video Format, FLV
The flash player by Adobe is one of the most common software programs on the system. This has made this video format one of the common ones on the market. The format can be played with ease as the supported plugins are there for other apps as well.
The flash content is supported by all browsers and therefore it is common to play these videos without any additional plugins. The best part of this format is the lossless quality that it provides to its users. Even if you compress these videos they remain HD as the quality remains the same.
- Apple QuickTime Movie, MOV
Among the Mac users, it is one of the most used formats. Developed by Apple it is a format that allows the users to overcome issues such as playback errors. The new version has also been launched which is known as QuickTime X.
The best part of this format is that it is available for Windows users as well. The files of the MOV format are usually of high quality. It is for the same that the size of such files is large as compared to other formats.
- Moving Pictures Expert Group 4, MP4
Introduced in 1998 it is a format that is used by the motion pictures association responsible for setting the standards. The format is widely used and is supported by various platforms as well as devices.
Even after the MP4 file is compressed it remains lossless and the quality remains the same. The HTML5 that has been launched currently also supports this format. It is compatible with almost all of the browsers that are on the market.
- 264
As the name suggests it is one of the best and the most used formats for HD videos. The compression remains lossless and even if the resolution is low the quality is maintained. The MP4 container is the one that is used to contain this format.
Most of the streaming devices, as well as the services, use this format while referring to HD video. The best part is that the format is widely accepted as industry standards for HD videos. Most of the users all over the world use this format to save their HD videos with ease.
- OGG
It is one of the most used video formats. It has been developed by the Xiph.org foundation to maintain the video as well as the audio quality on different platforms. The format is free and the documentation, as well as the configuration, can be downloaded by anyone.
- Advanced Systems Format, .ASF
If you want to stream videos then this is the format that is considered to be the best. It is still being used by the major popular streaming platforms of the world. The .ASF format is one of the best and it allows the users to overcome issues such as quality loss as well as streaming related issues.
You may also like: How to Post/Share a Video From YouTube on Instagram >>
Conclusion
If you require lossless compression then YouTube to WAV conversion is something that is required. Some many ways and means can be used to make sure that the idea is approached. The best way is to use Filmora as it is an easy and efficient operation.
The best way to get around the issue is to always use the service that is embedded with quality.
If you like this article then it is requested to comment and share it on social media. It will not only help others but will also let them have knowledgeable ideas.
Richard Bennett
Richard Bennett is a writer and a lover of all things video.
Follow @Richard Bennett
Richard Bennett
Mar 27, 2024• Proven solutions
YouTube to WAV converter is a very common phenomenon. This is done by the users as they want to play the video on selected devices.
In this article, we will help you manage to convert YouTube to WAV file with ease.
You will Learn :
- What is WAV?
- How to Convert YouTube to WAV Format? (4 Options)
- Tips to Convert YouTube to WAV
- Beside WAV Other Popular Formats for YouTube Videos
What is WAV?
WAV, known as Wave Form Audio File Format and is fully supported by Windows, is a common format that was launched back in 1991, which supports most of the older devices as well.
For the users that want uncompressed and lossless quality prefer to use WAV format. It is extended from the RIFF format to the RF64 format.
How to Convert YouTube to WAV Format?
Some many ways and programs can be used as YouTube to WAV converter. All these programs are easy to use and definitive guides are also available online. Some of the best ways are mentioned below.
Option 1: Convert YouTube to WAV by Wondershare Filmora
Filmora is by far the best program that can be used to convert YouTube to WAV format. YouTube to WAV file conversion has never been as easy as it is with this program. The program is easy to use and allows the users to overcome the issues which other programs present.
Features of the Program
- It is one of the very few programs that come with split-screen functionality. It means that the video and audio can be played simultaneously on a single interface.
- The audio equalizer ensures that the tuning is done as per the requirements.
- There is an advanced functionality of text editing which allows the users to mention the text onto the converted video as well.
- The UI of the program is graphical and hence it is easy to use. The independent reviews have granted a score of 9.5 based on this functionality of the program.
- The part selection is available in the program. It means that multiple conversions can be done at the same time without losing quality.
How to Convert YouTube to WAV Using Filmora?
This YouTube WAV converter is easy to use. The best part is that it is compatible with major platforms i.e. Windows and Mac. The processes for both will be explained in detail so that you can understand the program better.
The Process to Convert YouTube to WAV:
Step 1: Download Filmora for Windows or Mac (depends on your operating system).
If you want to download the program for Windows then click below download icon:
For Mac version download click below icon:
Step 2: There are three ways to import media into the program.
Methond 1: Click File > Import Media. Choose the YouTube file that you want to convert to WAV format. If the file is on another device then you can get it from there as well.
Method 2: Click Import Media on the main interface and select the file from the window that pops up.
Method 3: You can also drag and drop the files onto the interface to make sure that they are imported.
Step 3: You now just need to export the video in the WAV format. Click the Export button and then go for the Local tab. The export formats that are currently supported by the program are WMV, MP4, AVI, MOV, F4V, MKV, TS, 3GP, MPEG-2, WEBM, GIF and MP3.
Step 4: You can then alter the settings within the settings tab. The bit rate is the main thing that defines the quality of the video. Once the settings are done press OK
Step 5: You can also export the video as per the device that you want to play it on.
Step 6: You can also upload the video to social media platforms such as YouTube and Vimeo.
Step 7: You can also burn the converted format onto a DVD. Select the appropriate settings and press Export.
The process is explained as under. For video guides please visit Filmora 101 as it will get you the complete knowledge thoroughly.
You may also like: How to Convert YouTube to MP4 Safely? [Step by Step Guide] >>
Option 2: Other Way to Convert YouTube to WAV on Windows
5K Player is one of the best and the most used players that also work as YouTube to WAV conversion platform as well. The process is very easy to follow and is mentioned as under.
Step 1: Copy and paste the URL of the video on the desired location within the player. Click download and the process starts.
Step 2: Click “To Music” and select the WAV format from the drop-down that appears. You can also choose the bit rate, frame rate, and resolution. Once the conversion is completed you can save the file and the process ends here.
You may also like: >> How to to Convert WMV to MP4 Easily?
Option 3: Other Way to Convert YouTube to WAV on Mac
The Allavsoft is one of the best converters that can be used to convert YouTube to WAV on Mac. The process is simple and has been explained as under.
Step 1: Paste the URL of the YouTube video that you want to convert. You can also select the download quality and can access the file once the download has been completed.
Step 2: You can then select the format and once the conversion has been completed click the download button. The same has been depicted by numbers 2 and 3 in the picture below. WAV lossless quality should be selected from the dropdown to make sure that the work is done without any issue and problem.
Right format selection is important as the conversion is done instantly.
Option 4: YouTube to WAV Conversion Online
The process that you need to follow is explained as under.
Step 1: Visit https.//www.savethevideo.com/convert to access the converter.
Step 2: Paste the URL of the YouTube video that you want to convert and click the “Convert” button:
Step 3: Wait till the converter fetches the information.
Step 4: From the drop-down make sure that you select the WAV format.
Step 5: Click “Convert” once again and the process of conversion starts.
Step 6: The video then starts to download in the desired format.
Step 7: Click “Download” and save the file to the desired location. This concludes the process in full.
Tips to Convert YouTube to WAV
Below are some tips that would be useful for the users that want to convert YouTube to WAV format.
1. Always use the multipurpose software. It will allow you to download and convert the video at the same time-saving time.
2. Lossless quality is always to be selected while you are converting the format. It will make sure that the video is never compressed at all.
3. One of the best ways to convert the video is to disable the background noise. This will lead to awesome results.
4. Converting from YouTube to WAV also requires you to choose the software that is fast and reliable or else you will get the outcome which is not as per your requirements.
5. Free software programs can also get the malware to your system and therefore these are not recommended at all.
6. WAV is a format that is of high quality as the converters have loads of options so it is advised to use these carefully.
7. Make sure that the converters that are used are the ones that are highly rated and have a graphical user interface.
8. The YouTube to WAV downloader should be there on with the converter as it will make the process easy and you don’t need tons of software programs for a single purpose.
9. Always go for the program that supports the containers instead of just the format. If a program supports the containers then it is easy to convert a number of formats.
10. The conversion should be done with converters that do not cause any type of loss to enhance the quality as well.
Beside WAV Other Popular Formats for YouTube Videos
Many other video formats should be used to make sure that the best and the most advanced outcome is generated. Some of the most popular formats are as under.
- Audio Video Interleave Format, AVI
It is one of the oldest formats that are on the market. It was developed by Microsoft as a part of their video processing format for Windows. It was made publically available in 1992.
This one of the oldest formats is used universally. Many people consider it the standard to save videos. The AVI files are simple to use and are supported by almost every video player currently on the market.
It is easy to store as it takes less space than many other formats that are on the market. It will also let you transfer the files relatively faster due to the small size.
- Flash Video Format, FLV
The flash player by Adobe is one of the most common software programs on the system. This has made this video format one of the common ones on the market. The format can be played with ease as the supported plugins are there for other apps as well.
The flash content is supported by all browsers and therefore it is common to play these videos without any additional plugins. The best part of this format is the lossless quality that it provides to its users. Even if you compress these videos they remain HD as the quality remains the same.
- Apple QuickTime Movie, MOV
Among the Mac users, it is one of the most used formats. Developed by Apple it is a format that allows the users to overcome issues such as playback errors. The new version has also been launched which is known as QuickTime X.
The best part of this format is that it is available for Windows users as well. The files of the MOV format are usually of high quality. It is for the same that the size of such files is large as compared to other formats.
- Moving Pictures Expert Group 4, MP4
Introduced in 1998 it is a format that is used by the motion pictures association responsible for setting the standards. The format is widely used and is supported by various platforms as well as devices.
Even after the MP4 file is compressed it remains lossless and the quality remains the same. The HTML5 that has been launched currently also supports this format. It is compatible with almost all of the browsers that are on the market.
- 264
As the name suggests it is one of the best and the most used formats for HD videos. The compression remains lossless and even if the resolution is low the quality is maintained. The MP4 container is the one that is used to contain this format.
Most of the streaming devices, as well as the services, use this format while referring to HD video. The best part is that the format is widely accepted as industry standards for HD videos. Most of the users all over the world use this format to save their HD videos with ease.
- OGG
It is one of the most used video formats. It has been developed by the Xiph.org foundation to maintain the video as well as the audio quality on different platforms. The format is free and the documentation, as well as the configuration, can be downloaded by anyone.
- Advanced Systems Format, .ASF
If you want to stream videos then this is the format that is considered to be the best. It is still being used by the major popular streaming platforms of the world. The .ASF format is one of the best and it allows the users to overcome issues such as quality loss as well as streaming related issues.
You may also like: How to Post/Share a Video From YouTube on Instagram >>
Conclusion
If you require lossless compression then YouTube to WAV conversion is something that is required. Some many ways and means can be used to make sure that the idea is approached. The best way is to use Filmora as it is an easy and efficient operation.
The best way to get around the issue is to always use the service that is embedded with quality.
If you like this article then it is requested to comment and share it on social media. It will not only help others but will also let them have knowledgeable ideas.
Richard Bennett
Richard Bennett is a writer and a lover of all things video.
Follow @Richard Bennett
Also read:
- [New] Analyzing the Income Generated by Every YouTube Viewer
- The Ultimate Playbook to YouTube Hub Mastery
- Beginners’ Guide How To Create a YouTube Channel and Make Money
- In 2024, Content Distribution Excellence Vimeo vs YouTube
- Free Video Editing Software 8 Options Explored
- [Updated] 10 Best Video Streaming Alternatives to YouTube for Smartphone Users
- [Updated] Discover the Best 15 YouTube Science Think Tanks
- Engineering Video Excerpts for Online Platforms
- 2024 Approved Cutting-Edge Voice Altering Apps for Vloggers
- Craft Your Channel Studio or Beta Innovation Comparison for 2024
- Adding Richness YouTube Videos in Slideshows for 2024
- Loop & Love Effortless YouTube Video Views on Your TV Screen
- Finding Free Music A Producer's Handbook
- Essential Notebooks Excellent in Media Post-Production for 2024
- Decisive Content Reduction Find the Best Video Cutters for 2024
- Revolutionizing Viewer Retention on YouTube with These Powerful Strategies
- In 2024, Achieve Optimum Stability Incorrances for Tripods in Vlog Shoots
- [Updated] Becoming a Pro in Video Game Broadcasts
- Top Essentials for Launching a YouTube Success Story
- 15 Top-Rated YouTube Downloaders - Your Offline Viewing Solution
- In 2024, Crafting Captivating Intros on Mobile Platforms
- [New] Direct Link Between Spotify and YouTube The Top Tools for Music Sharing
- Calculator Projected Profits From YouTube for 2024
- In 2024, Design Strategies for Top-Tier Valorant Thumbnails on Social Media
- Composing Correspondents' Curtains
- In 2024, Affluent Streaming Stars
- Subforsup's Impact Safe or Not for Increasing YouTube Loyalty?
- Essential, Inexpensive Vlogging Tools Listed for 2024
- Learn How to Solve Common Issues for YouTube Shorts
- Leveraging YouTube for Affiliate Earnings
- [New] Channel Owner Uncovering Your Subscribers
- In 2024, Engage More, Dissuade Less Top 6 Ways to Increase Watch Time and Stayers
- In 2024, Celebrating Clickers Channel & Buttons Incentives
- Highest Rated Smartphone Camera & Recording Apps IPhone vs Android
- [Updated] Accelerate Your Channel Growth - Affordable Subscribers Available
- In 2024, Elevate Your Team with Expert Talent Selections
- 2024 Approved A Guide to Gathering Gold From Guided Goods' Gazes Online
- Optimal Methods for Mobile Video Sharing on YouTube
- Mitigating the Risk of YouTube Sanctions
- Crafting a Personalized YouTube Pathway to Viewers for 2024
- Crafting Videos YouTube Tools and More
- In 2024, Achieve Video Perfection YouTube Studio Edition Tips & Tricks
- 2024 Approved Affordable MCB Theme Images for Channels
- [New] Crafting Content for Success How to Start Your Own YouTube Chanel
- [Updated] Boost Popularity Quickly Top 30 Hashtags Every Gamer Needs
- [Updated] Convert Audio Online MP3 to YouTube Live Upload Guide
- The Most Useful Tips for Pokemon Go Ultra League On Honor 90 Pro | Dr.fone
- New In 2024, Unleash Your Creativity After Effects vs Premiere Pro for Video Editors and Motion Designers
- [New] Pixel Prowess Unleashed Pro Techniques for Filters Mastery
- Updated Advanced Editing Eliminating Audio Tracks in iMovie Productions
- 3 Ways to Erase Apple iPhone 15 When Its Locked Within Seconds | Dr.fone
- New Top 8 Digital Audio Workstations Your Ultimate Guide for Producing High-Quality Music
- Ultimate Ad-Free Android Video Maker
- Updated 2024 Approved Ultimate Guide How to Live Stream on Facebook?
- [Updated] In 2024, Top Tricks for Capturing Your Google Meeting Experience Flawlessly
- New In 2024, Encompassing Study The Essentials of Nero WaveMixer
- New In 2024, Say Goodbye to Shaky Footage Adobe Premiere Pro Stabilization Tips and Tricks
- How to retrieve erased call logs from Nokia C210?
- Facebook FB Upload Strategies for Mobile & Desktop
- Picture Capture Unpacker
- In 2024, 5 Best Route Generator Apps You Should Try On Vivo Y55s 5G (2023) | Dr.fone
- Video to Picture Perfection How To Save Individual Images in Windows 10
- A Complete Guide To OEM Unlocking on Infinix Hot 30 5G
- 11 Proven Solutions to Fix Google Play Store Not Working Issue on Huawei Nova Y91 | Dr.fone
- Distinguished Pioneers Elite Insta HLV Page Builders
- 2024 Approved Digital Dynamo Unleashing #VideoViral Impact
- Dose Life360 Notify Me When Someone Checks My Location On Google Pixel Fold? | Dr.fone
- Unlocking Success with Instagram's Business Platform
- new 2024 Approved Best 10 Chinese Video to English Translators
- New Mastering Sound Intervals Techniques for Manipulating Audio Timestamps in Final Cut Pro X for 2024
- A Comprehensive Guide to Azure Speech-to-Text Implementation for 2024
- Updated MP3 Kitty Acoustic Trick
- 2024 Approved Troubleshooting Common Issues in Skype & OBS Collaboration
- In 2024, 3 Solutions to Find Your Nokia 150 (2023) Current Location of a Mobile Number | Dr.fone
- In 2024, Top 12 Prominent Motorola Edge 2023 Fingerprint Not Working Solutions
- Everything You Need to Know about Lock Screen Settings on your Vivo T2 Pro 5G
- New In 2024, Laugh Out Loud The Top Meme Generator Apps for Mobile
- Effortless Group Chats Joining Zoom on Your Android for 2024
- Title: "2024 Approved Decision-Making in the Workplace A Neurological Approach to Efficacy and Ethics"
- Author: Steven
- Created at : 2024-05-25 18:33:34
- Updated at : 2024-05-26 18:33:34
- Link: https://youtube-clips.techidaily.com/2024-approved-decision-making-in-the-workplace-a-neurological-approach-to-efficacy-and-ethics/
- License: This work is licensed under CC BY-NC-SA 4.0.
